manuals.online logo
Brands
  1. Home
  2. •
  3. Brands
  4. •
  5. eControls
  6. •
  7. Thermostat
  8. •
  9. eControls Comfort365 C365W21 User manual

eControls Comfort365 C365W21 User manual

User Manual
Model C365W21
365
Comfort
Rev A Nov 2016
Inside
Tu
Day
Upstairs
Auto
Downstairs
Airflow %
HEAT
Schedule
AUTO
FANMENU MODE
Heat
Set To
SYSTEM
AM
UP/DOWN Keys.
Displays the downstairs (Inside)
or upstairs (Inside2) temperature.
Displays the Thermostat Mode
HOLD, SCHEDULE or VACANT
Displays time, day and schedule
MORNING, DAYTIME, EVENING
or NIGHT
MENU Key
Display and Set Schedule
Set Nighttime Airflow Option On or Off
Set Nighttime Airflow in Heating
Set Nighttime Airflow in Cooling
Clean Touch Screen
Displays the upstairs airflow
and downstairs airflow.
Displays the Airflow Mode
AUTOMATIC or MANUAL
Displays the heating or cooling
setpoint temperature
NEXT Key
Used to advance through options
ENTER Key
Used to save options
and return to thermostat
operation
Inside
Tu
Day
Upstairs
Auto
Downstairs
Airflow %
HEAT
Schedule
AUTO
FANMENU MODE
Heat
Set To
SYSTEM
AM
365
Comfort
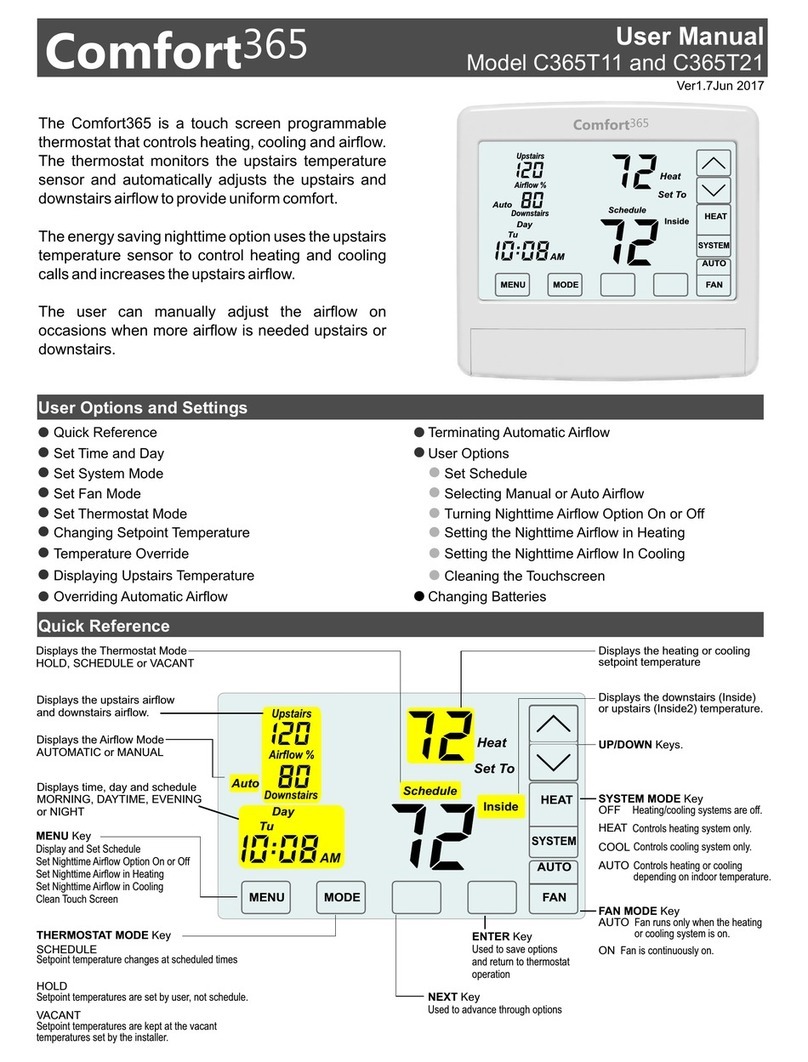
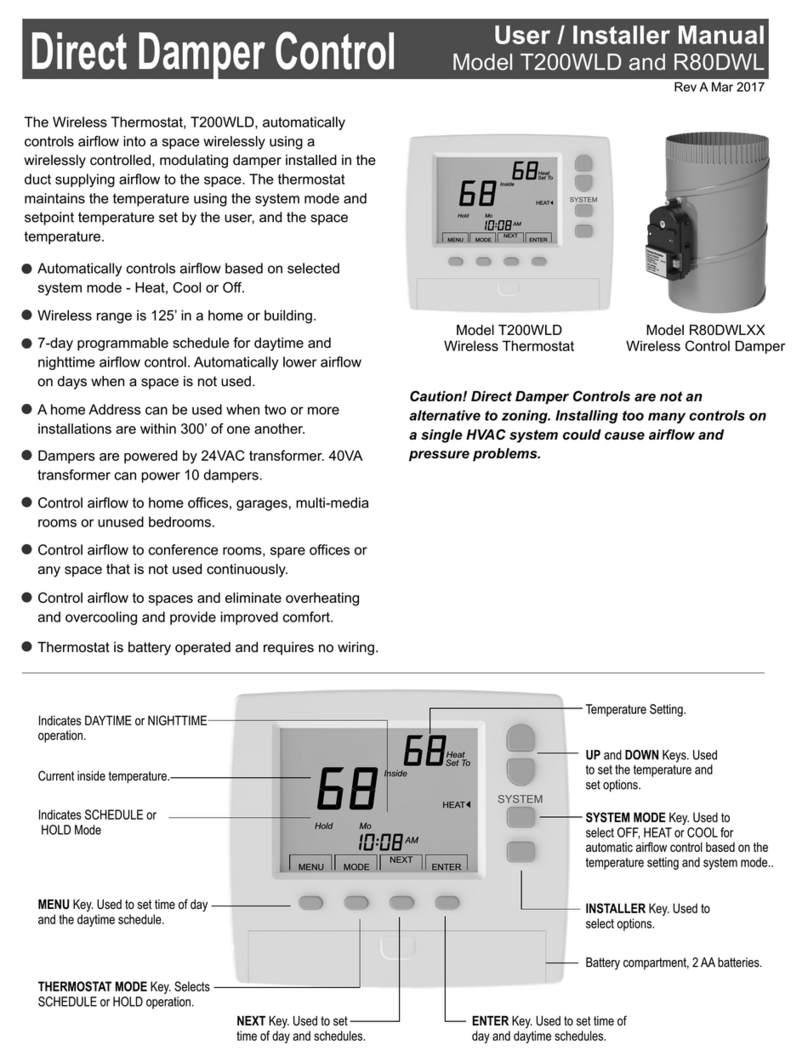
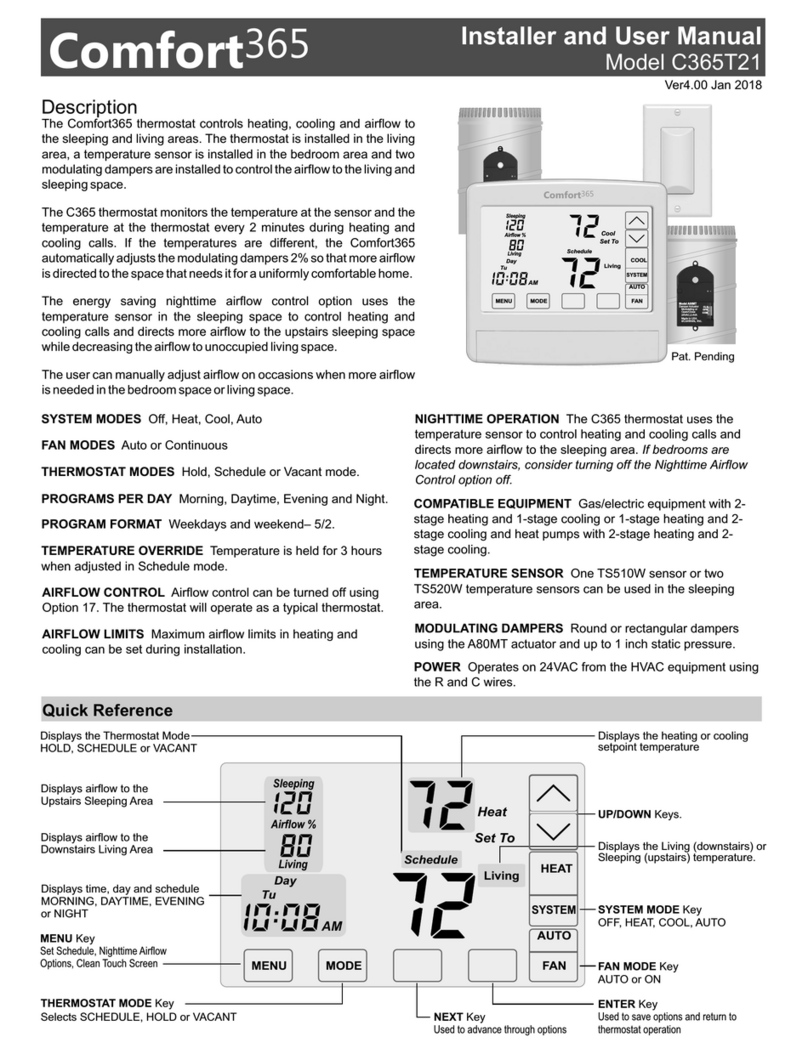
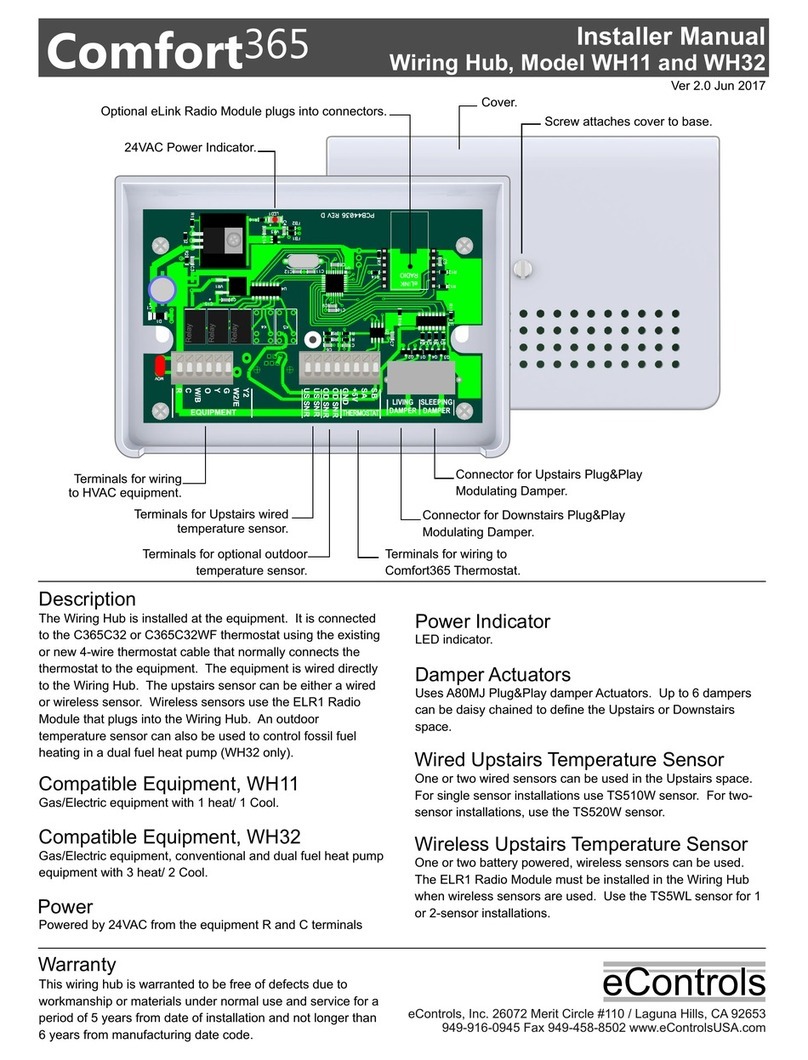
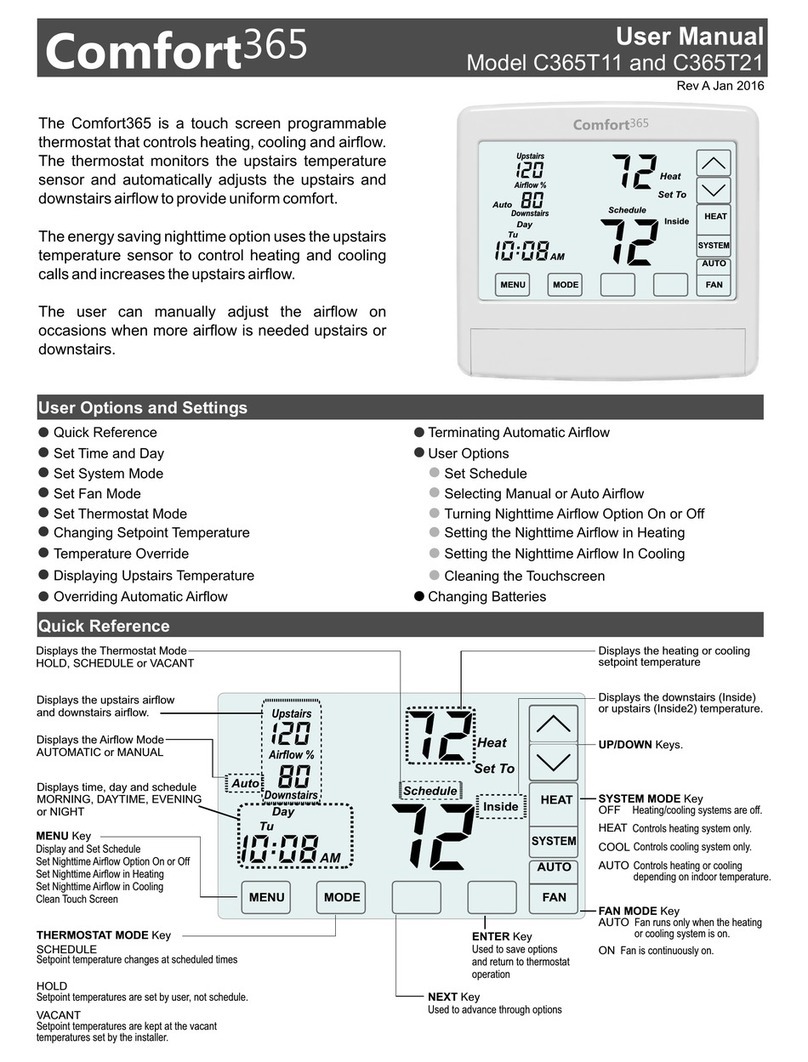
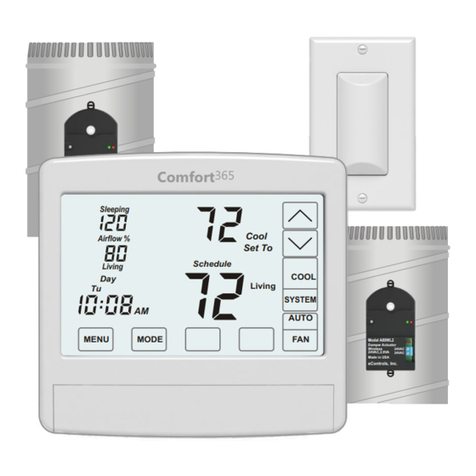
The Comfort365 is a touch screen programmable
thermostat that controls heating, cooling and airflow.
The thermostat monitors the upstairs temperature
sensor and automatically adjusts the upstairs and
downstairs airflow to provide uniform comfort.
The energy saving nighttime option uses the upstairs
temperature sensor to control heating and cooling
calls and increases the upstairs airflow.
The user can manually adjust the airflow on
occasions when more airflow is needed upstairs or
downstairs.
Quick Reference
SYSTEM MODE Key
OFF Heating/cooling systems are off.
HEAT Controls heating system only.
COOL Controls cooling system only.
AUTO Controls heating or cooling
depending on indoor temperature.
FAN MODE Key
AUTO Fan runs only when the heating
or cooling system is on.
ON Fan is continuously on.
THERMOSTAT MODE Key
SCHEDULE
Setpoint temperature changes at scheduled times
HOLD
Setpoint temperatures are set by user, not schedule.
VACANT
Setpoint temperatures are kept at the vacant
temperatures set by the installer.
Changing Batteries
Overriding Automatic Airflow
Terminating Automatic Airflow
Turning Nighttime Airflow Option On or Off
Setting the Nighttime Airflow in Heating
Setting the Nighttime Airflow In Cooling
Selecting Manual or Auto Airflow
Cleaning the Touchscreen
User Options and Settings
Quick Reference
Set Time and Day
Set System Mode
Set Fan Mode
Factory Set Schedule
Change Factory Set Schedule
Temperature Override
Set Thermostat Mode
Changing Setpoint Temperature
Displaying Upstairs Temperature
Sensor #1
Sensor #2
If two wireless upstairs temperature
sensors have been installed, there
are removable labels on the sensors
indicating the sensor number. Enter
the location, for example master
bedroom, for sensor #1 and sensor
#2 below for future reference.
Wireless Sensor Locations
Set Time and Day
NEXT ENTER
AM
Touch the UP/DOWN keys to change the
HOUR. Touch NEXT to save the hour and
go to change the minute.
CHANGE THE HOUR
Touch the UP/DOWN keys to change the
MINUTE. Touch NEXT to save the minute
and go to change the day of the week.
CHANGE THE MINUTE
Touch the UP/DOWN keys to change the
DAY OF THE WEEK.
Touch ENTER to save the day of the
week and return to thermostat operation.
CHANGE THE DAY OF THE WEEK
Inside
Tu
Day
Upstairs
Auto
Downstairs
Airflow %
COOL
Schedule
AUTO
FANMENU MODE
Cool
Set To
SYSTEM
AM
Touch here to change the
time and day of the week.
We
ENTER
AM
NEXT ENTER
AM
Press the touchscreen with your fingertip only, using a
firm touch. Do not use a sharp object such as a pen or
pencil.
Set System Mode
Touch the SYSTEM key to display the SYSTEM MODES - OFF, HEAT,
COOL, or AUTO. When HEAT is selected, the heating setpoint is
displayed. When COOL is selected, the cooling setpoint is displayed. In
AUTO or OFF, the setpoint for the last system call is displayed.
Inside
Tu
Day
Auto
Downstairs HEAT
Schedule
AUTO
MENU MODE
Heat
Set To
SYSTEM
AM
Upstairs
Airflow %
Touch and hold the SYSTEM key
to select:
FAN
OFF
HEAT
COOL
AUTO
Only heating calls are enabled.
Only cooling calls are enabled.
Heating or Cooling calls are
enabled.
Heating and cooling systems
are off.
Set Fan Mode
Touch the key to display the FAN MODES - AUTO or ON. AUTO is
the most commonly used setting.
FAN
Inside
Tu
Day
Upstairs
Auto
Downstairs
Airflow %
COOL
Schedule
AUTO
FANMENU MODE
Cool
Set To
SYSTEM
AM
Touch FAN key to select:
AUTO
ON
Fan is activated only during
heating or cooling calls.
Fan is continuously on.
Factory Set Schedule
Morn
Day
Even
Nite
Monday through Friday
The thermostat comes pre-set with the following energy-saving
schedule for weekdays (Monday-Friday) and weekends
(Saturday-Sunday).Using these settings can reduce your
heating/cooling expenses.
6:00 AM
8:00 AM
6:00 PM
10:00 PM
70
62
70
62
Time Heat Cool
Morn
Day
Even
Nite
Saturday and Sunday
6:00 AM
8:00 AM
6:00 PM
10:00 PM
70
62
70
62
75
75
83
83
75
75
78
78
Time Heat Cool
Change Factory Set Schedule
Touch the key to display SCHEDULE. Here you will select either
the weekday or weekend schedule to display or change. If no key is
touched, the thermostat returns to normal operation after about 30
seconds.
MENU
WeTuMo ThFr
Schedule
MENU NEXT ENTER
Touch the UP key to select the weekday
schedule (MoTuWeThFr) or touch the
DOWN key to select the weekend
schedule (SaSu) and then touch NEXT.
SELECTING THE WEEKDAY OR
WEEKEND SCHEDULE
WeTuMo
Morn
ThFr
Schedule
MENU NEXT ENTER
AM
WeTuMo
Morn
ThFr
Schedule
MENU NEXT ENTER
Heat
Set To
AM
WeTuMo
Morn
ThFr
Schedule
MENU NEXT ENTER
Cool
Set To
AM
Touch the UP/DOWN keys to change the
Morning Schedule Start Time and then
touch NEXT.
SETTING THE MORNING SCHEDULE
START TIME.
Touch the UP/DOWN keys to change the
Morning Schedule Heating Setpoint and
then touch NEXT.
SETTING THE MORNING SCHEDULE
HEATING TEMPERATURE.
Touch the UP/DOWN keys to change
Morning Schedule Cooling Setpoint and
then touch NEXT.
SETTING THE MORNING SCHEDULE
COOLING TEMPERATURE.
Continue setting the start times, heating setpoints, cooling setpoints for
the Day, Evening and Night schedules.
Touch ENTER to save the schedules to the weekdays or the weekend.
Changing the Setpoint Temperature
The UP/DOWN keys are used to change the setpoint temperature.
Inside
Tu
Day
Upstairs
Auto
Downstairs
Airflow %
COOL
Schedule
AUTO
FANMENU MODE
Cool
Set To
SYSTEM
AM
Touch the UP key to raise setpoint
temperature.
Touch the DOWN key to lower setpoint
temperature.
To display the opposing system setpoint, touch the area shown below.
An active heating call is indicated by
HEAT blinking. An active cooling call
is indicated by COOL blinking.
Upstairs
Touch here to display and change
the opposing setpoint temperature.
Heat
Airflow %
Set To
Auto Schedule
Downstairs
Inside COOL
Day
Tu
SYSTEM
AM
AUTO
FANMENU MODE
Touch the UP/DOWN keys to change the
setpoint temperature for the opposing
system. The thermostat will return to
displaying the active setpoint after about
30 seconds.
Temperature Override
If the thermostat is in SCHEDULE MODE, the setpoint temperature can
be overridden using the UP/DOWN keys. The setpoint temperature will
be held for 3 hours. After 3 hours the thermostat returns to normal
operation.
Inside
Tu
Day
Upstairs
Auto
Downstairs
Airflow %
COOL
Schedule
AUTO
FANMENU MODE
Cool
Set To
SYSTEM
AM
Touch the UP/DOWN keys to adjust the
setpoint temperature.
After 3 hours, the thermostat returns
to normal thermostat operation.
Set Thermostat Mode
Touch the key to display the THERMOSTAT MODES -
SCHEDULE, HOLD and VACANT.
In SCHEDULE MODE, the setpoint temperature is automatically
changed at the scheduled times as long as the SYSTEM MODE is in
AUTO. In HOLD MODE, the thermostat uses the temperatures set by
the user, ignoring the schedule. In VACANT MODE, the thermostat
uses the energy saving Vacant heating and cooling setpoints set by the
installer until the mode is changed.
MODE
Inside
Tu
Day
Upstairs
Auto
Downstairs
Airflow %
COOL
Schedule
AUTO
FANMENU MODE
Cool
Set To
SYSTEM
AM
Touch and hold the MODE key
to select:
SCHEDULE
HOLD
VACANT
Setpoint temperatures are changed
at scheduled times defined by the user.
Setpoint temperatures are set by
the user. No schedule is used.
Setpoint temperatures are kept at the
vacant temperatures set by the installer.
Displays the Mode.
Displaying the Upstairs Temperature
The thermostat displays the downstairs temperature and is indicated
by INSIDE. The upstairs temperature will be indicated by INSIDE2. In
Night Mode, the thermostat displays the upstairs temperature,
indicated by INSIDE2.
Inside2
We
Day
Upstairs
Auto
Downstairs
Airflow %
COOL
Schedule
AUTO
FANMENU MODE
Cool
Set To
SYSTEM
AM
To display the upstairs temperature,
touch the INSIDE temperature as
indicated. The thermostat will now
display the upstairs temperature,
indicated by INSIDE2.
After about 30 seconds, the
thermostat will return to displaying
the downstairs temperature.
Overriding Automatic Airflow
Terminating Airflow Override
In AUTOMATIC AIRFLOW MODE, the user can override the airflow to
the upstairs and downstairs by pressing AIRFLOW % in the area
shown and then use the UP/DOWN keys to adjust the airflow. After 3
hours, the thermostat returns to automatic operation. UPSTAIRS,
AIRFLOW% and DOWNSTAIRS blink when in airflow override.
AIRFLOW OVERRIDE can terminated by pressing in the
area shown and then pressing the Mode key. The thermostat returns
to automatic airflow control. The AIRFLOW % returns to the airflow
prior to the override.
AIRFLOW %
Touch AIRFLOW% as shown.
Touch the UP key to increase the
upstairs airflow (the downstairs airflow
will automatically decrease). Touch the
DOWN key to increase downstairs airflow
(the upstairs airflow will automatically
decrease).
The override range is defined by the
installer during set up.
Touch AIRFLOW% as shown.
Touch the MODE key to terminate airflow
override.
The thermostat returns to automatic
airflow control. The AIRFLOW % returns
to the airflow prior to the override.
Inside
Inside
We
We
Eve
Eve
Upstairs
Upstairs
Auto
Downstairs
Downstairs
Airflow %
Airflow %
COOL
COOL
Hold
Hold
AUTO
AUTO
FAN
FAN
MENU
MENU
MODE
MODE
SYSTEM
SYSTEM
PM
PM
This area will blink when
in airflow override.
Turning Nighttime Airflow Option On or Off
When bedrooms are located upstairs, the NIGHTTIME AIRFLOW
option can be used to save energy. The thermostat uses the upstairs
temperature sensor for controlling heating and cooling calls, as if the
thermostat has been moved upstairs. The airflow downstairs is reduced
and the upstairs airflow is increased.
Night
Upstairs
Downstairs
Airflow %
MENU NEXT ENTER
Touch the MENU key to display
NIGHTTIME AIRFLOW option indicated
by nAF On or Off.
Touch the UP key to turn the option ON.
Touch the DOWN key to turn the option
OFF.
Touch the key to save and go to
next option or touch the ENTER key to
save the options and return to normal
thermostat operation.
MENU
Setting the Nighttime Airflow in Heating
This option enables the user to set the maximum allowable upstairs
airflow in heating DURING NIGHTTIME OPERATION, not to exceed
the installer set maximum allowable upstairs airflow in heating.
Night
Upstairs
Downstairs
Airflow %
MENU ENTER
Heat
Touch the key to display
NIGHTTIME, UPSTAIRS AIRFLOW IN
HEATING indicated by nAF Heat.
Touch the UP/DOWN keys to adjust the
airflow.
Touch the MENU key to save and go to
next option or touch the ENTER key to
save the options and return to normal
thermostat operation.
MENU
Setting the Nighttime Airflow in Cooling
This option enables the user to set the maximum allowable upstairs
airflow in cooling DURING NIGHTTIME OPERATION, not to exceed
the installer set maximum allowable upstairs airflow in cooling.
Night
Upstairs
Downstairs
Airflow %
MENU ENTER
Cool
Touch the MENU key to display
NIGHTTIME, UPSTAIRS AIRFLOW IN
COOLING indicated by nAF Cool.
Touch the UP/DOWN keys to adjust the
airflow.
Touch the MENU key to save and go to
next option or touch the ENTER key to
save the options and return to normal
thermostat operation.
NEXT
NEXT
Selecting Manual or Auto Airflow
This option is only displayed if your installer enabled Manual Airflow
Control during installation. AUTOMATIC AIRFLOW is the default. In
AUTOMATIC AIRFLOW CONTROL, the airflow is adjusted by the
thermostat. In MANUAL AIRFLOW CONTROL, the user must adjust
the airflow. The airflow range is defined by the installer during set up.
Upstairs
Downstairs
Airflow %
MENU NEXT ENTER
Touch the MENU key until the following
thermostat screen is displayed.
Touch the UP key to select AUTO. Touch
the DOWN key to select MANUAL.
Touch the key to save and go to
next option or touch the ENTER key to
save the options and return to normal
thermostat operation.
MENU
Auto
Cleaning the Touch Screen
This option disables the touch screen for 30 seconds to enable the
user to clean the touch screen by wiping down with a soft, damp cloth.
Touch the MENU key to display the CLEAN DISPLAY option indicated
by CL. The timer will count down and return to normal thermostat
operation after 30 seconds. The remaining time is displayed on the
screen.
NEXT ENTER
Touch the MENU key to display CLEAN DISPLAY
option indicated by CL.
Press ENTER to start the 30 second count down.
The touch screen is disabled during this time.
Or, press NEXT to return to normal thermostat
operation.
Install Two AA Batteries
The batteries power the clock when
24VAC power is lost. Slide the battery
cover downward and install the two AA
batteries as shown.
- + - +
Warranty
This thermostat is warranted to be free of defects due to workmanship or
materials under normal use and service for a period of 5 years from date of
installation and not longer than 6 years from manufacturing date code.
949-916-0945 www.Comfort365USA.com
eControls, 26072 Merit Circle #110, / Laguna Hills, CA 92653
eControlseControls
Inside
Upstairs
Auto
Downstairs
Airflow %
Schedule
Cool
Set To
COOL
AUTO
FANMENU MODE
SYSTEM
If the C365 detects a communication
error with the wireless Upstairs
temperature sensor or sensors, a
blinking message appears where the
time is normally displayed. The display
will alternately show Snr and the sensor
number.
How to test the wireless sensor communication can be found in the
Installers Manual.
Error Messages
Inside
Upstairs
Auto
Downstairs
Airflow %
COOL
Schedule
AUTO
FANMENU MODE
Cool
Set To
SYSTEM
Homeowner resources are available
online at www.Comfort365USA.com,
including a consumer video
describing the features and outlining
the operation of the Comfort365.
Inside
Tu
Day
Upstairs
Auto
Downstairs
Airflow %
COOL
Schedule
AUTO
FANMENU MODE
Cool
Set To
SYSTEM
AM
The thermostat will display nP when
power is lost. The batteries will maintain
the time and once power is restored, the
thermostat will return to normal
operation.
Check that the batteries are installed
correctly or replace them if they are old.

Other eControls Thermostat manuals

eControls Comfort365 C365T21WF Operation and installation manual

eControls

eControls Comfort365 C365T21WF Operation and installation manual

eControls T200WLD Instruction Manual

eControls

eControls T200WLD Instruction Manual

eControls Comfort365 C365T21WF User manual

eControls

eControls Comfort365 C365T21WF User manual

eControls Comfort365 C365T11 Operation and installation manual

eControls

eControls Comfort365 C365T11 Operation and installation manual

eControls Comfort 365 C365T11 User guide

eControls

eControls Comfort 365 C365T11 User guide

eControls Comfort365 C365T11 Operation and installation manual

eControls

eControls Comfort365 C365T11 Operation and installation manual

eControls Comfort365 C365C32 User guide

eControls

eControls Comfort365 C365C32 User guide

eControls Comfort365 C365T11 User manual

eControls

eControls Comfort365 C365T11 User manual

eControls C365T21WF Operation and installation manual

eControls

eControls C365T21WF Operation and installation manual

eControls Comfort365 C365C32 User guide

eControls

eControls Comfort365 C365C32 User guide

eControls Comfort365 C365T21 User manual

eControls

eControls Comfort365 C365T21 User manual

eControls C365T21 Operation and installation manual

eControls

eControls C365T21 Operation and installation manual

eControls Comfort365 C365T21WF User manual

eControls

eControls Comfort365 C365T21WF User manual

eControls Comfort365 C365T21 Operation and installation manual

eControls

eControls Comfort365 C365T21 Operation and installation manual

Popular Thermostat manuals by other brands

Honeywell CT3200 series Installation quick guide

Honeywell

Honeywell CT3200 series Installation quick guide

Intermatic InTouch Z-Wave CA8900 Installation and user instructions

Intermatic

Intermatic InTouch Z-Wave CA8900 Installation and user instructions

Venstar ColorTouch T8900 Owner's manual & installation guide

Venstar

Venstar ColorTouch T8900 Owner's manual & installation guide

Carrier PROGRAMMABLE THERMOSTAT Homeowner's guide

Carrier

Carrier PROGRAMMABLE THERMOSTAT Homeowner's guide

Momento UDG instructions

Momento

Momento UDG instructions

jablotron TP-60 manual

jablotron

jablotron TP-60 manual

Danfoss RT 14L installation guide

Danfoss

Danfoss RT 14L installation guide

Honeywell RTH8500WF quick start guide

Honeywell

Honeywell RTH8500WF quick start guide

Robertshaw RS6110 Specifications

Robertshaw

Robertshaw RS6110 Specifications

OJ Electronics ETN4-1999 instructions

OJ Electronics

OJ Electronics ETN4-1999 instructions

Honeywell T641A installation instructions

Honeywell

Honeywell T641A installation instructions

QuickTec QuickTherm HF Operating and installation instructions

QuickTec

QuickTec QuickTherm HF Operating and installation instructions

Braeburn Premier Series Installer manual

Braeburn

Braeburn Premier Series Installer manual

AMG Insta-Therm instruction manual

AMG

AMG Insta-Therm instruction manual

Venstar T3900 Installation instructions and owner's manual

Venstar

Venstar T3900 Installation instructions and owner's manual

Salus VS10WRF Full user manual

Salus

Salus VS10WRF Full user manual

GE CC-SCSTAT installation manual

GE

GE CC-SCSTAT installation manual

Agilent Technologies InfinityLab LC Series user manual

Agilent Technologies

Agilent Technologies InfinityLab LC Series user manual

manuals.online logo
manuals.online logoBrands
  • About & Mission
  • Contact us
  • Privacy Policy
  • Terms and Conditions

Copyright 2025 Manuals.Online. All Rights Reserved.