Ecosmo 26SF02 User manual
1
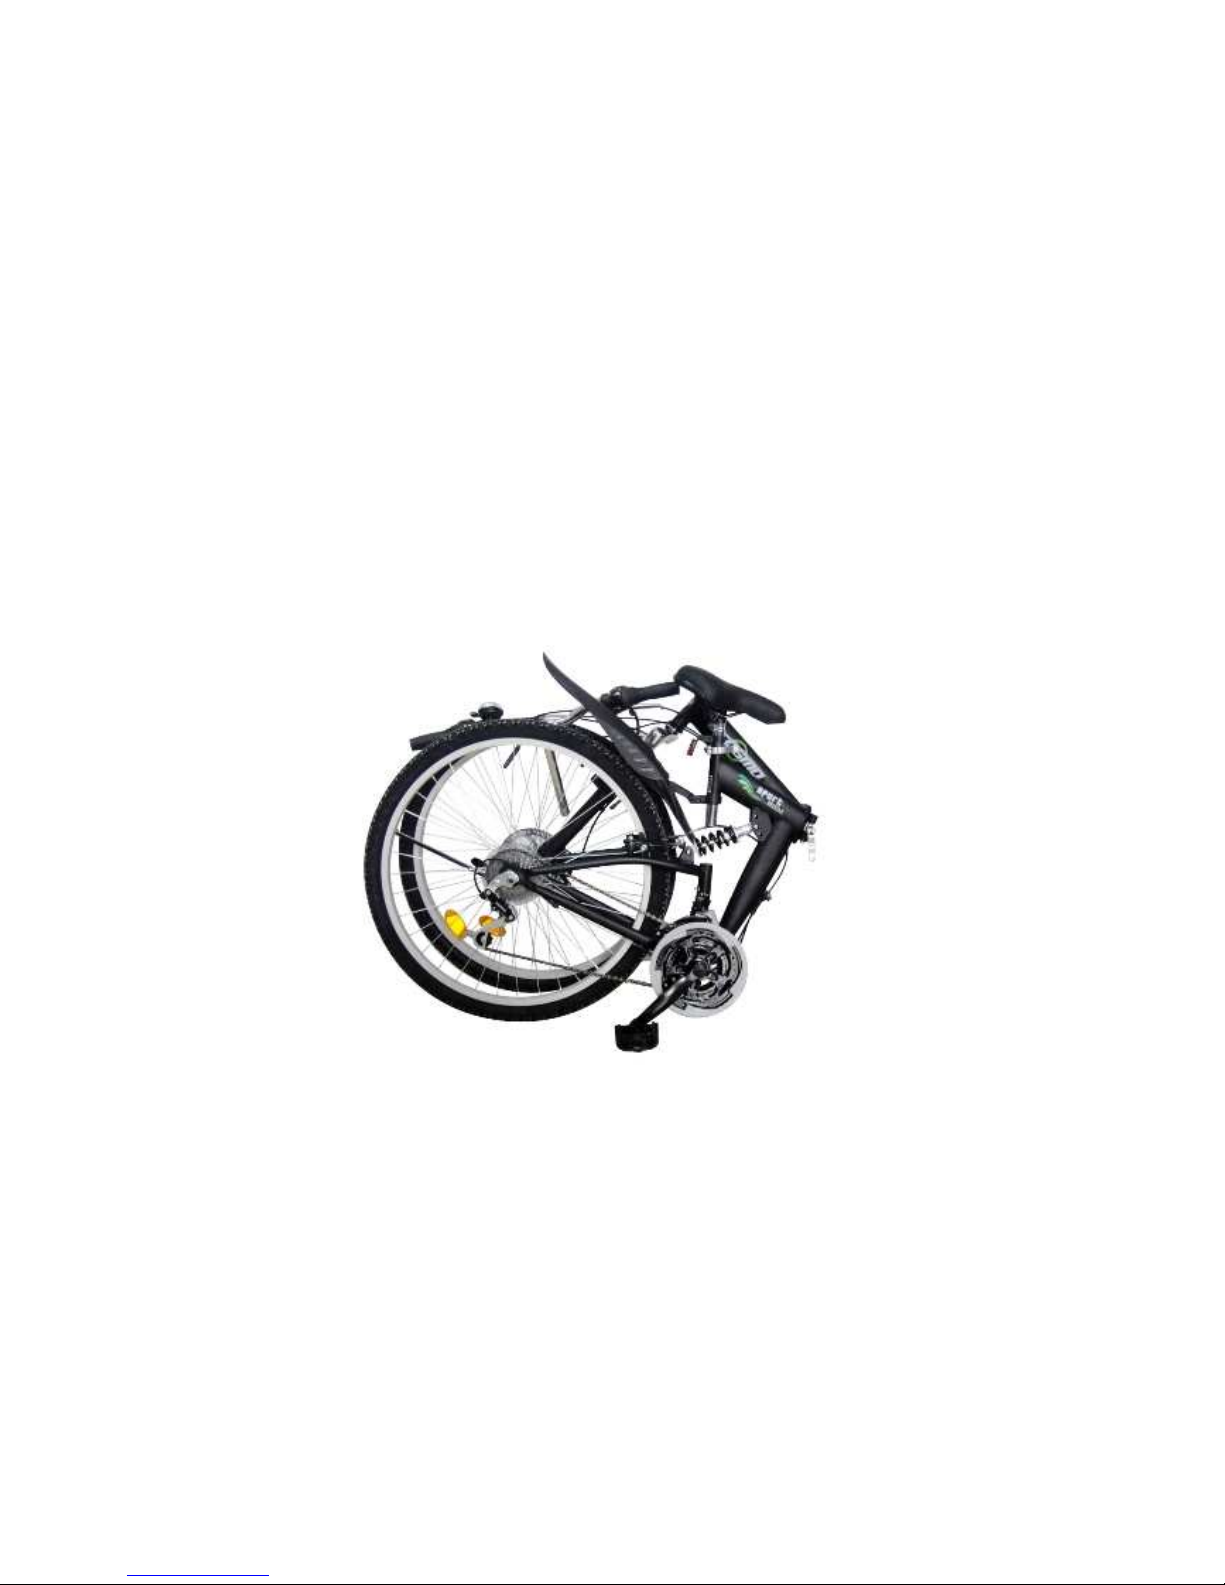
Folding Mountain Bike
Assembly Manual
26SF02
Ecosmo Ltd
2
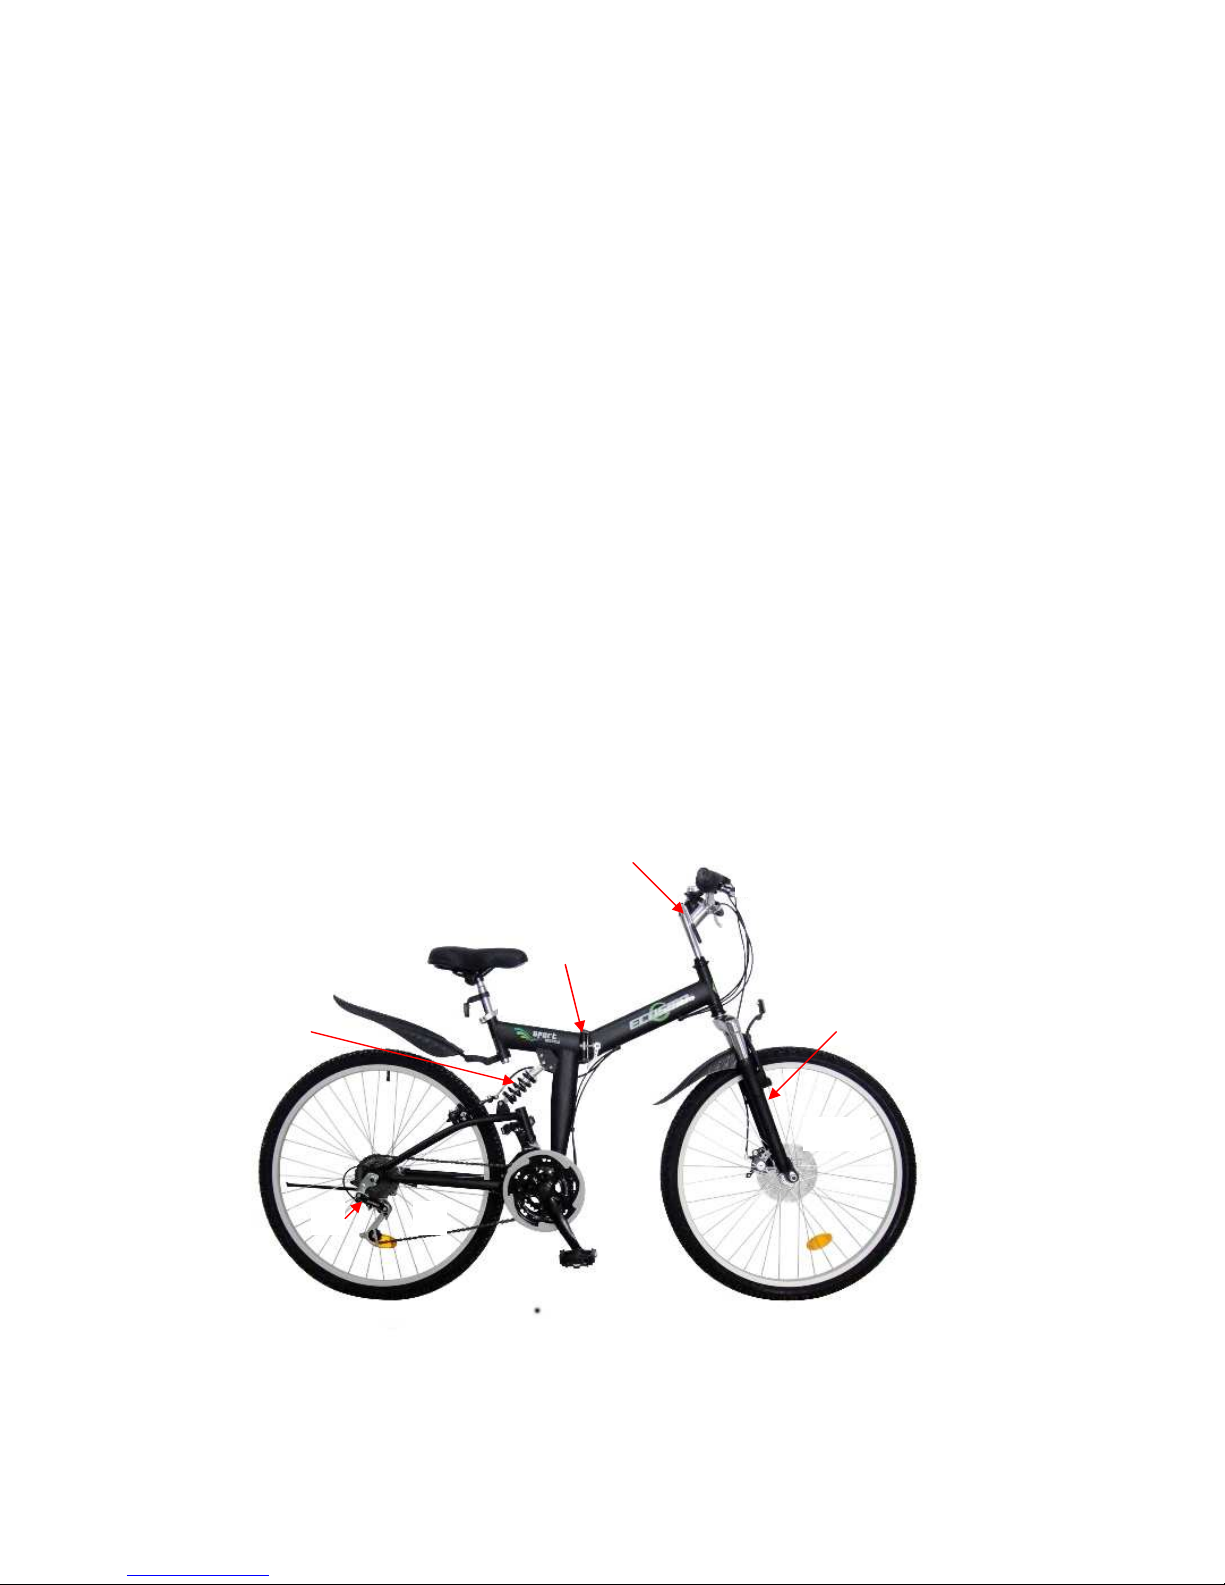
Know your folding bike
1. Wheel
2. Rear Derailleur
3. Chain
4. Crank Set
5. Pedal
6. Seat Post
7. Saddle
8. Frame
9. Frame Folding lock
10. Front Reflector
11. Gear Shifts
12. Handlebar
13. Handlebar Quick Release
14. Front Mudguard
15. Disc Brake
16. Rear Mudguard
17. Suspension
18. Fork
1
2
3
4
5
6
7
8
9
10
11
12
15
16
17
13
18
14

3
Safety
It is always advisable to have your bicycle properly assembled by a bicycle
professional. This setup and ongoing maintenance will ensure a proper and safe
setup and long life for your new folding bike.
• Before riding your bike for the first time, make sure to familiarize yourself with the
location and operation of all the quick release levers on your bike.
• Before each ride, check to make sure all latches and quick releases are properly
secured. Also check your brake system and tire pressure. Proper inflation for your
tires is indicated on the tire’s sidewall.
• Do not over-tighten the quick release levers. Always hand tighten until clamping is
snug. Never use a tool or wrench to tighten the quick release levers.
• Never operate the bicycle if the frame, wheels or quick release levers are
damaged.
• Rider’s weight including luggage should not exceed 100 kg or 220 lbs.
• Make sure that the seat post quick release is securely fastened and that the seat
post does not slip before you ride.
• Proper maintenance and adjustment of your bike will greatly increase riding safety
and performance.
• To keep bicycle in optimum operating condition, always dry the bicycle after use in
wet riding conditions.
• Reflectors alone are not adequate for riding at night. Front and rear lighting
systems are recommended to increase visibility.
• Always wear a helmet when riding your bike.
• This folding bike is designed for adult users only.
• Before your first ride, be sure you know all local traffic regulations. Remember to
comply with all bicycling safety laws and use common sense especially in adverse
weather conditions.
• Ecosmo Bike is not responsible for accidents resulting from failure to comply with
all bicycling safety laws, careless driving or improper maintenance of your bicycle.
4
Quick start
Thanks for purchasing a folding bike by Ecosmo Bike. Here are some tips to get
your new bike set up before riding. It is always advisable to have your bicycle
properly assembled by a bicycle professional. This setup and ongoing maintenance
will ensure a proper and safe setup and long life for your new folding bike.
Please remove folding bike from the delivery package and remove any protective
packing material.
Your Ecosmo Bike package includes a small box with:
* Instruction
* Saddle (with attached seat post connector)
* Pedals
* Free bell
* Front reflector and rear reflector
Also included in your Ecosmo Bike package is the seat post and mudguards.
Your bike comes at 85% assembly condition, you will need to install the brake disc
and front wheel, to set up the handlebar, mudguards, reflectors and bell.
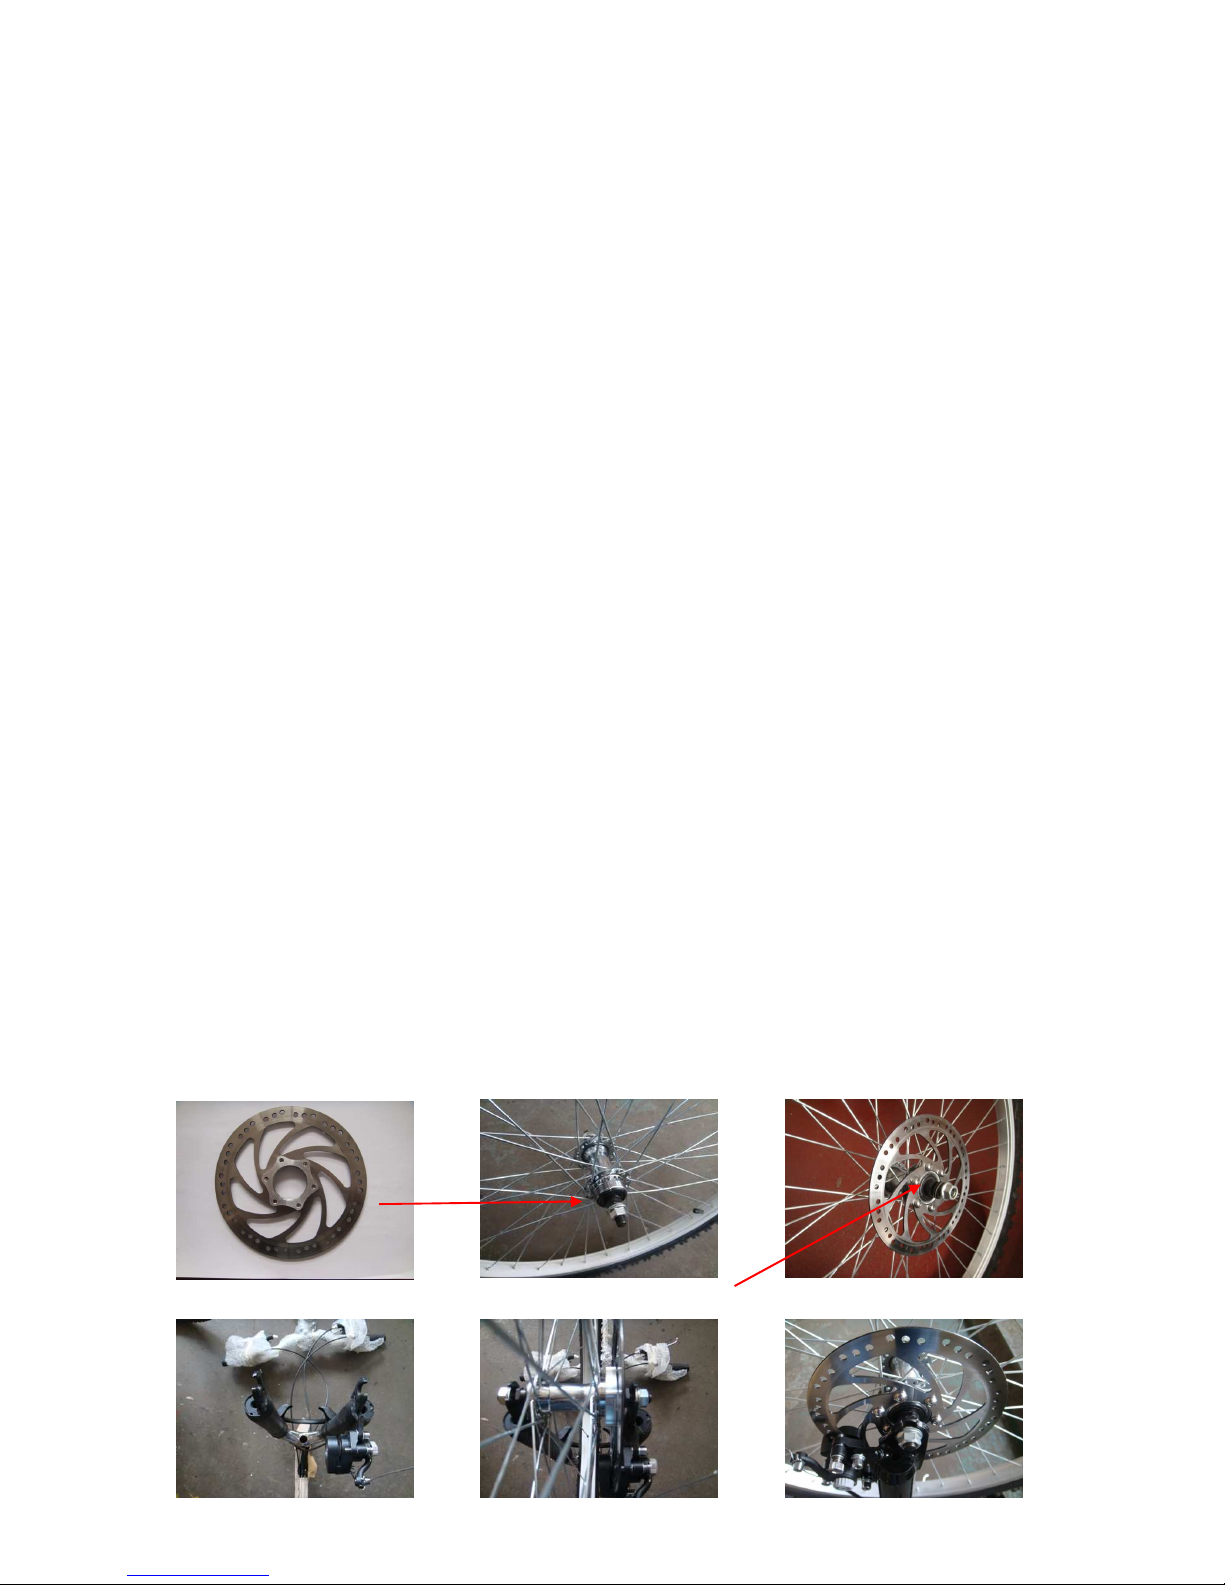
Installing disc brake and front wheel
Your bike comes with a disc brake, firstly attach the brake disc to the front wheel.
Reverse your bike, let the fork up, insert the axle of front wheel to the dropouts of
the fork. When installing the front wheel, don’t forget to put in the secure washers,
tighten the nuts by a wrench or a spanner.
Then reverse the bike back to normal, kick the stand down, make sure your bike is
stable.
Attention: Watch the direction of the disc, the screws face out
5
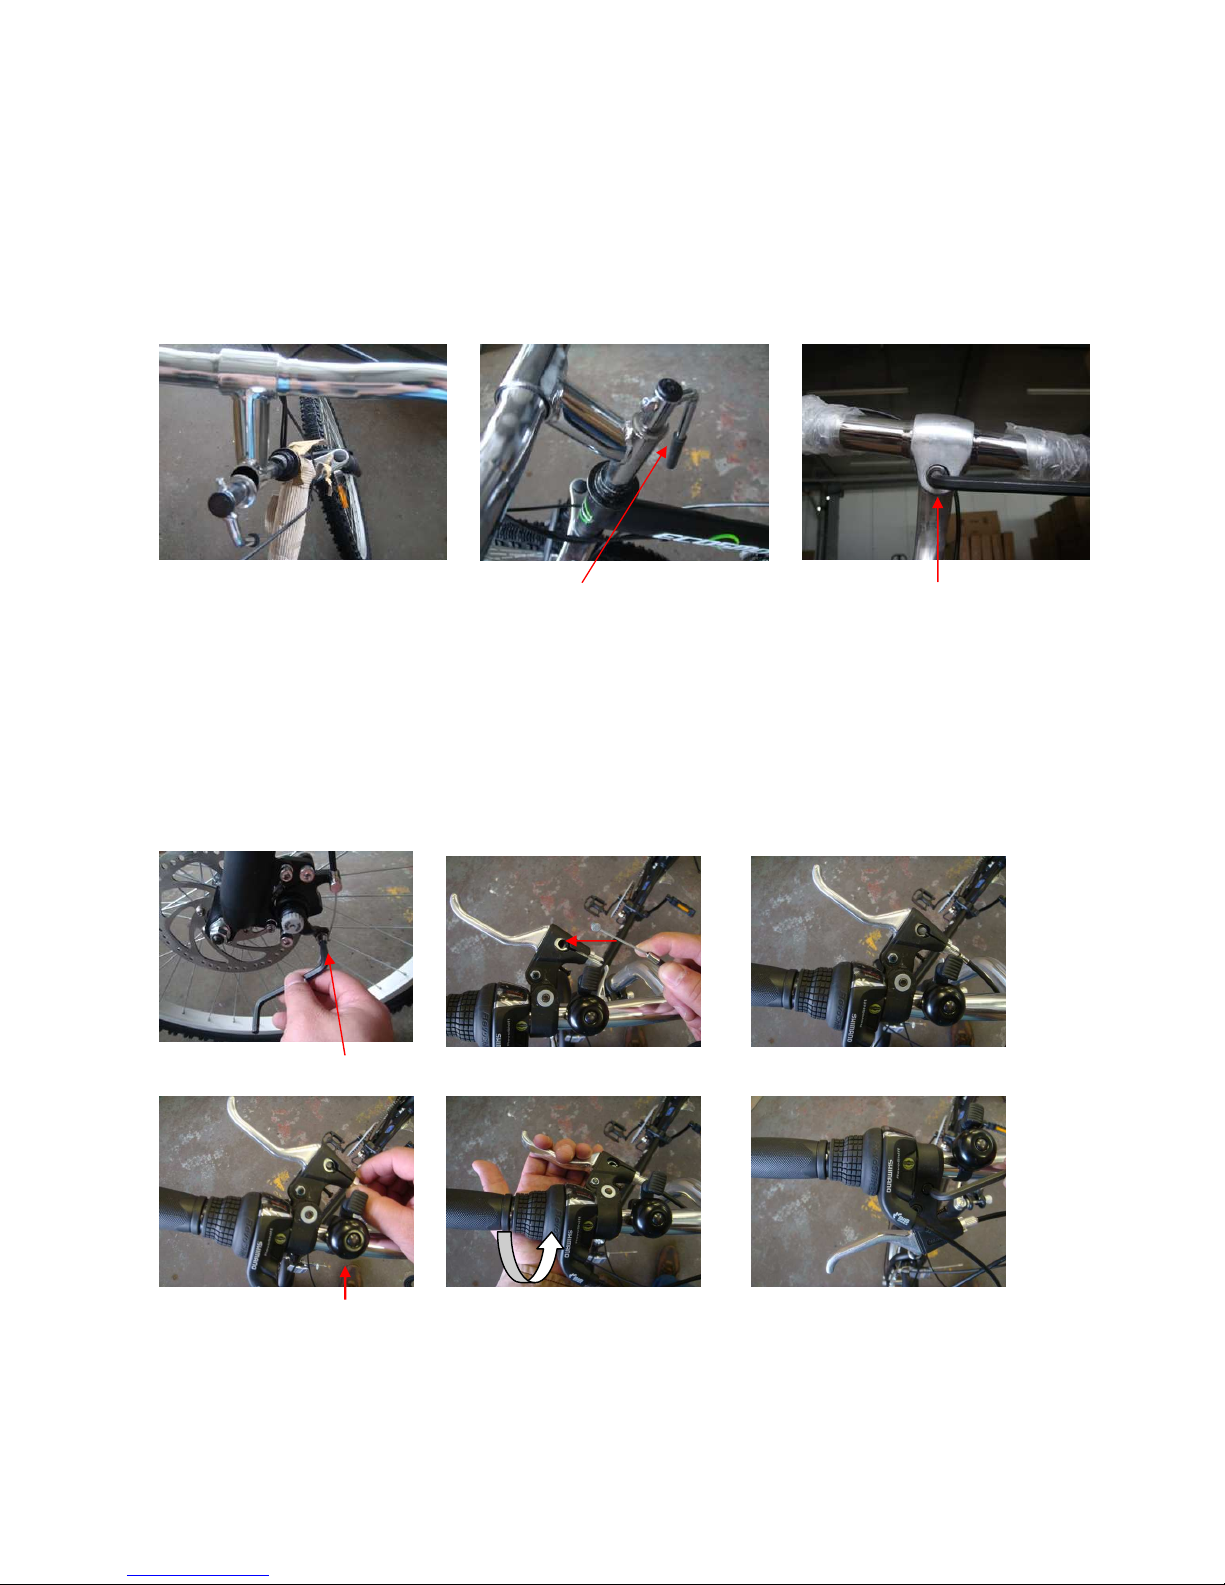
Setting up handlebar
When setting up the handlebar, insert the stem to the head tube, make sure the
front wheel and handlebar are in right positions before you secure the handlebar.
Also you can adjust the handlebar to a suitable position by loosing the nut in the
third picture.
Insert the stem into head tube Secure the stem by quick release Adjust handlebar
Connecting the front brake cable
Firstly loose the nut of the disc brake pad, release the cable, then insert the end of
cable into the hole of front brake lever, adjust the cable, lock the nuts, finally use
Allen Key to set the brake pads to right position.
A: Loose the nut, release the brake cable B : Insert the cable into the brake lever
G Bell H: Rotate the lever I: Secure the brake lever
Adjustingtheangleyour handbrake levers
Your bike has front and rear hand brake levers. The two levers require angle
adjustment and tightening for comfort and safety.

6
When your handlebars are properly set up, adjust the angle of the handbrake so
that they are easily accessible when your hands are on the handlebars.
The angle of the handbrake levers is generally a straight line from your shoulders
through your hands to the brakes. Tighten the position of the handbrake levers in
this position by tightening the hex nut with a 5mm hex key or allen wrench.
Attachingyourfreebell
Your folding bike comes with a free bell. It is recommended to attach the bell to the
right side of the handlebars. Loosen the screw on the attachment ring completely
with a screwdriver. Place the attachment ring around the handlebars and replace
and tighten the screw. The bell is rung by flicking the small tab.
AttachingyourMudguardsandreflectors
Thisfoldingbikecomeswiththefrontandrearmudguards,youneedattachthemonthefork
andundertheseatseparately.
Front mudguardanditsparts Reflectors
Rearmudguardand itsparts Installfrontreflector
Install frontmudguard InstallRearmudguardandreflector
7
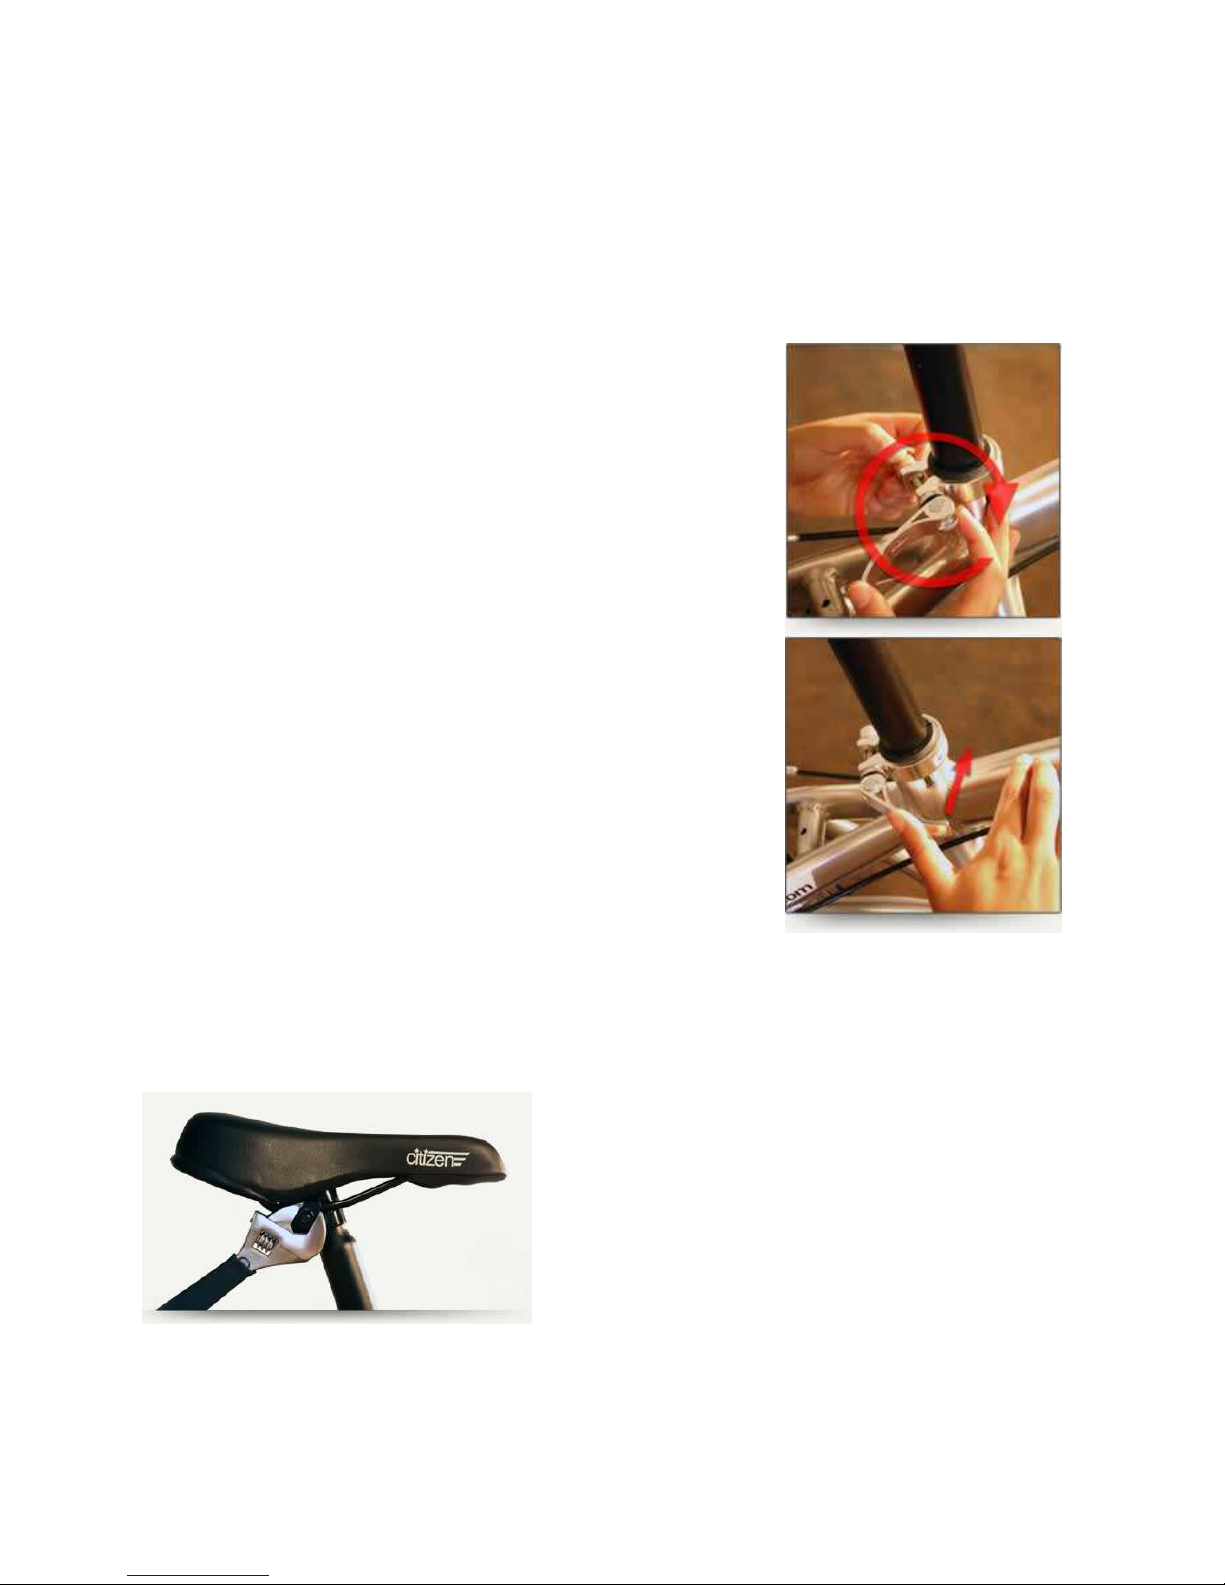
Connectingtheseattothepost
Your bike includes a saddle that is not already connected to seat post, the saddle
must be secured to the post.
Insert the seat post into the bike frame with the tapered end on top. The seat post is
inserted into the plastic shim. Please make sure the seat post quick release is open
before inserting the seat post. Insert the post to a level
that leaves the tapered end of the seat post visible to
allow sufficient space to connect the saddle.
Close the quick release to lock the seat post in position.
The quick release should close with sufficient force to
lock the seat post into position.
To tighten the quick release mechanism, open the quick
release, hold the nut opposite the lever with one hand
and rotate the quick release lever clockwise a complete
rotation while holding the nut firmly. This will tighten the
entire quick release mechanism. Now close the quick
release lever. You will notice that the quick release lever
is more difficult to tighten.
If the quick release requires more tightening, unlock the
quick release and continue to rotate the quick release
lever while holding the bolt opposite the lever until the
quick release mechanism is appropriately tightened.
Repeat if necessary.
Place your saddle on top of the post by placing the seat post connector onto the
tapered end of the seat post. The seat post connector should be completed
inserted onto the seat post so that the tapered end rests on the triangular stop on
the seat post connector.
Angle the saddle so that it is parallel to the
ground or at a preferred angle for comfort when
seated on the bicycle.
Tighten the bolts on opposite sides of the seat
post connector with a 14mm or adjustable
wrench. Alternate sides after each rotation to tighten evenly: tighten one side a full
rotation, then the opposite side a full rotation, and vice-versa until each bolt is
completely tight and there is no movement in the saddle angle.
8
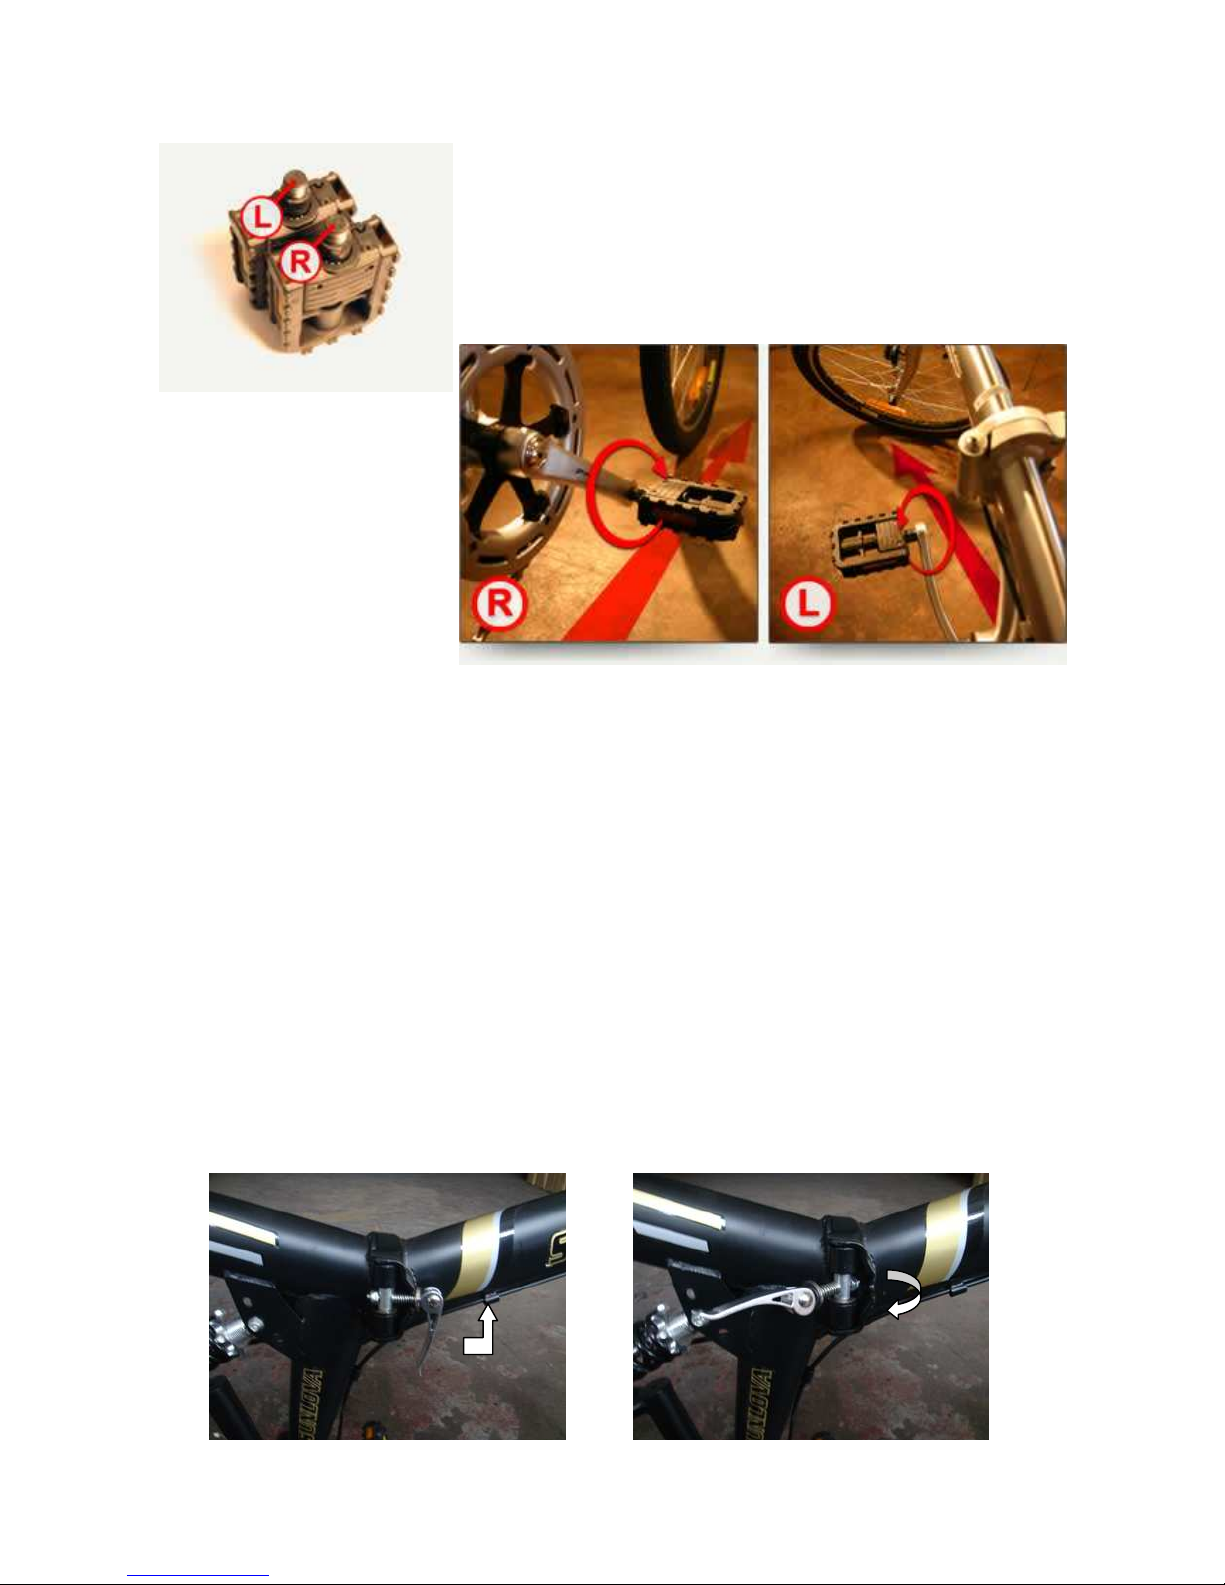
Connectingthepedals
Your folding bike includes a set of pedals, the pedals
are marked on the end of the pedal axle: “R” for “Right”
and “L” for “Left.” When seated on the bike, your right
foot would correspond to the right pedal and your left
foot would correspond to the left pedal.
Choose a pedal and start threading into the corresponding crank arm by hand
turning the pedal axle toward the front of the bike (both pedals thread in this
direction). If it does not thread easily do not force it and double check that you are
threading the appropriate pedal. Forcing the wrong pedal will damage the threading
on your pedal and crank arm.
Thread both pedals into the crank arms as far as you can by hand. Then fully
tighten them with a slender adjustable wrench or pedal wrench.
Unfolding/folding quick start guide
With a little practice, you should be able to fold or unfold your bike quickly and
easily. When folded, your bike should store the handlebars between the wheels.

9
When unfolding, swing your frame together. Make sure the quick release bolt snaps
into the frame folding box.
Tighten the quick release latch by pressing down the lever firmly.
NOTE: This lever should be tightened facing down as pictured to avoid interfering
with your legs while pedalling. You can adjust the tension on the quick release
levers by loosening or tightening the lever mechanism itself. Do not overtighten.
The frame folding quick release is attached to a vertical locking pin for safety. To
fold the frame, (a) position the unlocked frame quick release perpendicular to the
bike frame. While the quick release is perpendicular to the frame, (b) lift up
the lever to release the vertical locking pin from the frame. The frame lock (c)
will release and open.
Tire pressure
Look on the tire's sidewall for tire pressure recommendations. Don't exceed the
maximum tire pressure listed.
Check your tire pressure before every ride.
Front derailleur and rear derailleur
Normally you do not need to adjust the derailleurs, however, if you can’t change
gears properly, the below screws should be adjusted.
Front derailleur adjusting screws R
ear derailleur adjusting screws

10
thanks!
Thank you for purchasing a Ecosmo Bike!
Before using your new bike, please follow the setup steps and practice proper
folding and unfolding procedures.
Be sure to follow the sequence of steps carefully. Proper operation of your bicycle
is important for your safety and enjoyment. To avoid injury and maximize your
riding performance and enjoyment, read this manual completely.
With a bit of practice, you should be able to fold your bicycle quickly and easily.
Welcome to visit our website for more bikes!
www.8funbike.com
Table of contents
Other Ecosmo Bicycle manuals


Popular Bicycle manuals by other brands


ZEITGEIST
ZEITGEIST AIR Assembly instructions

Tiller
Tiller ROADMASTER manual

BirdBike
BirdBike VA00037 user manual

Scott
Scott EN ISO 4210-2 English translation of the original operating instructions

Moore Large
Moore Large Sonic Glamour owner's manual

PACIFIC CYCLE
PACIFIC CYCLE COMPACT BICYCLES 2006 instruction manual


