Ecowell WCVP02 User manual
ALTON INDUSTRY LTD. GROUP
643 Innovation Drive West Chicago, IL 60185
info @ altonindustries.com
https://www.altonindustries.com
MADE IN CHINA
Wet Dry Vacuum Cleaner and Mop
USER MANUAL
Read and understand this instruction manual thoroughly before using the product. It contains important
information for your safety as well as operating and maintenance advice.
成品尺寸:285X210(h)MM 展开尺寸:420X285(h)MM 已做出血位

Content
01
Safety Instructions 02
Packing List 03
Product View 04
Digital Display 05
Product Installation 06
How to Use 08
Product Maintenance and Care 10
Cleaning / Replacement Frequency Recommended 12
Trouble Shooting 13
Name and Content of Hazardous Substances 15
Recycling 16
Fault Code Table 14
Product Parameter 11
info@altonindustries.com

Safety Instructions
Users are forbidden to disassemble this product, otherwise it may cause danger.
1
Please do not add alcohol in the clean water tank.
25
Before cleaning or maintaining this product, please be sure to unplug and turn off the power.
2
Do not touch the socket, power adapter or display when hands are wet to avoid the risk of electric shock.
3
Please use the power adapter specifically for this product when charging, if using other power adapter charging
may lead to damage to the product.
4
If the power adapter is damaged, please stop using it immediately and contact our professional maintenance
personnel for replacement.
5
This product is not intended for use by people with physical,sensory or intellectual impairments or people
lacking experience and common sense (including children), unless supervised or instructed by others to ensure
that they can use it safely.
6
When using, if you find the machine leakage or motor temperature is too high and strange noise,such as the
body overheating, strange noise, odor and other problems, please immediately stop using, and contact our
after-sales service department for help.
7
Do not get the machine wet, otherwise there is a risk of fire and electric shock due to short-circuiting of the
machine.
8
Do not block the air inlet and outlet, so as not to overheat the machine.
9
Do not soak the ground brush in water, so as not to burn the machine.
10
Do not shake or collide the machine violently to avoid the inflow of sewage into the motor.
11
When moving the machine, please keep the machine upright so that the sewage will not flow into the motor.
12
Do not use when the water tank and sewage tank are not installed in place.
13
Please do not use in an environment lower than -10℃ and higher than 45℃.
14
This product is only suitable for use in the home environment, not in the industrial environment or outdoor use.
15
This product is suitable for use on hard floors in the home environment, such as marble floors, wooden floors,
tile floors, solid wood floors, laminate floors.
16
Do not use this product to clean unextinguished heat sources such as cigarette butts ormatches to avoid fire.
17
Do not use this product to clean flammable and explosive or highly volatile liquids, such as gasoline, kerosene,
paint, perfume, etc., which may lead to short circuit, or explosion.
18
Do not use this product to clean the color powder or toner used inside the laser printer or copier to avoid fire
or explosion.
19
Do not use this product to clean sharp objects,such as glass fragments, nails, tacks, paper clips, stones and
other items, to avoid damage to the product.
20
Do not clean strong stains such as pigments, paints, shoe polish, etc.
21
Please do not use this product to clean foam liquid, so as not to cause damage to the motor.
22
Cleaning fluid should be placed out of reach from children.
23
Please follow the floor cleaning liquid label instructions to use the cleaning liquid.
24
Packing List
Before using this product, please check if the package contains the following accessories, if any is missing, please
contact customer service. Below images are for reference only, please refer to the actual product received.
Self-cleaning and charging station x1
Main body×1 HEPA ×1
Adapter x1
Roller brush x1
Floor cleaner
( Optional)
( Suitable for cleaning all
kinds of floor stains)
Cleaning tool
( Suitable for cleaning the dirty water tank
and the tangled hair of the roller brush)
0302
https://www.altonindustries.com info@altonindustries.com

0504
https://www.altonindustries.com
Product View
Power button
ECO/MAX mode Spray button
Handle
Clean water tank status light:
Red light: water shortage
White light: ECO mode
Blue light: MAX mode
Clean water tank
LED display
Dirty water tank cover
Dirty water tank
Roller brush
Transparent window cover
Self-cleaning button
Voice switch
Battery pack
Charging station
Digital Display
The indicator will light up white when the cleaner is in
Eco Mode
The indicator will light up white when the cleaner is in
Max Mode.
When the cleaner is doing normal cleaning, it shows
the working time from"switching on"to" now " .
When the cleaner is in self-cleaning mode, it shows the
self-cleaning countdown from"59" to"o"
When the cleaner runs faulty, it shows the faulty code
to help identify the problem.
The indicator will flash RED slowly when Dirty Water
Tank is full, please empty the Dirty Water Tank in time.
The indicator will flash RED slowly when Clean Water
Tank is short of water, please fill up with clean water.
The indicator will light up WHITE when the cleaner is in
Self-cleaning Mode.
Battery Indicator, the indicator will flash white slowly when
charging, it will stop flashing after fully charged
The indicator will light up WHITE when user is manually
spraying water.
The indicators and the display may be slightly different with the final product,
please subject to the actual product.
info@altonindustries.com
07
06
https://www.altonindustries.com
Product Installation
1.Handle disassembly and installation
1.1 lnstallation: Insert the handle connection tube to
the body component port, and hear the "click"
sound to mark the installation in place.
1.2 Disassembly: Use a suitable size screwdriver or Allen
key, insert the thin hole located in the upper back of the
body and press, while lifting the handle up.
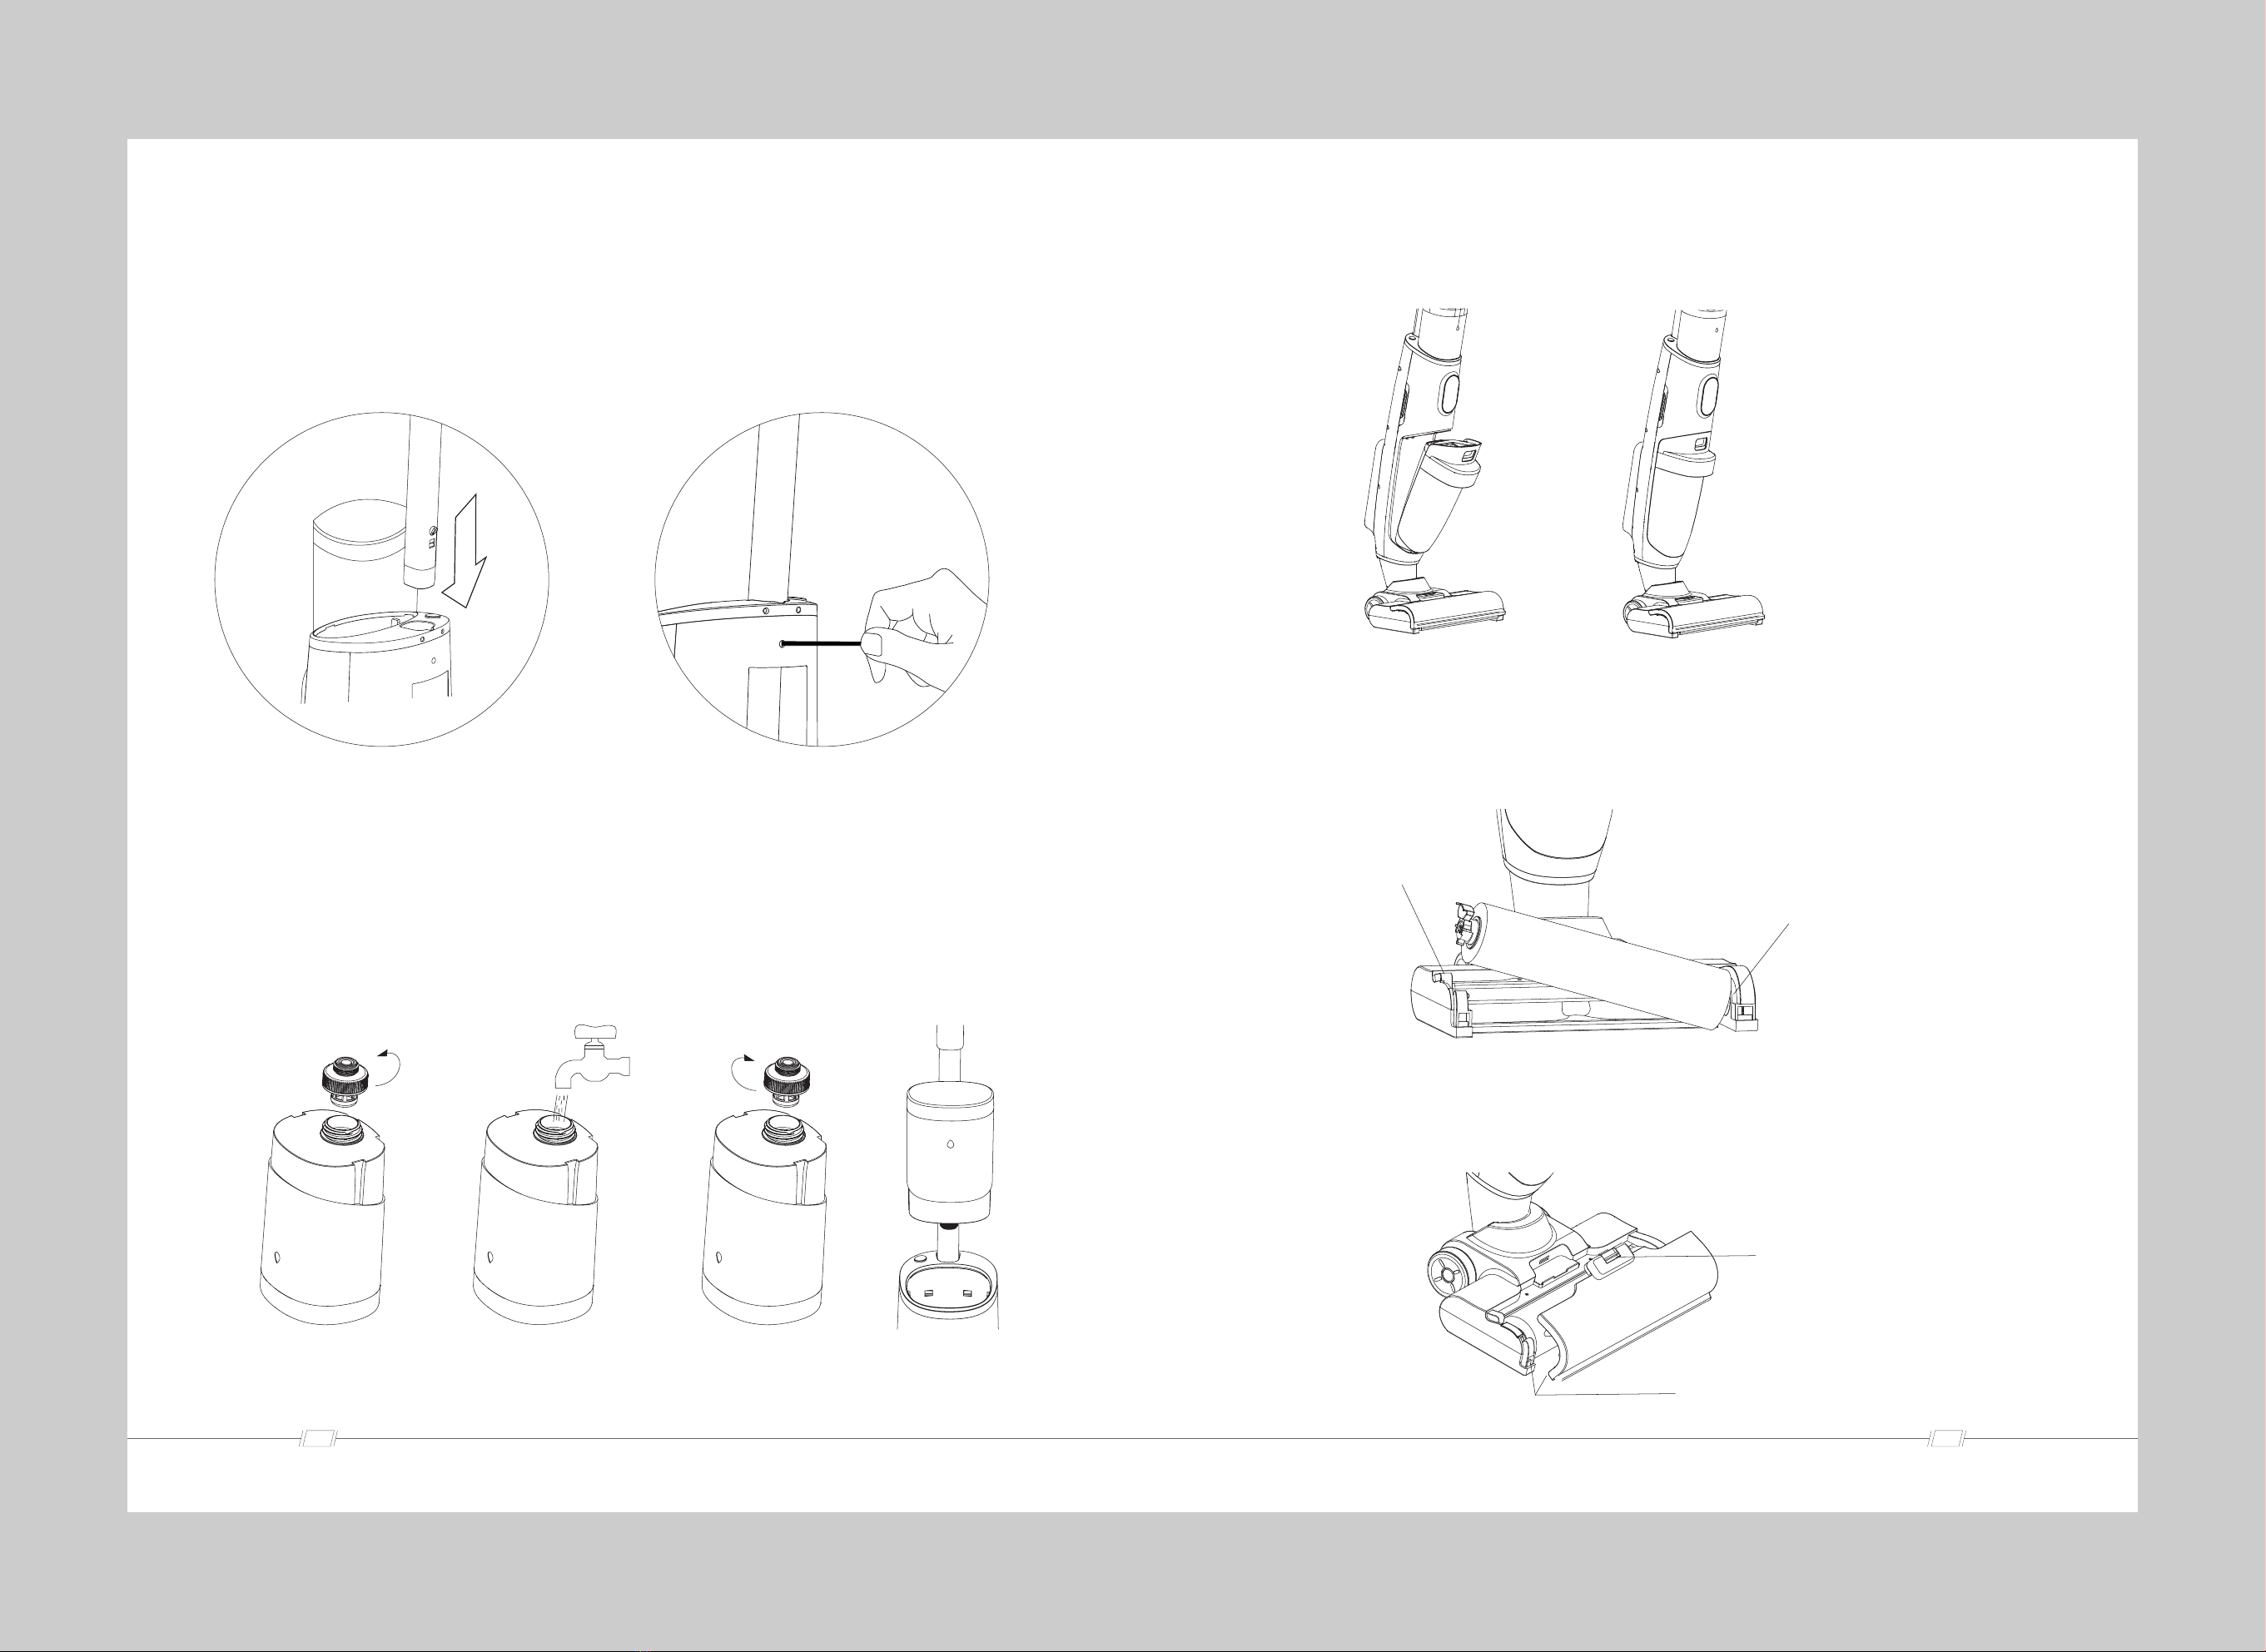
2.Clean water tank installation: unscrew the cover of the clean water
tank in accordance with figure
2.1 Below and load clean water, tighten the cover
of the clean water tank clockwise in accordance
with Figure
2.3 Put it into the clean water tank in accordance with
Figure 2.4, and hear a "click" to indicate that the
installation is in place.
Figure2.1 Figure2.2 Figure2.3 Figure2.4
3. Dirty water tank installation:as shown in figure
3.1 The bottom of the dirty water tank is placed at the opening of the body, and then pushed inward, and the
"click" sound is heard to indicate a successful installation.
Figure3.1 Figure3.2
4.Roller brush installation:
As shown in the figure below, please align the groove on the right side of the brush with the drive shaft and
then press down on the left side of the roller brush until it is installed.
Press down
Align the drive shaft
5.Roller brush transparent window installation:
As shown in the figure below, the first roller brush transparent window cover below the snap good,
the latch to the brush on the buckle, hear the "click" sound indicates that the installation in place.
Latch
Buckle position
info@altonindustries.com
09
08
https://www.altonindustries.com
How to Use
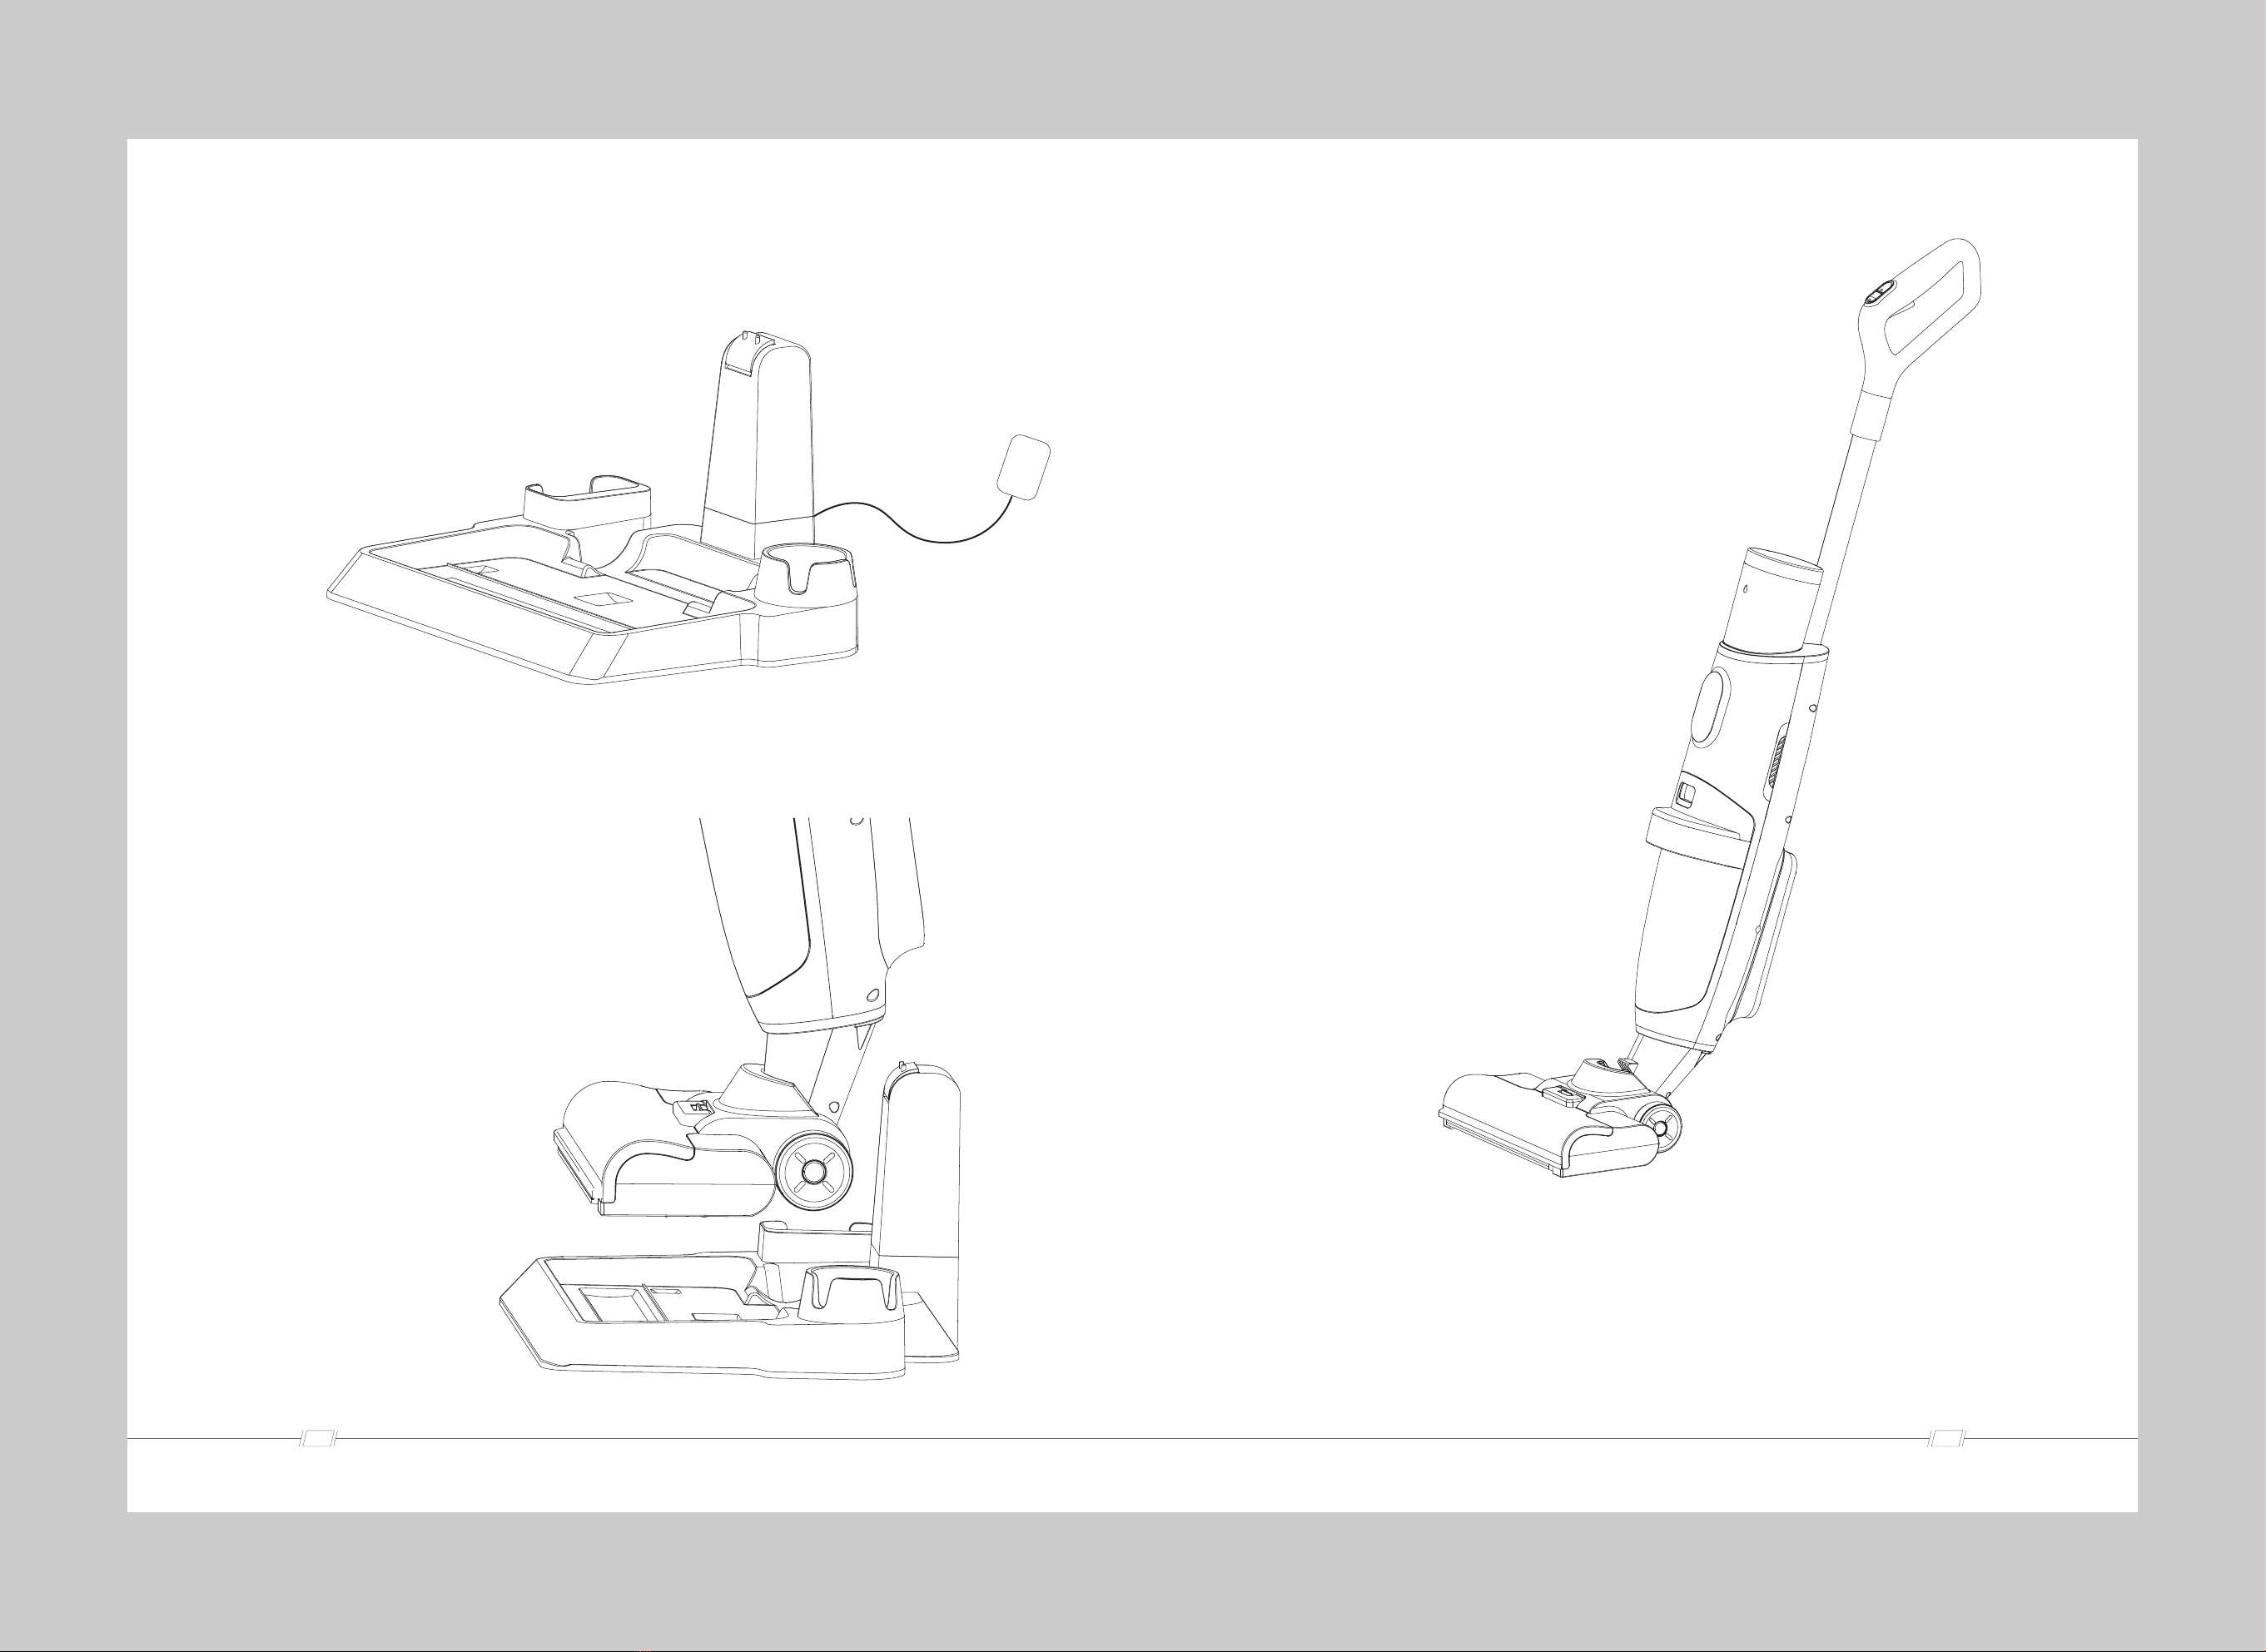
6.Self-cleaning and charging station installation:
1.Charging:
As shown in the figure below, align the machine with
the charging station, and the battery contact with
the charging station contact in place to start charging.
2.Self-cleaning:
When the machine is charging on the charging station,
press the self-cleaning button to enter the self-cleaning
mode. (Please make sure there is water in the clean
water tank while using).
3.Use:
Tilt the machine to the right angle and press the power
button to start working.
Warning:
-lf there is a large amount of foam in the dirty water tank during the working process, please clean up the dirty
water tank in time to avoid the water flowing to the fan motor.
-Prohibit fast pushing and pulling during the working process, so as not to cause the water flowing to the fan motor.
-While working, please be attentive to the dirt inside the dirty water tank, so as not to block the detector to affect the
full water detection.
-Please turn off the power before charging.
Insert the adapter charging port into the corresponding position of the charging
station and the adapter head into the home socket.
info@altonindustries.com

11
10
https://www.altonindustries.com
Product Maintenance and Care
*Please unplug the power supply, turn off the machine,
and remove the battery pack before maintenance and care.
1.Routine maintenance of dirty water tank: clean the dirty water tank and its shed immediately after each use,
avoiding to cause odor. Hold the dirty water tank handle by hand, press the lock buckle with thumb and pull the
dirty water tank out gently.
2.Routine maintenance of roller brush: please do the self-cleaning after each use. lf the roller brush is too dirty,
take out the roller brush according to the picture as below, and clean it by yourself.
Pull the roller brush buckle
3.HEPA daily maintenance: take out the HEPA from the dirty water tank as below, please place it in the air vent
to dry after cleaning.
Product Parameter
Model:WCVP02 Product dimensions(mm):1150*270*250
Working voltage(V):DC21.9V Noise(dB):70dB
Rated power(W):150W Adapter input:100-240V~50/60Hz 0.8A
Battery capacity(mAh):2600 Adapter output:DC 27V 0.8A
Cleaning water tank(ml):700 Charging time:4h
Dirty water tank(ml):500 Endurance:ECO mode 25min
Net weight(kg):3.9 Max mode 20min
*The above data are from our lab, actual usage may vary depending on the environment in which
it is used. Please refer to the actual use.
*Our company reserves the right to make any technical and design changes to the product due to
the continuous improvement of the product, and we reserve the rights to interpretation.
info@altonindustries.com

13
12
https://www.altonindustries.com
Cleaning / Replacement
Frequency Recommended
Part Cleaning/Replacement frequency recommended
Clean water tank Cleaning after each use
Dirty water tank Cleaning after each use
HEPA Cleaning after each use; Replacement every 3-6 months
Floater Cleaning after each use
Brush guard Cleaning after each use
lnfrared sensor Cleaning after each use
Roller brushes Cleaning after each use; Replacement every 3-6 months
Note:
Above frequency is only for your reference. The final cleaning/replacement frequency should depend on
the usage.
Trouble Shooting
Problems Possible reasons Solutions
Cleaner can not be charged.
The power supply does not
connect well.
Cleaner isn't connected well with
charging station.
Please check the connection of
power supply.
Please replace cleaner on the
charging station.
The handle control doesn't
work.
The battery capacity is low.
The handle doesn't connect well.
Please check the battery capacity and
fully charge it.
Please re-install the handle.
Cleaner doesn't work.
The dirty water tank is full.
The dirty water tank is not installed.
Roller brush is not installed.
Please empty the dirty water tank.
Please check and install the dirty
water tank.
Please check and install the roller brush.
The indicator display of clean
water tank is incorrect.
Take off the clean water tank, then
start to clean and spray, turn cleaner
off until draining the pipe. T hen press
the “Switch Button”and“Eco/Max
Button” for 5 seconds until the digital
display flash two times, then check
again.
Uncalibrated.
The vacuum is getting
weaker. The HEPA is wet.
The HEPA is blocked. Please check and clean the HEPA.
Please dry the HEPA first.
The clean water tank is
leaking.
The clean water volume is higher than
snuffle valve.
The clean water tank is not installed
well.
The cap is not screwed well.
Pour out water until the volume is
lower than snuffle valve.
Please re-install the water tank.
Please screw the cap well.
No water comes out when
spraying.
The clean water tank is empty.
The clean water tank is not installed
well.
Please fill up the clean water tank.
Please re-install the water tank.
No voice assistance. The voice function is switch off.
The version exclude voice.
Turn on the voice switch.
Please check and confirm withlocal
seller.
Cleaner doesn't work in
self-cleaning mode.
The dirty water tank is full.
Lack of water.
Please empty the dirty water tank.
Please fill up the clean water tank.
There are water drops at
air outlet.
The HEPA is not installed.
The HEPA is not dry.
Cleaner was tilted hard.
Cleaner vacuums the foam liquid.
Please check and install the HEPA.
Please dry the HEPA before use.
Use the machine correctly.
Empty the dirty water tank in time.
Cleaner moves hard. The roller brushed is not installed well. Please check and re-install the
roller brush as guide.
The indicator displays the dirty
water tank is full while it's not
The cleaner vacuums too much
foam liquid. Clean the foam liquid immediately
info@altonindustries.com

15
14
https://www.altonindustries.com
Fault Code Table
Error Code Causes Solutions
E2 Rechargeable battery
voltage is too low Replace the battery
Battery disconnect Replace battery
E1
E3 Rechargeable battery
voltage abnormal Replace the battery
E4 Temperature control of
battery is abnormal Replace the battery
E5 High discharging
temperature
Battery pack over temperature, do not use
until the battery temperature is restored
E6 High charging temperature Battery pack over temperature, do not charge
until the battery temperature is restored
E7 Low charging temperature Make sure the ambient temperature is
above 5℃
F1 Charging over-current Please confirm whether the charger is
original
F2 Short-circuit protection Please contact customer service
F3 Discharge Over-current Please contact customer service
F4 Roller brush discharge
Over-current
Check whether there is any foreign body to
be cleaned at the roller brush. If the fault
still exists, please contact customer service
F6 No dirty water installed Install dirty tank before use
Name and Content of
Hazardous Substances
Component
Content of hazardous substances
Plumbum
(Pb)
Mercury
(Hg)
Cadmium
(Cd)
Chromium VI
(Cr(VI))
Polybrominated
biphenyls
(PBB )
Polybrominated
biphenyls
ethers
(PBDE )
Plastic
Metal
Mercury(Hg)
Printed circuit
board assembly
Other metal
strutural parts
Standard parts
(screws/wash
ers, etc.)
O
O
O
O
O
O
O
O
O
O
O
O
O
O
O
O
O
O
X
O
O
O
X
X
O
O
O
O
O
O
O
O
O
O
O
O
This form is prepared in accordance with SJ/T 11364-2014.
O means that the content of the hazardous substance in all materials of the part is below the
limit requirements specified in GB/ T 26572-2011.
X means that the content of the hazardous substance in at least one homogeneous material
of the part exceeds the limit requirements specified in GB/ T 26572-2011.
X parts show that due to the current technical and technological level restrictions, it is
impossible to realize the complete replacement of non-environmental protection substances
or elements, and it will be gradually improved with the subsequent technical improvement.
* Means that only part of the model contains the component.
info@altonindustries.com

16
https://www.altonindustries.com
We reserve the right to changes in, text design, and technical
specifications which are subject to change without prior notice.
Recycling
The symbol on the product or its package indicates that this
product may not be treated as household waste. Instead, it
should be taken to the appropriate collection point for the
recycling of electrical and electronic equipment. By ensuring
this product is disposed of correctly, you will help prevent
potential negative consequences for the environment and
human health, which could otherwise be caused by inappropriate
waste handling of this product. For more detailed information
about recycling of this product, please contact your local
council, youe household waste disposal service or the shop
where you purchased the product.
The product meets all the requirements of the EU directives
applicable to the specific product.
Table of contents
Other Ecowell Vacuum Cleaner manuals


