Amibot Animal Premium User manual

EN
Vacuum cleaning robot
User Manual
Premium

EN
User Manual
Thank you for choosing AMIBOT! We hope you are fully satised
using your robot as part of your cleaning routine.
If you should encounter situations that have not been properly
addressed in this User Manual or were to have any queries, do not
hesitate to contact us and a member of our Technical Customer
Service Department will be more than happy to answer your
questions.
For more information, you can visit the ocial AMIBOT website:
www.amibot.tech
We reserve the right to make technical alterations to the appliance
without prior notice with the objective of continually improving our
products and customer satisfaction.
Please carefully read all instructions in this manual before using this
appliance. AMIBOT will not be liable for damage due to incorrect use.

1
Contents
EN
Recommendations ............................................................. 3
Product overview................................................................ 4
Product contents..................................................................................... 4
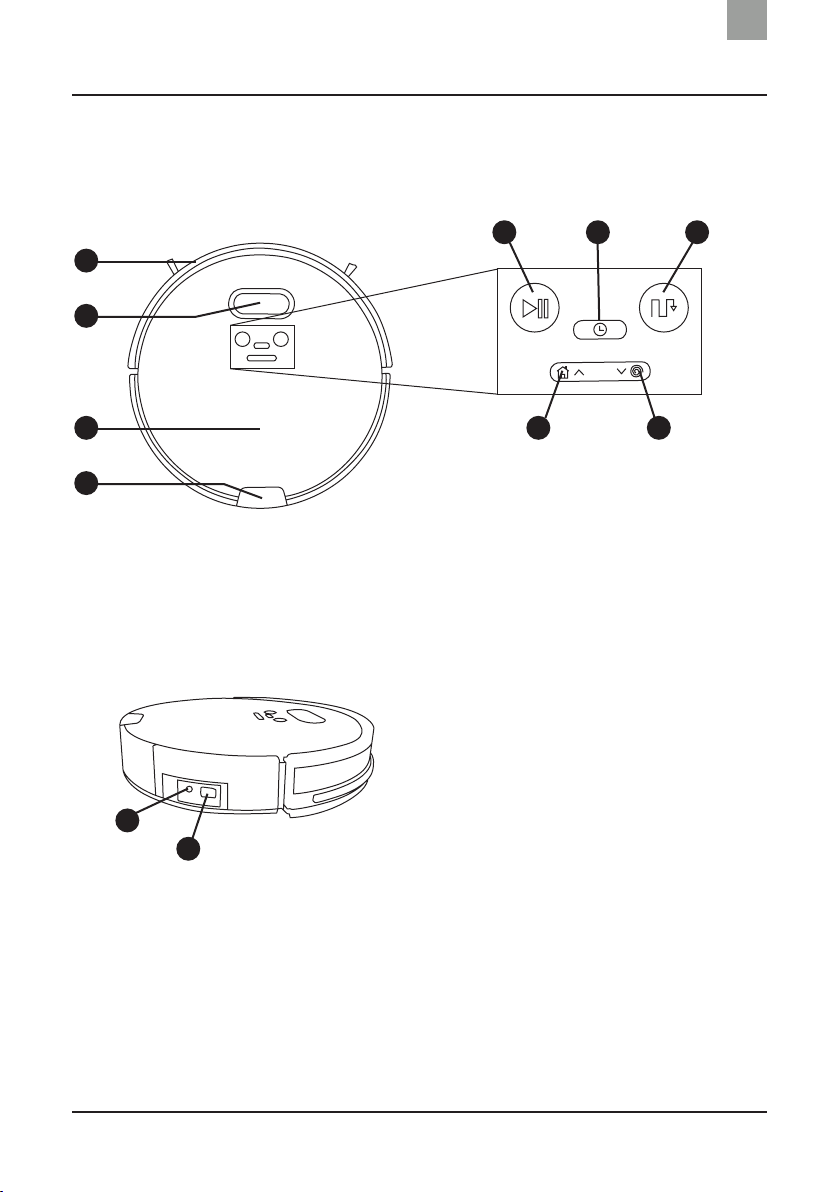
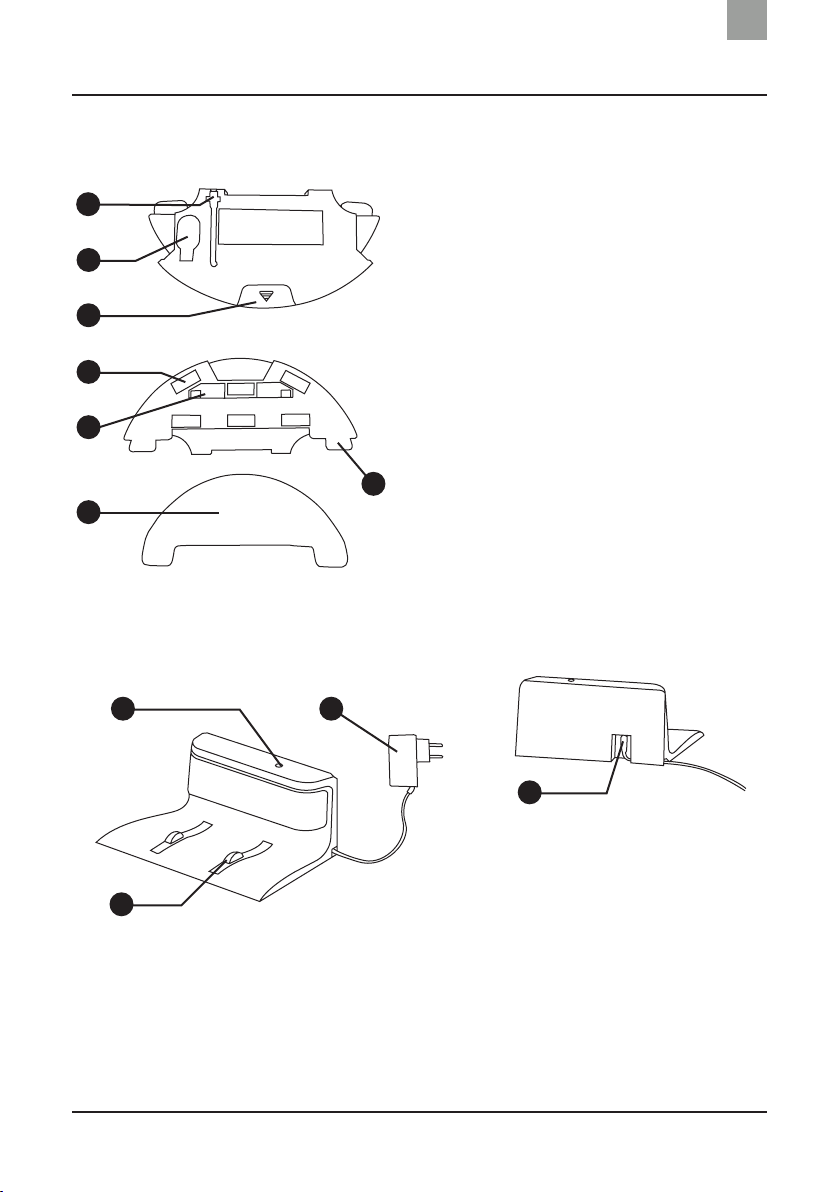
Product diagram ..................................................................................... 5
Operating the robot........................................................... 9
Charging the robot ................................................................................. 9
Vacuum mode (dust bin)...................................................................... 11
Mopping mode (H2O tank) .................................................................. 11
Starting the robot ................................................................................. 14
Scheduling the robot............................................................................ 14
Cleaning routes ..................................................................................... 18
Virtual wall ............................................................................................. 24
Pausing the robot ................................................................................. 25
Stopping the robot................................................................................ 25
Maintenance......................................................................26
Side brushes.......................................................................................... 26
Side wheels and castor ........................................................................ 26
Compartments and lters.................................................................... 27
Gap and power sensors ....................................................................... 29
Central Animal brush ........................................................................... 29
Microbre cleaning pads ..................................................................... 30
Indicator lights and sounds............................................31
Troubleshooting................................................................ 33
Tables: Malfunctions and possible causes......................................... 33
Warranty and after-sales service.................................. 38
Technical specications .................................................. 39

2
Contents
EN
Safety instructions and precautions............................40
Operating conditions............................................................................ 40
Recycling instructions .....................................................42

3
Recommendations
EN
• AMIBOT Animal Premium is designed to be used inside.
• AMIBOT Animal Premium is designed for a maximum surface
area of 200m2.
• AMIBOT Animal premium is designed for routine oor cleaning. It
is not intended to replace heavy-duty cleaning.
• AMIBOT Animal Premium needs a headway of at least 8cm so
that it can go under furniture.
• AMIBOT Animal Premium cannot go over thresholds over 1cm
thick, otherwise it automatically stops or reverses.
• AMIBOT Animal Premium is not designed to be used on long-pile
carpets, which could cause the robot to freeze or reverse.
• AMIBOT Animal Premium must be used on at surfaces.
• If the robot could come across a gap while cleaning, please check
that the gap sensors are clean.
• AMIBOT Animal Premium is not designed to vacuum water or
other liquid products.
• Do not use the appliance on damp oors.
• Please switch o the appliance before handling it (manually
moving it, maintenance, cleaning).
• The remote control requires 2 x LR03-type batteries (AAA). They
are not supplied with the robot.

4
Product overview
EN
Product contents
1. AMIBOT Animal Premium
robot
2. H2O tank
3. 2 x microbre cleaning pads
4. Cleaning tool
5. Remote control (batteries
not included)
6. Dust bin
7. 3 x HEPA lters
8. 4 x side brushes
9. Home base
10. Power adapter
11. 1 Animal Brush
12. 1 Virtual wall (batteries not
included)
13. User manual
1
2 3
4
7
5
6
8 9
10
11 12 13

5
Product overview
EN
Product diagram
Robot top view
1
2
8
53
1. Bumper
2. LCD display screen
3. AUTO button
4. CLOCK button
5. Mapping Mode button
6. HOME button / Up arrow
7. SPOT Mode button / Down
arrow
8. Integrated gyroscope
9. Dust bin/H20 tank
10
11
10. Power plug
11. ON/OFF button
9
4
6 7

6
Product overview
EN
Robot bottom view
1
3
4
1. Power sensors
2. Side brushes
3. Battery cover
4. Gap sensors
5. Side wheels
6. Castor
7. Central Animal brush
8. Central Animal brush cover
9. Dust bin/H20 tank
5
2
6
7
8
9
Dust bin
1. Dust bin cover
2. Dust bin release button
3. HEPA lter
4. Protection lter
5. Prelter
1
2
3
4
5

7
Product overview
EN
Home base
1. Power indicator light
2. Power adapter
3. Charging poles
4. Power plug
1 2
3
4
H2O tank
1
2
3
4
5
6
7
1. H2O tank sensor
2. Rell nozzle
3. H2O tank release button
4. Cleaning pad Velcros
5. Drip nozzles
6. Cleaning pad support
7. Cleaning pad

8
Product overview
EN
Remote control
1
2
3
4
5
6 7
1. HOME button
2. Directional arrows
3. AUTO Mode button
a. Pause/Resume
4. MAX button
5. Mapping Mode button
6. SPOT Mode button
7. EDGE Mode button
Virtual wall
1
2
3
1. ON/OFF button
2. Power indicator light
3. Infrared ray

9
Operating the robot
EN
Charging the robot
Assembling the home base
Plug in the home base using the power cable.
Place the home base on a level surface next to a wall, at a right angle
to the oor. Keep a distance of at least 2m in front of the base and
1m at either side.
NOTE: When your AMIBOT Premium robot is on its home base, make sure that your
robot is switched on and the home base power light is on.
Switching the robot on
Turn the power switch to ON. "I" is ON and "O" is OFF. The robot is
ready to be charged.
1 m 1 m
2 m
a

10
Operating the robot
EN
Charging the robot
Figure 1 Figure 2
There are two ways to charge the battery:
• using the home base (Figure 1).
• using the power adapter (Figure 2).
NOTES:
• Before using the robot for the rst time, you must charge it for at least 12 hours.
It will only need to be charged for between 300 and 350 minutes thereafter.
• The robot must be switched on while it is being charged.
• Do not place a mirror or other highly reective object within a distance of at
least 15cm from the home base.
• The robot is charging when the orange AUTO light ashes. Once charged, the
AUTO light turns steady green.
• When the battery is charged, the robot switches to stand-by after a few min-
utes. The green light turns o.
• If the battery is weak while the robot is cleaning, it returns to its home base. The
home base must therefore be switched on.
• If the robot is not used for a long period of time, you are recommended to fully
charge the battery, switch o the robot and store it in a cool, dry place.

11
Operating the robot
EN
Vacuum mode (dust bin)
To use the vacuum mode, attach the dust bin to the back of the ap-
pliance.
Mopping mode (H2O tank)
Attaching the cleaning pad
Figure 1
Attach the cleaning pad (Figure
1) to the H20 tank using the Vel-
cros on the underneath (Figure
2) then attach each side to the
cleaning pad supports (Figure 3).
Figure 2
Figure 3

12
Operating the robot
EN
Preparing the H2O tank
Open the H2O tank's rell nozzle and carefully pour in clean water
with some oor cleaner.
NOTES:
• The H2O tank has a maximum capacity of 300ml. For optimum performance, it
must have at least 50ml of liquid.
• For optimum cleaning, check the dilution ratio indicated on the detergent bot-
tle.
• Only use oor cleaner. Prolonged use of any other product, such as white vine-
gar or bleach, could damage the H2O tank.

13
Operating the robot
EN
The vacuum mode stops when the cleaning mode is selected; the
vacuum stops when the robot detects the water compartment.
Clip it to the back of the robot. The robot automatically detects the
water tank thanks to its tank sensor. The robot is ready to start its
cleaning cycle. During its cycle, the robot cleans 7mx7m areas.
NOTES:
• The AUTO mode cannot be accessed when the robot is in Mopping Mode.
• You can regulate the H2O tank's water ow intensity by pressing the MAX but-
ton and selecting the desired intensity from 1 to 3.
• Do not use the H2O tank to clean rugs or carpets.
• The H2O tank must be removed from the robot before it is charged.
• The dust remaining on the oor is picked up in the part of the tank intended for
the purpose as the central brush rotates.
• To allow vacuum mode to work, please refer to Vacuum Mode (page 10).
Inserting the H2O tank

14
Operating the robot
EN
Starting the robot
Attach the dust bin and switch the robot on. Press the AUTO button
on the robot or on the Remote Control. The robot starts its cleaning
cycle in AUTO Mode.
NOTES:
• When the robot leaves the home base, it beeps 5 times. Depending on the
Mode selected, the AUTO or Mapping Mode light ashes green, then the robot
starts. The light is continuous green and the mode appears on the LCD display
screen.
• If the water tank is attached, the robot starts its cleaning cycle in Mapping Mode.
• If the robot is on standby, press the AUTO button on the robot or on the Re-
mote Control to start a cleaning cycle.
• The robot's cycle can be interrupted and it can be manually controlled using
the remote control. When you reactivate automatic cleaning, the robot starts
a new path.
Scheduling the robot
With the daily schedule feature, the robot can start a cleaning cycle
at the time and on the days you choose. You can reset the time and
scheduled times whenever you want via the button on robot.
Setting the time
The robot must not be on standby to set the time. Therefore, press
the AUTO button.

15
Operating the robot
EN
Press the AUTO button to validate the time (Figure 3). A beep indicates
that the time is set.
NOTES:
• If no action is performed for more than 15 seconds when setting the time, the
robot leaves the setting mode.
• Press the AUTO button to validate the time, otherwise it will not be set.
Figure 1
Figure 2
Figure 3
Press the CLOCK button on the
top of the appliance for around
3 seconds (Figure 1). The robot
beeps and the display screen
ashes.
Use the up/down arrows to
modify the hour and minutes
(Figure 2). Press the CLOCK
button to switch from hours
to minutes, then the day of the
week and 12/24hr display.
Press the Mapping Mode button
to switch between 12 hr and
24hr display. Press the Mapping
Mode button once to set the
12 hr display; "ON" appears on
the screen. Press the Mapping
Mode button again to switch to
24 hr mode; "OFF" appears on
the screen.

16
Operating the robot
EN
Setting a schedule
Figure 1 Figure 2
Figure 3 Figure 4
Press the CLOCK button on the appliance (Figure 1). You will hear a
beep and a clock symbol and "MON" will ash on the display screen
(Figure 2).
Use the up/down buttons to choose the schedule day (Monday to
Sunday). Press the CLOCK button again to set the hour and minutes
of the day selected.
You can schedule several cleaning times by repeating the operation
as many times as necessary (you can schedule up to 7 days).
Press the AUTO button to validate the week's schedule (Figure 3).
The robot will start its cleaning cycle as scheduled.

17
Operating the robot
EN
Press the CLOCK button to cancel a cleaning schedule. You will hear a
beep and a clock symbol and "MON" will ash on the display screen.
Press on the Mapping Mode button to reset the scheduled time to
be shown as “ --:-- “ (Figure 4). Press this button again to see the
most recent settings. Repeat this action for all the recorded cleaning
schedules. Use the up/down arrows to switch from one cleaning
schedule to another. Press the AUTO button to validate.
NOTES:
• If no action is performed for more than 15 seconds when setting the time, the
robot leaves the setting mode.
• Press the AUTO button to validate the time or it will not be set.
• Scheduled cleaning and the Remote Control times are cancelled when the
batteries are changed. Reset the time and scheduled cleaning time as above.

18
Operating the robot
EN
Cleaning routes
The robot has six cleaning modes. These modes can be selected
using the Remote Control. You can also select the following 4 modes
directly using the buttons on the robot: AUTO, Mapping, SPOT and
HOME.
AUTO Mode
Figure 1
Figure 3
Figure 4
Press the AUTO button on the
robot or on the Remote Control
(Figure 1). The AUTO light is
continuous green and AUTO
Mode appears on the display
screen (Figure 2). The robot
analyses the surface area and
along the walls to mark out the
area it will clean.
It then cleans the entire area alternating between all of its cleaning
modes. "AUTO" and the mode that is in process appears on the
display screen (Figure 3).
This cleaning mode is recommended for open spaces and rooms
with carpets (Figure 4).
Figure 2
Table of contents
Languages:
Other Amibot Vacuum Cleaner manuals

Amibot
Amibot Prime User manual

Amibot
Amibot vision User manual

Amibot
Amibot Spirit LASER User manual

Amibot
Amibot Spirit MOTION User manual

Amibot
Amibot Pulse User manual

Amibot
Amibot Spirit LASER User manual

Amibot
Amibot signature JUNGLE User manual

Amibot
Amibot Spirit PREMIUM User manual

Amibot
Amibot Prime 2 User manual

Amibot
Amibot Swift User manual

Amibot
Amibot Swip AS70 User manual

Amibot
Amibot AG30 User manual

Amibot
Amibot flex Laser User manual

Amibot
Amibot Animal Motion User manual

Amibot
Amibot PURE LASER User manual

Amibot
Amibot Spirit ICE User manual

Amibot
Amibot Animal User manual

Amibot
Amibot Animal XL User manual

Amibot
Amibot glass AG31 User manual

Amibot
Amibot Swift User manual