EDAN SONOTRAX Lite User manual


I
About this Manual
P/N: 01.54.455405-11
Release Date: July 2012
© Copyright EDAN INSTRUMENTS, INC. 2012. All rights reserved.
Statement
This manual will help you understand the operation and maintenance of the product better. It
is reminded that the product shall be used strictly complying with this manual. User’s
operation failing to comply with this manual may result in malfunction or accident for which
Edan Instruments, Inc. (hereinafter called EDAN) can not be held liable.
EDAN owns the copyrights of this manual. Without prior written consent of EDAN, any
materials contained in this manual shall not be photocopied, reproduced or translated into
other languages.
Materials protected by the copyright law, including but not limited to confidential information
such as technical information and patent information are contained in this manual, the user
shall not disclose such information to any irrelevant third party.
The user shall understand that nothing in this manual grants him, expressly or implicitly, any
right or license to use any of the intellectual properties of EDAN.
EDAN holds the rights to modify, update, and ultimately explain this manual.
Responsibility of the Manufacturer
EDAN only considers itself responsible for any effect on safety, reliability and performance
of the equipment if:
Assembly operations, extensions, re-adjustments, modifications or repairs are carried out by
persons authorized by EDAN, and
The electrical installation of the relevant room complies with national standards, and
The instrument is used in accordance with the instructions for use.
Upon request, EDAN may provide, with compensation, necessary circuit diagrams, and other
information to help qualified technician to maintain and repair some parts, which EDAN may
define as user serviceable.
Product Information
Product Name: Ultrasonic Pocket Doppler
Model: SONOTRAX Lite, SONOTRAX Basic, SONOTRAX Basic A, SONOTRAX Pro,
SONOTRAX II, SONOTRAX II Pro, SONOTRAX Vascular

II
Terms Used in this Manual
This guide is designed to give key concepts on safety precautions.
WARNING
A WARNING label advises against certain actions or situations that could result in personal
injury or death.
CAUTION
A CAUTION label advises against actions or situations that could damage equipment,
produce inaccurate data, or invalidate a procedure.
NOTE
A NOTE provides useful information regarding a function or a procedure.

III
Table of Contents
Chapter 1 Safety Guide............................................................................................................ 1
1.1 Intended Use.................................................................................................................. 1
1.2 Safety Precautions ......................................................................................................... 1
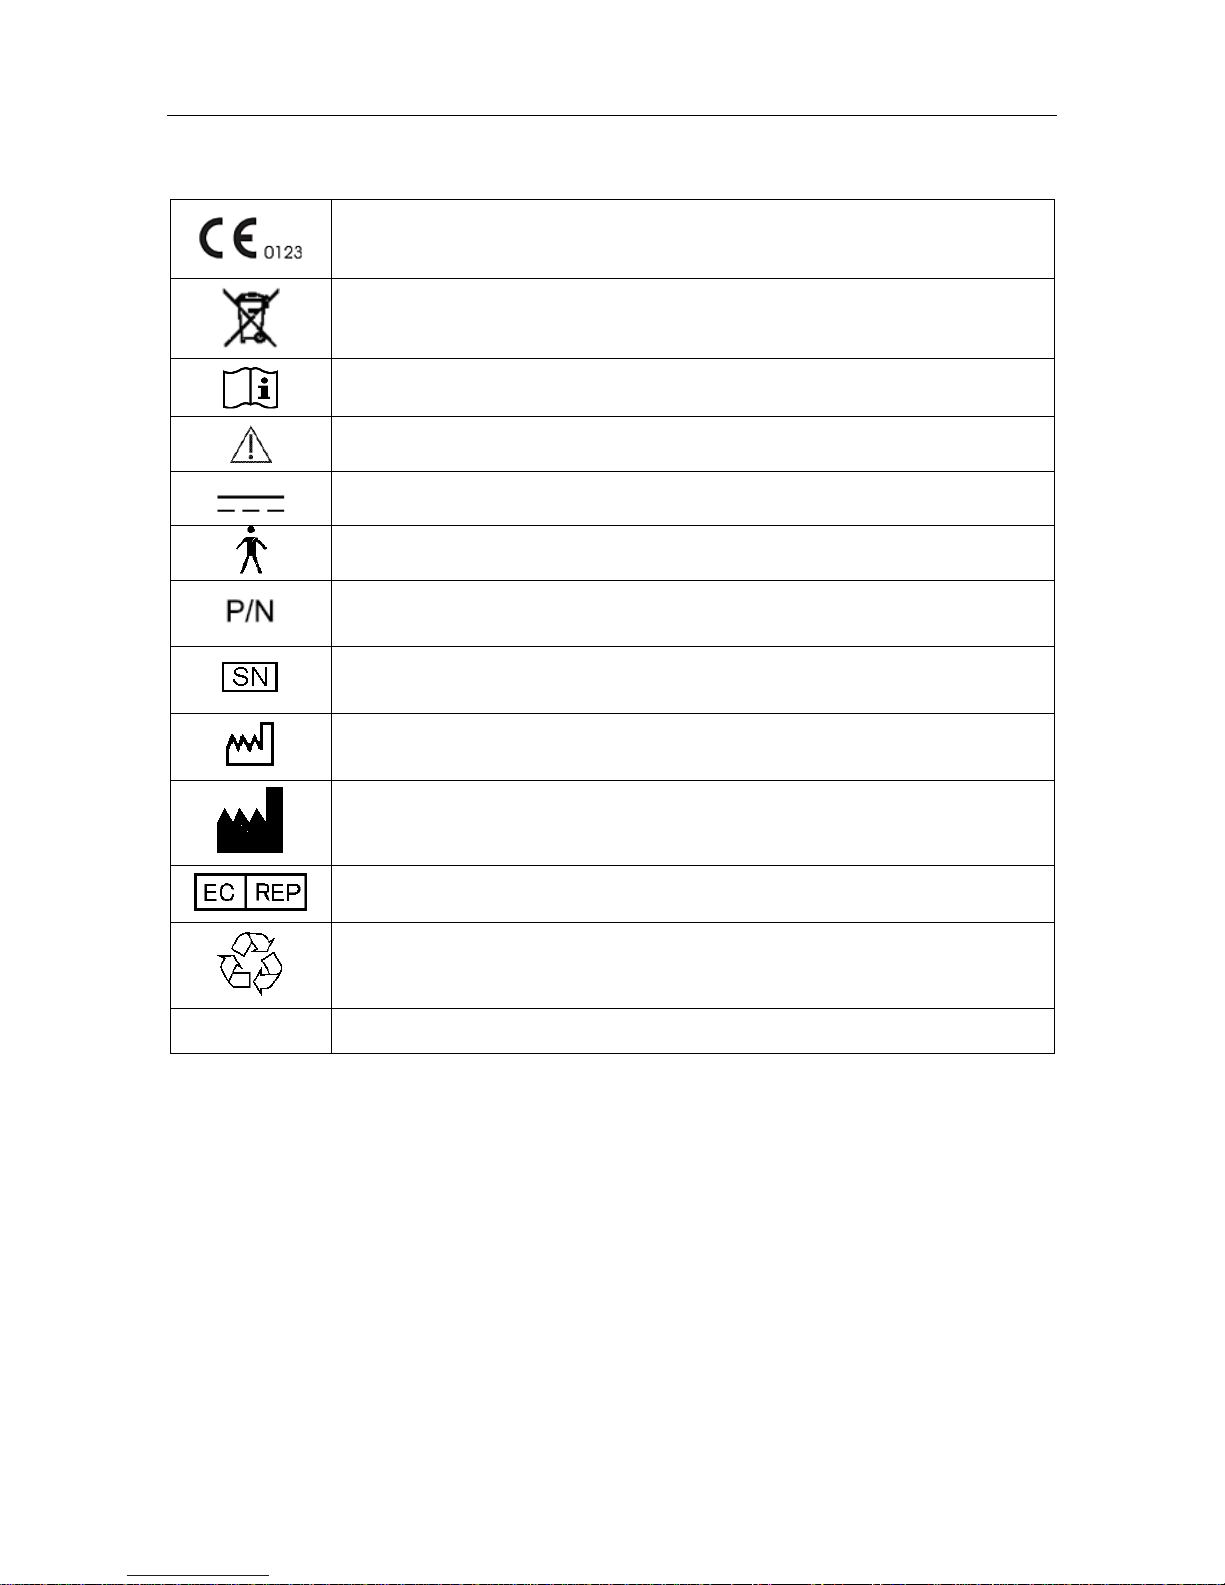
1.3 Symbols......................................................................................................................... 4
Chapter 2 Doppler and Accessories........................................................................................ 5
2.1 Features ......................................................................................................................... 5
2.2 Main Unit ...................................................................................................................... 6
2.2.1 Appearance.......................................................................................................... 6
2.2.2 Display Panel....................................................................................................... 7
2.2.3 Buttons ................................................................................................................ 8
2.2.4 Socket .................................................................................................................. 8
2.2.5 Probe Socket........................................................................................................ 9
2.2.6 Batteries............................................................................................................. 10
2.3 Probes .......................................................................................................................... 10
2.3.1 Waterproof Obstetrical Probes.......................................................................... 10
2.3.2 Waterproof Vascular Probes ............................................................................. 11
Chapter 3 Basic Operation .................................................................................................... 12
3.1 Opening the Package and Checking............................................................................ 12
3.2 Installing/Replacing Battery........................................................................................ 12
3.3 Probe Operation........................................................................................................... 14
3.4 Switching on................................................................................................................ 16
3.5 Selecting Work Mode.................................................................................................. 16
3.6 Enabling or Disabling Backlight ................................................................................. 16
3.7 Switching Off .............................................................................................................. 17
3.8 Replacing/Charging the Battery.................................................................................. 17
3.8.1 Battery Energy Indication ................................................................................. 17
3.8.2 Replacing Alkaline Batteries............................................................................. 17
3.8.3 Charging the NI-MH Batteries.......................................................................... 18
3.8.4 Charging NI-MH Battery Pack ......................................................................... 19
Chapter 4 Examining .............................................................................................................20
4.1 FH Examining ............................................................................................................. 20
4.2 FH Sound Recording and Playing............................................................................... 21
4.3 FH Sound Recording by PC ........................................................................................ 22
4.3.1 Recording Sounds ............................................................................................. 22
4.3.2 Playing Sound Files........................................................................................... 24
4.3.3 Burning CD or Sending in Email ...................................................................... 24
4.3.4 Record Troubleshooting.................................................................................... 24
4.4 Vascular Examining (Optional) .................................................................................. 26
4.5 Completing Examining ............................................................................................... 28

IV
Chapter 5 Product Specifications ......................................................................................... 29
Chapter 6 Maintenance ......................................................................................................... 33
6.1 Maintenance ................................................................................................................ 33
6.2 Cleaning ...................................................................................................................... 33
6.3 Disinfection of the Probe............................................................................................. 33
Chapter 7 Warranty and Service.......................................................................................... 35
7.1 Warranty...................................................................................................................... 35
7.2 Contact information..................................................................................................... 35
Appendix 1 Ordering Information ....................................................................................... 36
Appendix 2 EMC Information-Guidance and Manufacture’s Declaration ..................... 37
A2.1 Electromagnetic Emissions - for all Equipment and Systems.................................. 37
A2.2 Electromagnetic Immunity - for all Equipment and Systems .................................. 37
A2.3 Electromagnetic Immunity - for all Equipment and Systems that are not
Life-supporting.................................................................................................................. 38
A2.4 Recommended Separation Distances ....................................................................... 39
Appendix 3 Overall Sensitivity.............................................................................................. 40

SONOTRAX Series Ultrasonic Pocket Doppler User Manual Safety Guide
- 1 -
Chapter 1 Safety Guide
NOTE:
This user manual is written to cover the maximum configuration. Therefore, your model
may or may not have some of the parameters and functions described, depending on
what you have ordered.
1.1 Intended Use
The SONOTRAX Series Ultrasonic Pocket Dopplers (hereinafter called “the Doppler”) are
intended to be used by health care professionals including registered nurses, practical nurses,
midwives, ultrasound technicians, and physician assistants, by prescription from licensed
physicians in hospitals, clinics and private offices.
The 2 MHz and/or 3 MHz waterproof probes are indicated for the detection of fetal heart rate
from early gestation thru delivery and as a general indication of fetal well being. They can also be
used to verify fetal heart viability following patient trauma.
The 4 MHz, 5 MHz and/or 8 MHz waterproof vascular probes are indicated for the detection of
blood flow in veins and arteries for assisting in the detection of peripheral vascular disease.
1.2 Safety Precautions
This unit is internally powered equipment, and it is an IEC/EN 60601-1 Type B applied
part. Type B protection means that the connection between the equipment and personnel
complies with permitted leakage currents and dielectric strength of IEC/EN 60601-1.
WARNING and CAUTION messages must be observed. To avoid the possibility of injury,
observe the following precautions during the operation of the device.
WARNING
1 The Doppler is a tool to aid the healthcare professional and should not be used in
place of normal fetal monitoring. It is not intended for treatment.
2 This device is not explosion-proof and can not be used in the presence of flammable
anaesthetics.
3 Do not touch the signal input/output connector and the patient simultaneously.
4 We recommend that exposure to ultrasound should be kept as low as reasonably
achievable. This is considered to be good practice and should be observed at all
time.
5 Only use the probes provided by the manufacturer.
6 Do not throw batteries in fire as this may cause explosion.

SONOTRAX Series Ultrasonic Pocket Doppler User Manual Safety Guide
- 2 -
WARNING
7 Do not attempt to charge normal alkaline batteries. They may leak, catch fire or even
explode.
8 Remove the batteries and store it at a cool and dry environment if the monitor is not
used for a long time.
9 If the rechargeable batteries are stored alone and not used for a long time, we
recommend that the batteries should be charged at least once every 6 months to
prevent overdischarge.
10 The rechargeable NI-MH batteries and battery pack should be charged by using the
dedicated adapters supplied by the manufacturer.
11 SHOCK HAZARD - Do not attempt to connect or disconnect a power cord with wet
hands. Make certain that your hands are clean and dry before touching a power
cord.
12 Do not connect any equipment or accessories that are not approved by the
manufacturer or that are not IEC 60601-1 approved to the device. The operation or
use of non-approved equipment or accessories with the device is not tested or
supported, and device operation and safety are not guaranteed.
13 Accessory equipment connected to the analog and digital interfaces must be
certified according to the respective IEC/EN standards (e.g. IEC/EN 60950 for data
processing equipment and IEC/EN 60601-1 for medical equipment). Furthermore all
configurations shall comply with the valid version of the system standard IEC/EN
60601-1-1. Anybody who connects additional equipment to the signal input
connector or signal output connector to configure a medical system must ensure that
the system complies with the requirements of the valid version of the system
standard IEC/EN 60601-1-1. If in doubt, consult our technical service department or
your local distributor.
14 Replacement or charging of the battery shall be done at least 1.5 meters away from
patients.
CAUTION
1 Federal (U.S.) law restricts this device to sale by or on the order of a physician.
2 Refer servicing to qualified personnel.
3 The main unit is designed for continuous operation and is ‘ordinary’. Do not immerse
it in any liquid (i.e. not drip or splash-proof).
4 Keep the device in a clean environment and avoid vibration during storage.
5 Do not disinfect or sterilize the Doppler.
6 Electromagnetic Interference - Ensure that the environment in which the device is
operated is not subject to any source of strong electromagnetic interference, such as
radio transmitters, mobile telephones, etc.

SONOTRAX Series Ultrasonic Pocket Doppler User Manual Safety Guide
- 3 -
CAUTION
7 Prior to examination using the Doppler, check for visible damages of the main unit
and the probe that may endanger the patient/operator or machine performance. If
the damage is found, replace them with good ones at once.
8 The following safety checks should be performed once every two years or as
specified in the institution’s test and inspection protocol by a qualified person who
has adequate training, knowledge, and practical experience to perform these tests.
Inspect the equipment for mechanical and functional damage.
Inspect the safety relevant labels for legibility.
Verify that the device functions properly as described in the instructions for use.
Test the the pregnant woman’s leakage current according to IEC 60601-1: Limit:
d.c 10 µA, a.c 100 µA.
The leakage current should never exceed the limit. The data should be recorded in
an equipment log. If the device is not functioning properly or fails any of the above
tests, the device has to be repaired.
9 When the battery is charged, used or stored, keep it away from objects or materials
with static electric charges.
10 If rechargeable batteries are used, charge them fully before initial use by using the
method introduced in this manual.
11 Do not short-circuit the batteries or install the batteries reversely.
12 Store the batteries in a cool and dry environment.
13 Do not mix the batteries with metal objects to avoid short-circuit.
14 The device shall only be used when the battery cover is closed.
15 Batteries have life cycles. The alkaline batteries are intended to be used once. If the
time that the Doppler using NI-MH battery becomes much shorter than usual, the
battery life is at an end. Replace them with a new same one provided or
recommended by the manufacturer.
16 The device and accessories are to be disposed of according to local regulations after
their useful lives. Alternatively, they can be returned to the dealer or the
manufacturer for recycling or proper disposal. Batteries are hazardous waste. Do
NOT dispose them together with house-hold garbage. At the end of their life hand
the batteries over to the applicable collection points for the recycling of waste
batteries. For more detailed information about recycling of this product or battery,
please contact your local Civic Office, or the shop where you purchased the product.

SONOTRAX Series Ultrasonic Pocket Doppler User Manual Safety Guide
- 4 -
1.3 Symbols
The symbol indicates that the device complies with the European Council
Directive 93/42/EEC concerning medical devices.
The symbol indicates that the device should be sent to the special agencies
according to local regulation for separate collection after its useful life.
Consult Instructions for Use
Attention.
Direct current
Type B applied part.
Part Number
Serial Number
Date Of Manufacture
Manufacturer
Authorized Representative in the European Community
General symbol for recovery / recyclable
Rx only (U.S.) Federal (U.S.) Law restricts this device to sale by or on the order of a physician

SONOTRAX Series Ultrasonic Pocket Doppler User Manual Doppler and Accessories
- 5 -
Chapter 2 Doppler and Accessories
2.1 Features
There are seven different models available: SONOTRAX Lite, SONOTRAX Basic,
SONOTRAX Basic A, SONOTRAX Pro, SONOTRAX II, SONOTRAX II Pro and
SONOTRAX Vascular.
SONOTRAX Lite and SONOTRAX Vascular are for simple auscultation (intermittent
listening). SONOTRAX Basic, SONOTRAX Basic A, SONOTRAX Pro, SONOTRAX II,and
SONOTRAX II Pro not only detect fetal heart sound; they also display the fetal heart rate on a
LCD screen.
The features of the Dopplers are listed in the following chart:
Model
Function
SONOTRAX
Vascular
SONOTRAX
Lite
SONOTRAX
Basic
SONOTRAX
Basic A
SONOTRAX
Pro
SONOTRAX
II
SONOTRAX
II Pro
LCD Display - - √√√√√
LCD Backlight - - - √√√√
Mini USB Probe
Socket √√√√√√√
Probe Detecting √√√√√√√
Probe Identifying - - √√√√√
Audio Play √√√√√√√
Attached Earphone √√√√√√√
Volume Adjustable √√√√√√√
Modes Switching - - √√√√√
Audio Recording
and Playing - - - - √- √
Powered by Alkaline
Batteries √√√√√- -
Powered by
Rechargeable
NI-MH Batteries
* * * * * - -
Powered by NI-MH
Battery Pack - - - - - √√
Low Battery
Detecting &
indicating
√√√√√√√
Auto Shutdown - - √√√√√
Vascular Examining √******

SONOTRAX Series Ultrasonic Pocket Doppler User Manual Doppler and Accessories
- 6 -
√= configured - = not available * = available
2.2 Main Unit
NOTE:
The pictures and interfaces in this manual are for reference only.
2.2.1 Appearance
Take 2.0MHz obstetrical probe for example.
Figure 2-1 Front Panel Figure 2-2 Rear Panel
7 8 9 10 11
Figure 2-3 Top Panel Figure 2-4 Left Panel
1 Display Panel 2 POWER Button 3 Speaker
4 Probe Socket 5 Probe Holder 6 Battery Compartment
7 Charge Indicator/
Power Indicator
8 Earphone Socket 9 Charge Socket
10 Volume Control 11 Buttons
1
2
3
4
5
6

SONOTRAX Series Ultrasonic Pocket Doppler User Manual Doppler and Accessories
- 7 -
2.2.2 Display Panel
SONOTRAX Lite and SONOTRAX Vascular have a LED in the bottom left corner of its
display panel area. When powered on, the LED turns green. If the LED flashes in green, it
indicates that the probe is disconnected or poorly connected. If the LED flashes in orange, it
indicates that the battery is too low to support working. Change for a new battery or charge the
rechargeable battery in time.
For SONOTRAX Basic, SONOTRAX Basic A, SONOTRAX Pro, SONOTRAX II and
SONOTRAX II Pro, the LCD is shown as follows:
1 2 3 4
5 6 7
Figure 2-5 LCD
Item Screen Element Description
1
FHR Refresh Frequency
2
Working Mode
3 Playing Indicator
4 Recording Indicator
5
Battery Indicator

SONOTRAX Series Ultrasonic Pocket Doppler User Manual Doppler and Accessories
- 8 -
6
Numeric FHR
7
Probe Type
2.2.3 Buttons
At most there are three push buttons (MODE, START/STOP and REC/PLAY) and a volume
control button on the main unit of the Doppler. Their primary functions are as follows:
(1) MODE Button
(Only for SONOTRAX Basic / SONOTRAX Basic A / SONOTRAX Pro / SONOTRAX II /
SONOTRAX II Pro)
Function: Select the working mode.
(2) START/STOP Button
(Only for SONOTRAX Basic / SONOTRAX Basic A / SONOTRAX Pro / SONOTRAX II /
SONOTRAX II Pro)
Function: Start/ stop examining (Mode 3)/ setting (Mode 4 and Mode 5).
(3) REC/PLAY
(Only for SONOTRAX Pro/ SONOTRAX II Pro)
Function: Start/ stop recording or playing fetal heart sound.
(4) Volume Control Indicator
Function: Adjust volume. Rotate the volume gear toward “+” to turn up the volume, while
rotate it toward “-” to turn down the volume.
2.2.4 Socket
The two sockets are located on the top panel of the Doppler.
(1) Earphone socket :for outputting audio signals, the earphone or line-in cable connects to
the Doppler via this socket.

SONOTRAX Series Ultrasonic Pocket Doppler User Manual Doppler and Accessories
- 9 -
(2) Charge socket :for charging the NI-MH battery pack, the dedicated charger connects
to the Doppler via this socket. (For SONOTRAX II and SONOTRAX II Pro only)
NOTE:
Accessory equipment connected to the analog and digital interfaces must be certified
according to the respective IEC/EN standards (e.g. IEC/EN 60950 for data processing
equipment and IEC/EN 60601-1 for medical equipment). Furthermore all configurations
shall comply with the valid version of the system standard IEC/EN 60601-1-1. Anybody
who connects additional equipment to the signal input connector or signal output
connector to configure a medical system must ensure that the system complies with the
requirements of the valid version of the system standard IEC/EN 60601-1-1. If in doubt,
consult our technical service department or your local distributor.
2.2.5 Probe Socket
The probe socket is as shown in figure 2-6.
Figure 2-6 Probe socket
Connect the 2.0MHz/3.0MHz obstetrical probes or 4.0MHz/5.0MHz/8.0MHz vascular probes
supplied by the manufacturer to the Doppler through the probe socket.
CAUTION
1 Do not try to connect any other plug to the probe socket except the plug of the probes
mentioned above.
2 Do not stretch the probe cable for more than two meters long.
Jack Definition
1 Power Supply
2 Signal
3 Probe Coding 1
4 Probe Coding 2
5 GND
6 (Shell) GND

SONOTRAX Series Ultrasonic Pocket Doppler User Manual Doppler and Accessories
- 10 -
2.2.6 Batteries
SONOTRAX Lite, SONOTRAX Basic, SONOTRAX Basic A, SONOTRAX Pro and
SONOTRAX Vasc ular are powered either by two alkaline batteries or two rechargeable NI-MH
batteries.
SONOTRAX II and SONOTRAX II Pro are powered by a NI-MH battery pack supplied by the
manufacturer.
Alkaline Battery Rechargeable NI-MH Battery NI-MHBatteryPack
Figure 2-7 Batteries
NOTE:
The alkaline battery and rechargeable NI-MH battery can be replaced by those of
identical specifications purchased locally.
Alkaline battery: LR6, AA, 1.5V.
Rechargeable NI-MH battery: Ni-MH, AA, 1.2V.
2.3 Probes
2.3.1 Waterproof Obstetrical Probes
2.0MHz/3.0MHz waterproof obstetrical probes can be connected to the main unit for fetal heart
examining.
The 2MHz obstetrical probe features in deep penetration and is designed for use during the third
trimester pregnancy. The 3MHz obstetrical probe features in high sensitivity and is designed for
use during the entire pregnancy.

SONOTRAX Series Ultrasonic Pocket Doppler User Manual Doppler and Accessories
- 11 -
Figure 2-8 2.0/3.0MHz obstetrical probe
The main information on the probe is as follows:
2.0MHz/3.0MHz:means central frequency is 2.0MHz/3.0MHz.
Waterproof: The probe is waterproof.
IPX8: Water Ingress Protection Code. It indicates that this probe does not get soaked under water
within 1 meter deep for five hours.
2.3.2 Waterproof Vascular Probes
The 4.0MHz/5.0MHz/8.0MHz waterproof vascular probes can be connected to the main unit for
artery and vein blood flow examining.
Figure 2-9 4.0/5.0/8.0MHz Vascular Probes
The main information on the probe is as follows:
4.0MHz/5.0MHz/8.0 MHz: means the central frequency is 4.0/5.0/8.0 MHz.
Waterproof: The probe is waterproof.
IPX8: Water Ingress Protection Code. It indicates that this probe does not get soaked under water
within 1 meter deep for five hours.

SONOTRAX Series Ultrasonic Pocket Doppler User Manual Examining
- 12 -
Chapter 3 Basic Operation
NOTE:
To ensure that the Doppler works properly, please read this chapter and Chapter 1
Safety Guide before operation; follow the steps when connecting all the components.
3.1 Opening the Package and Checking
Open the package; take out the Doppler and accessories carefully. Keep the package for possible
future transportation or storage. Check the components according to the packing list.
Check for any mechanical damage.
Check all the cables and accessories.
If there is any problem, contact us or your local distributor immediately.
3.2 Installing/Replacing Battery
NOTE:
The battery pack of SONOTRAX II and SONOTRAX II Pro is fixed in the battery
compartment cover. Start from step 3 when installing it.
1) Open the battery compartment.
Turn the Doppler upside down. Hold the main unit with one hand; press the thumb of the other
hand on the cover notch and push it upward and forward. The compartment cover is open.
Figure 3-1 Opening battery compartment

SONOTRAX Series Ultrasonic Pocket Doppler User Manual Examining
- 13 -
2) Install the battery.
Put the alkaline batteries or NI-MH batteries into the battery compartment cover.
CAUTION
The direction of the batteries should comply with the polar mark on the cover. Reversed
connection is forbidden.
Figure 3-2 Putting batteries into the compartment cover
3) Close the compartment.
Put the batter compartment cover back into the compartment, push it forward and downward until
it clicks closed.
Figure 3-3 Close the battery compartment

SONOTRAX Series Ultrasonic Pocket Doppler User Manual Examining
- 14 -
CAUTION
1 If the Doppler is not used for an extended period, take the alkaline/NI-MH batteries
out and store them in a cool and dry environment.
2 Do not remove the NI-MH battery pack frequently after initial installation.
3 If the Doppler is not used for an extended period, charge the NI-MH batteries or the
NI-MH battery pack at least every three months.
3.3 Probe Operation
(1) Taking out the probe
Hold the main unit with one hand. Pinch the probe and pull it outwards using mild force.
Figure 3-4 Taking out the probe
(2) Placing the probe
Hold the main unit with one hand. Pinch the probe and align it with the probe holder. Push the
probe inwards using mild force until it clicks in position.

SONOTRAX Series Ultrasonic Pocket Doppler User Manual Examining
- 15 -
Figure 3-5 Placing the probe
CAUTION
Do not take out or place the probe when the Doppler is on. Remember to take out the
probe before switching on the Doppler, and place the probe after switching off the
Doppler.
(3) Replacing the Probe
Remove the old probe:
Switch off the Doppler; hold the main unit with one hand and pinch the jacket of the mini USB
socket. Lift the jacket up slightly and pull it out with mild force; take out the probe.
CAUTION
Do not pull the probe cable directly.
Figure 3-6 Removing the probe
This manual suits for next models
6
Table of contents
Other EDAN Measuring Instrument manuals