manuals.online logo
Brands
  1. Home
  2. •
  3. Brands
  4. •
  5. Edelbrock
  6. •
  7. Automobile Part
  8. •
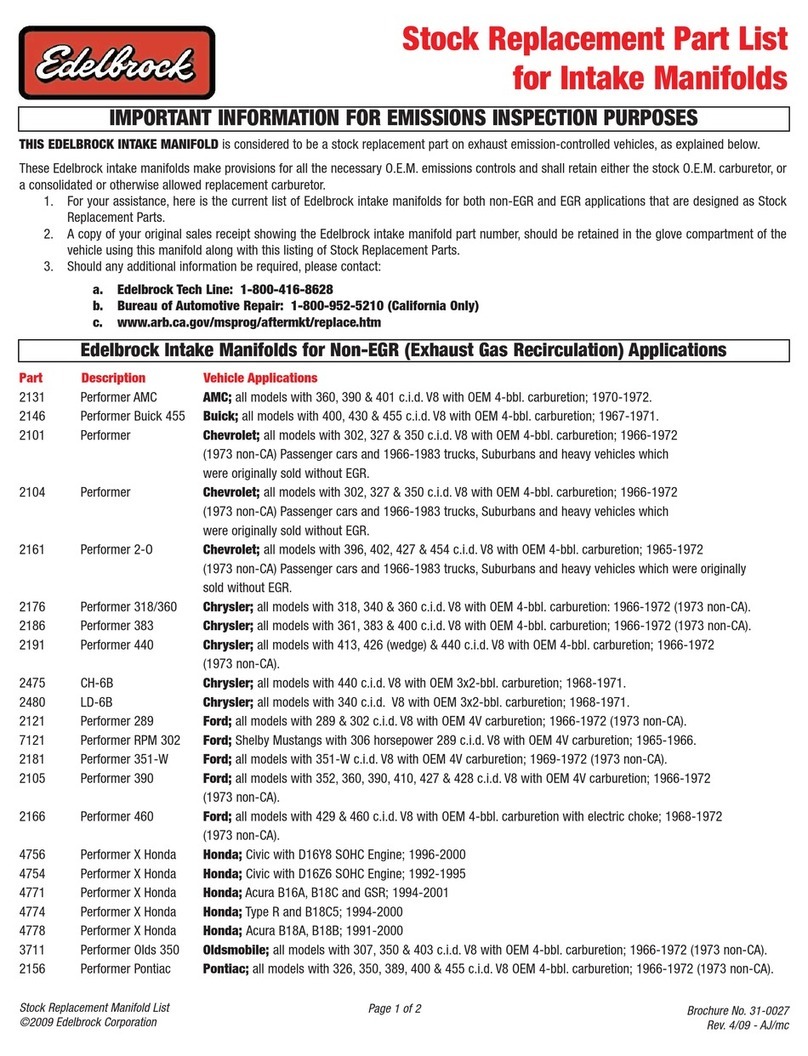
  9. Edelbrock Victor Jr. 70057 User manual

Edelbrock Victor Jr. 70057 User manual

©2005 Edelbrock Corporation
Rev. 07/05 - DC/mc
Catalog #70057 & #70058
Brochure #63-0331
Page 1 of 2
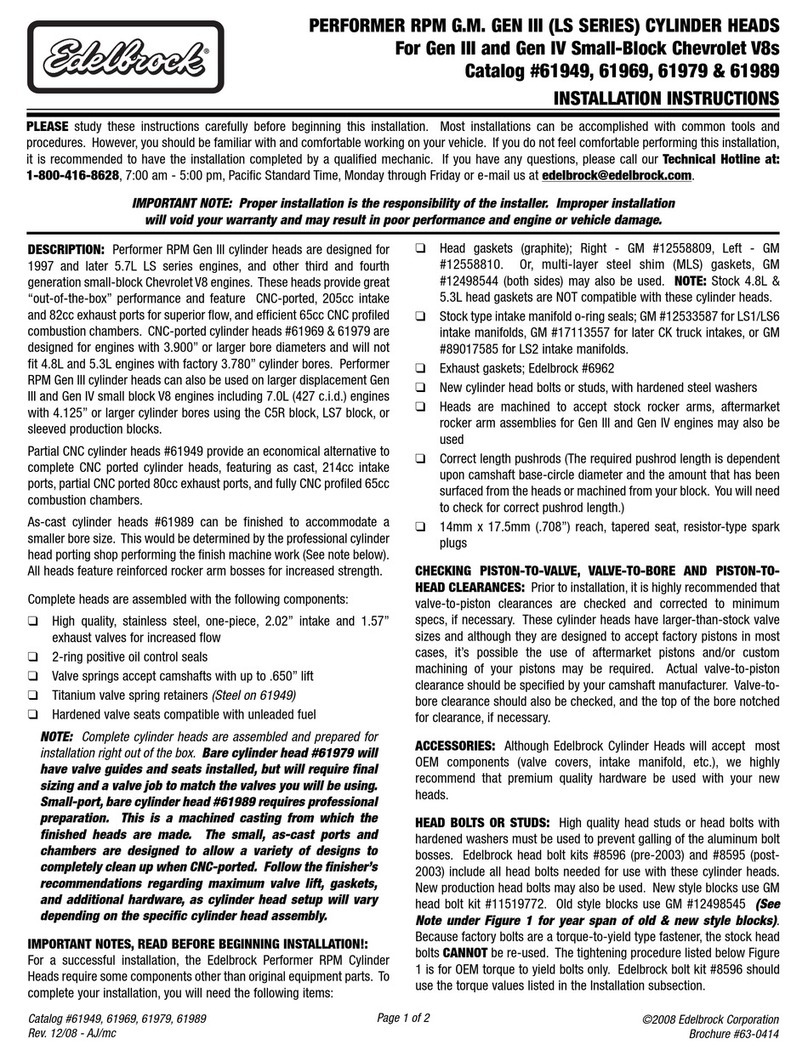
VICTOR JR. FORD 5.0L PLATE KIT
FOR PERFORMER RPM (II) MANIFOLD
Catalog #70057 & #70058
INSTALLATION INSTRUCTIONS
Please study these instructions carefully before installing your new Victor Jr. Ford 5.0L Plate Kit. If you have any questions
or problems, please contact our Technical Hotline at: 1-800-416-8628, 7:00 am to 5:00 pm, Monday through Friday,
Pacific Standard Time or e-mail us at [email protected]. Please fill out and mail your warranty card.
IMPORTANT: This kit requires the use of aftermarket fuel rails due to clearance issues with the stock fuel rail. This kit
may also require the purchase of an Edelbrock bottle kit as well as an Edelbrock Relay Assembly (Part #72270) to form a
complete system.
®
KIT COMPONENTS
Item # Quantity Description Item # Quantity Description
1 1 Nitrous Plate Assembly 13 1 Performer RPM Nitrous Solenoid
2 1 Manifold Spacer 14 1 Performer RPM Fuel Solenoid
3 4 1 in 4 out Distribution Blocks 15 1 Blue 6AN to 1/4”NPT Fitting
4 8 Pipe Plugs 16 1 Red 6AN to 1/4”NPT Fitting
5 8 Blue Pipe to Jet Fittings 17 2 Performer RPM Solenoid Brackets
6 8 Red Pipe to Jet Fittings 18 4 Solenoid Mounting Screws
7 2 Blue 3AN to 1/8”NPT Fittings 19 48 Various Jets
8 2 Red 3AN to 1/8”NPT Fittings 20 4 5/16” x 2 3/4” Stud
9 2 Blue 3AN 12” Lines 21 2 5/16” x 2 3/8” Stud
10 2 Red 3AN 12” Lines 22 2 5/16”-18 x 5 1/2” Flange Head Bolt
11 1 Blue 3AN 1/8”NPT Tee 23 6 5/16” Hex Nut
12 1 Red 3AN 1/8”NPT Tee 24 3 Base to Upper Gaskets
©2005 Edelbrock Corporation
Rev. 07/05 - DC/mc
Catalog #70057 & #70058
Brochure #63-0331
Edelbrock Corporation
2700 California Street
Torrance, CA 90503
Toll-Free Tech Line: 1-800-416-8628
Tech E-Mail: [email protected]
Victor Jr. 5.0L Plate Jet Map
Horsepower Gain Nitrous Jet Fuel Jet
300 HP Please contact the Edelbrock
Tech Line for this jetting.
250 HP 32 24
200 HP 29 22
150 HP 26 20
Tighten these
four swivel
adapters into
the same
depth or your
rails may leak.
Be sure to use Teflon
Paste when installing
these fittings.
RAIL ASSEMBLY:
1. Install the 8 supplied plugs into the ends of each of the 4
rails supplied with your kit. Be sure to use Teflon Paste
on these fittings and tighten securely.
2. Install four 3AN swivel adapters in each rail, as pictured
to the left, making sure that you use the same color
fittings for each rail. Be sure to use Teflon Paste on these
fittings and tighten securely. Each fitting should be
threaded in the same distance as the others in that rail.
3. Install a 3AN to 1/8”NPT fitting in the inlet of each rail as
pictured to the left. Be sure to use Teflon Paste on these
fittings and tighten securely.
4. Repeat steps 1-3 so you have a total of 4 assembled
rails, 2 having blue fittings, and 2 with red fittings.
PLATE AND SOLENOID INSTALLATION:
1. Select the jets that you intend to use with your nitrous
system from the jet map listed below. We highly
recommend starting with the small jets and working your
way up making sure that your engine can handle the
additional horsepower along the way.
2. Install the fuel jets in the fittings on the side labeled FUEL
and the nitrous jets in the side labeled NITROUS.
3. Install the two rails with the red fittings that you
previously assembled onto the fittings of the FUEL side of
your Victor Jr. plate. DO NOT USE ANY SEALANT ON
THESE FITTINGS. Be sure to tighten these fittings
evenly. Do not tighten each fitting at once, rotate
between fittings to prevent uneven tightening of the rails.
Use the same method to install the remaining blue rails
onto the NITROUS side of the plate.
4. Remove your Performer RPM (II) upper and studs from
your manifold. Scrape any left over gasket material for
your manifold upper and lower being sure that the
manifold flanges are clean.
5. Install the supplied studs in place of the ones that you
just removed.
When making your jet selection from the chart above, always start with
the lowest horsepower gain and work your way up safely. Before
installing your jets into the jet holders on the plate, hold the jets up to
light and make sure that the hole in the jet is free from obstructions and
there is no debri in the jet. Any kind of blockage in the jet can potentially
cause severe engine damage to your vehicle. Be sure that you install
the nitrous jets in the nitrous fittings and the fuel jets in the fuel fittings.
Each side of your nitrous plate is etched with an “N” for Nitrous or “F”
for Fuel to denote which side requires which jets.
6. Install one of the supplied manifold gaskets onto the
manifold lower. Install the supplied spacer plate onto the
manifold lower with another gasket on top of the spacer.
7. Install your Victor Jr. plate on the manifold lower being sure
that the side labeled “TOP” is facing up. Place the third
supplied gasket on top of the plate. Improperly installing
the plate may cause severe damage to your engine.
8. Install the blue tee fitting into the outlet side of your nitrous
solenoid and the blue 6AN filter fitting into the inlet side of
the nitrous solenoid using Teflon Paste.
9. Install the red tee fitting into the outlet side of your fuel
solenoid and the red 6AN filter fitting into the inlet side of the
fuel solenoid using Teflon Paste.
10. Install the solenoids onto the solenoid brackets using the
supplied screws. Mount the solenoid brackets to a secure
location on the manifold close to the inlets of the rails for
your Victor Jr. plate.
11. Install the blue 3AN lines from the tee fitting coming from the
nitrous solenoid to the nitrous rails. Install the red 3AN lines
from the fittings coming from the fuel solenoid to the fuel
rails.
12. Re-install your Performer RPM (II) upper manifold and torque
the manifold bolts to their required torque specifications.
This manual suits for next models

1

Other Edelbrock Automobile Part manuals

Edelbrock 68752 User manual

Edelbrock

Edelbrock 68752 User manual

Edelbrock Russell R08367 User manual

Edelbrock

Edelbrock Russell R08367 User manual

Edelbrock 3811 User manual

Edelbrock

Edelbrock 3811 User manual

Edelbrock 8192 User manual

Edelbrock

Edelbrock 8192 User manual

Edelbrock 66082 User manual

Edelbrock

Edelbrock 66082 User manual

Edelbrock 1727 User manual

Edelbrock

Edelbrock 1727 User manual

Edelbrock 5758 User manual

Edelbrock

Edelbrock 5758 User manual

Edelbrock Russell R09761 User manual

Edelbrock

Edelbrock Russell R09761 User manual

Edelbrock 4790 User manual

Edelbrock

Edelbrock 4790 User manual

Edelbrock Performer RPM 351-W Ford V8 User manual

Edelbrock

Edelbrock Performer RPM 351-W Ford V8 User manual

Edelbrock 66182 User manual

Edelbrock

Edelbrock 66182 User manual

Edelbrock 6510 User manual

Edelbrock

Edelbrock 6510 User manual

Edelbrock 770769 User manual

Edelbrock

Edelbrock 770769 User manual

Edelbrock 70401 User manual

Edelbrock

Edelbrock 70401 User manual

Edelbrock 5213 User manual

Edelbrock

Edelbrock 5213 User manual

Edelbrock 72285 User manual

Edelbrock

Edelbrock 72285 User manual

Edelbrock 2161 User manual

Edelbrock

Edelbrock 2161 User manual

Edelbrock 66332 User manual

Edelbrock

Edelbrock 66332 User manual

Edelbrock 5672 User manual

Edelbrock

Edelbrock 5672 User manual

Edelbrock 6883 User manual

Edelbrock

Edelbrock 6883 User manual

Edelbrock 1481 User manual

Edelbrock

Edelbrock 1481 User manual

Edelbrock 72176 User manual

Edelbrock

Edelbrock 72176 User manual

Edelbrock 8873 User manual

Edelbrock

Edelbrock 8873 User manual

Edelbrock 15015 User manual

Edelbrock

Edelbrock 15015 User manual

Popular Automobile Part manuals by other brands

Toyota All Toyota Models Replacement guide

Toyota

Toyota All Toyota Models Replacement guide

M7 SPEED MAXX-FLO 56-312101 quick start guide

M7 SPEED

M7 SPEED MAXX-FLO 56-312101 quick start guide

Axxess OESWC-8113-STK Instalation instructions

Axxess

Axxess OESWC-8113-STK Instalation instructions

Snapper 63151 parts manual

Snapper

Snapper 63151 parts manual

injen technology SP2106 quick start guide

injen technology

injen technology SP2106 quick start guide

Dinan Tronics D440-0052 installation instructions

Dinan Tronics

Dinan Tronics D440-0052 installation instructions

Dodge 8W-15 Wiring diagram

Dodge

Dodge 8W-15 Wiring diagram

Axxess AX-AM-AU95 installation instructions

Axxess

Axxess AX-AM-AU95 installation instructions

Vintage Air 564191 instruction manual

Vintage Air

Vintage Air 564191 instruction manual

BENDIX PIGGYBACK SPRING BRAKE manual

BENDIX

BENDIX PIGGYBACK SPRING BRAKE manual

WINDY NATION BAT-ML12-080 user manual

WINDY NATION

WINDY NATION BAT-ML12-080 user manual

Generac Power Systems FORD DURATEC 0F9765MNL Engine parts manual

Generac Power Systems

Generac Power Systems FORD DURATEC 0F9765MNL Engine parts manual

Ridewell Suspensions RAR-251 Installation and service manual

Ridewell Suspensions

Ridewell Suspensions RAR-251 Installation and service manual

Vintage Air 571064 manual

Vintage Air

Vintage Air 571064 manual

AutoMeter 9117 installation instructions

AutoMeter

AutoMeter 9117 installation instructions

Air Lift LoadLifter 5000 Ultimate installation guide

Air Lift

Air Lift LoadLifter 5000 Ultimate installation guide

SSBC A125-3 installation instructions

SSBC

SSBC A125-3 installation instructions

Murphy Digital Tach/Hourmeter with Overspeed Trip Point... Specifications
Murphy

Murphy Digital Tach/Hourmeter with Overspeed Trip Point... Specifications

manuals.online logo
manuals.online logoBrands
  • About & Mission
  • Contact us
  • Privacy Policy
  • Terms and Conditions

Copyright 2025 Manuals.Online. All Rights Reserved.