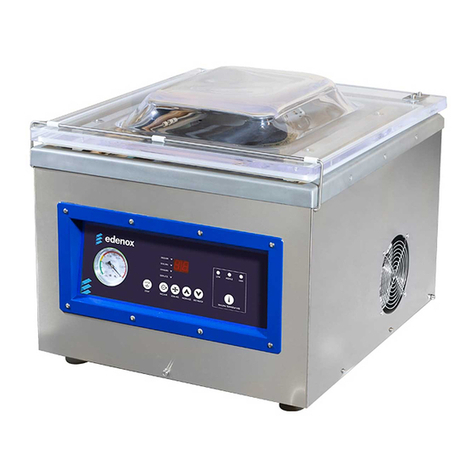
edenox VAC-10 DT User manual

Vacuum Packing Machine
VAC-10 DT, VAC-20 DT, VAC-20 DT L, VAC-20 DT L 2A VAC-40 DT,
VAC-63 DT, VAC-100 DT
Electronic models with digital control panel
Time-regulated vacuum control
Installation, operation and
maintenance manual

2
Installation, operation and maintenance manual
VACUUM PACKING MACHINE
VAC-10 DT, VAC-20 DT, VAC-20 DT L, VAC-20 DT L 2A, VAC-40 DT, VAC-63 DT, VAC-100 DT
Electronic models with digital control panel
Time-regulated vacuum control
Edesa
Hostelera
vacuum-packing
machines
are
of
the
highest
quality.
Please
read
this
instruction
manual carefully
to
ensure
correct
use.
G
UA
R
A
N
T
EE
Edenox
S.A.
is
only
responsible
for
manufacturing
defects,
and
is
not
liable
for
the
incorrect handling
or
use
of
the
goods
by
the
client
or
user.
The
6
month
guarantee
only
covers
defective
components
(excepting
glass,
bulbs
and
seals).
Labour costs
arising
from
diagnosis
and
repair
of
faults
are
not
covered.
S
PE
CIF
I
CA
T
I
O
N
S
On
the
vacuum-packing
machine
there
is
a
plate
with
the
following
information:
Made
by:
Edenox S.A
C/Beat Oriol 1-Edificio Forum
08110 MONTCADA I REIXAC
Barcelona - Spain
edenox@edenox.com
www.edenox.com
Model
Serial
number
Manufacturing
number
Date
of
manufacture
CE
homologated
Complies
with
norms:
EN
292-1
EN
292-2
EN
60204
Electrical
specifications

3
C
ONTROL
PANE
L
1. Main switch
2. Vacuum gauge (shows vacuum level)
3. 2-digit display
4. Stop button (STOP)
5. VacStop button
6. “+” and “-“ selection keys
7. Vacuum timer function
8. Inert gas function
9. Progressive atmosphere function
10. Heat-sealing time function Progressive atmosphere function
11. Function indicator LEDs
I
NSTALLATION
Place
vacuum-packing
machine
on
a
flat
surface
and
ensure
that
the
machine
is
level.
Check
voltage
of
machine
and
mains
outlet.
(230V
or
400V).
(See
specifications
plate
on
machine).
The machine
must
be
earthed.
Connect
to
the
mains.

4
OPERATING INSTRUCTIONS
Starting with the main switch. The machine starts up and marks the vacuum time. The other settings will be set to the
values used during the previous packing cycle as the machine stores them in memory. The numbers on the display
show the time in seconds.
PROGRAMMING THE VACUUM TIME
Press the “vacuum” key
Select the time with the ↑or ↓keys.
Programming the gas time.
Press the “gas” key
Select the time with the ↑or ↓keys.
Programming the heat-sealing time.
Press the “heat-sealing” key
Select the time with the ↑or ↓keys.
Activate/Deactivate progressive atmosphere.
Press the “progressive atmosphere” key
Vac Stop.
Stops the current function and continues with the following function.
Stop.
Aborts the packing process and discharges the chamber.
Gastro-Vac Programming.
Stop the machine and, with the vacuum key held down, flip the start switch until an indicator appears on
the display (small moving zero). Next, close the lid and we can now start work. The pump will not stop
until we press the STOP key, to finish the Gastro-Vac process and return to normal operation.
Operation.
To begin a packing cycle we simply have to close the lid. It is not necessary to programme all of the
settings because the machine stores them in memory. If we need to modify any of them, we select it with
the corresponding key, modify it and start the packing cycle by closing the lid. The new value is stored in
memory.

5
USAGE
Place the product to be packed in bag suitable for vacuum packing. Ensure that there is no product in the heat-sealing
area.
Place the bag in the chamber of the packing machine. If necessary, support it on top of a polythene filler slab.
Filler
slab
Bag
Gas entry
tube
Product
Chamber
Heat-
sealing
bar
Ensure that the entire width of the bag is above the heat-sealing bar. It is recommended to insert the gas tube into the
mouth of the bag, even if gas is not being used.
The vacuum process starts automatically when the packing machine lid is closed. Hold down the lid until the vacuum
holds the lid closed.
The vacuum level can be observed on the vacuum gauge.
The LEDs light up to indicate which phase of the process the packing machine is performing.
When the process ends, the vacuum is discharged and the lid opens automatically.
VACSTOP
Press the STOP key to stop a phase of the process and move on to the next one.
STOP
To stop the cycle completely, hold down the STOP button for over 1.5 seconds. The process will end and the lid will
open.
M
AINT
E
N
ANC
E
D
i
s
co
nne
c
t
ma
c
h
i
n
e
be
fore
un
de
rt
ak
i
ng
a
n
y
fo
r
m
o
f
ma
i
n
t
e
na
nce
.
C
LE
A
N
IN
G
Clean
the
vacuum-packing
machine
frequently
and
carefully. Clean
the
housing
with
a
cloth
with
water
and
detergent.
The
lid
should
be
cleaned
with
WA
TE
R
and
a
soft
CLO
T
H
only.
DO
N
O
T
US
E
ANY
T
Y
PE
OF
D
E
T
E
R
G
E
N
T,
SO
L
V
E
N
T
,
AL
COH
O
L
,
ACI
D
OR
ANY
SIM
I
L
A
R
C
L
E
A
N
I
N
G
PR
ODU
C
T.
Failure
to
comply
with
these
instructions
could
cause
the
lid
to
break.
In
this
case,
all
guarantees
would
be
null
and
void.

6
O
IL
Check
oil
level
frequently.
Top
up
if
necessary.
Do
not
fill
above
maximum. Use
the
correct
oil
for
the
size
of
pump:
6m
3
/h
SAE
10W
Premium
(Without
detergent)
10m
3
/h
SAE
10W
Premium
(Without
detergent)
20m
3
/h
SAE
10W
Premium
(Without
detergent)
40m
3
/h
SAE
30W
Premium
(Without
detergent)
63m
3
/h
SAE
30W
Premium
(Without
detergent)
100m
3
/h
SAE
30W
Premium
(Without
detergent)
Change
oil
after
the
first
100
hours
of
use.
After
the
first
100
hours,
change
oil
after
every
500
hours
of
use
or
every
six
months. The
hours
of
use
are
displayed
every
time
the
vacuum-packing
machine
is
switched
on.
The
oil
filters
in
the
63m
3
/h
and
100m
3
/h
machines
should
be
changed
every
5
years,
or
if
oil
stains appear,
if
the
consumption
of
oil
or
electricity
increases
noticeably,
or
if
the
motor
fails
to
work correctly.
Periodically
check
the
seal
bars,
the
silicon
lid
seal
and
the
electric
wires.
Replace
if
necessary.
Do not use products with liquids to make vacuum, if you have made, control and change oil more frequently.

SYMPTOM/SINTOMA CAUSE /CAUSA SOLUTION /SOLUCION
MACHINE IS SWITCHED OFF.
INTERRUPTOR APAGADO.
SWITCH ON THE MACHINE.
PONER INTERRUPTOR EN ON.
POWER CORD UNPLUGGED.
CABLE DESCONECTADO.
PLUG IN THE POWER CORD.
MACHINE DOES NOT RUN
LA MAQUINA NO FUNCIONA.
FUSE BURNED.
FUSIBLE FUNDIDO.
NOTIFY THE SERVICE DEPARTMENT
AVISAR AL SERVICIO TÉCNICO.
CHAMBER LID DOES NOT
REMAIN CLOSED DESPITE
PUMP RUNNING.
LA TAPA NO SE MANTIENE
CERRADA AL ACTIVARSE LA
BOMBA DE VACIO.
CHAMBER LID GASKET IS DIRTY.
LA JUNTA DE LA TAPA ESTA
SUCIA.
CHAMBER LID IS DAMAGED.
LA TAPA ESTA DAÑADA.
THE PUMP DON´T WORK
PROPERLY.
LA BOMBA NO FUNCIONA
CORRECTAMENTE.
CLEAN THE CHAMBER LID GASKET.
CHECK THE GASKET.
LIMPIAR LA JUNTA DE LA TAPA.
COMPROBAR LA JUNTA.
NOTIFY THE SERVICE DEPARTMENT.
AVISAR AL SERVICIO TÉCNICO
THE WELDING OF THE BAG IS
NOT CORRECT.
LA SOLDADURA DE LA BOLSA
NO ES CORRECTA.
SEALING TIME IS INCORRECT.
TIEMPO DE SOLDADURA
INSUFICIENTE.
PROTECTOR BAR WELDING IS
DIRTY OR BROKEN.
EL PROTECTOR DE LA BARRA
SOLDAR ESTÁ SUCIO O ROTO.
FILM POUCH NOT SUITABLE.
BOLSA NO APROPIADA.
SEALING BAR DAMAGED.
BARRA DE SOLDAR DAÑADA.
CORRECT THE SEALING TIME.
CORREGIR EL TIEMPO DE
SOLDADURA.
CLEAN THE WELDING BAR /REPLACE
THE PROTECTION.
LIMPIAR LA BARRA DE SOLDAR /
REEPLAZAR EL PROTECTOR.
CHANGE THE TYPE OF BAGS.
CAMBIAR EL TIPO DE BOLSAS.
NOTIFY THE SERVICE DEPARTMENT.
AVISAR AL SERVICIO TÉCNICO.
TROUBLE SHOOTING
QUE HACER EN CASO DE AVERÍA

2
VACUUM IS NOT COMPLETED
SUCCESSFULLY
EL VACIO NO SE HA
COMPLETADO
CORRECTAMENTE.
VACUUM TIME IS SET SO LOW.
TIEMPO DE VACIO MUY BAJO.
FOR SENSOR MODELS -NOT
CARRIED OUT THE ADJUSTMENT
OF ATMOSPHERIC PRESSURE.
PARA MODELOS DE SENSOR - NO
LLEVÓ A CABO EL AJUSTE DE
PRESIÓN ATMOSFÉRICA
LOW LEVEL OF OIL OR IT IS
DEGRADED.
NIVEL BAJO DE ACEITE O SE VE
DEGRADADO.
THE SYSTEM OF EVACUATION
DOESN'T WORK CORRECTLY.
EL SISTEMA DE EVACUACIÓN NO
TRABAJA CORRECTAMENTE.
CHAMBER LID GASKET IS
DAMAGED.
LA JUNTA DE LA TAPA ESTA
DAÑADA.
GAS VALVE IS OPEN.
VALVULA GAS INERTE ABIERTA.
CHECK THE SETTING.
VERIFIQUE EL TIEMPO DE VACÍO.
CHECK THE MANUAL TO CARRY OUT
ADJUSTMENT OF ATMOSPHERIC
PRESSURE.
REALIZAR AJUSTE DE PRESION
ATMOSFERICA SEGÚN
INSTRUCCIONES DEL MANUAL.
NOTIFY THE SERVICE DEPARTMENT.
REFILL OR REPLACE OIL
AVISAR AL SERVICIO TÉCNICO.
RELLENAR O REEMPLAZAR ACEITE.
NOTIFY THE SERVICE DEPARTMENT.
AVISAR AL SERVICIO TÉCNICO.
NOTIFY THE SERVICE DEPARTMENT.
AVISAR AL SERVICIO TÉCNICO.
CHECK IF THE GAS VALVE IS
ACTIVATED.
COMPROBAR SI EL GAS INERTE ESTA
ACTIVADO.
INCORRECT APORTATION OF
GAS.
APORTACIÓN DE GAS
INCORRECTA.
INCORRECT SUPPLY OF INERT
GAS.
APORTACION DE GAS INERTE
INCORRECTA.
BOTTLE IS EMPTY.
BOTELLA VACIA.
THE PERCENTAGE OF GAS
CONTRIBUTION IS NOT WELL
REGULATED.
PORCENTAJE DE CONTRIBUCIÓN
DE GAS MAL REGULADO.
THE OPENING OF THE BAG IS
NOT PLACED CORRECTLY.
LA APERTURA DE LA BOLSA NO
SE PONE CORRECTAMENTE.
GAS VALVE DOES NOT OPEN.
LA VALVULA DE GAS NO ABRE
CORRECTAMENTE.
THE PRESSURE OF THE BOTTLE IS
WEAK. ADJUST.
LA PRESIÓN DE LA BOTELLA ES
DÉBIL. AJUSTAR.
REPLACE THE BOTTLE.
REEMPLAZAR BOTELLA DE GAS.
INTRODUCE CORRECT VALUE.
INTRODUZCA EL VALOR CORRECTO.
PLACE THE BAG CORRECTLY.
COLOCAR LA BOLSA
CORRECTAMENTE.
NOTIFY THE SERVICE DEPARTMENT.
AVISAR AL SERVICIO TÉCNICO.

DECLARACIÓN
DE
CONFORMIDAD
CE
DECLARATION OF CONFORMITY CE
Edenox S.A
C/Beat Oriol 1-Edificio Forum
08110 MONTCADA I REIXAC
Barcelona - Spain
www.edenox.com
declara bajo su responsabilidad que las envasadoras al vacío de su
fabricación:
declares, as manufacturer, that the vacuum packing machines:
Modelos / Models: VAC-10 DT, VAC-20 DT, VAC-20 DT L, VAC-20 DT L 2A,
VAC-40 DT, VAC-63 DT, VAC-100 DT
cumplen con las directivas del Consejo de Europa:
comply with the directives of the Council of Europe:
89/392/CEE Directiva Seguridad General Máquinas / General Safety of Machines Directive
73/23/CEE Directiva de Baja Tensión / Low Voltage Directive
y las normas europeas:
and with European regulations:
EN 292-1 Seguridad General de Máquinas / General Safety of Machines
EN 292-2 Seguridad General de Máquinas / General Safety of Machines
EN 6024-1 Seguridad General de Máquinas. Prescripciones Eléctricas /
General Safety of Machines. Electrical Restrictions
Barcelona
Fecha / Date: 07/01/2016
7 Lluís
Bertomeu
Product
Manager

Envasadora al Vacío
Envasadora al Vacío VAC-10 DT, VAC-20 DT, VAC-20 DT L, VAC-20
DT L 2A VAC-40 DT, VAC-63 DT, VAC-100 DT
Modelos electrónicos con panel de mandos digitales
Regulación de vacío controlado por tiempo
Manual de instalación, utilización y
mantenimiento

2
Manual de instalación, utilización y mantenimiento
ENVASADORA AL VACÍO
VAC-10 DT, VAC-20 DT, VAC-20 DT L, VAC-20 DT L 2A, VAC-40 DT, VAC-63 DT, VAC-100 DT
Modelos electrónicos con panel de mandos digitales
Regulación de vacío controlado por tiempo
Las envasadoras al vacío de Edenox son de la más alta calidad. Leer y seguir bien estas instrucciones.
G
ARANTÍA
Edenox
S.A.
e responsabilizará únicamente de los defectos de fabricación, quedando excluidos la manipulación o
utilización incorrecta del material por parte del cliente o usuario. La garantía será de 12 meses, solamente para
componentes defectuosos de fabricación (están excluidas, cristales, juntas y elementos fungibles). El servicio de la
mano de obra y los desplazamientos son siempre por cuenta del cliente. Edenox declina toda responsabilidad por
los defectos imputables al transporte, siempre que no se realice la reclamación máximo 24 horas después de
recibir la mercancía.
ESPECIFICACIONES
La envasadora lleva una placa de especificaciones con las siguientes características y referencias:
Made
by:
Edenox S.A
C/Beat Oriol 1-Edificio Forum
08110 MONTCADA I REIXAC
Barcelona - Spain
edenox@edenox.com
www.edenox.com
Modelo
Número de serie ç
Número de fabricación
Fecha de fabricación
Homologación CE Fabricación según normas:
EN 292-1
EN 292-2
EN 60204
Características eléctricas de la envasadora

3
PANEL DE MANDOS
1. Interruptor general
2. Vacuómetro (visualiza el nivel de vacío)
3. Display 2 dígitos
4. Pulsador de parada (STOP)
5. Pulsador de VacStop
6. Teclas “+” y “-“ para seleccionar
7. Función Tiempo de vacío
8. Función Gas Inerte
9. Función Tiempo de Soldadura
10. Función Atmósfera progresiva
11. Leds indicativos de cada función
INSTALACIÓN
Situar la envasadora sobre una superficie plana y comprobar que la máquina esté nivelada.
Comprobar que la tensión de la envasadora corresponda a la de la red (230V ó 400V). (Ver placa de especificaciones
en la envasadora). La conexión con tierra es obligatoria.
Conectar la envasadora a la red.

4
INSTRUCCIONES DE FUNCIONAMIENTO
Puesta en marcha con el interruptor general. El equipo arranca visualizando el tiempo de vacío. Los valores de los
diferentes parámetros serán los usados en el último ciclo de envasado que se haya efectuado ya que el equipo los
retiene en memoria.
La visualizacón en pantalla es de tiempo en segundos.
PROGRAMACIÓN TIEMPO DE VACIO
Pulsar la tecla “vacio”
Seleccionar el tiempo con las teclas ↑o ↓.
Programación del tiempo de gas.
Pulsar la tecla “gas”.
Seleccionar el tiempo con las teclas ↑o ↓.
Programación del tiempo de soldadura.
Pulsar la tecla “soldadura”.
Seleccionar el tiempo con las teclas ↑o ↓.
Activación/Desactivación de la atmósfera progresiva.
Pulsar la tecla “atmósfera progresiva”
Vac Stop.
Permite finalizar la función en curso y continuar con la siguiente función .
Stop.
Aborta el proceso de envasado y provoca una descarga de la cámara.
Programación del Gastro-Vac.
Parar el equipo y manteniendo pulsada la tecla vacio accionar el interruptor de puesta en marcha hasta que
aparezca el indicador en pantalla (cero pequeño moviéndose). A continuación cerrar la tapa y ya podemos
empezar a trabajar. La bomba no se para hasta que accionemos la tecla STOP, con lo cual
terminamos el proceso Gastro-Vac y pasamos a un funcionamiento normal.
Funcionamiento.
Para iniciar un ciclo de envasado debemos simplemente cerrar la tapa. No hace falta programar todos los
parámetros, ya que el equipo retiene en memoria los usados en el último ciclo. Si necesitamos modificar
alguno de ellos lo seleccionamos con la tecla correspondiente, lo modificamos e iniciamos un ciclo de
envasado cerrando la tapa, el nuevo valor queda programado en memoria.

5
UTILIZACIÓN
Poner el producto para envasar en una bolsa adecuada para el envasado al vacío. Tener cuidado que no haya
producto en la zona de soldadura.
Colocar la bolsa en la cuba de la envasadora. Si es necesario, apoyarla encima de una placa de relleno de polietileno
Placa de
relleno
Bolsa
Tubo
entrada
gas
Producto
Camara
Barra de
soldadura
Comprobar que todo el ancho de la bolsa esté encima de la barra de soldadura. Se recomienda que se inserte el tubo
de gas en la boca de la bolsa, aunque no se utilice el gas.
Al cerrar la tapa de la envasadora el proceso de vacío empezará automáticamente. Apretar bien la tapa hasta que el
vacío mantenga la tapa cerrada.
El nivel de vacío puede visualizarse en el vacuómetro.
Los LEDs se iluminan e indican la fase del proceso que está realizando la envasadora.
Cuando se termina el proceso, el vacío se descarga y la tapa se abre automáticamente.
V
AC
S
TOP
Para parar una fase del proceso y pasar a la siguiente, pulsar el botón STOP.
STOP
Para parar el ciclo por completo, mantener apretado el botón STOP durante 1.5 segundos o más. Se terminará el
proceso y la tapa se abrirá.
MANTENIMIENTO
Antes de cualquier intervención de limpieza o mantenimiento,
desconectar la envasadora al vacío de la red.
LIMPIEZA
Limpiar frecuente y cuidadosamente la envasadora al vacío.
Limpiar la carrocería con un paño humedecido con agua y detergente.
La limpieza de la tapa se debe efectuar con un paño humedecido SÓLO con AGUA.
NO UTILIZAR NINGÚN TIPO DE
LÍQUIDO QUE CONTENGA DISOLVENTES, DETERGENTES, LIMPIACRISTALES, ALCOHOL, ÁCIDO O SIMILAR.
No cumplir con estas instrucciones puede provocar la rotura de la tapa e implicará la pérdida de la garantía de la
tapa.

6
ACEITE
Controlar frecuentemente el nivel del aceite. Si es necesario, completar, sin pasar el
nivel máximo.
Utilizar el tipo de aceite correcto para la capacidad de la bomba:
6m
3
/h
SAE
10W
Premium
(Without
detergent)
10m
3
/h
SAE
10W
Premium
(Without
detergent)
20m
3
/h
SAE
10W
Premium
(Without
detergent)
40m
3
/h
SAE
30W
Premium
(Without
detergent)
63m
3
/h
SAE
30W
Premium
(Without
detergent)
100m
3
/h
SAE
30W
Premium
(Without
detergent)
Cambiar el aceite después de las primeras 100h de funcionamiento.
Posteriormente, cambiar el aceite después de cada 500 horas de funcionamiento o cada 6 meses.
Las horas de uso se muestran en el display, cada vez que conectamos la maquina.
Los filtros de aceite en las bombas de 63m3/h y de 100m3/h deben remplazarse cada 5 años, o cuando aparece una
mancha de aceite, cuando el consumo de aceite aumenta, si el consumo eléctrico está elevado o si hay un mal
funcionamiento del motor.
Periódicamente controlar el estado de las barras de soldadura, de la silicona de la tapa y de los cables eléctricos.
Remplazar si es necesario.
No hacer vacio, con productos con contenidos líquidos, en caso de hacerlo se deberá tener un mayor control de
mantenimiento y del tiempo de vacío, además de realizar cambios de aceite más periódicos, si no podría afectar al
funcionamiento de la maquina y llegar a averiar la bomba.

DECLARACIÓN
DE
CONFORMIDAD
CE
DECLARATION OF CONFORMITY CE
Edenox S.A
C/Beat Oriol 1-Edificio Forum
08110 MONTCADA I REIXAC
Barcelona - Spain
www.edenox.com
declara bajo su responsabilidad que las envasadoras al vacío de su
fabricación:
declares, as manufacturer, that the vacuum packing machines:
Modelos / Models: VAC-10 DT, VAC-20 DT, VAC-20 DT L, VAC-20 DT L 2A,
VAC-40 DT, VAC-63 DT, VAC-100 DT
cumplen con las directivas del Consejo de Europa:
comply with the directives of the Council of Europe:
89/392/CEE Directiva Seguridad General Máquinas / General Safety of Machines Directive
73/23/CEE Directiva de Baja Tensión / Low Voltage Directive
y las normas europeas:
and with European regulations:
EN 292-1 Seguridad General de Máquinas / General Safety of Machines
EN 292-2 Seguridad General de Máquinas / General Safety of Machines
EN 6024-1 Seguridad General de Máquinas. Prescripciones Eléctricas /
General Safety of Machines. Electrical Restrictions
Barcelona
Fecha / Date: 07/01/2016
7 Lluís
Bertomeu
Product
Manager
This manual suits for next models
5
Table of contents
Languages:
Other edenox Kitchen Appliance manuals