EDG sinter press alumini User manual
Manual

Manual 01
Date of manufacture
200
Serial number
1Recepting
Theequipmentispackedseparatelyfromthevacuumpump,checkifyouhavetwo
boxes if you have acquired the furnace and the pump. Check the general
conditionsof thepackage, ifany damageis noticedcontact theshipping company.
We remind you that the equipment is shipped at the purchaser's account and risk
anditisinsuredbytheshippingcompany.
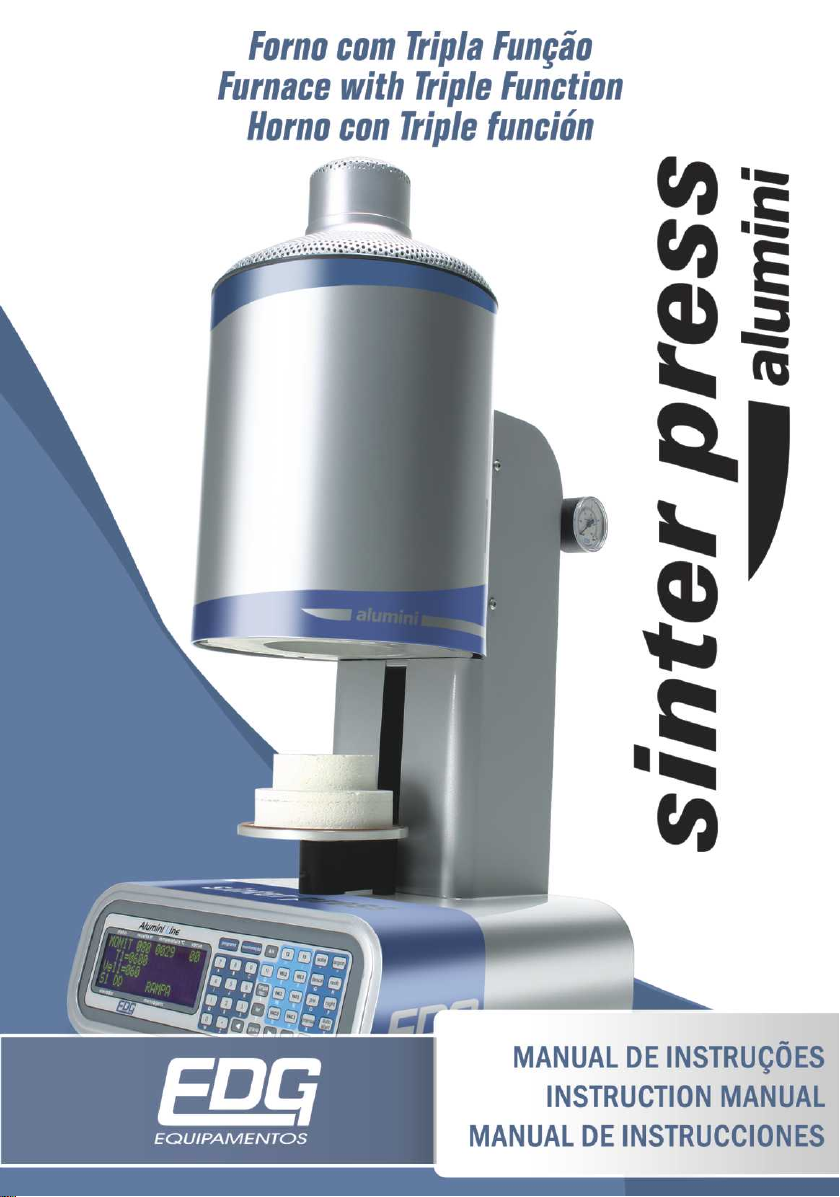
Furnace with Triple Function

Manual 02
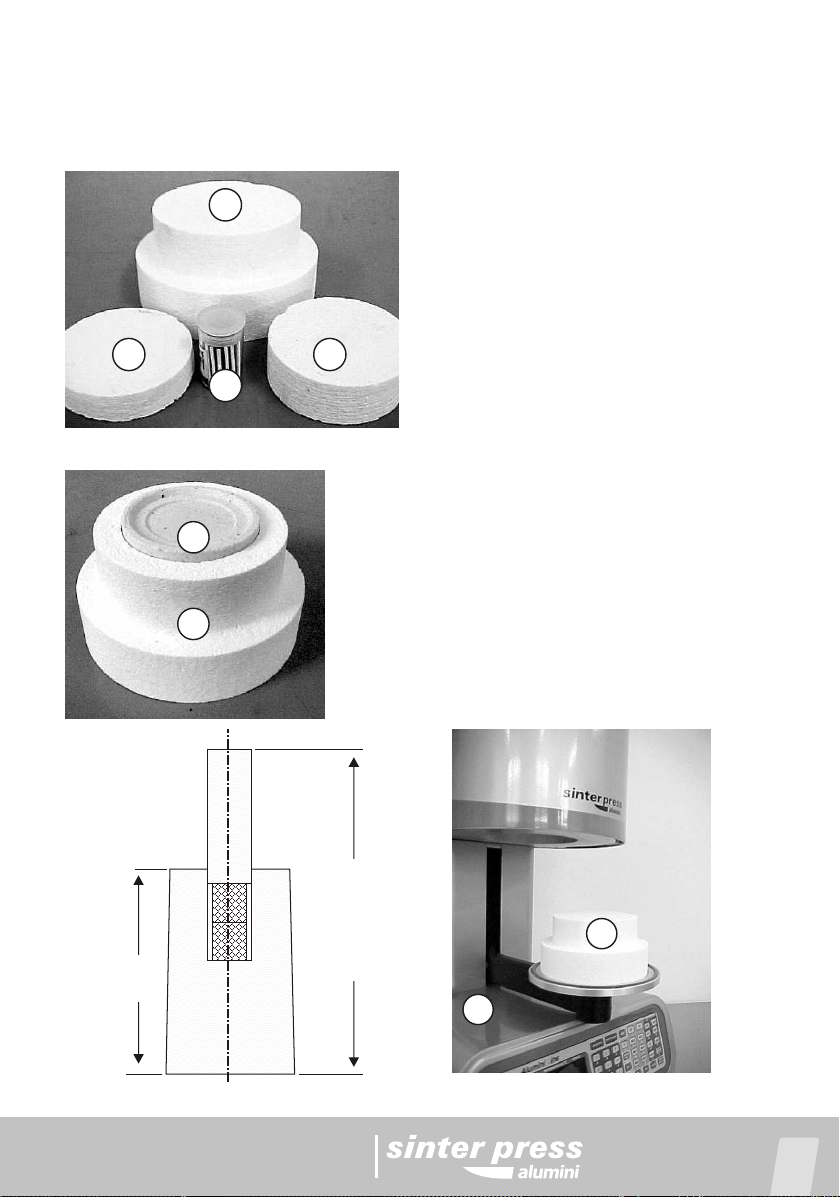
1.1The Sinter Press package should include
A)Afurnacesettledininjectedfoam
B)AspoolforconventionalceramicPic4-Item-15;
C)Aspoolforpressedceramic.Pic-5-item-19.
D)Arigidmat–Iforceramic.Pic-4-Item-17.
E)Arigidmat–IIforsinteringPic-4-Item-16.
F)Asoftmat.
G)ArefractoryplatformforpressedceramicPic-5-Item-20.
H)Aseethroughrefractoryplatformforceramic.
I)Asetofisothermalpins.Pic-4-Item-18.
J)Three1.5mhosesN.A.T.
K)Metallicclamps.(6pieces).
L)Instructionmanual.
M)Warrantydocument.
1.2The vacuum pump package should include
A)Thevacuumpump
B)Rubber,floorinsulatingcapsforfixation(4pieces).
C)Connectorsidentificationlabels
2S.A.L.V. System
Your Sinter Press has highly technological devices that allow it to perform 4
functions perfectly: traditional ceramic burn, pressed ceramic, sintering and
infiltration of alumina composites. When sintering alumina, the lining used heated
over 500º C releases sub-products which are absorbed by the muffle under
vacuum and can contaminate the ceramic, staining and fissuring it during the
sinteringprocess.
Long periods under high temperatures (1,200°C) in pressurized chambers
(vacuum muffles) can shorten the heating resistance useful life. The S.A.L.V.
systemwasspeciallydevelopedtoovercomesuchproblems

Manual 03
Sistema de aquecimento de longa vida.
(Long Life Heating System)
Two years guarantee at high temperatures.
The metallic alloys used as heating resistance have chemical elements in
itscompositionthat, when heatedandin contact withair, create anoxideadherent
layerwhichprotectsthemfromoutwear.
In ceramic furnace muffles, the process for the oxide layer formation can
beimpairedduetotheresistanceimprisonmentandtothevacuumoperation.
The exclusive S.A.L.V. system, developed and patented by EDG,
promotes airflow inside the quartz pipe that supports the muffle resistance. This
flow renews and maintains the protective oxide layer, increasing the useful life of
theresistanceathightemperatures.
This exclusive technological advance allowed EDG to extend the
guaranteeto2yearsforthefurnacesequippedwiththissystem.
To endure the high temperatures involved in the processes, the sensor
(termopar) should be made of platinum which, on the other hand, is not adequate
for low temperatures and for the necessary speed for eliminating water during the
sintering process. High level software was developed to compensate the platinum
limitationsinlow temperatures. Due to the characteristicsofthe sintering process,
new thermal insulating materials were used and an efficient ventilation system
keepsthecomponentstemperatureunderadequatevalues.
3Main Characteristics
• Quartz muffle with thermal insulation ceramic mat molded through low thermal
massvacuum,whichinsuresperfecttemperaturehomogeneity.
The exclusive system S.A.L.V® Sistema de aquecimento de longa vida (long life
heatingsystem)
· Muffle forced ventilation for the sintering/infiltration process which eliminates
stainsandminimizesfissures.
99programs:79forceramicand20forsintering/infiltration.
Managementbymicroprocessing.
•
•
•
•

Manual
Note:Thenumbersinparenthesesrefertothepicturethatfollows.
04
•
•
•
•
•
•
•
•
•
•
•
•
•
•
•
•
•
•
•
•
•
•
•
•
•
Easyoperationandvisualizationoftheburningparameters.
Ambient working temperature at 1,100°C for ceramic and at 1,200°C for
sintering/infiltration.
Maximumtemperaturelimiterat1,200°C
Lineardecimalheatingspeedfrom0.1to70.0°C/min.
Thyristoredpowercontrol
Ceramicburntimefrom0to30minutes.
Sintering/infiltrationtimefrom0to9hours59minutes.
Decreasingtimevisualization.
Vacuumtimefrom0to30minuteswithdecreasingvisualization.
Automatic or manual (which can be activated ant any stage of the process)
vacuumoperation
Programmableandindependentascendinganddescendingelevatortimes.
Safetysystemsprotecttheequipmentfromoperationmistakesordefects.
Flashingandbeepingsignsofallprocesssteps.
Toavoidambienceheatingandsaveenergy,analarmwillsoundafter5minutesif
the equipment is not being operated the muffle will be partially closed
automatically.
Night Mode: after 2 hours without any operation, the muffle is closed and the
temperatureiskeptat100°C.
Programmablequickcooling.
Operationtimetotalizer.
Lowcostmufflereplacingsystem.
Elevatorwithbottomentranceperfectlybalanced
Electronicsystemforcedventilationkeepsthecomponentssafe.
ARGONSYSTEM, allows thecleaning and helpswith ceramicburnemphasizing
itscolors,enhancingthetranslucenceandopalescence.
Serialcommunicationformaintenanceandsystemchecking.
Temperature safety devices, temopar, vacuum, elevator, power, muffle with
S.A.L.Vsystem,pistonandcompressedairsystem.
Digitalpanelinliquidcrystalwith4linesby20columnsonabluebackground.
Sensitivemembranewithsoundrecognitionoftheoperator'stouch.
4Installing
Manual
Your Sinter Press shouldbe farfromcurtains andinflammable material.Afurnace
isaheat generator whichneedsto be dissipated; otherwiseits components will be
overheated. Therefore, place the equipment at a ventilated area which allows free
aircirculation.
It is advisable to leave a 15cm clearance between the furnace and anything that
canimpairtheventilation.
Place the furnace far from taps or basins which can sprinkle water over the
equipment.
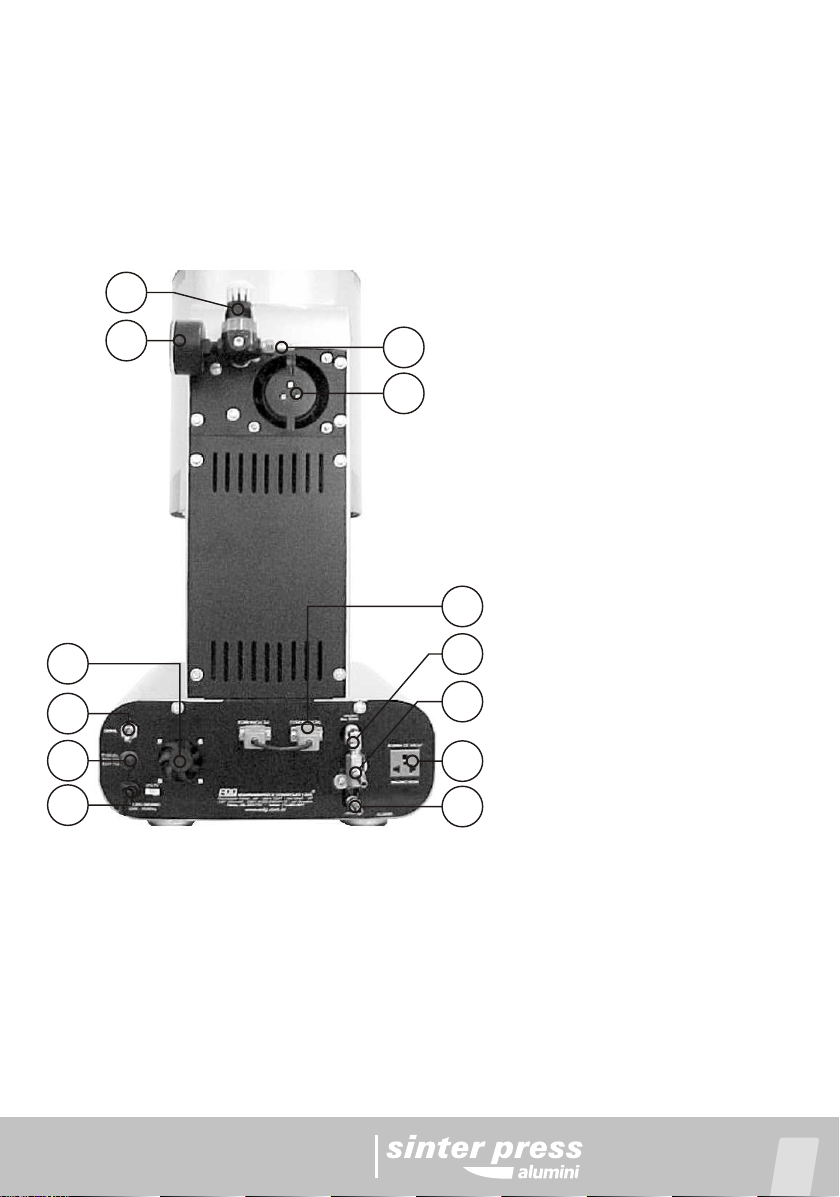
(1) - Network voltage identifier
/powercable.
(2)-Fuseholder.
(3)-Mainswitchon/off.
(4)- control system forced
ventilation.
(5)-Vacuumhoseconnection
(6)- Argon system hose
connection.
(7)-Vacuumpumpsocket.
(8)-SALVsystemvalve.
(9)-Serialcommunication.
(10)-Muffleventilation.
(11)- Compressed air hose
connection.
(12)- Pressing system
pressureregulator.
(13)- Pressing system
pressuremanometer.
13
12
10
11
09
08
06
07
05
01
02
03
04
Pic. 1
4-1)CheckifyournetworkvoltageisthesameastheoneshownonthefurnacePic
(1).–item(1).
4-2) Install the furnace into an exclusive electrical network using 6mm wiring to a
110voltsnetwork,or4mmwiringtoa220voltsnetwork.
4-3) Never connect the furnace to the same network in which other furnaces,
compressors, electrical taps or any other high electricity consumption devices are
alreadyconnected.
05

Manual
4-4)Checkifthe outletinwhichthefurnacewillbepluggedinisinperfectcondition
andofgoodqualitytobearatleast20amperes.
4-5) Connect the grounding end (round pin) to a grounding rod and never to the
electricalnetworkneutral.
!Note:Notcheckingtheproceduresabovewillinterfereontheequipment
correctworking,onitsguaranteeandalsoontheoperatorsafety.
4-6)Ifyourelectricalnetworkisveryinstable(thelightsflashalot),itisadvisableto
use a voltage regulator such as a saturated autotransformer with at least 2kw
capacity.
!Warning:Neveruse,byanymeans,regulatorsusedincomputers.
4-7) Connect the vacuum hose to the furnace Pic-1 item (5). Plug the vacuum
pump power cable to the outlet which is at the backside of the furnace Pic-1 item
(7)
4-8)connectthecompressedairhosetothefurnacePic-1item(11).Theairshould
be supplied dry by the compressor at a minimum pressure of 2 kg/cm² (30lbf/pol²).
Thispressureshouldbekeptwhilethefurnaceisworkingwithpressedceramic.
!Warning:The lack of pressure during this process will abort the burn
andamessagewillbeshownonthecontroldisplay.
4-9) Connect the argon hose to the furnace and to the cylinder outflow regulator
Pic-1item(6).Theargonusedisofcommercialtype.Thecylinderandtheregulator
are not supplied with the equipment. We recommend to contact a gas supplier in
your area. The maximum argon outflow should be adjusted in 10 L/m (liters per
minute). Note: We remind you that the argon provides better colors, opalescence
andtranslucence. However, itsuse canbe discharged.For thatdo notconnect the
argon hose and do not program the function for argon. Check the hoses
connectionsiftheyaretighttoavoidunpleasantleakages.
06
Manual
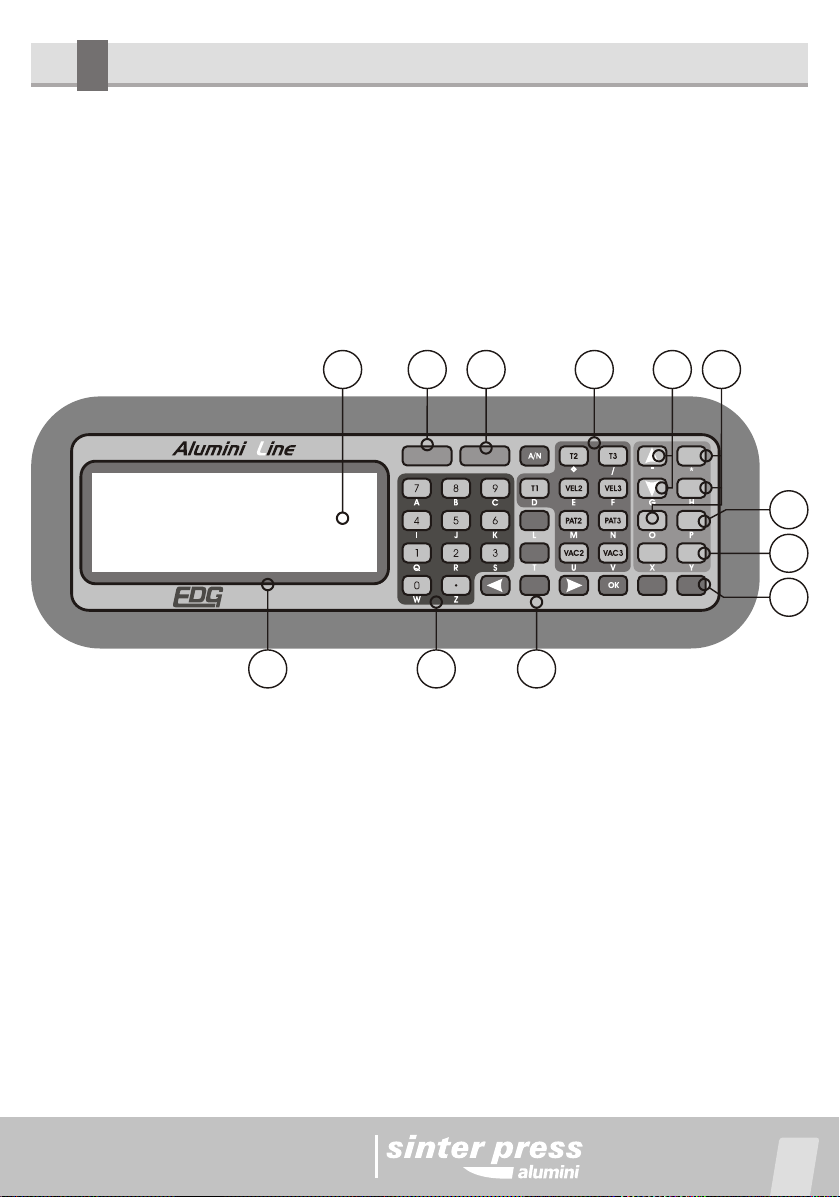
5Control panel
5-1) The panel has liquid crystal display with 4 lines by 20 columns on a blue
background and yellow printing with BACKLIGHT inside illumination that allows
easyidentificationoftheprogrammingfunctionsandlogmonitoring.
5-2) It has a membrane sensitive to the operator's touch, which makes the
functionsactivationeasierwithbeepingsoundrecognition.
5-3)Panelidentificationanditsmainfunctions.PIC-2
5-4)VISOR(display)–Liquidcrystaldisplay4/20blue. Item-21.
5-5)PROGRAMA(program)–Sequentialprogramkey.Item-22.
5-6)MONITORAÇÃO(monitoring)–controlsystemmonitoringkey.Item-23.
5-7)FUNÇÕES RÁPIDAS (quick functions) – Use the PROGRAMA key, the
sequentialscreensforprogrammingandmonitoring-Item-24.
5-8) ELEVADOR SOBE E DESCE (elevator up and down)– touch sensitive digital
commandwhichturnstheelevatormotoronandoff.Item-25.
5-9)FUNÇÕESAUXILIARES(auxiliary functions)–Argonwashing, quickcooling,
preburnandpressing.Item-26.
5-10) NIGHT –Automatic or manual resting system, it only operates with ceramic.
Item-27.
5-11) AUTO-START – This operation allows the automatic burn start from the
ambienttemperature.Item-28.
5-12)START/STOP- Itallowstostartorinterrupttheburnthroughtheoperator's
pré
read
register send
press
auto
start
clear
set up
start
stop
night
cool.
argon.up
down
set up nº temperature ºC
status vacuum
elevator messages
program monitoring
Pic. 2
21 22 23 24 25 26
27
28
29
303132
07
Manual
command.Item-29.
5-13) CONJUNTO DE TECLAS COM FUNDO CINZA (Keys set with gray
background)–Programmingandcontrolsystemexclusiveoperation.Item-30.
5-14) TECLADO NUMÉRICO (numeric keyboard) – Keyboard for inserting the
numericcontentfortherecipesvariables. Item-31.
5-15) MENSAGENS (messages) – Field reserved for visualizing the process
stages.Item-32.
6System start-up – step-by-step
6-1) Plug the furnace to a godd quality wall socket properly grounded to a copper
rod and never to the network neutral, check if your network voltage is the same as
theoneshownonthefurnacelabel.Pic-1item(1).
6-2)TurnthemainswitchonPic-1item(3)andwaitfortheequipmentstart-up.The
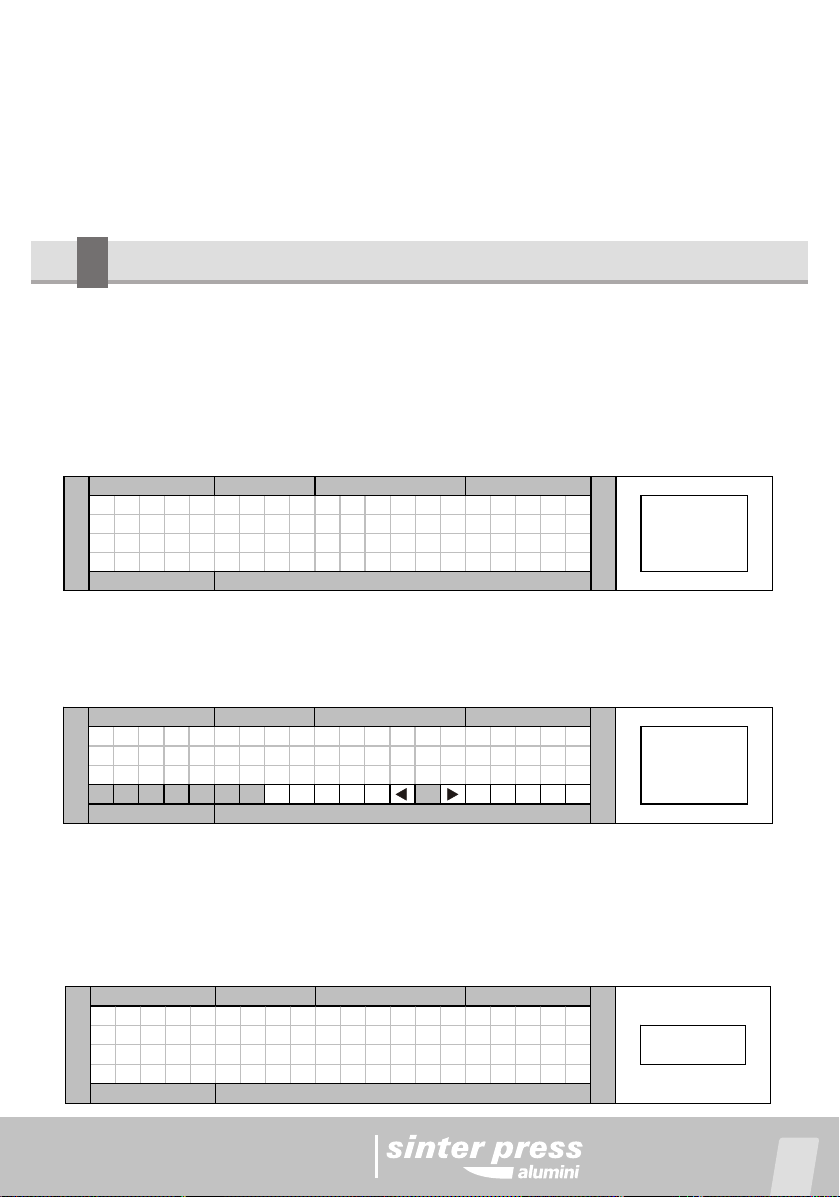
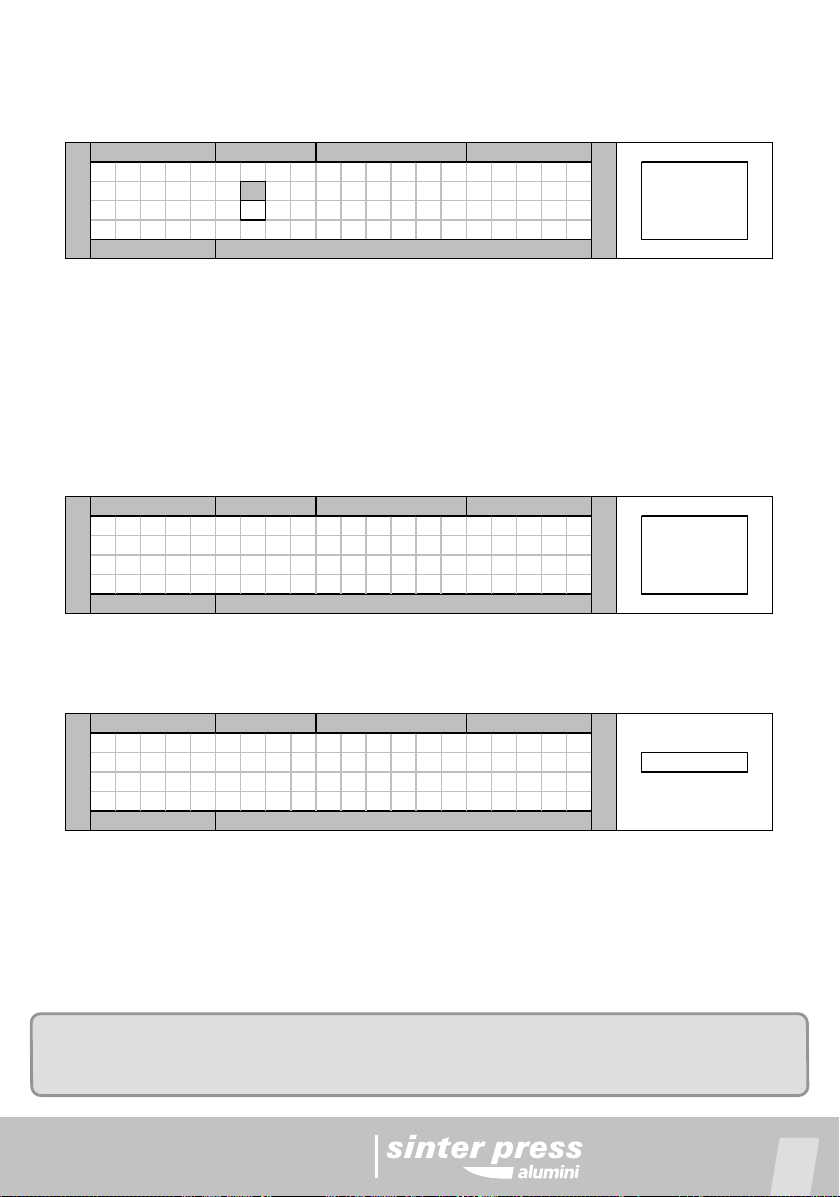
firstscreenoncontainstheprogramversionsdata.Ex-1.
E D G E Q U I P A M E N T O S TELA - 1 DE
E D G H A N D V 2 . 2 INICIALIZAÇÃO E
E D G B A S E V 1 . 3 CHECAGEM DO
W W W . E D G . C O M . B R FORNO
EX - 1
TEMP ºC VÁCUO
ELEVADOR
STATUS RECºN
MENSAGENS
6-3) The next screen shows the starting-up and the whole system checking-up, a
scroll bar keeps running through the screen while it performs the initial
configurations.Ex-2.
TELA - 2 DE
I N I C I A L I Z A N D O INICIALIZAÇÃO E
CHECAGEM DO
FORNO
EX- 2
TEMP ºC VÁCUO
ELEVADOR
STATUS RECºN
MENSAGENS
6-4) When the checking-up is over, the system loads the sintering standard recipe
nº 80 and waits for the operator's command to perform a new function. We remind
you that when sintering, the furnace will just heat up after the start command is
activated; therefore the temperature on screen is close to the ambient
temperature. Ex-3.
08
M O N I T 0 8 0 0 0 2 5 0 0
T 1 = 0 2 0 0 P A T 1 = H 0 : 3 0 MONITORAÇÃO
V E L 1 = 0 5 . 0 SINTERIZAÇÃO
S D D M . P A D R Ã O . S I N T E R . EX- 3
TEMP ºC VÁCUO
ELEVADOR
STATUS RECºN
MENSAGENS
Manual
6-5) The furnace should not start the burn process without the spool on the tray;
otherwise the sealing ring and the tray will be seriously damaged and will need to
bereplaced.Choosetheproperaccessoryfor thetype ofworktobeburn. PIC-4 e
PIC-5. 6-6) Accessories for the burning -
SINTERING.
A)Usespool-item(15).
B) Use the rigid mat item (16) on the
spool.
6-7) Accessories for the burning -
.CERAMIC–Conventional.
C)Usespool–item(15)
D) Use the rigid mat item (17) on the
spool.
E) Use isothermal pins for supporting
thepiece.Item(18).
6-8) Accessories for the burning -.CERAMIC
–PRESSED.
F)Usespool–item(19).
G) Use refractory platform item (20) inserted
inthespooltoplacethering.
09
17 16
18
15
Pic.4
20
19
Pic.5
Pic.6
58,0
MÁXIMO 92,0
Pic.3
15
14
Manual
!Warning:The set of RINGS, PADS and PLUNGER should not be
higherthanthemaximumheightof92millimeters,asshownonPIC-(6).
6-9)Movetheelevatortraytothefrontitem-(14)holdingitbyitsknobandplacethe
spool item-(15) on its fitting, next bring the tray back to its correct position on the
platformtostarttheequipmentoperation.
7Programming ceramic recipes
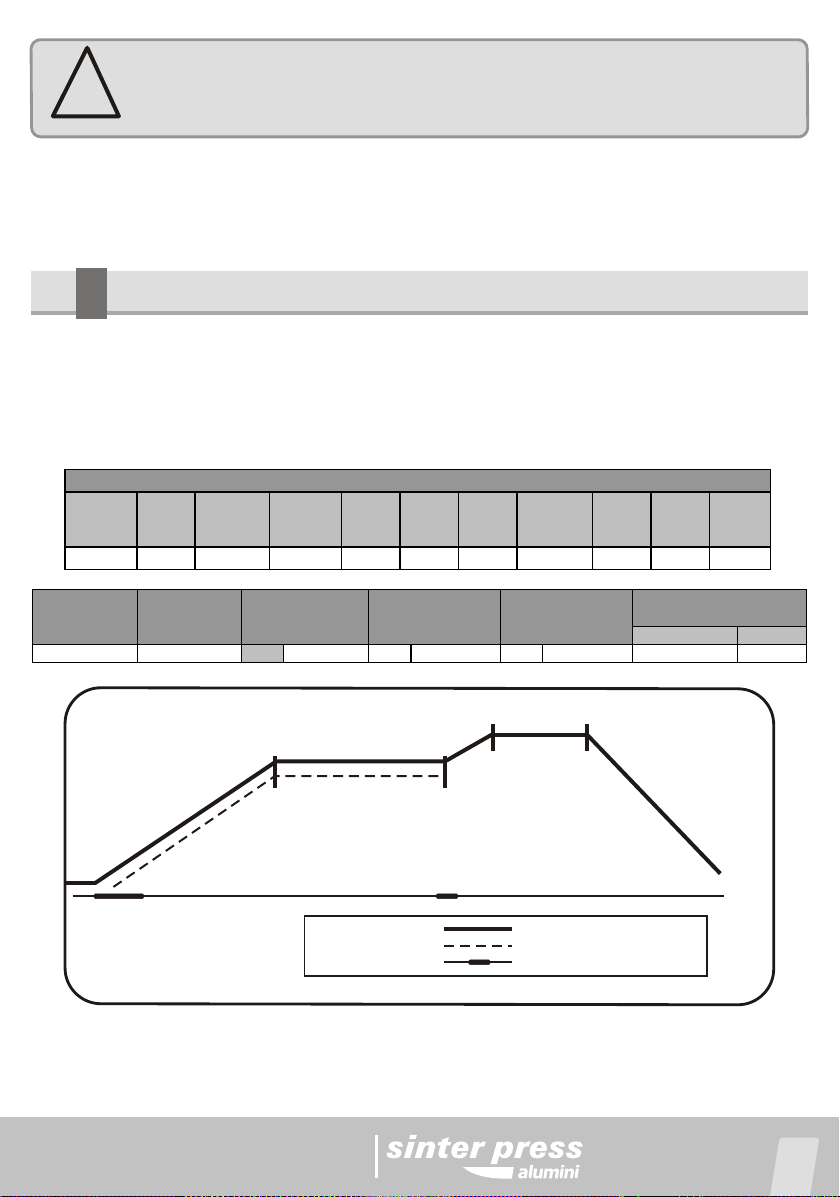
7-1) For better illustrating, we will follow some practical recipes examples for
conventionalceramic,pressedceramic,sinteringandinfiltration.
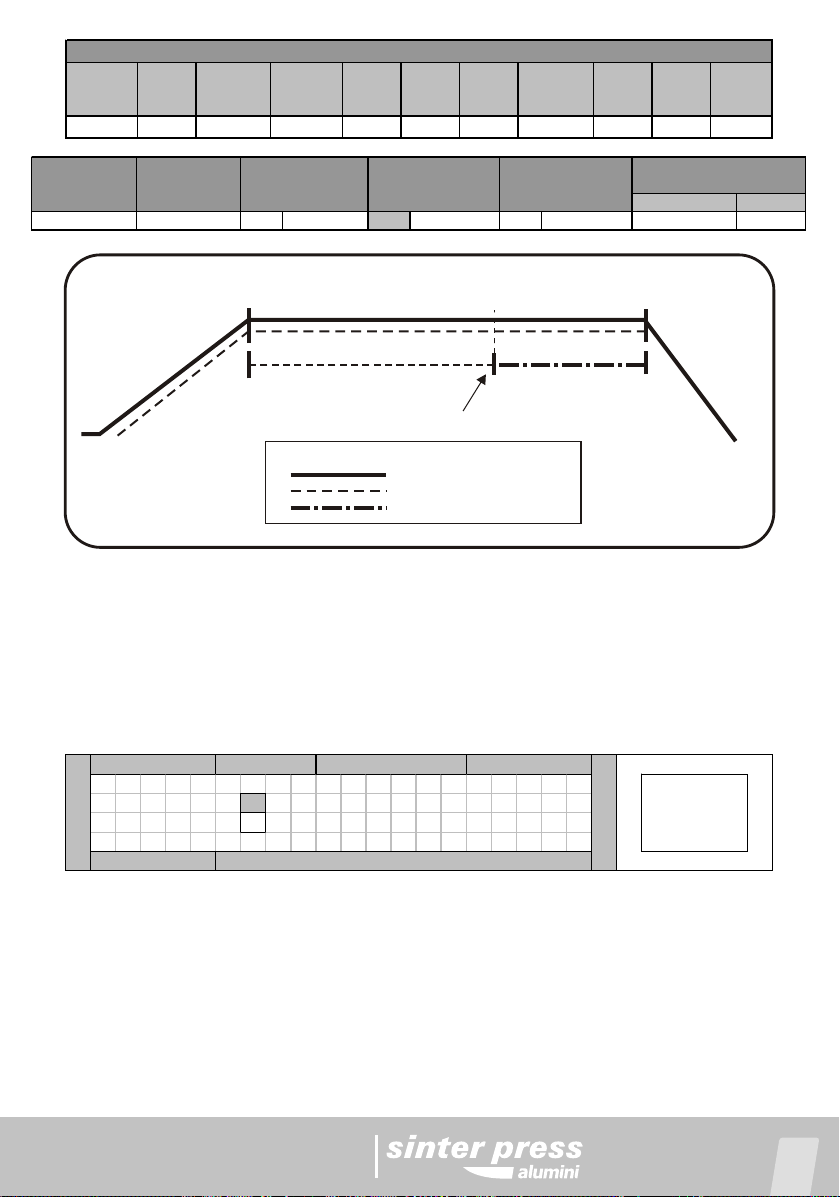
Ex-1 recipemodel-conventionalceramic
TEMP-1
ºC VEL-1
Fixo PAT-1
Elevador TEMP-2
ºC VEL-2
ºC/min PAT-2
min VAC-2
min TEMP-3
ºC VEL-3
ºC/min PAT-3
min VAC-3
min
600 60 BASE 960 55 01:00 01:00 980 20 01:00 0
EXEMPLO DE RECEITA PARA CERÂMICA CONVENCIONAL
10
UP DOWN
05:00 00:00 X YES NO NO 5 3
AUTO-START
Campo preenchido ELEVATORPRENSAGEM
min
PRÉ. QUEIMA
min ARGON
Campo preenchido RESFRIAMENTO
Campo preenchido
VEL-2=55ºC
T2=960ºC PAT-2=1:00
VAC-2=1:00 VEL-3=20ºC
T3=980ºC PAT-3=1:00
T1=600ºC
LIFT BELOW CAPTION HEATING CURVE
VACUUM CURVE
ARGON CURVE
NATURE
COOLING
7-2) Start the programming by reading the standard ceramic recipe (01); it will
serveasreferenceforprogrammingtheotherrecipes.
Manual
L E R LEITURA
0 1 à 7 9 C E R Â M I C A DAS RECEITAS
8 0 à 9 9 S I N T E R I Z A Ç Ã O DE
CERÂMICA
EX- 4
TEMP ºC VÁCUO
ELEVADOR
STATUS RECºN
MENSAGENS
7-4) On the next screen choose receita 01 typing número 1 on the REC field, or
navigate through the options list using the esquerda (left) or direita (right) arrows,
the name of the recipe will be shown on the messages field (PADRÃO CERAM)
EX-5, at this time you should confirm the option by activating the LER (read) key
again to complete with the operation. The recipe will automatically be sent to the
platformandwhenthereisnoreciperecorded,themessage(RECEITAVAZIA)will
beonthedisplay.
L E R LEITURA
R E C : 0 0 1 . . C E R Â M I C A . . DAS RECEITAS
A L F A DE
N O M E : . P A D R Ã O . C E R Â M . CERÂMICA
EX- 5
TEMP ºC VÁCUO
ELEVADOR
STATUS RECºN
MENSAGENS
11
7-3) Activate the LER (read) key and choose the type of work to be performed,
ceramic or sintering. To alternate between the two options use the OK key and
confirmtheoperationagainusingtheLER(read)key.Ex4.
7-5) After the standard recipe is read the system will return to its monitoring
screen.EX-11
M O N I T 0 0 1 0 6 0 0 0 0
T 1 = 0 6 0 0 MONITORAÇÃO
V E L 1 = 0 6 0 EX- 11
S D . D D P A D R Ã O . C E R Â M
TEMP ºC VÁCUO
ELEVADOR
STATUS RECºN
MENSAGENS
7-6) To start programming a new recipe you should activate the PROGRAMAkey,
and the display will show the message TELA1, the cursor will be flashing over the
field related to temperature T1=600. At this time we have two options, we can
simply type new values on the already filled fields or we erase all values using the
LIMPARECkey,thenwecantypeontheemptyfields.EX-12
Note: For CONVENTIONAL CERAMIC EX-1, we will use the empty fields
activatingthefunctionLIMPAREC.

Manual
T E L A 1 0 0 1 FUNÇÃO
T 1 = 0 0 0 0 LIMPA REC
CAMPOS VAZIOS
N O M E : . . . . . . . . . . . . . . . INSERIR DADOS
EX- 12
TEMP ºC VÁCUO
ELEVADOR
STATUS RECºN
MENSAGENS
7-7) On the screen TELA-1, now with the empty fields, you will see the cursor
flashing on the T1=0000 field. Type the new value T1=0600 following the steps
presentedforstandardconventionalceramicrecipeEX-6.
T E L A 1 0 0 1 PROGRAMAÇÃO
T 1 = 0 6 0 0 SEQUENCIAL
DAS RECEITAS
N O M E : P A D R Ã O . C E R Â M DE CERÂMICA
EX- 6
TEMP ºC VÁCUO
ELEVADOR
STATUS RECºN
MENSAGENS
7-8) Activate the PROGRAMA key again and a new screen TELA-2 can be
visualized, in which the cursor will be flashing on the T2=000 field. Type the new
value of T2=960 and confirm using the OK key, then the cursor will be flashing on
the velocity field VEL2=000, type the new value of VEL2=55 and confirm it using
theOKkey.NowtypethenewvalueforthebaselinetimePAT2=01:00andvacuum
time VAC2=01:00, these times are programmed using minutes. Confirm the
operationbyusingtheOKkey.EX-7.
12
T E L A 2 0 0 1 PROGRAMAÇÃO
T 2 = 0 9 6 0 P A T 2 = 0 1 : 0 0 SEQUENCIAL
V E L 2 = 0 5 5 V A C 2 = 0 1 : 0 0 DAS RECEITAS
N O M E : P A D R Ã O . C E R Â M DE CERÂMICA
EX- 7
TEMP ºC VÁCUO
ELEVADOR
STATUS RECºN
MENSAGENS
7-9) Activate the PROGRAMA key again and a new screen TELA-3 can be
visualized, in which the cursor will be flashing on the T3=000 field. Type the new
value of T3=980 and confirm using the OK key, then the cursor will be flashing on
the velocity field VEL3=000, type the new value of VEL3=020 and confirm it using
theOKkey.NowtypethenewvalueforthebaselinetimePAT3=01:00andvacuum
time VAC3=00:00, these times are programmed using minutes. Confirm the
operationbyusingtheOKkey.EX-8
T E L A 3 0 0 1 PROGRAMAÇÃO
T 3 = 0 9 8 0 P A T 3 = 0 1 : 0 0 SEQUENCIAL
V E L 3 = 0 2 0 V A C 3 = 0 0 : 0 0 DAS RECEITAS
N O M E : P A D R Ã O . C E R Â M DE CERÂMICA
EX- 8
TEMP ºC VÁCUO
ELEVADOR
STATUS RECºN
MENSAGENS
Manual
T E L A 4 0 0 1 A R G O N PROGRAMAÇÃO
P R É Q = 0 5 : 0 0 R E S F R SEQUENCIAL
P R E N = 0 0 : 0 0 A U T O S DAS RECEITAS
N O M E : P A D R Ã O . C E R Â M DE CERÂMICA
EX- 9
TEMP ºC VÁCUO
ELEVADOR
STATUS RECºN
MENSAGENS
7-11) Activate the PROGRAMA key again and a new screen TELA-5 will be
visualized,inwhichthecursor willbeflashingonthe “D”fieldof theascentfunction
SOBE, move the cursor to the position (5) using the left and right arrows and
confirm the operation by using the OK key. This option confirmation will be
visualized in parenthesis on the ascent field SOBE. Repeat the previous step to
program the descent function of the elevator DESCE, move the cursor to the
position (3) using the left and right arrows and confirm the operation by using the
OKkey. EX-10.
13
7-10) Activate the PROGRAMA key again and a new screen TELA-4 will be
visualized, in which the cursor will be flashing on the pre burn field PRÉQ=00:00,
typethenewvalueofPRÉQ=05:00andconfirmitusingtheOKkey,thenthecursor
will be flashing on the press field PREN=00:00, keep the value in ZERO and
confirm it using the OK key. Now the cursor will be flashing on the argon field
ARGON,toconfirmthisoperationactivatetheleftarrowandtherelatedfieldwillbe
filled,andconfirmitusingtheOKkey,ARGON=SIMATIVADO,repeattheprevious
step to program the quick cooling field RESFR=NÃO and also the auto start field
AUTOS=NÃO. When these fields are filled, the selected function will be enabled
anditwillmakepartoftherecipe.EX-9.
T E L A 5 0 0 1 E L E V A D O R PROGRAMAÇÃO
S O B E ( 5 ) M D 1 2 3 4 5 6 7 8 9| SEQUENCIAL
D E S C E ( 3 ) M D 1 2 3 4 5 6 7 8 9| DAS RECEITAS
N O M E : . . . P R E N S A D A . . . DE CERÂMICA
EX - 10
TEMP ºC VÁCUO
ELEVADOR
STATUS RECºN
MENSAGENS
7-12) Activate the PROGRAMA key again and the system will be back to the
programming beginning TELA-1. At this stage the recipe is ready to be saved
GRAVADAin the memory, check the step-by-step for saving recipes PG-24-item-
11. To send the recipe to the platform just activate the monitoring key
MONITORAÇÃO.
8Programming pressed ceramic recipes
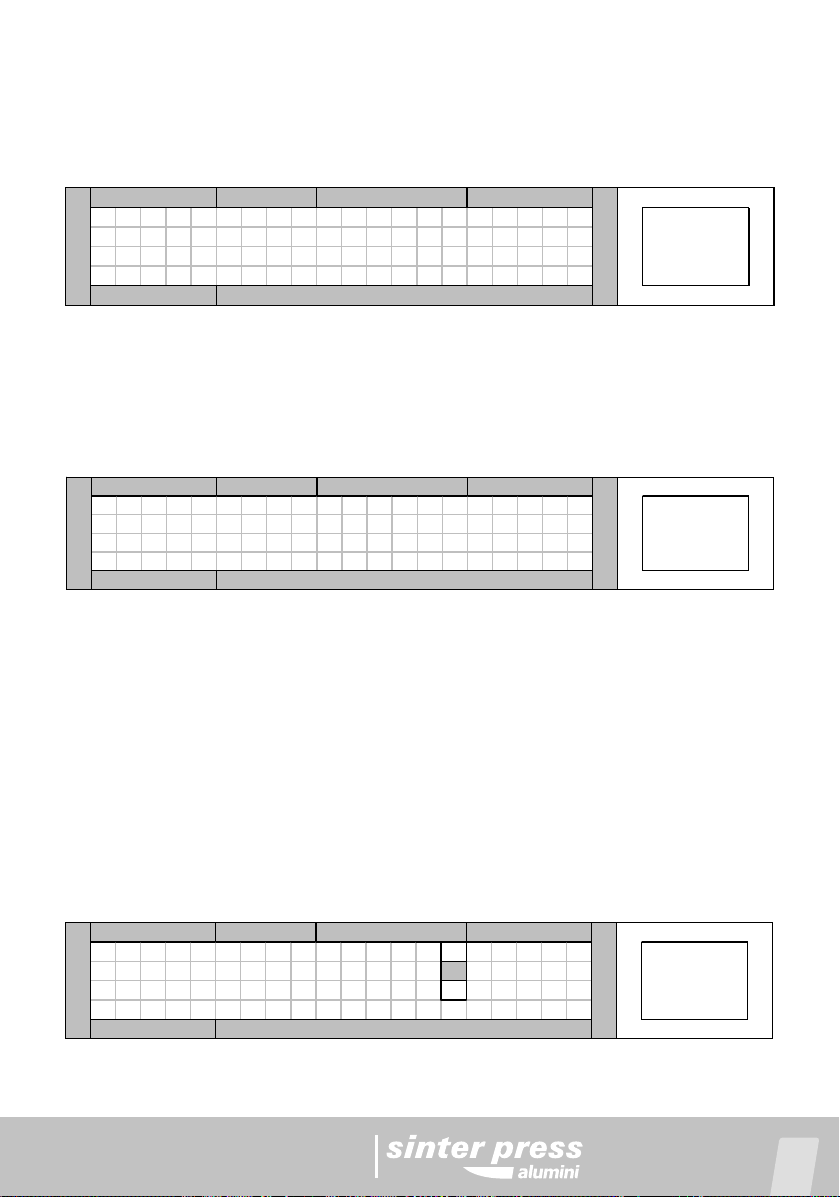
Ex-2 recipemodel–pressedceramic
Manual
VEL-2=55ºC
T2=960ºC PAT-2= 29:00-minutos PREN=9:00-minutos
FORCED
COOLING
PRESSING TIME
TOTAL = 9 MINUTES
SHOOT THE STOP WATCH
PRESS WITH GO 20 MINUTES
CAPTION
T1=800ºC
LIFT BELOW HEATING CURVE
VACUUM CURVE
PRESS CURVE
TEMP-1
ºC VEL-1
Fixo PAT-1
Elevador TEMP-2
ºC VEL-2
ºC/min PAT-2
min VAC-2
min TEMP-3
ºC VEL-3
ºC/min PAT-3
min VAC-3
min
800 60 BASE 960 55 29:00 29:00 0 0 00:00 0
EXEMPLO DE RECEITA PARA CERÂMICA CONVENCIONAL
UP DOWN
00:00 09:00 NO X YES NO D D
AUTO-START
Campo preenchido ELEVATORPRENSAGEM
min
PRÉ. QUEIMA
min ARGON
Campo preenchido RESFRIAMENTO
Campo preenchido
8-1) Start the programming by reading the standard ceramic recipes (01); it will
serveasreferenceforprogrammingtheotherrecipes.
8-2) Activate the LER (read) key and choose the type of work to be performed,
ceramic or sintering. To alternate between the two options use the OK key and
confirmtheoperationagainusingtheLER(read)key.Ex4.
14
L E R LEITURA
0 1 à 7 9 C E R Â M I C A DAS RECEITAS
8 0 à 9 9 S I N T E R I Z A Ç Ã O DE
CERÂMICA
EX- 4
TEMP ºC VÁCUO
ELEVADOR
STATUS RECºN
MENSAGENS
8-3) On the next screen choose receita 01 typing número 1 on the REC field, or
navigate through the options list using the esquerda (left) or direita (right) arrows,
the name of the recipe will be shown on the messages field (PADRÃO CERAM)
EX-5, at this time you should confirm the option by activating the LER (read) key
again to complete with the operation. The recipe will automatically be sent to the
platformandwhenthereisnoreciperecorded,themessage(RECEITAVAZIA)will
beonthedisplay.

Manual
L E R LEITURA
R E C : 0 0 1 . . C E R Â M I C A . . DAS RECEITAS
A L F A DE
N O M E : . P A D R Ã O . C E R Â M . CERÂMICA
EX- 5
TEMP ºC VÁCUO
ELEVADOR
STATUS RECºN
MENSAGENS
8-4)Afterthestandardrecipeisreadthesystemwillreturntoitsmonitoringscreen.
EX-11.
M O N I T 0 0 1 0 6 0 0 0 0
T 1 = 0 6 0 0 MONITORAÇÃO
V E L 1 = 0 6 0 EX-11
S D . D D P A D R Ã O . C E R Â M
TEMP ºC VÁCUO
ELEVADOR
STATUS RECºN
MENSAGENS
8-5) To start programming a new recipe you should activate the PROGRAMAkey,
and the display will show the message TELA1, the cursor will be flashing over the
field related to temperature T1=600. At this time we have two options, we can
simply type new values on the already filled fields or we erase all values using the
LIMPARECkey,thenwecantypeontheemptyfields.EX-12.
T E L A 1 0 0 1 FUNÇÃO
T 1 = 0 0 0 0 LIMPA REC
CAMPOS VAZIOS
N O M E : . . . . . . . . . . . . . . . INSERIR DADOS
EX- 12
TEMP ºC VÁCUO
ELEVADOR
STATUS RECºN
MENSAGENS
Note:For PRESSED CERAMIC EX-2, we will use the empty fields activating the
functionLIMPAREC.
15
8-6) On the screen TELA-1, now with the empty fields, you will see the cursor
flashing on the T1=0000 field. Type the new value T1=0800 following the steps
presentedforstandardpressedceramicrecipeEX-13.
T E L A 1 0 0 1 PROGRAMAÇÃO
T 1 = 0 8 0 0 SEQUENCIAL
DE CERÂMICA
N O M E : . . . P R E N S A D A . . . . PRENSADA
EX- 13
TEMP ºC VÁCUO
ELEVADOR
STATUS RECºN
MENSAGENS
8-7) Activate the PROGRAMA key again and a new screen TELA-2 can be
visualized,inwhichthecursorwillbeflashingontheT2=000field. Typethenew
Manual
T E L A 2 0 0 1 PROGRAMAÇÃO
T 2 = 0 9 6 0 P A T 2 = 2 9 : 0 0 SEQUENCIAL
V E L 2 = 0 5 5 V A C 2 = 2 9 : 0 0 DE CERÂMICA
N O M E : . . . P R E N S A D A . . . . PRENSADA
EX- 14
TEMP ºC VÁCUO
ELEVADOR
STATUS RECºN
MENSAGENS
T E L A 3 0 0 1 PROGRAMAÇÃO
T 3 = 0 0 0 0 P A T 3 = 0 0 : 0 0 SEQUENCIAL
V E L 3 = 0 0 0 V A C 3 = 0 0 : 0 0 DE CERÂMICA
N O M E : . . . P R E N S A D A . . . . PRENSADA
EX - 15
TEMP ºC VÁCUO
ELEVADOR
STATUS RECºN
MENSAGENS
8-8) Activate the PROGRAMA key again and a new screen TELA-3 can be
visualized, in which the cursor will be flashing on the T3=000 field. For this recipe,
stagethree(três)willnotbeused,soallthefieldsonthisscreenshouldbeatZERO
EX–15.
T3=000, VEL3=000, PAT3=00:00, VAC3=00:00
8-9) Activate the PROGRAMA key again and a new screen TELA-4 will be
visualized, in which the cursor will be flashing on the pre burn field PRÉQ=00:00,
keepitat ZERO and confirmitusing the OK key, thenthecursor will be flashingon
the press field PREN=00:00, type the new value of PREN=09:00 and confirm it
usingtheOKkey.NowthecursorwillbeflashingontheargonfieldARGON,keepit
deactivated ARGON=NÃO and confirm this operation using the OK key. To
program the quick cooling field RESFR, activate the left arrow to fill in the field
RESF=SIM and confirm this operation using the OK key. The cursor will then be
flashing on the auto start field, keep it deactivatedAUTOS=NÃO and confirm it by
usingtheOKkey.Whenthesefieldsarefilled,theselectedfunctionwillbeenabled
anditwillmakepartoftherecipe.EX-16.
16
T E L A 4 0 0 1 A R G O N PROGRAMAÇÃO
P R É Q = 0 0 : 0 0 R E S F R SEQUENCIAL
P R E N = 0 9 : 0 0 A U T O S DE CERÂMICA
N O M E : . . . P R E N S A D A . . . . PRENSADA
EX- 16
TEMP ºC VÁCUO
ELEVADOR
STATUS RECºN
MENSAGENS
8-10) Activate the PROGRAMA key again and a new screen TELA-5 will be
visualized,inwhichthecursorwillbeflashingonthe“D”fieldoftheascentfunction
value of T2=960 and confirm using the OK key, then the cursor will be flashing on
the velocity field VEL2=000, type the new value of VEL2=55 and confirm it using
theOKkey.NowtypethenewvalueforthebaselinetimePAT2=29:00andvacuum
time VAC2=29:00, these times are programmed using minutes. Confirm the
operationbyusingtheOKkey.EX-14.
Manual
T E L A 5 0 0 1 E L E V A D O R PROGRAMAÇÃO
S O B E ( D ) M D 1 2 3 4 5 6 7 8 9 SEQUENCIAL
D E S C E ( D ) M D 1 2 3 4 5 6 7 8 9 DE CERÂMICA
N O M E : . . . P R E N S A D A . . . PRENSADA
EX- 17
TEMP ºC VÁCUO
ELEVADOR
STATUS RECºN
MENSAGENS
8-11)Activate the PROGRAMA key again and the system will be back to the
programming beginning TELA-1. At this stage the recipe is ready to be saved
GRAVADAin the memory, check the step-by-step for saving recipes PG-24-item-
11. To send the recipe to the platform just activate the monitoring key
MONITORAÇÃO
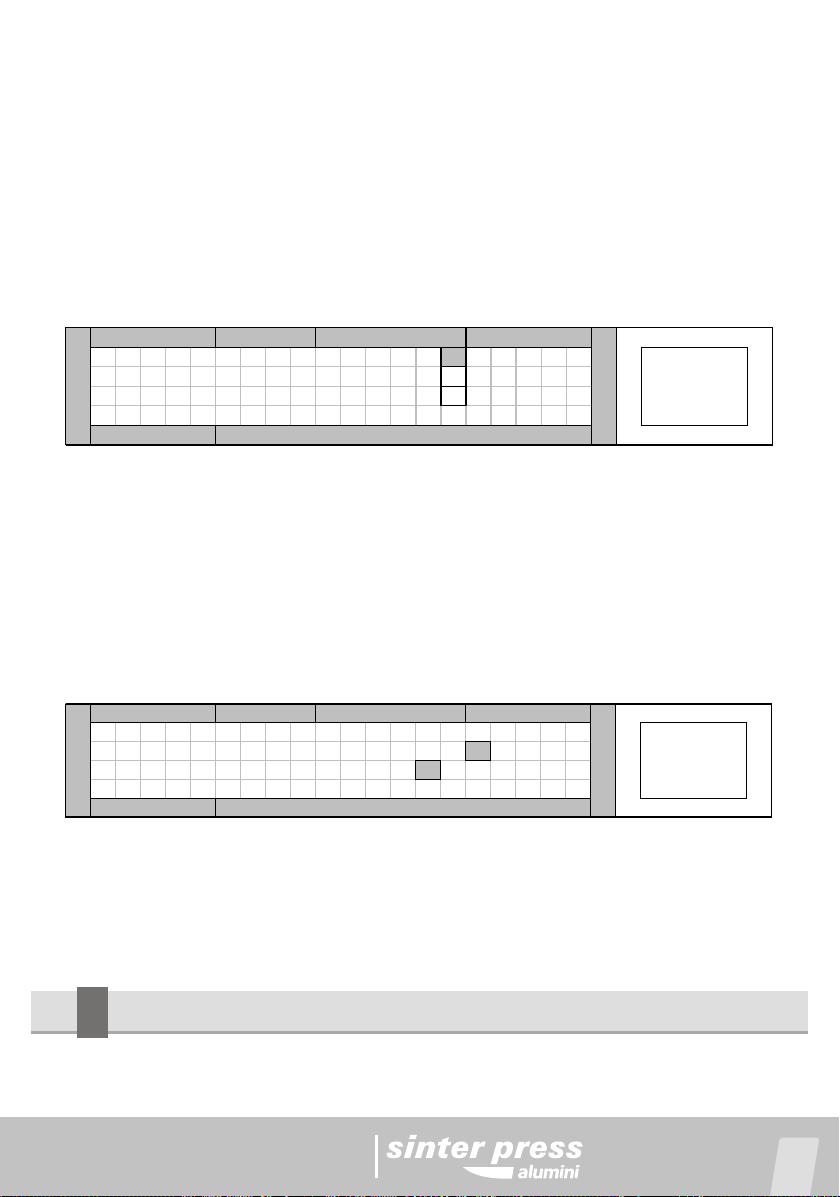
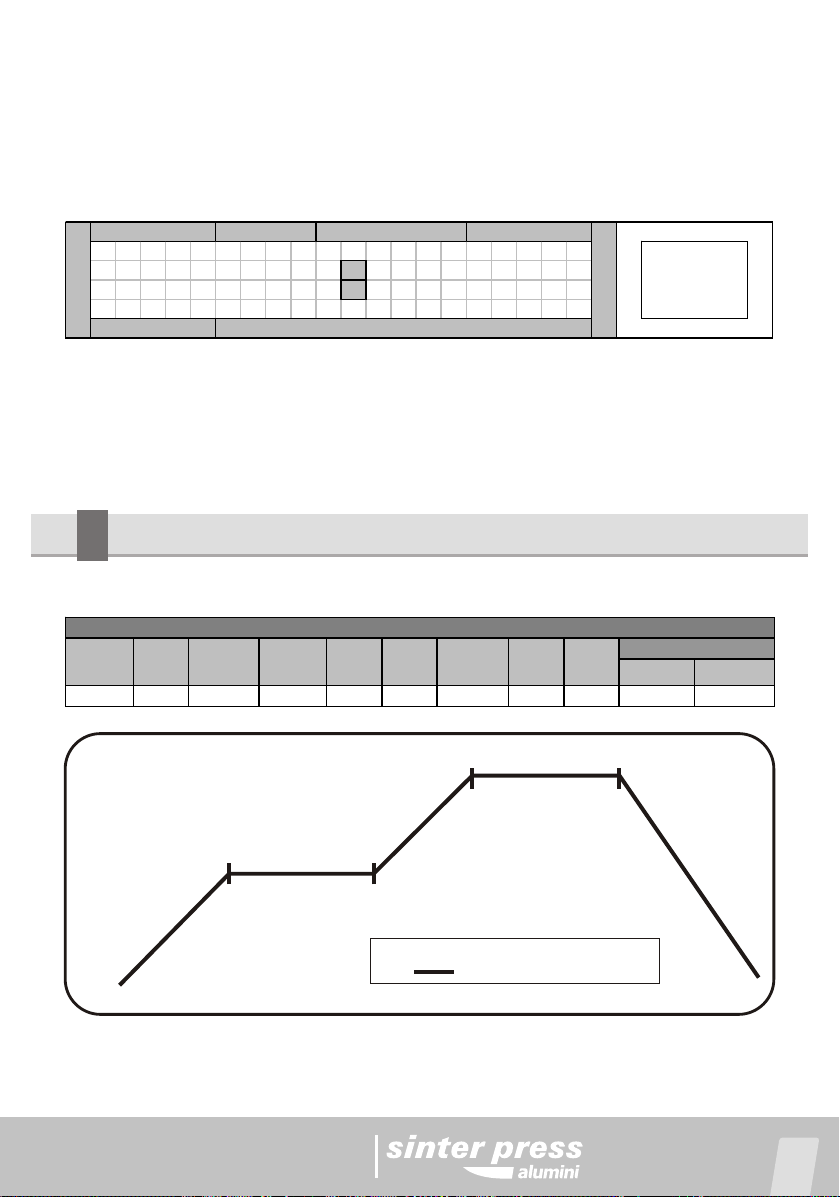
9Programming sintering recipes.
UP DOWN
200 7.0 00:10 1100 40.0 01:00 0 0 00:00 D 2
VEL-3
ºC/min PAT-3
H/min
EXEMPLO DE RECEITA PARA SINTERIZAÇÃO ELEVATOR
TEMP-1
ºC VEL-1
ºC/min PAT-1
H/min TEMP-2
ºC VEL-2
ºC/min PAT-2
H/min TEMP-3
ºC
T1=220ºC
PAT-1 = 00:10 min
VEL-1 = 7.0ºC
25ºC
VEL-2 = 40.0ºC
PAT-2 = 01:00 Hora
T2 = 1100ºC
NATURAL
COOLING
CAPTIONHEATING CURVE
17
SOBE,if necessary,movethe cursorto thedesiredposition usingthe leftandright
arrowsandconfirmtheoperationbyusingtheOKkey.Thisoptionconfirmationwill
bevisualizedinparenthesisontheascentfieldSOBE. Repeatthepreviousstepto
program the descent function of the elevator DESCE, move the cursor to the
position (D) using the left and right arrows and confirm the operation by using the
OKkey. EX-17.
Ex-3 recopemodel–sintering/infiltration
9-1) Start the programming reading the standard sintering recipe Receita (80), it
willserveasreferenceforprogrammingtheotherrecipes.

Manual
L E R LEITURA
0 1 à 7 9 C E R Â M I C A DAS RECEITAS
8 0 à 9 9 S I N T E R I Z A Ç Ã O DE
SINTERIZAÇÃO
EX - 19
TEMP ºC VÁCUO
ELEVADOR
STATUS RECºN
MENSAGENS
9-3) On the next screen choose receita 80 typing número 80 on the REC field, or
navigate through the options list using the esquerda (left) or direita (right) arrows,
the name of the recipe will be shown on the messages field (PADRÃO SINTER)
EX-20, at this time you should confirm the option by activating the LER (read) key
again to complete with the operation. The recipe will automatically be sent to the
platformandwhenthereisnoreciperecorded,themessage(RECEITAVAZIA)will
beonthedisplay.Itisnotpossibletoread(LER).
L E R LEITURA
R E C : 0 8 0 S I N T E R I Z A Ç Ã O DAS RECEITAS
A L F A DE
N O M E : P A D R Ã O . S I N T E R . SINTERIZAÇÃO
EX - 20
TEMP ºC VÁCUO
ELEVADOR
STATUS RECºN
MENSAGENS
9-4) After the standard sintering recipe is read the system will return to its
monitoringscreen.EX-25
M O N I T 0 8 0 0 0 2 5 0 0
T 1 = 0 2 0 0 P A T 1 = H 0 : 1 5 MONITORAÇÃO
V E L 1 = 0 5 . 0 SINTERIZAÇÃO
S D D M . P A D R Ã O . S I N T E R . EX - 25
TEMP ºC VÁCUO
ELEVADOR
STATUS RECºN
MENSAGENS
9-5) To start programming a new recipe you should activate the PROGRAMAkey,
and the display will show the message TELA1, the cursor will be flashing over the
field related to temperature T1=600. At this time we have two options, we can
simply type new values on the already filled fields or we erase all values using the
LIMPARECkey,thenwecantypeontheemptyfields.EX-26.
Note: For SINTERING EX-3, we will use the empty fields activating the function
LIMPAREC.
18
9-2) Activate the LER (read) key and choose the type of work to be performed,
ceramic or sintering. To alternate between the two options use the OK key and
confirmtheoperationagainusingtheLER(read)key.Ex-19

Manual
T E L A 1 0 8 0 FUNÇÃO
T 1 = 0 0 0 0 LIMPA REC
CAMPOS VAZIOS
N O M E : . . . . . . . . . . . . . . . INSERIR DADOS
EX- 26
TEMP ºC VÁCUO
ELEVADOR
STATUS RECºN
MENSAGENS
9-6) On the screen TELA-1, now with the empty fields, you will see the cursor
flashing on the T1=0000 field. Type the new value T1=220 and confirm using the
OKkey,thenthecursorwillbeflashingonthevelocityfieldVE1=00.0,typethenew
valueofVEL1=07.0andconfirmitusingtheOKkey.Nowtypethenewvalueforthe
baseline time PAT1=H0:10 this time is programmed using hours. Confirm the
operation by using the OK key. EX-21. Follow the step-by-step of the standard
sinteringrecipeEX-3
Note: The sintering velocities can be fractional, values lower than 1ºC/minute,
minimum0.1ºC/minute.
T E L A 2 0 8 0 PROGRAMAÇÃO
T 2 = 1 1 0 0 P A T 2 = H 1 : 0 0 DE
V E L 2 = 4 D . 0 SINTERIZAÇÃO
N O M E : P A D R Ã O . S I N T E R . INFILTRAÇÃO
EX - 22
TEMP ºC VÁCUO
ELEVADOR
STATUS RECºN
MENSAGENS
T E L A 1 0 8 0 PROGRAMAÇÃO
T 1 = 0 2 2 0 P A T 1 = H 0 : 1 0 DE
V E L 1 = 0 7 . 0 SINTERIZAÇÃO
N O M E : P A D R Ã O . S I N T E R . INFILTRAÇÃO
EX - 21
TEMP ºC VÁCUO
ELEVADOR
STATUS RECºN
MENSAGENS
9-7) Activate the PROGRAMA key again and a new screen TELA-2 can be
visualized, in which the cursor will be flashing on the T2=000 field. Type the new
value of T2=1100 and confirm using the OK key, then the cursor will be flashing on
thevelocityfieldVEL2=00.0,typethenewvalueofVEL2=40.0andconfirmitusing
theOKkey. Now typethenew value for thebaselinetime PAT2=H1:00, this timeis
programmed using hours with minutes visualization. Confirm the operation by
usingtheOKkey.EX-22.
9-8) Activate the PROGRAMA key again and a new screen TELA-3 can be
visualized, in which the cursor will be flashing on the T3=000 field. For this recipe,
stagethree(três)willnotbeused,soallthefieldsonthisscreenshouldbeatZERO
EX–15.
T3=000,VEL3=000,PAT3=00:00, VAC3=00:00
ConfirmtheoperationbyusingtheOKkey.EX-23.
19
Table of contents
Other EDG Laboratory Equipment manuals


Popular Laboratory Equipment manuals by other brands


Nordson EFD
Nordson EFD E2V operating manual

Hanna Instruments
Hanna Instruments HI97705 instruction manual

Micromeritics
Micromeritics MicroStar 022 installation guide

Ele
Ele 38-1000 operating instructions

Thermo Scientific
Thermo Scientific MEGA-PURE 680 D440046 Series Operation manual and parts list

Idexx
Idexx CardioPet ECG user guide