EF HB BI 584 FA User manual

EMBRACING FINEST MOMENT
BUILT-IN INDUCTION HOB
Model:
HB BI 584 FA
USER MANUAL

Dear Customer,
Thank you for having purchased and given your preference to our product. This
manual provides a means to make full use of the features of this product. The safety
precauons and recommendaons are also featured in this manual. We recommend
that you read this manual for best performance and to extend the life of your
appliance.
Please preserve this manual for future use, in the event that doubts arise relang to
the operaon.
Installaon
Electrical Shock Hazard
•Disconnect the appliance from the mains electricity supply before
carrying out any work or maintenance on it.
•Connecon to a good earth wiring system is essenal and mandatory.
•Means for disconnecon must be incorporated in the xed wiring in
accordance with the wiring rules.
•Alteraons to the domesc wiring system must only be made by a
qualied electrician.
•Failure to follow this advice may result in electrical shock or death.
Cut Hazard
•Panel edges are sharp – be careful
•Failure to use cauon could result in injury or cuts.
IMPORTANT: This appliance is designed and manufactured solely for the cooking
of domestic (household) food and is not suitable for any non-domestic
application and therefore should not be used in a commercial environment.
The appliance guarantee will be void if the appliance is used within a non-
domestic environment i.e. A semi commercial, commercial or a communal
environment.
SAFETY GUIDELINES

Important Safety Instrucons
•Aer having unpacked the appliance, check to ensure that it is not
damaged.
•No combusble material or products should be placed on this appliance
at any me.
•In order to avoid hazard, this appliance must be installed according to the
instrucons for installaon.
•This appliance is to be properly installed and earthed only by a suitably
qualied person.
•Do not aempt to modify the technical characteriscs of the appliance as
this may become dangerous to use.
•This appliance should be connected to a circuit which incorporates an
isolang switch providing full disconnecon from the power supply.
•WARNING: Use only hob guards designed by the manufacturer of this
appliance on the instrucons for use. The use of inappropriate guards can
cause accidents.
•Failure to install the appliance correctly could invalidate any warranty or
liability claims.
•Regarding the details of installaon, thanks to refer to the secon
<Installaon>.
Operaon and Maintenance
Electrical Shock Hazard
•Do not cook on a broken or cracked cooktop. If the cooktop surface is
broken or cracked, switch the appliance o immediately at the main
power supply (wall switch) to avoid the possibility of electric shock, for
hob surfaces of glass-ceramic or similar material which protect live parts
and contact customer service center.
•Switch the cooktop o at the wall before cleaning or maintenance.
•Failure to follow this advice may result in electrical shock or death.

Health Hazard
•This appliance complies with electromagnec safety standards for
domesc cooking. It should not interfere with other electronic unit.
•WARNING: Persons with cardiac pacemakers or any other electrical
implants must check with their doctor if they can use the inducon
cooking system.
Hot Surface Hazard
•During use, the appliance and its accessible parts will become hot. Care
should be taken to avoid touching the heang elements.
•Do not let your body, clothing or any item other than suitable cookware
contact the ceramic glass unl the surface is cool down.
•Children less than 8 years of age shall be kept away unless connuously
supervised.
•Metallic objects such as knives, forks, spoons and lids should not be
placed on the hob surface since they can get hot.
•Failure to follow this advice could result in burns and scalds.
Important Safety Instrucons
•Never use the appliance as a work or storage surface.
•Never leave any objects or utensils on the appliance.
•Never use the appliance for warming or heang the room.
•Aer use, always turn o the cooking zones and the cooktop as described
in this manual (i.e. by using the touch controls).
•The appliance is not intended to be operated by means of an external
mer or separate remote-control system.
•Do not allow children to play with the appliance or sit, stand, or climb on
it.
•Do not leave children alone or unaended in the area where the
appliance is in use.
•Do not stand on the appliance.
•Do not repair or replace any part of the appliance unless specically
recommended in the manual. All other servicing should be done by a
qualied technician.

•Do not use a steam cleaner to clean your cooktop as the moisture can get
into the appliance therefore making it unsafe
•Do not place or drop heavy or sharp objects on the glass ceramic hob
•Do not use pans with jagged edges or drag pans across the glass surface
as this can scratch the glass.
•Do not use scourers or any other harsh abrasive cleaning agents to clean
your cooktop, as these can scratch the ceramic glass.
•Please use suitable cookware meant for inducon cooking.
•Please use pans of recommended size (see minimum pan diameter in
page 8). It is not advisable to use pans smaller than the cooking zone.
•If the supply cord is damaged, it must be replaced by the manufacturer,
its service agent or similarly qualied persons in order to avoid hazard.
•This appliance can be used by children aged from 8 years and above and
persons with reduced physical, sensory or mental capabilies or lack of
experience and knowledge if they have been given supervision or
instrucon concerning use of the appliance in a safe way and understand
the hazards involved.
•WARNING: Unaended cooking on a hob with fat or oil can be dangerous
and may result in re. NEVER try to exnguish a re with water, but
switch o the appliance and then cover ame e.g. with a lid or a re
blanket.
•WARNING: Danger of re: do not store items on the cooking surfaces.

1. ON/OFF Key
2. Power Level Selection
3. Timer Key/Display
4. Key Lock
5. Heating Zone Selection
6. Flexible Zone Selection
7. Pause Function Key
8. Heating Zone Indicator
9. Power Level Display
Heating Zone
Power
(9*)
Booster
(P*)
1,2,3,4
1800W
2400W
Flexi Zone (L/R)
3000W
3600W
PRODUCT OVERVIEW
HB BI 584 FA
1
2
3
4
CONTROL PANEL

Before using the induction hob, read this manual carefully and take note on the
“Safety Guidelines” section.
Remove any protective film that may still be on the induction hob.
Induction Cooking System
Inducon cooking is a safe, advanced, ecient, and economical cooking technology.
When cooking zone is selected, the electromagnec circuit produce induced currents
that instantly heat the boom of the cookware which then transfer heat directly to
the food. Cooking takes place with hardly any energy loss between the inducon hob
and food. The glass becomes hot only when the cookware eventually heats it up.
Inducon hob operates only if a correct pan with right features and dimension is
placed on the cooking zone – refer to cookware selecon for inducon cooking.
Cookware for Induction Cooking
•Only use cookware with a base suitable for inducon
cooking. Look for the inducon symbol “ ” on the
packaging or at the boom of the pan.
•Cookware made from the following materials is not suitable
•Pure stainless steel, aluminum or copper without a
magnec base, glass, wood, porcelain, ceramic, and
earthenware.
•To check if the cookware is suitable for inducon,
•Use a magnet. Put the magnet at the boom of the base and if the magnet
scks, the cookware is suitable.
If you do not have a magnet, put some water in the cookware you want to check
and place on the cooking zone. Follow the steps under ‘To start cooking’. If the
USE OF INDUCTION HOB
Iron pot
Magnetic circuit
Ceramic glass plate
Induction coil
Induced currents
symbol “ ” does not appear on the display and the water is heang, the pan is
suitable.
•The cooking zone will not operate if the cookware diameter is too small (the
symbol “ ” will appear on the display. Follow the recommended cookware
diameter given in the following table to correctly use the cooking zone.
Cooking Zone (mm)
Minimum cookware diameter recommended
(refer to the boom of the cookware)
Independent zone
160 mm
Flexible zone
110 mm
Note: Some cookware available in the market is not in good quality or has an eecve
ferromagnec area which is smaller than the diameter of the cookware itself. Avoid using
this cookware as the inducon cooktop may not funcon properly or it may cause damage
to the cooktop.
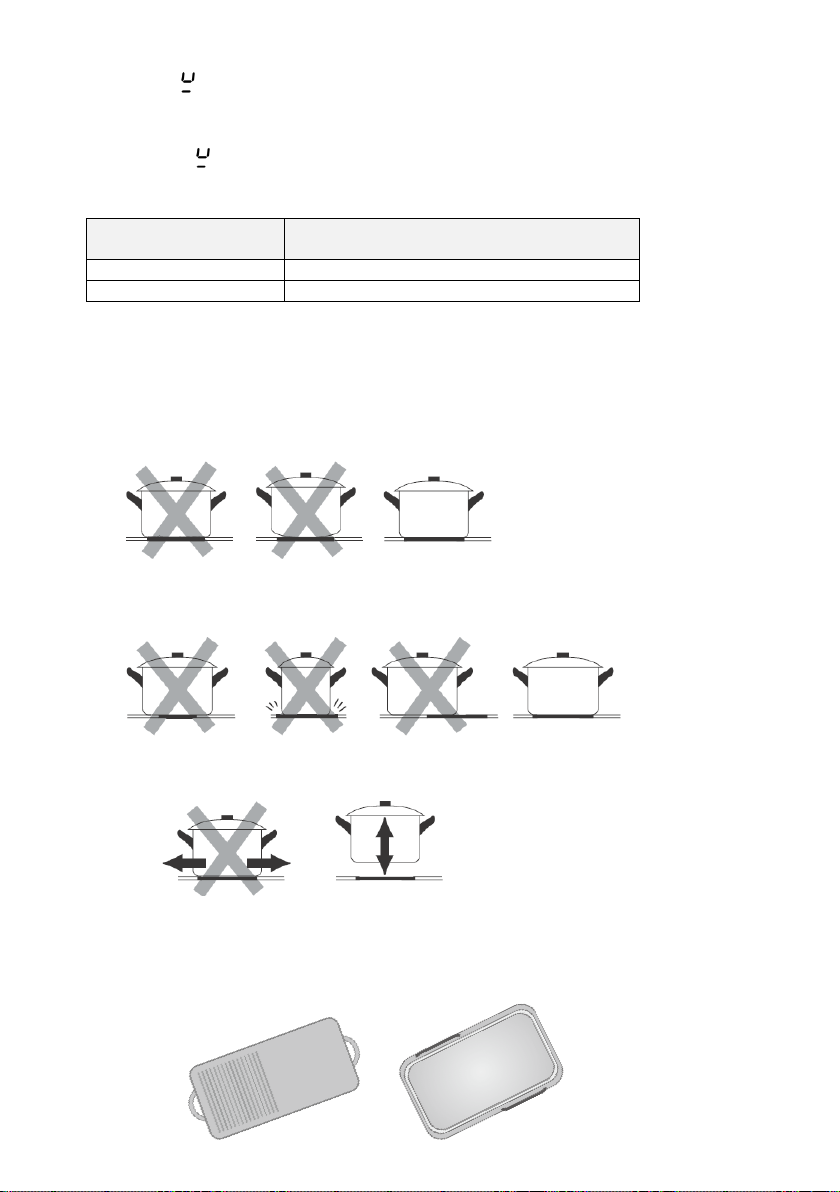
Do not use cookware with jagged edges or a curved base.
Make sure that the base of your pan is smooth, sits at against the glass, and is the
same size as the cooking zone. Always center your pan on the cooking zone.
Always li pans o the ceramic hob – do not slide, or they may scratch the glass.
Note: Some type of cookware may cause noise during cooking – the noise is normal and does
not mean any malfuncon of the appliance.
Choose the exible zone heang for griddle plate or large cookware

Some inducon cookware doesn’t have a complete ferromagnec base:
If the material of the boom of the cookware contains aluminum, the
ferromagnec area will also be reduced. This may mean that the cookware will
not become hot enough or even be detected.
Touch Control
The hob is fitted with induction cooking zones. These zones, shown by the painted
disks on ceramic surface, are controlled by touch control system
Notes:
•The control responds to touch, so you don’t need to apply any pressure.
•Use the ball of your nger, not the p.
•You will hear an acousc sound each me a touch is registered.
•Make sure the control area is always clean, dry and that there is no object (e.g. a
utensil or a cloth) covering them. Even a thin lm of water may make the control
dicult to operate.
The display of the touch control system indicate:
No Pan Detector
Indicator
Heating is Paused
Key Lock
Cooking Zone is Off
Cooking Zone is On
(Default power “5”)
Power Levels
Residual Heat Indicator
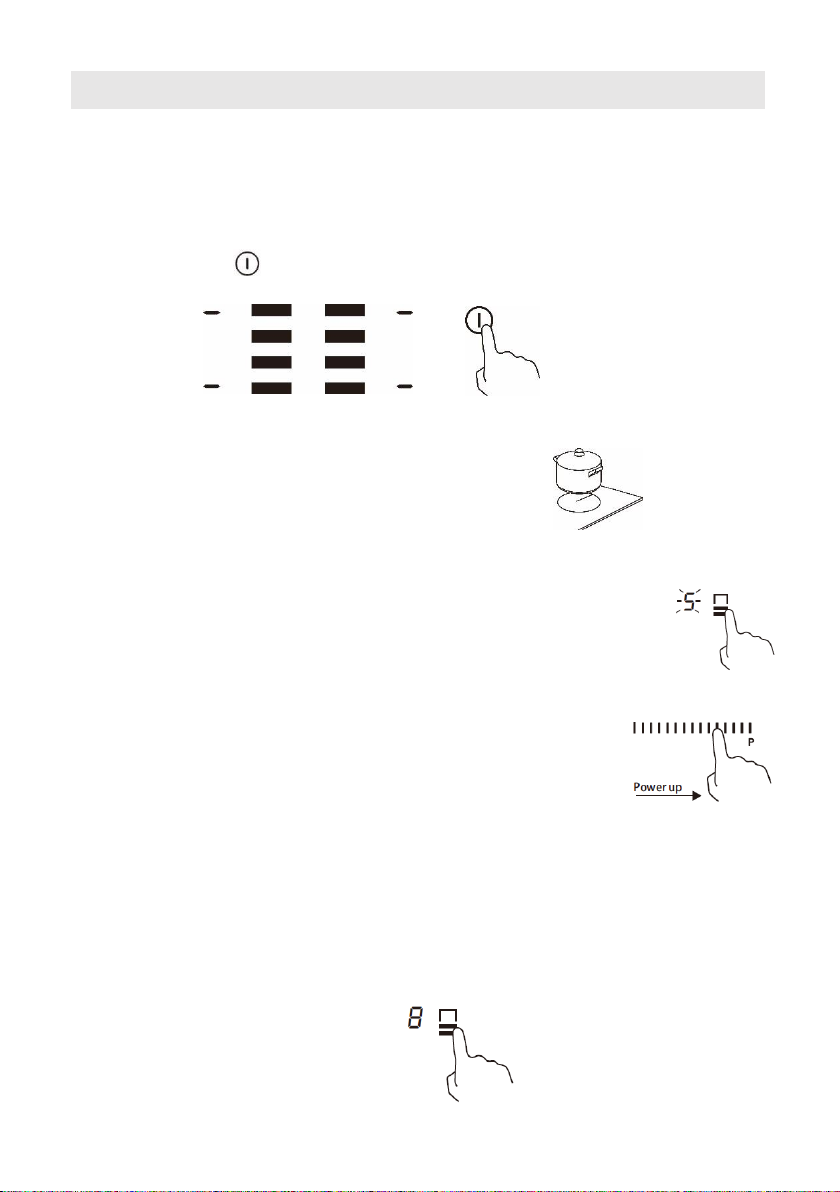
TO START COOKING
Turn on the main power supply, the buzzer beeps once and all the indicators light up
for 1 second then goes o, indicang that the hob has entered the state of standby
mode.
Touch the ON/OFF key. All the indicators show “- “
1. Place a suitable pan on the desired cooking zone.
(Make sure the boom of the pan and the surface
of the cooking zone is clean and dry.)
2. Select the cooking zone by touching the relevant heang zone.
The indicator next to the selected zone will ash. The default power
level seng is 5.
3. Select a heat seng by touching the slider control (between
minimum “1” and maximum “P”) – slide your nger along the
selector or touch at one point to “jump” to a specic seng.
The power level display will show the selected level. You can
modify the heat seng at any me during cooking.
Note: If a cooking zone is not turned on within 1 minute, the inducon hob will automacally
switch o. You will need to start again at step 1.
TO END COOKING
1. Select the desired heang zone
OPERATION

2. Turn the cooking zone o by sliding the power selector towards le or directly
jump to power level to “0”. Make sure the display shows “0”.
3. Turn the whole cooktop o by touching the ON/OFF control.
Note: Beware of hot surfaces
“H” will be lighted for cooking zone which is hot to touch. It will be turned o when the
cooking zone temperature drops below a preset temperature. It can also be used as an
energy saving funcon as you can heat up the pans by using the residual heat.
BOOSTER FUNCTION
This funcon allows the cooking zone to operate at the BOOSTER maximum power
for maximum of 5 minutes. It could be used, for example, to rapidly heat up large
amount of water.
Acvate the Booster funcon
1. Select the desired zone for booster power
2. Touch the end of the slider control unl power level display shows “ ”
Deacvate Booster funcon
Set a dierent power level on the selected cooking zone with booster
acvated.
Switch o the hob
Note: Booster last for 5 minutes and the cooking zone is automacally set to the power level 9
at the end of the booster funcon.
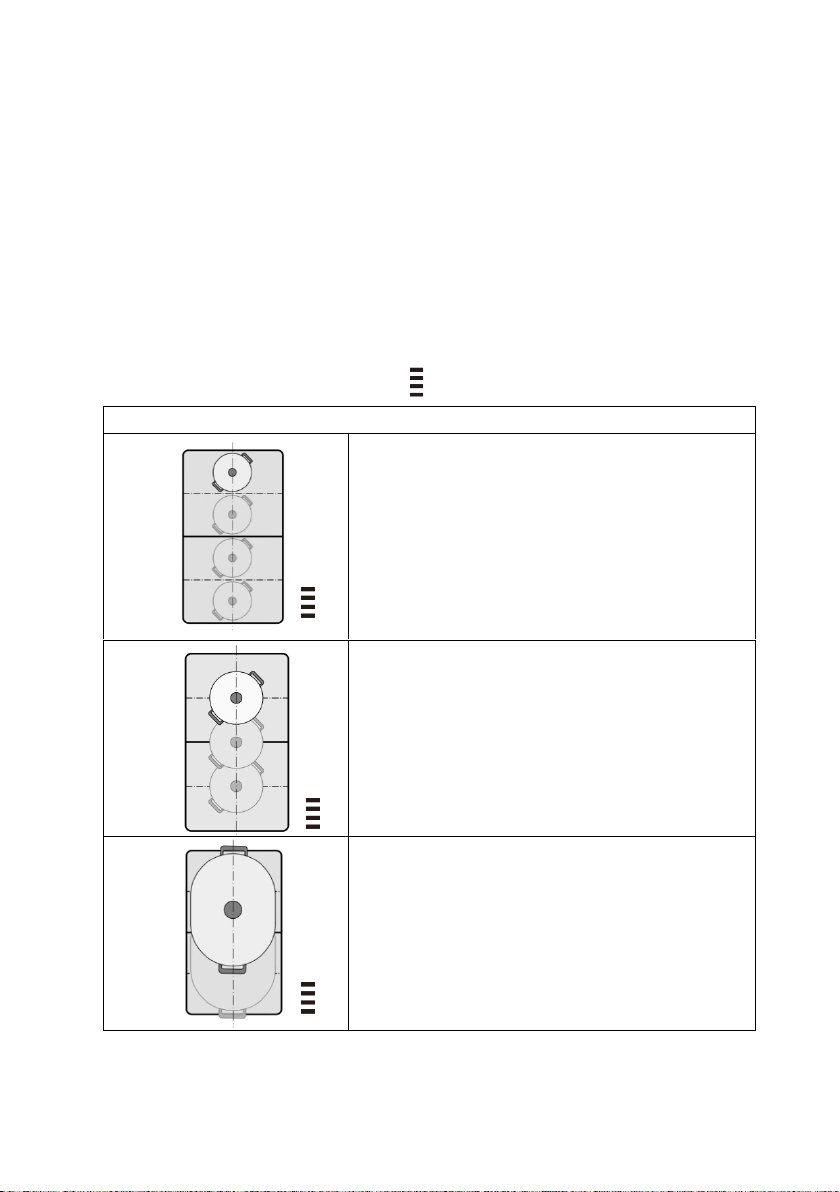
FLEXIBLE ZONE FUNCTION
The zone may be used as a single zone or two individual zones depending on the
cooking needs in each situaon.
It is made of four independent inductors that can be controlled separately.
When the exible zone is selected, only the zone covered by the cookware is
acvated (pan detecon funcon).
Advice on using cookware
To ensure that the cookware is detected and the heat is distributed evenly,
correctly place the cookware at the center of the zone
To use as single zone, select the symbol “ “ on the left or right zone
Single Zone
Cookware boom diameter is larger than 11cm
Place the cookware in one of the four posions
shown in the le gure.
Cookware boom diameter is greater than 16cm
Place the cookware in one of the three posions
shown in the le gure.
Warning: The center of cookware must be aligned
between two inductors!
Cookware boom diameter is greater than 28cm
If the cookware takes up more than one inductors,
please it starts on the upper or lower edge of the
exible cooking zone.

To use as independent zone, select the symbol “ “ or “ ” for the 4 different zones
Two Independent Zone
The front and rear heang zones have
two inductors and can be used
independently
Select the required heat seng for each
of the heang zone.
Use only one cookware on each heang
zone.
Recommendaons
It is not recommended to use several
zones at the same me for a single
cookware.
As a single zone
1. To acvate the exible area as a single big zone, simply touch the “Flexible zone”
key, and the pan sensor indicator lights up. There will be only one power level
shown on display.
2. The power setting works the same as the normal operation.
As two independent zones
To use the exible zone as two dierent zones with dierent power sengs,
Touch the desired heang zone selecon.
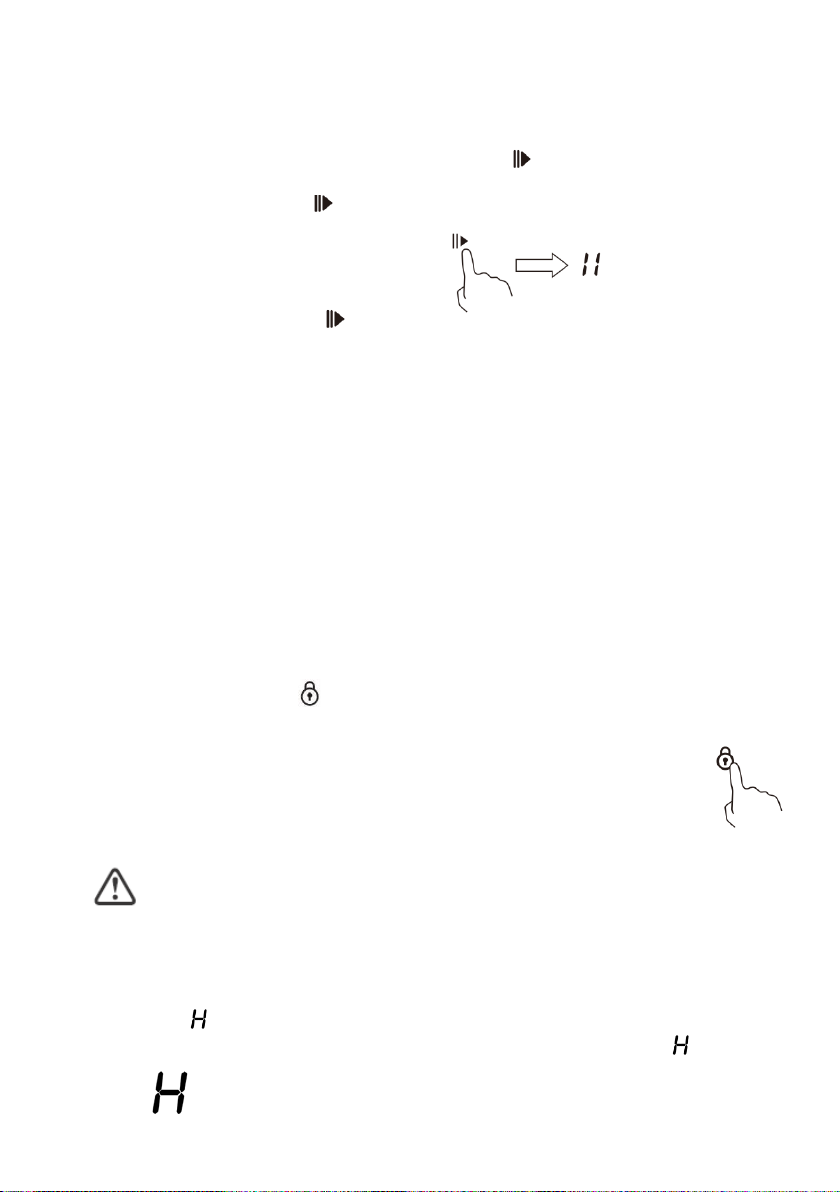
PAUSE FUNCTION
When at least one cooking zone is in operation, the cooking can be paused
temporarily by touching the pause function key “ ”
1. Select the pause funcon , all the heang zones stop working and the
power level display show“||” for all zones.
2. Touching the pause control one more me, all the heang zones will revert to
its original seng.
The pause mode can last for maximum 30 minutes. Thereaer, the inducon hob
will automacally be switched o if the pause mode is not cancelled.
`
SAFETY KEY LOCK
This funcon locks the touch control key to prevent unintended use, for example, to
prevent children accidentally switch on the cooking zones.
When the safety key lock is acvated, all the controls except the ON/OFF key are
disabled.
To acvate the key-lock
Touch the key lock control once, the mer indicator will show “Lo” and the key-
lock is acvated.
To deacvate the key-lock, touch and hold the key lock control for 3 seconds
unl the display “Lo” disappears.
When the hob is in lock mode, all the controls are disabled except the ON/OFF key, you can
always turn o the hob with the ON/OFF control. To use the cooktop aer it is switched o,
key-lock protecon has to be deacvated rst.
RESIDUAL HEAT WARNING
When the temperature of the cooking zone is sll hot aer the hob is switched o, the
relevant leer “ ” will be shown on the display as a warning of hot surface. Avoid touching
the cooking zone unl the temperate drops to a safe temperature and the leer “ ” is turned
o.

OVERHEAT PROTECTION
When overheang occurs, the cooking zone will display error code:
E6 – Overheang of cooking zone
E9 – Overheang of IGBT sensor
The inducon hob will stop heang and no power will be delivered to the cooking
zone.
Let the cooking zone cool down before using.
OVERFLOW PROTECTION
When the liquid ows to the control panel, the hob will automacally shut down
within 10 seconds.
To restart, turn o the power and wipe the area with a clean towel before using.
POWER MANAGEMENT
Power sharing funcon limits the maximum power used. The maximum available
power (preset) is shared between the cooking zones. If all zones are turned on, the
power management will not allow all zones to operate at full power but will alternate
the power among all zones so the total power will be equal to the preset maximum
power. The change will be visible on power level displays. The last command given to
a cooking zone takes priority on the power seng.

IMPORTANT: PART FOR QUALIFIED INSTALLERS ONLY.
ECO Mode Conguraon
This hob can be connected to a 13, 16, 25 or 32Amp supply and congured to work
on any of these power sengs.
The hob is preset to be connected to a 13Amp supply, all four zones are selected at
the same me the hob will limit the maximum power consumed so that the 2.8kW
power supply cannot be exceeded. In a similar way, when the hob is connected and
congured to a 16/25Amp supply, the hob will limit the maximum power at
3.6/6.0kW. So you need to change the cable, please prepare the extra cable that is
conformed to IEC standard.
If, however, the hob is connected and congured to a 32Amp power supply, all four
zones can be used on the maximum seng with boost.
To change the cable before conguring ECO Mode
1. Turn the cooktop upside down and put the glass side on a stable smooth surface
(using the packaging).
2. Remove the screw and li the top cover up.
3. Replace the preset 13Amp cable by qualied 32A cable. (Refer to “Connecng
the hob to the mains power supply” in Installaon Manual.)
ECO MODE CONFIGURATION INSTRUCTION

4. Conguraon should follow the method of connecons as shown below.
•When you use the power cord of three cores, you need to connect the power
cord with terminal plates. (Fig.1)
•When you use the power cord of ve cores, you only need to connect the
power cord. Do not throw away the terminal plates and remain them inside
terminal box in order to later need. (Fig.2)
•
5. Tilt the top cover down and ghten the screws.
Before congure the ECO mode, Read the Installaon Manual especially the “Safety
Warnings” secon.
The inducon hob must be connected to the mains supply only by a suitably qualied
electrician.
For power consumed exceed 13Amp, cable must be replaced to qualied 32A one.
Note: Do not throw away silicone sheet aer changing the cable. Save it together with 13Amp
cable for subsequent replacement.
L1 Brown
L2 Black
PE Green-
Yellow
N2 Grey
L Brown
PE Green-Yellow
N Blue

WARNING Never let the hob operates on 3.6/6.0/7.2kW mode with pre-assembly 13Amp
cable & plug. Exceeding power consumption will blow the fuse and may damage the hob &
causing other issues
To configure the hob into ECO Mode
1. Touch ON/OFF key to switch on the power supply. The buzzer beeps once, all
displays show “– “and “– – “, indicang that the hob has entered the state of
standby mode.
2. Touch front le zone key and rear le zone key simultaneously for 3 seconds.
The buzzer beeps indicang that the inducon hob enters selecon of ECO
Mode. Then the mer indicator will show “EC” for seconds, and it will turn to
show the current default power.
3. Touch the relevant zone keys and the number (e.g.72) show in the display
indicang that the total power will set to relevant ECO power sengs:
Selection Key
Timer Display
ECO power level
Power supply (Fuse
protection required)
Front left zone key
28
2.8kW
13Amp (BS plug available)*
Rear left zone key
36
3.6kW
16Amp
Rear right zone key
60
6.0kW
25Amp
Front right zone key
72
7.2kW
32Amp
* Default power seng is 2.8kW (13Amp)..

4. Touch the relevant zone keys again, mer display stop ashing and the
previously selected zone key will show “o” indicang that the seng is ok.
5. Touch the ON/OFF to switch o. Then switch on and the hob is congured ready
to use at the ECO Mode you set for.
To change the ECO conguraon seng
1. Cut o the power supply to the hob.
2. Leave the power supply cut o for ve minutes.
3. Switch on the power supply again.
4. Follow the instrucons under “To congure the hob into ECO Mode” from
number “1” onward.
NOTE: The ECO Mode Conguraon can be entered only once if the power supply of the hob
is not cut o.
OPERATION TIME LIMIT OF THE COOKING ZONE
Each cooking zone is switched o automacally aer a maximum preset me if no
further operaon is performed. The maximum preset me limit depends on the set
power level and the default cooking mes are shown in the table below:
Power Level
1
2
3
4
5
6
7
8
9
P
Operaon Time Limit
(hour)
8
8
8
4
4
4
2
2
2
5min
Each touch on the control key will reset the maximum operation time as initial
default value.
TIMER FUNCTION
The mer can be used in two dierent ways:
As a minute minder. In this case, the mer will not turn any cooking zone o
when the set me is up. It is funcon as a reminder or alarm.

As an automac switch o mer - to turn one or more cooking zones o aer
the set me is up.
In both ways, the mer can be set from “01” to “99” minutes.
Using Timer as Minute Minder
The minute minder can be acvated if there is no cooking zone selected
1. Make sure that the cooktop is turned on.
Note: The minute minder can be acvated before or aer cooking zone seng is nished.
2. Touch the mer control, the mer display will show “00”,
and both digits “00”will ash.
3. Set the me by touching the “+” “-”control of the mer.
a) Touch the “+” or “-” control of the mer once to increase or
decrease the me by 1 minute.
b) Touch and hold the “+” or “-” control of mer, the mer seng
will change with an interval of 10 minutes.
4. When the me is set, it will begin to count down immediately. The display will
show the remaining me.
5. Buzzer will beep for 30 seconds and the me display will show “- -“
when the me set is up. The cooking zone will connue operang.
Using the Timer as Automac Cut-o Timer
To set the cut-o mer on one cooking zone:
1. Select the heang zone and set the desired power level.
2. Touch the mer control, the mer display will show “00”
and both digits “00” will ash.
3. Set the me by touching the “+”or “-”control of the mer.
a) Touch the “+” or “-” control of the mer once to increase or
decrease the me by 1 minute.
b) Touch and hold the “+” or “-” control of mer, the mer seng
will change with an interval of 10 minutes.
4. When the mer is set, it will begin to count down immediately. The display will
show the remaining me.
NOTE: The red dot next to the power level indicator will be lit, indicang that
relevant zone is selected for mer
5. When cooking mer is ended, the relevant cooking zone will be
switched o automacally and other cooking zones will keep operang
if they are turned on previously.
NOTE: The me can be changed at any me by touching the mer control key.
Table of contents
Other EF Hob manuals


 User manual")


