Effekta SIGNUM AT User manual
INSTALLATION MANUAL
FOR SIGNUM AT
INSTALLATIONSMANUAL
FÖR SIGNUM AT
• Armaturstomme i slagtålig vit plast.
• Enkel- och dubbelsidig hänvisning.
• Tak, vägg- eller vajermontage.
• 24- eller 30 meters läsavstånd.
• Högt ljusutbyte för hög varseleekt.
• 5 piktogram ingår (pil ned, upp,
höger, vänster och blank).
• Autotest och NiMH batteri.
• 180 minuters drifttid.
• Låg energiförbrukning.
• Överkopplingsbar.
• Luminary in sturdy white plastic.
• Single- and double-sided pictogram.
• Ceiling-, wall or wire-mounting.
• 24- or 30 meters reading-distance.
• 5 pictograms are included (arrow down, up,
right, left and blank).
• High light-output for good visibility.
• Autotest and NiMh battery.
• 180 minutes autonomy.
• Low energy-consumption.
• Reconnectible.

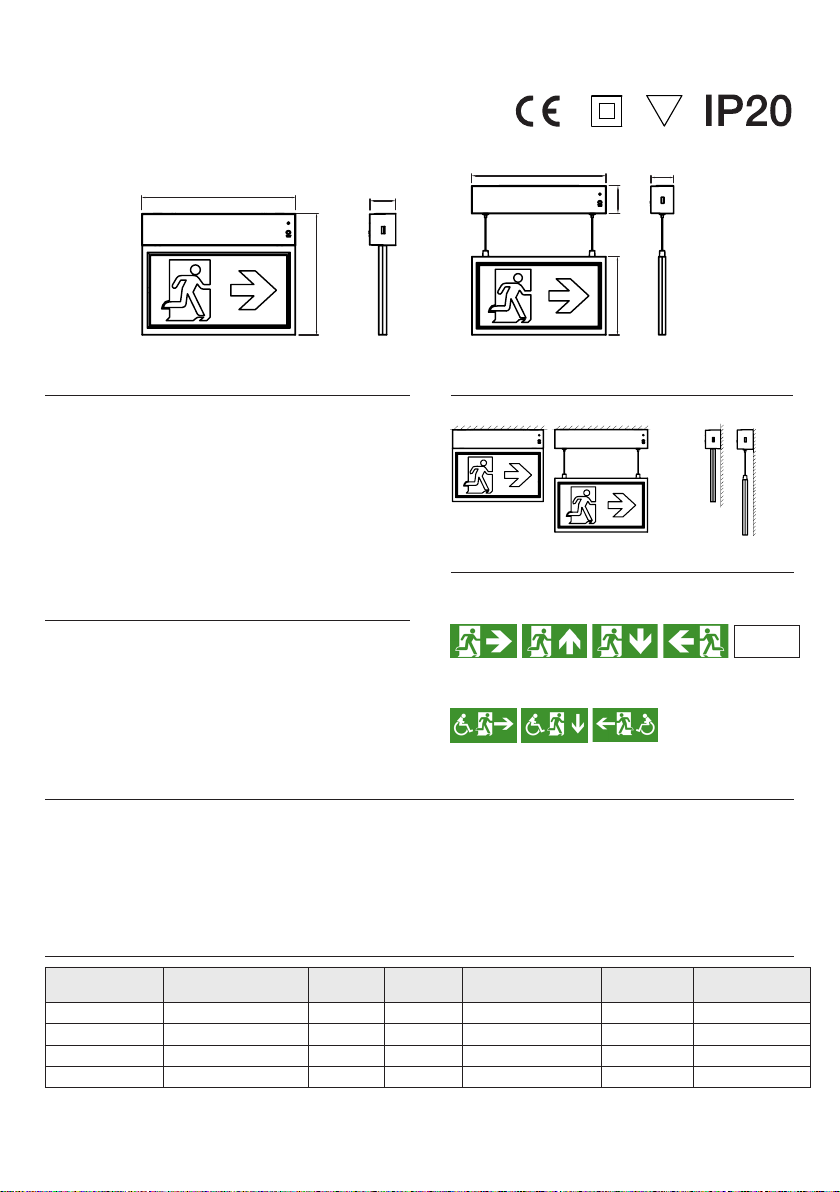
INSTALLATION INSTRUCTIONS FOR SIGNUM AT
24/30 m
WALL/CEILING OR WIREPENDULUM F
265/330 mm
210/248 mm
45 mm
265/330 mm
155/193 mm
55 mm
45 mm
Product Feature
Precautions
Technical Information
Pictogram Styles
Mounting Options
Service & Operation
Power Supply: 220-240VAC, 50/60 Hz
Power Consumption: Max. 3.5W
Ambient Operating Temp: -5 °C ...+45 °C
Charge Time: 24 Hours
Operation: Maintained and Non maintained
Emergency Duration: 3 Hours
Protection Class: II
IP Rating: IP20
Function: AUTO test and Manual test
Installation: Wall mount or Ceiling mount
Viewing distance: 24/30m
This product should be installed by a registered electrician
in accordance with local standards and electrical
regulations. Take care to ensure the mains supply is
isolated before installation.
Normal Operation: The green indicator light on the front of the unit stays on. The indicator will go out if the mains supply
fails, the internal charger malfunctions, or the unit in test mode.
Battery: Sealed NiMH rechargeable battery pack. Battery should be replaced when the required duration is no longer
achieved. To avoid any damage to the xture and ensure its performance, the battery should be replaced with same brand
and type.
Test Switch: Press the test switch buttom, LED indicator will go out and the sign will be illuminate from its battery pack.
See full description of AT function on page 6.
73 416 94 Pictograms in set (standard) 24 m
73 416 95 Pictograms in set (standard) 30 m
Wall mountingCeiling mounting
73 416 96 Pictograms in set (wheelchair) 24 m
73 416 97 Pictograms in set (wheelchair) 30 m
Article Number Input Voltage Charge
Duration Discharge
Duration Battery Power Con-
sumption LEDs
73 419 49 - 24m 220-240V~ 50/60Hz 24 tim 3 tim NiMH 3,6V/0,9Ah 3.5W Max. 14 x SMD 2835
73 419 50 - 30m 220-240V~ 50/60Hz 24 tim 3 tim NiMH 3,6V/0,9Ah 3.5W Max. 14 x SMD 2835
73 419 51 - 24m 220-240V~ 50/60Hz 24 tim 3 tim NiMH 3,6V/0,9Ah 3.5W Max. 14 x SMD 2835
73 419 52 - 30m 220-240V~ 50/60Hz 24 tim 3 tim NiMH 3,6V/0,9Ah 3.5W Max. 14 x SMD 2835
INSTALLATIONSMANUAL FÖR SIGNUM AT
24/30 m
TAK/VÄGG ELLER VAJERPENDEL F
265/330 mm
210/248 mm
45 mm
265/330 mm
155/193 mm
55 mm
45 mm
Produktbeskrivning
Observera
Teknisk information
Piktogramtyper
Monteringsalternativ
Service & Drift
Nätmatning: 220-240VAC, 50/60 Hz
Eektförbrukning: Max. 3.5W
Tillåten omgivn. temp: -5 °C ...+45 °C
Återuppladdningstid: 24 timmar
Driftläge: Permanent- eller beredskapsdrift
Drifttid: 3 timmar
Isolationsklass: II
Skyddklass: IP20
Funktion: AUTO test och manuellt test
Installation: Vägg eller takmontage
Läsavstånd: 24/30m
Denna produkt får endast installeras i enlighet med
manualen av en behörig elektriker i enlighet med lagar,
förordningar och elektriska regelverk. Försäkra Er om att
nätspänningen är frånslaget vid installationen.
OBS! I piktogramsatsen levereras även skylt med pilriktin-
ing uppåt vilket är tänkt för den internationella marknaden
och denna används normalt inte i Sverige. För fullständiga
skyltdirektiv, se Arbetsmiljöverkets hemsida www.af.se.
E nummer Inspänning Uppladd-
ningsstid Drifttid Batterityp Eektför-
brukning LEDs
73 419 49 - 24m 220-240V~ 50/60Hz 24 tim 3 tim NiMH 3,6V/0,9Ah 3.5W Max. 14 x SMD 2835
73 419 50 - 30m 220-240V~ 50/60Hz 24 tim 3 tim NiMH 3,6V/0,9Ah 3.5W Max. 14 x SMD 2835
73 419 51 - 24m 220-240V~ 50/60Hz 24 tim 3 tim NiMH 3,6V/0,9Ah 3.5W Max. 14 x SMD 2835
73 419 52 - 30m 220-240V~ 50/60Hz 24 tim 3 tim NiMH 3,6V/0,9Ah 3.5W Max. 14 x SMD 2835
Normaldrift: Den gröna lysdioden för indikation skall lysa fast. Lysdioden släcks vid nätbortfall, blinkar grönt vid test eller
blinkar rött vid fel med olika intervall beroende på felet (se beskrivning).
Batteri: Uppladdningsbara NiMh batterier. Batteri bör bytas ut när drifttiden ej längre uppnås eller autotestet larmar för
dåligt batteri. Batterierna får endast bytas ut mot samma typ och fabrikat. Gamla och uttjänta batterier skall återvinnas.
Testknapp: När man trycker på testknappen så blinkar den gröna lysdioden och armaturen går på batteridrift. Se full
beskrivning av AT funktionen på sidan 7.
73 416 94 Piktogram i set (standard) 24 m
73 416 95 Piktogram i set (standard) 30 m
VäggmontageTakmontage
73 416 96 Piktogram i set (rullstol) 24 m
73 416 97 Piktogram i set (rullstol) 30 m
*
*
1
3
5
7
2
4
6
8
L
SL
N
A
A
A
A
A
B
B
B
L LA
DA
SL SLB B
N NC C
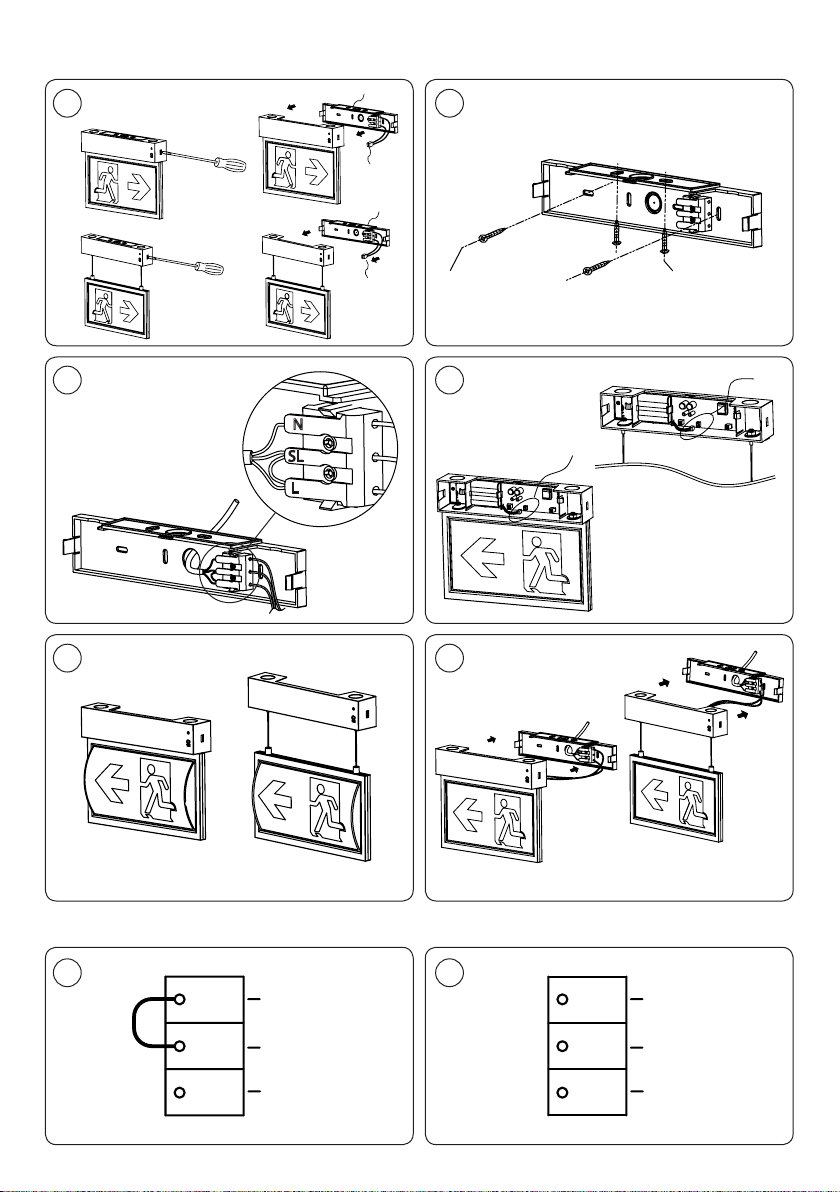
Wiring Instructions / Inkoppling
Mounting Instructions / Monteringsinstruktioner

Wiring Instructions
Mounting Instructions
1
2
3
4
5
6
7
8
Avlägsna montageplattan från stommen.
A. Monteringsplattan B. Nätkontakt
1. Sätt in en skruvmejsel i spåret på sidan av armaturen,
vinkla den lite och avlägsna montageplattan från
armaturdelen.
2. Koppla loss nätkontakten på från kretskortet.
Vägg- eller takmontage.
A. Väggmontage B. Takmontage
1. Bryt ut hål för kabel och skruvar som ska
användas i montageplattan.
2. Förlägg nätkabeln genom ingången i
monteringsplattan.
3. Skruva fast monteringsplattan med skruvar
anpassade efter underlaget.
Inkoppling.
Lämplig kabelarea 0.75-2.5mm²
Anslut nätkablarna till plinten.
Se inkopplings-instruktion nedan.
Inkoppling av batteri.
A. Batterikontakt
Koppla ihop hon- och hankontakterna mellan batteriet
och kretskortet i armaturen.
Montera önskat piktogram enligt bilden.
Slutför installationen.
Anslut nätkontakten från monteringsplattan med
kretskortet i armaturen och tryck ihop armatur- och
monteringsplattan
Permanentdrift (förvalt läge).
A. Fast fas B. Tändfas
C. Nolla D. Kabelbygel
Koppla in Fas (L), Nolla (N) och lämna
kabelbygeln inkopplad.
Beredskapsdrift.
A. Fast fas B. Tändfas
C. Nolla
Koppla in Fast fas (L), Nolla (N) och
avlägsna kabelbygeln.
Dispart mounting plate.
A. Mounting plate B. AC connector
1. Insert at screwdriver into slot on side of unit, pry
o and remove the mounting plate from unit.
2. Disconnect AC connector from PCBA.
Wall mounting or Ceiling mounting.
A. Wall mounting B. Ceiling mounting
1. Knock out appropriate center cable entry hole
and mounting screw hole on the mounting plate.
2. Route AC supply wire through center hole of
mounting plate.
3. Fix mounting plate on the mount surface with
screws and anchor nuts.
Wiring connection.
Suitable cable 0.75-2.5mm²
Connect the AC supply wire to terminal block.
Refer to wiring instruction showed below.
Battery connect.
A. Battery connector
Connect battery male and female connector inside of
mounting bracket
Change pictogram when necessary.
Remove the pictogram on the unit, select other
pictogram you need then insert into slot of panel.
Finish installation.
Snap AC supply on PCBA and then snap xture to
mounting plate.
Maintained (default operation).
A. Unswitched Live B. Switched Live
C. Neutral D. Jumper cable
Connect L,N and leave jumper cable connected.
Non-maintained.
A. Unswitched Live B. Switched Live
C. Neutral
Connect L,N and remove jumper cable.
Monteringsinstruktioner
Inkoppling

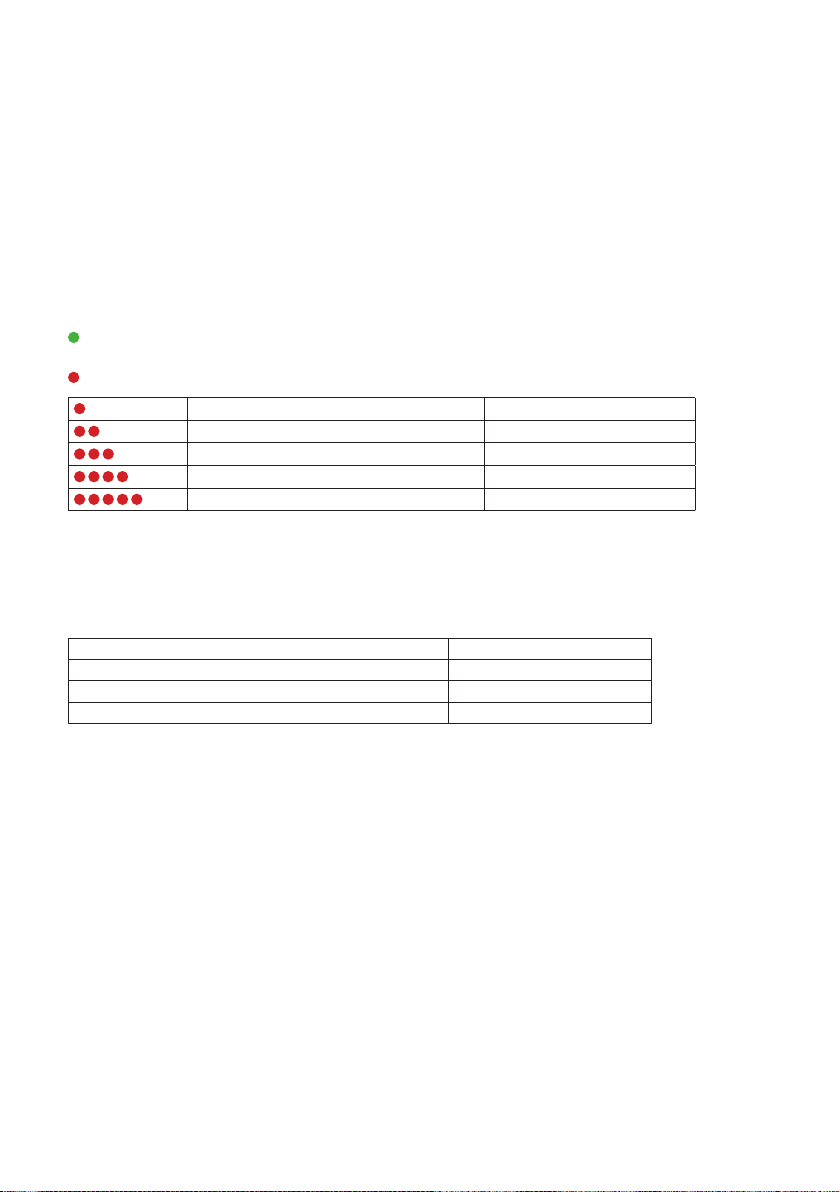
INSTRUCTIONS FOR AUTOMATIC TEST OPTION
EXIT LIGHT SELF DIAGNOSTICS/SELF TEST FUNCTION
1. Install LED exit sign according to installation instruction sheet.
2. Once the unit is powered up it will automatically initiate a self test and diagnostics as follows:
• Every 4 seconds : Checks for battery disconnection, charger board fault, lamp failure and transformer failure.
• Every month : Performs a 3 minute duration test.
• Every year : Performs a 3 hour duration test.
All test functions are factory preset and do not need eld adjustment.
3. Dual Colour Indicator LED Status Meanings
Green Solid On Ready / Normal Operation
Flashing Testing
Red Requires Service
NOTE!
After repairing a service fault, press and hold the test button for 2 seconds to reset the ashing indicator light to green
solid shine.
4. Manual Testing
One ash, 4 second pause Battery not connected
Two ashes, 4 second pause Battery short or low battery voltage
Three ashes, 4 second pause Charger board fault
Four ashes, 4 second pause Transformer fault
Five ashes, 4 second pause LED lamp fault
Press test button once 30 second duration test
Press test button twice within 2 seconds 3 minute duration test
Press test button 3 times within 2 seconds 30 minutes duration test
Press test button 4 times within 2 seconds 3 hours duration test
INSTRUKTION FÖR AUTOTEST
SIGNUM TAK/VÄGG OCH PENDEL 24 & 30 M
1. Installera armaturen i enlighet med manualen.
2. När armaturen är spänningssatt så startar autotestfunktionen automatiskt enligt nedan:
• Var ärde sekund: Kontrollerar om batteriet är inkopplat, om laddaren fungerar, om ljuskällan fungerar
eller om det är fel i elektroniken.
• Varje månad: Utförs ett funktionstest på tre minuter.
• Varje år: Utförs ett test av drifttiden i 180 minuter.
Alla testfunktioner är fabriksinställda och inga andra inställningar behöver göras.
3. Tvåfärgad LED för indikation av nedan AT status.
Grön Fast sken Normaldrift
Blinkar I test
Röd Enligt nedan Behöver service
OBS!
Efter reperation/service, håll inne testknappen i två sekunder för att återställa larmet och indikations
LEDen till grönt fast sken.
4. Manual Testing
En blinkning, 4 sekunders paus Batteriet är ej anslutet
Två blinkningar, 4 sekunders paus Batterifel eller lågt batteri
Tre blinkningar, 4 sekunders paus Laddarfel
Fyra blinkningar, 4 sekunders paus Fel i elektronik
Fem blinkningar, 4 sekunders paus Fel på ljuskällan
Tryck på testknappen en gång 30 sekunders test
Tryck på testknappen två gånger inom två sekunder 3 minuters test
Tryck på testknappen tre gånger inom två sekunder 30 minuters test
Tryck på testknappen fyra gånger inom två sekunder 3 timmars test

This manual suits for next models
4
Table of contents


