6
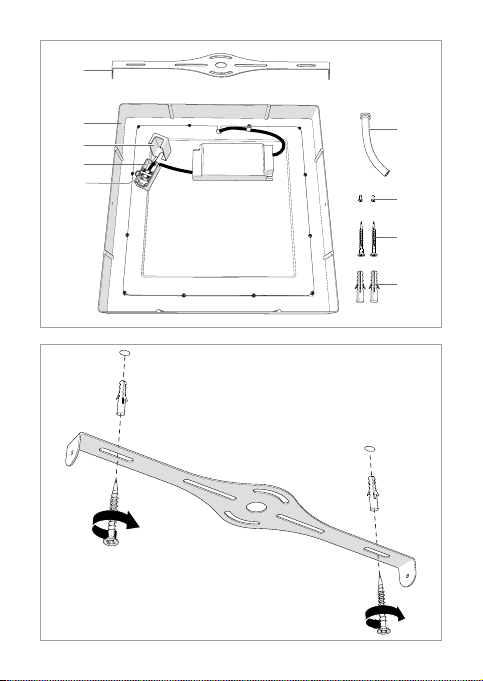
Installation of the Wi-Fi Smart Ceiling Light (image B – D)
-
Make sure the central power is switched o.
1. Fasten A1with the screws A8.
2. Connect the wires to the connector A5and fasten the screws.
3. Place A6in the slot in A4.
4. Attach A2to A1by fastening A7into the screw holes.
5. Switch on the central power.
6. Switch on the lamp.
7. In the Nedis SmartLife app, tap + D3.
8. Under Search Device, select the lamp from the list of available devices.
9. Check if the lamp is blinking. If so, tap to conrm.
4If the lamp does not blink, turn the lamp o and on 3 times and check again.
10. Enter the password of the 2,4 GHz Wi-Fi network to which your phone is
connected and tap Conrm. The Nedis SmartLife app will now search for the
lamp.
11. Rename the lamp after it has been found and added.
4If the regular connection method fails, the lamp can be connected using AP
mode:
1. Tap + D3.
2. Under Add Manually, tap Smart Bulb.
3. Tap AP Mode in the top right corner.
4. Follow steps 9 till 11 of the regular connection method.
Specications
Product Wi-Fi Smart Ceiling Light
Article number WIFILAC30WT
Dimensions 300 x 300 x 38 mm
Weight 1200 g
Power supply 220 – 240 V AC 50 – 60 Hz
18 W
Wireless technology Wi-Fi
Operating temperature -10 - 40 °C
Frequency Range 2412 - 2472 MHz
Max. radio transmit power 9 dBm
Brightness 1200 lm