EFFEKTIV TRIUMPHATOR 1700X User manual

DOMESTIC OVERLOCK MACHINE
EN USER MANUAL RU РУКОВОДСТВО ПОЛЬЗОВАТЕЛЯ
ES MANUAL DE USUARIO FR MANUEL DE L’UTILISATEUR
DE BENUTZERHANDBUCH IT MANUALE D’USO
TRIUMPHATOR 1700X / 1800X

32
TRIUMPHATOR 1700X / 1800X
RU FR
CONTENTS
1. Principal parts (names) .......................................6
2. Accessories that come with the overlock ........8
3. Needle .....................................................................9
4. How to remove the frontal lid .............................9
5. Beginning to sew ................................................10
6. Foot pedal ............................................................10
7. Using the free arm. .............................................11
8. Stitch length regulator.........................................11
9. Stitch width regulator .........................................11
10. Differential feed .................................................13
11. Assembling the thread stand…………...............15
12. Thread spool conservers ................................15
13. Spool of thread net......................................... 15
14. Thread tension release button..................... 16
15. Threading the upper looper.......................... 16
16. Threading the lower looper........................... 17
17. Using the automatic lower looper threading
mechanism...................................................... 17
18. Threading the left needle .............................. 18
19. Threading the right needle............................ 19
20. Chart with combinations of fabrics, threads
and needles ..................................................... 20
21. Thread tension adjustment.......................... 21
22. Tension adjustment chart (two-needle
overlocks)......................................................... 22
23. Beginning to sew ........................................... 23
24. Chain stitching ................................................ 24
25. Thread breakage during sewing.................. 24
26. Adjusting the pressure of the presser foot on
the fabric .......................................................... 25
27. Malfunctions and troubleshooting.............. 26
28. Rolled and narrow hem................................. 27
29. Rolled and narrow hem sample chart........ 29
30. Using different presser feet.......................... 30
31. Removing the upper knife............................. 32
32. Switching the kinfe......................................... 32
32. Convert upper looper to 2 thread serging...33
33. Cleaning and lubrication ............................... 34
34. Changing the backlight lamp ....................... 35
35. Machinespecications ................................. 36
ОГЛАВЛЕНИЕ
1. Наименованиеосновныхчастей ............ 40
2. Аксессуары,поставляемыевкомплектес
оверлоком ...................................................... 42
3. Игла .................................................................. 43
4. Какснятьпереднююкрышку.................. 43
5. Началошитья................................................ 44
6. Ножнаяпедаль.............................................. 44
7. Использованиерукавнойплатформы...45
8. Регулировкадлиныстежка....................... 45
9. Регулировкадлиныстрочки..................... 45
10. Дифференциальнаяподачаткани ........ 46
11. Установкастойкинитенаправителя.......49
12. Ограничителидлякатушкиниток .......... 49
13. Сеткадлякатушкиниток .......................... 49
14. Кнопкаослаблениянатяжениянити...... 50
15. Заправкаверхнегопетлителя.................. 50
16. Заправканижнегопетлителя................... 51
17. Использованиемеханизмаавтоматиче-
скойзаправкинитинижнегопетлителя.....
.............................................................................51
18. Заправкалевойиглы.................................. 52
19. Заправкаправойиглы................................ 53
20. Таблицакомбинацийтканей,нитейиигл...
.............................................................................54
21. Регулировканапряжениянити ................ 55
22. Таблицарегулировкинатяжения(двухи-
гольныеоверлоки)....................................... 55
23. Пробноешитье.............................................. 57
24. Выполнениецепногостежка .................... 58
25. Обрывнитивпроцессешитья................. 58
26. Регулировкадавленияприжимнойлапки
наткань........................................................... 59
27. Неисправностииметодыихустранения...
.............................................................................60
28. Ролевыйиузкийподрубочныйшов....... 61
29. Использованиеразличныхприжимных
лапок ................................................................ 64
30. Снятиеверхнегоножа ................................ 66
31. Заменаножа.................................................. 66
32.Конвертерверхнегопетлителядляпрове-
дения2-ниточнойобметкиткани............67
33. Чисткаисмазка ........................................... 68
34. Заменалампыподсветки ......................... 69
35. Спецификациямашины............................ 70
EN ES
2 3
TABLA DE CONTENIDO
1. Nombre de las partes principales ............... 74
2. Accesorios suministrados en el set............ 76
3. Aguja ................................................................. 77
4. Cómo quitar la cubierta frontal ................... 77
5. Empezar a coser............................................. 78
6. Pedal ................................................................. 78
7. Usando la plataforma de mangas... ........... 79
8. Ajuste de la longitud de la puntada............. 79
9. Ajuste de la longitud de la puntada............. 79
10. Alimentación diferencial de tejidos............. 80
11. Instalación del bastidor de guía de hilo.......83
12. Guías de hilo.................................................... 83
13. Red de hilo ....................................................... 83
14. Botón de liberación de tensión del hilo ...... 84
15. Enhebrado del áncora superior.................... 84
16. Enhebrado del áncora inferior...................... 85
17. Utilizar el mecanismo automático
Enhebrado de bucle inferior...........................85
18. Enhebrado de la aguja izquierda................. 86
19. Enhebrar la aguja derecha............................ 87
20. Tabla de combinaciones de tejidos, hilos y
agujas ... ............................................................88
21. Ajuste de la tensión del hilo.......................... 89
22. Tabla de ajuste de tensión (overlock de doble
cabezal) ............................................................ 89
23. Costura de prueba.......................................... 91
24. Costura de cadena......................................... 92
25. Rotura del hilo durante el proceso de.........92
26. Regulacion de presion del prensatelas sobre
tela..................................................................... 93
27. Fallas y solución de problemas....................94
28. Costuras de dobladillo enrolladas y
estrechas.......................................................... 95
29. Utilizar diferentes tipos de prensatelas...... 98
30. Extracción de la cuchilla superior .............100
31. Reemplazo de la cuchilla............................100
32. Para convertir el corchete superior de 2
hilos..........101
33. Limpieza y lubricación.................................102
34. Sustitución de la bombilla ..........................103
35. Información técnica ....................................104
TABLA DE CONTENIDO
1. Nom des parties principales ......................108
2. Accessoires fournis avec la surjeteuse....110
3. Aiguille ............................................................111
4. Comment retirer le capot avant ................111
5. Début de la couture......................................112
6. Pédale rheostat.............................................112
7. Utilisation de la plateforme pour manche.......
...........................................................................113
8. Réglage de la longueur de point................113
9. Réglage de la largeur de point ...................113
10. Alimentation différentielle...........................114
11. Installationdel’antenneduguide-l....... .117
12. Bloque-bobines.............................................117
13. Filetdeprotectionpourbobinedel ........117
14. Molettederelachementdelatensiondul....
...........................................................................118
15. Enlageduboucleursupérieur....................118
16. Enlageduboucleurinférieur ....................119
17. Utilisation du mécanisme automatique
d’enlageduboucleurinférieur...................119
18. Enlagedel’aiguillegauche .......................120
19. Enlagedel’aiguilledroite ..........................121
20. Tableaudecomparaisondestissus,lset
aiguilles............................................................122
21. Réglagedelatensiondul.........................123
22. Tableauderéglagedelatensiondul
(surjeteuse a deux aiguilles).......................123
23. Test de couture.............................................125
24. Réalisation d’un point de chainette ..........126
25. Aucasoulelsecasseraitpendantla....126
26. Réglage de la pression du pied presseur sur
le tissu.............................................................127
27. Dysfonctionnements et moyens de.................
....................128
28. Point d’ourlet roulé / de surjet étroit.........129
29. Utilisation de différents pieds presseurs.132
30. Retrait du couteau supérieur......................134
31. Changement du couteau ............................134
32. Convertir l’enrouleur supérieur pour surjet 2
ls..........135
33. Nettoyage et graissage ...............................136
34. Changement de la lampe d’éclairage.......137
35. Caractéristiques techniques .....................138

54
TRIUMPHATOR 1700X / 1800X
IT
DE TABLA DE CONTENIDO
1. Nom des parties principales ......................142
2. Mitgeliefertes zubehör für die overlock....144
3. Nadel...............................................................145
4. Wie sie die frontabdeckung entfernen .....145
5. Beginn des nähens.......................................146
6. Fußedal...........................................................146
7. Verwendung des freiarmes... .....................147
8. Stichlänge einstellen:...................................147
9. Nahtlänge einstellen ....................................147
10. Differenzialer stofftransport.......................148
11. Einstellen der fadenführungtragstange....151
12. Stopper für die fadenrolle ...........................151
13. Gitter für fadenrolle......................................151
14. Fadenspannungs-löseknopfl......................152
15. Bestücken des oberen schleifengänge
rs.......................................................................152
16. Bestücken des unteren schleifengänge
rs.......................................................................153
17. Benutzung des automatischen
bestückungssystems des unteren
schleifenfängers ...........................................153
18. Einfädeln der linken nadel...........................154
19. Einfädeln der rechten nadel........................155
20. Tabelle der stoff-, faden- und
nadelkombinationen ....................................156
21. Einstellen der fadenspannung ...................157
22. Spannungseinstelltabelle (doppelnadel-
overlock-maschinen)...................................157
23. Versuchsnähen.............................................159
24. Nähen eines kettenstichs ...........................160
25. Fadenbruch beim nähen.............................160
26. Einstellen des andrucks der stoffstange .161
27. Störungen und fehlersuche........................162
28. Roll- und schmale saumnaht... .................163
29. Verwendung unterschiedlicher Stoffstangen
...........................................................................166
30. Entfernen des obermessers.......................168
31. Messerersatz.................................................168
32. Oberer schleifengängerkonverter für 2-faden
säumen des stoffes......................................169
33. Reinigung und schmierung ........................170
34. Auswechseln der beleuchtungslampe.....171
35. Maschinenspezikation .............................172
TABLA DE CONTENIDO
1. I nomi delle parti principale ........................176
2. Accessori in dotazione con overlock........178
3. Ago ..................................................................179
4. Come togliere il coperchio anteriore ........179
5. L’inizio di cucitura.........................................180
6. Interruttore a pedale ....................................180
7. L’uso della piattaforma.................................181
8. Regolazione della lunghezza del punto ...181
9. Regolazione della lunghezza del................181
10. Differenziale di avanzamento del tessu
to......................................................................182
11. L’installazionedibanchialguidalocon...........
...........................................................................185
12. Limitatoriperbobinedilo.........................185
13. Magliaperbobinedilo..............................185
14. Pulsante di allentamento della tension.....186
15. Ricarica superiore looper.............................186
16. Ericarica bobina inferiore ............................187
17. L’uso di un meccanismo automatico di
rifornimentolobobinainferiore................187
18. Ericarica dell’ago sinistro.............................188
19. Ricarica dell’ ago destro...............................189
20. Tabellacombinazioniditessuti,lieaghi........
...........................................................................190
21. Regolazionedellatensionedello.............191
22. Tabella di regolazione della tensione (due
aghi zig zag) ..................................................191
23. Prova cucito...................................................193
24. Rl’esecuzione di catenella...........................194
25. Rotturadellodurantelacucitura ...........194
26. Regolazione della pressione del piedino
premistoffa ....................................................195
27. Malfunzionamenti e tecniche per la loro
risoluzione......................................................196
28. Cucitura di ruolo e a taglio..........................197
29. L’utilizzo di diversi tipi di pressione Del
piedino ............................................................200
30. Rimozione del coltello superiore ...............202
31. Sostituzione del coltello ..............................202
32. Il convertitore del crochet superiore per
eseguireilsopraggittoa2li......................203
33. Puliziaelubricazione.................................204
34. Sostituzione della lampadina.....................205
35. Informazioni tecniche .................................206

USER MANUAL
7EN
EN
TRIUMPHATOR 1700X / 1800X
6
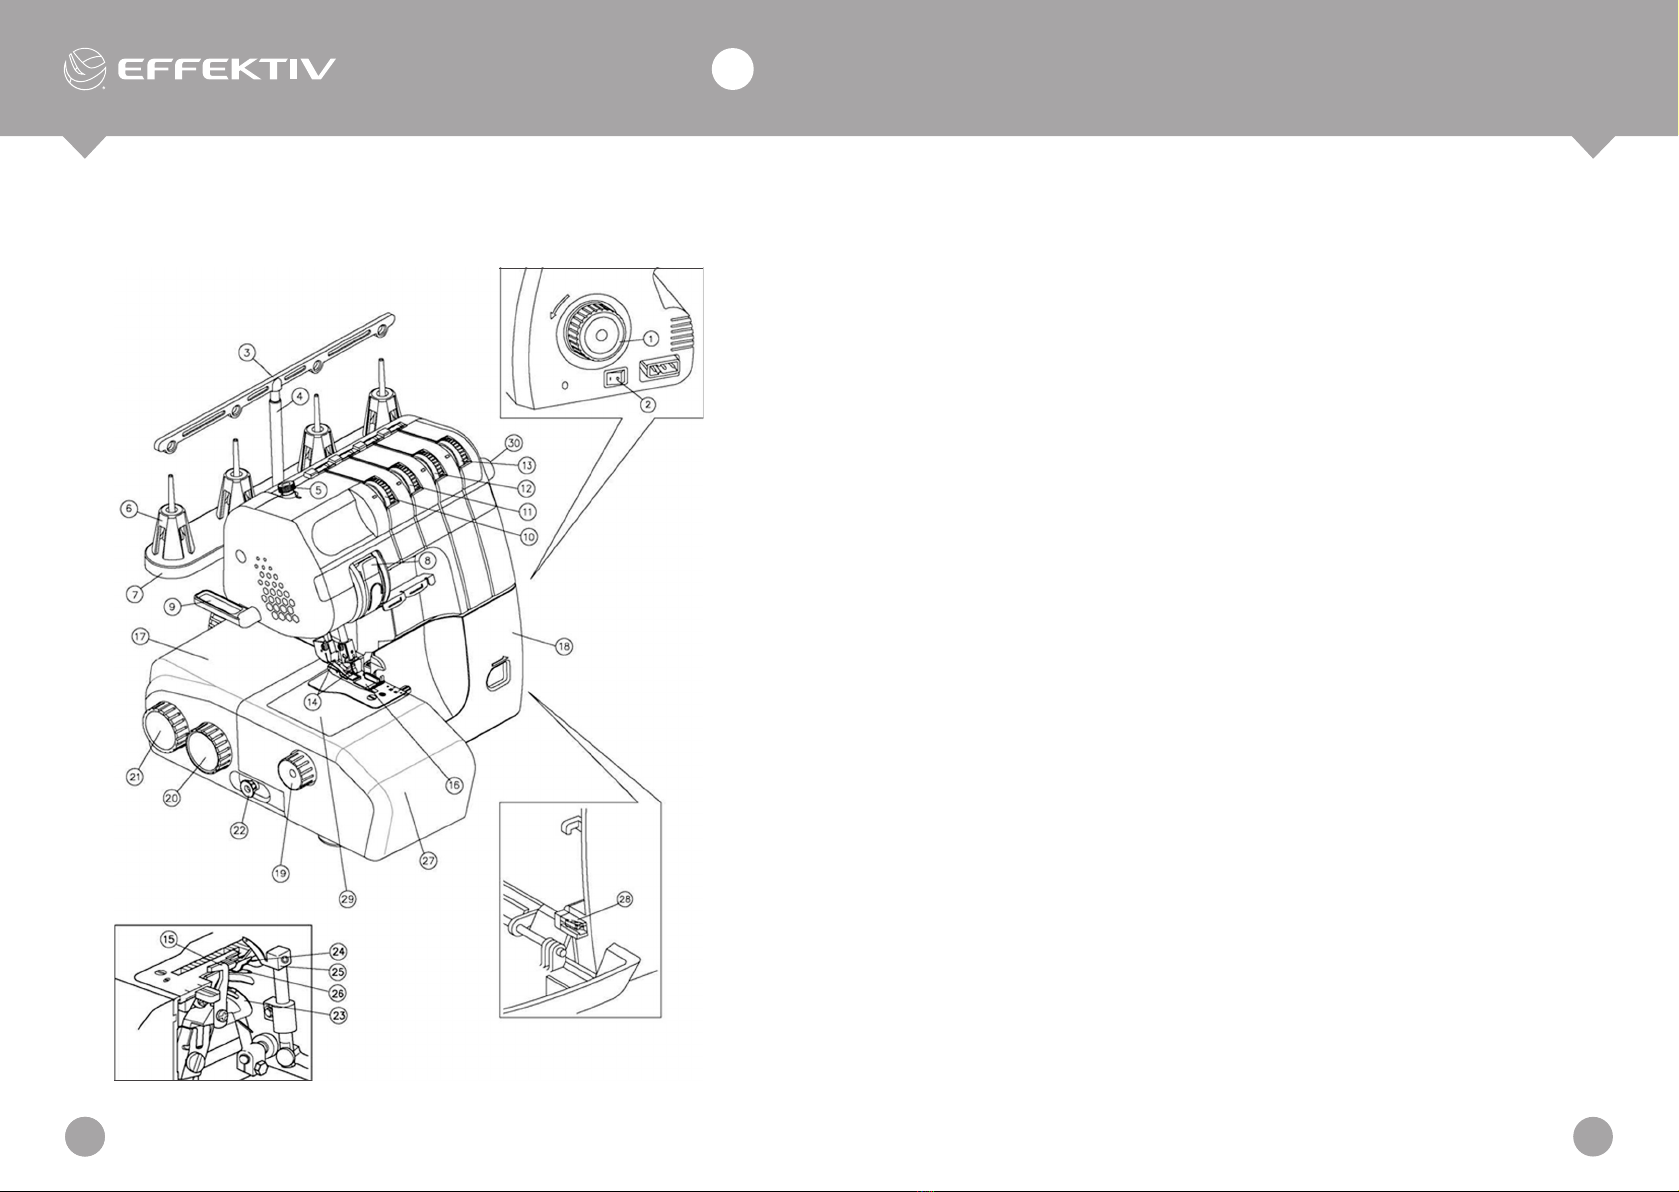
PRINCIPAL PARTS (NAMES) 1. Handwheel
2. Power/backlight switch
3. Thread quide
4. Thread guide support rod
5. Presser foot adjusting screw
6. Spool retainer
7. Spool holder
8. Thread guide lid
9. Pressure foot lifter
10. Left needle thread tension regulator
11. Right needle thread tension regulator
12. Upper looper thread tension regulator
13. Lower looper thread tension regulator
14. Needles
15. Upper knife
16. Presser foot
17. Fabric placement platform
18. Front lid
19. Stitch width regulator
20. Stitch length regulator
21. Differential feed regulator
22. Upper knife regulating knob
23. Lower looper thread guide
24. Feed dog rack gear
25. Upper looper
26. Lower looper
27. Sleeve platform
28. Microfuse
29. Sleeve platform lid
30. Instant thread tension release button

USER MANUAL
9EN
EN
TRIUMPHATOR 1700X / 1800X
8
NEEDLE
This overlock is designed to work with standard needles. Use needles type:
НАх1 (130/70SH)
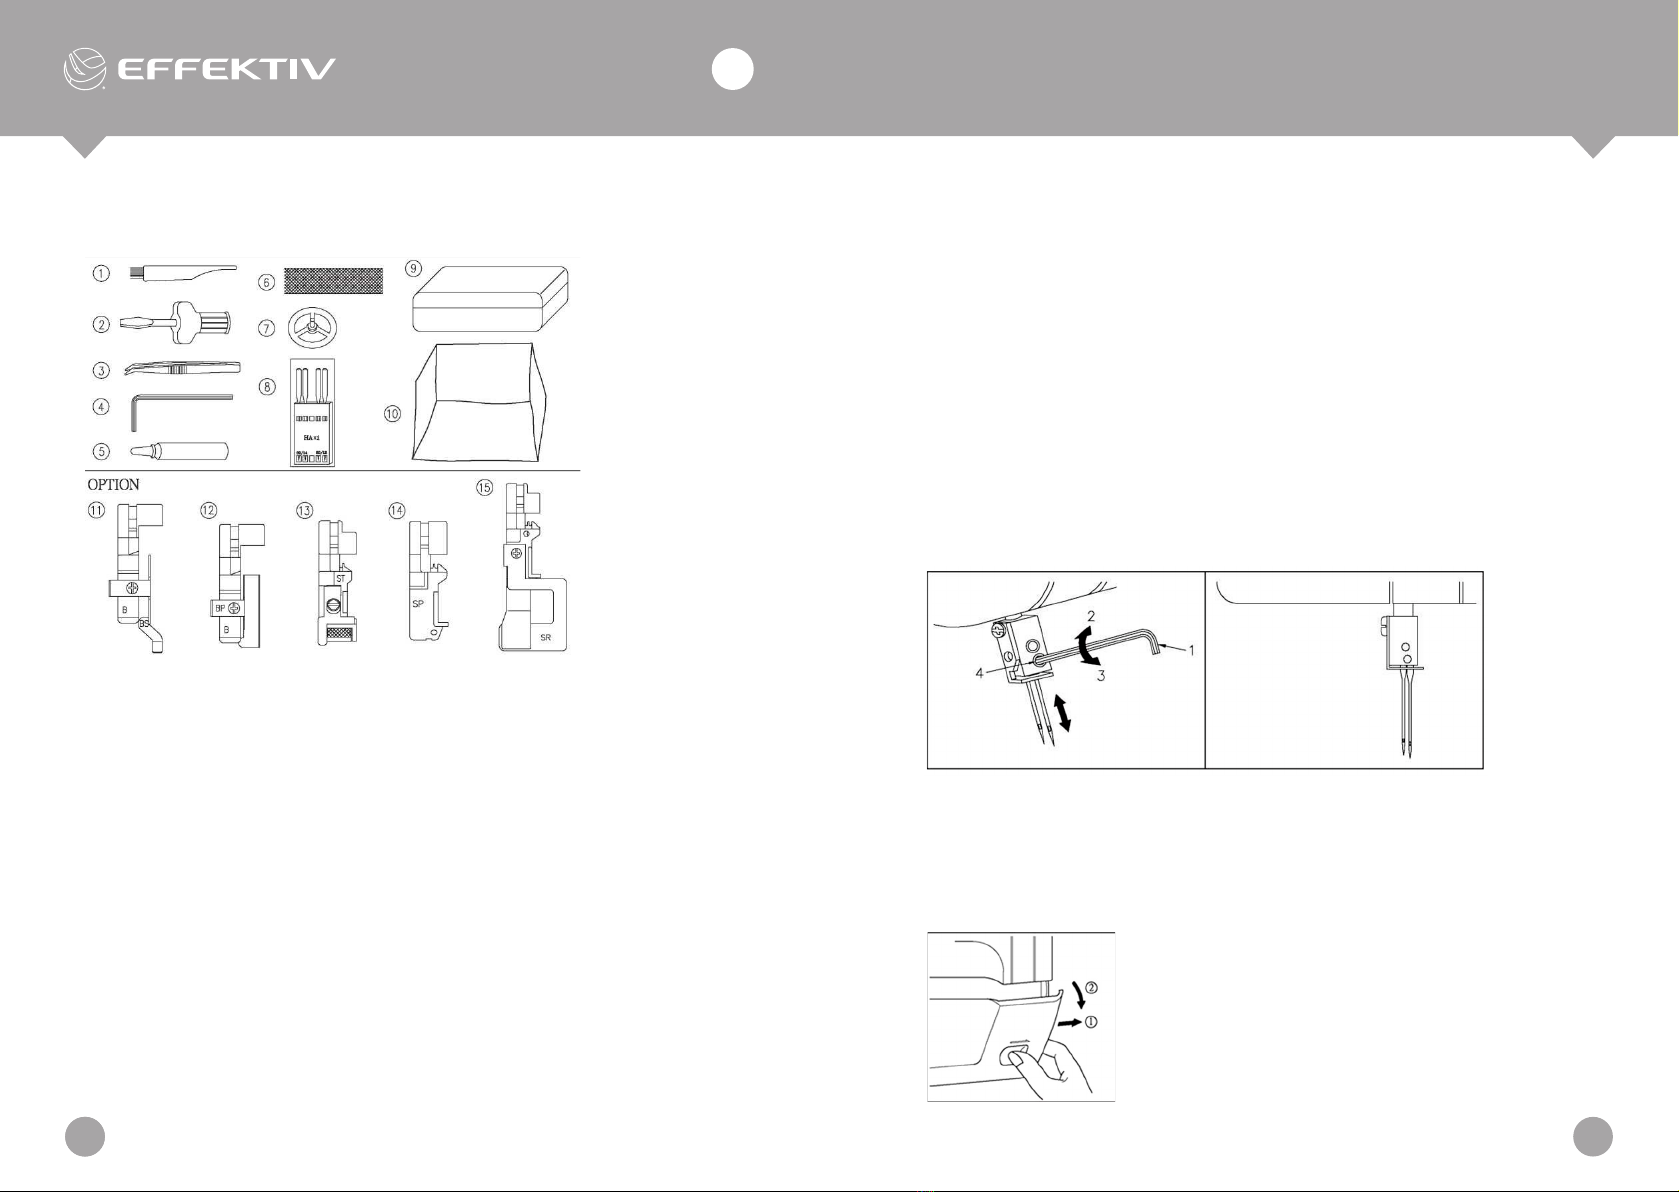
SWITCHING THE NEEDLE
1. Turn the handwheel towards you to bring the needle to its highest po-
sition.
2. Loosen the needle clamp screw with the supplied hex-key.
3. Insert a new needle into the needle holder (flat side facing away from
you) as far as it will go.
4. Tighten the needle clamp screw.
HOW TO REMOVE THE FRONT LID
To remove the front lid, slide it as far to the right
as possible, as shown in g.1.
Pull the lid towards you, as shown in g. 2
ACCESSORIES THAT COME WITH THE OVERLOCK
The numbers in the illustrations correspond to the numbers of the sewing
accessories:
1. Brush
2. Screwdriver
3. Tweezers
4. Hex-key
5. Oiler
6. Nets (4)
7. Spool of thread saver (4)
8. Set of needles: Hax1.80 / 12: 2
pcs. 90/14: 2 pcs..
9. Sewing box
10. Overlock case:
Optional (is not included, sold
separately)
11. Blindstitch foot
12. Bead/sequin sewing foot
13. Stretch stitch foot
14. Bias binding foot
15. Gathering foot

USER MANUAL
11EN
EN
TRIUMPHATOR 1700X / 1800X
10
USING THE FREE ARM
1. Slide lid A to the left.
2. Place the sleeve or cuff over the narrow free arm to begin work.
STITCH LENGTH REGULATOR:
1. For most of the sewing, the stitch length adjustment
knob should be set to the 3 mm (7/64 inch) mark.
2. When working with thicker fabrics, set the stitch length
knob to the 4 mm (5/32 inch) mark.
STITCH WIDTH REGULATOR
Two-needle overlocks
(1) To narrow the stitch width, turn up the stitch width regulator next to the
removable cover. To increase the stitch width, turn this knob down.
BEGINNING TO SEW
Connect the overlock to the mains. Pull the power switch to the “1” position.
When the overlock is turned on, the indicator light will switch on.
To turn off the overlock, pull the power switch to the “0” position. In this
case, the indicator light will switch off.
The motor of the unit cannot perform its work if the front lid of the overlock
is removed.
FOOT PEDAL
Meant to regulate sewing speed.
1. Power switch
2. Foot pedal
ATTENTION!
Before you begin to work make sure the front lid is in place!

USER MANUAL
13EN
EN
TRIUMPHATOR 1700X / 1800X
12
PURPOSE AND
ACHIEVED EFFECT
FEED TYPE MAIN FABRIC
FEEDER (BACK
RAIL)
DIFFERENTIAL
FEEDING
MECHANISM
(FRONT RAIL)
CONFIGURATION
Prevention of
wavy stitching.
Gathering fabric
Differential feed
with a positive
value
1,0 - 2,0
No differential
feed
Neutral feed 1,0
Preventing tissue
jams
Differential feed
with a negative
value
0,7 - 1,0
DIFFERENTIAL FEED
The differential feed mechanism is used to prevent wavy stitching and
fabric jams.
Also, this mechanism allows you to gather fabrics.
JAMMED FABRICS
Jams are common with woven or lightweight fabrics. For even seams, set
the differential feed regulator below Level 1.
WAVE STITCHES
Wavy stitches may occur when sewing knitted or elastic fabrics. To prevent
wavy stitches, set the differential feed regulator below Level 1.
The stitch width can be adjusted from R 4.5 mm (11/64 “) to 7 mm
(9/32”).
The standard stitch width for normal overlock stitching is 5 mm (13/64
inches).
To achieve the desired feed speed, adjust the differential feed regulator as
shown in the illustration below.
The differential feed can be adjusted from 0.7 to 2.0.
The default is 1.0.
DIFFERENTIAL FEED ADJUSTMENT

USER MANUAL
15EN
EN
TRIUMPHATOR 1700X / 1800X
14
ASSEMBLING THE THREAD STAND
The overlock comes with the thread guide stand in the lowest position.
Raise the thread guide stand to the highest position. Then adjust the posi-
tion of the thread guide.
THREAD SPOOL CONSERVERS
THREAD SPOOL NET
The conserver is used to x the thread spool on the
overlock rod.
1. Thread spool conserver.
Loosely wound polyester or nylon threads will loosen
when they come off the spool. To maintain a constant
feed rate of such threads, put a net over the spool.
1. Net.
GATHERING FABRIC
The differential feed mechanism makes it easier to gather lightweight fab-
rics. Use it to sew waist seams, seam sleeves, hem sleeves and cuffs, etc.
For best results when gathering fabrics, set the differential feed control
between the 1.5 and 2 marks.
FLAT SEAM
Clothing without wavy lines
WAVY SEAM
Wavy edge fabrics (without jamming)
GATHER
Gathering fabrics
UNEVEN SEAM
Fabric Jam (No Gathering)

USER MANUAL
17EN
EN
TRIUMPHATOR 1700X / 1800X
16
4. Pull the thread towards the upper looper through the thread guides 3-5
marked green on the overlock casing.
5. Pass the thread through the hole in the upper looper away from you
(see position 6).
Thread the lower looper as shown in the diagram (positions 1-7).
THREADING THE LOWER LOOPER
1. Draw the thread from the spool and
pass it towards you through the
thread guide hole on the stand.
2. Pass the thread through the thread
guide (position 1).
3. Then thread the thread into the slit
and guide it through the tension
control wheel, next to the tension
regulating knob (position 2).
4. Pull the thread towards the lower looper through the thread guides 3-7
marked in blue on the overlock body.
6. Pass the thread through the hole in the lower looper away from you (see
position 6).
USING THE AUTOMATIC LOWER LOOPER
THREADING MECHANISM
1. Pass the thread through the hole of the lower looper (position 1-2).
2. Pass the thread by the needle threading knob (position 3).
THREAD TENSION RELEASE BUTTON
The overlock is equipped with a button to instantly release the thread ten-
sion. When rethreading the threads, follow these steps:
1. Press the thread tension release key
located to the right of the tension
adjustment knob.
2. Pass the thread through the tension
control dial located in the groove
behind the tension adjustment
knob.
3. Press the button.
THREADING THE UPPER LOOPER
Thread the upper looper as shown in the diagram (positions 1-6).
1. Draw the thread from the spool
and pull it towards you through
the thread guide hole on the
stand.
2. Pass the thread through the
thread guide (position 1).
3. Then thread the thread into the
slit and guide it through the
tension control wheel, next to the
tension regulating knob (position
2).

USER MANUAL
19EN
EN
TRIUMPHATOR 1700X / 1800X
18
THREADING THE RIGHT NEEDLE
Thread the left needle as shown in the diagram (positions 1-8).
1. Draw the thread from the
spool and pass it towards
you through the thread guide
hole on the stand.
2. Pass the thread through the
thread guide (position 1).
3. Then thread the thread into
the slit and guide it through
the tension control wheel
next to the tension adjust-
ment knob (position 2).
4. Pass the thread as in posi-
tions 3-5.
4. Pass the thread as in positions 3-5.
5. When passing the thread through position 6, guide it down so that it
passes through the thread guide (position 7), then thread the thread
through the left needle (position 8).
5. When passing the thread through position 6, guide it down so that it
passes through the thread guide (position 7), then thread the thread
through the right needle (position 8).
3. Pull the lower looper threading
knob (position 5) to its highest
position so that it’s parallel to the
blue mark.
4. Relase the lower looper threading
knob (position 5) and then pull
the thread out from the backside
of the foot.
BE CAREFULL NOT TO MIX UP THE THREADS!
Pull the threads so that the lower looper thread is under the upper looper
thread.
THREADING THE LEFT NEEDLE
Thread the left needle as shown in the diagram (positions 1-8).
1. Draw the thread from the spool
and pass it towards you through
the thread guide hole on the
stand.
2. Pass the thread through the
thread guide (position 1).
3. Then thread the thread into the
slit and guide it through the
tension control wheel next to the
tension adjustment knob (posi-
tion 2).

USER MANUAL
21EN
EN
TRIUMPHATOR 1700X / 1800X
20
As the tension regulator is turned towards the higher numbers the tension
will increase accordingly.
As the tension regulator is turned towards the lower numbers the tension
will decrease accordingly.
Check the tension of each thread on a sample of the fabric you are going
to work with.
THREAD TENSION ADJUSTMENT
NOTE:
If you cannot choose the proper thread tension, refer to the following
illustrations.
For most of the work the regulator
can be se at «4».
TENSION ADJUSTMENT CHART (TWO-NEEDLE
OVERLOCKS)
А Back(wrong) side
В Front(right) side
С Left needle thread
D Right needle thread
Е Upper looper thread
F Lower looper thread
CHART WITH COMBINATIONS OF FABRICS, THREADS
AND NEEDLES
FABRIC STITCH TYPE STITCH
LENGTH
(MM)
THREAD NEEDLE
Light
weight
fabrics
Crepe de
chine, Geor-
gette, linen,
Organza,
Jersey
Overlock
stitching
2,0 - 3,0 Synthetic fyber: №80
cotton: №80, 100
silk: №80, 100
НАх1
№70
№80
Light
weight
fabrics
Crepe de
chine,
Georgette,
Batiste,
Organza
Narrow/rolled
hem
Less than
2,0
Needle thread: pol-
yester: №80 nylon:
№80 Looper thread:
polyester: N280 nylon:
№80
Combined threads
from wool and nylon
НАх1
№70
№80
НАх1
№80
№90
НАх1
№90
Overlock
stitching
Overlock
stiching
2,5 - 3,5
3,0 - 4,0
Synthetic fyber: №60,
80 cotton: №60,80
silk: №50, 80
nylon: №50, 80
polyester: №50, 80
Cotton: №40, 60
silk: №40, 60
nylon: №30, 60
Mid
weight
fabrics
Thick
fabrics
Poplin,
Guinem,
Seersucker,
Gabardine,
Twill, Jersey
Cashemere,
Tweed denim
NOTE:
For decorative sewing, it is recommended to thread decorative threads
into the upper looper.

USER MANUAL
23EN
EN
TRIUMPHATOR 1700X / 1800X
22
Upper looper thread tension is not
sufcient. Excessive lower looper
thread tension
Increase the upper looper thread
tension
Insufcient upper looper thread ten-
sion.
Increase the lower looper thread
tension
BEGINNING TO SEW
After threading the threads correctly, you can
begin your trial sew.
1. Raise the presser foot and place the fabric
sample underneath. Lower the presser foot
and start sewing. Do not raise the presser
foot while the overlock is in operation, as the
stitching will be uneven.
2. Before pressing the foot pedal, with your right
hand, turn the handwheel counter clockwise
while holding the end of the thread with your
left hand.
Insufcient tension of the left nee-
dle thread
Increase the left needle thread tension
Insufcient tension of the right needle
thread
Increase the right needle thread tension
Excessive tension of the left needle thread Loosen the tension of the left needle thread
Upper looper thread is too tight. Insuf-
cient tension of the lower looper
Loosen the upper looper thread
tension

USER MANUAL
25EN
EN
TRIUMPHATOR 1700X / 1800X
24
NOTE:
Do not pull the fabric out from under
the presser foot while sewing, as
this will cause the needle to bend or
break.
• The pressure of the presser foot on the fabric is initially set for sewing
mid-weight fabrics.
• Depending on the type of fabric you can change the presser foot pres-
sure with the adjusting screw.
Decrease the presser foot pressure for sewing lightweight fabrics.
Increase the presser foot pressure for sewing thick fabrics.
ADJUSTING THE PRESSURE OF THE PRESSER
FOOT ON THE FABRIC
At the same time check the operating mode of the overlock.
3. Gently press the foot pedal.
CHAIN STITCHING
When you have completed your trial sew, keep
pressing the foot control to continue sewing
over the edge of the fabric by about 10 cm (4
inches).
The overlock will automatically perform a
chain stitch.
• Uneven thread tension will result in an une-
ven chain stitch.
In this case, while holding the end of the
thread with your hand, check that the thread
is threaded correctly and adjust the tension.
The chain stitch will run smoothly after the
adjustment.
THREAD BREAKAGE WHILE SEWING
• If the thread breaks during your work, remove the fabric from under the
presser foot and then thread in the correct order:
1. Thread the upper looper, lower looper and right needle.
2. Then thread the left needle, after which place the fabric under the
presser foot so that there is 3-5cm of thread left up to the break point.
3. Proceed with your work.
Pressure adjusting screw
Decrease foot pressure
Increase foot pressure

USER MANUAL
27EN
EN
TRIUMPHATOR 1700X / 1800X
26
Stitch skips 1. The needle is bent or
the point of the needle
is dull
2. Incorrectly placed
needle
3. Poorly chosen needle
4. Thread is not threaded
correctly
5. Low pressure of the
presser foot on the
fabric
1. Change needle
2. Properly insert the
needle into the clamp
3. Use the recommended
needles
4. Feed the machine
properly
5. Turn the adjusting
screw clockwise to in-
crease the presser foot
pressure on the fabric.
Uneven(poor) stitches Poor thread tension Adjust the thread tension
Jammed fabric 1. Thread tension is too
tight
2. The thread is not
threaded correctly or is
tangled
1. Decrease the thread
tension when sewing
lightandnefabrics.
2. Remove any tangled
threads and thread the
machine correctly
Rolled and narrow hemming seams are ideal for
sewing delicate fabrics such as Crepe Georgette,
Crepe de Chine, silk, etc.
1. Raise the presser foot.
2. Remove the left needle.
ROLLED AND NARROW HEM
MALFUNCTION CAUSE SOLLUTION
The machine doesn’t
feed fabric.
Low pressure from the
presser foot on the fabric
Increase the pressure
of the presser foot on
the fabric by turning the
adjusting screw
Needles break 1. The needle is bent or
the needlepoint is dull
2. The needle is placed
incorrectly
3. Forcefully pulling the
fabric while sewing
1. Change the needle
2. Correctly insert the
needle into the clamp
3. While sewing, carefully
guide the fabric with
both hands.
Thread break 1. Thread incorrectly
threaded
2. Thread is tangled
3. Thread tension is too
tight
4. Needle placed incor-
rectly
5. Poorly chosen needle
1. Feed the machine
properly
2. Check the spool of
thread, thread guide
stand, etc. and remove
the tangled threads.
3. Adjust the thread ten-
sion
4. Correctly insert the
needle into the clamp
5. Use the recommended
needles
MALFUNCTIONS AND TROUBLESHOOTING

USER MANUAL
29EN
EN
TRIUMPHATOR 1700X / 1800X
28
NARROW HEM
Adjust the thread tension according to the guidelines below:
• Upper looper thread tension - 4-6
• Lower looper thread tension - 4-6
• Right needle thread tension - 4-6
The settings may vary slightly depending on the type of fabric and thread
used
Adjust the thread tension according to the guidelines below:
• Upper looper thread tension - 4-6
• Lower looper thread tension - 5-7
• Right needle thread tension - 4-6
The tension may vary slightly depending on the type of fabric and thread
used.
ROLLED HEM
SAMPLE CHART FOR ROLLED AND NARROW HEM
NARROW OVERLOCK
HEM
ROLLED HEM
Stitch type Wrong side of the fabric Wrong side of the fabric
3. Thread the right needle to sew a 3-thread overlock stitch. Afterwards,
turn the feed dog rack lever to the “R” position.
NOTE:
Before performing a standard overlock
stitch, make sure the feed dog rack is
in place.
1. Upper looper.
(4) Set the stitch width required for the rolled hem. Turn the stitch width
regulating knob, located next to the front lid of the overlock, to the “R”
position.
4. Stitch width regulator.
5. Needle plate with feed dog retracted.
2. Feed dog rack part of the fabric advancing mechanism.
3. Feed dog lever.
(5) Set the stitch length dial to the “R” mark as shown in
the illustration.

USER MANUAL
31EN
EN
TRIUMPHATOR 1700X / 1800X
30
4. Binding foot
5. Gathering foot
Fabric type Lightweight: Crepe de
Chine, Georgette, linen,
Organza
Lightweight: Crepe de
Chine, Georgette, linen,
Organza
Needle thread Nylonthreads№50
-№100
Polyester threads
№50-№100
Nylonthreads№100
Polyester threads
№100
Upper looper thread Combined wool and nylon
threads
Nylon threads
№100
Polyester threads
№100
Combined wool and nylon
threads
Decorative threads
Lower looper thread Nylonthreads№50
-№100
Polyester threads
№50-№100
Nylon threads
№100
Polyester threads
№100
Stitch length R R
Stitch width R.5 (two-needle overlock) R.5 (two-needle overlock)
Thread tension
Needle thread Upper
looper thread
Lower looper thread
4(4-6)
5(4-6)
4 (4-6)
4 (4-6)
4 (4-6)
6 (5-7)
USING DIFFERENT KINDS OF PRESSER FEET
1. Blind stitch / butt-seam foot
2. Bead / sequin foot
3. Stretch stitch foot

USER MANUAL
33EN
EN
TRIUMPHATOR 1700X / 1800X
32
• Loosen the screw and remove the knife.
• Place a new knife in the holder.
• The lower knife must be set so that the edge of its blade is even with
the needle plate.
• Tighten the screw that secures the lower knife.
1. Upper knife xing screw.
2. Lower knife xing screw.
SWITCHING THE LOWER KNIFE
0.5~1.0mm
0.7~1.2mm
CAUTION:
Be sure to turn off the power switch when removing or replacing the
converter.
TO CONVERT UPPER LOOPER TO 2 THREAD
SERGING
TO USE THE CONVERTER:
1)Open the front cover and turn the hand wheel to raise the needleto its
highest position.
2)Slide plate (A) of the converter into slot (B) and bring the upper
looperconverter (D) up and over into the eyelet (C).
REMOVING THE UPPER KNIFE
To work on the overlock without cutting the fab-
ric, switch the upper knife adjustment lever from
1 to 2 and the knife will cease operating.
SWITCHING THE KNIFE
A dull knife must be replaced.
NOTE:
Before replacing the blade, turn off the overlock by unplugging the
power cord.
SWITCHING THE UPPER KNIFE
• Remove the top cover and raise the upper knife to the highest position.
• Loosen the screw securing the upper knife and remove the knife.
• Place a new knife in the holder.
• Tighten the screw that secures the upper knife.
ADJUST THE POSITION OF THE UPPER KNIFE SO THAT THE EDGE OF THE
UPPER BLADE IS 0.5-1.0 MM OUTSIDE THE EDGE OF THE LOWER KNIFE.

USER MANUAL
35EN
EN
TRIUMPHATOR 1700X / 1800X
34
• Loosen the screw that secures
the lamp cap, pull the cap up and
remove it..
• Remove the backlight bulb and
install a new one.
1. Presser foot lifter screw.
2. Protective lamp cover.
3. Lamp cap screw.
CHANGING THE BACKLIGHT LAMP
Before removing the protective lamp cover, unplug the device from the
mains socket.
• Loosen the presser foot lifter attachment screw, raise the presser foot
lift lever and remove it from the device.
• Loosen the screw securing the protective lamp cover and remove the
cover as shown in the gure below.
• Screw В. For repairing and adjust-
ing only. Do not loosen or remove
this screw.
To guarantee an optimum performance from the machine, it’s necessary
that you clean and lubricate it from once in a while.
BEFORE CARRYING OUT MAINTENANCE MAKE SURE THE MACHINE IS
UNPLUGGED FROM THE MAINS!
CLEANING AND LUBRICATION
1. Remove the front lid.
2. Apply a drop of sewing machine oil to the spots indicated by the
arrows.
ALWAYS USE QUALITY SEWING MACHINE OIL. WHEN USING THE
OVERLOCK FREQUENTLY, LUBRICATE IT AT LEAST ONCE A WEEK!
CLEANING
1. Clean the needle plate with a brush.
2. Loosen the screw А. Remove the needle plate.
TO RESTORE THE UPPEL LOOPER:
Push end (D) of the converter out from eyelet (C) of upper looperand remove
converter (A) from looperslot (B).
NOTE: Place converter in accessory box when not using.
The converter is only available in the EFFEKTIV Triumphator 1800X.

USER MANUAL
37EN
EN
TRIUMPHATOR 1700X / 1800X
36
TECHNICAL INFORMATION
Designed to work With fabrics ranging from light to thick
Working speed 1200 stitches per minute
Stitch length (step) 1,1 - 4 mm (3/64 - 5/32 inch)
Stitch width (step) 2,3 - 7,0 mm (5/64 - 9/32 inch)
Presser foot Replacable presser foot
Presser foot lifter 5 - 6 mm (3/16 - 15/64 inch)
Needle bar stroke 25 mm (1 inch)
Needle НАх1
OTHER INFORMATION:
DISPOSAL
To dispose of this product, we recommend that you do not throw it away
with normal household waste. To prevent potential negative effects on the
environment, please follow our procedures for the treatment, disposal and
recycling of used electronic products.
In the event of warranty claims - contact the recommended service centers.
Needle and stich count Adjustment to 3- or 4-thread stitch.
Works with two needles or one.
Net weight 7,0кг.
SetofneedlesНАх1 №80(2),№90(2)
Model TRIUMPHATOR 1700X / 1800 X
TABLE OF SETTING
OF SEAM VARIETIES

39
TRIUMPHATOR 1700X / 1800X
EN
EN
38
Length Width Diferrential reel Spreader Converter
2-4 5-7 1 N +
R R 1 R +
2-4 5-7 1 N +
2-4 5-7 1 N +
2-4 5-7 2 N +
2-4 5-7 1 N +
2-4 5-7 2 N +
2-4 5-7 1 N +
R R 1 R -
2-4 5-7 1 N -
R 5-7 1 N -
2-4 5-7 2 N -
2-4 5-7 1 N -
2-4 5-7 1 N -
R 5-7 1 N -
2-4 5-7 2 N -
2-4 5-7 1 N -
R 5-7 1 N -
2-4 5-7 2 N -
2-4 5-7 1 N -
№Seam(hem) name Tension
I II III IV
1• 2-needles 3-threads Flatlock 1 1 - 8
2• 2-threads rolled - 4 - 4
3• 2-threads narrow - 4 - 4
4• 2-threads wide Flatlock 1 - - 8
5• 2-threads wide with gathering 4 - - 4
6• 2-threads wide 4 - - 4
7• 3-threads 2-needles with gathering 4 4 - 4
8• 3-threads 2-needle 4 4 - 4
9 3-needles rolled - 4 4 4
10 3-threads narrow Flatlock - 0 1 8
11 3-threads narrow dense - 4 4 4
12 3-threads narrow with gathering - 4 4 4
13 3-threads narrow - 4 4 4
14 3-threads wide Flatlock 0 - 1 8
15 3-threads wide dense 4 - 4 4
16 3-threads wide with gathering 4 - 4 4
17 3-threads wide 4 - 4 4
18 4-threads dense 4 4 4 4
19 4-threads with gathering 4 4 4 4
20 4-threads 4 4 4 4
• Stitch numbers 1 to 8 are only available for the model Triumphator 1800X
This manual suits for next models
1
Table of contents
Languages:
Other EFFEKTIV Kitchen Appliance manuals