Xtool PS2 User manual

PS2HeavyDuty
Preface
PS2HeavydutyscannerisamajorproductresearchedanddevelopedbyXtooltechCo.Ltd.The
maintechniciansplayatechnicalleadingroleinthisbusinessandmostotherengineershaverich
experiencesfordesigningplatformandsoftware.Therefore,ourcustomerscouldfeelthe
outstandingandpowerfulperformanceoftheproduct.
AsforthedesignofPS2,ourtechniciansperfectlymixappearanceswithpracticalitywithlarge
size,true‐color,touchingscreenandstreamlineappearance.CustomerswilloperatePS2more
intuitivelyandeasily.Thecapabilityofthebuilt‐inhighlyprocessingchipcouldreach400MHZ,
muchmoresuperiorcomparedwiththecommonusedARM7chip,whichcanguaranteethe
accuracyandreal‐timefunction,therebyitenhancestheconvenienceofusers.
Inthecompatibleaspectofdataagreement,PS2comprehensivelysupportsallprotocolsandall
modesfortheOBDII.Thebuilt‐inCANBUSchipsupportsallCANBUSagreements.The
forward‐lookingdesignmeetsautomobilemain‐lineexaminationnotonlyforthepresentbut
alsoforthefuture,justneedupdatingthedriversofdiagnosticmoduleviainternet.Ithasbeen
reducedtheequippedadaptersastotheformidablecompatibility,whichmakesusersmore
convenientandeasiertouse.
Theservicemencansitintheofficetocarryonthefunctionaltestviawirelesscommunication.
TheVAGconnectorcouldmeetthevariousrequestsfromcustomers.Alltestproceduresplaces
onahigh‐capacitySDcardwhichfacilitatestheupdatingprocedure.Themulti‐languageedition
willsatisfythecustomers’demandsfromdifferentareaaroundtheworld.
PS2isamaturedandtrustedproductasithasbeentestmassively,We’veneverstopourstepto
developandinnovate,whichenablesPS2becomeanreliableautomobilediagnosticequipment.
Itcantestfast,accuratelyandconveniently,whichhelpsusgainthepowerfulsupportingfrom
customers!
PS2isahigh‐techandprofessionalautomobilediagnostictool.Pleasefollowtheinstructionto
useitortocontactthetechnicalafter‐serviceIfyoumeetanyproblemsorquestionrelatedto
theoperation.
1

PS2HeavyDuty
Statement
(1)ThismanualisdesignedforthePS2product,anycompanyorindividualarenotpermitto
replicateandbackupitinanyformiftheydon'thavetheauthoritylicensefromXTOOLTECHCO.,
LTD(includeelectronic,mechanical,photocopying,recordingorothers).
(2)PS2heavydutyisjustofferedfortheprofessionalandtechnicalpersonnelofvehicle
maintenance
(3)ThismanualonlyprovidesmethodsofoperatingPS2products,ourcompanydoesnot
undertakeanyresponsibilityifitresultinanyconsequencesbyoperatingotherequipments.
(4)XTOOLTECHdoesnotundertakeanyresponsibilityiftheequipmentisdamagedorletusers
costorlossanyexpenditurebecauseoftheuser'spersonalorthird‐party’saccident;orabuseor
misuseoftheequipment;orunauthorizedalterationandrepair;orwrongoperatingnotguideby
manual,etc.
(5)Themanualisbasedontheexistingconfigurationandfunctions,anditwillalsobesubject
tochangeifthetoolisaddednewconfigurationandnewfeatures,butpleasepayattentionthat
wewontnoticeitspecially.
(6)XTOOLTECHCompanyhasconductedaregistrationoftrademarks,thelogois
(7)XTOOLTECHCompanyclaimthatitstillownstheownershipoftrademarks,servicemarks,
domainnames,logosandcompanynamesamongthenationalswherethosehavenotyetbe
registered.Theotherproductsandothercompanynamesmentionedbythemanualstillbelong
totheoriginalregisteredcompanies.nobodycanusethenameofXTOOLTECHorthetrademarks,
servicemarks,domainnames,logosandcompanynamesifwithouttheformalagreement
writtenbytheconsentoftheXTOOLTECHowner,
(8)Youcanaccessthewebsite:http://www.xtooltech.nettolearnmoreabouttherelated
informationofPS2equipment.
(9)XTOOLTECHcompanyownsthefinalinterpretationofthemanualcontents.
2

PS2HeavyDuty
DirectoryLists
ChapteroneacquaintanceofProduct……………………………………………………………………………………1
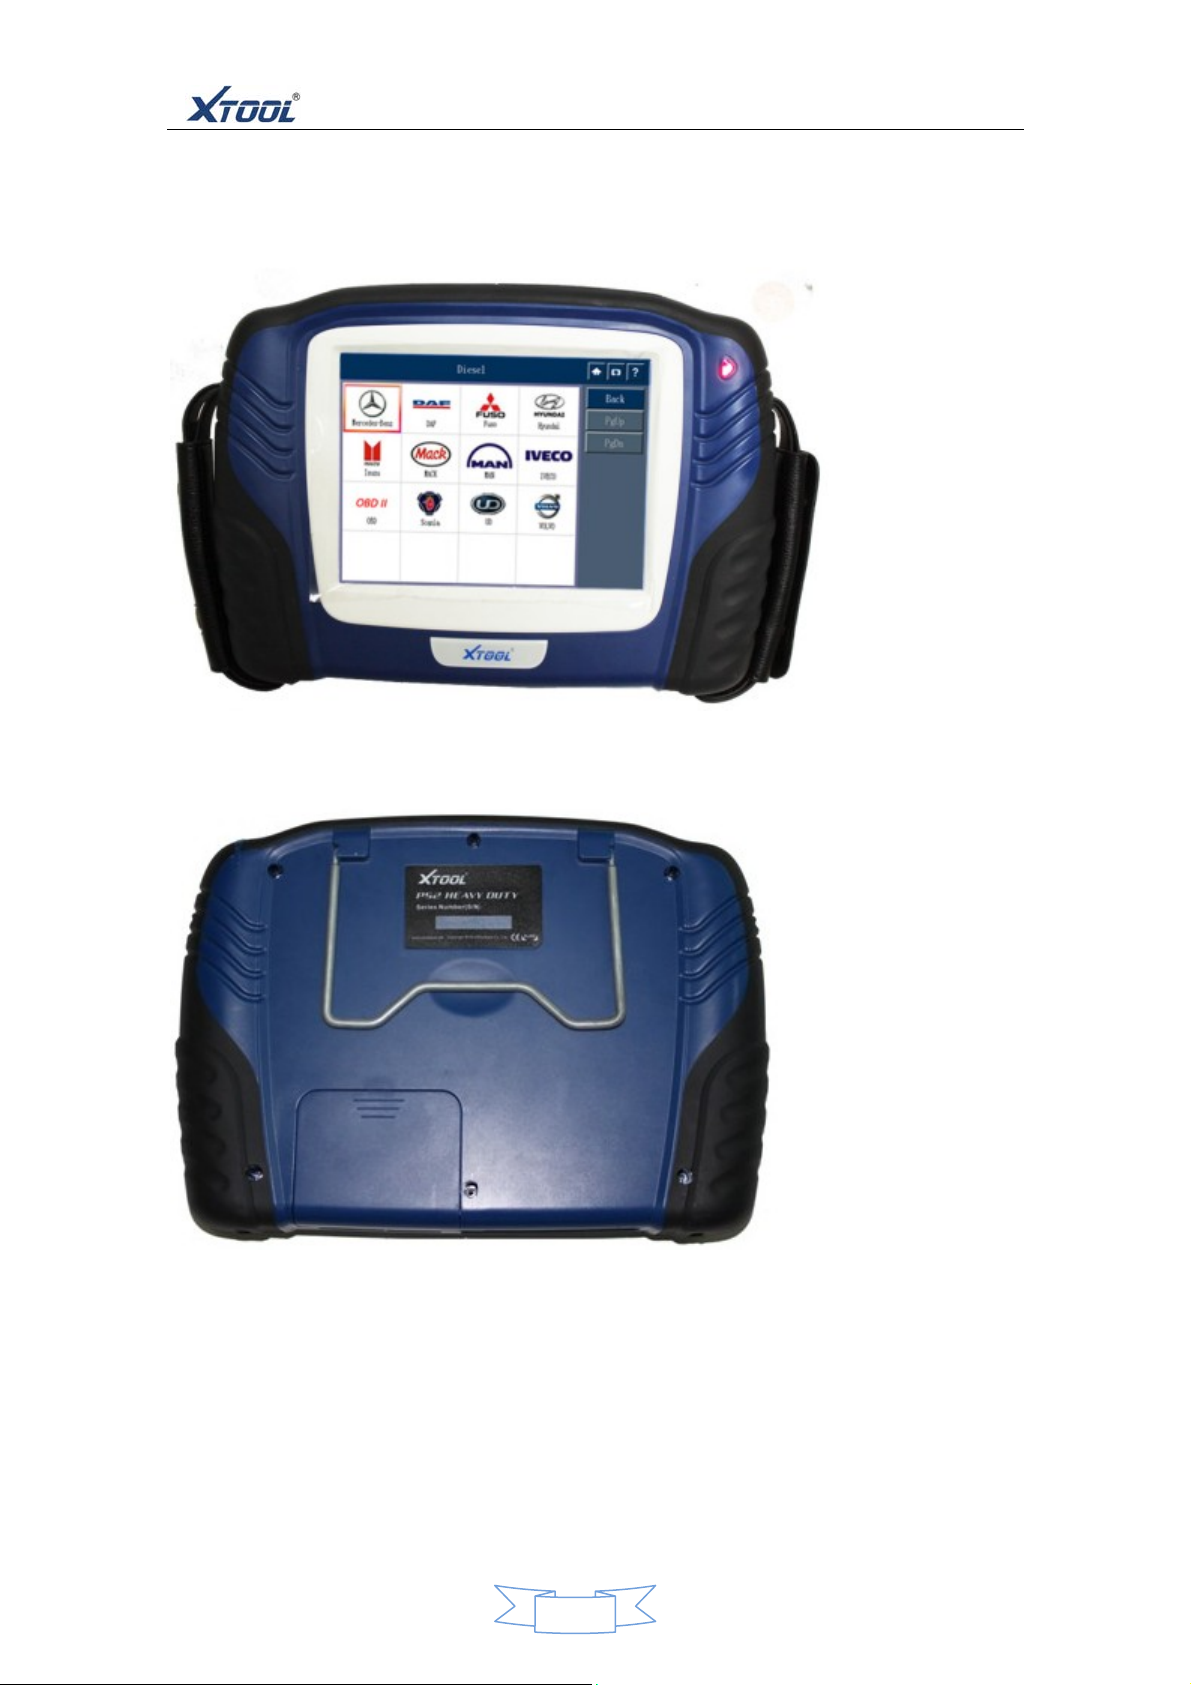
A.diagramofPS2mainframeappearance…………………………………………………..…………………………..1
1.Front‐ViewFigure…………………………………………………………………………………………………………………1
2.Back‐viewFigure……………………………………………………..………………………………………………………1
B.PS2mainframeInterfaceSchematic……………………………………………………………………………………1
1Theupward‐sideconnectionofthemainframe……………………………………………..……………………1
2.Thelower‐sideconnectionofthemainframe……………………………………………………………….…….2
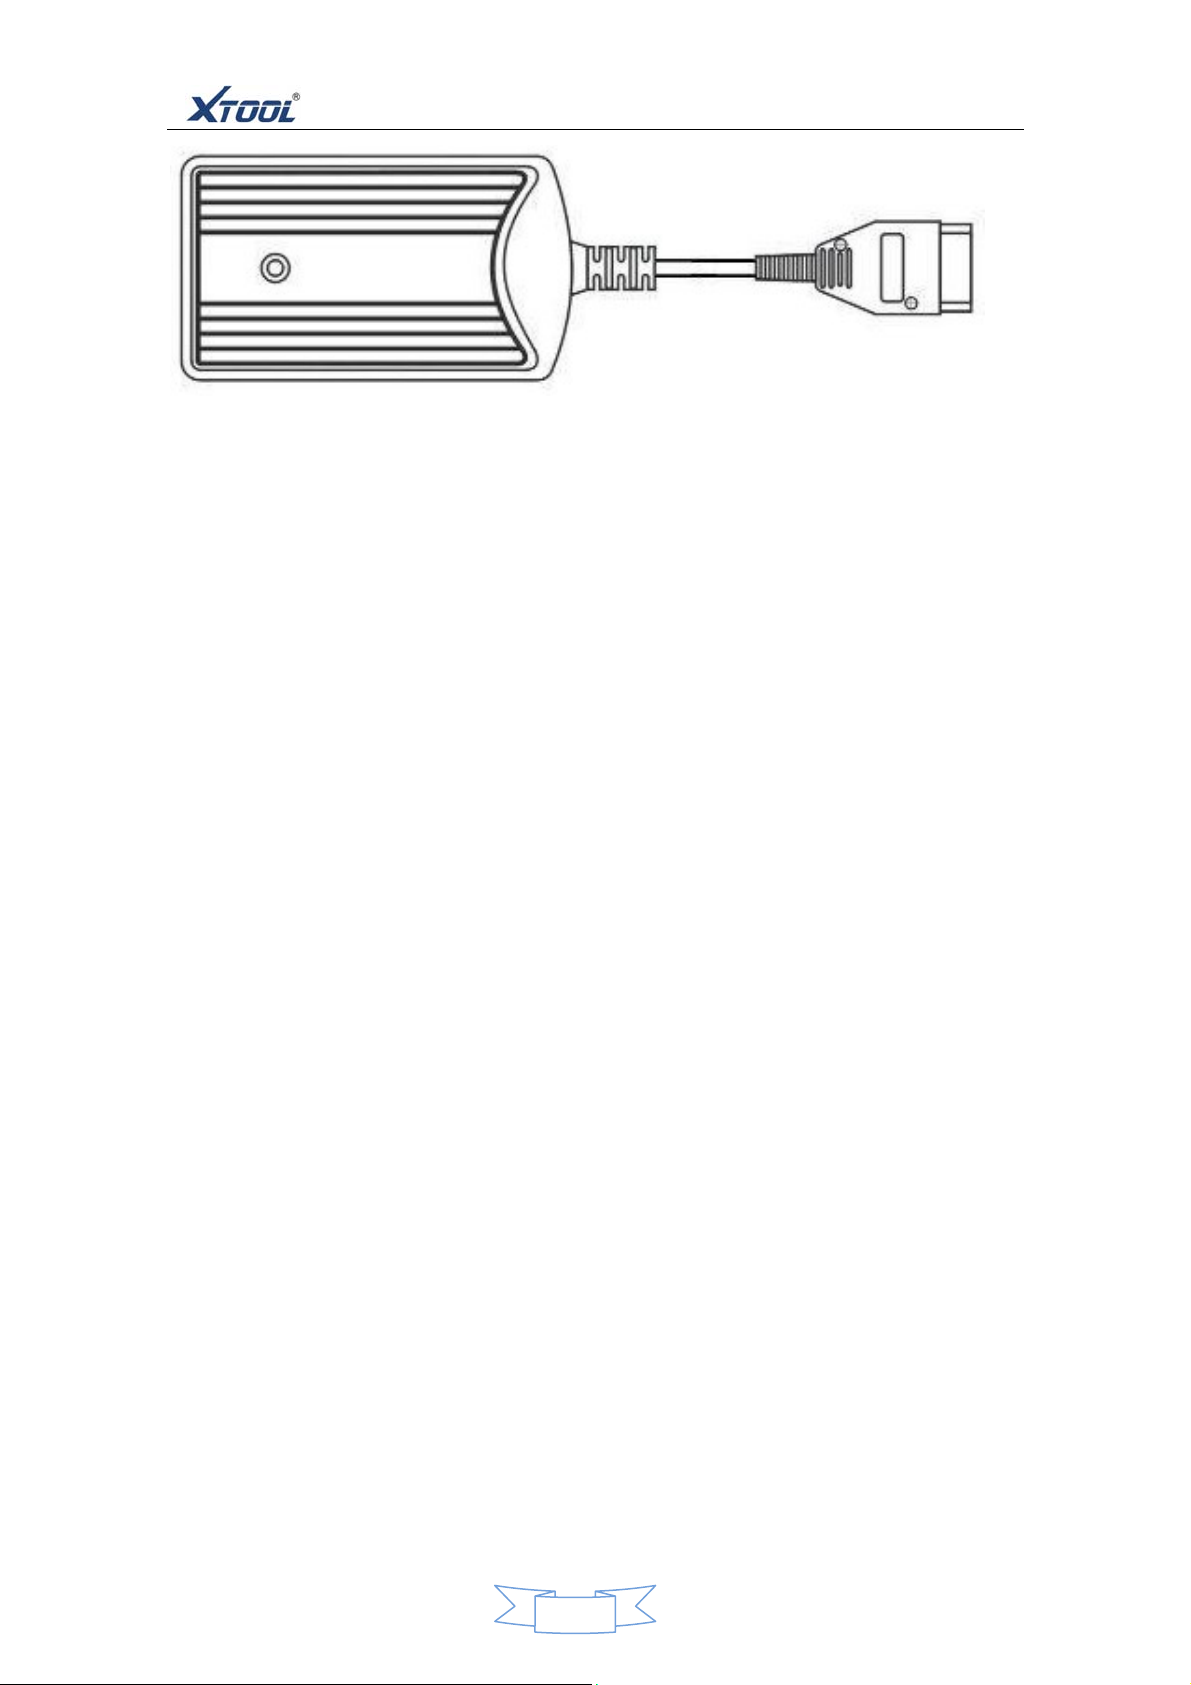
C.ShapeSchematicofVCIdiagnosticbox……………………………………………………………………………..2
D.PS2technicalparameters……………………………………………………………………………………………………3
E.Packageparameters……………………………………………………………………………………………………………3
Chaptertwooperatingtheproduct……………………………………………………….…………………………………4
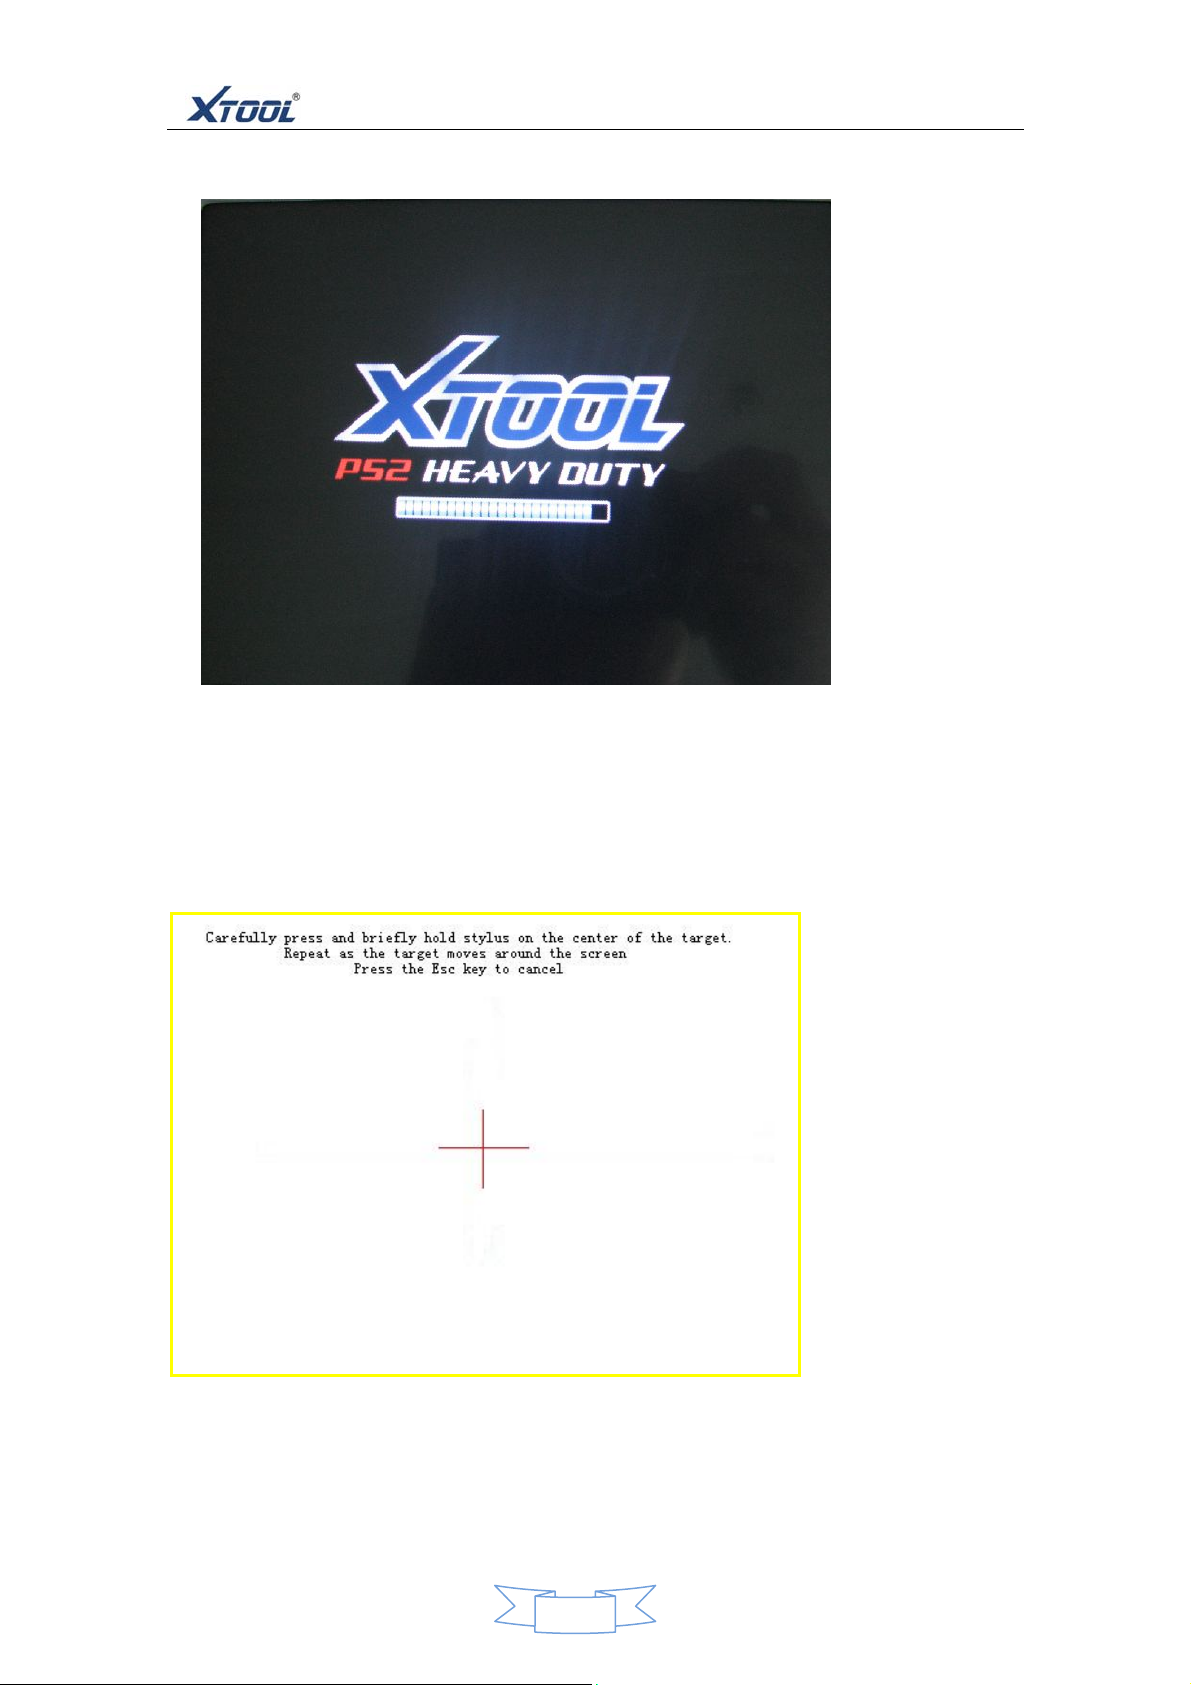
A.Calibrationofdisplay…………………………………………………………………………………………………………..4
B.Mainscreenandfunction‐keysnotes…………………………………………………………………..……………..5
1,PS2mainscreen………………………………………………………………………………………………….…………….5
2,PS2sub‐menu…………………………………………………………………………………………………………………….5
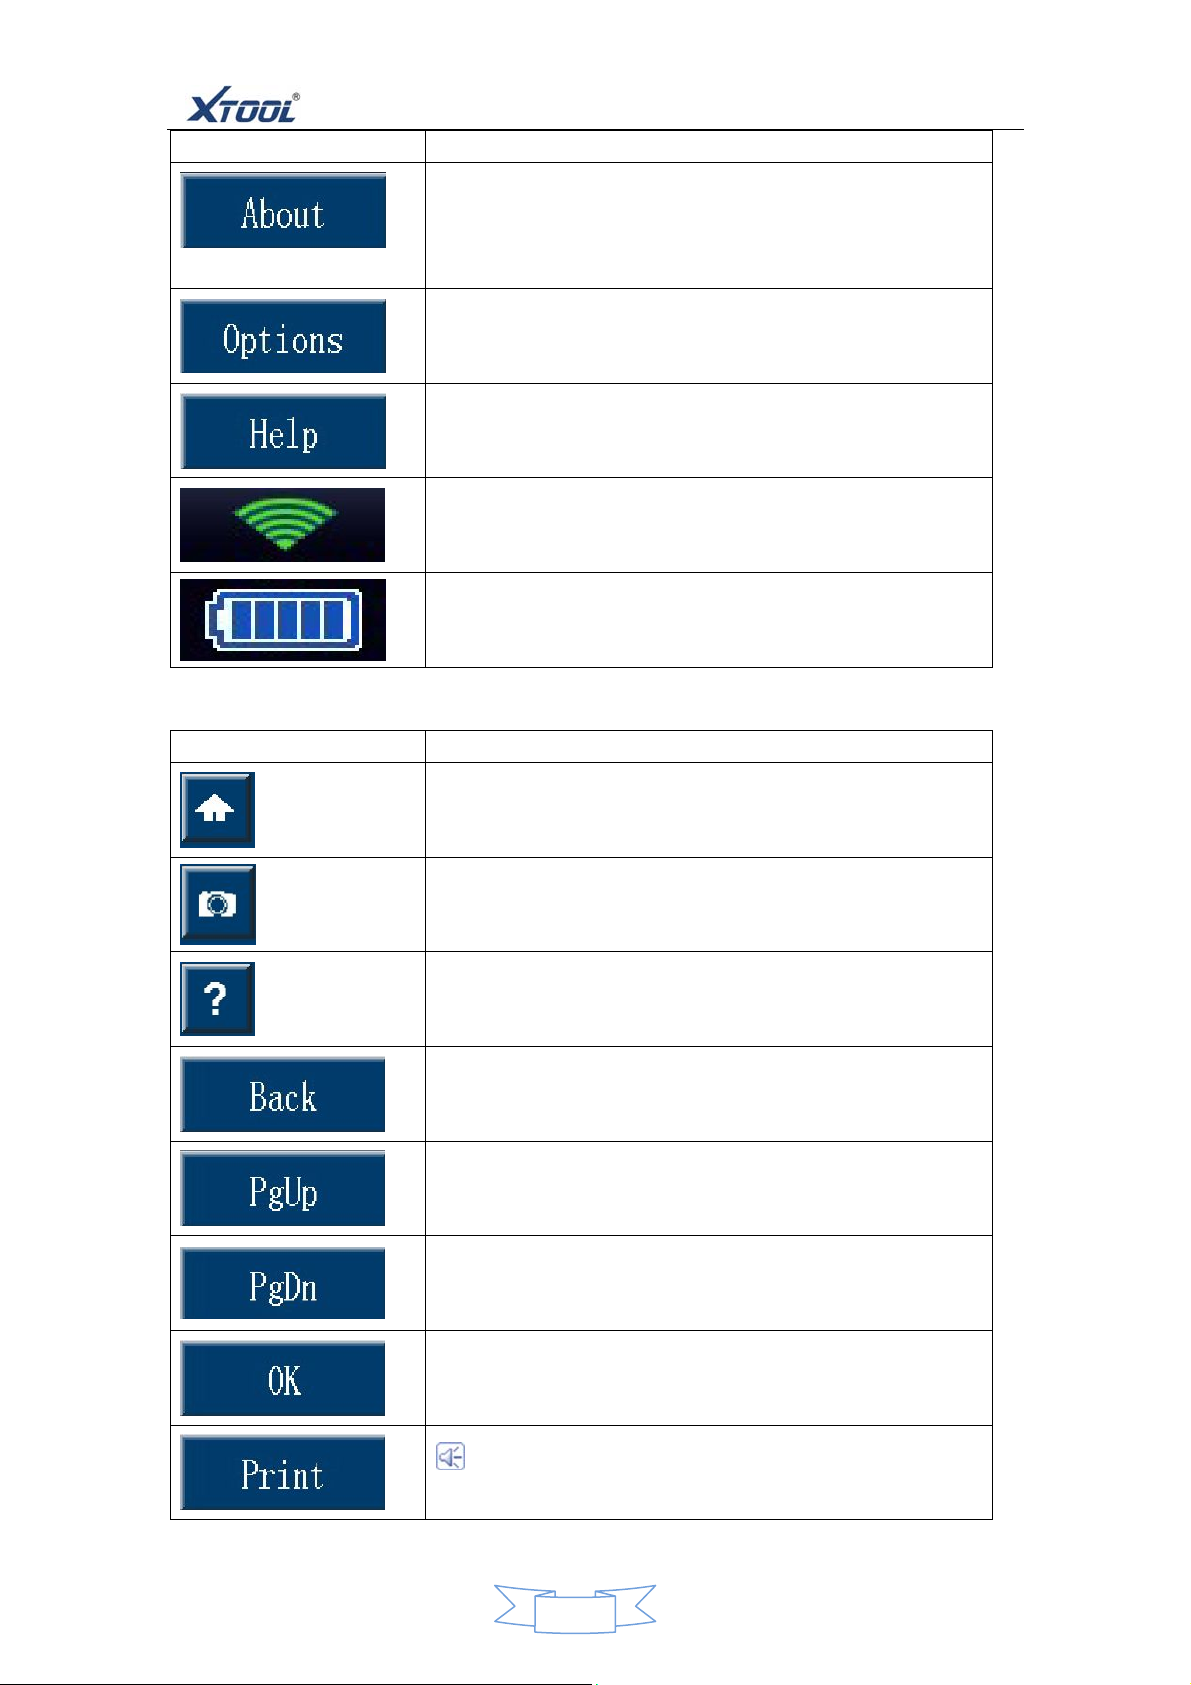
3.Function‐keysnotesformainscreen………………………………………………………………………………….6
4,Function‐keysnotesforsub‐menu……………………………………………………………………….…………….6
C.Settingmainframe………………………………………………………………………………………………………………7
1.Checkingtheinformationofmainframe……………………………………………………………………..…….7
2,settingmainframe……………………………………………………………………………………………………………7
3,notesofsettingfunctionmenu……………………………………………………………………………..………….8
D,installprintingpaper…………………………………………………………………………………………………..……….12
1,notice………………………………………………………………………………………………………………………………12
2,theinstallationofprintingpaper………………………………………………………………………..……………12
E.connectanddiagnosewithvehiclesbyPS2……………………………………………………………….………….13
1,testingofconnectingvehicle………………………………………………………………………………………..…..13
2,notesofconnectinganddiagnosisvehicle………………………………………………………………………..13
F,themethodandfunctionofusingPS2…………………………………………………………………………..……...14
1menuchoosing………………………………………………………………………………………………………………..14
2,operatingthetestingfunction……………………………………………………………………………….………...17
3.Readvehicleinformation………………………………………………………………………………………………….28
ChapterthreePlacesofdiagnosticseatindifferentvehiclemodels………………………………………….30
ChapterFourthThedefinitionofdiagnosticseatandthecommunicationalprotocols….......…….31
Athedefinitionofdiagnosticseatandthediagram………………………………………………………..…...31
1,thestandardOBDIIDiagnosisseat……………………………………………………………………..………….31
2,Round16PINdiagnosticseat…………………………………………………………………………………………..31
3,Round37PINdiagnosticseat………………………………………………………………………………………….31
4,Round38PINdiagnosticseatt………………………………………………………………………………………..32
5,Round9PINdiagnosisseat…………………………………………………………………………………………....32
BUsingthemulti‐jumperbox……………………………………………………………………………………..…….….33
1,themulti‐jumperbox………………………………………………….……………………………………………….33
2noteofthesideholeonmulti‐jumperbox……………………………………………..…………………….…..33
3

PS2HeavyDuty
3usingmethodofmulti‐jumperbox…………………………………………………………………………….……33
4

PS2HeavyDuty
ChapteroneacquaintanceofProduct
A,diagramofPS2mainframeappearance
1.Front‐ViewFigure
2,Back‐viewFigure
B.PS2mainframeInterfaceSchematic
1.Theupward‐sideconnectionofthemainframe:
1

PS2HeavyDuty
Schematicdiagramnotes:
①Powerswitch:Usesforstartingandclosingofmainengine
②USBconnection:UsesthisconnectiontocarryonthedatasynchronizationwithPC.
③VGAconnection:Usesthisconnectiontolinktheexternalmonitor(800×600pixels)
④Maintestconnection:Usesthetestinglinetocarryonthevehiclesdiagnosis.
⑤powerconnection:Usesfortheexteriorpowersupply
⑥touchingpen:Usesinclickingonthetouching‐screen.
2.Thelower‐sideconnectionofthemainframe
Schematicdiagramnotes:
①serialport:Usesinthemainbodydebugging.
②SDcardslot:usesforSDcard
③paperoutlet:useforminiprinter
C.SchematicdiagramofVCIdiagnosticbox:
2

PS2HeavyDuty
Function:
TheboxcommunicateswithPS2mainframeandvehicle.Itisalsocalledlower‐position
machinebox.Thisdiagnosticboxhastwoconnections:DB15andOBDII.Themaintestingline
connectsPS2mainframewithDB15.TheOBDIIconnectioncouldlinkwiththetestingadapter
(vehiclewithOBDIIadaptorcoulddirectlylinkwithPS2mainframe)
PS2mainframewithnomaintestinglinealsocandodiagnosisasthebluetoothcommunication
modulehasbeeninstalledintotheVCIdiagnosisbox.Pleasechangethesettingfrom“on‐line
diagnosis”tothe“wirelessdiagnosis”onthemenuifyouarewonderingtouseitwithwireless!
D.PS2technicalparameters:
① operatingsystem:WINCE5.0operatingplatforms
② CPU:SAMSUNG32bitsprocessors,basicfrequencyis400MHZrandommemory:SDRAM64M
③programmingmemory:FLASH64M,supportsSDcardslot‐inandslot‐out
④mainframebattery:rechargeablebattery3500m/Ah
⑤mainframepowersupply:DC12V/24V
⑥mainframepower:25W
⑦printer:Minihigh‐speedthermalsensitiveprinter
⑧screen:8inchesreal‐colortouch‐screens,800×600withLEDback‐light
⑨relativehumidity:<90%,temperature:‐20‐50℃
⑩wirelesscommunication:blue‐teeth
E.Packageparameters:
①machinecomposition:mainframewithSDcard,touchingpen,testingadapters,groupoflines,
SDcardadaptor,operationmanualandoutsidesuitcase
②overallsize:305.2×215.2×85mm
③weight:10KG
Chaptertwooperationoftheproduct
A.PS2displaycalibration
3

PS2HeavyDuty
1,Whenthehostboot,tapanywheretoaccessthescreencalibrationprograminterface,asshown
below.▼
2,Pleaseclickonthecenterofthecrosscalibrationofthemainscreencursorafter
enteringintothescreencalibrationprograminterface,(crosscursorwillturninthe
middleofthescreen,upperleft,lowerleft,lowerright,upperrightcornerofthefive
points.Eachclickwillmovethecrosscursortothenextposition.moreaccurateyou
click,betterthefunctionofcalibrationwillbe.thescreenwillmentionyoutoclickon
anywheretostorethecurrentcalibrationvalueafterfivedirectionsarefollowedby
click,,thenthemaininterfacewillturnintotheboot.)Asshownbelow. ▼
Tip:Typically,thescreenisnoneedtobecalibratedineachusingtime,butitshould
bedoneinthesenseoftheusingoftouch‐screenisinaccurateoritsdifficulttoclick
theselectedmenu.Touch‐screencalibrationalsocanbesetonthesettingfunctionof
mainmanuasitispowered
B.mainscreenandfunction‐keysnotes
4

PS2HeavyDuty
1,PS2maininterface
MaininterfaceisshownasbelowafterPS2isturnedon▼
2,PS2sub‐menu.
Youcanclick
【PgUp】
or
【PgDn】
keytoselectthepageasitenterintothe"Diesel"
sub‐menu,theinterfaceasshownbelow▼
3,ThemaininterfaceFunctionKeys:
5

PS2HeavyDuty
FunctionkeysFunctionnotes
mainframeinformationbutton,clickonthebutton,it
coulddisplayitsinformation(includingsoftwareand
hardwareversion,releasedateandproductserial
number,etc.)
Settingsbutton,clickonthisbuttonwilldisplaythe
mainsetupmenu.
Helpbutton,clickonthisbuttonwilldisplayhelp
information,technologyinformation.
WirelessBluetoothsignalsprompt.
Hostbatterytips.
4,thesub‐menuFunctionKeys:
FunctionkeysFunction
Homebutton,clickthebuttontoreturntothemain
interface.
Capturekey,clickonthisbutton,displaypicturescould
becapturedandbestoredinthe"Snapshot"folderof
SDcard.
Helpbutton,clickonthisbutton,canchecktherelevant
usingassistanceandtechnical
information.
Returnkey,clickonthisbutton,canreturntothe
previousscreenfromthecurrentscreen.
Flipkey,clickonthebuttonwillturnthecurrent
interfaceisbasedonthepreviousinterface.
Scrolldownkey,clickthebuttonnextwillbebasedon
thecurrentturntothenextscreeninterface.
OKbutton,theselectedmenuorfunctiontodetermine
action.
Printbutton,clickonthePrintScreenkeyhosttothe
currentlydisplayedinformation.
6

PS2HeavyDuty
C. settingmainframeinterface
1.checkingtheinformationofinterface
Clickthebuttonatthebottomofthemaininterfacetodisplaythehost
softwareandhardwareversion,releasedateandproductserialnumber
Information,asshownbelow.▼
2,settinginterface
Clickthebutton below,thenshowesthehostsettingsmenu,canchoose
settingasshownbelow.▼
3,notesofsettingfunctionmenu
menuNotesofmenu
7

PS2HeavyDuty
Languagesettingsmenu,toenterthemenucanbeamore
activelanguage
Screencalibratedmenu,toenterthemenutocalibratethe
screen.
Brightnessadjustmentofthemenu,toenterthemenuisa
brightnessadjustmenton
Buzzersetmenu.toenterthemenucanbeabuzzeratthe
openingorclosingset
Andthetogglemenu,toenterthemenutothepublic,can
switchtheEN/METRIC.
Displaysettingsmenu,toenterthemenuaresubjecttochoose
andthecontrolbuttonsplacesetting.
Usertoenterthemenu,andcanenterauserinformation.
USBconnectionsettingsmenu,toenterthemenucanbesetup
pchostandconnectivitycommunicationsanddata
synchronization.
Onlinediagnosissetmenu.toenterthemenucanbesetona
wiredorwirelesshostmedicaldiagnosissettings.
8

PS2HeavyDuty
A.Languagesettings
clickthe"language"Inthe
interface,themenuiconinto
thelanguagesettingsmenu
interface,choosethe
languageasshown.←
B.clickthe“display
calibrated”onsetting
screem,thecalibration
methodisintroducedbefore,
screemshotisshownas←
←
C.adjustScreenbrightness
Clickthe"brightness”onthe
settinginterface,clickthe
brightnessstripfromleftto
righttochoosehebrightness
youneed,screemshotis
shownas←
9

PS2HeavyDuty
D.Buzzersetting
,clickthe“buzzer”Inthe
interfacetoset,abuzzer
openingorclosin。
Screemshotisasshown←
E,EN/METRICswitch
clickthe "EN/METRIC"In
theinterfacemenuto
chooseyourneed
screemshotisasshown←
F.Displaysettings
click”Display”menuInthe
interfacetochoosethe
themeselected,ortoset
controlbuttonontheleftor
rightasyouusedto.
Screemshotisasshown←
10

PS2HeavyDuty
G.Userinformation
Click”userinfo”inthe
interface,youcanenteryour
userinfo.theinputkeyboard
willautomaticallypopupas
youenterthemenu,the
informationwillbeprinted
outwhenit’sprint.
H.USBconnectionsettings
click“USBConnect”Inthe
interface,hostcanbeset
prohibitedorpermittedto
connectwiththepc
communication
I.Onlinediagnosis
Click“PCConnect”inthe
interface,hostcanbeset
diagnostictestingbywired
orwireless
11

PS2HeavyDuty
D.ToinstallPrintingpaper
1,Notes
①ThestandardofprintingpaperisΦ30mmX57mmandinnerholeisΦ 10mmforthermal
paper
②Thermalpapermustbeputfarawayfromhigh‐temperatureplace,oritcouldleadto
abnormalshowing,fuzzy‐printingorblack‐stoneontheprinterpaper.
③ItcantbeprintoutnormallyifthepaperInstallednegatively
2、installationforprintingpapaer
①Taketheprintercoverofffromthe
mainframe‐back,holddowntheprinter
covertopushbacktowardthedirectionof
thearrowtoopen,asshownbelow▼
③Stretchoutsometypingpaper,andensure
thattheedgeoftypingpaperisonaparallel
withprintingbox,thenpushbackthecoveras
shownbelow▼
②takeouttheprinter‐roller,installthe
printingpaperpositively,thenplugtheroller
intotheinnerhole,asshownbelow
▼
④itcanprintafterthecoverisinstalled,if
papercantprintsmoothly,pleasecheckif
paperinstalledunfit;ifitcantprintoutwords,
pleasecheckifpaperinstallednegatively▼
12

PS2HeavyDuty
E.connectPS2todiagnosisvehicle
1、connectingtestwithPS2
①PleasecheckiftheSDcardisputintothemainframecorrectly
②ConnectmainframewithVCIdiagnosticboxbymaintestingline
③findoutthe correspondingtestingconnectorinthePS2suitcaseaccordingtothetypeof
vehiclediagnosticblock,thenconnectVCIboxwithvehiclediagnosticblockbytesting
connector
④youcanusetheuniversaljumperboxtotestifincasethereisnosuitableconnectorin
suitcase,butpleasepayspecialattention:
a.pleasetestthediagnosticblockbymultimeterbeforeconnecting,soastoconfirmits
anode,Negativeelectrode,KcommunicationlineorCANBUScommunicationline
b.pleasepaymoreattentiontoavoidshakinghandleadtoshortcircuitanddestroythe
electroniccomponentsasthedistanceofdiagnosticblock’sterminalsisverysmall.
c.WrongconnectionwilldestroyECUortheelectroniccompolentsinmainframe,for
example,wrongconnectionwithanodeandnegativeelectrode,ortreatanodeasKline,which
woulddestroydiagnosticequipment.WhileitwillleadtonowaytoenterintothesystemifH
lineiswronglyinsteadconnectwithLlineofCANBUScommunication.
d.moreillustrationaboutdiagnosticblockcompolentsandjumerline,pleasecheckpage
38.
⑤Itsreadytodiagnosevehicleastheelectricity‐ lightswitchturnedonandthepower
buttonpresseddown
Theconnectingdiagramisshownasfollows:
①:PS2 主机②:主测试线③:VCI 诊断盒④:测试接头
2、Notesofconnectingdiagnosis
13

PS2HeavyDuty
① Thepowershouldreachtothenormalworkingvoltage,12Vor24V
②thehandshouldpinchthefrontofharnesstoPullorinsertthetestingwire,cantpullthe
middlepartforcibly.Pleasecheckifitisflatafterinserting,cantslanttoinsertsoastoinvoice
destroyingtheterminals.
③Theusershouldoperatebytheillustrationastestingspecialfunction.Forexample,the
factorsofOff‐cylindertestforsomevehiclesareasfollows:thewatertemperatureofengineis
80℃‐105℃,shouldcloselight,airconditionandloosenpedalfastetc.
④asthedieselmachineandtheelectroniccontrolsystemareusuallycomplex,soifitcant
testortestingdataiswrong,pleasecheckoutthecorrectECUmodel,thenchooseitto
correspondwiththemenu
⑤MaybeitshouldupdatethesoftwareIfyoucantfindoutthevehiclemodelordiesel
electroniccontrolsysteminthemenu.Orcontactwithtechnicalservicedepartment.
⑥Nousingtheharnessnotproducedbyxtooltechinordertoavoidunnecessaryloss.
⑦NopluggingoutSDcardintermsofdiagnostictestinginordertoavoidlosingdata.
⑧NopoweroffdirectlyintermsofcommunicationwithPS2andvehicle,pleasecancelthetask
first,thenbacktomaininterface,andthenpoweritoff.
⑨Pleaseusingitgentlyandnoshakingandstriking.Pleasetouchingscreengentlysothatit
canbeusedaslongaspossible.
⑩pleasepoweritoffiflongtimenouseit.
F.Usingmethodandfunctions
1、Menuchoosing
⑴ AsconnectingPS2withvehiclesuccessfully,Pressdownpowerkey,enterintothemainmenu,
shownasfollows▼
14

PS2HeavyDuty
⑵ choosemenuaccordingtoyourneed:▼
⑶exampleforHINO,choose“engine”,thensee“HINO”logo,ifnot,pleaseclick【PgUp】
or【PgDn】tofindit,shownasfollows:
15

PS2HeavyDuty
⑷ Ifthescreendisplaymultipleversions,usuallychooseahigheredition,clickon【OK】,
thenenterinto【HINO】menu,andthenchoosewhatyouwant,themenuisshownasfollows:
⑸ Takediagnose“Engine”asexample,turntheignitionkeyto“ON”position,afterselect
“Engine”menu,PS2diagnosticboxwillcommunicatewithECUofthecar,meanwhilethescreen
willdisplayacommunicationstatusasthepictureshowsbelow.▼
⑹ IfthecommunicationbetweenPS2andECUofthecarisfailed,thescreenwillshow
“testfailed”asthepictureshowsbelow.▼
16
Other manuals for PS2
1
Table of contents
Other Xtool Diagnostic Equipment manuals

Xtool
Xtool IP819TP User manual

Xtool
Xtool Anyscan A30D User manual

Xtool
Xtool D9 Pro User manual

Xtool
Xtool IP819 User manual

Xtool
Xtool X100PAD Elite User manual

Xtool
Xtool Anyscan A30D User manual

Xtool
Xtool EZ400PRO User manual

Xtool
Xtool PS80 User manual

Xtool
Xtool PS90 User manual

Xtool
Xtool N9EV User manual