EGi Compact 10404 User manual
009093 • 06/2018
Compact
10404
4 Z1 Z2
3 W; 32 Ω3 W; 32 Ω3 W; 32 Ω3 W; 32 Ω3 W; 32 Ω3 W; 32 Ω3 W; 32 Ω3 W; 32 Ω
Z2
1204
TL
4PIN
6 W; 16 Ω6 W; 16 Ω6 W; 16 Ω6 W; 16 Ω
Z1
Z1
Z1
Z2
AUDIO
AUX INPUT
(3.5 mm Jack)
12 17
9
45
7
11
10
16
15
13
14
2
3
1
6
78
EGi garantiza sus fabricados electrónicos y electroacústicos contra cualquier defecto de fabricación que afecte a su funcionamiento durante 36 meses a partir de la fecha de su
producción (indicada en cada fabricado), comprometiéndose a reparar o reponer los módulos defectuosos cuyo fallo, siempre a juicio de EGi, se deba a defecto de fabricación, sin
cargos de repuestos.
Esta garantía no incluye gastos de envío de módulos, ni mano de obra de sustitución en la instalación de los citados módulos electrónicos y electroacústicos. En ningún caso la garantía
cubre los desperfectos o roturas de piezas embellecedoras (rejillas, embellecedores, carátulas, marquillos...).
Esta garantía se refiere únicamente al concepto de sustitución en fábrica de los módulos producidos por EGi, excluyéndose cualquier otra cobertura o responsabilidad sobre el
resto de materiales o el conjunto de la instalación puesta a disposición del usuario, pero que EGi no suministra ni ejecuta.
Por lo tanto no quedan cubiertas por esta garantía:
a. La instalación e interconexionado entre sus módulos.
b. Las consecuencias de abuso o mal uso del producto, incluyendo pero no limitado a:
b.1. No usar el producto para fines normales, o no seguir las instrucciones de EGi, para el correcto uso y mantenimiento del mismo.
b.2. La instalación o utilización de los productos de forma no concordante con las normas técnicas o de seguridad vigentes.
c. Las averías producidas por la incorrecta instalación de los módulos, o con cable que no sea el adecuado.
d. Las averías generadas por intervención de persona no autorizada por EGi.
e. Las consecuencias de mezcla con equipos de otro origen, así como adaptaciones, modificaciones, ajustes y/o tentativas de ajustes, irrespectivamente de que ello haya sido efectuado
de forma técnicamente correcta en principio, siempre que no exista expresa autorización por EGi.
f. Las consecuencias de accidentes, catástrofes naturales o cualquier causa ajena al control de EGi, incluyendo pero no limitado al rayo, agua y disturbios públicos.
En todos estos casos excluidos de la garantía, y siempre que los módulos no sean juzgados como defectuosos por parte de EGi, su remitente deberá hacerse cargo del importe total
de la reparación, y caso de producirse visita de nuestros técnicos, su solicitante correrá con los gastos originados sin causa justificada de garantía.
ATENCIÓN: Si Vd. observa algún problema en su instalación EGi nuestro Servicio de Atención al cliente le atenderá de 9 h. a 15 h.
Garantía
Especificaciones técnicas
10404 Consola bizona 25+25 W con Bluetooth®, AUX IN y micrófono
es manual de instrucciones
Avda. Almozara, 79 • 50003 ZARAGOZA - España • T. +34 976 40 53 53 • F. +34 976 40 53 54 • e-mail: [email protected] • www.egiaudio.com
Esquema de conexión
Esquema de conexión
Esquema de conexión
SOPORTE TÉCNICO
Si durante el uso de su sistema se encuentra con un problema, y no puede solucionarlo
consultando el manual, por favor, contacte con su instalador. Puede también consultar la
web www.egiaudio.com donde encontrará información actualizada y otros recursos
para dar solución a su problema.
IINSTRUCCIONES DE SEGURIDAD
1. Lea las instrucciones. Antes de utilizar su nueva unidad, por favor lea todas las
instrucciones de seguridad y operación.
2. Conserve estas instrucciones. Para futuras referencias y resolución de
problemas conserve estas instrucciones.
3. Tenga en cuenta todas las advertencias. Todas las advertencias en este
manual deben ser consideradas.
4. Siga las instrucciones. Siguiendo las instrucciones presentes en esta guía,
será capaz de usar el sistema de forma correcta y segura.
5. Agua y humedad. No use este aparato cerca del agua (piscinas, fuentes, por
ejemplo). No exponga el equipo a salpicaduras ni coloque sobre él objetos que
contengan líquidos, por ejemplo vasos o botellas.
6. Limpieza. Limpie con un paño seco sin hilos. No use limpiadores basados en
disolventes.
7. Instalación. No instale el aparato cerca de ninguna fuente de calor como
radiadores, estufas u otros aparatos que produzcan calor. Debe instalarse siempre
sin bloquear la libre circulación de aire a través de sus rejillas de ventilación.
8. Puesta a tierra y cables de alimentación. El cable de alimentación suministrado
con su unidad tiene conector de tres terminales. No corte o dañe el terminal de tierra.
Si el conector suministrado no puede conectarse en su enchufe, consulte a un
electricista para sustituir el enchufe obsoleto. Proteja el cable de alimentación de
ser pisado o pellizcado.
La unidad está dotada de un cable de alimentación desconectable que se conecta
al conector AC del chasis. El cable de alimentación posee un conector hembra IEC
en un extremo y un conector macho en el otro.
El equipo no tiene interruptor, el interruptor es el propio cable de alimentación.
La base de enchufe deberá estar accesible y próxima al equipo.
Tenga en cuenta que la tensión nominal de alimentación es el valor indicado en la
etiqueta, con un rango ±10% de ese valor (según IEC 60065:2001).
9. Opciones. Usar sólo los accesorios suministrados por el fabricante.
10. Servicio. No existen partes ajustables por el usuario en el interior de este equipo.
Cualquier operación de mantenimiento o reparación debe ser realizada por personal
cualificado. Es necesario el servicio técnico cuando el aparato se haya dañado de alguna
forma, tal como que haya caído líquido o algún objeto en el interior del aparato, haya
sido expuesto a lluvia o humedad, no funcione correctamente o haya recibido un golpe.
IMPORTANTE
Lea detenidamente estas "Instrucciones de seguridad" antes de utilizar cualquier producto EGi.
El signo de exclamación dentro de un triángulo indica la existencia de
importantes instrucciones de operación y mantenimiento en la
documentación que acompaña al producto y la existencia de componentes
internos cuyo reemplazo puede afectar a la seguridad.
Aparato de Clase I.
El signo del rayo con la punta de flecha, alerta contra la presencia de voltajes
peligrosos. Para reducir el riesgo de choque eléctrico, no retire la cubierta.
Los signos del rayo cerca de los terminales de salida del amplificador alertan
del riesgo de choque eléctrico en condiciones normales de uso (terminales
peligrosos al tacto). No toque dichos terminales mientras el equipo esté
encendido.
Este símbolo indica que el presente producto no puede ser tratado como
residuo doméstico normal, sino que debe entregarse en el correspondiente
punto de recogida de equipos eléctricos y electrónicos.
PRECAUCIÓN: Para reducir el riesgo de shock eléctrico no retirar la cubierta.
Reparar solo personal cualificado.
No exponga este artículo a la lluvia o a la humedad.
PRECAUCIÓN: Para prevenir la propagación del fuego, evite el uso de
velas u otro tipo de llamas cerca del producto.
La marca CE significa Conformidad Europea y es una marca europea para
ciertos grupos de servicios o productos industriales.
La marca CE debe ser ostentada por un producto si este se encuentra
dentro del alcance de las aproximadamente 20 llamadas Directivas "New
Approach" y puede venderse y ponerse en servicio legalmente dentro de
los países que conforman la UE. Si el producto cumple las provisiones
de las Directivas Europeas aplicables y la marca CE se ostenta en el
producto, los estados miembros no pueden prohibir, restringir o impedir la
colocación en el mercado o puesta en servicio del producto. La marca CE
puede considerarse como el pasaporte para el comercio del producto en los
países de la Unión Europea.
información
Información
Funcionamiento
FUNCIONAMIENTO
IMPORTANTE: Para comenzar a usar la Compact Bizona asegúrese de que la alimentación está conectada a la corriente eléctrica y que existen altavoces
correctamente conectados en las zonas 1, 2 o ambas.
CONFIGURACIÓN
Antes de encender la consola, le recomendamos que realice una breve configuración sencilla.
La consola Compact permite la opción de trabajar con dos zonas independientes (2 Zones por defecto), o modificando el selector (14) pasar a trabajar solo como
una zona (1 Zone).
En 2 zonas (2 Zones) tendríamos amplificación y regulación de volúmenes separados por zona (25 W Z1 y 25 W Z2); o por el contrario si utilizamos la posición
(1 Zone) la consola solo activa el control de música y avisos para la Z1, pero sin embargo sale el mismo audio y avisos tanto por Z1 25 W como por Z2 (que
saldrá el audio y avisos de Z1) + 25 W.
De esta forma logramos tener toda la potencia de la consola 50 W en dos líneas de altavoces, pero con el control único desde los mandos de la Zona 1. Seleccionar
la opción deseada para su instalación.
ENCENDIDO Y APAGADO
Para encender y apagar la consola, pulse la tecla (1) de encendido y apagado Stand-by.
La consola se activa y se encienden los leds de control y de los amplificadores.
A continuación seleccione la fuente de entrada de sonido entre AUX y Bluetooth®, y ajuste los volúmenes a la selección deseada.
Para apagar la consola, pulse la tecla (1). Al encenderla de nuevo, vuelve al estado de entrada de audio seleccionado anteriormente. En caso de pérdida del
suministro eléctrico la consola volverá a la entrada de Bluetooth®, por defecto de fábrica.
SELECCIÓN DE ENTRADA DE AUDIO
La consola Compact Bizona permite seleccionar dos entradas de audio para reproducirse por ambas zonas a la vez.
Una entrada de audio Bluetooth®para reproducir música inalámbricamente desde cualquier dispositivo multimedia Bluetooth®y otra entrada analógica AUX
desde la entrada AUX AUDIO (ubicada en un lateral) para conectar a la fuente a través de un conector Jack de 3.5 mm estéreo.
NOTA: Aunque la consola recibe las entradas de audio en estéreo, esta los convierte a mono para obtener el sonido completo en ambas salidas, ya que las salidas
de zona Z1 y Z2 son mono.
• Bluetooth®:Pulse la tecla (2) para seleccionar Bluetooth®.
En la 1ª activación de fábrica el led azul parpadeará rápidamente ya que no dispone de ningún dispositivo memorizado previamente.
El Bluetooth®de la consola estará visible con friendly name “EGi 10404 xxxx”. Seleccione el dispositivo Bluetooth®para realizar la vinculación.
Al no necesitar de PIN, se conectará directamente y el led azul se quedará iluminado fijo. El dispositivo se quedará memorizado internamente y una vez iniciada
la pista de audio del dispositivo multimedia, esta comenzará a amplificar la música por las zonas.
Al perder la conexión Bluetooth®, la consola deja de emitir audio y el led azul se queda parpadeando lentamente para permitir vincularse de nuevo SOLO a
equipos Bluetooth®memorizados anteriormente.
Para volver a vincularse con otro nuevo dispositivo, pulse la tecla Bluetooth®(2) durante más de 2 segundos, el led parpadeará rápido y volverá a verse la
vinculación Bluetooth®“EGi 10404 xxxx”.
Cada vez que pulse la tecla (2) la consola permitirá realizar la vinculación Bluetooth®con cualquiera de los dispositivos previamente memorizados, en orden
del último utilizado al más antiguo memorizado.
NOTA: Recuerde que el equipo permite la memorización de hasta 8 dispositivos diferentes. Para borrar la lista de dispositivos memorizados, pulse la tecla
(2) durante más de 6 sg, el led parpadeará con una interrupción luminosa, y volverá a tener la memoria vacía.
• AUX: Para seleccionar la fuente de audio externa analógica, conecte 1º la entrada auxiliar lateral derecha a través de una conexión macho Jack de 3.5 mm.
Seguidamente pulse la tecla (3), se encenderá el led verde superior y la consola amplificará la entrada de audio a través de las dos zonas simultáneamente.
NOTA: Esta entrada permite la amplificación de equipos de audio en línea de 500 mV (teléfonos móviles, reproductores MP3, fuentes de audio como CD o
DVD e incluso mesas de mezclas).
AJUSTE DE VOLUMENES POR ZONA
La consola Compact dispone de dos reguladores para ajustar el volumen de zona deseada, teclas (5). Estos reguladores de volumen van desde la posición 0
(mínimo-silencio) hasta la posición 9 (máximo). La consola dispone de una ecualización automática de compensación DYNAMIC LOUDNESS, que aporta más
frecuencias graves y agudas en las posiciones bajas de 0 a 6, para compensar la pérdida de sensibilidad en esas frecuencias, que tiene el oído humano a bajo volumen.
EMISIÓN DE AVISOS
La consola Compact Bizona permite la emisión de avisos bien individuales o generales para ambas zonas. Al emitir un aviso en la zona 1, este no se oye por la
zona 2 y viceversa.
Para emitir un aviso, pulse zona 1 o zona 2 mediante las teclas (7) manteniendo la pulsación mientras habla a través del micrófono (4), y suéltela a la finalización
del aviso.
Para emitir el aviso a ambas zonas simultáneamente, pulse las dos teclas a la vez (7) manteniendo la pulsación mientras habla a través del micrófono (4), y
suéltelas a la finalización del mismo.
NOTA: Recuerde ajustar el volumen de aviso adecuadamente, a través del ajuste de volumen de aviso (13) MIC CALL VOLUMEN, para lograr escuchar al volumen
deseado, siendo este siempre más alto que la música, pero sin llegar a producir un acople o Feedback entre los altavoces y el micrófono. Este efecto aumenta
cuanto más cercanos estén los altavoces del micrófono de la consola.
SALIDAS PIN AUDIO OUTPUT
Las salidas de audio PIN Audio Output (12), sirven para ampliar la potencia de las zonas 1 y 2, mediante otra amplificación separada (paralela a la interior
auto-amplificada), que se activa mediante salida PIN solo para etapas de potencia o mandos de la marca EGi. Permiten la ampliación a líneas con etapas desde
3 W hasta 480 W dependiendo del modelo de etapa seleccionado. Ejemplos (03001, E17G/D, 40426, 40430 y todas las de la serie MILLENNIUM).
CONEXIÓN A MÓDULOS DE COMPENSACIÓN DE VOLUMEN AUTOMÁTICO 10405 Y OTROS
La entrada (10) para conexión de interfaces, permite la conexión con equipos como el ajuste de volumen automático 10405 (opcional y sucesivos 10xxx) que sirve
para regular automáticamente el volumen de la sala o Zona 1 (esté como esté configurada), en función del ruido ambiente registrado a través del micrófono 5104
(opcional), que se debe colocar en dicha zona y en un punto donde se pueda analizar bien el ruido ambiente y la música de la sala.
El micrófono 5104 registra el ruido ambiente, y el módulo 10405 sube o baja el volumen seleccionado desde la consola, en función de si sube o baja el ruido
ambiente del público. Este se realizará mediante la adición opcional de estos interfaces a través del conector lateral derecho DB25.
Para conectar el interface, apague la red eléctrica, conecte el interface y vuelva a colocar la red eléctrica. A continuación encienda la consola, ajuste el volumen
deseado, y seguidamente ajuste en el interface 10405, con la compensación que desee.
Cuanto más lo suba hacia el “MAX.”, más abrupta será la subida de volumen de música al aumentar el ruido ambiente. Sin embargo, cuanto más lo ajustemos
hacia el “OFF”, menos intensa será la subida de volumen.
La Compact Bizona le permite emitir avisos de voz y música desde un dispositivo Bluetooth® o una fuente musical auxiliar a 2 zonas diferentes.
De 115 a 230 V~; 50/60 Hz
75 W
0.3 W
20 Hz ÷ 20 KHz
25 W RMS; 4 W min.
25 W RMS; 4 W min.
5 Vdc + 3 Vac
5 Vdc + 3 Vac
Tensión de alimentación
Consumo máximo (activo)
Consumo máximo (standby)
Respuesta en frecuencia (@ –3dB)
Salida Zona 1
Salida Zona 2
Salidas PIN Audio Output Z1
Salidas PIN Audio Output Z2
Electret unidireccional
Jack 3.5 mm ST (500 mV)
–5ºC a 50ºC
Versión 4 con perfil A2DP-SINK
0.88
220 x 190 x 160
(con flexo extendido +
tapa protectora de cableado)
Tipo de micrófono
Entrada de audio AUX
Temperatura de trabajo
Receptor Bluetooth®
Peso (Kg.)
Dimensiones (mm)
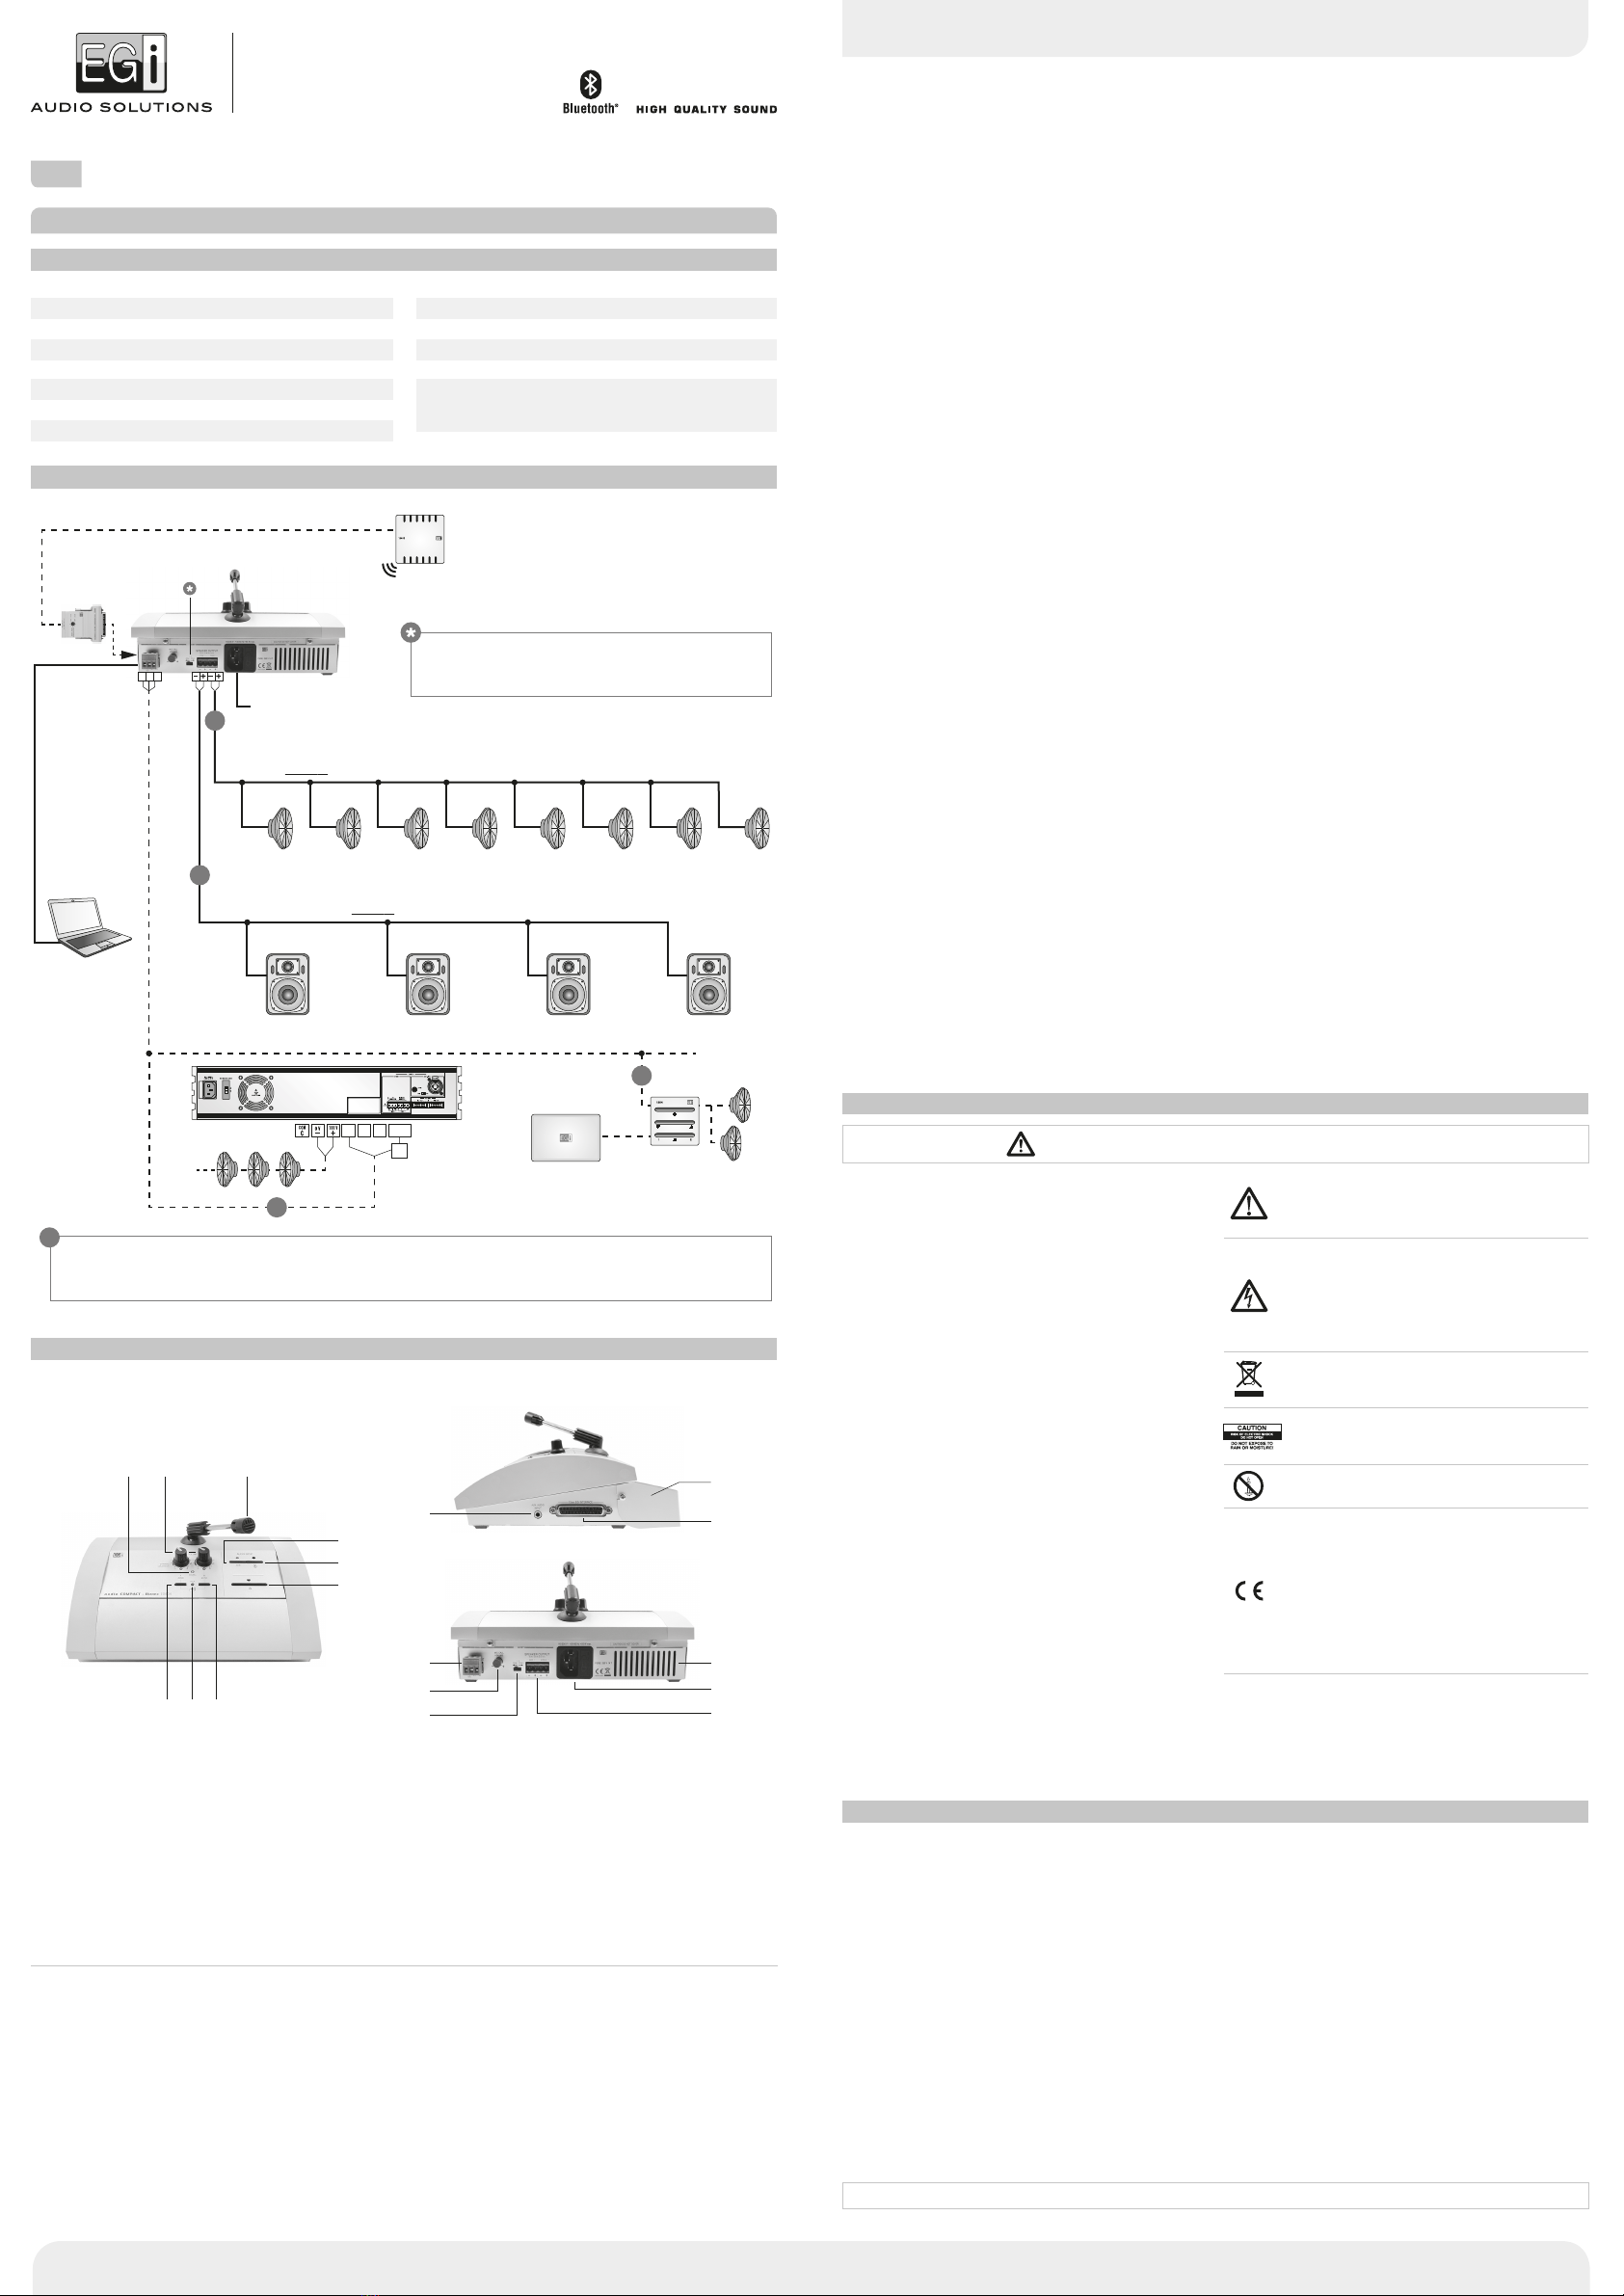
OUT Audio
PC, tablet, móvil,
CD, DVD...
Z3
NOTA:
Las salidas de zonas por PIN, Z1 y Z2, equivalen a salidas de audio no amplificadas con activación PIN incorporada para ampliar a más potencia a
través de etapas de potencia EGi de las series MILLENNIUM, DOMOS2, DOMOS y COMPACT. Incorporan música de fondo y preferencia de avisos.
25 W (cualquier combinación de altavoces en paralelo o serie que nunca sea inferior a 4 Ω, respetando siempre
la polaridad +/–).
Ejemplos: 8 x 32 Ωo 4 x 16 Ωo 2 x 8 Ωo 1 x 4 Ω).
25 W (cualquier combinación de altavoces en paraleloo serie que nunca sea inferior a 4 Ω, respetando siempre
la polaridad +/–).
Ejemplos: 8 x 32 Ωo 4 x 16 Ωo 2 x 8 Ωo 1 x 4 Ω).
A red de 115 a 230 V~
NOTA:
En el selector de zonas, la consola puede ajustarse para unir las dos zonas
en una (1 Zone) o separarlas en 2 zonas independientes (2 Zone).
10405
Ajuste de volumen
automático.
MÓDULOS OPCIONALES
EJEMPLO OPCIONAL
5104
Micrófono para analizar ruido ambiente.
1307 - Alimentador 15 Vdc
(K12G/IN, K13G.2, 40730).
1Pulsador y led de encendido/apagado.
2 Activación y selección de Bluetooth®.
3Selección de AUX IN.
4 Micrófono unidireccional Electret ajustable para avisos.
5 Reguladores de volumen para música en zona 1 y zona 2.
6 Led señal de entrada de audio.
7 Pulsadores de avisos por zona.
8 Led de activación de avisos.
9 Entrada Jack 3.5 mm. audio input AUX.
10 Conector DB25 para accesorio de ajuste automático de volumen ref. 10405.
11 Tapa protectora del cableado.
12 Regleta de salida de audio con activación PIN OUT por zona para etapas de
potencia supletorias.
13 Ajuste de volumen para avisos.
14 Configuración de zonas (1 ó 2).
15 Salida de audio amplificada por zona para altavoces.
16 Toma de corriente de 115 a 230 V~.
17 Rejilla de ventilación.

009093 • 06/2018
Compact
10404
4 Z1 Z2
3 W; 32 Ω3 W; 32 Ω3 W; 32 Ω3 W; 32 Ω3 W; 32 Ω3 W; 32 Ω3 W; 32 Ω3 W; 32 Ω
Z2
1204
TL
4PIN
6 W; 16 Ω6 W; 16 Ω6 W; 16 Ω6 W; 16 Ω
Z1
Z1
Z1
Z2
AUDIO
AUX INPUT
(3.5 mm Jack)
12 17
9
45
7
11
10
16
15
13
14
2
3
1
6
78
EGi guarantees its electronic and electroacoustic products against any manufacturing defect that affects its operation for 36 months from the production
date (indicated in every manufacture), taking the commitment of repairing or replacing the faulty modules which failure, always to the discretion of EGi, is
caused by a manufacturing defect, without any charge for spare parts.
This guarantee does not include charges for the shipping and handling of the modules, nor the labour charges for the replacement in the installation of the aforementioned
electronic and electroacoustic modules. The guarantee will not cover in any case the damages or breakings of the trimming pieces (lattices, trims, masks, frames...).
This guarantee refers only to the concept of replacement in factory of the modules produced by EGi, excluding any other cover or responsibility on the rest
of the materials or the whole of the installation that is put at the user disposal, but that is not supplied nor executed by EGi.
Therefore this guarantee does not cover:
a. The fitting up and the interconnection between the modules.
b. The results from the abuse or misuse of the product, including but not limited to:
b.1. Not using the product for usual purposes, or not following the instructions from EGi for the correct use and maintenance of the product.
b.2. The installation or use of the products in a way that is not concordant with the technical or security rules now in force.
c. The malfunctions caused by the wrong installation of the modules, or by an installation with inappropiate cables.
d. The malfunctions caused by the intervention of a person non-authorised by EGi.
e. The consequences of mixing with equipment from other sources, and also adaptations, modifications, adjustments and/or adjustment attempts, irrespectively
of those that have been performed in a technically correct way, provided that there is not an express authorisation by EGi.
f. The consequences of accidents, natural catastrophes or any cause beyond EGi control, including but not limited to lightning, water and public disturbances.
In all these cases that are excluded from the guarantee, and every time that the modules are not considered as faulty by EGi, the sender should take
responsibility of the full amount of the repair, and in the event of a visit from our technicians, the requesting person will bear the expenses originated without
a cause justified in the guarantee.
ATTENTION: If you notice any problem in your EGi installation, our Customer Support Service will attend you from 9 h. to 15 h (Central European Time).
Guarantee
Technical specifications
10404 Bizone console with 25+25 W, Bluetooth®, AUX IN and microphone
en instruction manual
Av. Almozara, 79 • 50003 ZARAGOZA - Spain • T. +34 976 40 53 56 • F. +34 976 40 53 54 • e-mail: [email protected] • www.egiaudio.com
Wiring diagram
Wiring diagram
Wiring diagram
TECHNICAL SUPPORT
If, while using the system, you encounter a problem that cannot be solved by consulting the
manual, please contact the installer. You can also consult the website www.egiaudio.com
to find the latest information and other resources to solve your problem.
SAFETY INSTRUCTIONS
1. Read these instructions. Before using your new unit please read all of the safety
and operating instructions.
2. Keep these instructions. Keep these instructions for future reference and
troubleshooting.
3. Heed all warnings. All of the warnings in this manual must be heeded.
4. Follow all instructions. By following the instructions in this guide you will be
able to use the system correctly and safely.
5. Water and moisture. Do not use this appliance near to water (swimming pools,
fountains, etc.). Make sure that the equipment is not exposed to splashing and do
not place glasses or bottles containing liquid on it.
6. Cleaning. Clean with a dry, lint-free cloth. Do not use abrasive solvent-based
cleaning products.
7. Installation. Do not install the apparatus near to a heat source such as radiators,
heaters or other appliances that produce heat. It must always be installed in a place
that allows air to freely flow through its ventilation grille.
8. Earthing connection and power supply cords. The power supply cable that is
supplied with your unit has a three-terminal connector. Do not cut or damage the earth
terminal. If the connector supplied does not fit your plug, as an electrician to replace the
obsolete plug. Protect the power supply cord from being walked on or pinched.
The unit has a disconnectable power supply cord that connects to the AC connector
on the frame. The power supply cord has an IEC female connector at one end and
a male connector at the other.
The unit does not have a switch; the switch is the power supply cord itself. The plug
socket must be accessible and near to the unit.
Bear in mind that the nominal supply voltage is that indicated on the label, with a
range of ±10% of said value (according to IEC 60065:2001).
9. Options. Only those accessories supplied by the manufacturer should be used.
10. Servicing. There are no user-adjustable parts inside this unit. Any maintenance or
repair work must be performed by qualified personnel. Servicing is required when
the apparatus has been damaged in any way, such as liquid has been spilled or
objects have fallen into the apparatus, it has been exposed to rain or moisture or it
does not operate properly or it has been dropped.
IMPORTANT
Please read these "Safety instructions" carefully before using any EGi product.
An exclamation mark inside a triangle indicates important operation and
maintenance instructions and the existence of components that may affect
safety if replaced.
Class II device.
The lightening-shaped arrow warns of the presence of dangerous voltage.
To minimise the risk of electric shock, do not remove the cover.
The lightening signs near the amplifier output terminals warn of the danger
of electric shock in normal usage conditions (Terminals dangerous to touch).
Do not touch these terminals while the device is in operation.
This symbol indicates that the product must not be treated as normal domestic
waste, but must be handed over to the corresponding collection point for
electrical and electronic equipment.
WARNING: To reduce the risk of an electric shock, do not remove the cover.
There are no user-adjustable parts inside the product.
Repairs must only be carried out by qualified personnel.
Do not expose this article to rain or moisture.
WARNING: To avoid spread of fire, do not use candles or other types of
flames near to the product.
The CE smark means European Conformity and is a European mark for certain
groups of services or industrial products.
The CE mark must be displayed by a product if it is within the scope of the
approximately 20 "New Approach" Directives and can be sold and put into
service legally within the countries of the EU. If the product complies with
the provisions of applicable European Directives and the CE is displayed on
the product, member states cannot prohibit, restrict or impede the placement
of the product or service on the market. Thus, the CE mark can be considered
as a passport for commercialising a product in EU countries.
información
Information
Function
From 115 to 230 V~; 50/60 Hz
75 W
0.3 W
20 Hz ÷ 20 KHz
25 W RMS; 4 W min.
25 W RMS; 4 W min.
5 Vdc + 3 Vac
5 Vdc + 3 Vac
Power supply
Max. power consumption (active)
Max. power consumption (standby)
Frequency response (@ –3dB)
Zone 1 output
Zone 2 output
Outputs PIN Audio Z1
Outputs PIN Audio Z2
Unidirectional Electret
Jack 3.5 mm ST (500 mV)
–5ºC to 50ºC
4 Version with A2DP-SINK profile
0.88
220 x 190 x 160
(with neck + wires cover)
Microphone type
AUX audio input
Operating temperature
Bluetooth®receiver
Weight (Kg.)
Dimensions (mm)
Audio OUT
PC, tablet, mobile,
CD, DVD...
NOTE:
The zone outputs by PIN, Z1 and Z2, are equivalent to unamplified audio outputs with built-in PIN activation to expand to more power through EGi
power amplifiers of MILLENNIUM, DOMOS2, DOMOS and COMPACT series. They incorporate background music and calls preference.
25 W (any combination of speakers in parallel series that is never less than 4 Ω, always respecting the polarity +/–).
Examples: 8 x 32 Ωor 4 x 16 Ωor 2 x 8 Ωor 1 x 4 Ω)
25 W (any combination of speakers in parallel series that is never less than 4 Ω, always respecting the polarity +/–).
Examples: 8 x 32 Ωor 4 x 16 Ωor 2 x 8 Ωor 1 x 4 Ω)
From 115 to 230 V~ mains.
NOTE:
In the zone selector, the console can be set to join the two zones into one
(1 Zone) or separate them into 2 independent zones (2 Zone).
10405
Automatic volume
adjustment.
OPTIONAL MODULES
OPTIONAL EXAMPLE
5104
Microphone to analyze ambient noise.
1307 - 15 Vdc Feeder
(K12G/IN, K13G.2, 40730).
Z3
1Push button and led for on/off
2 Bluetooth selection and activation.
3AUX IN selection.
4 Unidirectional Electret microphone adjustable for calls.
5 Music volume regulators for zone 1 and zone 2.
6 Led audio signal input.
7 Call push buttons by zone.
8 Led activation of calls.
9 Jack 3.5 mm for audio input AUX.
10 DB25 connector for automatic volume adjustment 10405 ref. accessory.
11 Wires cover.
12 Audio output strip with PIN OUT activation per zone for additional power
amplifiers.
13 Volume adjustment for calls.
14 Zones configuration (1 or 2).
15 Speaker amplified audio output by zone.
16 Main power 115 to 230 V~.
17 Ventilation grid.
The Compact Bizone allows you to broadcast voice and music announcements from a Bluetooth device or an auxiliary music source to 2 different zones.
OPERATION
IMPORTANT: Before you start using the Compact Bizone, make sure that the power is correctly connected to the main power and that there are speakers connected
in zones 1 or 2.
CONFIGURATION
Before turning on the console, we recommend you to make a brief simple configuration.
The Compact console allows the option to work with two independent zones (2 Zones by default), or by modifying the selector (14) to work only
as a one zone (1 Zone).
In 2 zones (2 Zones) we would have amplification and regulation of volumes separated by zone (25 W Z1 and 25 W Z2); or on another side if we use the position
(1 Zone) the console only activates the music control and calls on the Z1, but it will have the same audio and calls for both Z1 25 W and for Z2 (which will output
the audio and calls of Z1) + 25 W.
In this way we achieve the full power of the console in 50 W, through the two speaker lines, but with an unique control from the controls of Zone 1. Select the
desired option for installation.
ON / OFF
To turn ON and OFF the console, press the key (1) ON and OFF (Stand-by).
The console is activated and the control leds and amplifiers are switched on.
Then select the sound input source between AUX and Bluetooth®, and adjust the volumes to the desired selection.
To turn off the console, press the key (1). When turned on again, it returns to the previously selected audio input state. In case of loss of power supply, the console
will return to the Bluetooth®input, by factory default.
AUDIO INPUT SELECTION
The Compact Bizone console allows you to select two audio inputs to be played by both zones at the same time.
A Bluetooth®audio input to play music wirelessly from any Bluetooth®multimedia device, and another analog AUX input from the AUX AUDIO input (located on
the right side) to connect to the source through a stereo 3.5 mm Jack.
NOTE: The console receives the audio inputs in stereo, it converts them to mono to obtain the full sound in both outputs, because the zone outputs Z1
and Z2 are mono.
• Bluetooth®:Press the key (2) to select Bluetooth®.
In the 1st activation from factory, the blue LED will flash quickly as there is not any previously stored device.
The Bluetooth®from the console will be visible with friendly name "EGi 10404 xxxx" device to perform pairing.
Because it does not need a PIN, it will connect directly and the blue LED will light fixed. The device will be stored internally and once the audio track of the
multimedia device starts, it will begin to amplify the music by the zones.
When the Bluetooth
®
connection is lost, the console stops amplifying audio and the blue LED change blinking slowly to allow it to be linked ONLY to Bluetooth
®
devices previously memorized.
To re-link with another new device, press the Bluetooth®key (2) for more than 2 seconds, the led will flash quickly and the Bluetooth®link "EGi 10404 xxxx"
will be visible again.
Each time you press the button (2) the console will allow you to connect Bluetooth®with any of the previously memorized devices, in order of the last used
to the oldest memorized.
NOTE: Remember that the equipment allows the memorization up to 8 different devices. To delete the list of memorized devices, press the key (2) for more
than 6 seconds, the led will flash with a light interruption, and the memory will be empty again.
• AUX: To select the analog external audio source, first connect the right side auxiliary input through a male 3.5 mm Jack connection. Then press the key (3),
the upper green led will light up and the console will amplify the audio input through the two zones simultaneously.
NOTE: This input allows amplification of 500 mV line audio equipments (mobile phones, MP3 players, audio sources such as CD or DVD and even mixers).
ADJUSTMENT OF VOLUMES BY ZONE
The Compact console has two controllers to adjust the volume of the desired zone, keys (5). These volume regulators range begines from position 0 (minimum-silence)
to position 9 (maximum). The console has a DYNAMIC LOUDNESS automatic compensation equalization, which provides more bass and treble frequencies in low
positions from 0 to 6, to compensate the loss of sensitivity in those frequencies, which the human ear has low sensibility.
TO MAKE CALLS
The Compact Bizone console allows to make individual or general calls for both zones. When you make a call in zone 1, it is not heard in zone 2 and vice versa.
To make a call, press zone 1 or zone 2 by pushing the keys (7) keeping the pulsation while speaking through the microphone (4), and release it at
the end of the call.
To make a call for both zones simultaneously, press the two keys at the same time (7) keeping the pulsation while speaking through the microphone (4), and
release them at the end of the call.
NOTE: Remember to adjust the volume mic call, through the control (13) MIC CALL VOLUME, to achieve the listening desired volume, this must be higher than
the music, but without producing Feedback between the speakers and the microphone. This effect increases more, as closer is the microphone of the console,
from the speakers.
AUDIO PIN OUTPUTS
The audio outputs PIN AUDIO OUTPUT (12), are use to enlarge the power audio of zones 1 and 2, by another separate amplification (parallel to the internal
self-amplified), which is activated by its PIN output only for power amplifiers or audio controls from the EGi brand. They allow to enlarge power speaker lines
with amplifiers from 3 W to 480 W depending on the selected amplifiers model. Examples (03001, E17G/D, 40426, 40430 and all of the MILLENNIUM series).
CONNECTION TO AUTO VOLUME MODULE COMPENSATION 10405 AND OTHERS
The input (10) for connection of interfaces, allows connection with equipments such as the automatic volume adjustment 10405 (optional and successive 10xxx) that
serves to automatically regulate the volume of the room or Zone 1 (whether it is configured), depending on the ambient noise registred through the microphone 5104
(optional), which must be placed in this area and in a point where the ambient noise and the music of the room can be well analyzed.
The microphone 5104 register the ambient noise, and the module 10405 increases or decreases the volume selected from the console, depending on whether the
ambient noise of the audience rises or falls. This will be done by the optional addition of these interfaces through the DB25 right side connector.
To connect the interface, turn off the power, connect the interface and replace the electrical power. Then turn on the console, adjust the desired volume, and then
adjust the interface 10405, with the compensation you want.
The more you raise it to the "MAX.", more higher will be the music volume as the ambient noise increase. However, the more we adjust it to the "OFF", the less
intense the volume increase will be.
Table of contents
Languages:
Other EGi Recording Equipment manuals


