EGi 1111 Instruction sheet
www.egiaudio.com 1.
www.egiaudio.com
CONFIGURATION MANUAL
1111 - 1113

2. www.egiaudio.com
The following manual will guide you in configuring the 1111 or 1113
modules Software version: V8.
We put at your disposal our technical attention service, for any doubt,
query or suggestion you may have through the mail
sat_consultas@egiaudio.com or on our phone 976 404 677.
If you want to stay informed of all the news of EGi Audio Solutions, you
can subscribe to our newsletter through our website
www.egiaudio.com

www.egiaudio.com 3.
Index
1.SAFETY AND WARRANTY WARNINGS______________________________________________________________ 5
1.1. SAFETY INSTRUCTIONS ___________________________________________________________________________ 5
1.2.GARANTÍA _____________________________________________________________________________________ 5
2.DESCRIPCIÓN GENERAL _________________________________________________________________________ 6
2.1.MAIN FEATURES ________________________________________________________________________________ 7
2.2. INTEGRADE USE WITH THE MILLENNIUM SYSTEM OR INDEPENDENTLY __________________________________ 10
2.2.1.Integración con MILLENNIUM _________________________________________________________________________ 10
2.2.2.Distributed IP PA without MILLENNIUM _________________________________________________________________ 10
3.CONFIGURACIÓN GENERAL_____________________________________________________________________ 11
3.1. TURNING ON THE COMPUTER. START-UP AND FIRST STEPS ____________________________________________ 11
3.1.1. Turning on the computer and connecting to the software _________________________________________________ 11
3.1.2RECHAT function ____________________________________________________________________________________ 12
3.2.SYSTEM ADMINISTRATION AND DATA ______________________________________________________________ 13
3.2.1.Synchronizing the time with your computer's browser _____________________________________________________ 14
3.2.2.Customizing the computer name ______________________________________________________________________ 14
3.2.3 Selection of time zone _____________________________________________________________________________ 14
3.2.4.Time synchronization via external NTP protocol __________________________________________________________ 15
3.2.5.Sincronización horaria a través del equipo 1113 como servidor NTP __________________________________________ 15
3.3.NETWORK AND CONNECTIONS ____________________________________________________________________ 15
3.3.1.Network Status _____________________________________________________________________________________ 15
3.3.2.Network Configuration ______________________________________________________________________________ 17
3.3.2.1.Configuring the computer on a static or fixed IP __________________________________________________ 17
3.4.PASSWORD MANAGEMENT ______________________________________________________________________ 18
3.5.BROWSER INTERFACE ___________________________________________________________________________ 18
3.5.1. interfaz configuration ______________________________________________________________________________ 18
3.6. SYSTEM ENGRAVING OPERATIONS _______________________________________________________________ 19
3.6.1. Backing up _______________________________________________________________________________________ 19
3.6.2. Applications _____________________________________________________________________________________ 19
3.6.3. Incremental updates_______________________________________________________________________________ 20
3.6.4. Restoring and updating the computer's firmware _______________________________________________________ 20
3.7.SYSTEM RESTART ____________________________________________________________________________ 21
4.WORKING MODES ____________________________________________________________________________ 22
4.1.CLIENT WORKING MODE _________________________________________________________________________ 23
4.1.1. Functions / Audio services available in Cliente mode _____________________________________________________ 23
4.1.1.1.Analog Input _______________________________________________________________________________ 23
4.1.1.2.Player ____________________________________________________________________________________ 25
4.1.1.4. SIP VoIP Client ____________________________________________________________________________ 27
4.1.1.5. Scheduler of pre-recorded calendars, events and messages _______________________________________ 29
4.1.1.6. Multicast Client ___________________________________________________________________________ 39
4.1.1.7.Cliente Audiolink ___________________________________________________________________________ 41
4.1.1.8. Public Address Client ________________________________________________________________________ 43
4.1.2. Mixer Service ____________________________________________________________________________________ 44
4.2. WORKING AS A SERVER _________________________________________________________________________ 46
4.2.1Functions / Audio Services in Server Mode _______________________________________________________________ 46
4.2.1.1. Analog Input _____________________________________________________________________________ 47
4.2.1.2.Player ____________________________________________________________________________________ 49
4.2.1.4.Cliente VoIP SIP ____________________________________________________________________________ 51
4.2.2.Mixer service in Server mode _________________________________________________________________________ 53
4.3PAX WORKING MODE ____________________________________________________________________________ 55
4.3.1. Configuring the computer in PBX mode _______________________________________________________________ 56
4.3.2. Functions in PBX mode _____________________________________________________________________________ 56
5.HERRAMIENTAS ______________________________________________________________________________ 59
5.1.AUDIO FILE BROWSER _________________________________________________________________________ 59
5.2.WEB PLAYER ________________________________________________________________________________ 68

4. www.egiaudio.com
5.3.DIAGNÓSTICOS ________________________________________________________________________________ 73
6.HELP MENU _________________________________________________________________________________ 74
6.1.MANUAL _____________________________________________________________________________________ 74
6.2. SUPPORT ____________________________________________________________________________________ 74
6.3.ABOUT _______________________________________________________________________________________ 75
7.TROUBLESHOOTING __________________________________________________________________________ 76
8.INSTALLATION EXAMPLES ______________________________________________________________________ 79
8.1.DIRECT CONNECTION BY PIN OUTPUT OF MODULE 1111 TO EGI AMPLIFIERS _______________________________ 79
8.2.CONNECTING A ZONE TO ALL INSTALLATION PIN ENTRIES WITH PUSHBUTTONS TO LAUNCH THE EVACUATION MESSAGE
79
8.3.CONNECTING "X" INDEPENDENT ZONES BY MODULE 1113 PIN OUTPUT ___________________________________ 80
8.4.CONNECTING MODULE 1113 BY XLR OUTPUT TO XLR VOX INPUT MODULE CONTROL 1110.A _________________ 81
8.5.CONNECTING MODULE 1113 BY XLR OUTPUT TO 135X STAGE XLR INPUT INDEPENDENT OF A MILLENNIUM INSTALLATION
81
8.6.CONNECTION BY PIN OUTPUT OF MODULE 1113 TO ALL PIN INPUTS OF THE INSTALLATION ___________________ 82
8.7.CONNECTION BY PIN OUTPUT OF MODULE 1113 TO THREE ZONES _______________________________________ 83
8.8.PIN OUTPUT CONNECTION OF MODULE 1113, POWERED BY 135X STAGE, TO ALL MODULES BY PIN INPUT _______ 84
8.9.EXAMPLE OF A SCHOOLYARD _____________________________________________________________________ 85
8.10.CONNECTION BY PIN OUTPUT OF MODULE 1113 TO THREE ZONES ______________________________________ 86

www.egiaudio.com 5.
1.SAFETY AND WARRANTY WARNINGS
1.1. SAFETY INSTRUCTIONS
This system has been designed and manufactured to meet the latest safety standards for electronic equipment in the domestic sphere. However, to
ensure safe use of this product, it is important to take into account the instructions indicated in this documentation.
No EGi product should be covered with any element that hinders its ventilation.
Nude flame sources such as lit candles or the like should not be placed on the apparatus.
Do not pour water, do not expose to dripping or water projections.
Cut off the power supply before any intervention in the installation.
Do not expose the product to the direct action of the sun.
Do not press the moving parts of the product.
The user must avoid any attempt to intervene or repair the product and address only qualified personnel.
Use only accessories supplied by EGi.
EGi declines all responsibility arising from the improper use of the product or from a use other than that for which it is intended (see the Warranty
section).
The exclamation mark within a triangle indicates the existence of important operating and maintenance instructions in the
documentation accompanying the product and the existence of internal components whose replacement may affect safety.
This product cannot be treated as normal household waste, but must be delivered to the corresponding collection point for electrical
and electronic equipment.
This product is in accordance with the European Guidelines that apply to it.
1.2.GARANTÍA
EGi guarantees its electronic and electroacoustic manufactures against any manufacturing defect that affects its operation for 36 months from the
date of its production (indicated in each manufactured), committing to repair or replace the defective modules whose failure, always in the opinion
of EGi, is due to manufacturing defect, without spare parts charges.
This guarantee does not include shipping costs of modules, nor replacement labor in the installation of the aforementioned electronic and electroacoustic
modules. In no case does the warranty cover damage or breakage of beautifying parts (grids, trims, covers, marquillos ...).
This warranty refers only to the concept of factory replacement of the modules produced by EGi, excluding any other coverage or liability for the rest of the materials or
the whole of the installation made available to the user, but which EGi does not supply or execute.
Therefore, the following are not covered by this warranty:
1.The installation and interconnection between its modules.
2.The consequences of abuse or misuse of the product, including but not limited to:
2.1.Do not use the product for normal purposes, or do not follow the instructions of EGi, for the correct use and maintenance of the same.
2.2.The installation or use of the products in a manner not in accordance with the technical or safety standards in force.
3.Breakdowns caused by the incorrect installation of the modules, or with cable that is not adequate.
4.Breakdowns caused by the intervention of a person not authorized by EGi.
5.The consequences of mixing with equipment of another origin, as well as adaptations, modifications, adjustments and / or attempts at adjustments,
respectively that this has been done in a technically correct way in principle, provided that there is no express authorization by EGi.
6.The consequences of accidents, natural disasters or any cause beyond the control of EGi, including but not limited to lightning, water and public
disturbances.
Electroacústica General Ibérica S.A is not responsible for failures or malfunctions or anomalous of devices or systems not manufactured by EGi.
In all these cases excluded from the warranty, and provided that the modules are not judged as defective by EGi, its sender must be responsible for
the total amount of the repair, and if there is a visit by our technicians, your applicant will bear the expenses incurred without justified cause of
guarantee.
EGi reserves the right to modify its products at any time. While it is a matter of presenting the updated documentation, the documents and the image
provided may not match the product purchased.

6. www.egiaudio.com
2.DESCRIPCIÓN GENERAL
Ip interfaces 1111 and 1113 allow the emission and reception of sound over Ethernet. In addition, the different channels and options
can be controlled by mobile systems compatible with Android and iOS, thanks to which you can play music locally or through a VoIP
phone to make public address announcements.
This system combines the wealth of benefits of decentralized systems with the simplicity and power of 100 V public address systems.
It supports the realization of mixed installations where you can combine the choice of several independent musical programs for
each area (offices, meeting rooms, warehouses, large surfaces ...) and listen and send music in streaming through its IP module, in
addition to the possibility of making announcements by public address system and establishing, thanks to its Multicast, the priority
of each audio channel.
The facilities are sounded efficiently allowing the emission of voice warnings with priority and the reproduction of music to any place
in a decentralized way.
In addition, they can be combined with the 100 V public address systems and the PoE 1112 feeder, which serves to power the modules
from the Ethernet cable itself, provided that the Switch supplies PoE power.

www.egiaudio.com 7.
2.1.MAIN FEATURES
The 1111 and 1113 are universal and independent modules for audio and IP management. They allow you to send audio and IP voice
anywhere, and multiple modes of work and connection.
Below are their main characteristics and the differences between the two teams.
1111 1113
Allows priority of ambient music warnings
Remote control to smartphone través, Tablet the PC.
Configuration via website
Upgradeable firmware
USB 2.0 connection
RJ45 Ethernet connection at 10/100Mb speed
Power supply at 15Vdc or PoE IEE 802.3 via auxiliary cable 1112
Audio input and output with balanced/unbalanced XLR connectors or PIN strips
Hard Drive 8 Gb
Auxiliary input and output function for relays
8 control inputs and 8+1 voltage-free OUT relays (NO/NC/COM)
Standalone watch included
Aluminium finish
Issuance of pre-recorded messages by time or central input
Messages may be associated with output relays to redirect audio to different
areas (see section 4.1.1.5)

8. www.egiaudio.com
1111 - ELEMENTS:
1111 - ESCHEMA OF CONNECTION:
1111 – TECHNICAL DATA:
www.egiaudio.com 9.
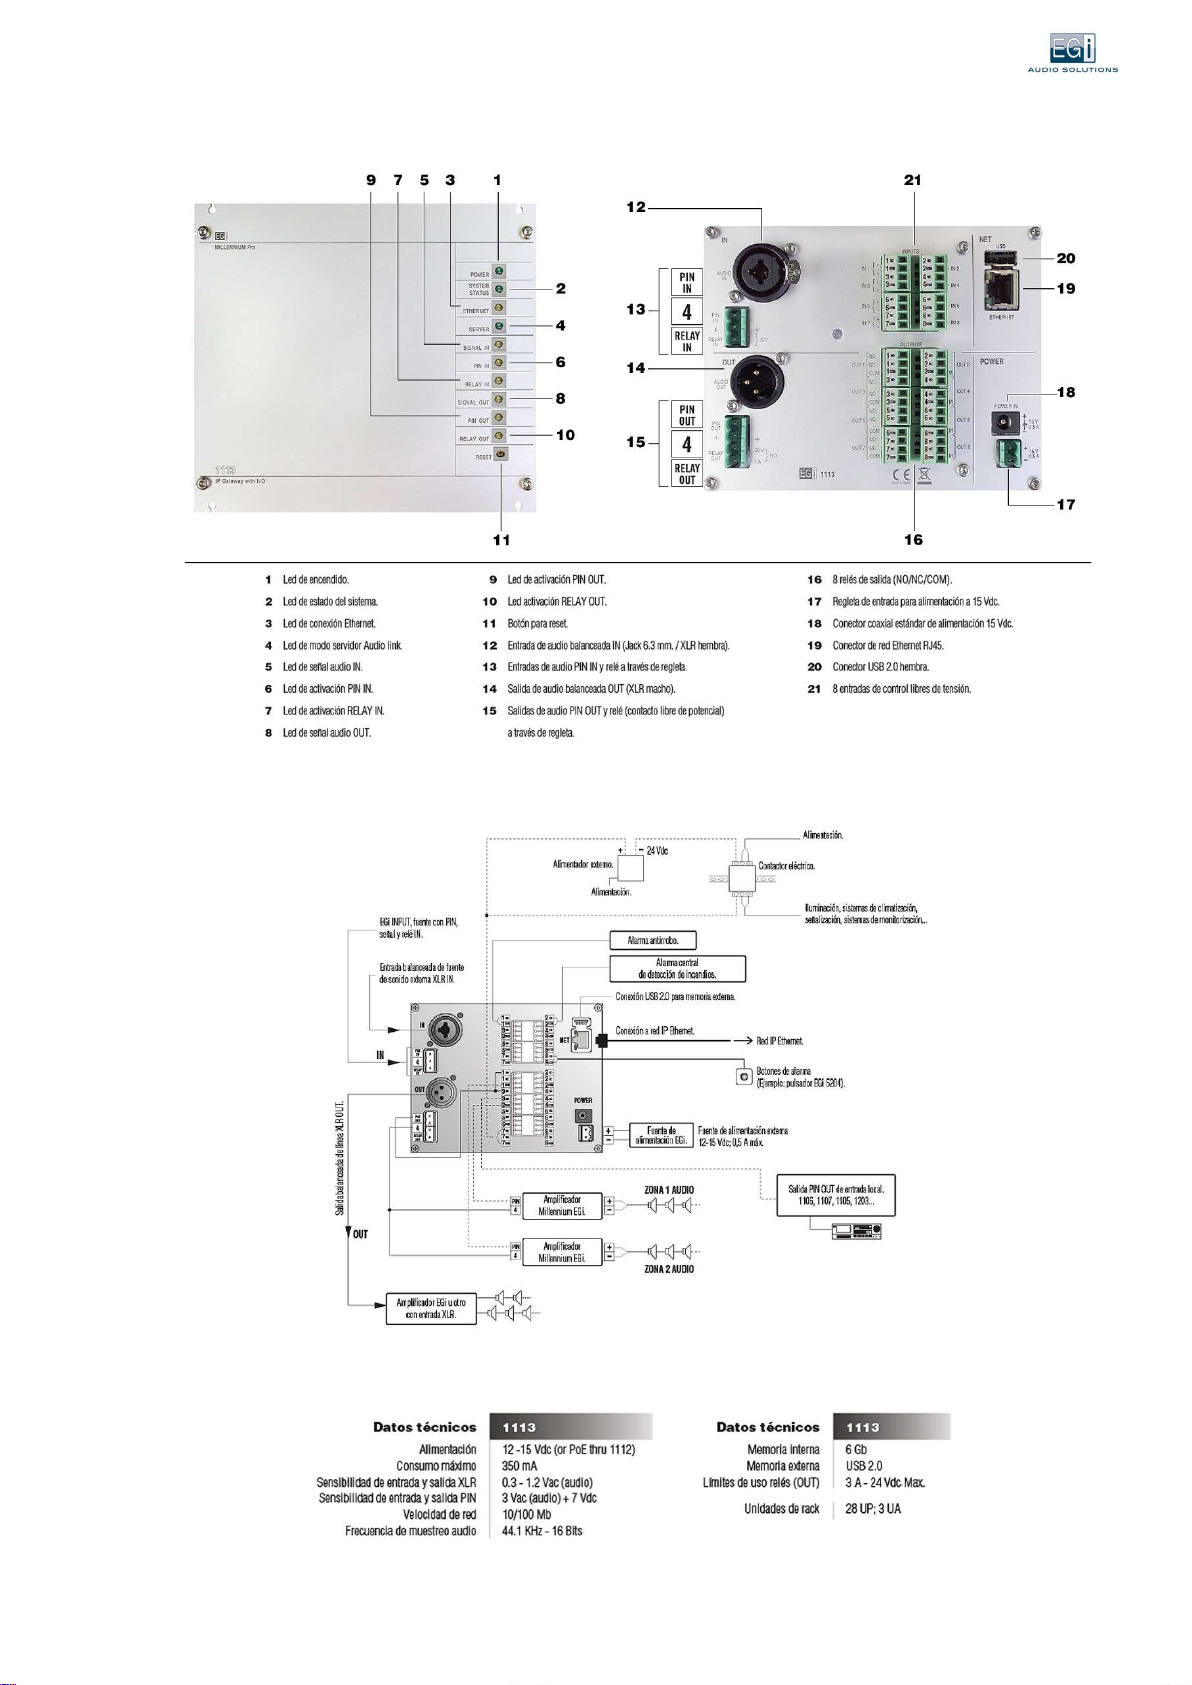
1113 - ELEMENTS:
1113 - ESCHEMA OF CONNECTION:
1113 – TECHNICAL DATA:

10. www.egiaudio.com
2.2. INTEGRADE USE WITH THE MILLENNIUM SYSTEM OR INDEPENDENTLY
2.2.1.Integración con MILLENNIUM
DECENTRALIZATION THROUGH IP NETWORKS (AUDIOLINK MODE).
A 1306 module sends audio from a Millennium zone to module 1111 or 1113.
One module 1111 or 1113 can be configured as "Server" of "Analog Input" and another (or several) as "Audiolink
Client".
Installations in tunnels (distributed equipment).
Large buildings (decentralized racks).
Module 1111 can be configured as an advanced audio source with scheduled schedules, corporate audio...
Integrating a module 1111 or 1113 in a Millennium installation, it adds a warning system or doorbells through the message
scheduler, widely used in schools and companies.
2.2.2.Distributed IP PA without MILLENNIUM
ZONE MODULE.
Management of audio sources by priority.
Warnings via VoIP (VoIP Mode).
– Con o sin “Servidor” PBX (Private Branch Exchange).
– Unicast & Multicast with G.711 Codecs or high quality without compression.
– Pre-recorded messages for advertisements, advertising, etc.
Ambient music.
– Local MPD music (local files and internet radio), (Player Mode).
– Streaming audio channels.
– Local audio input with configurable priority.
SERVER MODULE.
Serves the selected audio: Analog output, music player, or VoIP client.
Message scheduler.
Streaming output.

www.egiaudio.com 11.
3.CONFIGURACIÓN GENERAL
3.1. TURNING ON THE COMPUTER. START-UP AND FIRST STEPS
3.1.1. Turning on the computer and connecting to the software
1. To power on the computer, it must be connected to both the 15 Vdc power supply and the Ethernet network cable of the
Reuter, switch or directly to a computer, either desktop or laptop.
2. After a period of approximately two minutes, the boot will end, the network parameters will be configured automatically
and the LEDs must be turned on: Power, System Status and Ethernet if there is a DHCP server (in case you do not have a
DHCP server that provides an automatic address, follow the instructions in section 6 of this section).
3. Computers 1111 and 1113 start by default in client mode, with PLAYER mode activated. It takes the assigned IP
automatically, with the two outputs enabled PIN OUT and RELAY OUT.
4. To access the computer software, you must enter in your web browser, address the name of the equipment indicated on
the product label.
Team 1111: http://EGI-1111-XXXX Team 1113: http://EGI-1113-XXXX
5. The following screen will appear in your browser:
Both the interface module 1111 and the 1113 allow its programming, entering the username and password or password.
By default they will be:
Username: egi
Property ID: 1234

12. www.egiaudio.com
6. If there is no DHCP server, the computer will act as follows:
a. You will stand still with the Power LED on, the Ethernet LED fluctuating with network traffic (if any) and the System Status
LED flashing quickly. At that point, a short press of the Reset button should be made. The System Status LED turns off and
you must wait about a minute until the start of the device is finished, and the LED stays on fixed. at that point the computer
has temporarily taken the default ip 192.168.1.2
b. In order to access the configuration web of the equipment, the network adapter that we are using on our computer
must be within the same range 192.168.1.xxx.
c. A fixed IP must be assigned, otherwise, in future system boots, the computer will return to look for an automatic IP
(see section 3.3.2)..
3.1.2RECHAT function
By pressing the RESET button, and as long as the "System Status" LED is on fixed, the following functions can be performed:
Playback through the audio output (AUDIO OUT or PIN OUT) of the name of the equipment to facilitate its location on
the LAN network: Continuous press less than 1 second. If pressed again, it will play the IP address.
Restart of the computer: Continuous pressing for more than 2 seconds. If there is a pendrive inserted into the USB with
a file called: "EGiMillenniumIP_upgrade_files.tar.gz.gpg" in the root directory, the software on the computer will be
updated. If there is a file called: "backup-config-files.tar.gz" the configuration will be updated.
Restore the computer to the initial factory settings: Continuous pressing for more than 10 seconds.
www.egiaudio.com 13.
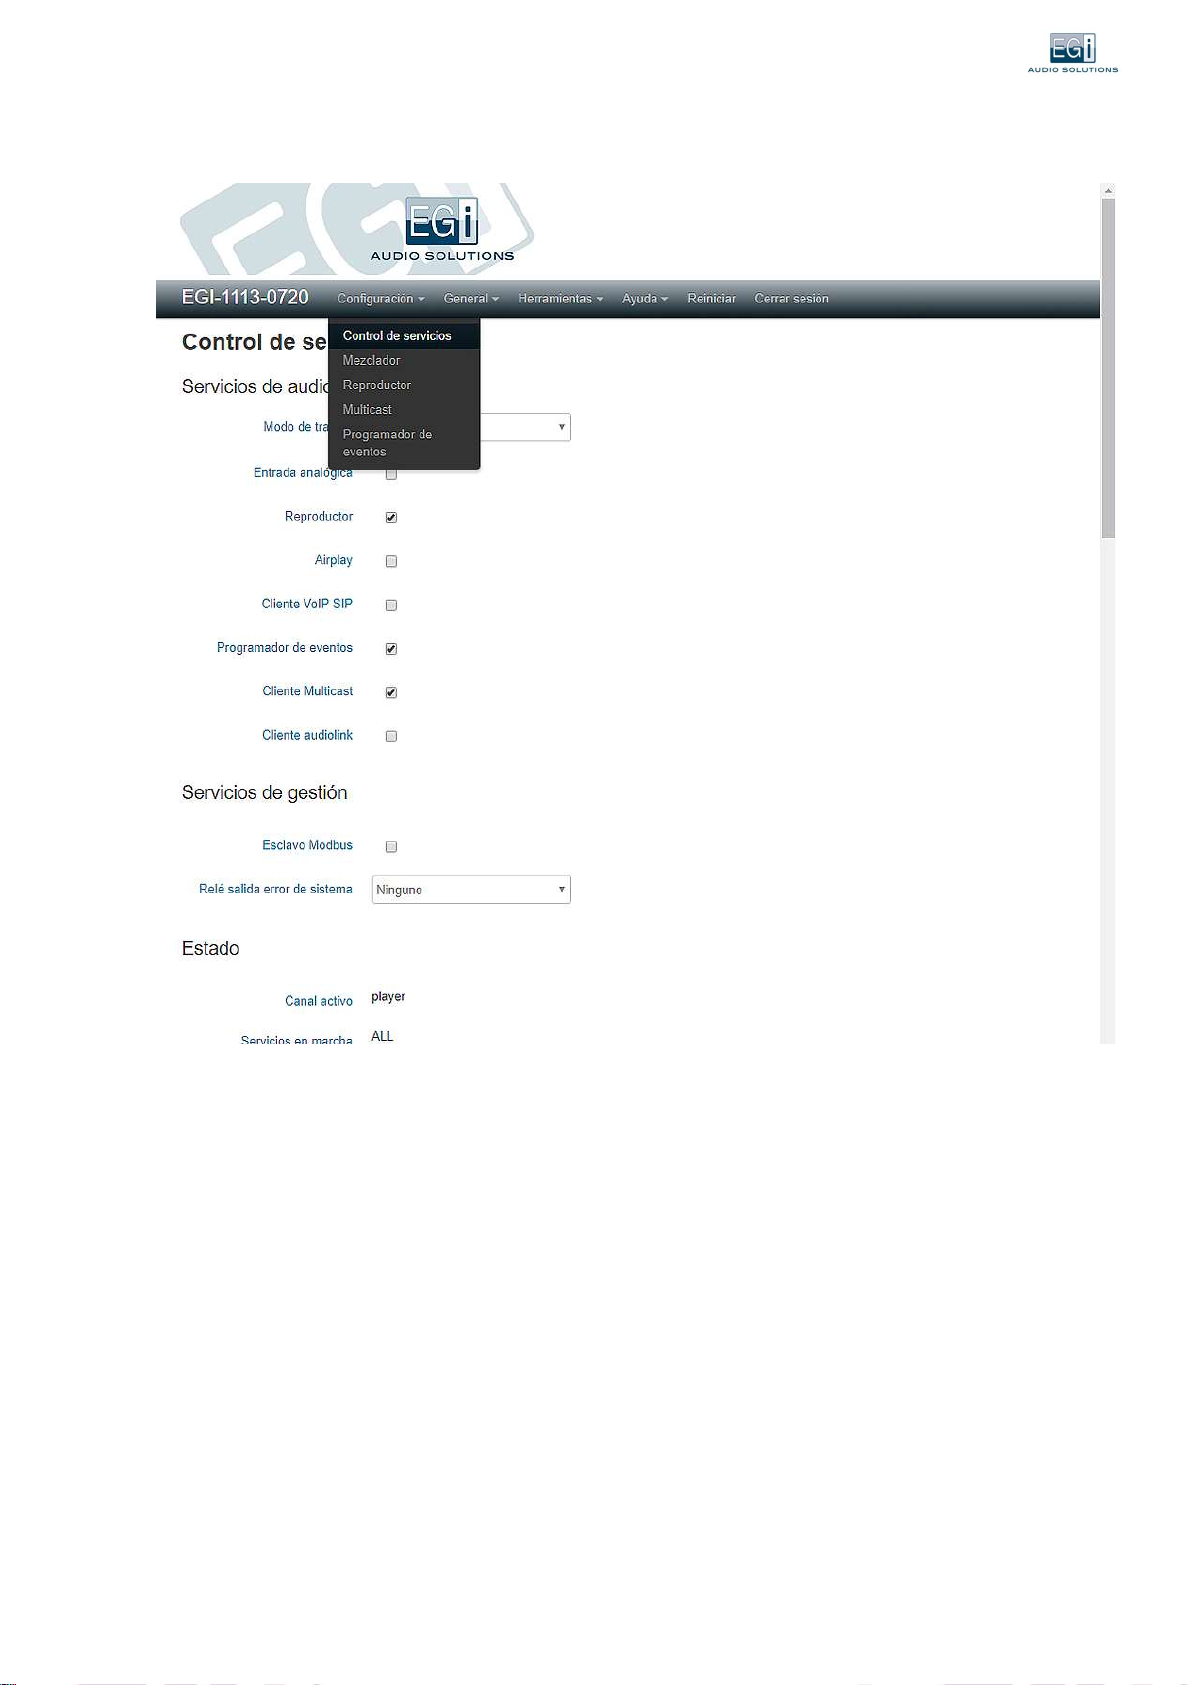
After correctly entering our access data, we display the "Service Control" screen, which shows the status and configuration of the
services:
3.2.SYSTEM ADMINISTRATION AND DATA
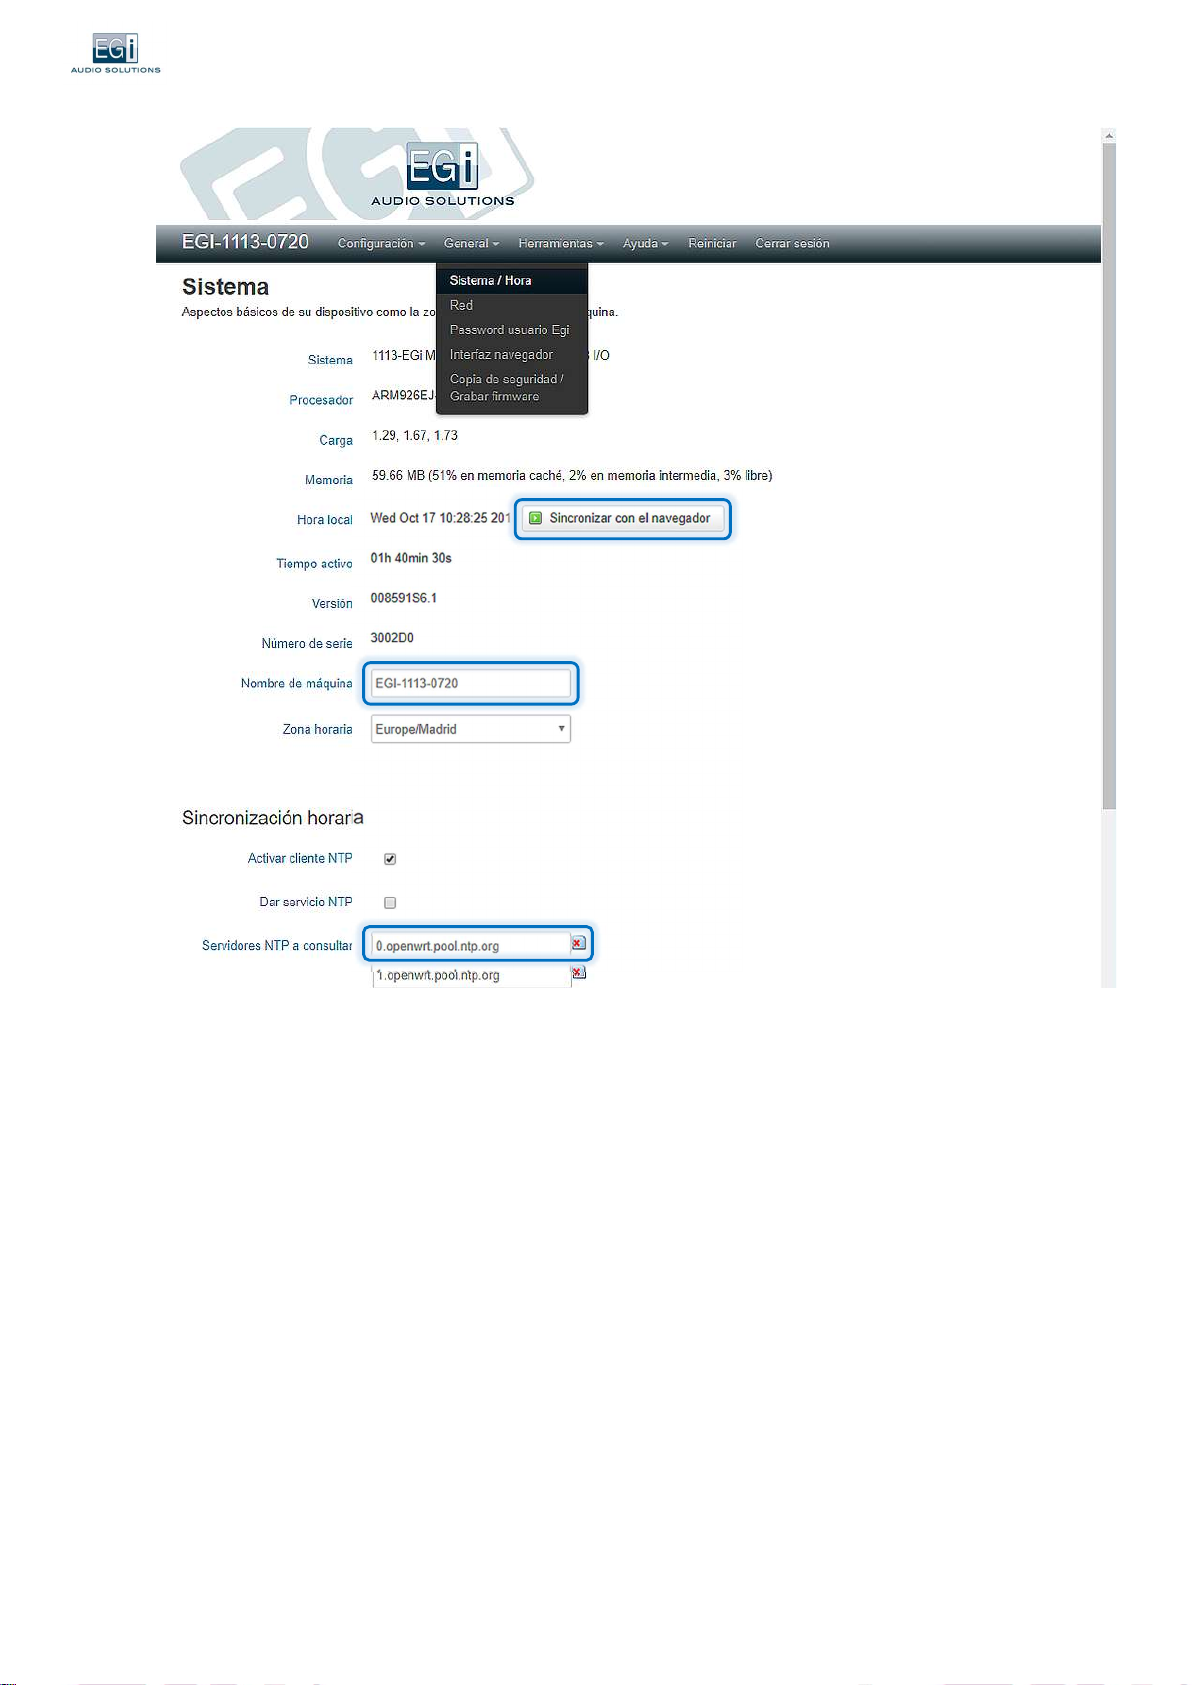
Within the GENERAL menu, in the "System/Time" option, the main parameters of the equipment are displayed:
1. System.
2. Processor.
3. Load.
4. Memory status.
5. Local time, allows you to synchronize the local time with that of the browser.
6. Uptime.
7. Version: For example, in version 008591S6.2 the first seven digits are the software code, 6 is the version and 2 the index of
modifications to improve functionality and correct errors found in the version.
8. Serial number.
9. Customize the machine name.
10. Selection of the time zone.
14. www.egiaudio.com
3.2.1.Synchronizing the time with your computer's browser
SYNC WITH BROWSER - Selecting this option synchronizes the time on your device with the time set in your computer's
browser.
3.2.2.Customizing the computer name
MACHINE NAME - Displays the name assigned to the computer. By default, it will be the same as on the label on the front of
the equipment.
3.2.3 Selection of time zone
TIME ZONE - Allows you to select the desired time zone to be set as a reference for the computer. This selection will be used
to calculate local time, and the beginning of daylight saving time (DST).
www.egiaudio.com 15.
3.2.4.Time synchronization via external NTP protocol
At the bottom of the screen allows you to make adjustments to the time synchronization through the NTP protocol.
If your computer is connected to the Internet, selecting the "Enable NTP client" option will synchronize your computer's clock with
an internet atomic clock server or time server on our local network. This feature is common to the 1111 and 1113 devices.
The NTP servers to be queried by the computer must be indicated. This will consult them in the order in which they are indicated
and will take the data of the one who responds before. If you do not get a response from anyone, the computer will synchronize
with the last saved time.
Example: "hora.roa.es" is the time provided by the NTP time server installed at the Royal Institute and Observatory of the
Spanish Navy. Each country has its official NTP server, it is advisable to add it.
3.2.5.Sincronización horaria a través del equipo 1113 como servidor NTP
In case of using a 1113 equipment, having an internal precision clock, the equipment itself is able to act as an NTP server
within the network, which can be useful to synchronize several computers that are on the same network (for example, more
1111 modules) or that do not have access to the internet.
To configure this function, you must put the IP address of the computer that acts as a server in one of the fields corresponding
to the NTP servers to be consulted by other computers, and then activate in the time synchronization menu of 1113 the
option "Give NTP service".
In this way other computers will take the time set by the 1113 computer that acts as an NTP server.
On 1111 computers, because it does not have an accurate internal clock, the time server is of little use. It could be used so
that all teams had the same time exactly. But if the power is turned off, the time would be lost.
3.3.NETWORK AND CONNECTIONS
In this section you will be able to view and configure the network status of your computer.
3.3.1.Network Status
In the "Network" option of the GENERAL menu, you can see the status of the connection and configure the parameters of
our network.
The MAC address, IPv4, IPv4 netmask, traffic, and errors are displayed.

16. www.egiaudio.com

www.egiaudio.com 17.
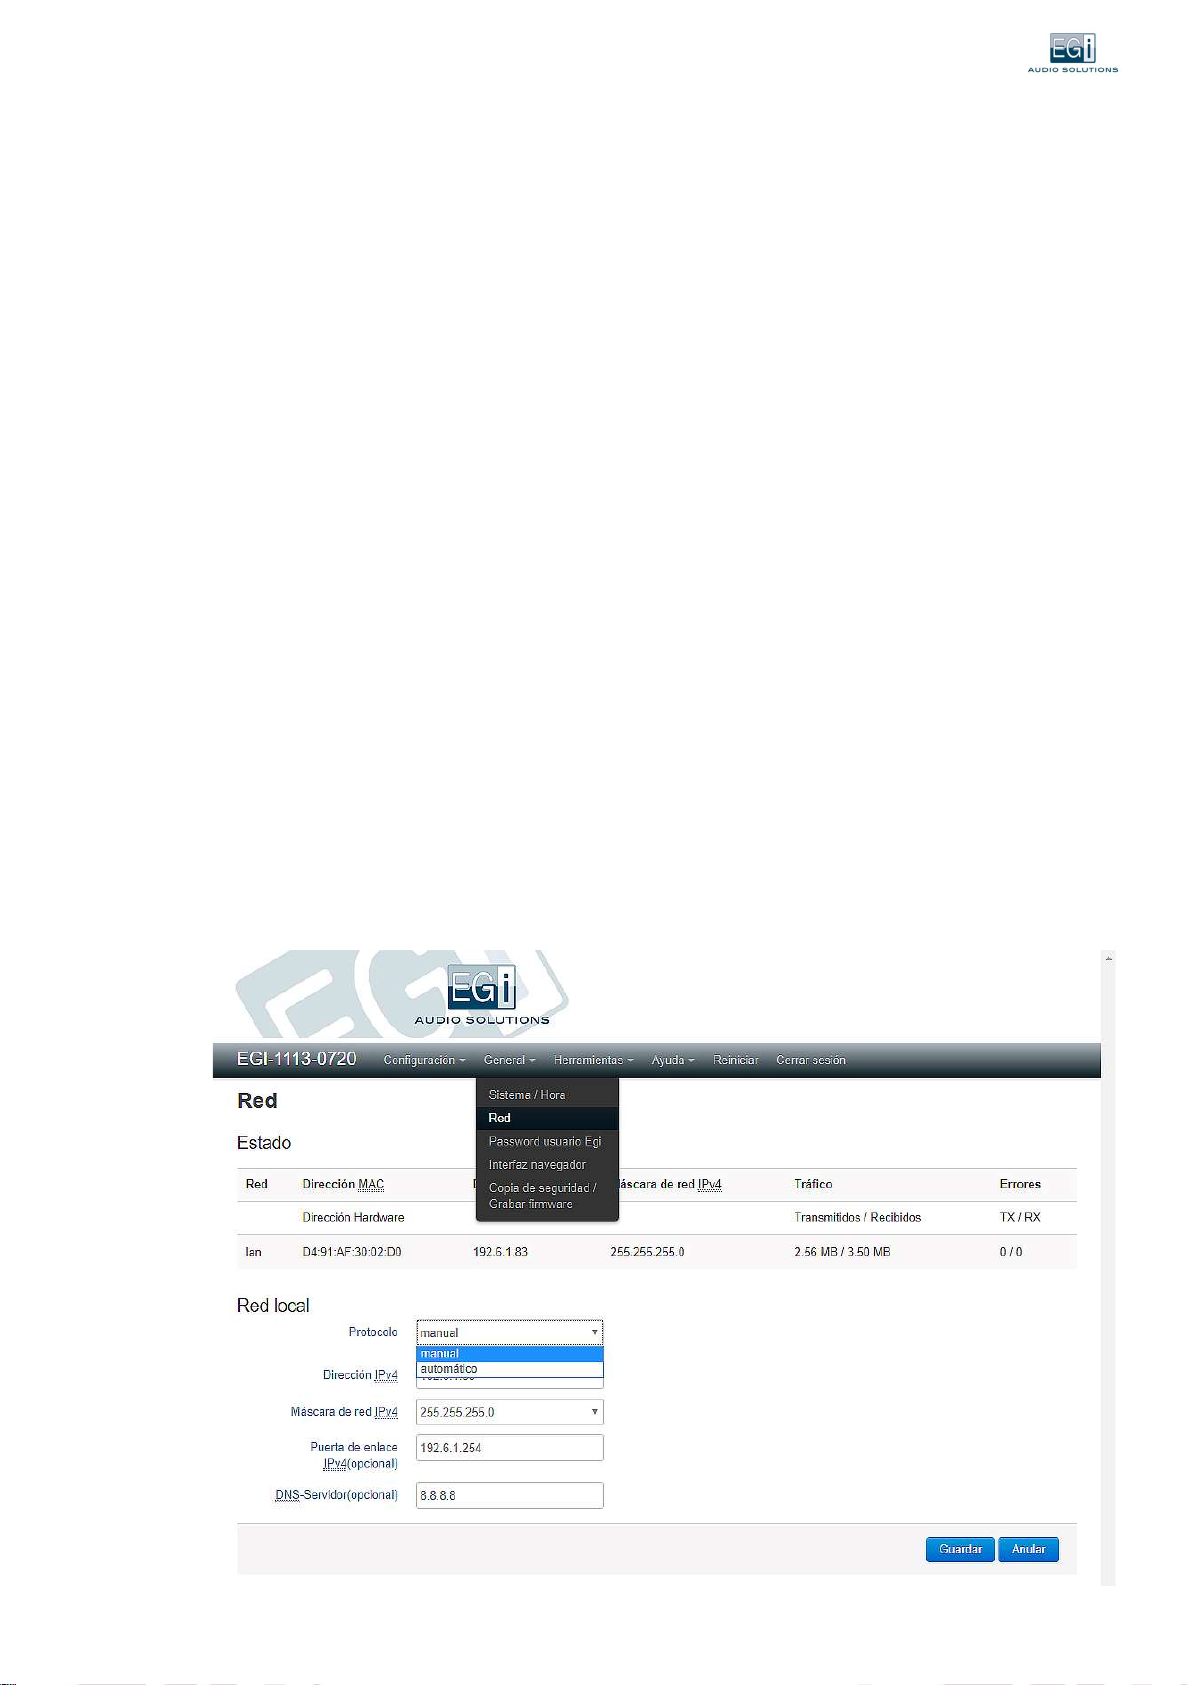
3.3.2.Network Configuration
In the "Local Network" section, you can configure the necessary parameters to establish a local network.
PROTOCOL - Allows you to configure the protocol to be used between 2 options: Automatic and Manual, as detailed below.
Automatic: Protocol established by default on the computer, takes by default the network configuration automatically
from a DHCP service. The DHCP server is a server that receives requests from clients requesting an IP network
configuration. The server will respond to such requests by providing the parameters that allow clients to self-configure.
Manual: Allows you to configure the different parameters in a personalized way obtaining greater control over the equipment.
Section 3.3.2.1 provides the steps to manually configure the appliance with a fixed or static IP.
3.3.2.1.Configuring the computer on a static or fixed IP
The manual protocol must be configured using the following steps.
1. Within the GENERAL menu, in the "local network" section of the "Network" option, we will select Manual protocol
and the network configuration parameters will appear.
2. In IPv4 address, type the static IP address on our network.
3. In IPv4 netmask normally place the numbering 255.255.255.0
4. At the gateway enter the Gateway address of the LAN network that connects our network section to the rest of the world.
5. In DNS-server, enter the value supplied by the internet provider. If you do not know the value or if it is not
provided by the internet provider, it is preferable to use the value 8.8.8.8, since otherwise, the equipment will
not be able to access the internet for time servers and / or radio stations.
6. After filling in these fields, you must save your changes.
In order for our team to communicate with others on the same stretch of network, they must all have the same
IPv4 Netmask. In different sections, the router must route the Multicast traffic.

18. www.egiaudio.com
3.4.PASSWORD MANAGEMENT
If you want to change the Password set by default, you can do so by entering the GENERAL menu, option "Password user Egi".
You have to complete both fields with the new key you have chosen and Save the changes.
3.5.BROWSER INTERFACE
The "Browser Interface" option, in the GENERAL menu, allows you to change the language and appearance settings of the browser.
3.5.1. interfaz configuration
Within the "Browser Interface" option of the GENERAL menu you can customize the design of the web interface among 4
options:
1. EGi (the original recommended interface).
2. MATERIAL (menu with collapsible sidebar on the left, good for mobile).
3. DARKMATTER (as MATERIAL, but in dark tones, for places in low light).
4. BOOSTRAP (simplified).
Once the interface is selected, click Save and it is selected.
By default the computer is configured with the EGi appearance, on which this manual is based.
www.egiaudio.com 19.
3.6. SYSTEM ENGRAVING OPERATIONS
If you want to save all the changes made to the configuration, not only on the computer but in a security file, we recommend
you enter the GENERAL menu, option "Backup security/ Record firmware".
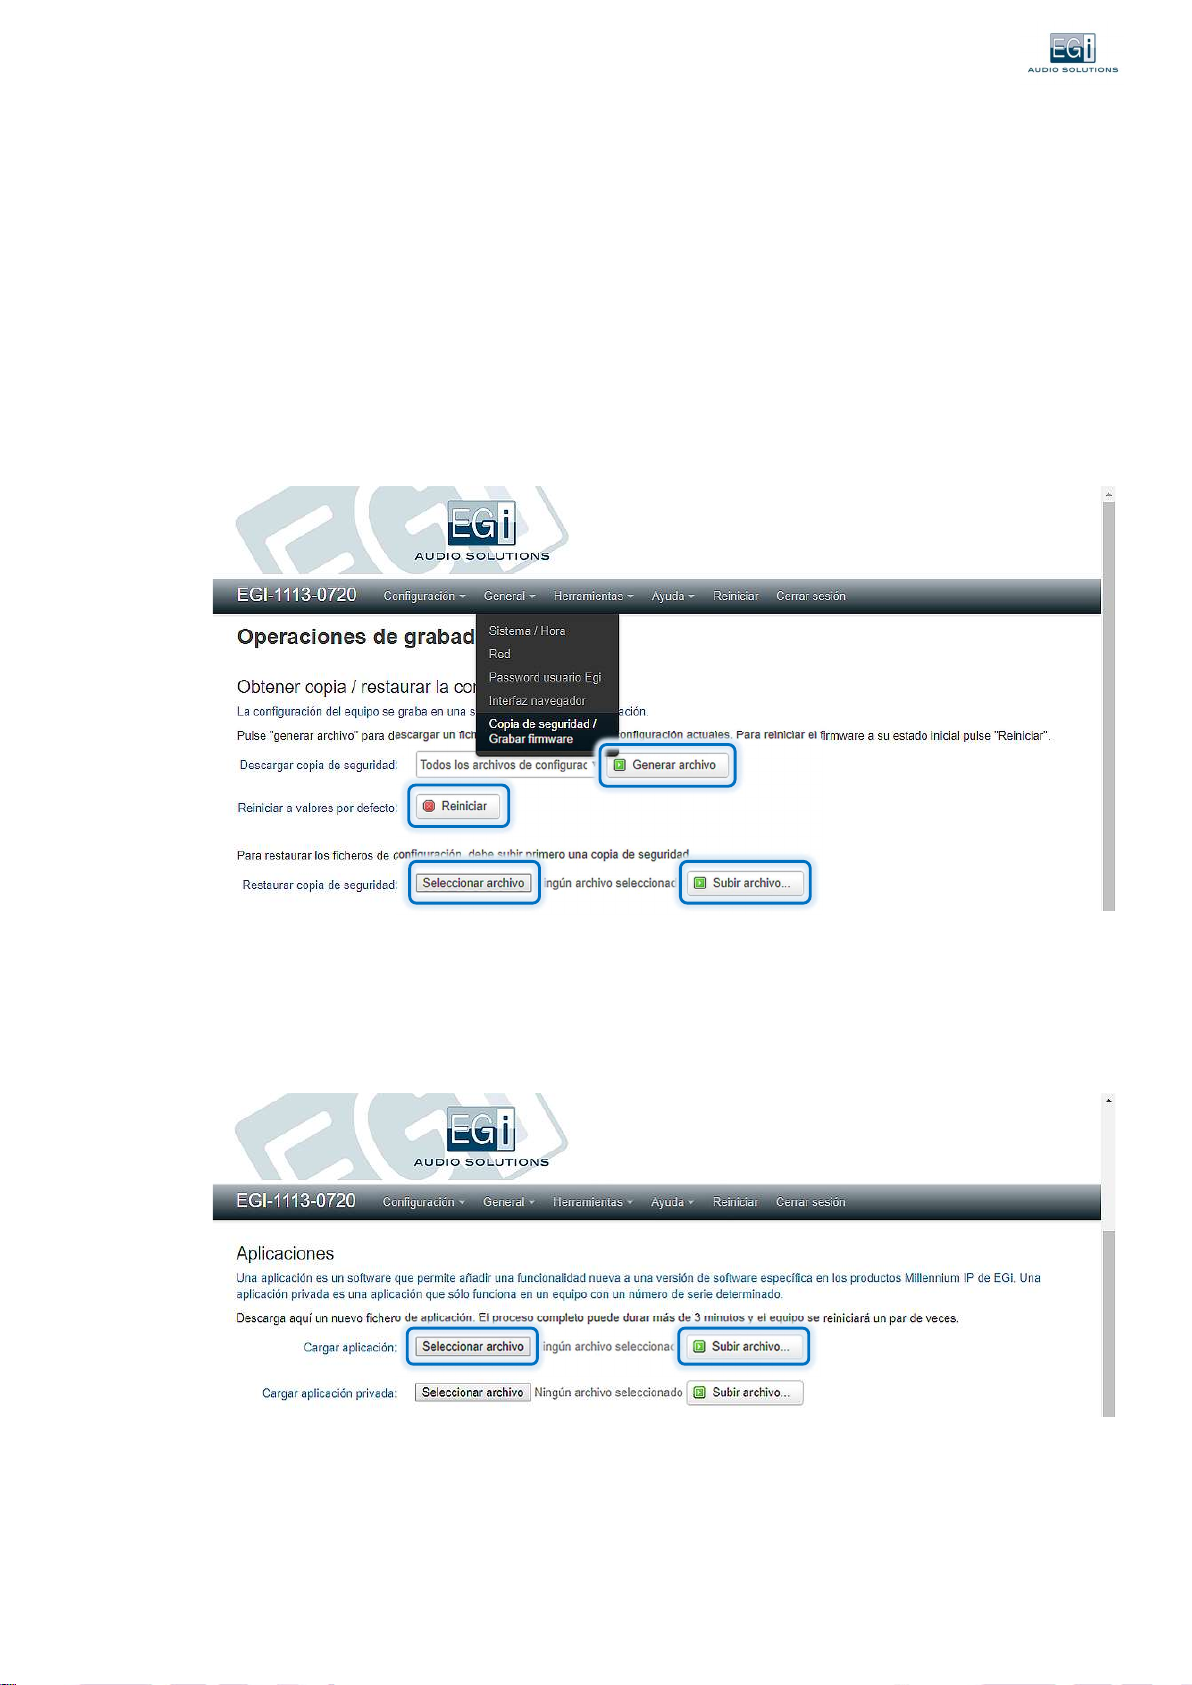
3.6.1. Backing up
To make a backup, go to the GENERAL menu , "Backup/Record Firmware" option.
To download the backup: Press the "Generate File" button, and a file will be automatically generated with the data of the
current configuration of the computer. You can select which configuration data to save: "All configuration files", or only those
of a given service.
To reset the computer to factory settings, click the "Restart" button.
To restore a saved backup, "Select File" in Restore Backup, and click "Upload File".
3.6.2. Applications
In the "Applications" section, we can install new applications in our software. An application is specific software that allows you to
add new functionality to your computers. To download it, select the file in "Select file" and then click on "Upload file".
A private application is an application that only works on a computer with a certain serial number.
20. www.egiaudio.com
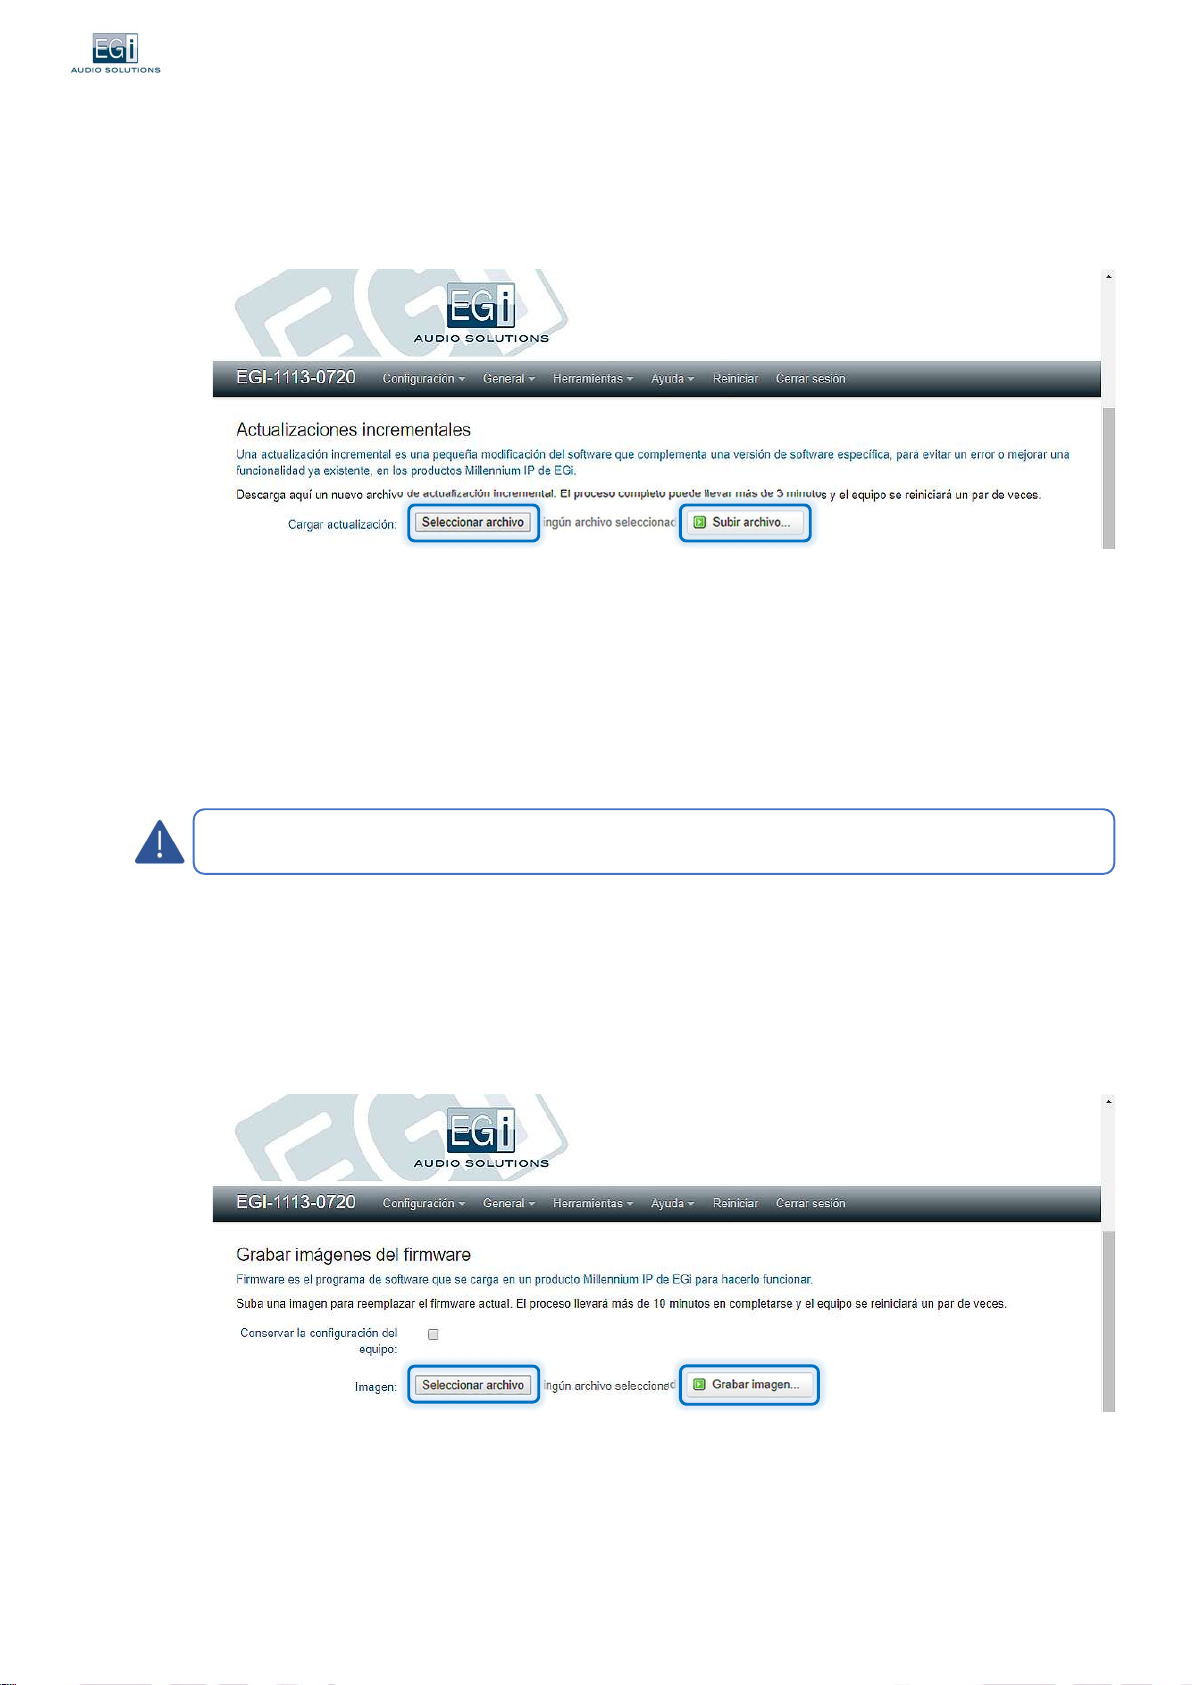
3.6.3. Incremental updates
An incremental update is a small modification of the software that allows you to avoid an error or improve an existing
functionality in the computers, for a certain software version. To download an update, select the corresponding file in "Select
file" and then click on "Upload file".
3.6.4. Restoring and updating the computer's firmware
Allows you to change your computer's software to a newer version, or restore existing software.
It is advisable to perform the update from the PC software instead of from this option.
Due to safety checks, the entire process can take about 15 minutes, during which the equipment must remain on. It will take
about 4 minutes to download the file, 3 minutes to check integrity, 5 minutes to record the Flash and 3 minutes to restart.
First we decide if we want to save the current configuration files, so that they are kept with the new software. To do this, we
must select the box: "Keep the configuration of the equipment".
It is important, even with everything, to back up the configuration before recording a new firmware, in case there are any
problems in the process. And also do not shut down or restart the computer until the process is finished.
In "Image", select the desired file in "Select File" and once selected, press "Record Image".
It will be a file of the type: "EGiMillenniumIP_upgrade_files.tar.gpg"
A bar counter or % (depending on the browser) will appear at the bottom of the screen, indicating that you are uploading the
file (about 5 minutes).
Once the download is finished, it will perform the integrity check of the file, this procedure takes about 5 minutes
approximately. The LED "SERVER" will start flashing fast.
A new screen will appear at the end of the check:
On the new screen, press the proceed button to start recording the Flash. The LED "SYSTEM STATUS" flashes fast: The file is being unpacked.
The computer restarts and the "SYSTEM STATUS" and "SERVER" LEDs will flash quickly, while the software version of the computer is
replaced by the new one. This is the most delicate moment of the process, during which we should neither shut down nor restart the
computer. The computer will restart a couple more times until the process is complete, which will take about 7 more minutes. Do not turn
off or do anything on the computer until the process is finished and the "SYSTEM STATUS" LED is on.
This manual suits for next models
1
Table of contents
Other EGi Recording Equipment manuals


