EGR SBAR0015 User manual

SB0013b
Page 1 of 7
Place these instructions in vehicle’s glove box after installation is complete
Ford Falcon Ute 2008
Part Number: SBAR0015
SPORTS BAR
INSTALLATION INSTRUCTIONS
Clean Sports Bar with a mild
detergent and water solution. Do not use abrasive
cleaners or solvents.
Care Instructions:
Item
1
2
3
4
5
6
7
8
9
10
11
12
13
1
1
1
6
2
2
1
1
1
1
1
1
2
2
2
4
4
2
6
8
2
8
2
Front Sports Bar Tube
Rear Sports Bar Leg LHS
Rear Sports Bar Leg RHS
Cam Nuts
Front Clamp Plates
Rear Clamp Plates
Foot Gasket LHS Front
Foot Gasket LHS Rear
Foot Gasket RHS Front
Foot Gasket RHS Rear
Leg Joiner LHS
Leg Joiner RHS
Nylon Spacers
Component Name Qty Item
14
15
16
17
18
19
20
21
22
23
Grommets
M12x80mm Screws
M8x25mm Screws
M8x20mm Screws
M6x50mm Screws
M4x12mm Countersunk Screws
M8 Spring Washers
M6 Spring Washers
M8 Flat Washers
M6 Flat Washers
Component Name Qty
LIST OF PARTS
Socket Drive Handle and Extension Bar (½” Drive)
Socket Drive Allen Key Long Series M12 (Kincrome)
Socket Drive Allen Key to Suit M6
Socket Drive Allen Key to Suit M8
Torque Wrench Rated to at Least 30Nm
Phillips Head Screwdriver to Suit M4
Tape Measure
RECOMMENDED TOOL LIST
20/01/10

SB0013b
page 2 of 7
FORD FALCON UTE 2008 SPORTS BAR
20/01/10
12345
678910
11 12 13 14 15
16 17 18 19 20
21 22 23
IMPORTANT: To obtain correct installation, we recommend that you follow these step by step instructions carefully.
Please take care when assembling and installing this product to protect the finish and your investment.
Regular polishing and waxing is required to protect the finish.
Finish Protection: Our products have a high finish that must be maintained such as any other high finish product on the vehicle.
Protect the finish with a non-abrasive automotive wax after polishing.
Regular polishing of the sportsbar is required to prevent staining or corrosion of the finish.
Use products formulated for stainless steel. Failure to maintain the finish may cause unrepairable damage to the sportsbar.
Disclaimer: The buyer assumes all risk and liability whatsoever from the installation and use of our products.
Our products are sold as decorative accessories and should not be relied upon as protection for the vehicle or occupants in the
event of a collision or rollover.
The manufacturer assumes no liability for injury, loss, incidental or consequential damages in the event of a collision or rollover.
EGR Customer service hotline, phone; +61 7 3337 0155 (Business hours, Australia)

REAR LEG
LEFT HAND SIDE
(LHS) REAR LEG
RIGHT HAND SIDE
(RHS)
SB0013b
page 3 of 7
FORD FALCON UTE 2008 SPORTS BAR
20/01/10
2. Insert the leg joiner with “LHS” marked on the front face, into the top end of the rear Sports Bar leg LHS as shown, ensuring the
spigot inserts correctly into its hole as shown. Repeat process for the other side of the Sports Bar. See Dia #2.
Diagram #2
1. NOTE: Two people are required to complete installation. Thoroughly clean and dry the installations areas. See Dia #1.
Diagram #1
REAR LEG
LEFT HAND SIDE
(LHS)
LEG JOINER
LEFT HAND SIDE
(LHS)
SPIGOT
3. Insert the M12x80mm screws into the nylon spacers as shown. See Dia #3.
Diagram #3
NYLON
SPACER
x2
FRONT VIEW
“LHS”
AT TOP
M12x80
SCREW
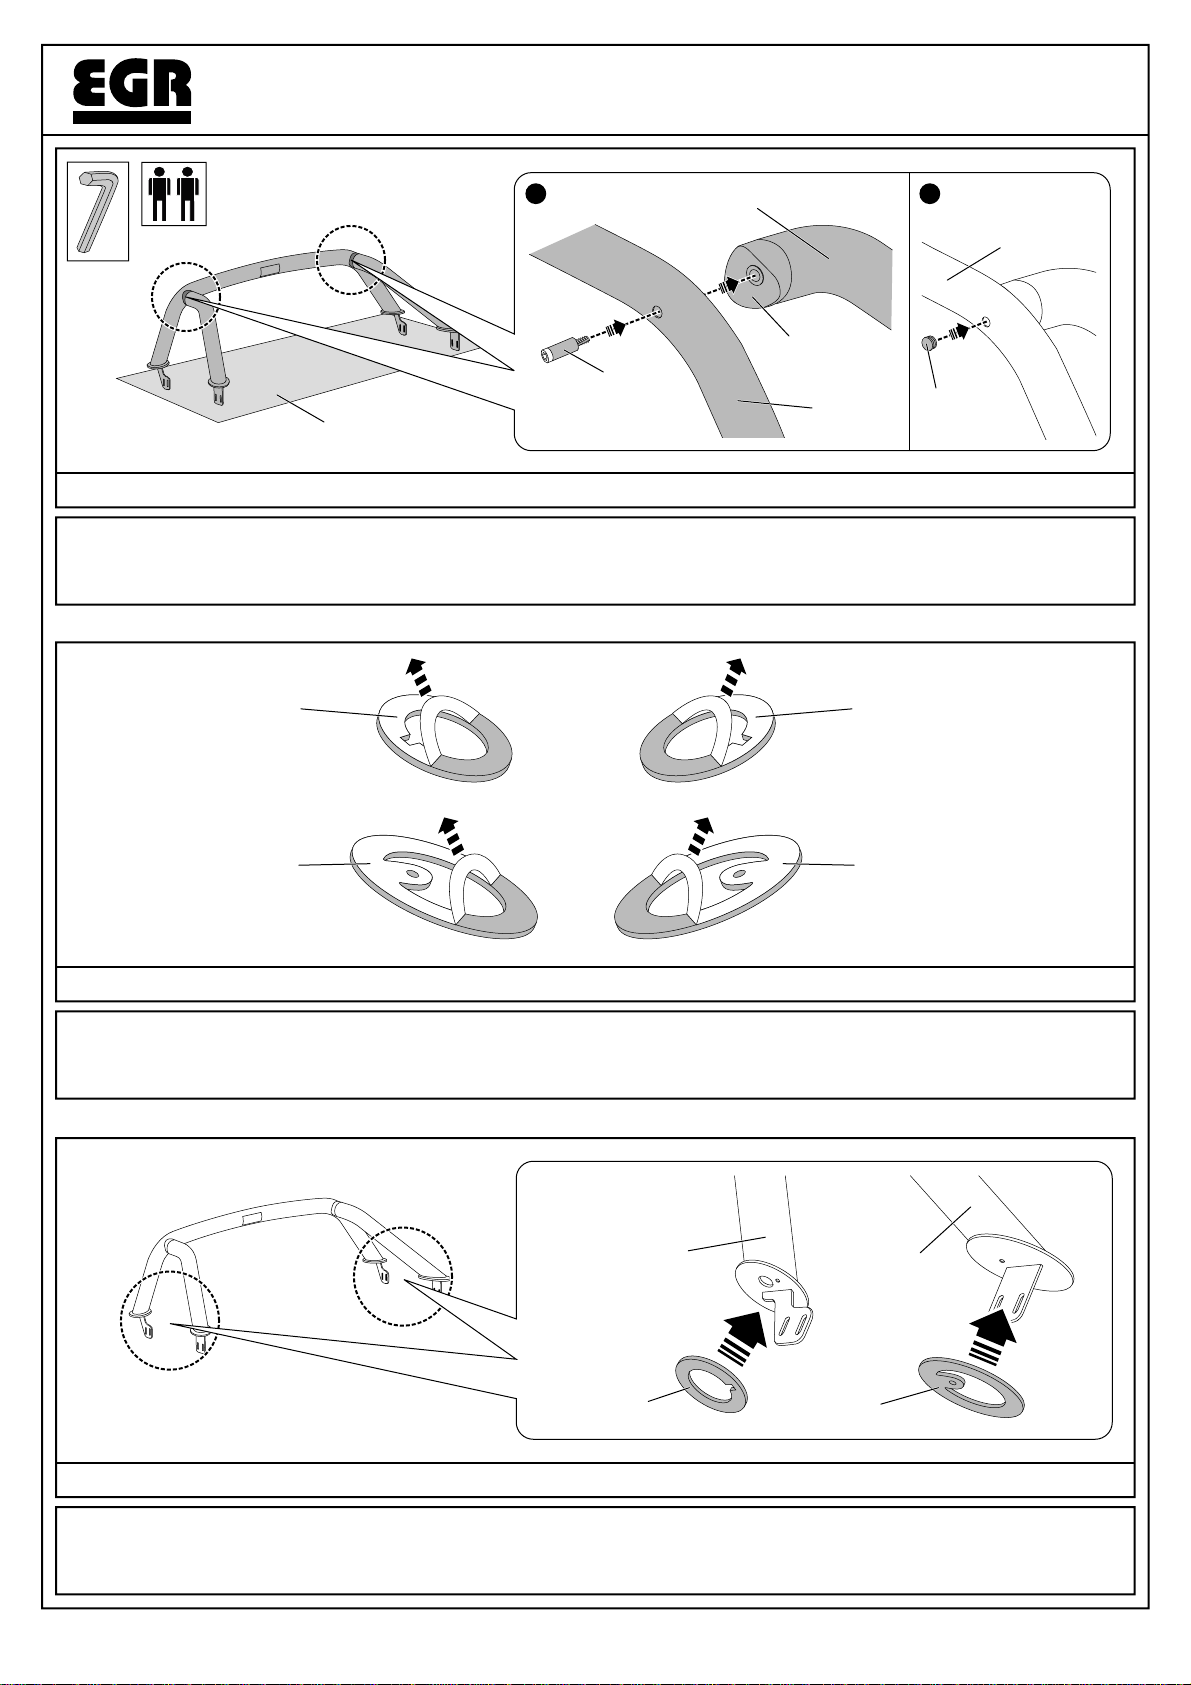
4. Lay the Sports Bar front tube and rear legs out on a non-abrasive surface. Using two people, attach the front Sports Bar tube to the
rear Sports Bar leg LHS using the M12x80mm screws as shown. Tighten to torque 20Nm. Repeat process for the other side of the
Sports Bar. Insert the grommets into the holes on the front Sports Bar tube as shown. See Dia #4.
Diagram #4
SB0013b
page 4 of 7
FORD FALCON UTE 2008 SPORTS BAR
20/01/10
6.Attach the foot gaskets to their correct Sports Bar foot as shown, ensuring the holes in the Sports Bar feet remain accessible. Repeat
process for the other side of the vehicle. See Dia #6.
Diagram #6
5. Remove the protective lining from all of the foot gaskets. See Dia #5.
Diagram #5
LHS SHOWN LHS SHOWN
1 2
FRONT
TUBE
REAR LEG
LHS
LEG JOINER
LHS
FRONT
TUBE
GROMMET
M12x80 SCREW &
NYLON SPACER
NON-ABRASIVE
SURFACE TORQUE 20Nm
FOOT GASKET
REAR RHS
REAR LEG
RHS
FRONT TUBE
FOOT GASKET
FRONT RHS
RHS SHOWN
FOOT GASKET
FRONT RHS
FOOT GASKET
REAR RHS
FOOT GASKET
FRONT LHS
FOOT GASKET
REAR LHS
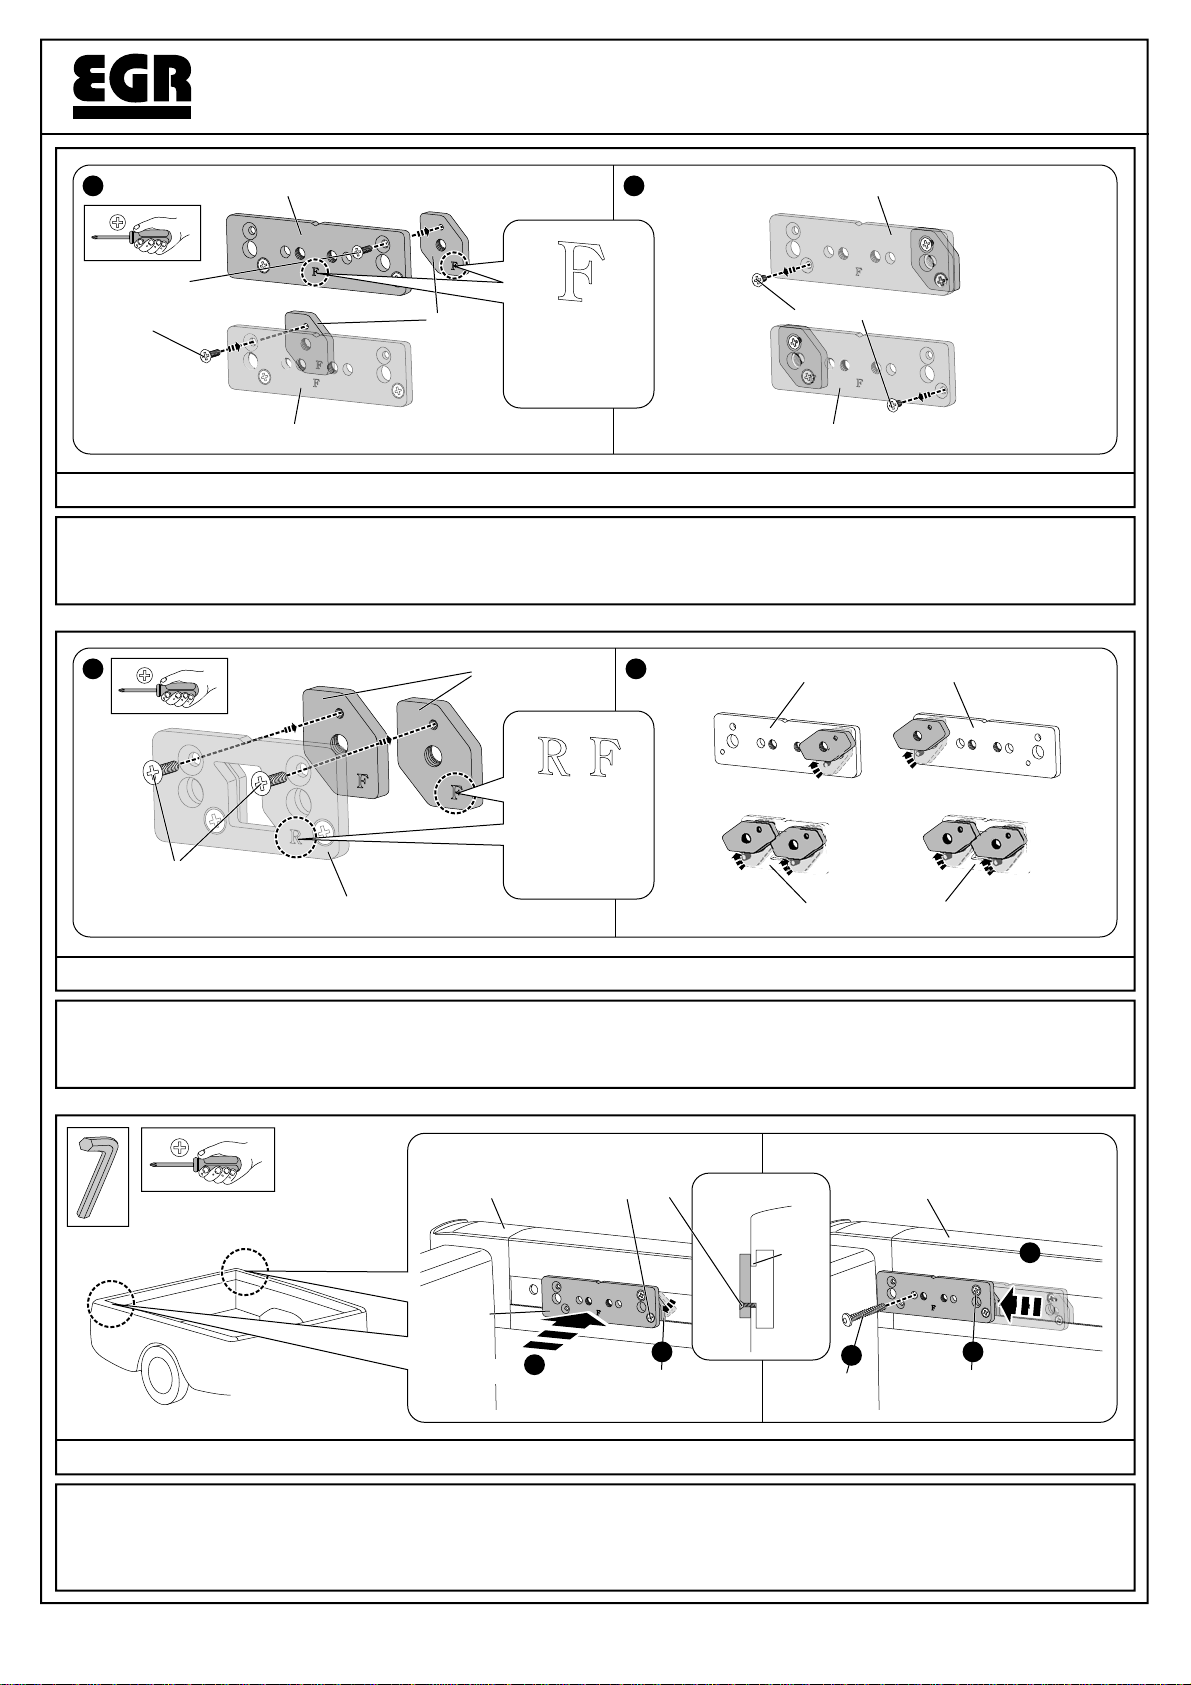
7. Loosely attach the cam nuts (4 turns only) to the front clamp plates, ensuring they are attached to opposite ends of the plates as
shown. Remove the screw from the end opposite the attached cam nut as shown. Note which side of the vehicle the front clamp plates
will be attached to later, as indicated in the diagram. See Dia #7.
Diagram #7
SB0013b
page 5 of 7
FORD FALCON UTE 2008 SPORTS BAR
20/01/10
9. Fit the front clamp plate to the side rail as shown. Ensure bottom screws lip onto bottom edge of side rail opening. Rotate the cam
nut so that it sits behind the bottom lip of the side rail as shown. Slide the front cam plate into place at the front of the side rail as shown
and loosely insert the M6x50mm screw through the hole in the front clamp plate and into the existing threaded hole in the side rail.
Finally, tighten the M4x12mm screw to torque 10Nm. Repeat process for the other side of the vehicle. See Dia #9.
Diagram #9
8. Loosely attach the cam nuts (4 turns only) to the rear clamp plates as shown. Rotate the cam nuts on both the front and rear clamp
plates so that they sit above the screws protruding from the back of the clamp plates as shown. See Dia #8.
Diagram #8
M4x12mm
SCREWS
(4 TURNS ONLY)
M4x12mm
SCREWS
(4 TURNS ONLY)
CAM NUTS
FRONT CLAMP PLATE (FOR LHS OF VEHICLE)
FRONT CLAMP PLATE (FOR RHS OF VEHICLE)
1 2
1 2
REAR CLAMP PLATE x2
FRONT CLAMP PLATE (FOR LHS OF VEHICLE)
ROTATE
CAM NUTS
REAR CLAMP PLATES
FRONT CLAMP PLATES
(RHS)
(LHS)
FRONT CLAMP PLATE (FOR RHS OF VEHICLE)
REMOVE SCREW
IMPORTANT:
ENSURE “F” IS
ALWAYS FACING
TOWARD YOU
IMPORTANT:
ENSURE “R” & “F”
ARE ALWAYS
FACING
TOWARD YOU
CAM
NUTS
RHS SHOWN
SIDE RAIL BOTTOM
SCREW
M6x50mm
SCREW
RHS SHOWN
SIDE RAIL
SLIDE
ROTATE
CAM NUT TIGHTEN TO
TORQUE 10Nm
3
SIDE VIEW
SIDE
RAIL
FIT
1
FRONT
CLAMP
PLATE
(FOR RHS) 245
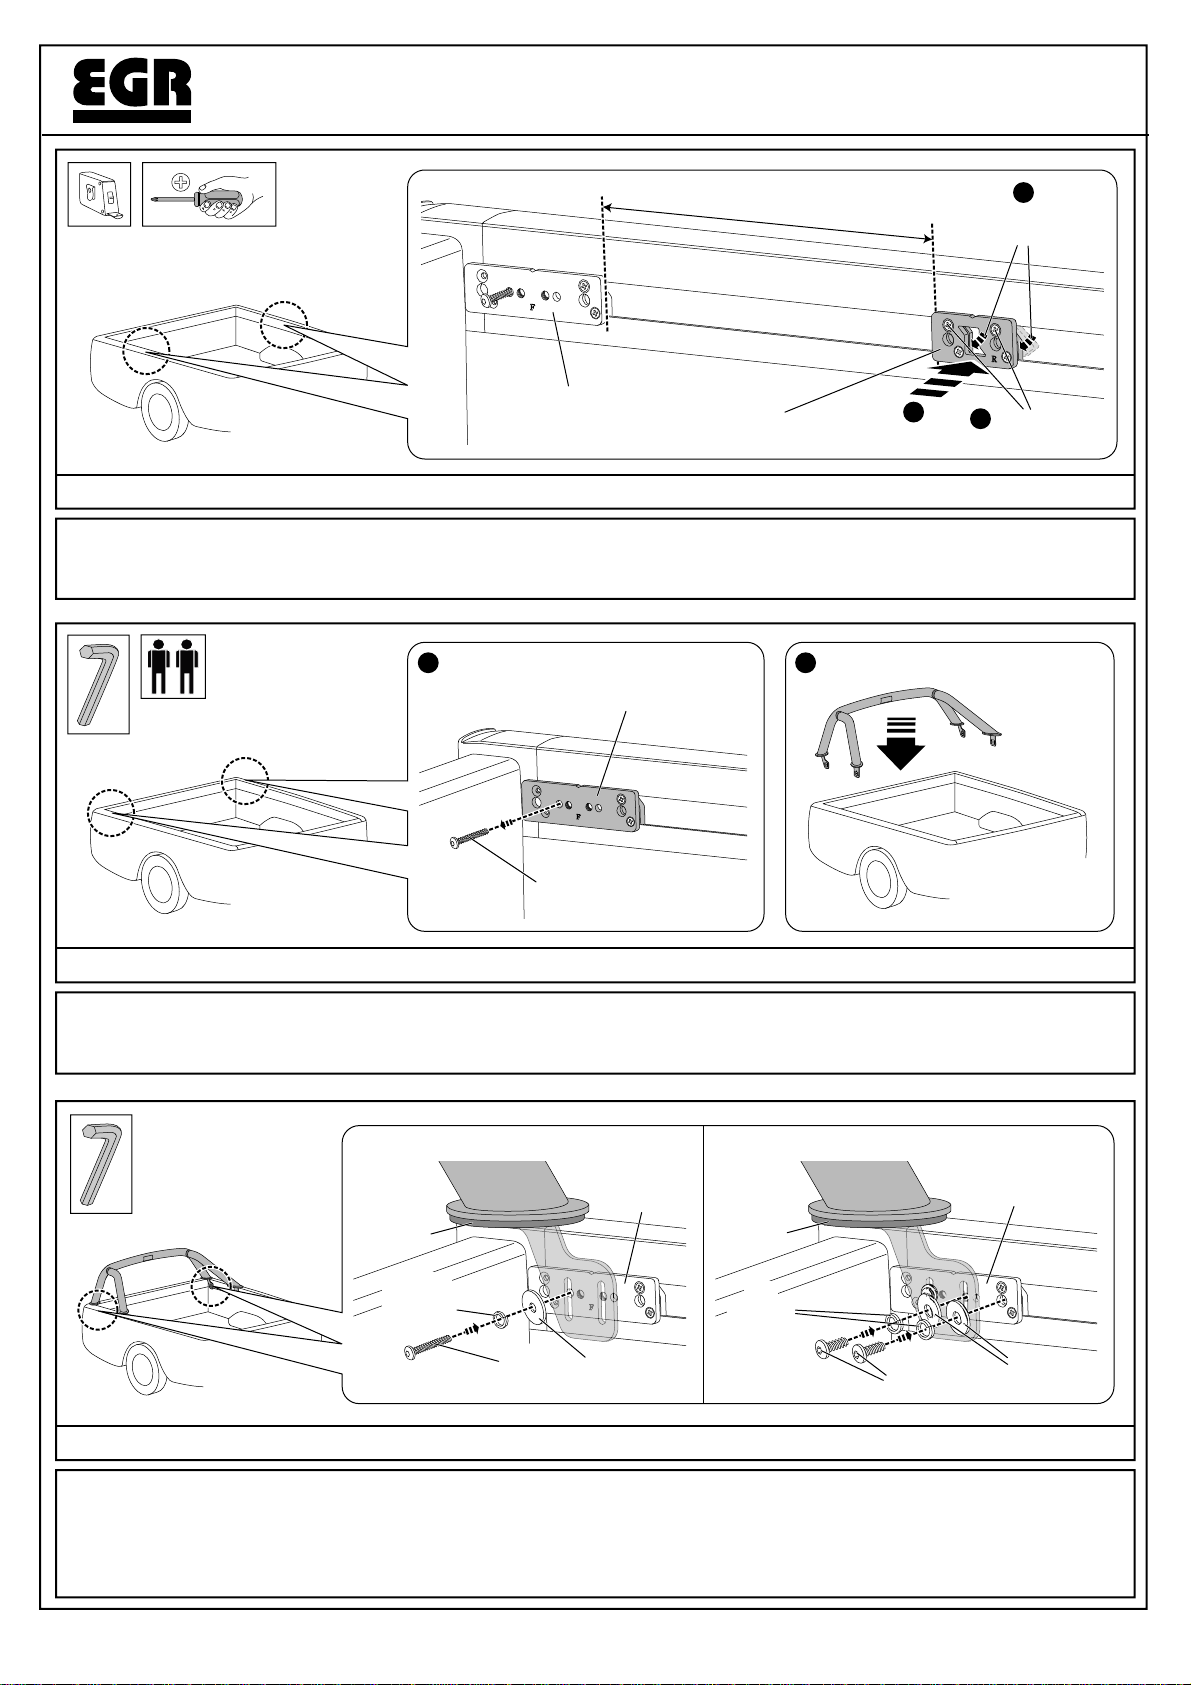
10. Fit the rear clamp plate to the vehicle’s side rail and position it 321mm from the front clamp plate as shown. Rotate the cam nuts
so that they sit behind the bottom lip of the side rail as shown. Tighten the M4x12mm screws to torque 10Nm. Repeat process for the
other side of the vehicle. See Dia #10.
Diagram #10
SB0013b
page 6 of 7
FORD FALCON UTE 2008 SPORTS BAR
20/01/10
12. Attach the Sports Bar foot to the vehicle’s side rail using the M6x50mm screw, M6 spring washer and M6 flat washer into existing
front hole in vehicle as shown. Push down on the Sports Bar foot towards tub contact with gasket. Tighten to torque 10Nm. Attach the
Sports Bar to the front clamp plate using the M8x20mm screw, M8 spring washer and M8 flat washer as shown.Also attach M8x20mm
screw, M8 spring washer and M8 flat washer through the front clamp plate rearward position and into cam nut. Tighten both M8 screws
to torque 20Nm. Repeat process for the other side of the vehicle. See Dia #12.
Diagram #12
11. Remove the M6x50mm screws from both of the front clamp plates as shown. Position Sports Bar on vehicle using two people either
side of the vehicle and lower the Sports Bar down so the feet tags are aligned inside the tub over the clamp plate positions.
See Dia #11. NOTE: If fitting with EGR 3pc Tonneau Cover, refer to Tonneau Cover Fitting Instructions to complete fitment.
Diagram #11
ROTATE
CAM NUTS
321mm 2
TIGHTEN TO
TORQUE 10Nm
FIT 3
RHS SHOWN
SIDE RAIL
FRONT CLAMP PLATE
(FOR RHS) REAR CLAMP
PLATE 1
21 RHS SHOWN
REMOVE M6x50mm
SCREW
FRONT CLAMP PLATE
M6x50
SCREW M6 FLAT
WASHER
TORQUE 10Nm
FRONT CLAMP
PLATE
RHS SHOWN
SPORTS
BAR
M8x20
SCREWS M8 FLAT
WASHERS
TORQUE 20Nm
FRONT CLAMP
PLATE
RHS SHOWN
SPORTS
BAR
M6
SPRING
WASHER
GASKET GASKET
M8
SPRING
WASHERS

13. Attach the Sports Bar to the rear clamp plate in two places using the M8x25mm screws, M8 spring washers and M8 flat washers
as shown. Push down on the Sports Bar foot towards tub contact with the gasket. Tighten to torque 20Nm. Repeat process for the other
side of the vehicle. See Dia #13.
Diagram #13
SB0013b
page 7 of 7
FORD FALCON UTE 2008 SPORTS BAR
20/01/10
RHS SHOWN SPORTS
BAR
REAR CLAMP
PLATE
GASKET
M8 FLAT WASHERS
M8 SPRING
WASHERS
M8x25
SCREWS
TORQUE 20Nm
Table of contents
Other EGR Automobile Accessories manuals


Popular Automobile Accessories manuals by other brands


Whispbar
Whispbar K666 manual

Torklift
Torklift C4201 Important owner-operator installation instructions

Rigid Industries
Rigid Industries E Series installation instructions

Metra Electronics
Metra Electronics 95-7298B installation instructions

Parrot
Parrot Easydrive user guide

Guardsman
Guardsman G1460 FITTING INSTRUCTION

POOL-LINE
POOL-LINE 110003 Assembly instructions

Eaton
Eaton VORAD AlwaysAlert installation guide

Discount Car Stereo
Discount Car Stereo PXDX-CTS Quick start installation guide

Road Angel
Road Angel RA8100 User's installation guide

Lippert
Lippert SolidStep Gen 2 Installation and owner's manual

tams elektronik
tams elektronik FCS-2 manual