910 11 12 13 14 15 16
CAUTION:
• Use on ly the suppli ed lithium ba ttery and ca ble, or ones wi th the same
specic ation to charge. U sing any other bat teries, cab les or dierent
specic ations may dama ge the drone.
• Aft er playing, l et the batter y cool for at least 20 m inutes before cha rging.
Pairing
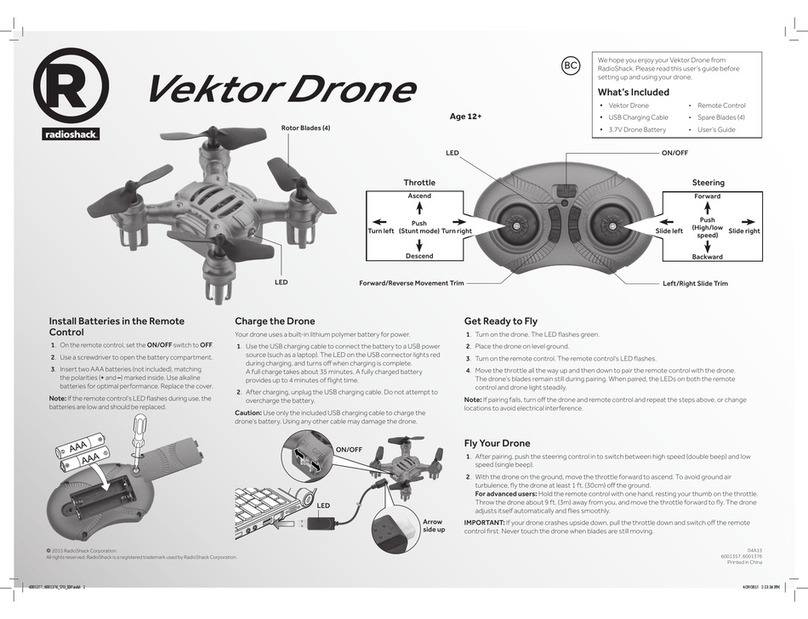
1. Turn on the drone. T he LEDs ash.
2. Place the dro ne on level ground .
3. Turn on the remote co ntrol. The remot e control’s LED as hes.
4. Move the throt tle all the wa y up and then dow n to
pair the rem ote control with t he drone. The dron e’s
blades rem ain still dur ing pairin g. When paired , the
LEDs on both t he remote control an d drone light
steadily.
Note: If pai ring fails, t urn o the drone a nd remote control
and repeat t he steps above, or ch ange locati ons to avoid
electr ical interf erence.
Fly
1. After pai ring, push t he steering con trol in to switch
between a dvanced mode to y in high spee d
(double be ep) and beginn er mode to y in lo w speed
(single be ep).
2. With the d rone on the groun d, move the thrott le
forward to as cend. To avoid ground ai r turbulence ,
y the dron e at least 1 ft. (30 cm) o the ground .
IMPORTANT: If your d rone crashes upsi de down, pull
the thrott le down and swi tch o the remote cont rol rst.
Never touch t he drone when pro pellers are st ill moving.
Tri m
Move the throt tle forward a nd see how the dro ne reacts.
Note: The remote control be eps when you press a t rim control but s tops
beeping w hen you reach max imum trim ad justment.
Ready to Fly
ON/OFF
LED
Flashin g = Searching
On = Paired
Ascend
Turn
left
Turn
right
Descend
Push
(Stunt mode)
Forwa rd
Slide
left
Slide
right
Backward
Push
(High/l ow speed)
Forwa rd/
Reverse
Movement Trim
Left/R ight
Slide Trim
Land
1. Slowly mov e the throttle b ackward to desce nd.
Avoid movin g the throttle to o quickly, as it ca n stop
the blad es instantly a nd cause the dro ne to crash.
2. After play ing, turn o t he remote control an d
drone.
Stunts
IMPORTANT: Make sure there is enoug h space for the dron e to perform st unts
withou t crashing into ob jects or pe ople.
1. Push the th rottle control i n so that the remote
control bee ps repeatedly to en ter stunt mode.
2. Use the stee ring control to pe rform stunt s:
3. The dron e automatica lly exits stu nt mode after
perfor ming a stunt.
Tro ub le sh oo ti ng
Drone does n ot respond
• Make su re the drone and rem ote control are swit ched on and paire d.
• Dron e battery mayb e low. Fully charge t he battery. Se e “Charge the Dro ne
Battery.“
• Make su re the drone is wit hin the control r ange (65 ft./2 0 m) and in line of
sight.
Drone dic ult to control
• Adju st the propell ers by hand. If yo u cannot adjus t them, repla ce with the
spare propel lers.
• The t hrottle contro l is very sensit ive. Use small, ne movements to co ntrol.
• Prac tice at low spee d mode. See “Fly.“
Drone swer ves / runs erra tically bef ore take o
• The g yroscope inside y our drone needs c alibratin g. Do the follo wing:
1. W ith your drone an d remote control swi tched on and pai red, place the
drone on leve l ground.
2. Mov e the throttle a ll the way down an d the
steerin g forward at the s ame time. Hol d this
position fo r a few seconds unti l the drone LEDs
start to b link.
3. When the LE Ds light stead ily, release the cont rols.
Calibra tion is complet e and you are now ready f or
takeo.
• See “ Trim ” if necessar y to ne tune and i mprove control of you r drone after
calibration.
Fly Safely
• Whe n ying outdo ors, keep the dro ne away from power l ines, trees, we eds,
and water.
• Whe n ying indoo rs, keep the dron e away from walls , air conditio ning, air
vents, fa ns, breakabl e objects, a nd other obst acles.
• Do not y the drone near o r at other peopl e or animals.
• Keep eyes , hands, hair, and l oose clothin g away from moving p ropellers.
• Adul t supervis ion is recommen ded at all time s.
• Do not y your drone over pr ivate proper ty where you are not we lcomed.
• Do not y your drone where e mergency resp onders are work ing, or
emergenc y aircraft are o perating.
FCC Information
This equi pment has been te sted and found to co mply with th e limits for a Cl ass
B digita l device, pursua nt to Part 15 of the FCC Ru les. These lim its are desig ned
to provide reaso nable protect ion against h armful inter ference in a resi dential
instal lation. This e quipment ge nerates, uses a nd can radiate r adio frequen cy
energy and , if not instal led and used in ac cordance with t he instruct ions, may
cause harm ful interfe rence to radio com municatio ns. However, there is no
guarante e that interfe rence will not occ ur in a partic ular instal lation. If th is
equipme nt does cause ha rmful inter ference to radio o r television rece ption,
which can b e determined by t urning the e quipment o an d on, the user is
encourag ed to try to correc t the inter ference by the foll owing measures :
• Reor ient or relocate t he receiving a ntenna.
• Incre ase the separat ion between t he equipme nt and receiver.
• Conn ect the equi pment into an ou tlet on a circuit d ierent from tha t to
which the re ceiver is connec ted.
• Consu lt your dealer o r an experien ced radio/T V technicia n for help.
If you cannot e liminate th e interferen ce, the FCC requires th at you stop using
your equi pment. Chang es or modic ations not expres sly approved by th e
party res ponsible for co mpliance cou ld void the user ’s authorit y to operate the
equipment.
This devic e complies wit h Part 15 of the FCC Rul es. Operatio n is subject to t he
followin g two conditi ons: (1) this device may not c ause harmful i nterference , and
(2) this device m ust accept any inte rference recei ved, includ ing interfere nce that
may cause un desired opera tion.
Limited Warranty
Go to www. radioshack .com/help for d etails.
RadioSha ck Customer Rela tions
300 Radio Shack Circle, For t Worth, T X 76102
Charge the Drone B attery
1. Make sure your drone is sw itched o. Plug th e USB charging ca ble into
your drone’s cha rging port (CHG) an d a USB power source. T he LED on the
USB connec tor lights red d uring chargi ng, and turns o when chargin g is
complete.
A full charg e takes about 45 mi nutes, and prov ides up to 5 minute s of ight
time.
2. After charging , unplug the c harging cabl e. Do not attempt to ov ercharge.
Battery N otes
• Disp ose of old batter ies promptly an d properly. Do not b urn or bury th em.
Use only fres h batteries of th e required size and re commended t ype.
• Do not m ix old and new bat teries, di erent types of bat teries (stan dard,
alkalin e, or rechargeab le), or rechargeab le batteries of d ierent capac ities.
• Remove b atteries dur ing longer s torage perio ds.
© 2016 General Wire less Operati ons Inc. All r ights reser ved.
RadioSha ck is a registered tr ademark used b y General Wirel ess
Operati ons Inc. dba Rad ioShack.
radioshack.com
08A16
2770422
Printed
in China
Complie s with the Europe an Union’s “Res triction of
Hazardous Su bstances Di rective,” which p rotects the
environme nt by restrict ing specic h azardous materi als
and produc ts.
Forward/ Reverse Movement I f the
drone tends to m ove forward, pre ss
6
; if it tends to m ove backward,
press 5.
Left/R ight Slide Trim:
If the drone t ends to slide ri ght, press
5; if it tends to slide lef t, press 6
.
ON/OFF
Install Batter ies in the Remote Control
1. Set the remote co ntrol’s ON/OFF sw itch to OFF.
2. Open th e battery com partment a nd i
nsert tw o AAA batte ries (not
include d), matching the p olarities (+ an d –) marked inside . Replace the
cover.
Note: If the remote control ’s LED ashes dur ing use, the bat teries are low an d
should be re placed.
WARNING:
• To avoid injury an d damage, inspect th e propellers for nicks an d breaks and
make sure they are securely at tached before and afte r each ight. Replace
nicked, chipped, cracked or broken propellers. (See details on page 9)
• To replace a dam aged propell er, remove the old one a nd press the new
one onto the p ropeller axl e. If you cannot re move the old prop eller by hand,
carefull y use pliers.
• Use on ly the suppli ed propeller s. Do not alter, modi fy, or customize the
propelle rs.
Propelle rs A (2) 1.2 x 4mm
Screws (8)
Propelle rs B (2) Suspensi on
Pads (4)
A
A
B
B
The left a nd right prope llers are die rent (see A and B mark ings on the dron e
and propel lers). Make sure you ins ert the corre ct propeller i n the correct
locatio n to y properly.
LED
Throttle Steerin g
Front ip
Move steeri ng forward
Back ip
Move steeri ng backward
Barrel rol l
Move steeri ng right or lef t
2770422_UG_EN.080416.indd 9-16 8/8/2016 4:27:28 PM
