eKoral eK Doser User manual

eK Doser
User Manual 2020

1

Table of Contents
1.0. Creating an eKoral Account 3
1.1. International
1.2. China
2.0. Packaging Contents 3
2.1. eK Doser
2.2. Dosing Tubes
2.3. Dosing Tube Holder
2.4. Power Adapter
2.5. Graduated Cylinder
3.0. Safety Precautions 4
4.0. eK Doser Setup 4
4.1. eK Doser Pairing
4.1.1. Online Pairing (Soft AP)
4.1.2. Offline Pairing (Direct Connect)
4.1.3. Troubleshooting
5.0. If/Then Rules 6
6.0. Schedule 7
6.1. eK Doser
7.0. Resetting your eK Doser 7
8.0. Connecting eKoral Sync Supported Third-Party Devices 8
9.1. Identifying eKoral Sync Products
9.2. Connecting an eKoral Sync Device to your eKoral Account
9.0. Figures 9
2

1.0. Creating an eKoral Account
To begin, please download the eKoral app from the App Store (Apple iOS) or the Google
Play Store (Android). You may also use the QR codes provided. Search for “eKoral”, and
download the app specified for aquarium use (Pg. 1
).
Once downloaded, please open the eKoral app and create an account either using your
email address or Facebook account.
Please note: there are two settings when you are creating an account, these are
explained below.
1.1. International
If you are an international user (i.e. are located outside of mainland China), please be
sure to select the “International” setting when creating your account and logging into the eKoral
app.
1.2. China
If you are a user from mainland China, please be sure to select the “China” setting when
creating your account and logging into the eKoral app. This will ensure that you are logged onto
our Chinese servers.
Please note: The version of the app will be clear as it will be displayed in the top
right-hand corner once downloaded.
Once an account is created, you are ready to start pairing to a device.
2.0. Packaging Contents
2.1 eK Doser
★Dosing Pump
★Specifications:
Automatic dosing system. Use the eK Doser with regulated dosing
schedules to provide an ideal environment for your reefs to live and grow. Each dosing
pump has the ability to dose at 3 different rates (20-40ml/min). Main features include
Delay-time Protection, where pumps can delay dosing schedules based on different
programmed pump activities.
○ Size: 329x200x140mm (12.6″x17.87″x5.51″)
○ Weight: (US) 1600g (3.52lb)
○ Working Environment: Temp: 0°C ~ 40°C / 32°F ~ 104°F Relative humidity: <80%
2.2. Doser Tubing
★Specifications
: 6m tube that has the dimensions of 2.0mm x 4.0mm
2.3. Dosing Tube Holder
★Specifications
: Holds 4 dosing tubes measuring 2.0mm x 4.0mm
3

2.4. Power Adapter
★Specifications
: US/AU/CN versions available
★Input is 12V, equivalent to 1A.
2.5. Graduated Cylinder (10 mL)
3.0. Safety Precautions
When using the eK Doser, as is the case for all electronic equipment operated around
water, it is essential to take steps to maintain the integrity and functionality of the devices.
Standard precautions should be taken to minimize risks:
1. Ensure that the outlet you are using can support the voltage level required by the eK
Doser and its associated devices. If needed, check with a licensed electrician or your
local power company to establish that the power consumption is safe.
2. Choose an outlet that is not within the immediate vicinity of your tank (i.e. within the
“splash zone”, where water splashes or droplets may land on your devices, or “salt
creep” may occur).
3. Be sure to “drip loop” all power cords emerging from your aquarium so that water that
may run down cords will not reach the outlet.
4. Regularly inspect all your electronic equipment to account for “salt creep” and
algae/sponge buildup.
4.0. eK Doser Set Up
4.1. Pairing
Once you have successfully logged into your eKoral account, you will need to pair your
eK Doser to your eKoral account using either your mobile phone or tablet. You can establish a
connection using online (Soft AP) or offline (Direct Connect) pairing.
4.1.1. Online Pairing (Soft AP)
When you are pairing your device to your eKoral account through Soft AP, you are
also configuring the WiFi on your eKoral device.
1. By clicking on the “+” button at the bottom of the screen it will allow you to select
which device you wish to pair. In this case, it is the eK Doser (Fig. 1 & 2, Pg. 9
).
2. To start connecting, follow the instructions shown on the app. Confirm the Status
LED is off and the WiFi LED is flashing. To activate Soft AP mode, press and hold
the reset button for 1 second, causing the WiFi LED to flash slowly. Once
complete, click “Next” (Fig. 3 & 4, Pg. 9
).
4

3. Connect your mobile device to the eK Doser’s built in network, shown on your
WiFi list as ‘eK-Doser-SERIAL NUMBER’.
4. Scan the QR code on the back of the device and wait for validation.
5. Name the device.
6. Select the WiFi network that the device will be connected to. Enter the correct
details and save.
4.1.2. Offline Pairing (Direct Connect)
When pairing with a device via Direct Connect, it is connecting to the device’s
local hotspot. This hotspot will always be formatted in the form [eK-Doser-SERIAL
NUMBER] on your mobile device’s WiFi list (e.g. eK-Doser-AHbAAA000).
In this situation, please note that your phone or tablet will not be connected to the
Internet and will therefore be unable to control the tank or receive notifications once out of
range of the eK Doser.
1. By clicking on the “+” button at the bottom of the screen, you will be able to select
which device you wish to pair. In this case, select the eK Doser (Fig. 1, pg. 10).
2. Select “Direct Connect” and follow the instructions shown on the app. Confirm the
Status LED is off and the WiFi LED is flashing.
3. Connect your mobile device to the eK Doser’s built in network, shown on your WiFi list
as ‘eK-Doser-SERIAL NUMBER’.
4. Scan QR code on the back of the device and wait for validation.
5. Name the device.
Complete.
Please Note: The default password for the eK Doser hotspot is “HieKoral”
(case-sensitive)
4.1.3 Troubleshooting
If you are having difficulty connecting your mobile device to your ekoral device,
the following steps are a workaround to re-establish connectivity.
1. Create a new mobile hotspot using your phone, and name it “mp”. Set the
password to be “ekoprosolutions”. On an Android device, you can name your
hotspot irrespective of your phone’s name. On an iOS (Apple) device, you will
have to rename your phone “mp” for this workaround to function as needed.
5

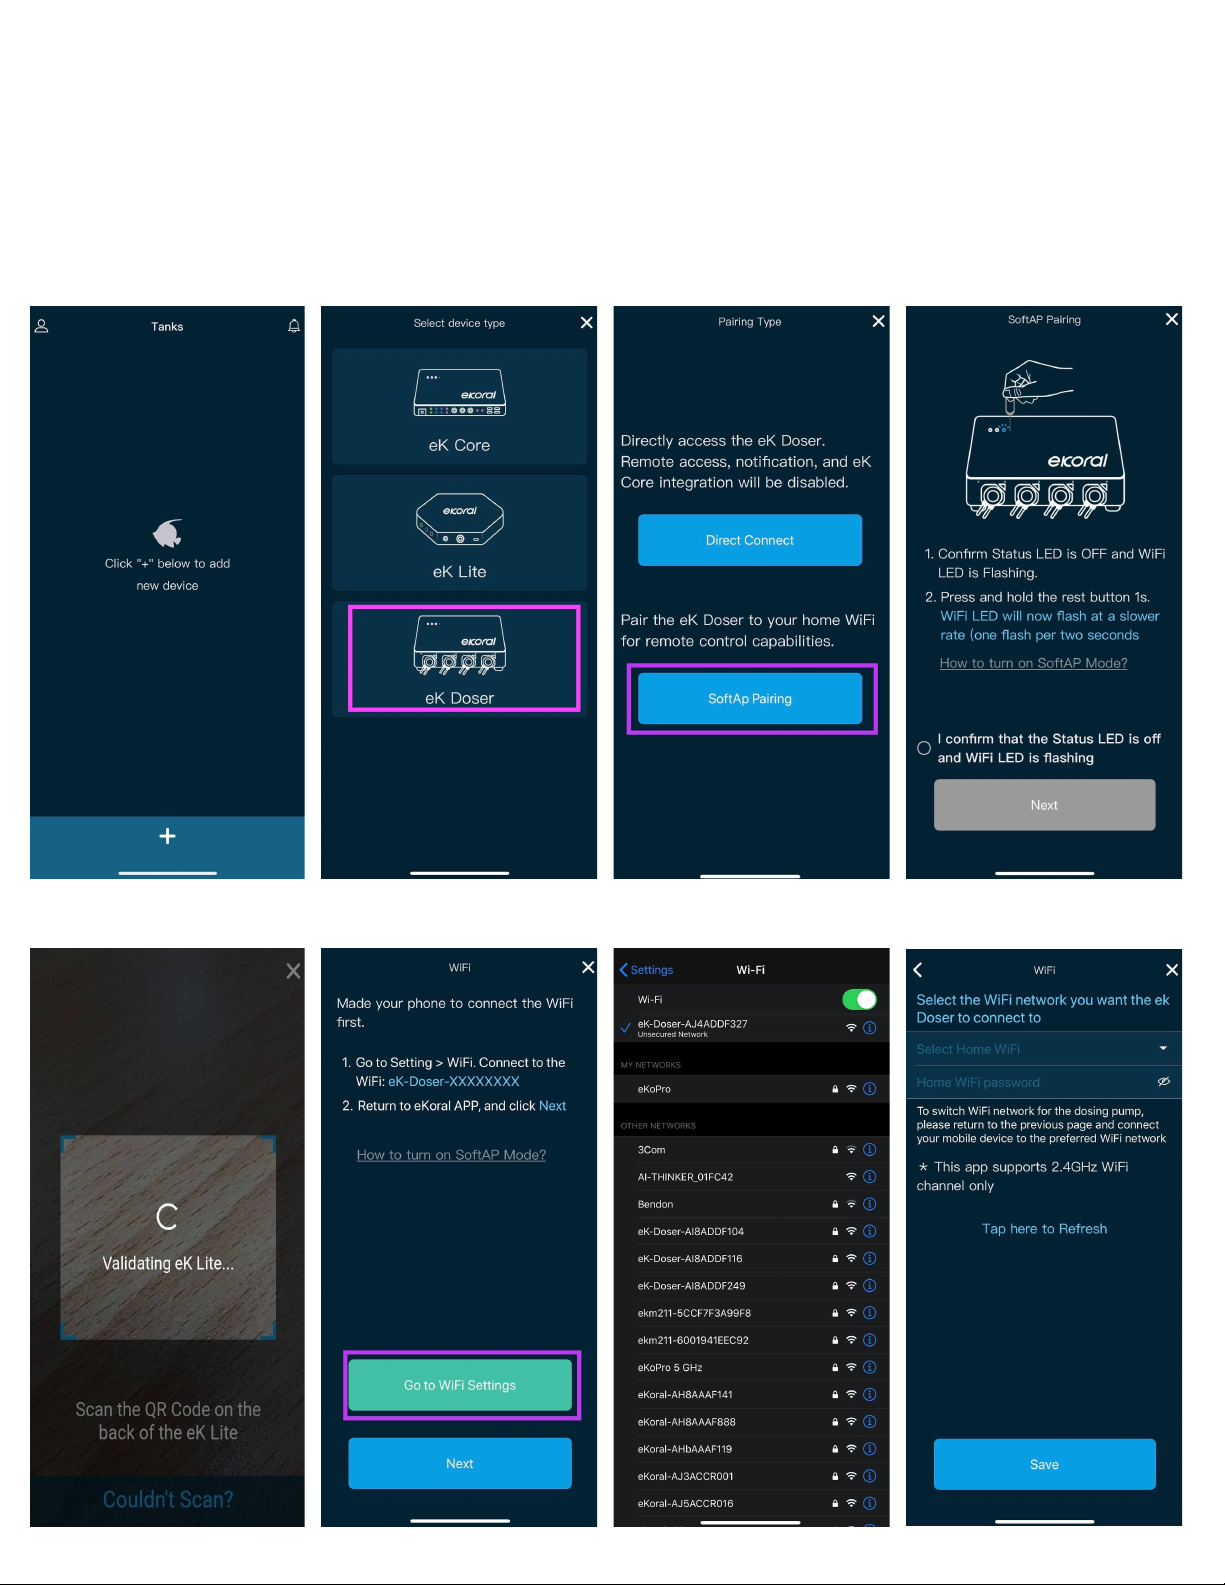
2. Access your eKoral device through the eKoral app. Select the “i” icon next to your
device name.
3. On the page that follows, select “Configure WiFi”. Proceed with onscreen
instructions to configure the WiFi to the “mp” hotspot you have just created.
Even when you are experiencing connectivity issues, this should allow your eKoral
device to come back online.
4.2. Calibration
You will need your graduated cylinder and your tubing to calibrate. Remember to ensure
that your connectors and tubing fit snugly before proceeding with the calibration (Fig. 1, pg. 11).
Your eK doser is capable of three dosing speeds (20-40mL/min). If you ever want to
change your dosing speed, you will need to recalibrate.
In order to ensure that the dosage is accurate, it is important to make sure that there is
liquid already within the tube. The app will prompt you to initiate a brief period of manual dosing
to ensure that this occurs.
You will be calibrating at your preferred dosing speed. The app will prompt you to initiate
a 10-second dosing period, after which you will be able to enter the amount dosed measured by
the graduated cylinder. Calibration is now complete.
5.0. If/Then Rules
Ensure you have other outlets connected to your eK Doser (e.g. the eK Lite, eK Core or
eK Power Lite). This feature can only be used on an eK Doser if it is connected to an
eKoral controller (e.g. the eK Lite or eK Core).
1. Select the “Rules” function on the homepage and then select “IF” (Fig. 1 & 2, pg. 12
).
2. Choose the device that the rule is attached to (e.g. eK Core). Then, you can decide which
parameter is the independent trigger (e.g. temperature or pH).
3. Select the “Then” tab. This is when you select the dependent clause--what will change
when the independent clause is triggered (e.g. the eK Power 6, the eK Doser, or any
associated eKoral Sync device). From the selection, choose the output (Fig. 6, Pg. 19)
.
4. Now add details to the IF/THEN rule--you can be as specific as you wish. After you finish,
click Save
.
5. You will then be prompted to set a lock time, which is an aspect of our “Fail-Safe”
feature. For more information on this feature, please refer to section 10.0 of the eKoral
Lite or eKoral Pro manual.
Please Note: Remember to check that you have activated the rule.
6

6.0. Schedule
6.1 eK Doser
1. After selecting the schedule tab, select the pump that the schedule will apply to and then
tap on the ‘+’ icon at the bottom of the page to start a new schedule.
2. Here you can select the amount of element you wish to dose into your tank for your
selected amount of time (Fig. 3 & 4, pg. 13
).
3. Choose a time frame you wish for the schedule to take place; ranging from anywhere between
12:00am and 11:59pm. You can preview your planned schedule before saving by tapping
“Start”.
4. Select the day(s) of the week you wish for this schedule to occur. This can be as many or as few
as you wish.
5. Select the delay protection time you prefer. Tap “Save” to finish the schedule (Fig. 7, pg. 13
).
Delay-Time Protection: The “Delay-Time” functionality delays both BEFORE and AFTER the dose
occurs. For example, if you set a 10-minute delay time on a dose, there will be a 10-minute delay
BEFORE the dose, and a 10-minute delay AFTER the dose, for a total of 20 minutes, in addition to the
time that the dosing takes.
If you dose frequently, we recommend that you account for this in your calculations.
7.0. Resetting your eK Doser
Attached to your system on delivery will be a reset pin. This is the piece of equipment that
enables you to reset the device (Fig. 1, pg. 8
).
1. Ensure that you want to reset your eK Doser before proceeding with this process. Once
it is done you cannot restore the settings back to their original state.
2. Get the reset pin and locate the reset hole on your device. On the eK Doser it is on the
top next to the Status LED light.
3. Press onto the reset pin for 10 seconds and wait for the WiFi and Status LED lights to
turn off and start flashing slowly.
4. If the lights are flashing quickly (once or twice per second), press down into the hole
again for 1-5 seconds, until the WiFi light starts flashing slowly (approximately every 2
seconds). It is now ready to pair again.
7

8.0 Connecting eKoral Sync Supported Third-Party Devices.
The eKoral sync program is an approval process that certifies third-party hardware that
has the capability to work flawlessly with the eKoral system. All approved products have to pass
a strict testing and validation process by eKoral engineers, and only the very best are certified as
eKoral sync approved products.
9.1. Identifying eKoral Sync products
All eKoral certified products come with an identifiable ‘’eKoral Sync’’ logo
attached to the product itself, the packaging or in the marketing materials (Fig. 1, pg. 15
).
9.2. Connecting an eKoral Sync device to your eKoral account
All eKoral Sync devices have their own entry in the “Devices” tab. Depending on
the type of device, adding your eKoral Sync device may require different navigation
routes.
9.0. Figures of Products:
1. Reset Pin
8

9.0. Figures of Products:
4.1.1. eK Doser (Soft AP) Pairing
9

4.1.1. eK Doser (Direct Connect) Pairing
10

4.2. eK Doser Calibration
11

5.0. If/Then Rules
12

6.1. eK Doser Schedule
13

8.0. Resetting eK Doser
14

10.1. Identifying eKoral Sync Products
15
Table of contents
Other eKoral Aquarium manuals
Popular Aquarium manuals by other brands

TMC Aquarium
TMC Aquarium 5249-L instructions

Dennerle
Dennerle Nano Cube 10 quick start guide

TMC Aquarium
TMC Aquarium V2 PowerPump Instructions for installation and use

D-D The Aquarium Solution
D-D The Aquarium Solution H2Ocean COMPACT ATO Product user manual

velda
velda Fish Feeder Easy manual

AutoAqua
AutoAqua Smart ATO micro SATO-120P manual