Elan PG-300W-IP User manual

USER MANUAL
PG-300W-IP

FOREWORD
Thank you for choosing our PG-300W-IP, which is the latest high-quality
beam light.It is much lighter and more convenient in the same power with the
perfect combination of international advanced electronic control technology and
excellent humanized industrial design. It fully complies with the CE standard
and supports the international DMX512 signal control mode.
The model is fitted with 300w LED light source, with strong light effect, large
angle water streak effect, and clear gobo. Meanwhile it is with 6 colors+ open
color wheel, prism+ water streak, and zoom function.
It is widely used in building, bridge, theme park, monument, landscape, night
clubs or exhibition, performances and other professional places.

CATALOG
1. SAFETY INSTRUCTIONS---------------------------------------------------------------------4
2. TECHNICAL PARAMETERS------------------------------------------------------------------5
3. SCHEMATIC LIGHTING COMPONENTS --------------------------------------------------6
4. PACKING AND SHIPPING------------------------------------------------------------------7-8
5.SAFETY STANDARD-------------------------------------------------------------------------8-10
6. POWER CONNECTION-----------------------------------------------------------------------11
7. LED CHIP ---------------------------------------------------------------------------------------11
8.FUNCTIONS--------------------------------------------------------------------------------11-12
9.LCD DISPLAY-------------------------------------------------------------------------------13-15
10.CHANNELS -------------------------------------------------------------------------------16-17
11. TROUBLE SHOOTING & SOLUTION-----------------------------------------------------18
12. FIXTURE CLEANING ------------------------------------------------------------------------18

1. SAFETY INSTRUCTIONS
Before using this product, please carefully observe the product is not unwrapped or damage during
transport. In case of damage caused by transportation, please do not use this lamp, and as soon as
possible contact your dealer or manufacturer.
Before turning on the product, ensure that the voltage and hertz to meet the requirements of this product.
It is very important, connecting the ground wire to avoid electric shock.
This product is for dry indoor environments.
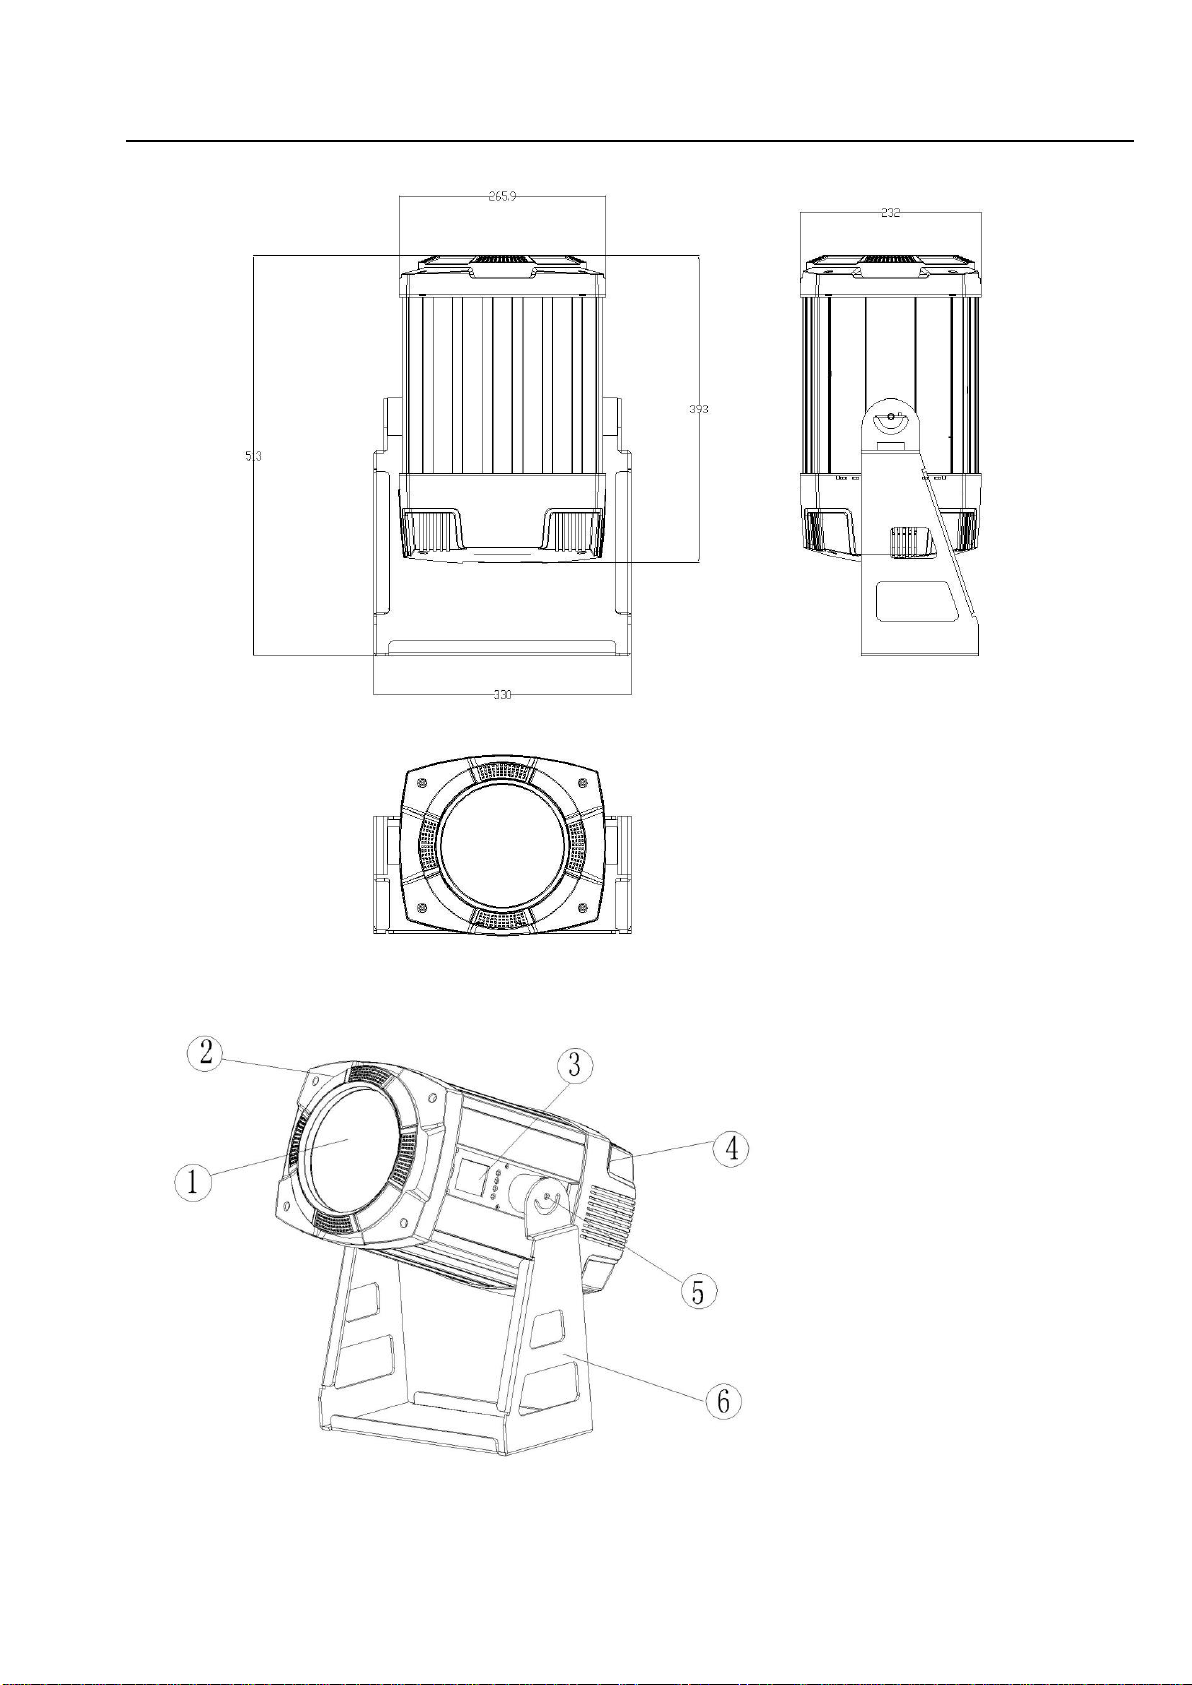
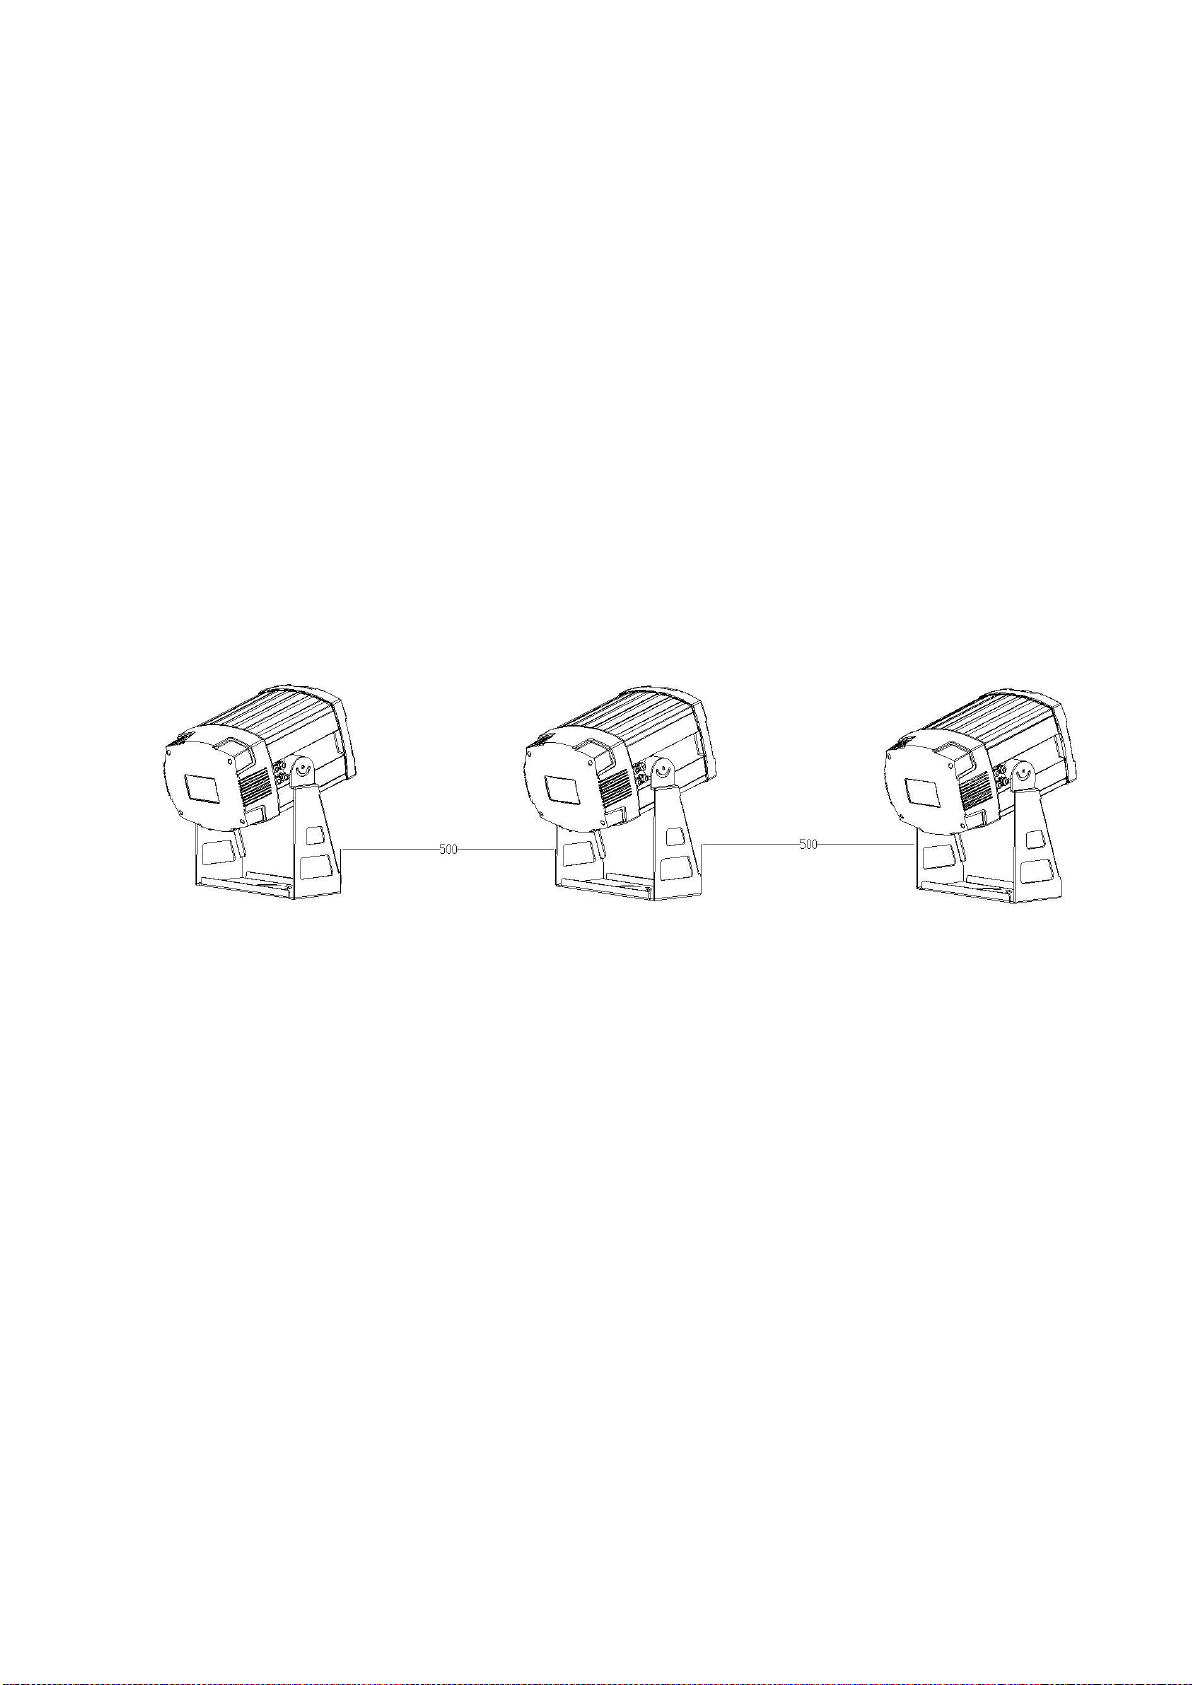
This product must be installed on the sufficient space, adjacent to interface the shortest distance of 50cm,
to ensure that the lights will not crash each other.
Before moving or repairing the product, please unplug the power.
When it working, ensure that no inflammable and explosive near objects.
When installing this product, please use the safety rope. When handling this product, lift the armrest
base, rather than the lamp body.
The product is suitable for a maximum temperature of 40 degrees Celsius, when the surrounding
environment is higher than 40 degrees Celsius. Please do not use this product.
Do not touch. In operation, the product running very fast, to prevent bumps hands.
If there is a problem with the operation during the show, the lighting should be stopped immediately. Do
not perform repairs, damage or repairs that may occur during maintenance. Please contact the company's
service point for repair. Use the same model of accessories during the repair process.
During the repair process, use the same type of accessories.
Please carefully read the instructions, this guide consists of important information about installation, use
and maintenance.
Please read this manual, especially regarding the installation, use, maintenance parts. It is important that
the moving head light must have anti-vibration protection carton or flight case during transportation.
Please carefully read the instructions, this guide consists of
Important information about installation, use and maintenance

2. TECHNICAL PARAMETERS
DMX Channel:15CHs
Control Mode:DMX512
LED LCD Display + Press Button
Source: 300W LED Light Source
Color temperature is 7000K, life span is 20000Hs
6 Colors+ Open, Semi Color Effect
Prism: 8-Facet Rotating Prism
Optical lens: High precision glued optical lens combination
Zoom: Linear Zoom
Focus: Linear Focus
Dimmer: 0-100% Linear Dimmer Adjustment
Beam: 11-46°
Strobe: Electronic strobe (0.3-25FPS)
Motors: 8pcs super mute sound motors
Housing: High temperature resistant alloy plastic + plastic handle
IP Rate: IP66
Weight:12KG
Size: 330*232*513mm

3. Schematic Lighting Components
1. dustproof tempered glass 2. head cover 3. display 4. head back cover 5. twist 6.
body trestle

4.Packing and Shipping
4.1 Packing Material and Accessories
PG-300W-IP is packaged by carton or standard 2in1 flight case (Other options are the 1in1 flight
case and 4in1 flight case). Random accessories items as shown below.
Item
Quantity
Unit
User Manual
1
Piece
Signal Line
1
Piece
Safety Rope
1
Piece
Bracket+ Clamp
2
Piece
Power Line
1
Piece
4.2 Packing
1. Power off to let the lamp cool completely before packaging equipment at least 15
minutes or more.
2. Lock the light protection locks when cleaning the surface of the light.
3. Use the packing bag to cover the light, seize the aluminum handle on both sides of the
equipment and put it upside down and put it into the box gently.
4. Add lighting accessories after putting the light into packing box.
5. It’s only up to two crates stacked and is prohibited upside down.
4.3 Unpacking
1. Open the packing box and packing bag.
2. Seizing the equipment’s handles, lifting and carrying away the light from the packing box or opening
the flight case cover placing lift boom close to the light base, then equipping light hook on light base
bottom tightening quick Install locks. At last rising away boom to the top of the lamp from flight case,
put the flight case away.
3.Check if the lamp body break obviously because of transportation before the fixture is powered on.

Note:
5. Safety Standard
Users should ensure that light and installation materials are checked for regular safety checks.
Unprofessional incorrect installation can lead to dangerous, if the lack of working conditions and
professional standards, please operate the light by professionals.
Do not use the light if the working temperature isn’t 0-40 degrees Celsius. Don’t stand directly
under the light when the light is installed, dismantled, moved or serviced. The operator must ensure that
the fixtures are securely connected. Installing the light after professionals approving electrical
parameters make sure that these installation must be checked at least once per year by experts.
5. Safety Standard
5.1 Hook Clamp Installation
PG-300W-IP light could be placed on the stage or on a stand in any direction,quick lock system
can quickly and easily remove or install a light hook.
Note:
5.2 Fixing Equipment
1.Before installing fixtures must verified rigging equipment is not damaged, and can bear at least 10
times of light’s weight. Check the building can be bore at least 10 times of total weights of light, fixture,
and cable accessories.
2. Insert the locked hook fastener into base mounting holes horizontally, grab the handle clockwise 90
degrees fasteners, in the same way to install a second fastener, make sure the fastener is fastened under
the light base.
3. If truss can be lifted the equipment can be directly clamped from flight case and locked fixture base.
Then hung on the light and fixed it. Before rising the light to right height, connect the power line and
signal line.
Note: add a safety rope attached the light's base insurance shelf, do not connect the device handle.
Upon receipt of lamps, please check if there is damage to the fold
closure caused by transport, where there is transportation damage,
please do not use this fixture, and contact us as soon as possible.
Two fixtures must be used to secure the device and tighten the clamp with
a 1/4 button. Only the 90°clockwise rotation can lock the fastener.

Note 1:
add a safety rope attached the light's base insurance shelf, do not connect
the device handle.
Note 2: Lights be placed vertically upward, the shortest distance between working
lights must be more than or equal 500mm, lighting installation layout as follow.
5.3 Data cable
Data cable is DMX512 signal.
Caution: Signal line connections is X-type connector.
X-type connector-----If the external flexible cable or cord of this light is damaged, please replace
professional cable or cord from the manufacture or its agent.
Lights’ DMX input and output connects to a 3&5pin XLR, first pin is grounded, then negative signal is
second pin, third pin connects to the positive polarity signal, the fourth and fifth is empty.
In order to prevent reception reflection and interference control signal, a terminal plug must be installed
on the first branch of the connected device last 3-pin output jack.

The controller connects to the nearest input XLR 3-pin, then from the output of the device connects to
the input of the next device, continuous connection one by one, the final output data cable terminal
equipment plug one end into the terminal.
If the signal transmission is long-distance, 512 signal amplifier must be added. DMX512 signal
controller connect to the input of the amplifier first, then connect to the fixture from its output, couple
with the terminal plug last.
Caution:
1. Do not use two separate output connections. To connect the branch, a
separating consecutive DMX512 signal amplifier must be used to separate.
2. Please use the specialized DMX512 shielded twisted-pair cable. Standard
microphone cables can not be reliably controlled long-distance data.

6. Power Connection
If the external flexible cable or cord of this light is damaged, please contact the manufacturer or its
agent or a similar qualified person to replace, in order to avoid danger.
Connect the power supply personnel must have the appropriate qualifications before proceeding, you
must make sure you are using the power supply voltage matches the voltage identified and have
overload or leakage protection. Directly connect the device to the power supply, do not connect to the
silicon box dimming system, otherwise damage to the equipment.
7. LED Chip
PG-300W-IP uses domestic top LED 300W light source, this LED light source + concentrator
integrated light source provides a very stable color temperature at 7000K, color rendering index is
greater than 96, and average life is more than 20,000 hours (according to leds Relevant use
environment)
Note:
1. Please do not install other similar led light source, otherwise it will cause safety hazards or damage
the equipment.
2. To reduce the risk of damage to the light, replace the LED Chip before it exceeds the life of the
lamp.
3. It is forbidden to use damaged LED Chip
8.FUNCTIONS
8.1 water gobo wheel
A water gobo wheel and a water droplet wheel combines to create a dynamic and static effect of the
water ripple.
8.2 rotating gobo wheel
6 customed gobos with dynamic rotating effects

8.3 Color Wheel
The color wheel consists of 6 fixed colors of high standard. Users can easily choose the color they like
and create a perfect lighting effect. At the same time, it can be used with the water gobo wheel, to have a
better effect. Colors can be customed.
8.4 Optical Lens
Two high-precision motors are used to drive the belt to work synchronously, and the optical lens is
quickly adjusted to complete the water streak sharpness and gobo zooming function.
8.5 Prism
The prism wheel is equipped with 8 or 16 facet prism , which can be rotated clockwise and
counterclockwise at adjustable speed.
The color and water streak can be combined to create a variety of beautiful lighting effects.
8.6 dimming and strobe
0-100% linear electronic dimming, instant switching, stroboscopic speed can be adjusted freely, up to
25 times / sec, with special function of random strobe.

9. LCD Display
Menu Setting
Buttons:
FUNC(Select)(Confirm)、UP(Last one)、 DOWN(Next one)、ESC(Exit/Return)
Main Menu:
1. DMX Address:01-512
2. Channel Mode:15
3. Reset
1. Power on/off
YES/NO
1. Pan/Tilt
2. Color
3. Gobo
4. Dimmer
5. Zoom/Prism
4. Operation(DMX0)
1. DMX
2. Auto 1
3. Auto 2
5. Manual Control
1. Color
0-255
2. Prism
0-255
3. Focus
0-255
4. Shutter
0-255
5. Dimmer
0-255
6. Prism/Rotating
7. Water Effect Gobo 1
8. Water Effect Gobo 1
9. Automatic back to homepage after 30 seconds
6. Operation Settings
1. Dimmer Curve:S
Curve
1. Straight Line
2. Flat
3.
4. S Curve
5.

6. Master-slave Mode:
Auxiliary Machine
Main Machine
7. Playing Scene
0-23
Scene 1
0-22
Scene 2
0-22
Scene 3
0-22
Scene 4
0-22
Scene 5
0-22
Scene 6
0-22
Scene 7
0-22
Scene 8
0-22
Return
0-22
8. Editing Scene
1. Scenes No.
00-22
2. Step No.
00-29
3. Editing
Scene
Time
000-255
Channels
0-10
000-255
Return
9. Switching
1. Color
YES/NO
2.Gobo
YES/NO
3.Prism
YES/NO
Return
10. Adjustment Shutter
YES/NO
11. Linear Adjustment Color
YES/NO
Return
7. Display Settings
1. Sleep
30 seconds
2 seconds
10 seconds
No Sleep
2.luminance
1―10
3. Reverse display
YES/NO
4.Signal light
Auto/On
Return
8. Advanced Setup
1. Fine Adjustment(Value: 576)
2. Factory Setting
3. Copy of Fine Adjustment Info and Recover
4. No DMX
5. Prism Setting
YES/NO
6. Advanced functional channel
YES/NO

7. Fan’s Speed
Auto/Full Speed
8. Language
1. Chinese
2. English
3、Espanol(Spanish)
9. Logo Showed
YES/NO
10. Clear Lamp On times
Confirm
Cancel
11. Factory Reset
Confirm
Cancel
12. Continue
Electronic
Ballast
YES/NO
Effect
YES/NO
Water effect
plate
YES/NO
Return
13. Clear Programming Set
Confirm
Cancel
Return
9. Information
1. DMX
2. Status
3. Lamp on times
4. Error Information
5. Time Remaining(Hour): Infinite
6. Security Setting 3.0
7. Testing Mode
Return

10. Channels
Channel
13 Channel
Value
Function
1
Color
0……7
Color film 0(white)
8-……15
white +red(Semi color)
16……23
red
24……31
red+ Orange(Semi color)
32……39
Orange
40……47
Orange +yellow (Semi
color)
48……55
yellow
56……63
yellow+green(Semi color)
64……71
green
72……79
green+blue
80……87
blue
88……95
yellow + Warming color
film
96……103
Warming
104……111
Warming +white
112……127
Color film 0(white)
128……191
anticlockwise from fast to
slow
192……255
ticlockwise from slow to
fast
2
Shutter
0……2
Power off
3……7
Power on
8……97
Shutter from slow to fast
98……101
Light off
102……126
Open pulse shuttle from fast
to slow
127……151
Off pulse shutter from fast
to slow
152……155
Power on
156……180
random Open pulse shuttle
from fast to slow
181……205
Random closed pulse
shuttle from fast to slow
206……209
Power on
210……249
Random shutter from fast
to slow
250……255
Power on
3
Dimmer
0……2
Power off
3……255
Dimmer
4
Gobo
0……7
Photo 0(white)
8…15
Photo1
16……23
Photo2
24……31
Photo3
32……39
Photo4
40……47
Photo5
48……55
Photo6
56……63
Photo 0(Open)

64……95
anticlockwise
96……127
clockwise
128……143
Photo 1 shake from slow to
fast
144……159
Photo 2 move from to fast
160……175
Photo 3 move from slow to
fast
176……191
Photo 4 move from slow to
fast
192……207
Photo 5 move from slow to
fast
208……223
Photo 6 move from slow to
fast
224……255
Photo 0(open)
5
Gobo Rotation
0……63
Rotate 360 angle
64……127
clockwise from fast to
slow
128……191
Anticlockwise Rotate
192……255
Rotate back and forth
6
Streak1
64……127
clockwise Rotate from slow
to fast
128……191
Anticlockwise Rotate from
fast to slow
192……255
Positive and negative
reversal from slow to fast
7
Streak2
64……127
Positive reversal from slow
to fast
128……191
Positive and negative
reversal from fast to slow
192……255
Positive and negative
reversal from slow to fast
8
PRISM
0……127
empty
128……255
PRISM
9
PRISM Rot prism
rotating
0……63
prism rotating 0-720dgree
64……127
prism Positive from fast to
slow
128……191
Prism negative reversal
from slow to fast
192……255
prism Positive and negative
reversal from slow to fast
10
focuse
0……255
focuse
11
focuse ROT
0……255
Fine Focuse
12
zoom
0……255
Zoom
13
Fine zoom
0……255
Fine zoom
14
Macro function
0……31
Streak1+ Streak2
32……63
Streak 1+prism +prism
rotating
64……95
Streak2+ prism + prism
rotating
96……127
photo+ Streak 二+prism+
prism rotating
128……159
……

160……191
……
192……223
……
224……255
……
15
fanction
Reset
164--191
Auto
11. Trouble Shooting
Listed below are a few common problems that you may encounter, with solutions.
◇Unit does not work, no light output and the fan does not work;
1. Check the power connection and main fuse.
2. Be sure the voltage of the connector.
◇Not responding to DMX Control;
1. After connecting the controller, the lamp should be working. If it does not work properly, please
check if the signal plug and power cable is connected correctly.
2. If the DMX LED is on and no response to the channel, check the address settings and the polarity
of DMX output voltage.
3. If the signal of the product is unstable, please check the input terminal and circuit boards.
4. Try using another DMX controller.
5. Check to see if the DMX cables run near or run alongside to high voltage cable. It may cause
damage or interference to DMX interface circuit.
◇One of the channels is not working:
1. The stepper motor might be damaged or the cable connected to the PCB is broken.
2. The motor’s drive IC on the PCB might be out of condition.
12. FIXTURE CLEANING
The cleaning of internal and external optical lenses and/or mirrors must be carried out periodically to
optimize light output.
Cleaning frequency depends on the environment in which the fixture operates: damp, smoky or
particularly dirty surrounding can cause greater accumulation of dirt on the unit’s optics.
Clean with soft cloth using normal glass cleaning fluid.
Always dry the parts carefully.
Clean the external optics at least every 20 days. Clean the internal
optics at least every 30/60 days.
Clean the fans on the head and base every 20 days.
Disconnect the fixture before clear.
Table of contents
Other Elan Dj Equipment manuals

Elan
Elan SPIDER WHITE User manual

Elan
Elan STROBE-400-LEDMINI-RGB User manual

Elan
Elan CABLED 1915Z User manual

Elan
Elan CAB-330-MULTI User manual

Elan
Elan PSD-63-IP User manual

Elan
Elan PAR 64 LONG User manual

Elan
Elan PSD-1415-IP User manual

Elan
Elan CABLED R-W-S User manual

Elan
Elan CABLED-60-BEAM-Z-FPTR User manual

Elan
Elan PSD-67-IP-WIRELESS User manual