Elastocon Cell Ageing Oven EB 36 User manual

Manual
Cell Ageing Oven EB 36
© 2021, Elastocon AB, SWEDEN
Contents
1. Setting up the Cell Ageing Oven p. 2
2. Running the Cell Ageing Oven p. 2
3. Programming of cycling temperatures p. 9
4. Temperature calibration p. 17
5. Service and maintenance p. 17
6. Troubleshooting p. 17
7. Safety p. 17
8. Technicalspecication p. 18
Technical documentation supplied
on USB flash drive
ma-eb36_01_2110
Elastocon AB •Tvinnargatan 25 •SE-507 30 Brämhult •Sweden
2
Elastocon Manual – Cell Ageing Oven EB 36
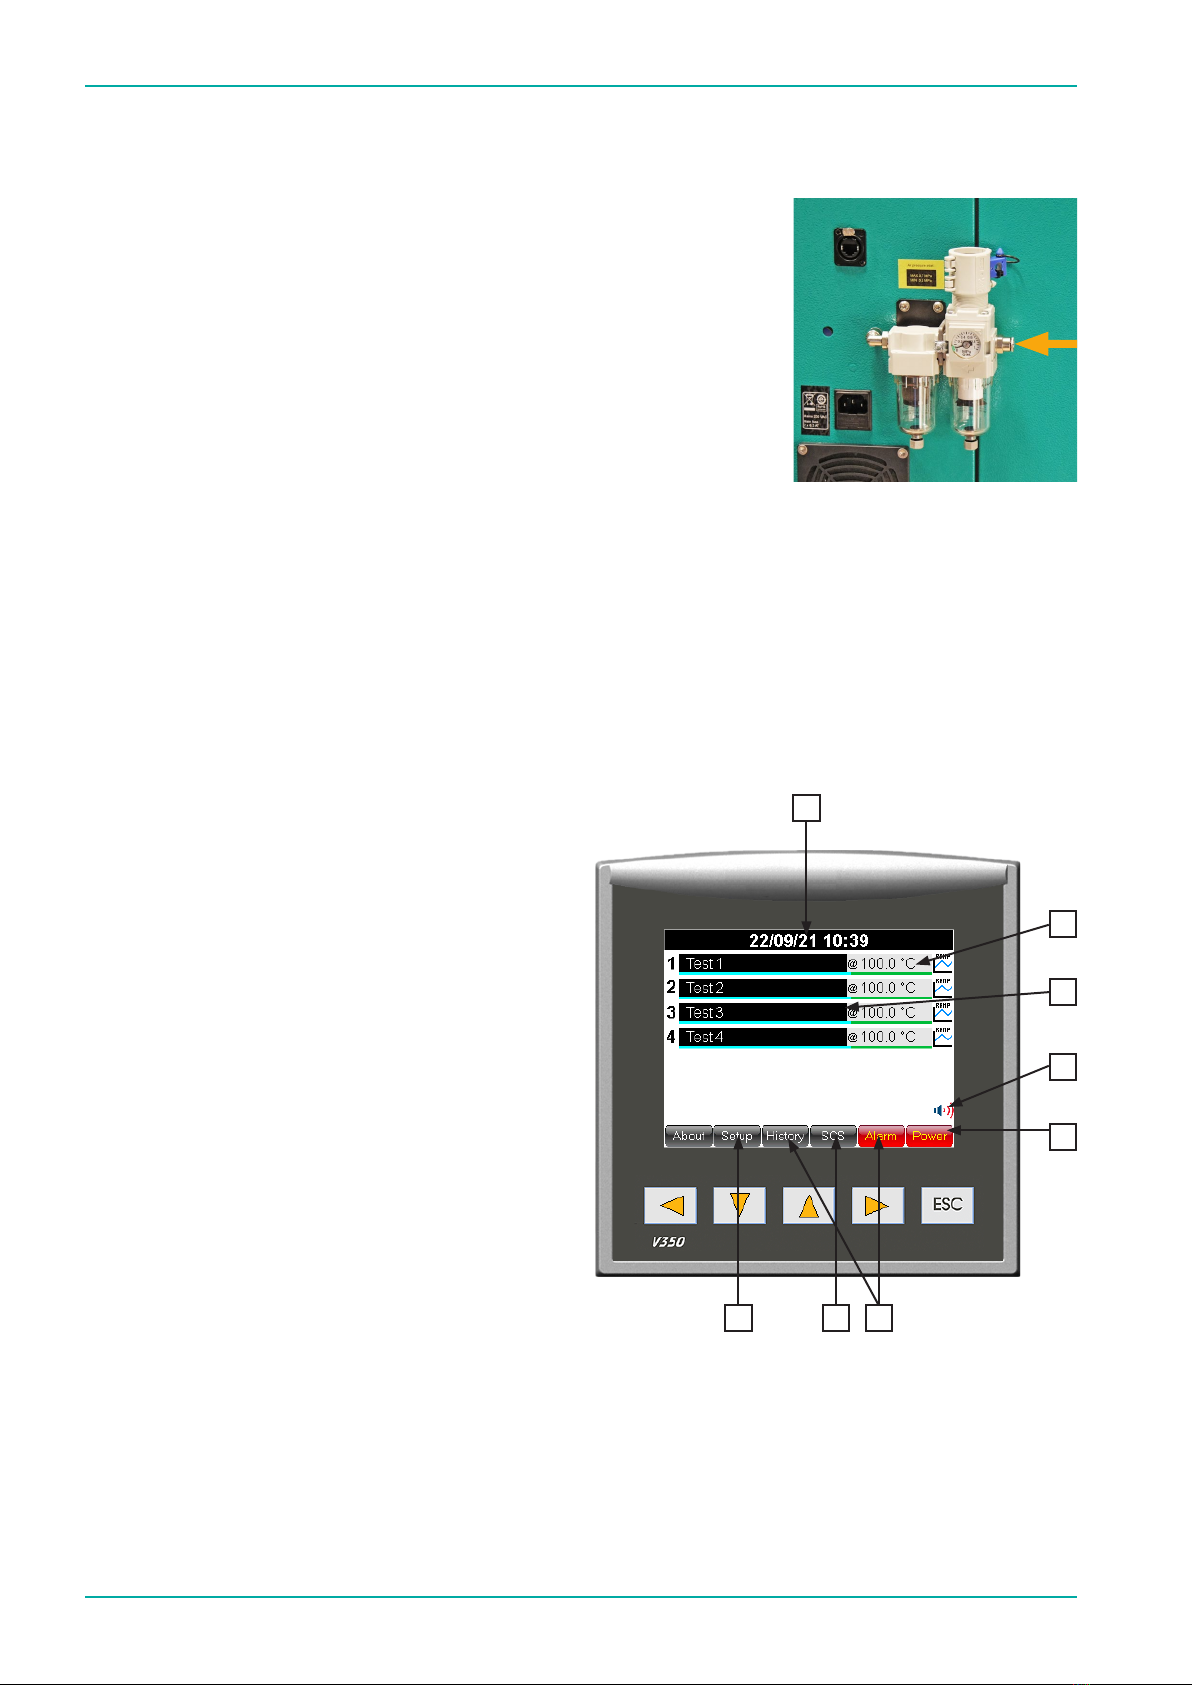
1. Setting up the Cell Ageing Oven
Place the ageing oven on a stable and horizontal bench.
Connect the oven to a grounded mains outlet, according to the type label on
the oven. We recommend the use of an Earth Leakage Detector.
The oven should be connected to a compressed air supply of 5 to 7 bar for the
air exchange. The connector on the oven is found on the back of the oven.
Connect it with a 6 mm hose for compressed air with a push in connector.
Astandardparticlelterandwatertrapshouldbeinstalledbeforetheoven
connection.Thisltershouldbeinspectedregularlyanddrainedforwater.
Therearetwoparticleltersonthebackoftheoven,onenelterwitha
pressurecontrollersetat1bar,andonesub-microlterwithwatertraps.
Theseltersshouldbeinspectedannually.
2. Running the Cell Ageing Oven
2.1 Starting
Switch on the power (red switch).
Reset the power failure and alarm, see 2.2.3 and 2.2.5.
Set the temperature and test time on the PLC, see 2.2.1.
2.2 Settings
Explanation
1. Date & time
2. Temperature set for this cell
3. Test name
4. Alarm Buzzer on or off
5. Power Failure
6. Alarm and History – tap this symbol
and the alarm history will be visible
on the PLC screen
7. SCS – multiple cells will be shown as slides
shifting in a sequence with enlarged displays
8. Set up for
•date&time
•communicationwithsoftware
•calibrationoffset
The oven has a touch controlled screen. A touch pen will be included.
Note: Do not use sharp objects to touch the screen.
This can cause damage on the screen.
8
4
3
2
5
1
67
Figure 1 – The arrow marks the
connection for compressed air
supply, which is found on the back
of the oven.

3
Elastocon Manual – Cell Ageing Oven EB 36
2.2.1 Temperature and test time setting
Tap on the temperature actual value to set the test
temperature,seegure2.2.1.a.
On the next screen tap on the set value box on the rigth side
of the SetTtext,seegure2.2.1.b.
Anumerickeyboardwillshow(seegure2.2.1.c).Typein
thesettemperaturewiththenumerickeyboardandnish
with a tap on the return button.
Whilestillonthisscreen(seegure2.2.1.d),thetesttime
can also be set in hours and minutes and the test time
started to count down.
Hoursandminutesareseparatedintwodierentboxes.
Tollinthehourstapintheboxontherightsideofthetext
Test time [xxxx h].
A numeric keyboard will show. Type in the time in hours
followed by a tap on the return button.
To set the test time minutes repeat the same proceedure but
instead of a tap on the xxxxh box, tap on the xxxxm box
To start the test time count down at this point, tap on the
hour glass symbol.
The time will now start countdown. This time can
only be changed when the hour glass symbol to the
right is stopped. To stop the test time count down,
tap and hold the hour glass symbol pressed for >3 seconds.
A stopped test time count down will indicate with a red
stretch over the hour glass symbol.
When the test time is stopped the test time in hours and
minutes can now be changed.
The count down time can be stopped and started at any time.
The test time will return to the last time entered every time
the test time is stopped.
Figure 2.2.1.a – Temperature setting.
Figure 2.2.1.b – Temperature setting.
Figure 2.2.1.c – Temperature setting.
Figure 2.2.1.d – Test time.

4
Elastocon Manual – Cell Ageing Oven EB 36
2.2.2 Test name
Fromthemainscreen,taponthenameeldthat
correspondstotheovencellchannel(seegure2.2.2.a).
Type the test name from the touch screen keyboard (see
gure2.2.2.b). One test name row on the screen can hold up
to 40 characters.
1. Use the white arrow buttons on the upper left corner to
swapbetweendierentkeyboardcharacterlayouts.
2. Tap on the Enterbuttontonalizethetestnameinput.
3. To re-enter any character on the same test name row,
it is possible to correct any character in the test name with
a tap on any of the white left or right arrow buttons in the
lower left and right corner on the screen.
4. To cancel any input changes, tap on the ESC button and
return to the previous screen.
2.2.3 Power failure
Power failure during a test
If the test time is running when a power failure occurs, the
oven temperature and test time counters will continue from
the time when the power failure occurred, when the power is
resumed.
Power failure indicator
When the power is resumed after a power failure during
a test with temperature control at set point and test timer
running, the screen will lit up a power failure button.
Tap on the Power Failure button to see more information
andtoresetthepowerfailure,seegure2.2.3.a.
Anewscreenwillshow,seegure2.2.3.b.
This feature will give the operator information about
duration of the power failure and temperature deviation
caused by the power failure. The power failure button will
remain until the button Clear & Exit is tapped.
2.2.4 Set up screen (user)
Password
A password is needed to enter the set up mode.
Tap on the Setup button on the main screen to enter the
passwordscreenforsetup,seegure2.2.4.a.
Default password is: 1111
Figure 2.2.3.a – Power failure.
Figure 2.2.3b – Power failure.
Figure 2.2.4.a – Password.
Figure 2.2.2.a – Test name.
Figure 2.2.2.b – Test name.
5
Elastocon Manual – Cell Ageing Oven EB 36
IP-address
In the Set up mode an IP-address can be typed in to establish
a communication with a PC-software e.g. monitoring
program. Tap on the IP-addr.eldtoenteranIP-address,
seegure2.2.4.b.
The IP-addr.eldisdividedintosmallerelds.
Theovenmainpowermustbeswitchedoandon(restart)
for the IP settings to refresh and initiate.
Temperature offset
Inthesetupmodetheosetisadjustedaccordingto
calibration. When a re-calibration is done, values may have
to be adjusted again.
Anindividualosetvaluecanbeaddedtoboththe
temperature-indicator and -controller.
Standby temperature
The operator can in this Set up also preset a standby
temperature. That means when the test timer has reached
0:00, the oven will be set to this pre-set temperature. To
access the standby temperature setting, tap on the control
box below Stdby,seegure2.2.4.c.
A zero value in this control means that it is not active and
after the test timer timeup the oven will remain at the same
temperature as during the test.
A higher value than zero represents the temperature
set value. Eg. if the operator sets the standby control to 30,
the oven will go to 30 °C after the test time has reached the
end.Minimumsetvalue(SV)fortheovenis30°C,seegure
2.2.4.d.
Theovenhasnocooling.Thetemperaturewilljustcoolo
naturally. The cooling time depends on the room ambient
temperature.
Real time clock
Tap on the real time clock control to set time and date,
seegure2.2.4.e.
This is the system time and date and this time/date stamp
will be included to all alarm and time critical information
visible on the screen.
Use the numeric keyboard to set a new time and date.
Figure 2.2.4.b – IP-address.
Figure 2.2.4.c – Standby temperature.
Figure 2.2.4.d – Standby temperature.
Figure 2.2.4.e – Real time clock

6
Elastocon Manual – Cell Ageing Oven EB 36
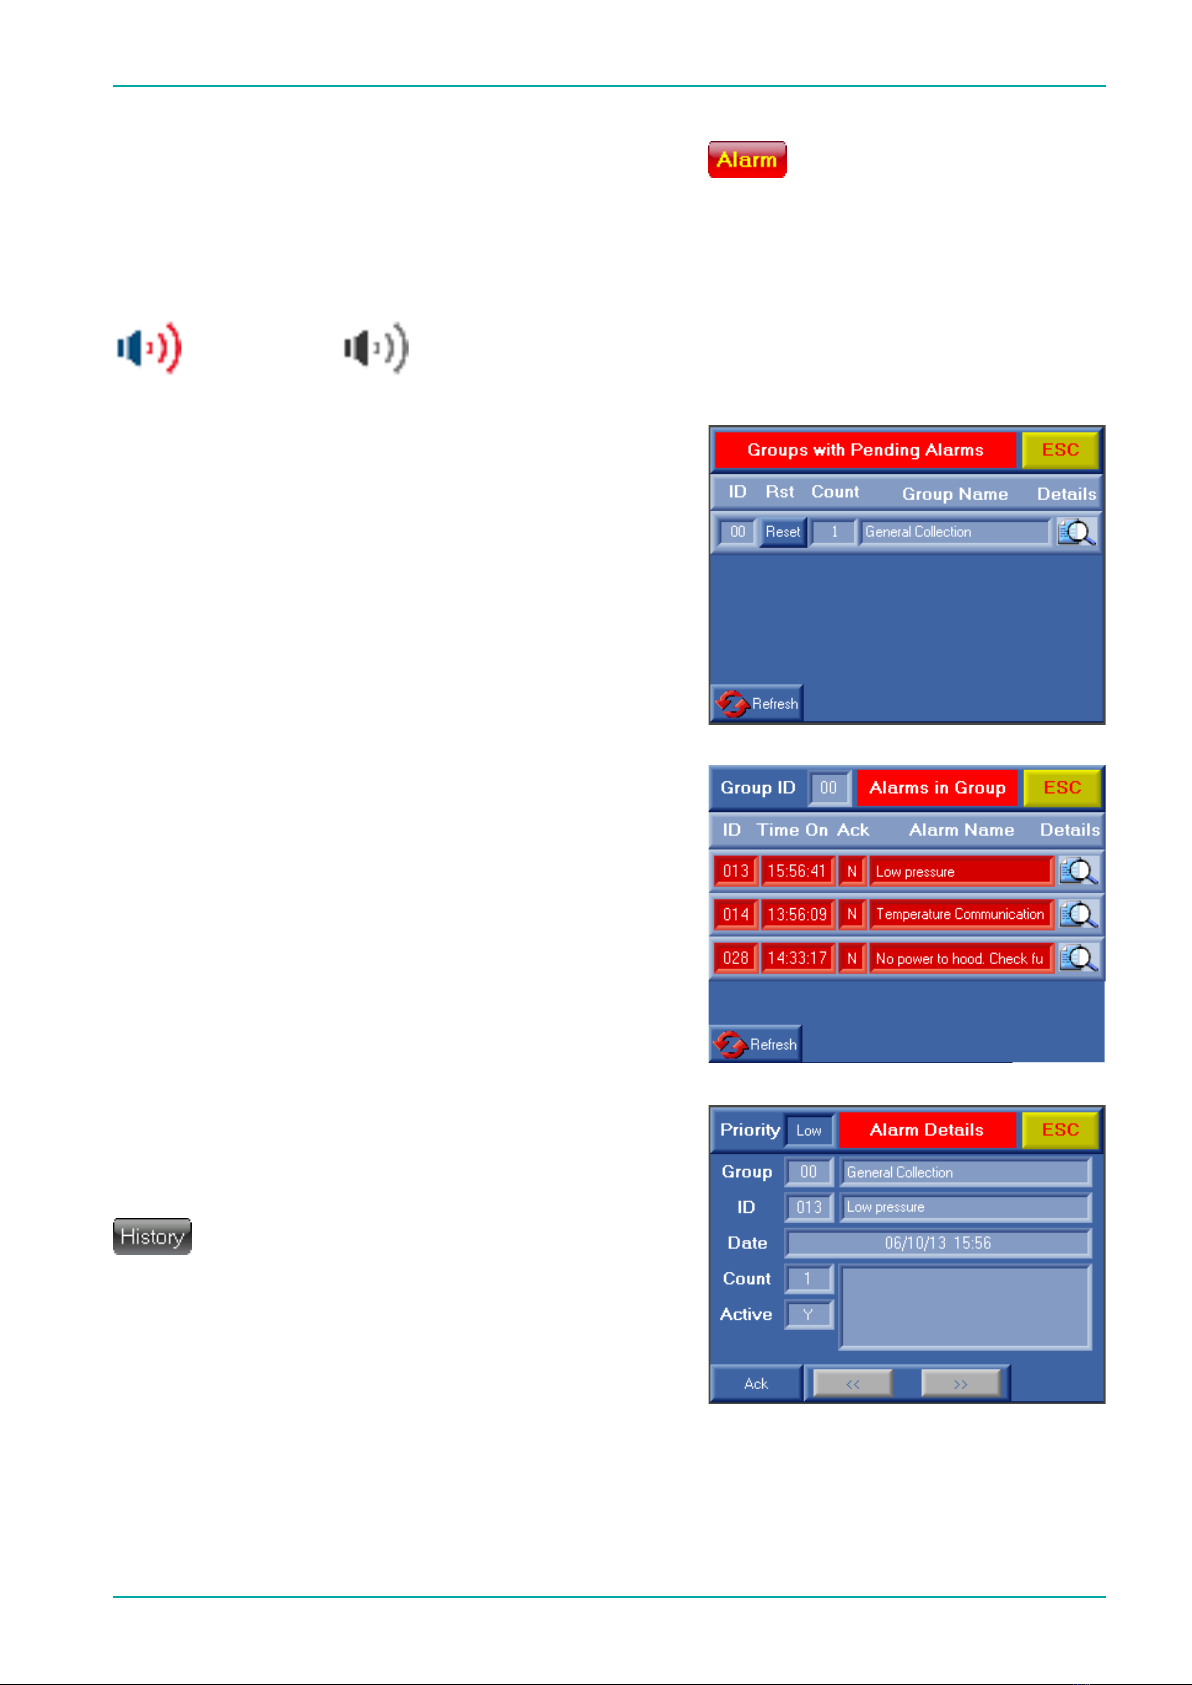
2.2.5 Alarm
Alarm is activated at:
•hightemperatureinthetestchamber,+1°Cfromsetvalue
•lowtemperatureinthetestchamber,-1°Cfromsetvalue
•hightemperatureofthecontroller,+5°Cfromsetvalue1)
1) This alarm will be reset automatically when the temperature is within tolerance from set value again.
Error code Problem cause Remedy
001–006 Oven cell is too warm. The alarm will be reset when the alarm
Cell 1–6 has been acknowledged and the cell
has cooled down.
007–012 Temperaturedierencebetween Waituntilthetemperatureiswithin
Cell 1–6 set value and process value ± 1 °C. range to acknowledge the alarm.
013 Lowpressurefromairpump. Checktheairpumplterandfunction.
014 Shinko Communication Timeout. Contact support.
015 Low battery. Replace backup battery in OPLC
(contact support).
016–021 Loop break controller #. Broken temperatur sensor,
Cell 1–6 call for service.
022–027 Temperaturedierence Acknowledgethealarm.
Cell 1–6 between set value of controller When temperature is within range
andactualvalue+5°C. thealarmwillbereset.Ifthealarm
is not reset contact support.
Coloured lines on PV and SV display indicates alarm status.
•AredlineabovePVdisplay=PVtemperaturediers+1°CfromSVtemperature.
•AlightbluelinebelowPV=PVtemperaturesdiers-1°CfromSVtemperature.
•AredlineaboveSV=SVdiers+5°Cfromactualcontrollertemperature.
•AgreenlinebelowSV=PVtemperatureiswithin±1°CfromSVtemperature.
SV temp. di. alarm to general alarm collection list and ashing alarm button
will only be active for running channels (active count down meter).
7
Elastocon Manual – Cell Ageing Oven EB 36
Alarmwillactivateabuzzerand/oraashingredAlarmbutton.
Thebuzzercanbeswitchedonandobyataponthebuzzer
symbol.
Ifthealarmbuttonstartstoash,gothroughthechecklistin
this chapter to identify the alarm and address the problem for
proper action.
Buzzer on Buzzer o
Acknowledge any alarm
To acknowledge any alarm, tap on the button Alarm.
Figure 2.2.5.a. All active alarms can be seen on this screen. Press
the magnifying glass to the right side of the alarm ID 00 in the
alarm group list to view all active alarms in that group.
This oven will present all active alarms in the group named
ID 00.
All the alarms in this group are divided into two levels
depending on how serious the alarm is.
First level will reset the alarm automatically, but still requires
an acknowledgement to be cleared from the alarm list.
Second level must always be acknowledged by the operator
manually.
Figure 2.2.5.b. To acknowledge an alarm, press the magnifying
glass to the right of the chosen alarm.
Figure 2.2.5.c. Press the button Ack and the alarm will be reset.
Any alarm that is reset automatically will remain in the alarm
list until a normal condition is met. The red Alarm button will
howeverswitchfromashingtoaxedstate.
Alarm that still persists will show up again after the
acknowledge procedure.
Press the Esc button several times to return to main screen.
The History button will show a record of all previous alarm.
Figure 2.2.5.a
Figure 2.2.5.b
Figure 2.2.5.c

8
Elastocon Manual – Cell Ageing Oven EB 36
2.2.6 Set the air flow rate
According to standards the air has to be changed during
thetest.AS/NZS1660.2.3requiresanairowof0,25
± 0,025 m3/h.
The cells in the oven have a volume of 2,4 l/cell.
Thisgivesthefollowingowofairthroughtheowmeters:
air ow rate
m3/h l/min
0,225 3,7
0,25 4,2
0,275 4,6
Readtheowoftheowmetersatthecenteroftheoats.
Theoatsshallrotateslowlytoshowthecorrectreading.
Note:Iftheoatsdoesnotrotateproperlycheckiftheoven
is placed horizontally.
2.3 Start the test
When the test temperature is reached, take up the test piece
holders and place your samples on the pins, then return the
sample holders in the cells. Be careful when placing the lid
of the test piece holder, to achieve a good contact with the
aluminium block of the oven.

9
Elastocon Manual – Cell Ageing Oven EB 36
Figure 3
3. Programming of ramp with cycling temperatures
Programming of cycling
temperatures/ramp is an additional
option.
If this addition is included in the oven
the ramp button will be visible on the
main screen.
A temperature cycle is divided into
segments. Each segment is known in
this chapter as a ramp.
The ramp can be set within the same
temperatureintervalasspeciedfor
the oven. The ramp is built up by 2 break
points known as legs. There are 50 legs
available to build ramps and create a full
temperature cycle. See illustration on the next page
(Leg-Ramp-Cycle).
Each leg can be used to set a new temperature or
maintain the same temperature over a time period
(duration). Duration up to 999 hours and 59 minutes,
can be set to each leg.
Ramp button
Press the ramp button to enter the ramp function.
This button can be found on the main screen.
Legs
Ovens with more than one individually controlled
temperature cell or chamber will have 50 legs
available for each temperature cell or chamber.
Each leg consists of a time control (Time h:m) and
one temperature set point control (Final Temp). An
optionalbutton[ON/o]isincludedtosomeovens.
The ON/o buttons will be described further on.
Leg at start of temperature cycle
If the temperature in the header (Temp) for the
instrument is equal to the temperature set point in
leg 1, that same temperature will be kept over the
time duration set in leg 1.
On the other hand, if the temperature set value for
theovenislowerorhigherthanthersttemperature
set point in leg 1, the temperature will increase/
decrease towards the temperature set point typed in
the leg 1 control. The temperature increase/decrease-
speed will be calculated to last over the time duration
set in leg 1.

10
Elastocon Manual – Cell Ageing Oven EB 36
3.1 Leg when temperature cycle
is running
Whentherampisstarted,eachleglledwith
information will be processed. Legs with time settings
0:00 will not be processed and will be skipped.
If the temperature set value in a leg (Final Temp) is
equal to the temperature set point in the following
leg, the same temperature will be kept over the time
duration set in the following leg.
On the other hand, if the temperature set value for
the leg is lower or higher compared with the following
leg, the temperature will increase/decrease towards
the temperature set point typed in the following leg
control. The temperature increase/decrease -speed
will be calculated to last over the time duration set in
the following leg.
Ramp speed tolerances can be found in the speci-
cationsfortheinstrument.
The essential part of the leg
function is that if the following
legissetwithadierent
temperature (set value) than
the previous leg, a ramp in
temperature will be created.
The duration for the ramp
is always controlled by the
following leg.
Button next
Press the button Next to show additional 13 legs
available for the same temperature cell/chamber.
There are three Next screens. A total of 50 legs are
available.
Ramp
Cycle
Leg

11
Elastocon Manual – Cell Ageing Oven EB 36
Button [ON/off] (optional)
This button is available on some instruments that
require any type of mechanical action such as open/
close valves for additional cooling or heating. These
buttons are not visible if the instrument does not
have this option. The button is included to each leg
clusterandwillonlytakeactionwhenthespecicleg
is running and a time has been set for that leg.
Pressthebuttontogiveitaxstate.
ON= willactivatetheoutput(valveorcontrolwillbe
switched on when this leg is running).
o= noactionwillbetakenandtheoutputwill
remaino(valveorcontrolwillbeswitchedo
when this leg is running).

12
Elastocon Manual – Cell Ageing Oven EB 36
Ramp view header
Theheaderislocatedontherstrampscreen.The
header consists of one Play (start) button, Current
lap, Temp, Laps and Total [h:m].
The PLAY (start) button will execute the full
temperature cycle(s). To start the temperature cycle,
press the button PLAY. The play button will change it
appearance to a stop button.
An additional button will now also appear. This
button is the PAUSE button. Press the Pause button
to pause the ramp. In this state the temperature will
stop at the current processed set value. Press the
Pause button again and the temperature ramp will
continue.
To stop the ongoing cycle, press and hold the STOP
button pressed until the process is stopped (about
3 seconds).
Current lap is an indicator.This indicator
will show the current lap that is beeing
processed.
When the temperature cycle is started, the
Current lap indicator will show the current
processing lap.
The Temp control is the same control
as the set value (SV) control on the main
screen of the instrument.
This control will also act as an indicator
when the temperature cycle is started. The
operator can then follow the temperature in
this control as the cycle proceeds.
The Lap(s) is a control where the operator
can set up a number of repetitions for the
cycle.
Total [h:m] will calculate the total time of the
temperature cycle. The time settings for each leg will
be summed up. This time value is then multiplied by
the number of laps typed in the header control laps
to give the total time for the temperature cycle(s).
The Total [h:m] indicator will show the remaining
time for the full temperature cycle(s), when the
temperature cycle is running.
For some software versions, the total time cannot
show more than 9999 hours. In these cases, the
indicator will show xxxx. The function will remain
normal, but the total time is not possible to show.
Play
Pause Stop
13
Elastocon Manual – Cell Ageing Oven EB 36
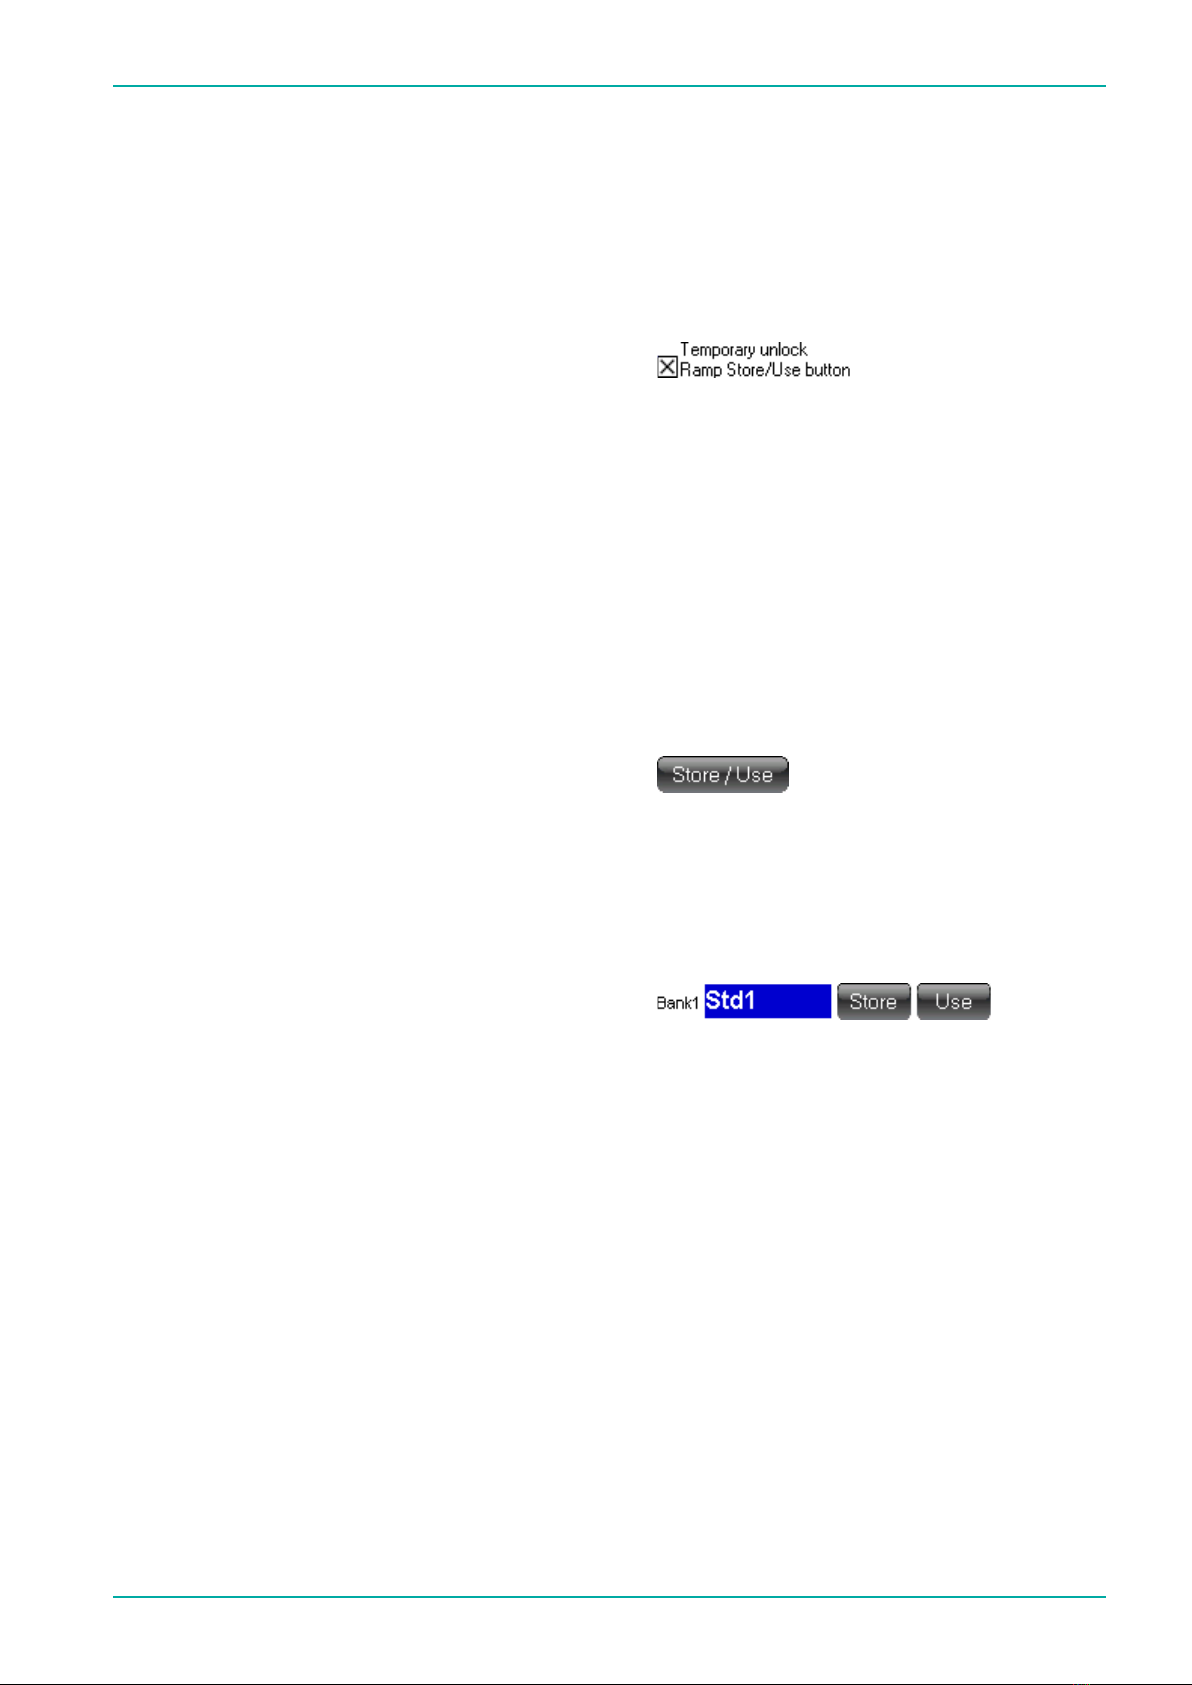
3.2 How to Store/Use
a programmed ramp
The total ramp generated can be stored into a
memory Bank.
There are six individual memory banks to choose
from.
Any stored ramp can be used for any heater cell/
chamber in the same oven, if the oven has more
than 1 heater cell/chamber.
The ramp program is write-protected and must be
temporary unlocked to edit the ramp data or store a
programmedramptole.
ES 07-II
Locked state is indicated with the word Locked on the
main screen.
Any other oven
Locked state is only indicated by disabled input
controls on the ramp screen.
In the locked state, any pre-stored ramp can still be
selected when the ramp screen is opened. Refer to
point USE in this chapter.
The ramp edit mode will remain open until the ramp
screen is closed and 1 minute has passed.
Store
Noticethatthelenameforthestoredrampisxed
andthelenamesarealways“RampDat1forBank1”,
“RampDat2forbank2”andsoon.
Thestorebuttonwillsavethecurrentrampintoale
on the onboard SD micro card.
Iftheleislocked,thenreadthedescriptionbelow
from point 1.
Iftheleisun-locked,thenreadthedescription
below from point 5.
1. From the main screen, press the button Setup.
2. Enterpassword1111+Enter.
3. Press the button Options (not for instrument
EB 17).
4. Tick the box Temporary unlock Ramp Store/Use
button.
5. Return to the main screen and press the RAMP
button.
6. Prepare the ramp as wanted with temperature and
time.
The temporary unlock will stay unlocked while
stepping between any of the four Channel Ramp#
screens.
When changing to another screen except these,
the temporary unlock will be cancelled and after
2 minutes the Store/Use button will then be
locked automatically.
7. Press the button Store/Use.
8. If any memory Bank is empty, type in a new
lenameandpressitsStore button.
If a memory Bank is occupied, Press its Store
buttonandchooseto“overwrite”theoldle.
Anewlenamecanbegivenatalltimebefore
pressing the Store button.

14
Elastocon Manual – Cell Ageing Oven EB 36
Use
The Use button will connect any of the ramps stored
in any of the six memory banks to the Channel ramp
in use.
If the oven has more than one temperature cell/
chamber, any of these cells/chambers can be
connected to any of the memory banks.
1. From the Ramp screen press the button Store/
Use.
2. Press the button Use on any of the memory Banks.
3. Press the physical key ESC to return to the Ramp
screen.
4. TheleselectedwillnowbeloadedtotheChannel
in use.
If the oven has more than one cell or chamber
a matrix will be visible on the right side of the
Store/Use buttons.
This matrix will show each channel and if it is
connected to a ramp.
The maximum number of cells/chambers is six.
The example below shows that oven cell 1 was edited
(Administrate Ramp for Channe1) and ramp in
“Bank1”iscurrentlyinuseforthisovencellandsois
the oven cell 6.
Ovencell2isusingrampdatafrom“Bank2”andso
is oven cell 4, oven cell 3 is using ramp data from
“Bank3”,ovencell5isusingrampdatafrom“Bank5”.

15
Elastocon Manual – Cell Ageing Oven EB 36
Quick guide to initiate a ramp
(temperature cycle) and run it.
1. From the main instrument windows press the
ramp button symbol.
2. Fill in the header controls Temp and Laps.
Temp is the standby temperature before the ramp
(temperature cycling) is started and Laps
multiplies the number of cycles to run.
3. Fill in the Time and Final temp for a number of
legs to build all individual ramps in a full
temperature cycle. Nine legs are available in the
rstrampscreen.Another13legscanbeinitiated
in the next ramp screen. Press the button Next to
enter the next ramp window. Four screens are
available. First screen has 11 legs and the following
screens have 13 legs per screen. 50 legs in total.
Event buttons [EV]
(visible on instruments with this option)
To activate the event output, click and set the
event ON for each leg that is supposed to activate
the event output. Instruments with the LTP option
will open the cooling water valve on any leg that
has this option set to ON. This option is only
availableonthersttemperaturecell/chamber,
if the instrument has more than one temperature
cell/chamber.
4. When the full cycle has been programmed with all
legs necessary, the total time will be calculated and
shown in the header indicator Total [h:m].
5. The temperature cycle can now be started. To start
the temperature cycle, press the header button
PLAY (Start).
6. The ramp symbol will start to blink on the main
screen, when the main screen is restored
automatically after two minutes or if the operator
presses the ESC key below the screen to restore
the main screen.

16
Elastocon Manual – Cell Ageing Oven EB 36
Example of a temperature cycle:
Header Temp is set to 23 °C (or the standby temperature of your oven).
Time Temp Option Description
Leg 1 1:00 23 ON ‘ Temp will be kept at 23 °C for 1 hour.
Option is ON to run an optional event.
Leg2 1:42 125 o ‘ During1hand42minthetemperaturewillrise
to 125 °C. That represents a ramp speed of
1°C/min.125-23=102->102minutes
=1hand42minutes.
Optionisotoholdanoptionalevent.
Leg3 1:00 125 o ‘ Thetemperaturewillbekeptat125°C
for 1 hour.
Optionisotoholdanoptionalevent.
Leg 4 1:42 23 ON ‘ During 1 h and 42 min the temperature will drop
from 125 °C to 23 °C. That represents a ramp speed
of1°C/min.125-23=102->102minutes
=1hand42minutes.
Option is ON to run an optional event.
Repeat this cycle three times: When leg 4 is
completed, the cycle will start over on leg 1. The total
time for all cycles will be 16 hours and 12 minutes.
The number of laps and remaining time can be
followed on the indicators Current lap and Total
[h:m]. After this time the ramp will stop and the
temperature will remain on the last leg temperature
set value if no standby temperature was set. In this
example the oven will keep 23 °C when the ramp is
complete.
This is how the ramp window should look like
according to the example above.
It is possible set a standby temperature, if the last leg
has a high temperature set point and the operator
would like to end the temperature cycle with a low
temperature. This can be done from the Setup screen.
See chapter 2.2.4 Set up screen (Standby
temperature).

17
Elastocon Manual – Cell Ageing Oven EB 36
6. Troubleshooting
When the oven does not work properly, check the following.
Problem Problem cause Remedy
No power. No main power. The main fuse, 6,3 AT, is placed
in the connector for the mains lead
on the back of the oven.
Black screen No power to screen. Open up the cover on the right side
on power up. of the oven and check fuse F3 (2 AF).
Refer to electrical drawings.
Alarmbuttonashing. Anyalarm. Seechapt2.2.5Alarm.
Oven cell stirrer No power to stirrer. Make sure that the electric connector
notturning. isinsertedforthespecicstirrer.
Open up the cover on the right side of
the oven and check fuse F4 & F5 (2 AF).
Refer to electrical drawings.
Check electric schematics for fuses. Before changing a defective fuse,
check for any possible short circuit, causing the fuse to burn.
4. Temperature calibration
The instrument is adjusted and calibrated according to the
attachedcalibrationcerticateatthedelivery.
Calibration should be done annually.
5. Service and maintenance
The cell oven shall be cleaned on both the outside and inside,
at regular intervals. The oven can be cleaned with water and
a detergent or ethanol on the outside.
On the inside, most dirt is accumulated on the inside of the
upper lid, by volatiles from the samples condensing. The
lid can be cleaned with a suitable solvent such as ethanol or
white spirit.
Themostsensitivepartsoftheovenaretheairlterandthe
air pump, which should be checked at least once a year.
7. Sa fet y
Note: Use gloves when the samples are placed in the
oven or removed from the oven.
Important! For the best performance of the
instrument, we recommend the following working
environment:
• Standardlaboratorytemperatureofeither
23 °C ±2° or 27 °C ±2°.
• Humiditynotmorethan90%RH
– non condensing.
• Otherenvironmentalaspects:Pollutiondegree2
– Laboratory environment.

18
Elastocon Manual – Cell Ageing Oven EB 36
8. Technical specification
EB 36
Temperaturerange,°C: +40to+200
Temp.control, +40to+100°C,°C: ±0,5
+101to+200°C,°C: ±1,0
Temp. variation in time, °C: ± 0,25
Temp.variationinspace,%: ±0,5
Temperature sensors: Pt 100, 1/3 DIN
No. of temperatures: 4
No. of cells: 4
Paddle speed, rpm: 60
Airow,m3/h: 0,25 ± 0,025
Useful volume, l: 4 × 2,4
Dimensions, inner, dia × h, mm: 100 × 300
Dimensions, external, w × h × d, mm: 760 × 620 × 510
Weight, kg: 58
Voltage, V/phase/freq: 220–240/1/50
Power, W: 900
Standards: AS-NZS 1660.2.3

19
Elastocon Manual – Cell Ageing Oven EB 36
Common specifications:
• TheovensarecontrolledfromaPLC(witha
colour touch screen).
• Specialdesignwithcontrolledairowrate.
• Thecasingconsistsofsteel,paintedwithpowder
paint in bluegreen colour.
• Theinnercellsaremadeofaluminium.
• Temperaturecontrollerwith0,1°Csetpoint(PLC).
• Temperatureindicatorwithsensorineachcell
(PLC).
• Fixedovertemperaturefuse.
• Flowmeterswithneedlevalves,forsetting
theairowrate.
• Alarmforlowairpressure(PLC).
• Coolingchannelsinthecasingforlowsurface
temperature.
• Temperaturecontrolledcoolingfanforthe
electronics cabinet.
• Indicationofpowerfailure(PLC).
• Run-timemeter(PLC).
• Countdowntimer(PLC).
• Microlterfortheairwhichremovesallparticles
over0,01μm.
Optional accessories
EB-P Ramp function for temperature setting
in the PLC.
EC 11 Monitoring software.
ED 04 Computer, PC.
Network cable.

Elastocon AB
Tvinnargatan 25 •SE-507 30 Brämhult •Sweden
www.elastocon.com
Support
+46333233934
Table of contents
Other Elastocon Laboratory Equipment manuals


Popular Laboratory Equipment manuals by other brands


Waters
Waters Xevo G2 QTof Operator's, overview and maintenance guide

Buchi
Buchi S-300 installation manual

Shel lab
Shel lab SMI2-2 Installation & operation manual

BioLAB
BioLAB BCBS-103 Operation manual

SPETEC
SPETEC SuSi FMS Series Translation of the original operating instructions

Buchi
Buchi Rotavapor R-200 operating instructions