Operating Modes
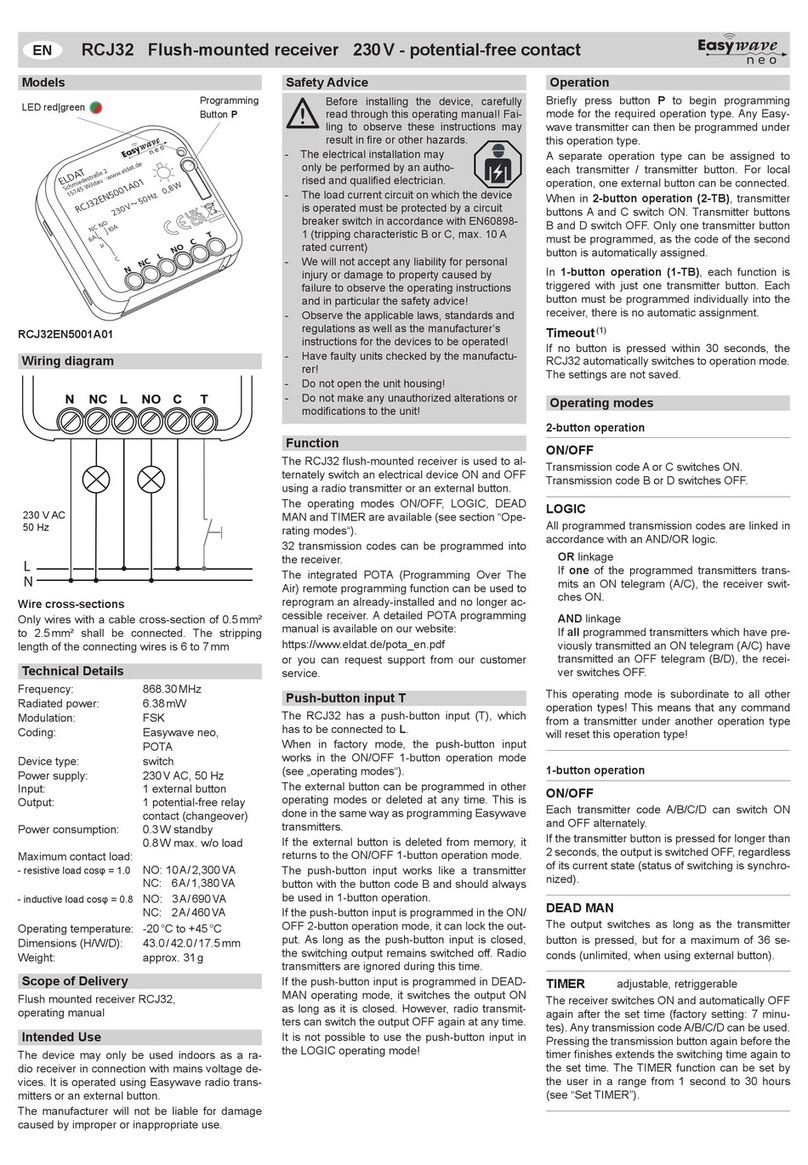
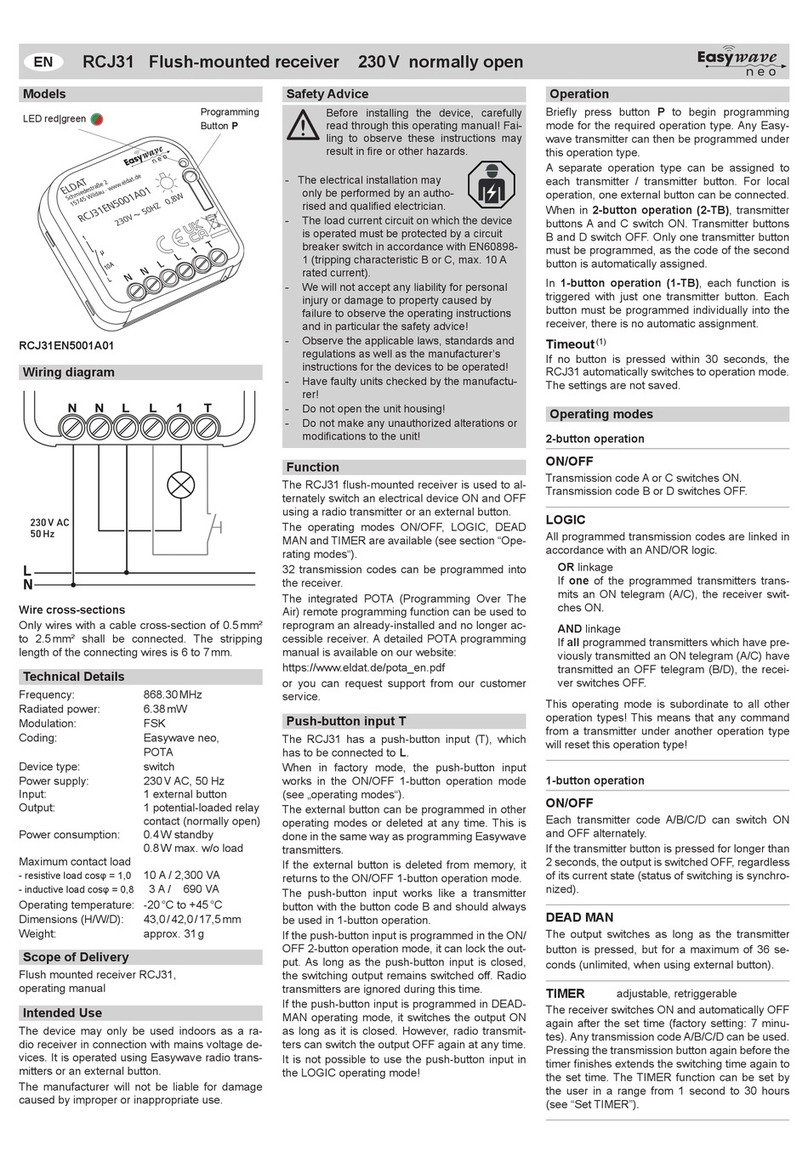
Via jumper J2 you can set the operating modes.
PULSE (J2 on Pos. 4)
1-button operation
If a transmitter button A/B/C/D is pressed, the cor-
responding relay is triggered for one second.
ON/OFF (J2 on Pos. 3-4)
2-button operation
The relay can selectively be switched ON or OFF.
The transmitter button A or C switch ON, the
transmitter button B or D switch OFF.
Caution! In order to change the operating mode,
rst delete the transmitter transmission code
then, using a jumper, reset the operating mode
required and subsequently teach the transmis-
sion code.
Start-Up
Caution! Make sure there is no interference with
the wireless connection. Do not mount the device
in a distribution box, in metal casings, in direct
proximity to large metal objects, on the oor or
close to it.
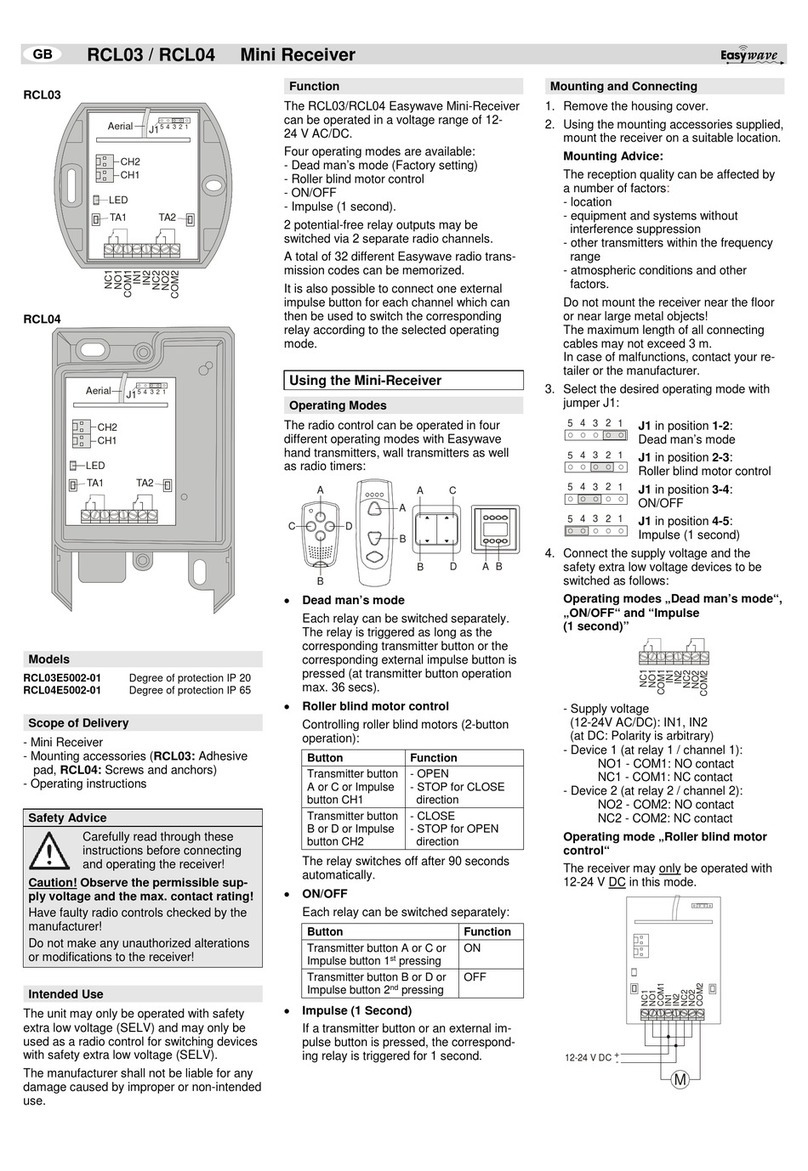
1. Remove the housing cover.
2. Select an operating mode using jumper J2
and the select whether the acknowledge
function should be activated or deactivated
using jumper J1. The receiver is delivered ex-
works with the operating mode IMPULS and
deactivated acknowledge function.
3. Connect the supply voltage and the protective
low voltage loads to e switched on. The I/O
LED will light up in green.
NC1, COM, NO1, NO2: CO/NO
+,-Power Supply 12-24V DC
4. Re-install the housing cover.
5. Transfer the codes of the transmitters to the
receiver (see section “Teaching in the trans-
mission codes“).
Notice: The receiver cannot be programmed
with the learn button PTx of the Easywave ra-
dio transmitters.
Changing the acknowledge function
To change the acknowledge function (activated
↔ deactivated), the RCL07 must first be made
voltage-free and jumper J1 must be moved into
the corresponding position.
activate: J1 Pos. 1+2
deactivate: J1 Pos. 1
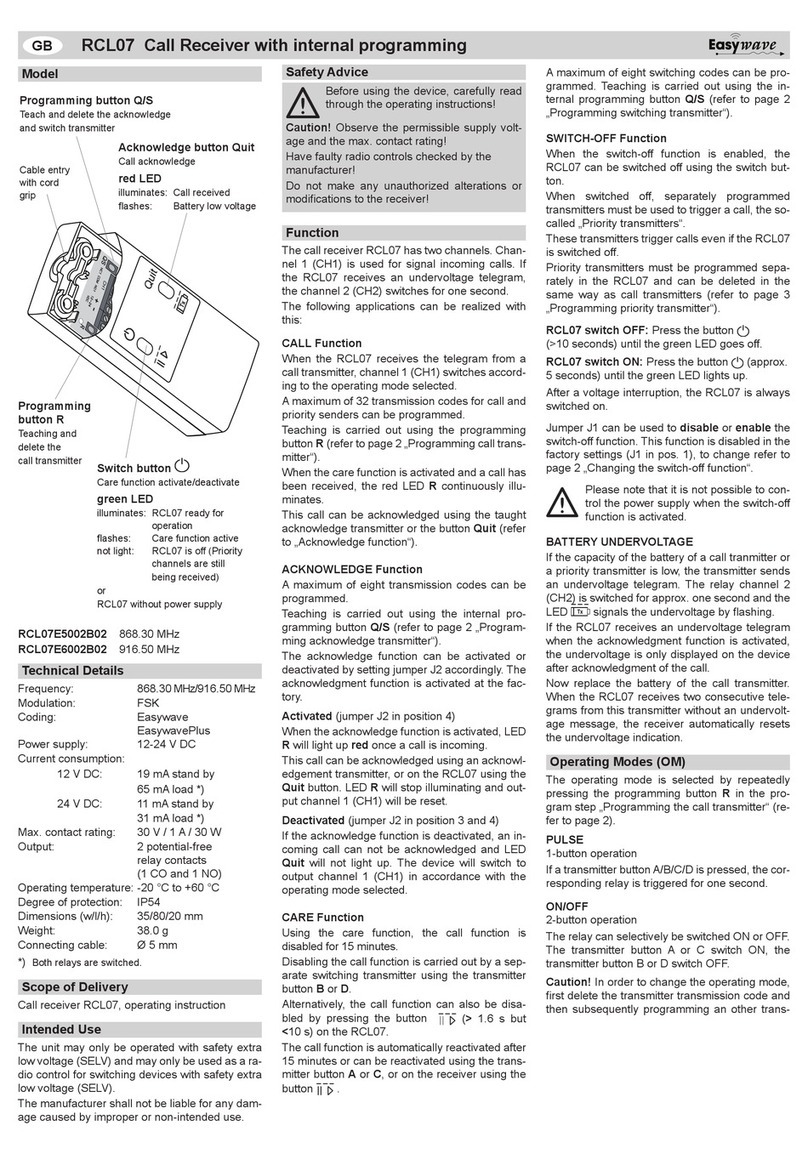
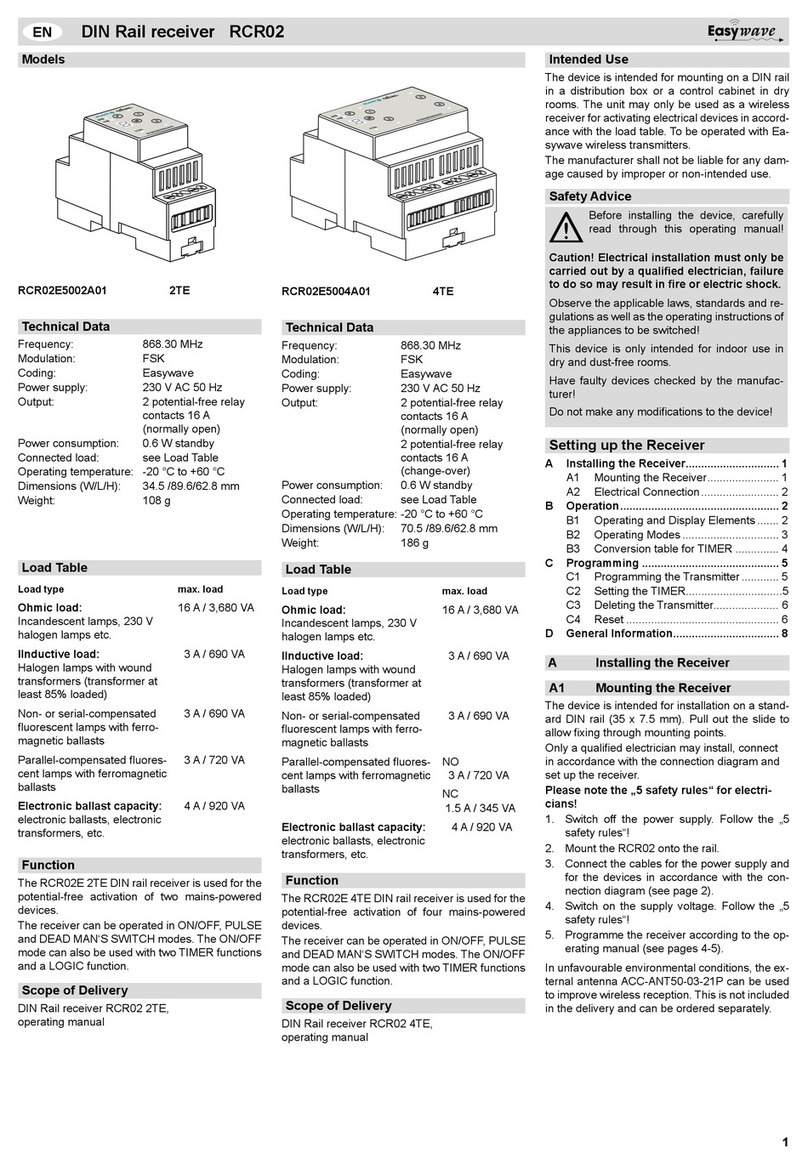
Model
Technical Details
Frequency: 916.50 MHz / 868.30 MHz
Modulation: FSK
Coding: Easywave, Easywave-
Plus
Power supply: 12-24 V DC
Current consumption:
12 V DC: 19 mA stand by
65 mA load *)
24 V DC: 11 mA stand by
31 mA load *)
Max. contact rating: 30 V / 1 A / 30 W
Output: 2 potential-free relay
contacts
(1 CO and 1 NO)
Operating temperature: -20 °C to +60 °C
Degree of protection: IP54
Dimensions (w/l/h): 35/80/20 mm
Weight: 38.0 g
Connecting cable: Ø 5 mm
*) Both relays are switched.
Scope of Delivery
Call receiver RCL07, operating instruction
Intended Use
The unit may only be operated with safety extra
low voltage (SELV) and may only be used as a ra-
dio control for switching devices with safety extra
low voltage (SELV).
The manufacturer shall not be liable for any dam-
age caused by improper or non-intended use.
Safety Advice
Before using the device, carefully read
through the operating instructions!
Caution! Observe the permissible supply volt-
age and the max. contact rating!
Have faulty radio controls checked by the
manufacturer!
Do not make any unauthorized alterations or
modications to the receiver!
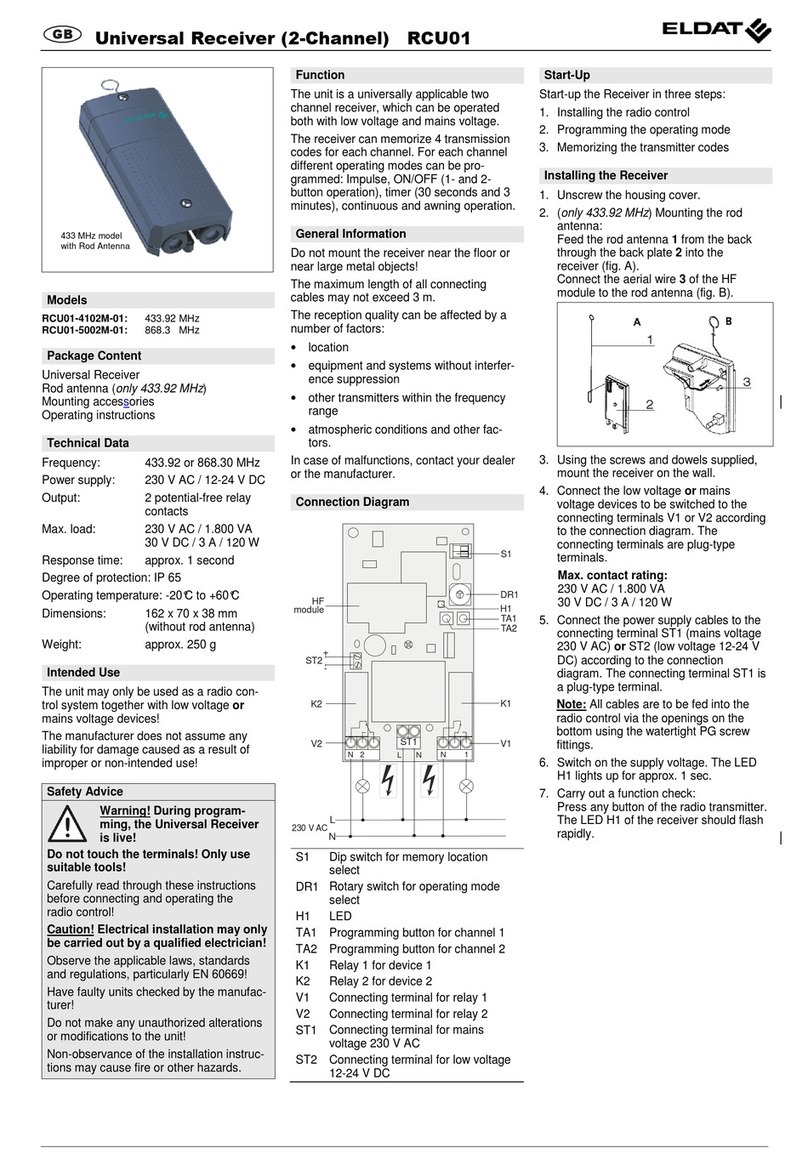
Call Receiver RCL07
GB
Cable entry
with cord grip
Switch button I/O
care function
activate/deactivate
Programming button Q/S
Teach the acknowledge and
switch transmitter
green LED
illuminates: RCL07 ready for operation
ashes: Care function active
Acknowledge button Quit
Call acknowledge
Programming button R
Teaching the call transmitter
red LED
illuminates: Call received
ashes: Battery low voltage
Function
The call receiver RCL07 has two channels. Chan-
nel 1 (CH1) is used for the operating modes and
the switching functions. If the RCL07 receives
an undervoltage telegram, the channel 2 (CH2)
switches the output NO2 for one second.
The following applications can be realized with
this:
CALL FUNCTION
When the RCL07 receives the telegram from a
call transmitter, channel 1 (CH1) switches accord-
ing to the operating mode selected. The receiver
is delivered with the default operating mode
PULSE.
When a call has been received, the red LED R
continuously illuminates. This call can be ac-
knowledged using the taught acknowledge trans-
mitter or the button Quit (refer to „Acknowledge
function“).
A maximum of 32 transmission codes can be
taught. Teaching is carried out using the program-
ming button R (refer to page 2 „Teaching call
transmitter“).
ACKNOWLEDGE FUNCTION
When the acknowledge function is activated,
LED Rwill light up red once a call is incoming.
This call can be acknowledged using an acknowl-
edgement transmitter, or on the RCL07 using the
Quit key. LED Rwill stop illuminating and output
channel 1 (CH1) will be reset.
If the acknowledge function is deactivated, an
incoming call can not be acknowledged and LED
Rwill not light up. The device will switch to output
channel 1 (CH1) in accordance with the operating
mode selected.
The acknowledge function can be activated or
deactivated by setting jumper J1 accordingly (see
„Change acknowledge function“). The acknowl-
edge function ist deactivated ex-works.
A maximum of eight transmission codes can be
taught. Teaching is carried out using the program-
ming button Q/S (refer to page 2 „Teaching ac-
knowledge transmitter“).
CARE FUNCTION
Using the care function, the call function is disa-
bled for 15 minutes. Disabling the call function is
carried out by a separate switching transmitter us-
ing the transmitter button B or D, or by momentar-
ily pressing (<5 seconds) the button I/O.
The call function is automatically reactivated after
15 minutes, or can be reactivated using the trans-
mitter button A or C, or on the receiver using the
button I/O.
A maximum of eight switching codes can be
taught. Teaching is carried out using the pro-
gramming button Q/S (refer to page 2 „Teaching
switching transmitter“).
BATTERY UNDER VOLTAGE
If the capacity of the battery of a call transmitter
is low, the transmitter sends an undervoltage tel-
egram. The relay channel 2 (CH2) is switched for
approx. one second.
If the RCL07 receives a call and an undervoltage
telegram, the undervoltage will only be displayed
by the ashing of the red LED Ronce the call has
been acknowledged.
Now replace the battery of the call transmitter.
When the RCL07 receives two consecutive tel-
egrams from this transmitter without an under-
voltage message, the receiver automatically ac-
knowledges the undervoltage indication.
RCL07E6002B01
916.50 MHz
RCL07E5002B01
868.30 MHz
J2
J2
J1
1234
J2 J1
NC1
COM
NO1
J1
J2
