Elecrow CrowPi2 User manual

by Elecrow
CrowPi2- All in one STEM Learning
Platform & Raspberry Pi Laptop
USER MANUAL
V1.2 2020
2020 ELECROW All Rights Reserved.
Cwww.elecrow.com
*Pictures are for display only


Product info
Main features
The main parameters
Structure
Development board
Specifications
Module list
Conventional accessories
How to use
Install Raspberry Pi
Keyboard and mouse
Storage compartment
Power bank
Screen brightness adjustment
FAQ
Precautions
Software
Parts
Main page and User Settings
Operation Process
Learning
Projects
Minecraft
AI
Python
Game
Micro:bit
Scratch
Arduino
1
1
2
2
3
3
4
5
6
6
8
9
10
10
11
11
12
13
14
18
18
18
19
20
23
23
23
23
23
Catalog

Product info
CrowPi2 combines Raspberry Pi and a range of common sensors, it’s just as useful for learning about STEM
education and setting up as a portable laptop. No matter you are Raspberry Pi fan , a STEM educator, or someone
who wants to experience something interesting, CrowPi2 will be your best choice!
Main features
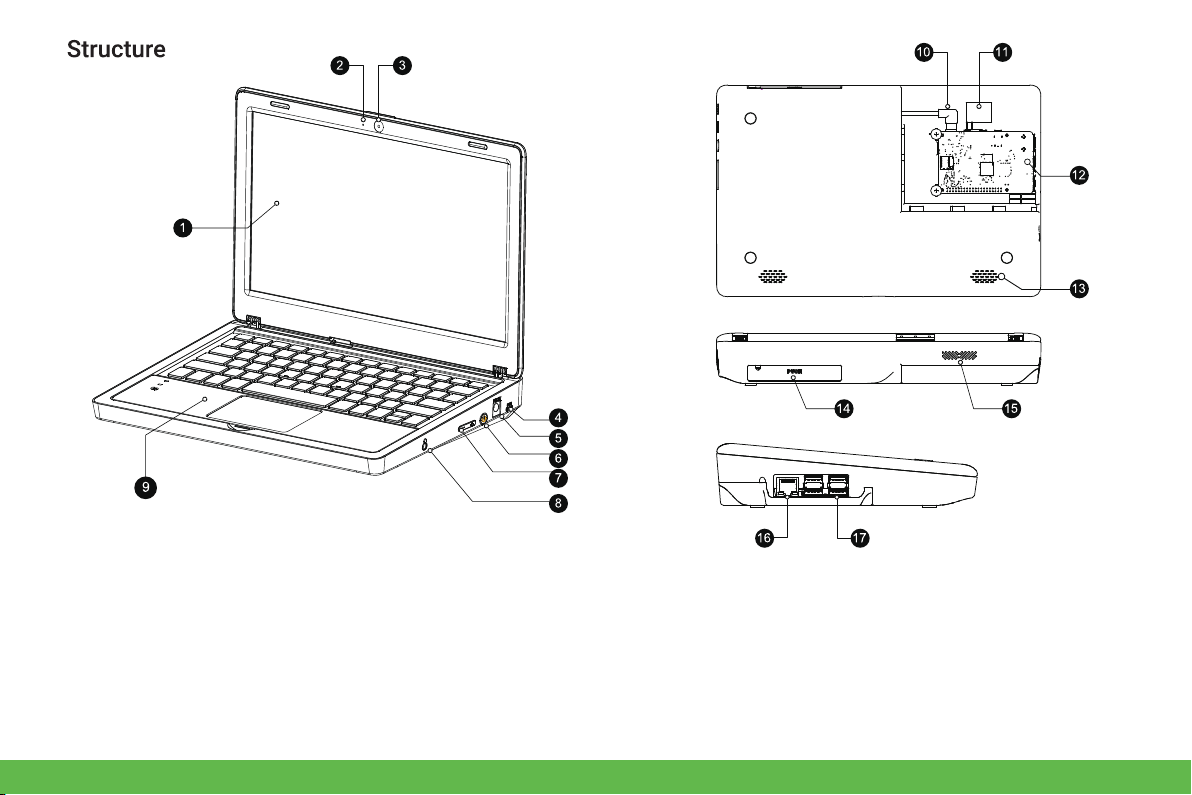
1. 11.6-inch 1920*1080 IPS screen
2. Sleek body made out of environmentally-friendly material, portable for on-the-go use
3. Wireless keyboard detaches from body or stays connected via magnet
4. Convert between playing and learning in second
5. Get started via one-step installation of Raspberry Pi 4B
6. 2-MP camera, microphone, and stereo output built in
7. Switch between projects using one button and get creative using Raspberry PI GPIO pins, all of which connect to
the onboard sensors or function as independent outputs
8. All-in-one board includes all necessary sensors for learning hardware and software
9. Self-developed software for learning Scratch, Python, AI, and Minecraft step-by-step via an engaging dialogue
teaching mode
10. Offline account management for saving learning progress and achievements and convenient for further study
1

2
1. 11.6 -inch 1920 * 1080 resolution screen
2. Microphone
3. Two-megapixel camera
4. 5V USB power supply port
5. DC 12V power supply port
6. Power switch
7. Screen brightness +/-
8. 3.5mm headphone jack
9. Removable wireless keyboard
10. Raspberry Pi power supply head (reserved)
11. HDMI connector
12. Raspberry Pi fixed position
13. Speakers
14. Storage groove
15. Cooling hole
16. Raspberry Pi network port
17. Raspberry Pi USB port

Development board
1. Joystick
2. Segment
3. Relay
4. Screen driver
5. Cooling fan
6. Raspberry Pi and PCBA connection
switch
7. GPIO interface
8. GPIO indicate LED
9. DHT11 temperature and humidity
sensor
10. Breadboard
11. Tilt sensor
12. LCD1602
13. PIR sensor
14. Sound sensor
15. IR sensor interface
16. I/O/ADC/UART
expansion interface
17. 9g servo interface
18. I2C expansion interface
19. Stepper motor interface
25. Touch sensor
26. 8x8 RGB matrix
27. RC522 RFID induction module
28. Light intensity sensor
29. LCD1602 brightness adjustment
30. Ultrasonic sensor
20. 4x4 button matrix
21. Buzzer
22. PIR sensitivity adjustment
23. Vibration motor
24. Sound sensor sensitivity adjustment
1 13
14
15
16
17
18
19
20
21
22
23
24
25
27
26
28
29
30
2
3
4
5
6
7
8
9
10
11
12
3

The main parameters
291(L)*190(W)*46(H)mm
1.3kg
11.6-inch 1920*1080 IPS screen
2.0MP camera with microphone
DC12V/ USB 5V power supply
Micro USB/ DC
2.4G wireless
2.4G wireless
Stereo speaker
Support
Support
Support
3.5mm headphone jack
Compatible with Raspberry Pi 4B
storage box (power bank box)
Raspbian, Ubuntu, CentOS, Windows IOT, KALI, Pidora, ArchLinux,
FreeBSD, Kodi, OpenWrt, RISC OS, RetroPie, LAKKA, Recalbox,
LibreELEC, OSMC
CE, FCC, RoHS
CrowPi2 Specification
Dimensions
Weight
Screen
Camera
Power supply
Power port
Keyboard
Mouse
Audio output
Volume adjustment
Screen brightness adjustment
Induction screen function
Audio port
Compatibility
Other function
Supporting operation system
Certification
4

Power supply x1
Screwdriver x1
Infrared remote control x1
IR receiver x1
Manual x1
RFID white card + tag x1
Crowtail -moisture sensor(with cable) x1
Components Pack x1
2.4G wireless mouse x1
Stepper motor & Servo x1
TF Card Reader x1
Motor + small fan x1
1. Joystick
2. Segment LED
3. Relay
4. Cooling fan
5. Switch converts connection between sensors
and Raspberry Pi
6. GPIO pin socket
7. GPIO indicate LED
8. DHT11 temperature and humidity sensor
9. Breadboard
10. Tilt sensor
11. Hall sensor
12. PIR motion sensor
13. PIR sensitivity adjustment
14. Sound sensor
15. IR receiver
16. I/O/ADC/UART extension port
17. IIC port
18. 9G servo
19. Stepper motor
20. LCD1602 display
21. 4x4 button matrix
22. Buzzer
23. Vibration motor
24. Touch sensor
25. 8x8 RGB matrix
26. RC522 RFID sensing part
27. Moisture sensor
28. Light sensor
29. Ultrasonic sensor
30. Screen driver
31. Basic components pack
32. LCD1602 brightness adjustment
33. Sound sensor sensitivity adjustment
Module list:
Conventional accessories:
5

1. Insert the SD card (built in system) into the Raspberry
Pi SD card slot.
2. Push to the right to open the back cover of the Crowpi2
Raspberry Pi compartment.
3. Vertically install the Raspberry Pi 4 with the TF card
inserted into the Raspberry Pi compartment.
4. Connect the Micro HDMI adapter board to the Micro
HDMI interface of the Raspberry Pi.
● Install Raspberry Pi
How to use
6

5. Connect the Raspberry Pi power cable and the 2pin interface
to the female socket on the PCBA board, and insert the Type-c
into the Raspberry Pi type-c power port.
6. Remove the USB head and insert it into the USB port of the Raspberry Pi through the cable hole. It’s for camera and
microphone.
7

● Keyboard and mouse
7. Close the cover.
1. Remove the wireless receiver in the mouse
compartment .
2. Insert any USB port of the Raspberry Pi.
8. Connect the power supply, Use
the 12V power supply in the
accessories, insert the DC round
head into the DC12V power
supply port.
8

● Storage compartment
Use your finger to open and close the storage compartment.
3. Install a battery into the mouse,and then switch the button of keyboard
and mouse to "ON" side.
4. Get started, and you can use Fn+F1 to open/close the touchpad.
5. When the power led of keyboard is blink, it means that the power is
almost exhausted, please use the micro usb cable to power the keyboard.
And you can replace the battery of mouse if it runs out of power,
9

● Power bank
1. Install 5v power bank
2. Press the power button
● Screen brightness adjustment
Press the +button to increase the brightness, press -to decrease.
1.1. Open the storage compartment, put the powerbank
into the compartment, insert the wire through the wire
hole, and then push it into device.
1.2. Access to 5V micro USB port.
10
DC-12V
USB

FAQ
1. Unable to boot
Make sure you are using the correct charger and that the SD card is inserted into the Raspberry Pi.
2. The module or sensor on the PCBA board cannot be used
Please make sure that GPIO toggle switch have been switched to A successfully.
3. The wireless keyboard cannot be used
Please ensure that the power is sufficient, and ensure that the wireless transmitter is plugged into the USB port of the
Raspberry Pi.
4. The screen goes black and crashes
Please check whether the high-current peripheral is mounted to cause the insufficient power supply.
5. camera and microphone do not work
Please check if USB is connected .
6. Unable to connect to the network
Please turn on the wireless network or connect to the Raspberry Pi Ethernet network port.
1.2. Access to 5V micro USB port.
Precautions
Do not use in humid environment
Do not use an unsuitable power supply to power the device
Do not approach heat sources
Do not bend the keyboard and screen
!
11

Software
This is a software specially designed for Crowpi2 users, which integrates scratch, python programming and adaptation
tutorials, Micro:bit and Arduino IDE, as well as the most popular programming game Minecraft.
In addition, it also can be used as entertainment device, which not only allows you to play small python games, but also
enjoy videos and audios with a built-in player. Even if you want to learn the hottest AI related projects of recent years
- face and speech recognition, we've provided some examples for you to get started.
12

Let users quickly master the knowledge of python programming and
software and hardware interaction
Let users quickly master the knowledge of scratch programming and
software and hardware interaction
20 small applications designed for quick familiarity with Crowpi2
hardware features
Use game Minecraft to open the door to python programming world
for children, teaching in fun
Get the most popular knowledge of AI- face recognition and speech
recognition
Built-in python programming client
Experience the fun of simple Mini Game written by python and
develop your child's brain
Makecode entry which is designed for Micro:bit programming
Built-in Scratch Visual Programming Client
Built-in Arduino programming IDE
Python lessons
Scratch lessons
Projects
Minecraft
AI
Python
Game
Micro:bit
Scratch
Arduino
Learning
Parts
Part name Function
13

Main page and User Settings
Main page
The page is the main software page, click on the
corresponding module area to enter the corresponding
section.
Click to return to the desktop.
Click to pop up the shutdown window.
Click shutdown the device or to reboot.
Click to Create and login accounts.
14

Create and login accounts
Enter account login page, click go back to the
previous step.
The first time you use the software you need to register a
new account.
Click Create Account to create a new user account. Then
go to the page shown in the image below, click back
to the previous step.
Enter Name, only support numbers and letters.
Enter Password, limit the number of characters to 6-12 bits
Reconfirm the password entered in the second step, Click
NEXT
15

Set up secret questions and answers, click to
complete account creation.
Go back to the login page and enter the username and
password you just set up.
Then click to sign in.
Once you've successfully logged in, click on the user icon,
pop up a personal user window, where you can view the
progress of your course and your private folder. Click
to log out of your account.
CREATE
16

If you forget your password, click on the
login page to go to the password reset page, click
back to the previous step.
Enter the secret question and answer, click to
the next step, click back to previous step.
Enter the new password and confirm it twice, click
complete password reset, go back to the
login page and log in with the new password.
NEXT
CREATE
Forget Password?
Forget password
17
Other Elecrow Educational Equipment manuals
Popular Educational Equipment manuals by other brands

LEXIBOOK
LEXIBOOK EDU100i4 instruction manual

Consequential Robotics
Consequential Robotics MiRo-E owner's guide

AVer
AVer AVerVision F17+ user manual

Rompa
Rompa Sound to Light Panel manual

Nasco Healthcare
Nasco Healthcare Auscultation Trainer instruction manual

Talk To Me Technologies
Talk To Me Technologies wego 13A-D quick reference