Elikliv EDM401 Max User manual
User Manual
Customer service: support@elikliv.com
Please read this user manual carefully and keep it for future reference.
Should you encounter any problem, please contact us by following e-mail.
Most technical questions can be answered through our knowledge base.
Model:EDM401 Max/EDM402 Max
HDMI Microscope
Read Me First
Packing List
Installation
Quick Start
Parts Description
Detailed Operation
1. Save Photos/Videos With Micro SD Card
3. How to Make the LED Lights Work
4. How to Use the Transmitted Light Stage and Slide Kit
5. Switch Different Modes
6. Capture Photos
7. Record Videos
8. Photo/Video Playback and Files Management
9. Connect with HDMI TV
10. Connect with PC
11. Work With Windows
12. Work with Mac
Menu Settings
Specifications
FAQ
Get Support
1
2
5
9
10
14
14
2.Howtopowerupthemicroscope? 14
16
19
20
21
21
22
23
24
26
27
28
34
35
36

Read Me First
1. Congratulations on purchasing the Elikliv EDM401 Max/EDM402 Max
digital microscope system by Elikliv Microsystems. The special design
makes it a universal, highly versatile tool for viewing microscopic
specimens and capturing still images or even video.
2. The product contains tiny parts and is inedible, please avoid
accidental ingestion by children. Also, this product is not intended for
medical use.
4. Clean the lens if you notice a deterioration in image quality.
Carefully wipe the microscope with soft and clean cotton cloth
(such as an eyeglass cloth) moistened with alcohol.
3. For user’s safety, Elikliv EDM401 Max/EDM402 Max don’t come
equipped with battery, they should be plugged into the wall socket with
AC adaptor (included ). Or they can be connected with power bank/
computer/laptop to work.
5. Monitor on the main unit is not shockproof, please use it with care.
Do not drop it, press it hard or touch it with sharp object. The monitor is
not waterproof, please clean it with dry and soft cloth. Do not press the
monitor when adjusting angle.
6. Elikliv offers one year manufacture warranty and life-long technical
support for HDMI digital microscope. Please feel free to get in touch with
us if you need any help. It is recommended to attach photos or videos
showing the problems in the e-mail/message for quick solutions.
Elikliv customer service usually responds in 12 hours on business day.
E-mail: support@Elikliv.com
-1-
E-mail: support@Elikliv.com
Elikliv

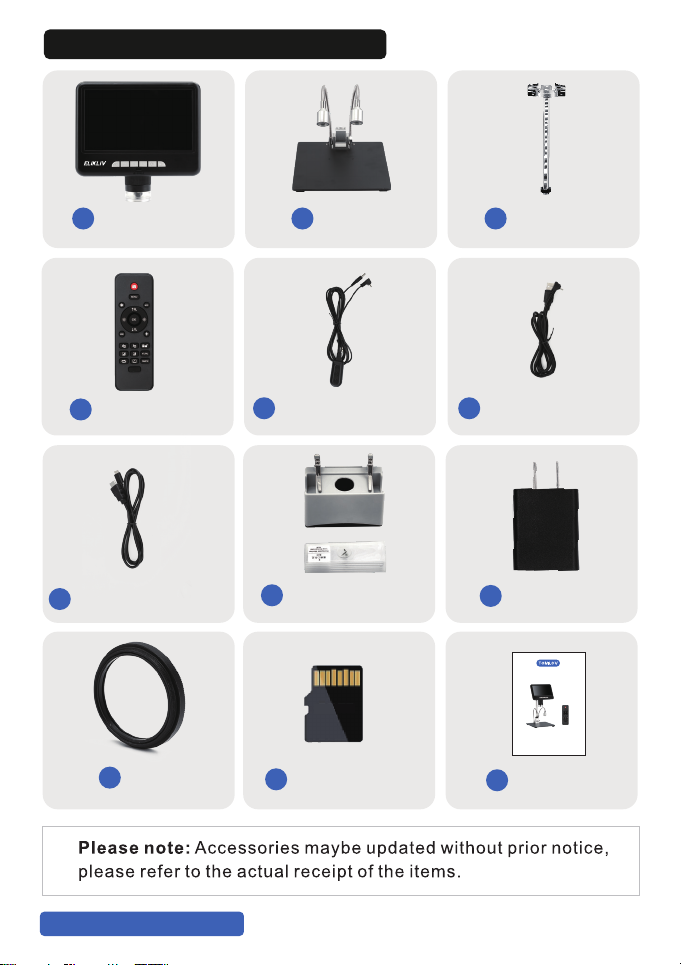
Packing List
7" Microscope
1Base Plate
210 inch Stand
3
4Remote Control
Power Supply Cable
for supplying power
5USB Cable for conne
cting to a computer
6
HDMI Cable for conne
cting an HD Monitor
75V 2A Adaptor
8
-2-
E-mail: support@Elikliv.com
1. Packing List (Model: EDM401 Max)
32G Micro SD Card
9
User Manual
10
User Manual
Pleaseread this user manual carefully and keep it for future reference.
Shouldyou encounter any problem, please contact us by following e-mail.
Mosttechnical questions can be answered through our knowledge base.
Model:EDM401 Max/EDM402 Max
HDMI Microscope
10" Microscope
1Base Plate
210 inch Stand
3
Remote Control
4
UV Lens
10
5V 2A Adaptor
9
64G Micro SD Card
11 User Manual
12
Power Supply Cable
for supplying power
5USB Cable for conne
cting to a computer
6
HDMI Cable for conne
cting an HD Monitor
7
User Manual
Customer service: [email protected]
Please read this user manual carefully and keep it for future reference.
Should you encounter any problem, please contact us by following e-mail.
Most technical questions can be answered through our knowledge base.
Model:DM401/DM401 Pro/DM402
HDMI Microscope
-3-
E-mail: support@Elikliv.com
3. Packing List (Model: EDM402 Max)
Transmitted Light
Stage and Slides Kit
8
64GB
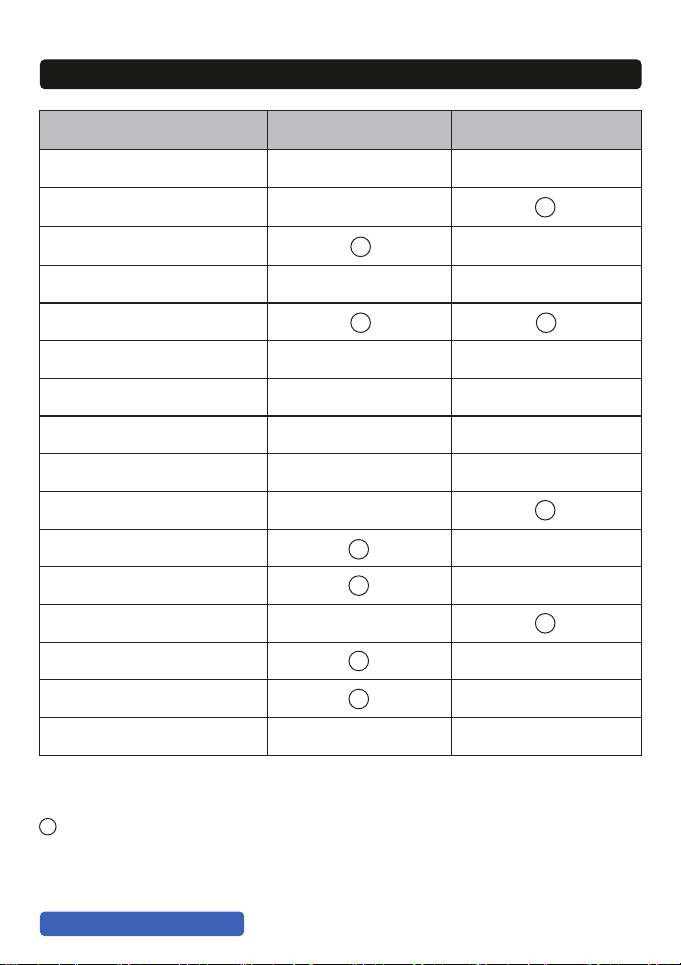
What’s included
Microscope unit
Base Plate (7.9*4.7”)
Base Plate (7.9*7”)
Stand (10 inch )
Stand (6 inch )
Remote Control
Power Supply Cable
USB Cable
HDMI Cable
Extension Tube
Transmitted Light Stage
10 Pcs of Slides
32GB Memory Card
64GB Memory Card
UV Filter
AC Adaptor(5V 2A)
EDM401 Max EDM402 Max
√ √
√
√
√
√
√
√
√
√
√
√
√
√
√
√
√
√
Explanation of symbols:
√ Included in the delivery package
Available optionally as accessories
For information on optional accessories, please contact the seller or
your local Tomlov Microsystems authorized dealer.
-4-
E-mail: support@Elikliv.com
Standard delivery and optional accessories for different models
√
√
√
√
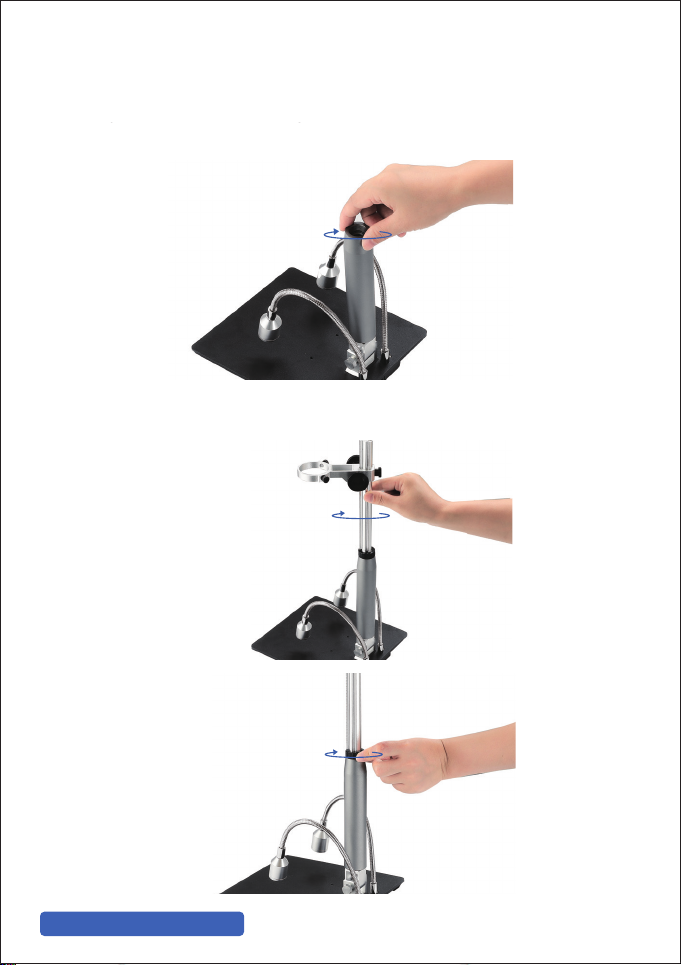
(1) How to Install the Stand
Step 1: Screw the stand on the base.
Step 2: Rotate the black ring clockwise one or two turns.
Installation
-5-
E-mail: support@Elikliv.com
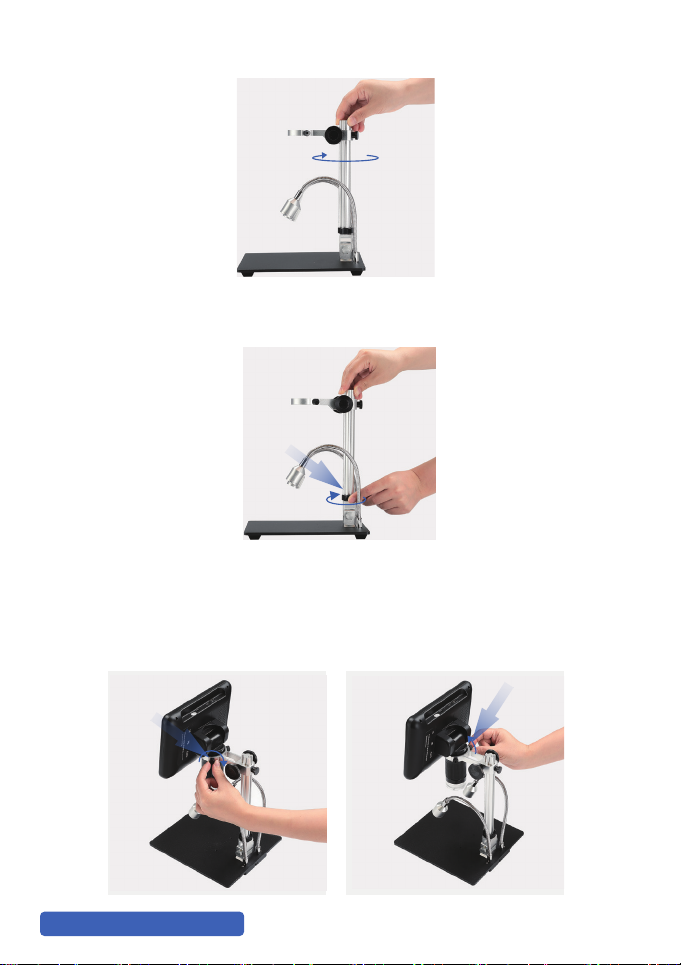
Step 4: Screw the black ring clockwise to fix the bracket tightly.
(2) How to Install the Monitor
Step 1: Insert the monitor and tighten the two little screws.
Step 3: Screw the rod clockwise.
-6-
E-mail: support@Elikliv.com
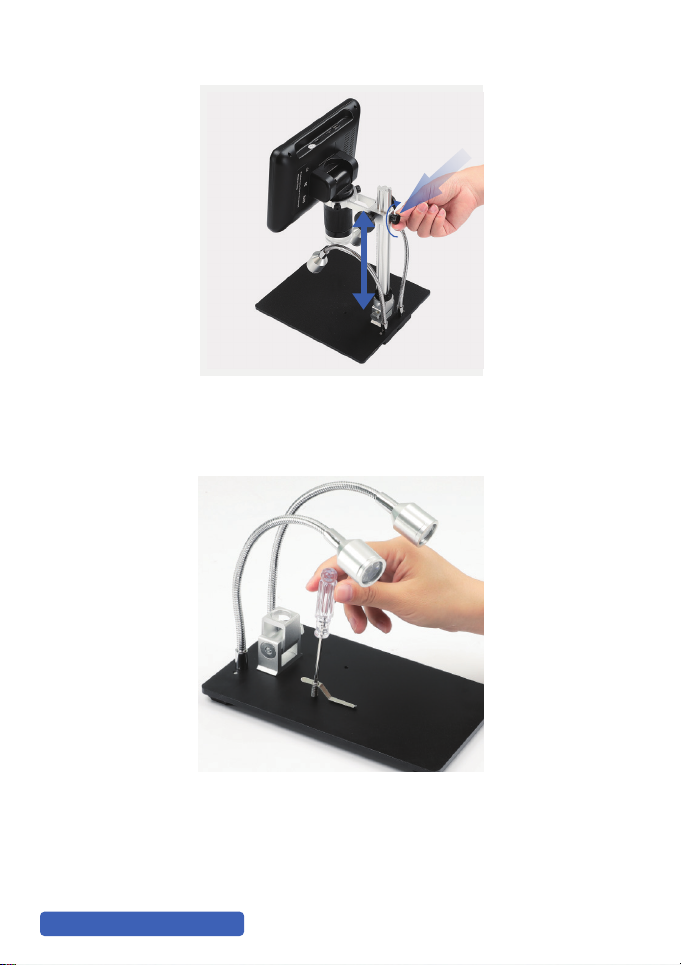
Step 2: Adjust the monitor up and down,then tighten this screw.
Fix the clips into the stand base according to your need.
The stage doesn’t move smoothly on the base after the clips installed,
so if you use button transmitted light stage with DM401 Pro/DM402 Pro
microscope,We recommend that you don’t install the clips.
(3) How to Install the Clip
-7-
E-mail: support@Elikliv.com
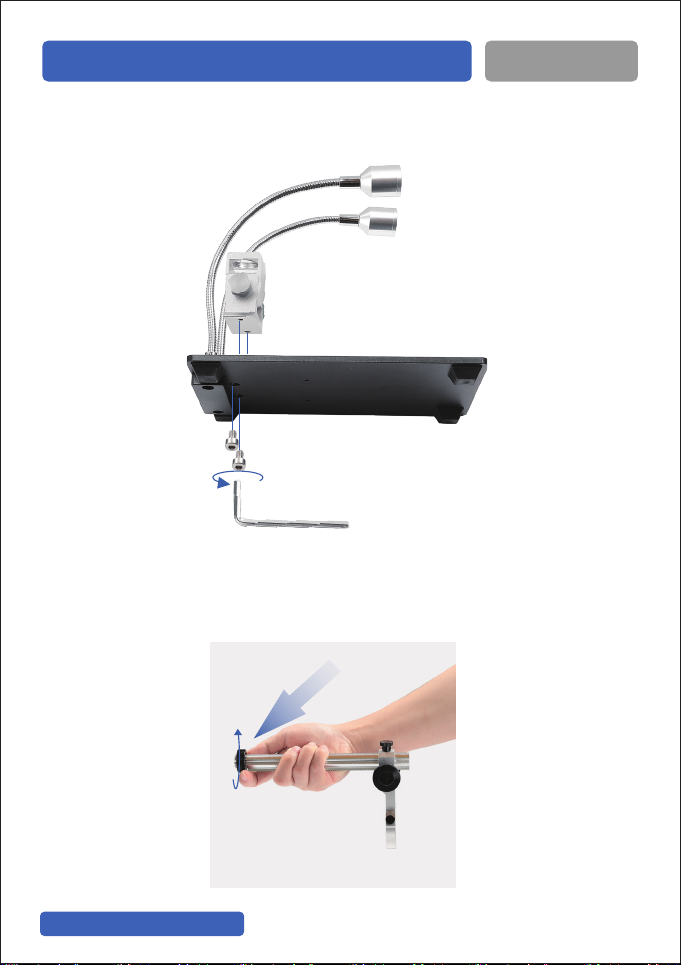
(4) How to Install the Extension Tube
Step 1: Screw the extension tube on the base.
Step 2: Screw and fix the holder on the extension tube.
(Only available for EDM401 Max )
-8-
E-mail: support@Elikliv.com
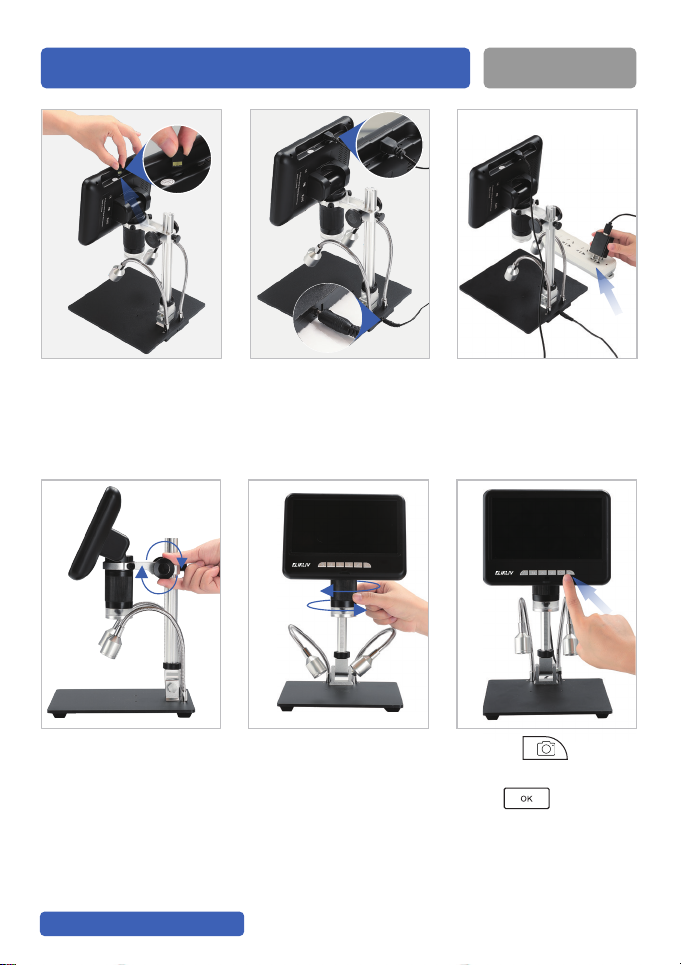
1. Insert Micro SD card 2. Connect the power
cable to the microscope
3. Connect the power
cable to power supply,
the microscope turns
on automatically.
4. Adjust to get suitable
distance and clear
image
5. Rotate the knob to
zoom & focus
6. Press to capture
an image,
press to start and
stop a video recording .
Quick Start
-9-
E-mail: support@Elikliv.com

Monitor
Metal Base
Height Adjusting Screw
Focusing Knob
Lens Cover
Side Light
Main Light Control Knob
Stand
M
Power ON / OFF
Mode / Menu
Up / Digital Zoom +
Down / Digital Zoom -
① Confirm
② Start/Pause video recording
Photo Button for capturing an image
IR Receiver
Parts Description
-10-
E-mail: support@Elikliv.com
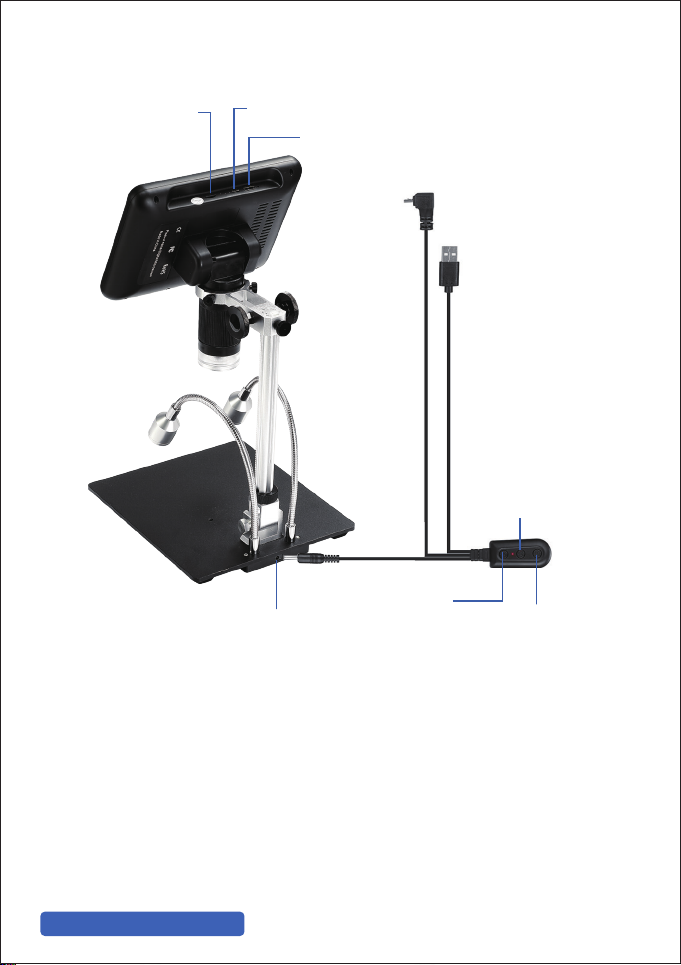
Micro SD Card Slot
HDMI Output
Micro USB Slot
Base Light Power Slot Base Light Brightness -
Base Light Brightness +
Main Power Supply
Micro USB(to power up the microscope)
Turn On/Off Microscope
-11-
E-mail: support@Elikliv.com
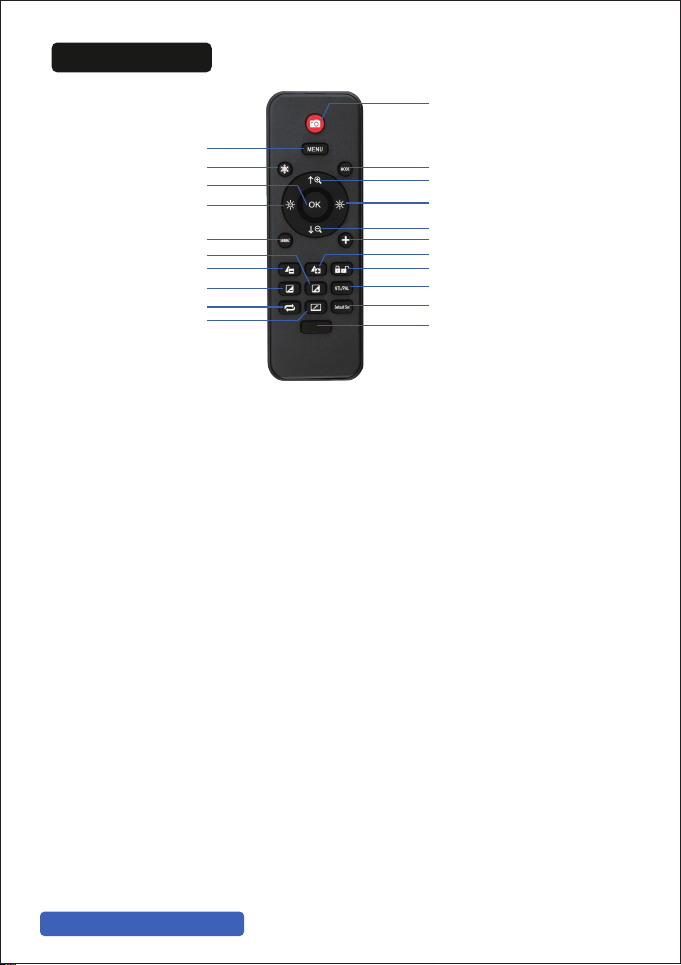
Photo Capture: Snap an photo
Menu: Press this button to enter/exit the menu.
Freeze Image: Freeze the screen under video mode, press this button
again to unfreeze.
Left/Brightness -: Dim the screen brightness.
Right/Brightness +: Increase the sharpness.
OK: Confirm the menu. Start or end video recording.
50/60HZ: The refresh rate of this display. Set the display to redraw the
image 50 or 60 times per second.
Sharpness -: Adjust sharpness .
Sharpness +: Adjust sharpness .
Contrast -: Adjust contrast.
Contrast +: Adjustcontrast.
Negative Film: Press this button to set negative filter.
Black & White: Black and white photo.
Rotate Image: Rotate the image vertically.
Mode: Switch the modes among photo, video and playback.
Up/Zoom +: Zoom out
Down/Zoom -: Zoom in
Cross Line: Turn on/off cross line
Photo Capture
Sharpness +
OK
Contrast +
Black & White
Mode
Up / Zoom +
Right / Brightness +
Down / Zoom -
Cross Line
Menu
Freeze Image
50/60HZ
Sharpness -
Contrast -
Negative Film
Not Available for These Models
NTL / PAL
Not Available for These Models
Rotate Image
Left / Brightness -
Remote Control
-12-
E-mail: support@Elikliv.com

----------------
The microscope can be operated by remote control , there are 3 tips
for better operation :
1. The remote control should be aligned with the IR receiver on the
microscope.
2. The best distance between the remote control and microscope is
10cm-15cm.
3. Please wait a moment so that the microscope can follow and run
the instruction after pressing the button on the remote control.
Don't press the buttons too quickly.
-13-
E-mail: support@Elikliv.com

You can save photos and videos on a micro SD card to review later.
Insert the micro SD card into slot on back of the monitor.
Detailed Operation
-14-
E-mail: support@Elikliv.com
1. Save Photos/Videos With Micro SD Card
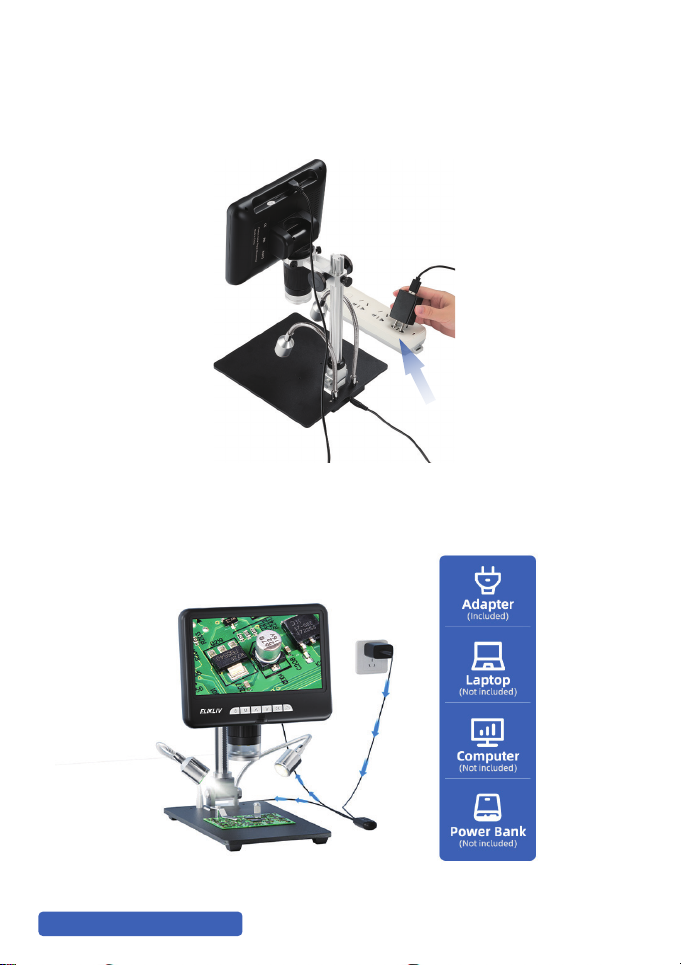
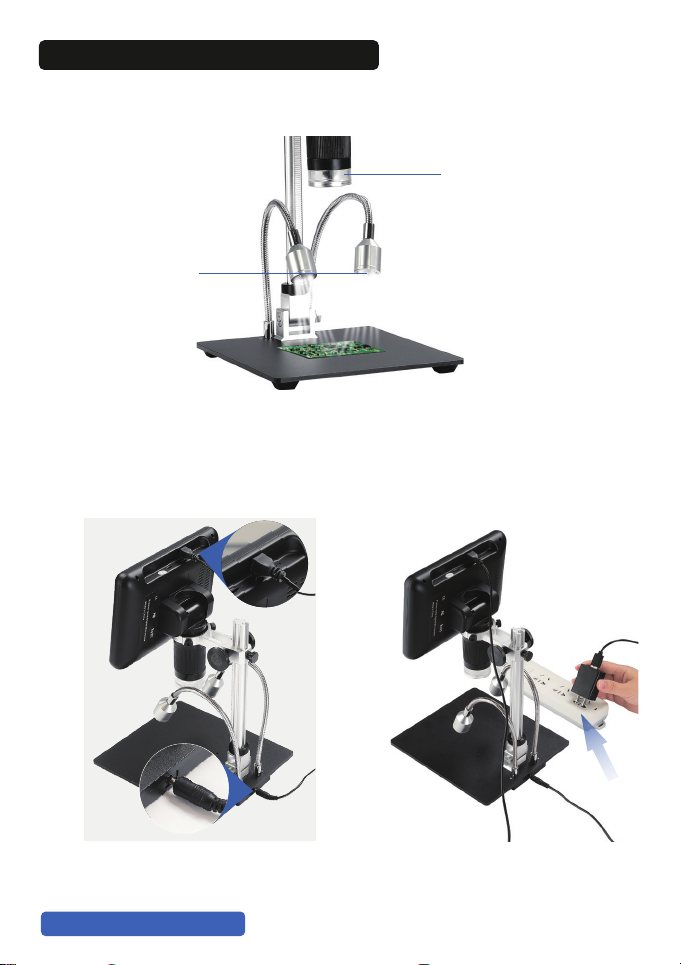
For user’s safety, Tomlov DM401/DM401 Pro/DM402 Pro don’t come
equipped with battery, they can be plugged into the wall socket with
AC adaptor.
(1) Connect the power cable to the microscope as the photo below :
2. How to power up the microscope
-15-
E-mail: support@Elikliv.com
(2) Connect the microscope to a suitable power socket using the
AC adaptor.
Please only connect the provided power supply AC adaptor.
Using an incorrect voltage can substantially damage the microscope.
Or they can be connected with power bank/computer/laptop to work.
There are main LED lights (around the camera)and 2 side LED lights
(on the base),they are powered and controlled separately.
Two Side Lights
Main LED Lights
(1) How to make main LED lights to work
Connect power cable to power supply, the lights are on automatically.
-16-
E-mail: support@Elikliv.com
3. How to Make the LED lights Work

Rotate the light control knob to adjust the brightness.
(2) How to make the side lights work
Press brightness + or brightness - to adjust the brightness of the
side lights.
-17-
E-mail: support@Elikliv.com
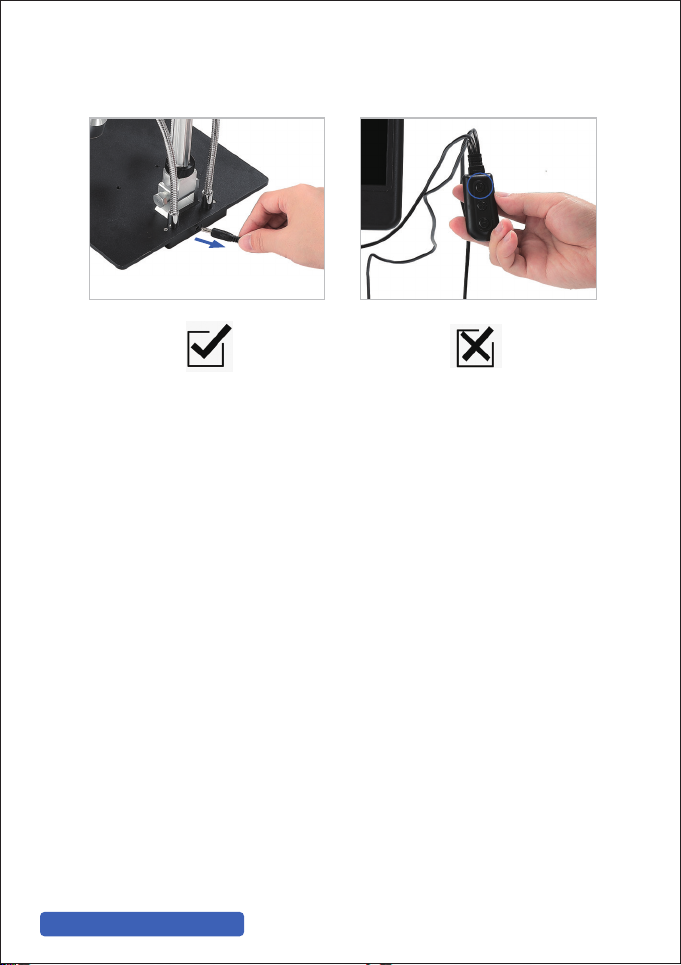
Disconnect the power cable from the base slot to turn off the side
lights.
Notice :
Don't press On/Off button to turn off the lights.The button is used
to turn on/off the microscope.
-18-
E-mail: support@Elikliv.com
This manual suits for next models
1
Table of contents
Other Elikliv Microscope manuals


Popular Microscope manuals by other brands


Discovery Telecom
Discovery Telecom Biological Microscope instruction manual

Zeiss
Zeiss LSM 900 manual

Solaris Scientific
Solaris Scientific CM300 Series user guide

Zeiss
Zeiss Axio Zoom.V16 operating manual

Bresser Junior
Bresser Junior Biolux ICD Pro 20x/50x operating instructions

KERN
KERN OPO-1 operating instructions


