Elk ELK-6051 User manual
1
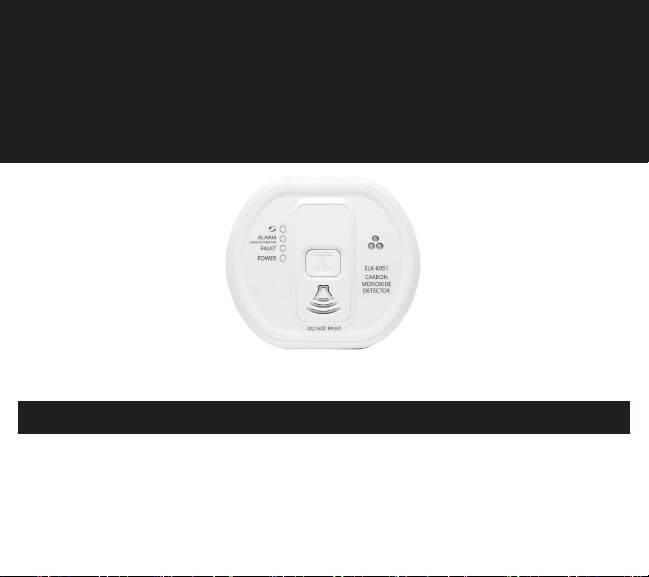
Wireless Carbon Monoxide Detector
ELK-6051
ELK-6051 Wireless Carbon Monoxide Detector
Read carefully and retain for as long as the product is being used. It contains vital
information on the operation and installation of your Detector. This booklet should be
regarded as part of the product. If you are just installing the Detector, this booklet
must be given to the homeowner. This booklet is to be given to any subsequent user.
Instructions

2
Table of Contents Page
1. Read This First ......................................................................................... 3
2. Carbon Monoxide – The Silent Killer ........................................................ 4
3. Where to Place CO Detectors .................................................................. 8
4. Installation ............................................................................................... 14
5. Testing / Monitoring & Maintenance ........................................................ 16
6. What to do when the alarm sounds ........................................................ 20
7. How to Protect your Family ..................................................................... 21
8. TechnicalSpecication ............................................................................ 23
9. Getting the CO Detector Serviced .......................................................... 24
10. Warranty .................................................................................................. 24
11. Limitations of CO Detectors..................................................................... 25
12. Troubleshooting ....................................................................................... 27
13. Indicator Summary................................................................................... 28
14. Agencies Compliance.............................................................................. 30

3
1. Read This First
• Congratulations on becoming the owner of an Elk Carbon Monoxide Detector. This product
willhelpprotectyouandyourhouseholdfromthedangerouseectsofCarbonMonoxide-
the silent killer.
• Remove the battery pulltab to engage the batteries. The Carbon Monoxide Detector is
poweredupbycarefullyrotatingitontothemountingplatewhichactivatestheon/oswitch.
Thered,amber&greenlightswillimmediatelyashinsequencetoshowtheyareworking.
Then wait 15 seconds after connecting the power before button testing.
• Install a CO Detector in every room that contains a fuel burning appliance, particularly high
occupancy areas e.g. bedrooms, kitchens etc.
• In rooms with a fuel burning appliance, install (preferably) on the ceiling, (1ft (300mm)
from walls) and between 5ft to 10ft horizontally from appliance. In rooms remote from the
appliance install at ‘head height’, where the Detector indicators can be seen.
• Test the Detector weekly by pressing the test/hush button, the horn will sound (at a
diminished sound output level initially and then quickly reach maximum sound output level).
• Replace Detector after approx. 10 years operation (see ‘Replace by’ date on side wall
label).
• Do not install Detector until all construction is completed to avoid contamination.
• Individuals with health issues may consider warning devices which provide audible and
visual signals for carbon monoxide concentrations under 30ppm.

4
2. Carbon Monoxide – The Silent Killer
2.1 What is Carbon Monoxide?
Many people are killed each year, and many more suer ill health from Carbon Monoxide
(CO) poisoning. CO is an invisible, odorless, tasteless and extremely toxic gas. It is produced
by appliances and vehicles burning fuels, such as coal, oil, natural gas, propane, kerosene,
paran,wood,gasoline,diesel,charcoaletc.COisabsorbedbyredbloodcellsinthelungs
in preference to oxygen - this results in rapid damage to the heart and brain from oxygen
starvation.
High levels of CO in a house can be caused by:
• Incorrectly or poorly installed fuel-burning appliances.
• Blockedorcrackedchimneys/ues.
• Blocked vents or draft-proong which makes areas with fuel burning appliances or
replacesairtight.
• Enginesofcars,lawnmowersetc.leftrunninginconnedspaces.
• Portable kerosene or propane heaters in poorly ventilated rooms.
2.2 What happens when your CO Detector detects Carbon Monoxide?
WhentheDetectordetectspotentiallydangerouslevelsofCO,itashestheredalarmLED
immediately and then sounds a loud alarm if the CO persists. Table B below shows how the
CODetectorreactstodierentlevelsofCOgasandexposuretime.AthigherlevelsofCOthe
alarmturnsonsooner.TherateofashingoftheredLEDindicatesthelevelofCO.IfyourCO
Detector sounds follow the instructions on page 20. NEVER IGNORE THE ALARM!

5
2.3 Symptoms of Carbon Monoxide Poisoning
Table A
Concentration
of CO in Air
▲ ppm
Inhalation Time (approx) and Symptoms Developed
35 The maximum allowable concentration for continuous exposure in any 8 hour period
according to OSHA *.
150 Slight headache after 1.5 hours.
200 Slight headache, fatigue, dizziness, nausea after 2-3 hours.
400 Frontal headaches within 1-2 hours, life threatening after 3 hours, also maximum parts
permillioninuegas(onanairfreebasis)accordingtoUSEnvironmentalProtection
Agency.
800 Dizziness,nauseaandconvulsionswithin45minutes.Unconsciousnesswithin
2 hours. Death within 2-3 hours.
1,600 Headache, dizziness and nausea within 20 minutes. Death within 1 hour.
3,200 Headache, dizziness and nausea within 5-10 minutes. Death within 25-30 minutes.
3,400 Headache, dizziness and nausea within 1-2 minutes. Death within 10-15 minutes.
12,800 Death within 1-3 minutes.
The following symptoms may be related to CARBON MONOXIDE POISONING and should be discussed
with ALL members of the household:
Mild exposure:Headaches,runningnose,soreeyes,oftendescribedas“u”-likesymptoms;
Medium exposure: Dizziness,drowsiness,vomiting;
Extreme Exposure:Unconsciousness,braindamage,death.
Many cases of reported CARBON MONOXIDE POISONING indicate that while victims are aware they are
not well, they become so disoriented they are unable to save themselves by either exiting the building or
calling for assistance.
▲ppm=partspermillion*OSHAOccupationalSafety&HealthAssociation

6
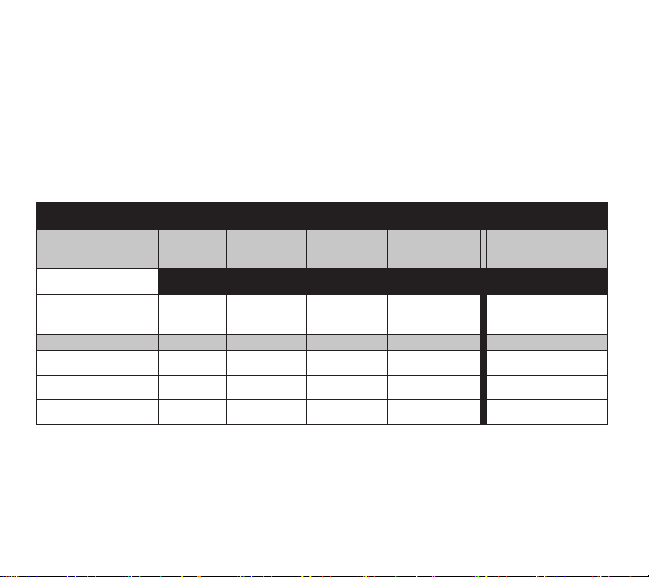
Table B: CO Detector Response
CO Gas Level Red LED Horn/Sounder
0 ppm to < 30 ppm OFF * OFF *
> 45 ppm 1ashevery3secs. on within 60-240 minutes
(typ 90 mins)
> 100 ppm 2ashesevery3secs. on within 10-50 mins
(typ 30 minutes)
> 250 ppm 3ashesevery3secs. on within 4-15 mins
(typ 9 mins)
> 750 ppm 3ashesevery3secs. on within 3 mins
(typ 2 mins)
* unless it has alarmed previously (see CO Alarm Memory below) ppm values shown in table are for example purposes only
Detector Indicators
CO Present: RedLEDashonly
CO Alarm: RedLEDash+sounder
Faults: YellowLEDash+beeps

7
CO present (before horn sounds): When the Detector detects over 45 ppm CO
theredLEDashesinaccordancewithTableB.ThishelpslocateCOleaksas
the unit gives an immediate indication.
(Without this feature the CO level would need to be at 45 ppm CO for typically
90minutesforanalarmsoundtobegiven).NotetheredLEDashesmaybe
triggered by CO produced by gas appliances, from car engines or nearby barbe-
cues.Thisisusuallynotaconcern,unlesstheredLEDashespersistuntilthe
Detector sounds and the CO source is unknown.
NOTE: The CO Detector may sound if cigarette smoke is blown into it, or aero-
sols are released nearby.
ALARM MEMORY
The alarm memory is an important feature of the CO Detector where even if the
house is unoccupied during an alarm condition it warns the homeowner that the
unit has previously detected CO gas and been in alarm. The memory feature has
two operation modes:
- memory indication for 24 hour period after alarm.
- memory recall on demand
24 hour memory indicators: Afteralarm,theREDLEDwillashatdierent
rates every 50 seconds depending on the level of CO detected - see Table C.
Memory recall on demand: To review the memory status after initial 24 hours,
pressandholdthetestbutton,theredLEDwillashinaccordancetoTableC.

8
Table C: CO Detector Memory Indicators
CO Gas Level Red LED Response
24 Hours On Bemand (Button Press)
ppm > 45 ppm 1ashevery50sec 1ash
ppm > 100 ppm 2ashesevery50sec 2ashes
ppm > 250 ppm 4ashesevery50sec 4ashes
ppm > 750 ppm 4ashesevery50sec 4ashes
Reset Memory: Hold down the test button until the red LED stops and green LED
startsashing.CovertheDetectorwithaclothtomuethesounderduringthis
time.Pleasenotethatthememorywillalsoberesetwhentheunitisswitchedo.
3. Where to Place CO Detectors
NATIONALFIREPROTECTIONASSOCIATIONREQUIREDPROTECTION
For your information the National Fire Protection Association’s Standard 720
advises as follows:
Carbon Monoxide Detectors shall be installed as follows:
1. Outside of each separate dwelling unit sleeping area in the immediate vicinity of
the bedroom.
2. On every occupiable level of a dwelling unit, including basements but excluding
attics and crawl spaces.
3. Other locations where required by applicable laws, codes or standards. The
equipment should be installed using wiring methods in accordance with the
National Fire Protection Association’s Standard 72, 720. (National Fire Protection
Association, Batterymarch Park, Quincy, MA 02269)

9
IMPORTANT!
SpecicrequirementsforCarbonMonoxideDetectorinstallationvaryfromstateto
state and from region to region. Check with your local Fire Department for current
requirements in your area.
3.1 Ideally a Carbon Monoxide Detector should be installed in:
- Every room containing a fuel burning appliance, and
- Remote rooms where occupants spend a considerable amount of time
- Every bedroom.
HoweverifthenumberofCarbonMonoxideDetectorstobettedislimited,thefollow-
ingpointsshouldbeconsideredwhendecidingwherebesttottheDetector(s)
- If there is an appliance in a room where people sleep, place a CO Detector in
this room
- LocateaCODetectorinaroomcontainingauelessoropen-uedappliance,and
- Locate a CO Detector in a room where the occupant(s) spend most of their time
(e.g. family room)
- In a studio apartment, the CO Detector should be placed as far away from the cook-
ing appliance as possible, but near to where the person sleeps
- If the appliance is in a room not normally used, such as a furnace room, the CO
Detector should be placed immediately outside the room so that the Detector will be
heard more easily.
10
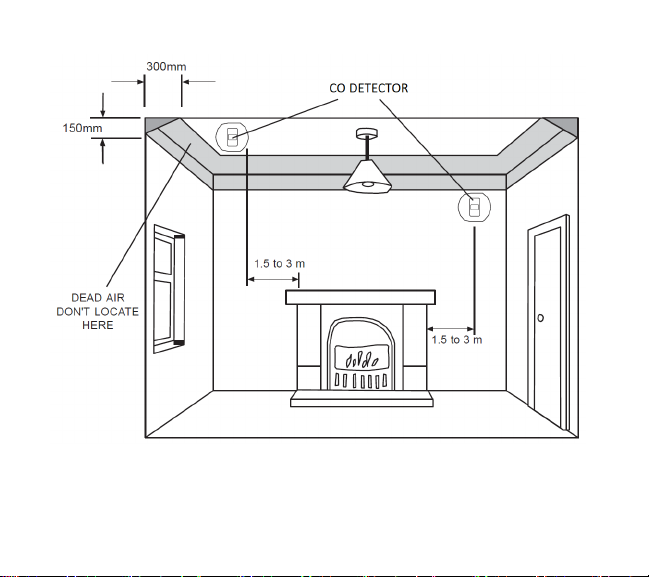
Figure 1
Location in room with a fuel burning appliance
11
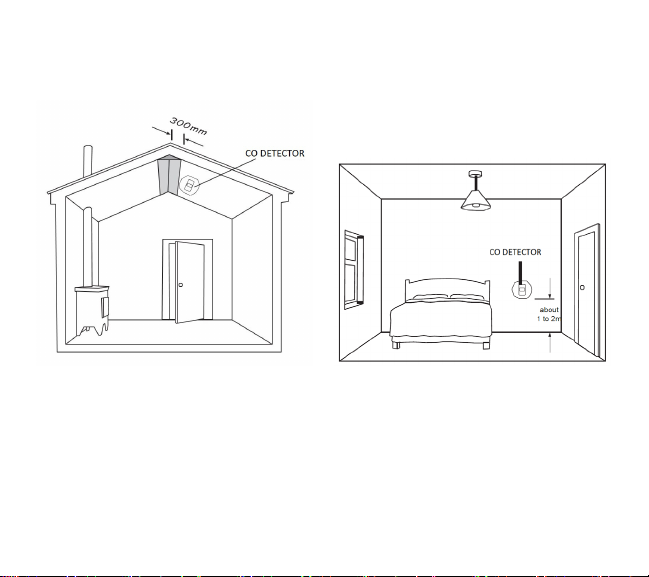
Figure 2
Location in rooms with sloped
ceilings, the CO Detector should be
located at the high side of the room
Figure 3
Location in bedrooms & other
rooms remote from the appliance
(i.e. at breathing level)

12
3.2 Unsuitable Locations
Do not place the CO Detector in any of the following areas.
1. In the immediate vicinity of a cooking appliance (keep it at least 3ft (1 metre)
horizontally from it).
2. Outside the building.
3. In an enclosed space (e.g. in or below a cupboard).
4. In a damp or humid area.
5. Directly above a sink, stovetop or oven.
6. Nexttoadoor,window,airventoranywherethatitcouldbeaectedby
drafts.
7. Next to a ceiling or exhaust fan or air conditioning vents.
8. Over heat sources such as radiators or heating vents.
9. Where it would be obstructed, e.g. by curtains or furniture.
10. In an area where the temperature could drop below 40°F (4.4°C) or rise
above 100°F (37.8°C).
11. Where dirt or dust could block the sensor.
12. Where it could be easily knocked or damaged, or where it could be
accidentallyturnedoorremoved.
13. In a bathroom or other areas where the CO Detector may be exposed to
water splashes, dripping or condensation (e.g. above an electric kettle).
14. Near paint, thinners, solvent fumes or air fresheners.

13
3.31 If locating the CO Detector in a room with a fuel burning appliance
(see gure 1)
• If it is mounted on a wall, it should be located at a height greater than the height
of any door or window but still be at least 0.5ft (150mm) from the ceiling.
• If it is mounted on the ceiling it should be at least 1ft (300mm) from any wall or
lightxture.
• The CO Detector should be a horizontal distance of between 5ft to 10ft (1.5m
and 3m) from the potential CO source.
• If there is a partition in the room, the CO Detector should be located on the same
side of the partition as the potential source of carbon monoxide.
• In rooms with sloped ceilings and fuel burning appliances, the CO Detector
shouldbelocatedatthehighsideoftheroom(seeg2).
3.32 If locating the CO Detector in a bedroom or in rooms remote from a fuel
burning appliance (see gure3)
• Mount the CO Detector relatively close to the breathing zone of the occupants.
Whatever position is chosen make sure it is possible to view the three LED
indicators, when in the vicinity of the Detector.
WARNING: A CO Detector should not be used as a substitute for proper installation,
use and maintenance of fuel-burning appliances, including appropriate ventilation
and exhaust systems.
WARNING: Your CO Detector is intended for use in ordinary indoor locations of
family units. It is not designed to measure compliance with OSHA commercial or
industrial standards.
14
4. Installation
Warning: The Installation of this apparatus should not be used as a substitute
for proper installation, use and maintenance of fuel burning appliances including
appropriate ventilation and exhaust systems.
4.1 Installation Procedure
1. Select a location complying with the advice in
Section 3.
2. Remove the mounting plate from the
packaging/ Detector.
3. Place the mounting plate on the ceiling/wall
exactly where you want to mount the Detector.
With a pencil, mark the location of the two
screw holes.
4. Taking care to avoid any electrical wiring in the
ceiling,drillholesusinga13/64”(5.0mm)drill
bit through the center of the marked locations.
Push the plastic screw anchors provided into
the drilled holes. Screw the mounting plate to the ceiling/ wall.
5. Alternatively,ifdesired,theCODetectorwillalso freestandonaatsurface
with the mounting plate attached.
6. This CO Detector is designed for use with an ELK-M1 Control and
ELK-M1XRFTWM Wireless RF Receiver. It must be RF enrolled into
the M1 Control using the instructions which accompany the ELK Control
and/or Receiver.
Figure 4

15
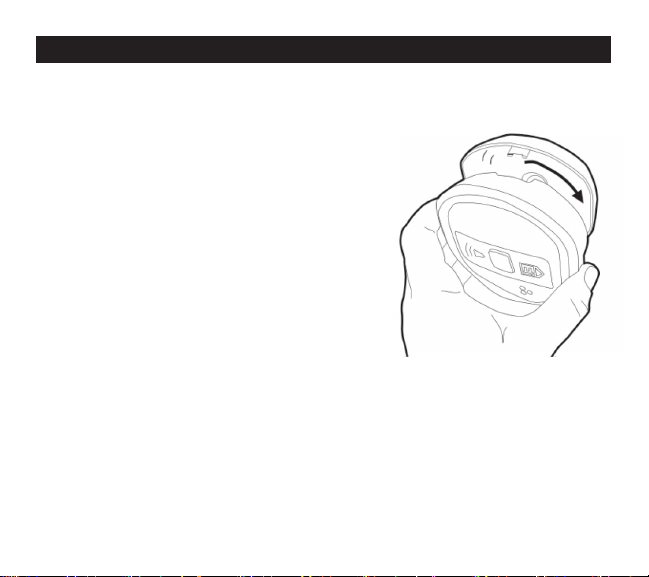
4.2 How to Tamperproof the Detector
The Detector can be made resistant to
unauthorizedremoval.Breakothesmallpillar
on the base as shown in Figure 6a. To remove
the Detector once installed, it is now necessary
to use a small screwdriver, to release the catch
(pushcatchtowardstheceiling)andthentwisto
the Detector (see Figure 6b).
Red
Light
Amber
Light
Green
Light
Test
Button
Figure 5
Figure 6a Figure 6b Figure 7
7. Carefully align the Detector with the base,
gently press home & twist on - see Figure 4.
(This connects the batteries). The red, amber &
greenLEDswillimmediatelyashinsequence
to show the Detector is powered correctly.
8. Press the Test button (after 15 seconds) to
ensure that the Detector is functioning correctly
(see Figure 5).
9. Install all the other Detectors similarly.

16
5. Testing / Monitoring & Maintenance
If necessary it is possible to further secure or tamperproof the Detector by using a
No.2orNo.43/32”to7/64”(2to3mm)diameter-notsuppliedselftappingscrew¼”to
5/16”(6to8mm)longtormlylocktheDetectoranditsmountingplatetogether(see
Figure 7).
Testing
Frequent testing of the system is a requirement to ensure its continued and safe
operation. To test the Detector press the hold the test button. NOTE: Always notify
your Alarm Monitoring Center prior to performing any testing.
TheGreenLEDwillashandthehornwillrampuptofullsoundtoindicatethe
Detector is operating correctly.
Guidelines and best practices for testing are as follows
1. Immediately after the system is installed or upgraded
2. Once weekly thereafter
3. After prolonged absence from the dwelling (e.g. after extended vacation)
4. Afteranysignicanthomerepairsorremodelingwork
Silencing (Hush)
When the Detector sounds, after sensing CO, pressing the test/hush button will
immediatelysilencetheDetector(theredLEDwillcontinuetoash).IfCOisstill
present the red LED and sounder will activate again after about 4 minutes. The
Detector can only be silenced once during a CO incident. At levels > 250ppm CO
the Detector cannot be silenced.
17
Monitoring
The ELK-6051 CO Detector will self check (monitor) itself and give a status update
every 50 seconds if there are any problems.
The status of the Detector can also be checked on demand by using the test
button. The table below shows the status response to both the self check and on
demand testing.
If the Detectors are indicating a fault, pressing the test button will silence the beeps
for a 24 hour period. This is for your convenience and can only be done once.
Monitoring Summary
Status Result Red LED
(Alarm)
Amber
LED (Fault)
Green LED
(Power) Sounder Action
Standby No visual or audible indication if unit is OK
Unit OK (Test
Button)
O O On Ramps up to
full sound
Low Battery O 1 Flash O 1 Beep Replace batteries
Sensor Fault O 2 Flashes O 2 Beeps Replace Unit
End of Life (EOL) O 3 Flashes O 3 Beeps Replace Unit
Maintenance
Clean the outside housing by occasionally wiping with a clean damp cloth. Do
not use any cleaning agents, bleaches, detergents or polishes, including those
in aerosol cans. Avoid spraying air fresheners, hair spray, paint or other aerosols
near the CO Detector. Do not place air fresheners near the unit.
18
Usethenarrownozzleofavacuumcleanertoremoveuandothercontamination
from the cover slots and gas entry holes.
Caution: Do not paint the CO Detector.
Remove the CO Detector when decorating. Do not allow water or dust to
contaminate the Detector.
Warning: Do not open or tamper with the CO Detector. There are no user
serviceable parts inside and this can damage the Detector.
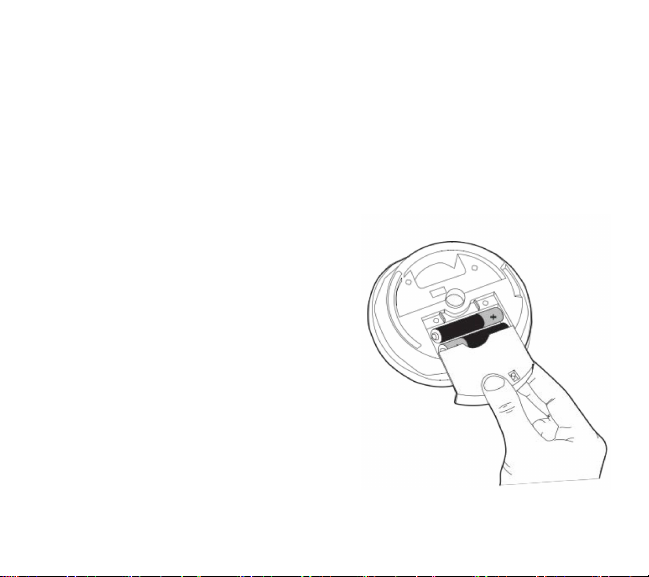
Battery Replacement
If the Detector indicates a yellow ash with
a single beep, remove the Detector from the
mounting plate, remove the battery cover
(seegure8)andreplacethebatteries.Use
only Duracell Alkaline MN2400BK AAA size
batteries (from a local retailer).
Insert the new batteries with the orientation
shown on the base. Replace the battery cover
and carefully line up the Detector on the base.
Gently press home & twist on (this action
automatically switches on the batteries). The
red, amber & green LEDs will immediately
ash in sequence to show the batteries are
connected properly. After 15 seconds press
the Test button to ensure that the Detector works. Figure 8

19
IftheDetectorstillindicatesayellowashwithasinglebeepthebatteriesmay
be depleted. Replace with fresh batteries. If the red, amber & green LEDs
do not ash in sequence the batteries may be installed incorrectly (reverse
polarity). Remove the Detector from the mounting bracket, remove the
battery cover and check if the batteries are installed correctly. If the batteries
were connected incorrectly after correcting the polariy of the batteries for
the rst hour the Detector may indicate CO present by a ashing red LED.
Please note that during this period the Detector will still activate as required
during an actual CO event.
AudioLINK
AudioLINK is an added feature available in the ELK-6051. This feature allows an
authorized person to download information from the Detector through by way of a
mobile App. For more information on using this feature, please refer to the relevant
section on www.elkproducts.com.
Warning! - Constant exposures to high or low temperatures or high humidity
mayreducebatterylife.Useonlybatteriesspeciedinmarking.Useofadierent
batterymayhaveadetrimentaleectonDetectoroperation.
For environmentally sound disposal, remove the Detector from its mounting plate,
open the battery door and remove the batteries. Dispose in accordance with best
practice and guidance on WEEE disposal and recycling.

20
6. What to do when the alarm sounds
Functional Gas Test
The Carbon Monoxide Detector checks for CO gas every 4
secondsandwhenexposedtotheCOgas,theredLEDwillash
(asperTableB)toconrmthatitisdetectingtheCOgas.
Solo C6 brand canned CO testing agent may be used to verify
the Detector’s ability to sense CO. To gas test the Detector, for 3
secondsspraythe cannedCOwithin1/4”ofthegas entryholes
(seeFigure9).Withinseconds,theredLEDwillbegintoash(as
perTable B)toconrmtheDetector hasdetectedCO.Toenter
the accelerated functional gas test mode, press the Test button
momentarily (approx. 1 second) while the Detector is indicating CO
presence. The Detector will sound 2 x 4 temporal tone patterns to
indicate an alarm condition.
To return the unit to standby, simply leave the Detector in clean air
forafewminutesuntiltheredLEDisnolongerashing. Figure 9
Warning! “Actuation of your CO Detector indicates the presence of carbon
monoxide(CO)whichcanKILLYOU.Ifanalarmsignalsounds:
!
1. Operate reset/ Silence button (only operational at concentrations < 250 ppm)
2. Call your local Fire Department or 911
3. Immediately move to fresh air – outdoors or by an open door/ window. Do a
head count to ensure that all persons are accounted for. DO NOT re-enter the
premisesuntiltherstrespondershavearrived,thepremiseshavebeenaired
out and your Detector returns to its normal condition.
Gas Entry
Holes
Table of contents
Other Elk Security Sensor manuals


Popular Security Sensor manuals by other brands


Sentrol
Sentrol ShatterPro SPRES installation instructions

DMP Electronics
DMP Electronics 1127W-WINT Installation sheet

Elkron
Elkron DC200 instruction manual

TEUFELBERGER
TEUFELBERGER antiSHOCK Manufacturer's information and instructions for use

Toshiba
Toshiba LF150 instruction manual

NA-DE
NA-DE FD 8010 instruction manual