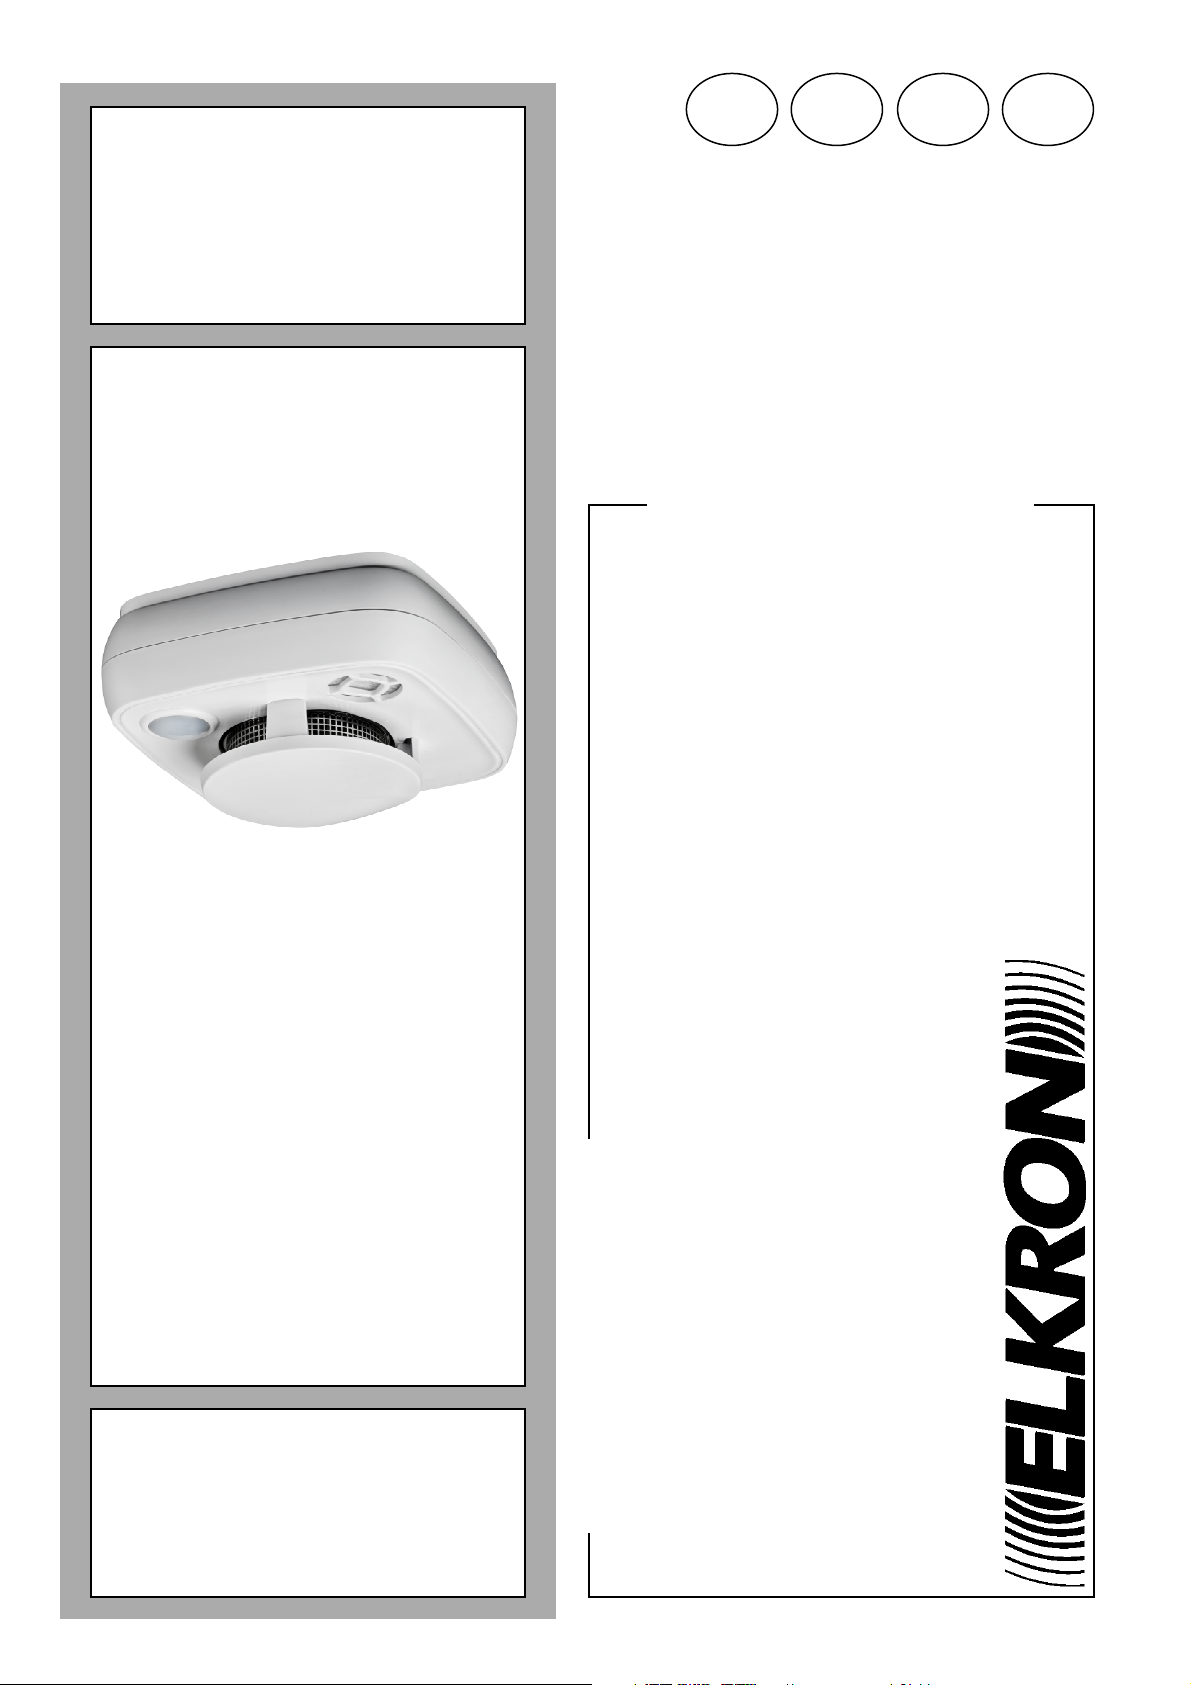
Elkron SD600 Assembly instructions

DS80SD8Z-002
SD600
Rilevatore di fumo
Smoke detector
Détecteur de fumée
Rauchmelder
Manuale d’uso, installazione e progr
ammazione
Installation programming and functions manual
Notice di installation, programmation et utilization
Installations
-, programmier- und gebrauchsanleitun
I EN FR DE

2 DS80SD8Z-002
ITALIANO
SD600 è un rilevatore di fumo miniaturizzato da inserire in un impianto antifurto.
Identificazione delle parti
1.
Indicatore LED e Pulsante
Apprendimento/Test
LED rosso
Lampeggio ogni due secondi, fase di inizializzazione o fase di calibrazione;
Tre brevi lampeggi, quando il rilevatore è fuori portata
Lampeggio rapido per due secondi, il rilevatore è in funzionamento normale
Lampeggio rapido, allarme fumo
LED arancione
Lampeggio ogni secondo, errore di calibrazione
Lampeggio ogni 45 secondi, batteria quasi scarica
LED arancione/rosso
Lampeggio ogni 4 secondi: batteria scarica
Pulsante Test
Premere questo pulsante una volta per:
Inviare il codice di apprendimento
Inviare un segnale di Test
Verificare lo stato della camera di rilevazione fumo
Silenziare un allarme
2. Buzzer
3. Fori per agganci
4. Vano batteria
5. Agganci
6. Fori per montaggio a soffitto
Per maggiori dettagli sul comportamento dei led e del buzzer, consultare la tabella TAB.1 al fondo del presente manuale
Apprendimento
Attivare la funzione di apprendimento sull’unità di controllo (per i dettagli, fare riferimento al manuale di istruzioni della
unità di controllo).
Inserire la batteria nel dispositivo. Esso emetterà due bip e avvierà la propria inizializzazione che durerà un minuto.
Durante questo periodo il LED rosso lampeggerà ogni due secondi
Alla fine della sua inizializzazione, il dispositivo emetterà un bip per indicare l’inizio della procedura interna di
calibrazione che durerà per un periodo da 1 a 9 minuti durante il quale il LED rosso lampeggerà ogni due secondi.
Durante questo periodo NON effettuare apprendimenti
Una volta terminata la propria calibrazione, il dispositivo emetterà un tono bitonale e il LED rosso si spegnerà per
entrare nella sua modalità di funzionamento normale.
Premere il pulsante Test per trasmettere il segnale all’unità di controllo
Se l’unità di controllo riceve il segnale dal rilevatore, visualizza le informazioni corrispondenti del dispositivo. Per
completare il processo di apprendimento, fare riferimento al manuale dell’unità di controllo.
Batteria
La batteria che alimenta il dispositivo è una batteria al litio da 3V modello CR123A. Per sicurezza, non è possibile chiudere il
dispositivo senza la batteria installata.
Quando la batteria sarà quasi scarica, il dispositivo invierà un segnale di batteria bassa verso l’unità di controllo e il LED
5

DS80SD8Z-002 3
arancione lampeggerà ogni 45 secondi insieme ad un bip di bassa intensità. Entrambi i LED, rosso e arancione, lampeggeranno
ogni 4 secondi quando la batteria sarà considerata scarica e quindi da sostituire prima che il dispositivo smetta di funzionare.
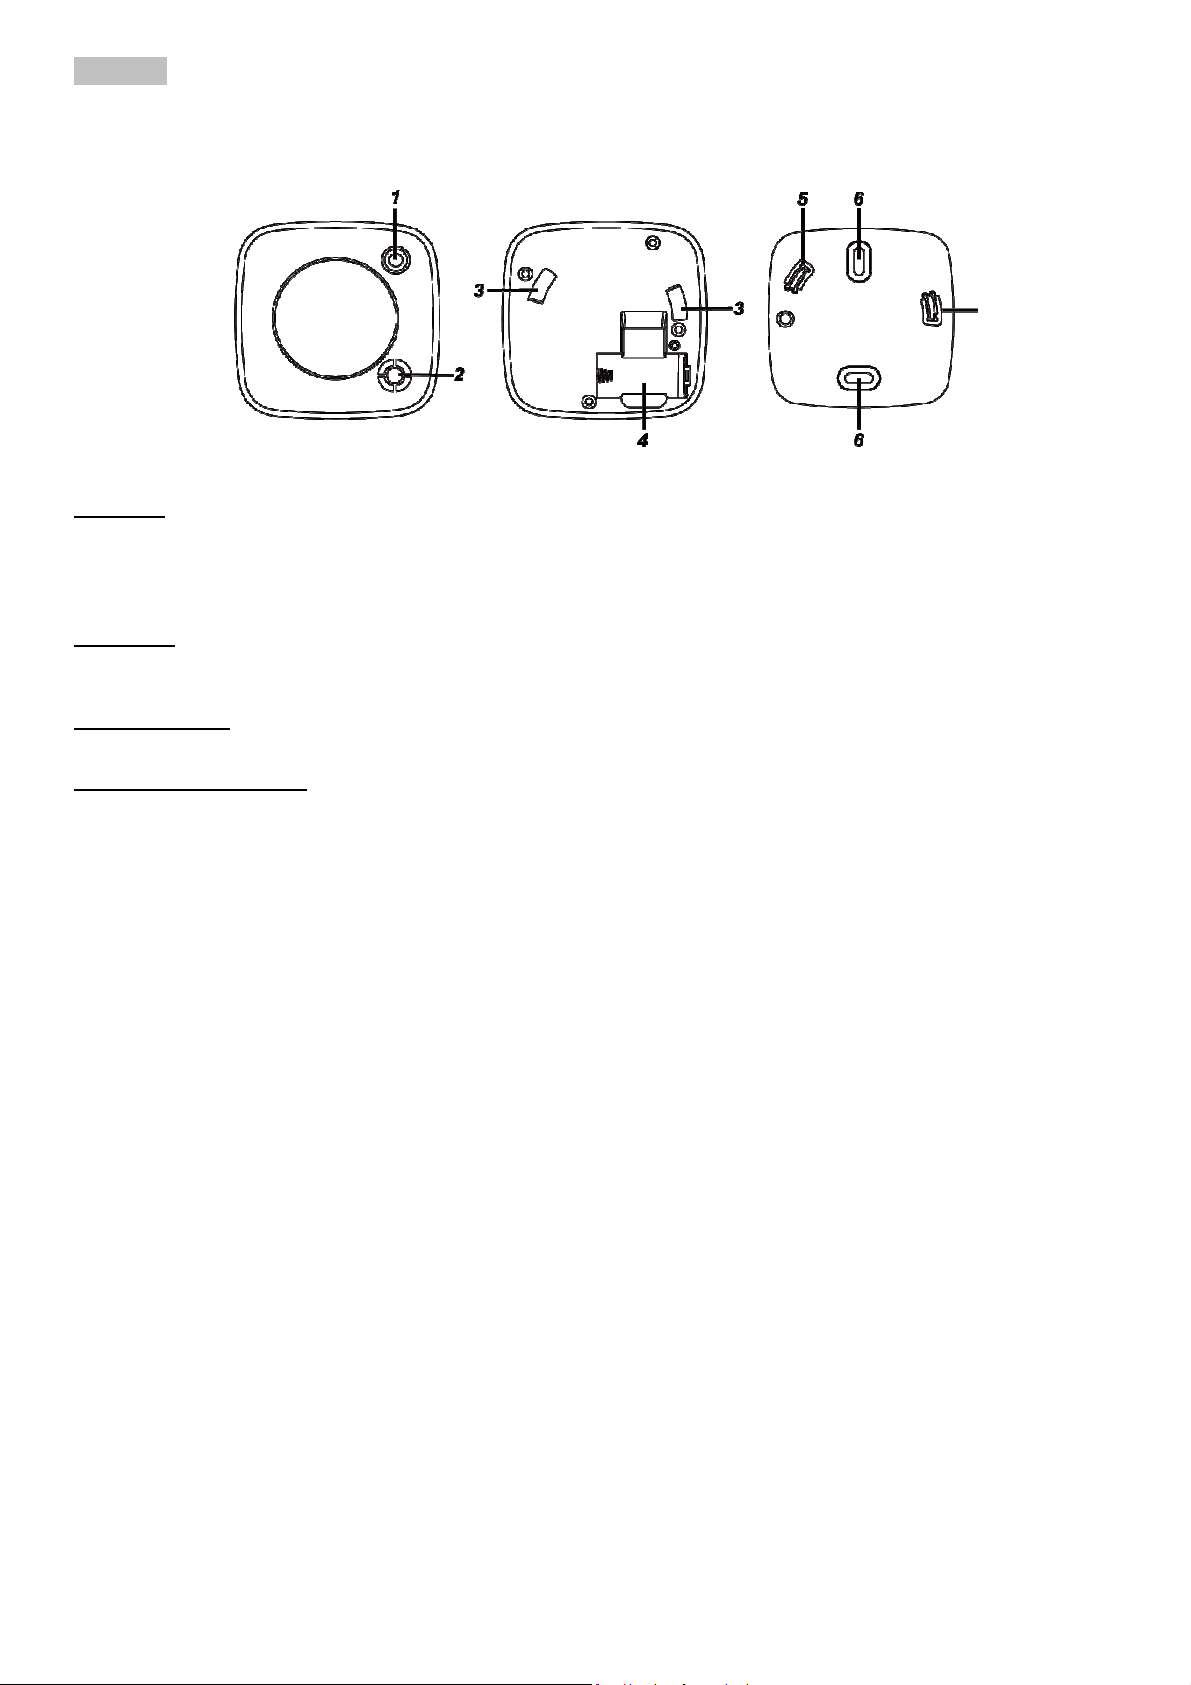
Durante la sostituzione delle batterie, dopo aver rimosso quelle esauste, premere l'interruttore tamper o Apprendimento/Test un
paio di volte per scaricare completamente il dispositivo prima di inserire le batterie nuove.
Test di funzionamento
Premendo il pulsante di Test, il rilevatore attiva un test per verificare il corretto funzionamento.
Se il sensore funziona regolarmente, il LED rosso lampeggerà brevemente a conferma che la comunicazione con l’unità
di controllo è andata a buon fine. Subito dopo il lampeggio vengono emessi tre toni, a conferma che anche
l’autodiagnosi del rilevatore ha dato esito positivo.
Se il buzzer non emette alcun suono, la Camera Ottica interna potrebbe essere sporca o fuori servizio.
Se, dopo aver premuto il pulsante di Test, il LED rosso lampeggia velocemente per 1 secondo, l’unità di controllo ha
correttamente ricevuto il segnale di test e ha inviato la conferma al dispositivo. Se non vi è conferma da parte dell’unità
di controllo, il LED rosso lampeggerà 3 volte.
Supervisione
Il sensore trasmette un segnale di supervisione (stato in vita) ogni 90/110 minuti.
Rilevazione allarmi
Un allarme per presenza di fumo viene generato quando la concentrazione di fumo all’interno della Camera Ottica ha superato
la soglia prefissata.
Il sensore controlla la presenza di fumo ogni 8 secondi.
In presenza di allarme, il dispositivo invia la segnalazione all’unità di controllo e attiva il proprio buzzer interno e il LED rosso che
inizierà a lampeggiare velocemente. La segnalazione acustica del rilevatore in caso di presenza fumo è facilmente riconoscibile
perché diversa dalla segnalazione acustica della centrale antifurto in caso di allarme furto.
Comportamento del dispositivo in caso di allarme
Il buzzer si attiva e il led inizia a lampeggiare:
- Premendo il pulsante Test dopo 1 minuto dalla rilevazione dell’allarme, il buzzer verrà silenziato per 9 minuti.
- Premendo il pulsante Test entro 1 minuto dalla rilevazione dell’allarme, il buzzer smetterà di suonare solo alla fine del
primo minuto.
- Durante i 9 minuti circa successivi alla pressione del tasto, il rilevatore continuerà a monitorare la presenza di fumo e il
LED rosso lampeggerà per tutto il tempo.
- Al termine dei 9 minuti circa, se la presenza di fumo sarà rimasta sotto la soglia, il LED smetterà di lampeggiare e
verranno emessi due bip per indicare l’uscita dallo stato di monitoraggio.
NOTA
Se la presenza di fumo dovesse scendere in modo significativo sotto la soglia di allarme o scomparire del
tutto entro un minuto dall’inizio del primo allarme, il rilevatore tornerà a riposo.
- Se invece, al termine dei 9 minuti e dopo l’emissione dei due bip, la presenza di fumo continua a rimanere sopra la
soglia, verrà attivato un nuovo allarme.
- Se la concentrazione di fumo aumenta durante i 9 minuti di silenzio e supera una seconda soglia, il dispositivo genera
immediatamente un nuovo allarme che non potrà essere silenziato.
- Se il pulsante Test non viene premuto in alcun caso, il buzzer e il led si disattiveranno quando la presenza di fumo
scenderà sotto la soglia o scomparirà del tutto.
Nota bene: gli allarmi possono essere tacitati solo localmente, non è possibile farlo da remoto
Ricalibrazione
Nel caso in cui le condizioni ambientali varino, è possibile eseguire una nuova calibrazione del sensore per stabilire le nuove
corrette soglie di allarme. Per fare ciò:
Premere e tenere premuto il pulsante Apprendimento/Test per 10 secondi e rilasciarlo quando il dispositivo emette 2
bip. Dopo 5 secondi verrà emesso un altro bip ed inizierà la fase di calibrazione. Il LED rosso lampeggerà ogni 2
secondi.
Il processo durerà da 1 a 9 minuti.
Una volta terminata la calibrazione, il dispositivo emetterà un suono bitonale e il LED rosso smetterà di lampeggiare
per indicare il ritorno allo stato normale.
Se la calibrazione fallisce il dispositivo emetterà un suono continuo e il LED arancione lampeggerà ogni secondo. In
questo caso rimuovere la batteria, premere il pulsante Apprendimento/Test due volte per scaricare il dispositivo e
reinserire la batteria per riavviarlo.
Avvertenze per l’installazione
Si raccomanda di installare il sensore al centro del soffitto. Non installare il sensore nei seguenti casi:
In cucina, dove i fumi di cottura potrebbero generare falsi allarmi.
Vicino a un ventilatore, a una lampada fluorescente o a un condizionatore d’aria, i cui movimenti d’aria potrebbero
generare falsi allarmi.
Vicino a travi del soffitto o al di sopra di pensili, perché una mancata circolazione d’aria può compromettere il
funzionamento.
Nel vertice di un profilo ad “A” del soffitto.
In zone soggette a repentini cambi di temperature causati, ad esempio, da termosifoni o condizionatori.

4 DS80SD8Z-002
TAB. 1
IN
IZIALIZZAZIONE / APPRENDIMENTO
CONDIZIONE SEGNALAZIONE LED LAMPEGGIO LED BUZZER
Fase di apprendimento sull’unità di controllo
dopo inserimento della batteria ROSSO
Ogni due secondi per 1
minuto Due bip brevi
Inizio calibrazione del rilevatore dopo la fine
dell’inizializzazione o dopo aver premuto il
pulsante Test per 10 secondi per una
ricalibrazione
ROSSO
Ogni due secondi per un
tempo da 1 a 9 minuti Un bip
Procedura di calibrazione OK Tono bitonale
Procedura di calibrazione FALLITA ARANCIONE Intermittente Suono intermittente
FUNZIONAMENTO NORMALE
CONDIZIONE SEGNALAZIONE LED LAMPEGGIO LED BUZZER
* Pressione del pulsante di Test:
trasmissione/ricezione con l’unità di controllo OK ROSSO Lampeggi veloci per un
secondo
* Pressione del pulsante di Test:
trasmissione/ricezione con l’unità di controllo
FALLITA
ROSSO Tre lampeggi
* Pressione del pulsante di Test: funzionamento
OK ROSSO Lampeggi veloci Tre toni
Pressione del pulsante di Test: camera ottica
sporca o fuori servizio Nessun suono
La batteria si sta scaricando ARANCIONE Ogni 45 secondi Bip continui di bassa
intensità
Batteria scarica ROSSO/ARANCIONE Ogni 4 secondi
RILEVAZIONE ALLARMI E TACITAZIONE BUZZER
CONDIZIONE SEGNALAZIONE LED LAMPEGGIO LED BUZZER
Allarme rilevazione fumo ROSSO Veloce Suono intermittente
Pressione pulsante Test dopo 1 minuto
dall’allarme ROSSO Continuo per 9 minuti Smette di suonare per
9 minuti
Pressione pulsante Test entro 1 minuto
dall’allarme ROSSO Continuo per 9 minuti Smette di suonare alla
fine del minuto
Conclusione dell’intervallo di 9 minuti dalla
rilevazione dell’allarme e con presenza fumo
sotto la soglia
Smette di lampeggiare Due bip
Rilevatore fuori servizio o camera ottica sporca ARANCIONE Ogni 5 secondi
* Questi test vengono eseguiti in sequenza ogni volta che si prema il pulsante di Test
Installazione
1. Individuare la posizione di montaggio dove il dispositivo sia correttamente raggiungibile dall’unità di controllo (eseguire
un Test preliminare).
2. Utilizzare i fori della base del dispositivo come dima.
3. Fissare il dispositivo tramite viti e tasselli.
4. Facendo riferimento alle marchiature laterali visualizzate nella figura A, allineare i fori del sensore con i ganci della
base. Inserire il sensore nella base.
5. Ruotare il sensore in senso orario per bloccarlo come in figura B.
(Figura A)(Figura B)
Manutenzione
Durante il normale funzionamento, il rilevatore può segnalare, mediante lampeggi intermittenti del LED arancione, la necessità di
manutenzione; una segnalazione verrà inviata anche all’unità di controllo. In tale condizione è necessario pulire la camera di
rivelazione per ripristinare il corretto funzionamento, utilizzando un panno asciutto o un pennello sottile. L’intervallo tra le
manutenzioni dipende dalle condizioni ambientali in cui il rilevatore è installato.

DS80SD8Z-002 5
Sostituzione batteria
1. Aprire il dispositivo.
2. Rimuovere la batteria esausta e premere due volte l'interruttore Apprendimento/Test per scaricare completamente il
dispositivo.
3. Inserire la nuova batteria al litio CR123A nell’alloggiamento, rispettando correttamente la polarità.
4. Chiudere il dispositivo.
Specifiche tecniche
Rilevazione fumo: in camera fotoelettrica
Alimentazione: 1 batteria CR123A 3V
Autonomia batterie: 10 anni
Frequenza radio bidirezionale: 868 MHz
Potenza sonora della sirena interna: 85dB/3m
Temperatura operativa: -10°C ÷ +45°C
Dimensioni: 30 mm X 70 mm X 70 mm
Peso: 100g
Certificato EN14604
DICHIARAZIONE DI CONFORMITÀ UE SEMPLIFICATA
Il fabbricante, URMET S.p.A., dichiara che il tipo di apparecchiatura radio: RILEVATORE DI FUMO SD600 è conforme alla
direttiva 2014/53/UE. Il testo completo della dichiarazione di conformità UE è disponibile al seguente indirizzo Internet:
www.elkron.com.
ELKRON
Tel. +39 011.3986711 - Fax +39 011.3986703
www.elkron.com – mail to: [email protected]
ELKRON è un marchio commerciale di URMET S.p.A.
Via Bologna 188/C – 10154 Torino (TO) Italia
HU
www.urmet.com
U
H
MADE IN TAIWAN

6 DS80SD8Z-002
ENGLISH
The SD600 is a miniaturised smoke detector to be inserted in an anti-theft system.
Part identification
1.
LED indicator / Test button
Red LED
One flash every two seconds during initialisation or calibration
Three short flashes when the detector is out of range
Fast flashes for two seconds, the detector working normally
Fast flashes: smoke alarm
Amber LED
One flash a second: calibration error
One flash every 45 seconds: battery almost flat
Amber/red LED
One flash every 4 seconds: low battery charge
Learning/test button
Press this button once to:
Send the learning code
Send a test signal
Check the smoke detection chamber conditions
Silence an alarm
2. Buzzer
3. Holes for fasteners
4. Battery compartment
5. Fasteners
6. Ceiling installation holes
For more details on the behaviour of the LEDs and the buzzer, see TABLE 1 at the end of this manual
Preparation
Activate the Learn function on the control unit.
Insert the battery into the device. It will beep twice and start its own initialisation which will last one minute. During this
time, the red LED will flash once every 2 seconds.
After initialisation, the device will beep to indicate the start of the internal calibration procedure which will take from 1 to
9 minutes during which the red LED will flash once every 2 seconds. DO NOT perform any learning procedures during
this time.
After calibration the device will emit a two-tone alert and the red LED will go out to enter its normal operating mode.
Press the Test button to transmit the signal to the control unit
The corresponding information of the device is displayed if the control unit receives the signal. Refer to the manual of
the control unit to complete the learning process.
Battery
The device is powered by a 3V lithium battery model CR123A. For your safety, you cannot close the device if the battery is not
installed.
When the battery is low, the device will send a low battery signal to the control unit and the orange LED will flash every 45
seconds at low intensity. Both the red and orange LEDs will blink every 4 seconds when the battery is completely flat dead and
therefore needs to be replaced before the device stops working.
While replacing the batteries, after having removed the flat batteries, press the tamper or learning/test button a few times to
discharge the device completely before inserting the new batteries.
5

DS80SD8Z-002 7
Operating Test
The detector activates a correct function test whenever the Test button is pressed.
If the sensor is working properly, the red LED flashes briefly to confirm that communication with the control unit was
successfully established. Immediately after flashing, three TONES are emitted to confirm that the detector self-
diagnosis test was successful.
If the buzzer does not sound, it could mean that the internal optical camera is fouled or out of order.
The red LED will flash quickly for 1 second after pressing the Test button to indicate that the control unit has successfully
received the test signal and sent confirmation to the device. If there is no confirmation from the control unit, the red LED
flashes three times.
Supervision
The sensor transmits a supervision signal (live status) every 90/110 minutes.
Alarm detection
A smoke alarm is generated when the smoke concentration inside the optical chamber exceeds the set threshold.
The sensor checks for smoke every 8 seconds
If there is an alarm, the device sends the signal to the control unit and activates its internal buzzer. The red LED will start flashing
quickly. The acoustic signal of the detector can be easily recognised by the acoustic signal of the central burglar alarm in case of
alarm theft.
Device behaviour in the event of an alarm
The buzzer sounds and the LED starts flashing:
- Press the Test button 1 minute after the alarm is detected to silence the buzzer for 9 minutes.
- Press the Test button within 1 minute of alarm detection to stop the buzzer from sounding only until the end of the first
minute.
- During approximately 9 minutes after pressing the button, the detector will continue to monitor for smoke and the red
LED will flash for the entire time.
- At the end of approximately 9 minutes, if the presence of smoke remains under the threshold, the LED will stop flashing
and two beeps will sound to indicate end of monitoring status.
NOTE
If the presence of smoke falls significantly below the alarm threshold or disappears completely within one
minute from the start of the first alarm, the detector will return to standby mode.
- If the presence of smoke continues to remain above the threshold at the end of the 9 minutes and after the two beeps
have been emitted, a new alarm will be trigger.
- If the smoke concentration rises during the 9 minutes of silence and exceeds a second threshold, the device
immediately generates a new alarm that cannot be silenced.
- If the Test button is not pressed at all, the buzzer and LED will be deactivated when the presence of smoke falls below
the threshold or disappears completely.
Important note: Alarms can only be silenced locally, it is not possible to do so remotely
Recalibration
A new sensor calibration can be performed to establish the new correct alarm thresholds if the ambient conditions change. To do
this:
Press and hold the Learn/Test button for 10 seconds and release when the device beeps twice. After 5 seconds
another beep will sound and the calibration phase will begin. The red LED will blink once every 2 seconds:
The process will take from 1 to 9 minutes.
When calibration is complete, the device will sound the two-tone alert and the red LED will stop flashing to indicate
that it has returned to its normal state.
If the calibration fails, the device will sound continuously and the orange LED will flash every second. In this case,
remove the battery, press the Learn/Test button twice to discharge the device and reinsert the battery to restart it.
Warnings for installation
It is advisable to install the sensor in the middle of the ceiling. Do not install the sensor in the following cases:
In a kitchen, where cooking fumes could generate false alarms.
Close to a fan, fluorescent lamp or A/C unit, whose air movements could generate false alarms.
Close to ceiling beams or above wall units, because a lack of air circulation can compromise operation.
In the apex of an "A" shaped profile of the ceiling.
In areas subject to sudden temperature changes caused, for example, by radiators or A/C units.

8 DS80SD8Z-002
TABLE 1
INITIALISATION / LEARNING
CONDITION LED INDICATION LED FLASHES BUZZER
Learning phase on the control unit after inserting
the battery RED
Every two seconds for 1
minute Two short beeps
Start of detector calibration after the end of
initialisation or after pressing the Test button for
10 seconds for recalibration
RED
Every two seconds for 1
to 9 minutes One beep
Calibration procedure OK Two-tone alert
Calibration procedure FAILED AMBER Intermittent Intermittent sound
NORMAL OPERATION
CONDITION LED INDICATION LED FLASHES BUZZER
* Press the test button: transmission/reception
with control unit OK RED Fast flashes for 1 second
* Press the test button: transmission/reception
with control unit FAILED RED Three flashes
* Press Test button: operation OK RED Fast flashes Three tones
Press test button: optical chamber fouled or out
of service No sound
The battery is running out AMBER Every 45 seconds Low intensity
continuous beeps
Flat battery RED/AMBER Every 4 seconds.
ALARM DETECTION AND BUZZER SILENCING
CONDITION LED INDICATION LED FLASHES BUZZER
Smoke detection alarm RED Fast Intermittent sound
Press Test button after 1 minute from the alarm RED Continuous for 9 minutes Stops sounding for 9
minutes
Press Test button within 1 minute from the alarm RED Continuous for 9 minutes Stops sounding at the
end of the minute
End of 9 minutes after alarm detection and with
smoke below threshold Stops flashing Two beeps
Detector out of service or optical camera fouled AMBER Every 5 seconds.
* These tests are performed in sequence whenever the Test button is pressed
Installation
1. Locate the installation location where the device is correctly accessible from the control unit (perform a preliminary test).
2. Use the holes in the base of the device as a template.
3. Fix the device with screws and anchor bolts.
4. Refer to the side marks shown in figure A to align the holes in the sensor with the fasteners on the base. Insert the
sensor into the base.
5. Turn the sensor clockwise to lock it as shown in figure B.
(Figure A)(Figure B)
Maintenance
During normal operation, the detector can signal the need for maintenance by flashing the amber LED; a signal will also be sent to
the control unit. In this condition, the detection chamber must be cleaned using a dry cloth or a thin brush to restore proper
operation. The maintenance frequency depends on the environmental conditions in which the detector is installed.

DS80SD8Z-002 9
Replacing the battery
1. Open the device.
2. Remove the flat battery and press the Learn/Test switch twice to discharge the device completely.
3. Insert the new CR123A lithium battery in the housing, respecting the correct polarity.
4. Close the device.
Technical specifications
Smoke detection: in photoelectric chamber
Power supply: 1 battery CR123A 3V
Battery life: 10 years
Two-way radio frequency: 868 MHz
Sound level of the internal siren: 85dB/3m
Working temperature range -10°C – +45°C
Dimensions: 30 mm X 70 mm X 70 mm
Weight: 100g
EN14604 certified
SIMPLIFIED EU DECLARATION OF CONFORMITY
Hereby, URMET S.p.A. declares that the radio equipment type: SMOKE DETECTOR SD600 is in compliance with Directive
2014/53/EU. The full text of the EU declaration of conformity is available at the following internet address: www.elkron.com.
ELKRON
Tel. +39 011.3986711 - Fax +39 011.3986703
www.elkron.com – mail to: info@elkron.it
ELKRON is a trademark of URMET S.p.A.
Via Bologna 188/C – 10154 Turin (TO) Italy
www.urmet.com
MADE IN TAIWAN

10 DS80SD8Z-002
FRANÇAIS
SD600 est un détecteur de fumée miniaturisé à compléter une installation antivol.
Identification des composants
1. Indicateur LED / Bouton Test
LED rouge
Clignotement toutes les deux secondes : phase d’initialisation ou phase d’étalonnage ;
Triple clignotement court : détecteur hors de la portée
Clignotement rapide pendant deux secondes : détecteur en fonctionnement normal
Clignotement rapide : alarme de fumée
LED orange
Clignotement toutes les secondes : erreur d’étalonnage
Clignotement toutes les 45 secondes : batterie presque déchargée
LED orange/rouge
Clignotement toutes les 4 secondes : batterie déchargée
Bouton Apprentissage/Test
Appuyer une fois sur ce bouton pour :
Envoyer le code d’apprentissage
Envoyer un signal de test
Vérifier l’état de la chambre de détection de fumée
Mettre au silencieux une alarme
2. Ronfleur
3. Trous pour accrochages
4. Compartiment à batteries
5. Accrochages
6. Trous pour montage au plafond
Pour plus de détails sur le comportement des LED et du ronfleur, consulter le tableau TAB.1 au fond de ce manuel
Préparation
Activer la fonction d’apprentissage sur l’unité de contrôle.
Insérer la batterie dans le dispositif. Il émet deux bips sonores et démarre son initialisation qui dure une minute.
Pendant ce temps, la LED rouge clignote toutes les deux secondes
À la fin de son initialisation, le dispositif émet un bip sonore pour indiquer le début de la procédure d’étalonnage interne
qui dure de 1 à 9 minutes au cours desquelles la LED rouge clignote toutes les deux secondes. Pendant cette période,
NE PAS effectuer d’apprentissages
Une fois l’étalonnage terminé, le dispositif émet une tonalité bitonale et la LED rouge s’éteint pour passer en mode de
fonctionnement normal.
Appuyer sur le bouton Test pour transmettre le signal à l’unité de contrôle
Si l’unité de contrôle reçoit le signal du détecteur, les informations correspondantes du dispositif sont affichées. Pour
terminer la procédure d’apprentissage, se reporter au manuel de l’unité de contrôle.
Batterie
La batterie qui alimente le dispositif est une batterie au lithium de 3 V modèle CR123A. Pour des raisons de sécurité, il n’est pas
possible de fermer le dispositif sans la batterie installée.
Lorsque la batterie est presque déchargée, le dispositif envoie un signal de batterie faible à l’unité de contrôle, la LED orange
clignote toutes les 45 secondes et un bip sonore de faible intensité est émis.
Les deux LED rouge et orange clignotent toutes les 4 secondes lorsque la batterie est considérée déchargée et doit donc être
remplacée avant que le dispositif cesse de fonctionner.
5

DS80SD8Z-002 11
Lors du remplacement des batteries, après avoir retiré celles épuisées, appuyer quelques fois sur l’interrupteur tamper ou sur le
bouton Apprentissage/Test pour décharger complètement le dispositif avant d’insérer les nouvelles batteries.
Test de fonctionnement
Chaque fois que le bouton Test est enfoncé, le détecteur active un test de bon fonctionnement.
Si le capteur fonctionne normalement, la LED rouge clignote brièvement pour confirmer que la communication avec
l’unité de contrôle a réussi. Juste après le clignotement, trois tonalités sont émises pour confirmer que l’autodiagnostic
du détecteur a réussi lui aussi.
Si le ronfleur n’émet aucun son, la Chambre Optique interne pourrait être sale ou hors service.
Si, après avoir appuyé sur le bouton Test, la LED rouge clignote rapidement pendant 1 seconde, l’unité de contrôle a
correctement reçu le signal de test et a envoyé la confirmation au dispositif. Si l’unité de contrôle n’envoie pas de
confirmation, la LED rouge clignote trois fois.
Supervision
Le capteur transmet un signal de supervision (état en vie) toutes les 90/110 minutes.
Détection d’alarmes
Une alarme de fumée est déclenchée lorsque la concentration de fumée dans sa chambre optique dépasse le seuil défini.
Le capteur vérifie la présence de fumée toutes les 8 secondes
En présence d’une alarme, le dispositif envoie le signal à l’unité de contrôle et active son ronfleur interne ainsi que la LED rouge,
qui commence à clignoter rapidement. Le signal acoustique du détecteur peut être facilement reconnu par le signal sonore de la
centrale antivol en cas d’alarme antivol.
Comportement du dispositif en cas d’alarmes
Le ronfleur s’active et la LED commence à clignoter :
Si le bouton Test est enfoncé après qu’une minute se soit écoulée de la détection de l’alarme, le ronfleur est désactivé
pendant 9 minutes.
Si le bouton Test est enfoncé avant qu’une minute se soit écoulée de la détection de l’alarme, le ronfleur ne cesse de
sonner qu’à la fin de la première minute.
Pendant ces 9 minutes environ après avoir appuyé sur la touche, le détecteur continue de monitorer la présence de
fumée et la LED rouge clignote pendant tout ce temps.
Après ces 9 minutes environ, si la présence de fumée est restée en dessous du seuil, la LED cesse de clignoter et
deux bips sonores sont émis pour indiquer la sortie de l’état de monitorage.
NOTE. Si la présence de fumée tombe sensiblement sous le seuil d’alarme ou disparaît complètement dans une minute du
début de la première alarme, le détecteur revient au repos.
Si, au contraire, après les 9 minutes et après l’émission des deux bips, de la fumée est encore détectée au-delà du
seuil, une nouvelle alarme est activée.
Si la concentration de fumée continue d’augmenter pendant les 9 minutes de silence et dépasse un deuxième seuil,
le dispositif déclenche immédiatement une nouvelle alarme qui ne peut pas être désactivée.
Si le bouton Test n’est en aucun cas enfoncé, le ronfleur et la LED se désactivent lorsque la présence de fumée
descend sous le seuil ou disparaît complètement.
Remarque : les alarmes ne peuvent être désactivées que localement ; il n’est en fait pas possible de le faire à distance
Réétalonnage
Si les conditions environnementales varient, il est possible d’effectuer un nouvel étalonnage du capteur pour établir les
nouveaux seuils d’alarme corrects. Pour ce faire :
Appuyer sur le bouton Apprentissage/Test et le maintenir enfoncé pendant 10 secondes, puis le relâcher lorsque le
dispositif émet 2 bips sonores. Après 5 secondes, un autre bip sonore est émis et la phase d’étalonnage démarre. La
LED rouge clignote toutes les 2 secondes.
Le processus dure de 1 à 9 minutes.
Une fois l’étalonnage terminé, le dispositif émet un son à deux tons et la LED rouge cesse de clignoter pour indiquer
le retour à l’état normal.
Si l’étalonnage échoue, le dispositif émet un son continu et la LED orange clignote toutes les secondes. Dans ce cas,
retirer la batterie, appuyer deux fois sur le bouton Apprentissage/Test pour décharger le dispositif et réinsérer la
batterie pour le redémarrer.
Avertissements d'installation
Il est recommandé d’installer le capteur au centre du plafond. Ne pas installer le capteur dans les cas suivants :
Dans la cuisine, où les émanations de cuisson pourraient générer de fausses alarmes.
Près d’un ventilateur, d’une lampe fluorescente ou d’un climatiseur dont les mouvements d’air pourraient générer de
fausses alarmes.
Près des poutres de plafond ou sur des placards, car l’absence de circulation d’air pourrait altérer le fonctionnement.
Au sommet d’un profil en « A» du plafond.
Dans des zones sujettes à de brusques changements de température causés, par exemple, par des radiateurs ou
des climatiseurs.

12 DS80SD8Z-002
TAB. 1
INITIALISATION / APPRENTISSAGE
CONDITION SIGNALISATION LED CLIGNOTEMENT LED RONFLEUR
Phase d’apprentissage sur l’unité de contrôle
après avoir inséré la batterie ROUGE
Toutes les deux
secondes pendant 1
minute
Deux bips courts
Début de l’étalonnage du détecteur après la fin
de l’initialisation ou après avoir enfoncé le
bouton Test pendant 10 secondes pour un
réétalonnage
ROUGE
Toutes les deux
secondes pendant une
période de temps de 1 à
9 minutes
Un bip
Procédure d’étalonnage OK Tonalité bitonale
Procédure d’étalonnage ÉCHOUÉE ORANGE Intermittent Son intermittent
FONCTIONNEMENT NORMAL
CONDITION SIGNALISATION LED CLIGNOTEMENT LED RONFLEUR
* Pression du bouton de Test :
transmission/réception avec l’unité de contrôle
OK
ROUGE Clignotements rapides
pendant une seconde
* Pression du bouton de Test :
transmission/réception avec l’unité de contrôle
ÉCHOUÉE
ROUGE Trois clignotements
* Pression du bouton de Test : fonctionnement
OK ROUGE Clignotements rapides Trois tonalités
Pression du bouton de Test : chambre optique
sale ou hors service Aucun son
La batterie est en train de se décharger ORANGE Toutes les 45 secondes Bips continus de faible
intensité
Batterie épuisée ROUGE/ ORANGE Toutes les 4 secondes
DÉTECTION DES ALARMES ET MISE EN SOURDINE DU RONFLEUR
CONDITION SIGNALISATION LED CLIGNOTEMENT LED RONFLEUR
Alarme détection fumée ROUGE Rapide Son intermittent
Pression bouton Test après 1 minute de l’alarme ROUGE Continu pendant 9
minutes Arrête de sonner
pendant 9 minutes
Pression bouton Test avant 1 minute de l’alarme ROUGE Continu pendant 9
minutes Arrête de sonner à la
fin de la minute
Fin des 9 minutes de la détection de l’alarme et
avec présence de fumée sous le seuil Arrêt du clignotement Deux bips
Détecteur hors service ou chambre optique sale ORANGE Toutes les 5 secondes
* Ces tests sont effectués en séquence chaque fois que le bouton de Test est enfoncé
Installation
1. Identifier la position d’installation où l’unité de contrôle peut accéder correctement au dispositif (effectuer un test
préliminaire).
2. Utiliser les trous de la base du dispositif en tant que gabarit.
3. Fixer le dispositif à l’aide de vis et de chevilles.
4. En se reportant aux repères latéraux illustrés à la figure A, aligner les trous du capteur aux crochets de la base. Insérer
le capteur dans la base.
5. Tourner le capteur dans le sens des aiguilles d’une montre pour le verrouiller comme illustré à la figure B.
(Figure A)(Figure B)

DS80SD8Z-002 13
Entretien
Au cours du fonctionnement normal, le détecteur peut signaler le besoin d’entretien, par des clignotements intermittents de la LED
orange ; une signalisation est également envoyée à l’unité de contrôle. Dans cette condition, pour rétablir le bon fonctionnement, il
est nécessaire de nettoyer la chambre de détection à l’aide d’un chiffon sec ou d’un pinceau fin. L’intervalle entre les entretiens
dépend des conditions environnementales où le détecteur est installé.
Remplacement de la batterie
1. Ouvrir le dispositif.
2. Retirer la batterie épuisée et appuyer deux fois sur l’interrupteur Apprentissage/Test pour décharger complètement le
dispositif.
3. Insérer la nouvelle batterie au lithium CR123A dans le compartiment en respectant la polarité.
4. Fermer le dispositif.
Spécifications techniques
Détection de fumée : dans la chambre photoélectrique
Alimentation : 1 batterie CR123A de 3 V
Autonomie des batteries : 10 ans
Fréquence radio bidirectionnelle : 868 MHz
Puissance sonore de la sirène interne : 85 dB/3 m
Température de fonctionnement : De -10 °C à +45 °C
Dimensions : 30 mm X 70 mm X 70 mm
Poids : 100 g
Certificat EN14604
DECLARATION UE DE CONFORMITÉ SIMPLIFIÉE
Le fabricant, URMET S.p.A., déclare que l’équipement radio : DETECTEUR DE FUMEE SD600 est conforme à la directive
2014/53/UE. Le texte complet de la déclaration UE de conformité est disponible à l’adresse internet suivant : www.elkron.com.
ELKRON
Tel. +39 011.3986711 - Fax +39 011.3986703
www.elkron.com – mail to: [email protected]
ELKRON est une marque commerciale de URMET S.p.A.
Via Bologna 188/C – 10154 Turin (TO) Italie
www.urmet.com
MADE IN TAIWAN

14 DS80SD8Z-002
DEUTSCH
Der SD600 ist ein in eine Einbruchmeldezentrale einsetzbarer Miniatur-Rauchmelder.
Identifizierung der teile
1. LED-Anzeige / Test-Taste
Rote LED
Blinkzeichen alle zwei Sekunden, Initialisierungs- oder Kalibrierphase;
Drei kurze Blinkzeichen, wenn der Melder sich außerhalb der Reichweite befindet
Zwei Sekunden langes schnelles Blinken, der Melder befindet sich im Normalbetrieb
Schnelles Blinken, Rauchalarm
Orangefarbene LED
1 Blinkzeichen pro Sekunde: Kalibrierfehler
1 Blinkzeichen alle 45 Sekunden: Batterie fast entladen
Orangefarbene/Rote LED
1 Blinkzeichen alle 4 Sekunden: Batterie entladen
Einlern-/Test-Taste
Betätigen Sie diese Taste einmal, um:
einen Einlerncode zu versenden
ein Testsignal zu versenden
den Zustand der Rauchmelderkammer zu überprüfen
einen Alarm zu unterdrücken
2. Summer
3. Öffnungen für Befestigungen
4. Batteriefach
5. Befestigungen
6. Deckenmontagebohrungen
Wegen weiterer Einzelheiten zum Verhalten der Leds und des Summers siehe Tabelle TAB.1 am Ende dieser Anleitung
Vorbereitung
Auf dem Steuergerät die Einlernfunktion aktivieren.
Setzen Sie die Batterie in das Gerät ein. Dieses sendet zwei Pfeiftöne aus und beginnt mit seiner Initialisierung, die
eine Minute in Anspruch nimmt. Während dieses Zeitraums blinkt die rote LED alle zwei Sekunden
Am Ende seiner Initialisierung sendet das Gerät einen Pfeifton aus, um den Beginn des internen Kalibriervorgangs
anzuzeigen, der einen Zeitraum von 1 bis 9 Minuten in Anspruch nimmt, während dem die rote LED alle zwei
Sekunden blinkt. Während dieses Zeitraums KEINE Einlernvorgänge ausführen.
Sobald die Kalibrierung abgeschlossen ist, sendet das Gerät einen bitonalen Pfeifton aus und die rote LED schaltet sich
aus, um ihren Normalbetrieb aufzunehmen.
Die Test-Taste betätigen, um das Signal an das Steuergerät zu übertragen
Wenn das Steuergerät das Signal vom Detektor empfängt, blendet es die entsprechenden Informationen des Geräts
ein. Zum Abschließen des Einlernvorgangs auf das Handbuch des Steuergeräts Bezug nehmen.
Batterie
Bei der Batterie zum Speisen des Geräts handelt es sich um eine 3 V-Lithiumbatterie Modell CR123A. Zur Sicherheit ist es nicht
möglich, das Gerät ohne eingelegte Batterie zu schließen.
Bei fast entladener Batterie sendet das Gerät ein Signal der niedrigen Batterieladung an das Steuergerät und die orangefarbene
LED blinkt alle 45 Sekunden bei einem gleichzeitigen Pfeifton geringer Lautstärke.
Die rote und die orangefarbene LED blinken beide alle 4 Sekunden, wenn die Batterie als entladen und damit zu ersetzen
5

DS80SD8Z-002 15
betrachtet wird, bevor das Gerät seinen Betrieb einstellt. Während des Ersetzens der Batterien und nach dem Entfernen der
entladenen Batterien den Tamper-Schalter oder die Einlern-/Test-Taste mehrmals betätigen, um die Vorrichtung vollkommen zu
entladen, bevor die neuen Batterien eingelegt werden.
Funktionstest
Bei jedem Betätigen der Test-Taste aktiviert der Melder einen Test der korrekten Funktionsweise
Funktioniert der Sensor regulär, blinkt die rote LED kurz, um zu bestätigen, dass die Kommunikation mit dem
Steuergerät erfolgreich war. Gleich nach dem Blinken werden drei töne ausgesendet, um zu bestätigen, dass
auch die Eigendiagnose des Melders zu einem positiven Ergebnis gekommen ist.
Sendet der Summer keinen Ton aus, könnte die optische Kammer im Inneren verschmutzt oder außer Betrieb sein.
Blinkt die rote LED nach dem Betätigen der Test-Taste eine Sekunde lang schnell und sendet einen bitonalen Ton
aus, hat das Steuergerät das Testsignal korrekt erhalten und die Bestätigung an das Gerät versandt. Erfolgt keine
Bestätigung von Seiten des Steuergeräts blinkt die rote LED dreimal.
Überwachung
Der Sensor überträgt alle 90/110 Minuten ein Überwachungssignal (Lebenszeichen).
Alarmerfassung
Ein Alarm wegen Rauchs wird ausgelöst, wenn die Rauchkonzentration im Inneren der optischen Kammer den festgelegten
Schwellenwert überschreitet.
Der Sensor kontrolliert das Vorhandensein von Rauch alle acht Sekunden.
Bei einem Alarm sendet das Gerät die Signalisierung an das Steuergerät und aktiviert seinen internen Summer und die rote LED,
die schnell zu blinken beginnt. Das akustische Signal des Melders ist leicht von dem akustischen Signals der
Einbruchmeldezentrale im Fall von Diebstahlalarm zu unterscheiden.
Verhalten des Geräts im Alarmfall
Der Summer wird aktiviert und die Led beginnt zu blinken:
- Durch Betätigen der Test-Taste 1 Minute nach der Alarmerfassung wird der Summer 9 Minuten lang unterdrückt.
- Durch Betätigen der Test-Taste innerhalb von 1 Minute ab der Alarmerfassung ertönt der Summer erst am Ende der
ersten Minute nicht mehr.
- Während ca. 9 Minuten nach dem Betätigen der Taste überwacht der Melder das Vorhandensein von Rauch weiter und
die rote LED blinkt während des gesamten Zeitraums.
- Am Ende der ca. 9 Minuten hört die LED auf zu blinken, wenn der Rauch unter dem Grenzwert geblieben ist, und es
werden zwei Pfeiftöne ausgesendet, um das Verlassen des Überwachungsstatus anzuzeigen.
HINWEIS
Sollte der Rauch weit unter die Alarmschwelle nachlassen oder innerhalb einer Minute ab Beginn des
ersten Alarms völlig verschwinden, kehrt der Melder in den Ruhezustand zurück.
- Sollte dagegen nach den 9 Minuten und nach dem Aussenden der beiden Pfeiftöne weiterhin Rauch über dem
Schwellenwert vorliegen, wird ein neuer Alarm ausgelöst.
- Sollte die Rauchkonzentration während der 9 Minuten Stille weiter zunehmen und überschreitet einen zweiten
Schwellenwert, löst das Gerät umgehend einen neuen Alarm aus, der nicht unterdrückt werden kann.
- Wird die Test-Taste in keinem der Fälle betätigt, werden Summer und Led deaktiviert, wenn der Rauch unter den
Schwellenwirt abnimmt oder vollkommen verschwindet.
Beachten: Die Alarm können nur vor Ort unterdrückt werden, eine standortferne Unterdrückung ist nicht möglich
Rekalibrierung
Sollten sich die Umgebungsbedingungen ändern, kann eine Neukalibrierung des Sensors vorgenommen werden, um die
korrekten neuen Alarmschwellenwerte festzulegen. Gehen Sie dazu wie folgt vor:
Betätigen Sie die Einlern-/Test-Taste und halten Sie sie zehn Sekunden lang gedrückt. Lassen Sie sie los, wenn die
Vorrichtung 2 Pfeiftöne aussendet. Nach fünf Sekunden wird ein weiterer Pfeifton ausgesendet und die Kalibrierphase
beginnt. Die rote LED blinkt alle 2 Sekunden
Der Vorgang nimmt ein bis neun Minuten in Anspruch.
Sobald die Kalibrierung abgeschlossen ist, sendet das Gerät einen bitonalen Ton aus und die rote LED hört auf zu
blinken, um die Rückkehr in den Normalzustand anzuzeigen.
Schlägt die Kalibrierung fehl, sendet das Gerät einen Dauerton aus und die orangefarbene LED blinkt einmal pro
Sekunde. Entnehmen Sie in diesem Fall die Batterie, betätigen Sie die Einlern-/Test-Taste zweimal, um das Gerät zu
entladen und setzen Sie die Batterie wieder ein, um es neu zu starten.
Installationswarnungen
Es wird empfohlen, den Sensor in der Deckenmitte zu installieren. Installieren Sie den Sensor nicht an den folgenden Stellen:
In der Küche, in der Kochdunst falsche Alarme verursachen könnte.
In der Nähe eines Ventilators, einer Leuchtstoffröhre oder einer Klimaanlage, deren Luftbewegungen falsche Alarme
auslösen könnten.
In der Nähe von Deckenträgern oder über Hängeschränken, da eine mangelnde Luftzirkulation die Funktionsweise
beeinträchtigen könnte.
An der Spitze eines "A"-Profils der Decke.
In wiederholten Temperaturwechseln ausgesetzten Bereichen, die zum Beispiel durch Heizkörper oder
Klimaanlagen bedingt sind.

16 DS80SD8Z-002
TAB. 1
INITIALISIERUNG / EINLERNEN
ZUSTAND LED-ANZEIGE BLINKEN DER LED SUMMER
Einlernphase auf dem Steuergerät nach dem
Einlegen der Batterie ROT
Alle 2 Sekunden eine
Minute lang Zwei kurze Pfeiftöne
Beginn der Kalibrierung des Melders nach dem
Ende der Initialisierung oder nachdem die Test-
Taste 10 Sekunden zu einer erneuten
Kalibrierung betätigt wurde
ROT
Alle zwei Sekunden über
einen Zeitraum von 1 bis
9 Minuten
Ein Pfeifton
Kalibrierungsvorgang OK Bitonaler Klang
Kalibrierungsvorgang FEHLGESCHLAGEN ORANGE Intermittierend Intermittierender Ton
NORMALBETRIEB
ZUSTAND LED-ANZEIGE BLINKEN DER LED SUMMER
*Betätigen der Test-Taste:
Übertragung/Empfang mit Steuergerät OK ROT Eine Sekunde lang
schnelle Blinkzeichen
*Betätigen der Test-Taste:
Übertragung/Empfang mit Steuergerät
FEHLGESCHLAGEN
ROT Drei Blinkzeichen
Betätigen der Test-Taste: Funktionsweise OK ROT Schnelle Blinkzeichen Drei Töne
Betätigen der Test-Taste: optische Kammer
verschmutzt oder außer Betrieb Kein Ton
Die Batterie entlädt sich ORANGE Alle 45 Sekunden Kontinuierliche
Pfeiftöne geringer
Lautstärke
Batterie leer ROT/ORANGE Alle 4 Sekunden
ALARMERFASSUNG UND SUMMERUNTERDRÜCKUNG
ZUSTAND LED-ANZEIGE BLINKEN DER LED SUMMER
Rauchmeldungsalarm ROT Schnell Intermittierender Ton
Betätigen der Test-Taste 1 Minute ab dem
Alarm ROT 9 Minuten lang
kontinuierlich Ertönt 9 Minuten lang
nicht mehr
Betätigen der Test-Taste innerhalb 1 Minute ab
dem Alarm ROT 9 Minuten lang
kontinuierlich Ertönt ab dem Ende
der Minute nicht mehr
Endet 9 Minuten ab dem Erfassen des Alarms
und bei Rauch unter dem Schwellenwert Hört auf zu blinken Zwei Pfeiftöne
Melder außer Betrieb oder optische Kammer
verschmutzt ORANGE Alle 5 Sekunden
* Diese beiden Tests werden der Reihe nach bei jedem Betätigen der Test-Taste ausgeführt
Montage
1. Stellen Sie die Montageposition fest, in der das Gerät korrekt vom Steuergerät erreichbar ist (führen Sie zuerst einen
Test durch).
2. Verwenden Sie die Öffnungen in der Basis des Geräts als Schablone.
3. Befestigen Sie das Gerät mit Schrauben und Dübeln.
4. Beziehen Sie sich auf die in Abbildung A angegebenen seitlichen Kennzeichnungen und richten Sie die Öffnungen des
Sensors mit den Haken der Basis aus. Setzen Sie den Sensor in die Basis ein.
5. Drehen Sie den Sensor im Uhrzeigersinn, um ihn wie in Abbildung B zu blockieren.
(Abbildung A)(Abbildung B)

DS80SD8Z-002 17
Wartung
Während des normalen Betriebs kann der Melder durch intermittierende Blinkzeichen der orangefarbenen LED die Notwendigkeit
der Wartung anzeigen. Eine Meldung wird auch an das Steuergerät versandt. Unter diesen Bedingungen muss die
Erfassungskammer unter Verwendung eines trockenen Tuchs oder dünnen Pinsels gereinigt werden, um die korrekte
Funktionsweise wiederherzustellen. Die Wartungsabstände hängen von den Umgebungsbedingungen ab, in denen der Melder
installiert ist.
Ersetzen der Batterie
1. Öffnen Sie das Gerät.
2. Entnehmen Sie die entladene Batterie und betätigen Sie die Einlern-/Test-Taste zweimal, um das Gerät vollständig zu
entladen.
3. Legen Sie die neue Lithium-Batterie CR123A in das Fach ein und beachten Sie dabei die korrekte Polarität.
4. Schließen Sie das Gerät wieder.
Technische Daten
Rauchmeldung: in fotoelektrischer Kammer
Versorgung: 1 3 V-Batterie CR123A
Batterieautonomie: 10 Jahre
Bidirektionale Funkfrequenz: 868 MHz
Schallleistung der internen Sirene: 85dB/3m
Betriebstemperatur: -10°C ÷ +45°C
Abmessungen: 30 mm X 70 mm X 70 mm
Gewicht: 100 g
Zertifiziert nach EN14604
VEREINFACHTE EU-KONFORMITÄTSERKLÄRUNG
Der Hersteller, URMET S.p.A., erklärt, dass der Funkgerätetyp: RAUCHMELDER SD600 der Richtlinie 2014/53/UE entspricht. Der
ungekürzte Text der EU-Konformitätserklärung steht unter der folgenden Internetadresse zur Verfügung: www.elkron.com.

18 DS80SD8Z-002
ELKRON
Tel. +39 011.3986711 - Fax +39 011.3986703
www.elkron.com – mail to: [email protected]
ELKRON ist ein eingetragenes Warenzeichen von URMET
S.p.A.
Via Bologna 188/C – 10154 Torino (TO) Italy
www.urmet.com
MADE IN TAIWAN
Other manuals for SD600
1
Table of contents
Languages:
Other Elkron Smoke Alarm manuals

Elkron
Elkron FAP54 User manual

Elkron
Elkron FDOT500 User manual

Elkron
Elkron SD610 Assembly instructions

Elkron
Elkron SD200 User manual

Elkron
Elkron FDO500 User manual

Elkron
Elkron FLR500 User manual

Elkron
Elkron FL100 User manual

Elkron
Elkron FO31WL User manual

Elkron
Elkron FO31WL User manual

Elkron
Elkron SD600 User manual