Elkron SD600 User manual

ITALIANO
SD600
RILEVATORE DI FUMO
1. Indicatore LED e Pulsante
Apprendimento/Test
2. Buzzer
3. Fori per agganci
4. Vano batteria
5. Agganci
6. Fori per montaggio a soffitto
Indicatore LED
LED rosso
Lampeggio ogni due secondi, fase di inizializzazione o fase di calibrazione;
Tre brevi lampeggi, quando il rilevatore è fuori portata
Lampeggio rapido per due secondi, il rilevatore è in funzionamento normale
Lampeggio rapido, allarme fumo
LED arancione
Lampeggio ogni secondo, errore di calibrazione
Lampeggio ogni 45 secondi, batteria quasi scarica
LED arancione/rosso
Lampeggio ogni 4 secondi: batteria scarica
Pulsante Test
Premere questo pulsante una volta per:
Inviare il codice di apprendimento
Inviare un segnale di Test
Verificare lo stato della camera di rilevazione fumo
Silenziare un allarme
Procedura di apprendimento
Attivare la funzione di apprendimento sull’unità di controllo (per i dettagli, fare riferimento al manuale di istruzioni della
unità di controllo).
Inserire la batteria nel dispositivo. Esso emetterà due bip e avvierà la propria inizializzazione che durerà un minuto.
Durante questo periodo il LED rosso lampeggerà ogni due secondi
Alla fine della sua inizializzazione, il dispositivo emetterà un bip per indicare l’inizio della procedura interna di calibrazione
che durerà per un periodo da 1 a 9 minuti durante il quale il LED rosso lampeggerà ogni due secondi. Durante questo
periodo NON effettuare apprendimenti
Una volta terminata la propria calibrazione, il dispositivo emetterà un tono bitonale e il LED rosso si spegnerà per
entrare nella sua modalità di funzionamento normale.
Premere il pulsante Test per trasmettere il segnale all’unità di controllo
Se l’unità di controllo riceve il segnale dal rilevatore, visualizza le informazioni corrispondenti del dispositivo. Per
completare il processo di apprendimento, fare riferimento al manuale dell’unità di controllo.
Modalità Test
Premendo il pulsante di Test, il rilevatore attiva un test per verificare il corretto funzionamento.
Se il sensore funziona regolarmente, il LED rosso lampeggerà brevemente a conferma che la comunicazione con l’unità
di controllo è andata a buon fine. Subito dopo il lampeggio vengono emessi tre toni, a conferma che anche l’autodiagnosi
del rilevatore ha dato esito positivo.
Se il buzzer non emette alcun suono, la Camera di rilevazione fumo interna potrebbe essere sporca o fuori servizio.
Se, dopo aver premuto il pulsante di Test, il LED rosso lampeggia velocemente per 1 secondo, l’unità di controllo ha
correttamente ricevuto il segnale di test e ha inviato la conferma al dispositivo. Se non vi è conferma da parte dell’unità di
controllo, il LED rosso lampeggerà 3 volte.
GUIDA RAPIDA
DS80SD8Z-003
5

Installazione
1. Individuare la posizione di montaggio dove il dispositivo sia correttamente raggiungibile dall’unità di controllo
(eseguire un Test preliminare).
2. Utilizzare i fori della base del dispositivo come dima.
3. Fissare il dispositivo tramite viti e tasselli.
4. Facendo riferimento alle marchiature laterali visualizzate nella figura A, allineare i fori del sensore con i ganci della
base. Inserire il sensore nella base.
5. Ruotare il sensore in senso orario per bloccarlo come in figura B.
(Figura A)(Figura B)
Manutenzione
Durante il normale funzionamento, il rilevatore può segnalare, mediante lampeggi intermittenti del LED arancione, la necessità di
manutenzione; una segnalazione verrà inviata anche all’unità di controllo. In tale condizione è necessario pulire la camera di
rivelazione fumo per ripristinare il corretto funzionamento, utilizzando un panno asciutto o un pennello sottile. L’intervallo tra le
manutenzioni dipende dalle condizioni ambientali in cui il rilevatore è installato.
DICHIARAZIONE DI CONFORMITÀ UE SEMPLIFICATA
Il fabbricante, URMET S.p.A., dichiara che il tipo di apparecchiatura radio: RILEVATORE DI FUMO SD600 è conforme alla
direttiva 2014/53/UE. Il testo completo della dichiarazione di conformità UE è disponibile al seguente indirizzo Internet:
www.elkron.com.
CLICCARE SUL SEGUENTE LINK DEL SITO ELKRON PER ACCEDERE ALLA SCHEDA TECNICA DEL PRODOTTO E
SCARICARE IL MANUALE COMPLETO:
DIRETTIVA 2012/19/UE DEL PARLAMENTO EUROPEO E DEL CONSIGLIO del 4 luglio 2012 sui rifiuti di apparecchiature
elettriche ed elettroniche (RAEE).
Il simbolo del cassonetto barrato riportato sull’apparecchiatura o sulla sua confezione indica che il prodotto alla fine
della propria vita utile deve essere raccolto separatamente dagli altri rifiuti.
L’utente dovrà, pertanto, conferire l’apparecchiatura giunta a fine vita agli idonei centri comunali di raccolta differenziata
dei rifiuti elettrotecnici ed elettronici. In alternativa alla gestione autonoma è possibile consegnare l’apparecchiatura che
si desidera smaltire al rivenditore, al momento dell’acquisto di una nuova apparecchiatura di tipo equivalente.
Presso i rivenditori di prodotti elettronici con superficie di vendita di almeno 400 m2 è inoltre possibile consegnare gratuitamente,
senza obbligo di acquisto, i prodotti elettronici da smaltire con dimensione massima inferiore a 25 cm.
L’adeguata raccolta differenziata per l’avvio successivo dell’apparecchiatura dismessa al riciclaggio, al trattamento e allo
smaltimento ambientalmente compatibile contribuisce ad evitare possibili effetti negativi sull’ambiente e sulla salute e favorisce il
reimpiego e/o riciclo dei materiali di cui è composta l’apparecchiatura.
ELKRON
Tel. +39 011.3986711 - Fax +39 011.3986703
www.elkron.com – mail to: [email protected]
ELKRON è un marchio commerciale di URMET S.p.A.
Via Bologna 188/C – 10154 Torino (TO) Italia
HU
www.urmet.com
U
H
MADE IN TAIWAN

ENGLISH
SD600
SMOKE DETECTOR
1. LED indicator / Test button
2. Buzzer
3. Holes for fasteners
4. Battery compartment
5. Fasteners
6. Ceiling installation holes
LED indicator
Red LED
One flash every two seconds during initialisation or calibration
Three short flashes when the detector is out of range
Fast flashes for two seconds, the detector working normally
Fast flashes: smoke alarm
Amber LED
One flash a second: calibration error
One flash every 45 seconds: battery almost flat
Amber/red LED
One flash every 4 seconds: low battery charge
Learning/test button
Press this button once to:
Send the learning code
Send a test signal
Check the smoke detection chamber conditions
Silence an alarm
Preparation
Activate the Learn function on the control unit.
Insert the battery into the device. It will beep twice and start its own initialisation which will last one minute. During this
time, the red LED will flash once every 2 seconds.
After initialisation, the device will beep to indicate the start of the internal calibration procedure which will take from 1 to 9
minutes during which the red LED will flash once every 2 seconds. DO NOT perform any learning procedures during this
time.
After calibration the device will emit a two-tone alert and the red LED will go out to enter its normal operating mode.
Press the Test button to transmit the signal to the control unit
The corresponding information of the device is displayed if the control unit receives the signal. Refer to the manual of the
control unit to complete the learning process.
Operating Test
The detector activates a correct function test whenever the Test button is pressed.
If the sensor is working properly, the red LED flashes briefly to confirm that communication with the control unit was
successfully established. Immediately after flashing, three tones are emitted to confirm that the detector self-diagnosis test
was successful.
If the buzzer does not sound, it could mean that the smoke detection chamber is fouled or out of order.
The red LED will flash quickly for 1 second after pressing the Test button to indicate that the control unit has successfully
received the test signal and sent confirmation to the device. If there is no confirmation from the control unit, the red LED
flashes three times.
Installation
1. Locate the installation location where the device is correctly accessible from the control unit (perform a preliminary
test).
2. Use the holes in the base of the device as a template.
QUICK GUIDE
DS80SD8Z-003
5

3. Fix the device with screws and anchor bolts.
4. Refer to the side marks shown in figure A to align the holes in the sensor with the fasteners on the base. Insert the
sensor into the base.
5. Turn the sensor clockwise to lock it as shown in figure B.
(Figure A)(Figure B)
Maintenance
During normal operation, the detector can signal the need for maintenance by flashing the amber LED; a signal will also be sent
to the control unit. In this condition, the smoke detection chamber must be cleaned using a dry cloth or a thin brush to restore
proper operation. The maintenance frequency depends on the environmental conditions in which the detector is installed.
SIMPLIFIED EU DECLARATION OF CONFORMITY
Hereby, URMET S.p.A. declares that the radio equipment type: SMOKE DETECTOR SD600 is in compliance with Directive
2014/53/EU. The full text of the EU declaration of conformity is available at the following internet address: www.elkron.com.
CLICK ON THE FOLLOWING LINK OF THE ELKRON SITE TO ACCESS THE PRODUCT TECHNICAL SHEET AND
DOWNLOAD THE COMPLETE MANUAL:
DIRECTIVE 2012/19/EU OF THE EUROPEAN PARLIAMENT AND OF THE COUNCIL of 4 July 2012 on waste electrical and
electronic equipment (WEEE).
The symbol of the crossed-out wheeled bin on the product or on its packaging indicates that this product must not be
disposed of with your other household waste.
Instead, it is your responsibility to dispose of your waste equipment by handing it over to a designated collection point
for the recycling of waste electrical and electronic equipment. The separate collection and recycling of your waste equipment at
the time of disposal will help to conserve natural resources and ensure that it is recycled in a manner that protects human health
and the environment.
For more information about where you can drop off your waste equipment for recycling, please contact your local city office,
your household waste disposal service or the shop where you purchased the product.
ELKRON
Tel. +39 011.3986711 - Fax +39
011.3986703
www.elkron.com – mail to: info@elkron.it
ELKRON is a trademark of URMET S.p.A.
Via Bologna 188/C – 10154 Turin (TO) Italy
www.urmet.com
MADE IN TAIWAN

FRANÇAIS
SD600
DÉTECTEUR DE FUMÉE
1. Indicateur LED / Bouton
Test
2. Ronfleur
3. Trous pour accrochages
4. Compartiment à batteries
5. Accrochages
6. Trous pour montage au
plafond
Indicateur LED
LED rouge
Clignotement toutes les deux secondes : phase d’initialisation ou phase d’étalonnage ;
Triple clignotement court : détecteur hors de la portée
Clignotement rapide pendant deux secondes : détecteur en fonctionnement normal
Clignotement rapide : alarme de fumée
LED orange
Clignotement toutes les secondes : erreur d’étalonnage
Clignotement toutes les 45 secondes : batterie presque déchargée
LED orange/rouge
Clignotement toutes les 4 secondes : batterie déchargée
Bouton Apprentissage/Test
Appuyer une fois sur ce bouton pour :
Envoyer le code d’apprentissage
Envoyer un signal de test
Vérifier l’état de la chambre de détection de fumée
Mettre au silencieux une alarme
Préparation
Activer la fonction d’apprentissage sur l’unité de contrôle.
Insérer la batterie dans le dispositif. Il émet deux bips sonores et démarre son initialisation qui dure une minute. Pendant
ce temps, la LED rouge clignote toutes les deux secondes.
À la fin de son initialisation, le dispositif émet un bip sonore pour indiquer le début de la procédure d’étalonnage interne
qui dure de 1 à 9 minutes au cours desquelles la LED rouge clignote toutes les deux secondes. Pendant cette période,
ne pas effectuer d’apprentissages.
Une fois l’étalonnage terminé, le dispositif émet une tonalité bitonale et la LED rouge s’éteint pour passer en mode de
fonctionnement normal.
Appuyer sur le bouton Test pour transmettre le signal à l’unité de contrôle
Si l’unité de contrôle reçoit le signal du détecteur, les informations correspondantes du dispositif sont affichées. Pour
terminer la procédure d’apprentissage, se reporter au manuel de l’unité de contrôle.
Test de fonctionnement
Chaque fois que le bouton Test est enfoncé, le détecteur active un test de bon fonctionnement.
Si le capteur fonctionne normalement, la LED rouge clignote brièvement pour confirmer que la communication avec l’unité
de contrôle a réussi. Juste après le clignotement, trois tonalités sont émises pour confirmer que l’autodiagnostic du
détecteur a réussi lui aussi.
Si le ronfleur n’émet aucun son, la chambre de détection de fumée pourrait être sale ou hors service.
Si, après avoir appuyé sur le bouton Test, la LED rouge clignote rapidement pendant 1 seconde, l’unité de contrôle a
correctement reçu le signal de test et a envoyé la confirmation au dispositif. Si l’unité de contrôle n’envoie pas de
confirmation, la LED rouge clignote trois fois.
Installation
1. Identifier la position d’installation où l’unité de contrôle peut accéder correctement au dispositif (effectuer un test
préliminaire).
GUIDE RAPIDE
DS80SD8Z-003
5

2. Utiliser les trous de la base du dispositif en tant que gabarit.
3. Fixer le dispositif à l’aide de vis et de chevilles.
4. En se reportant aux repères latéraux illustrés à la figure A, aligner les trous du capteur aux crochets de la base. Insérer
le capteur dans la base.
5. Tourner le capteur dans le sens des aiguilles d’une montre pour le verrouiller comme illustré à la figure B.
(Figure A)(Figure B)
Entretien
Au cours du fonctionnement normal, le détecteur peut signaler le besoin d’entretien, par des clignotements intermittents de la LED
orange ; une signalisation est également envoyée à l’unité de contrôle. Dans cette condition, pour rétablir le bon fonctionnement,
il est nécessaire de nettoyer la chambre de détection de fumée à l’aide d’un chiffon sec ou d’un pinceau fin. L’intervalle entre les
entretiens dépend des conditions environnementales où le détecteur est installé.
DECLARATION UE DE CONFORMITÉ SIMPLIFIÉE
Le fabricant, URMET S.p.A., déclare que l’équipement radio : DETECTEUR DE FUMEE SD600 est conforme à la directive
2014/53/UE. Le texte complet de la déclaration UE de conformité est disponible à l’adresse internet suivant : www.elkron.com.
CLIQUEZ SUR LE LIEN SUIVANT DU SITE ELKRON POUR ACCÉDER À LA FICHE TECHNIQUE DU PRODUIT ET
TÉLÉCHARGER LE MANUEL COMPLET :
LES BONS GESTES DE MISE AU REBUT DE CE PRODUIT (Déchets d’équipements électriques et électroniques)
Ce symbole apposé sur le produit, ses accessoires ou sa documentation indique que ni le produit, ni ses accessoires
électroniques usagés (chargeur, casque audio, câble USB, etc.), ne peuvent être jetés avec les autres déchets
ménagers.
La mise au rebut incontrôlée des déchets présentant des risques environnementaux et de santé publique, veuillez
séparer vos produits et accessoires usagés des autres déchets. Vous favoriserez ainsi le recyclage de la matière qui les compose
dans le cadre d’un développement durable.
ELKRON
Tel. +39 011.3986711 - Fax +39 011.3986703
www.elkron.com – mail to: [email protected]
ELKRON est une marque commerciale de URMET S.p.A.
Via Bologna 188/C – 10154 Turin (TO) Italie
www.urmet.com
MADE IN TAIWAN

DEUTSCH
SD600
RAUCHMELDER
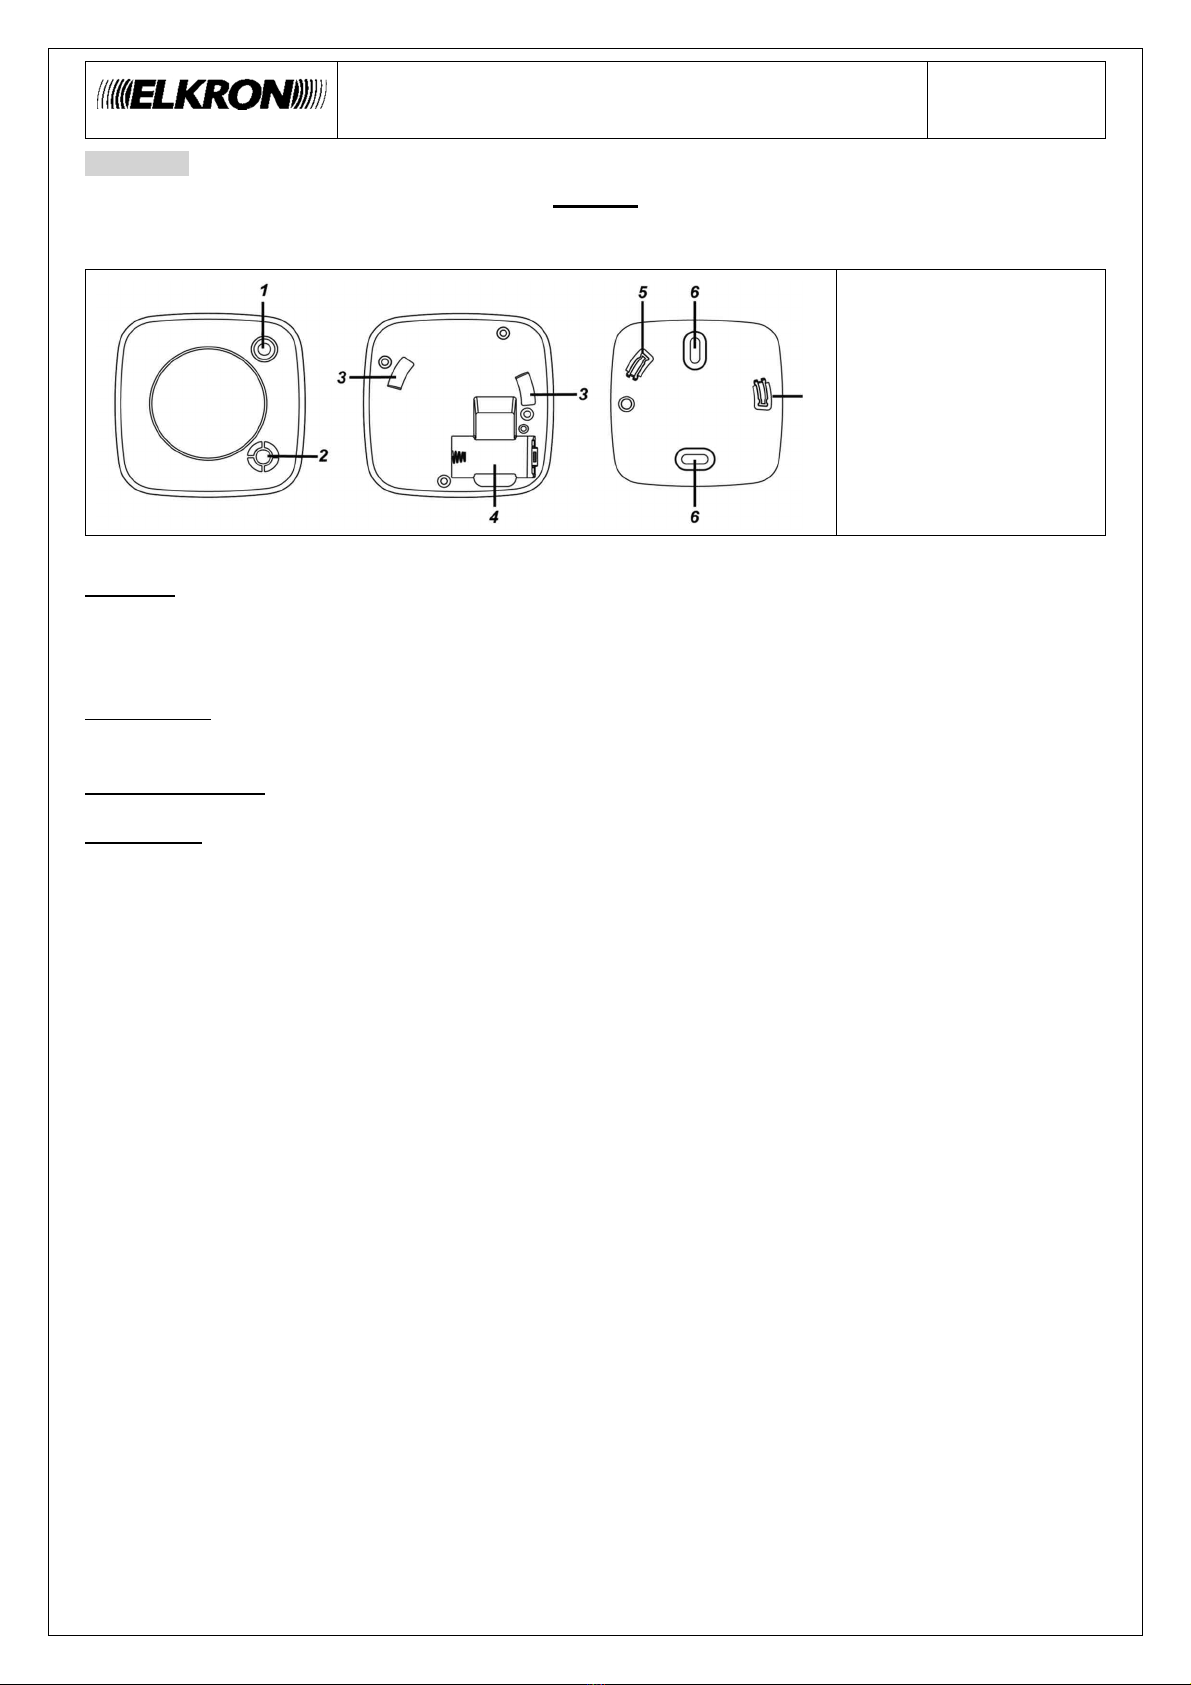
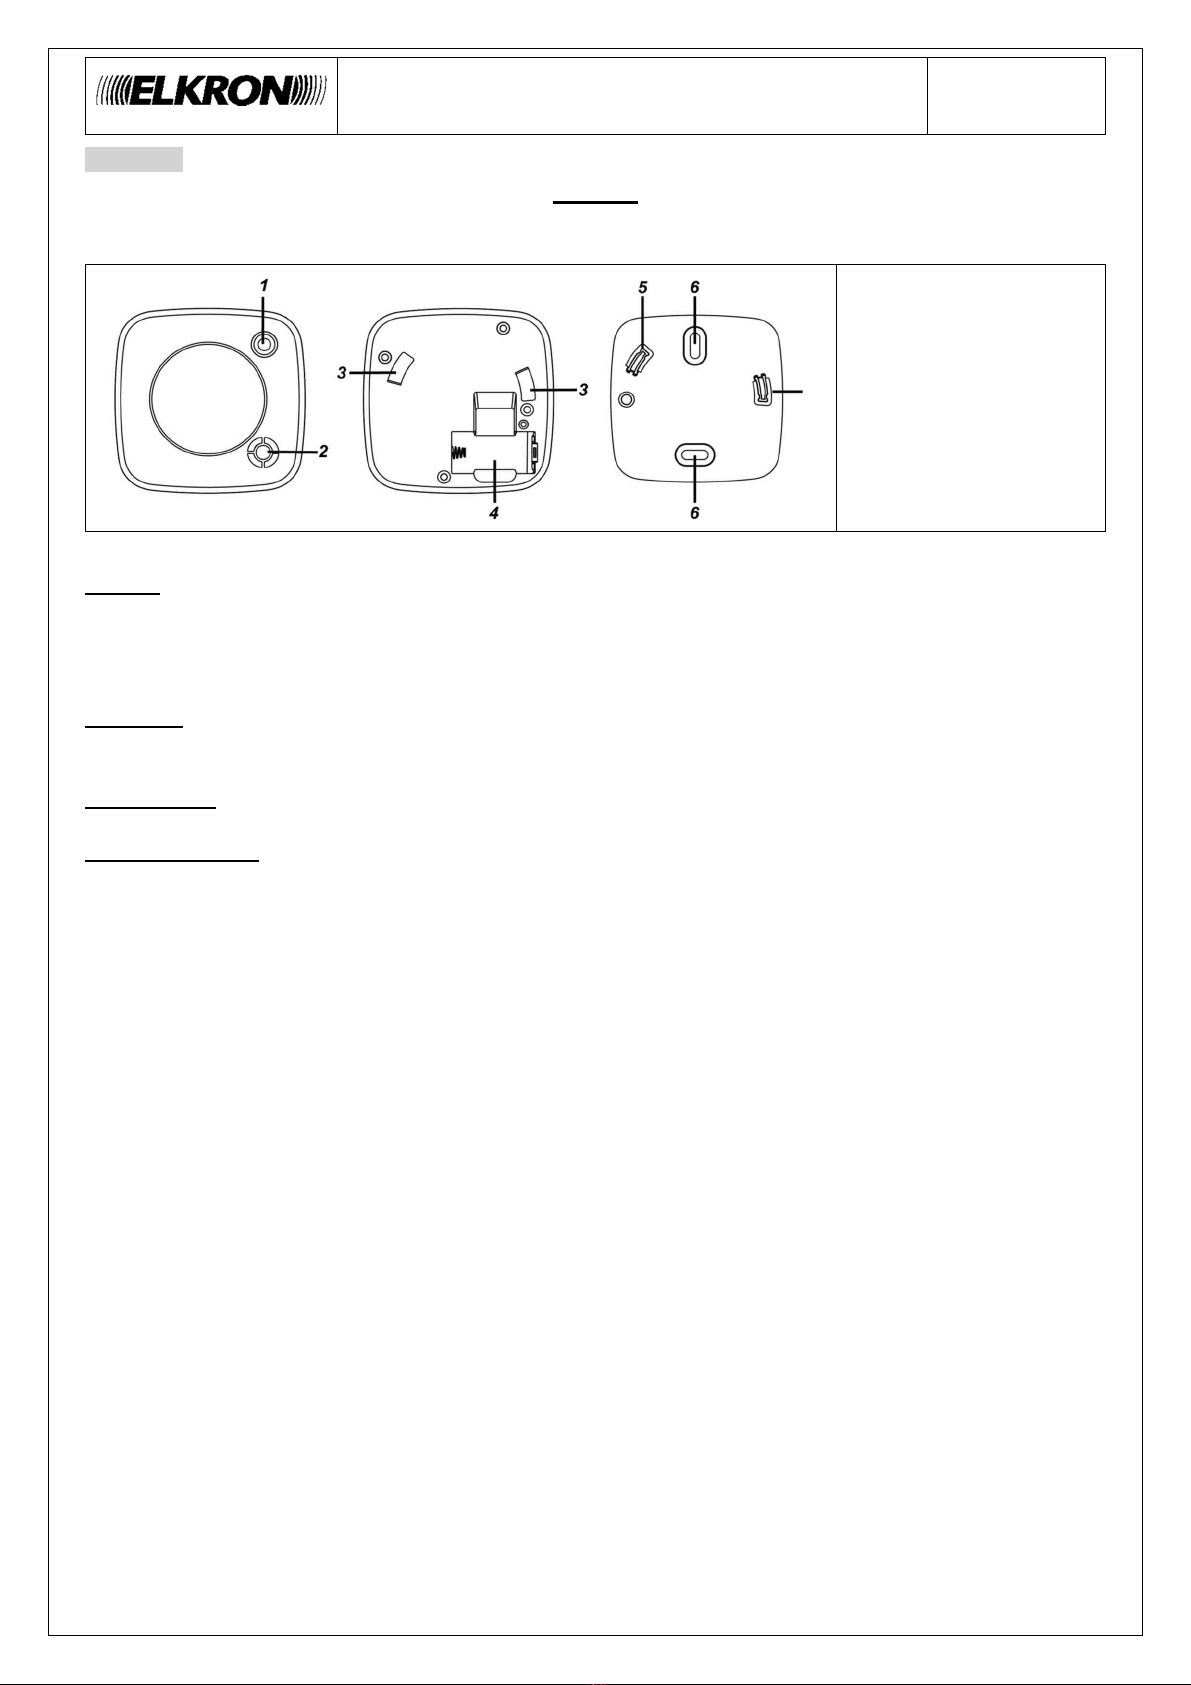
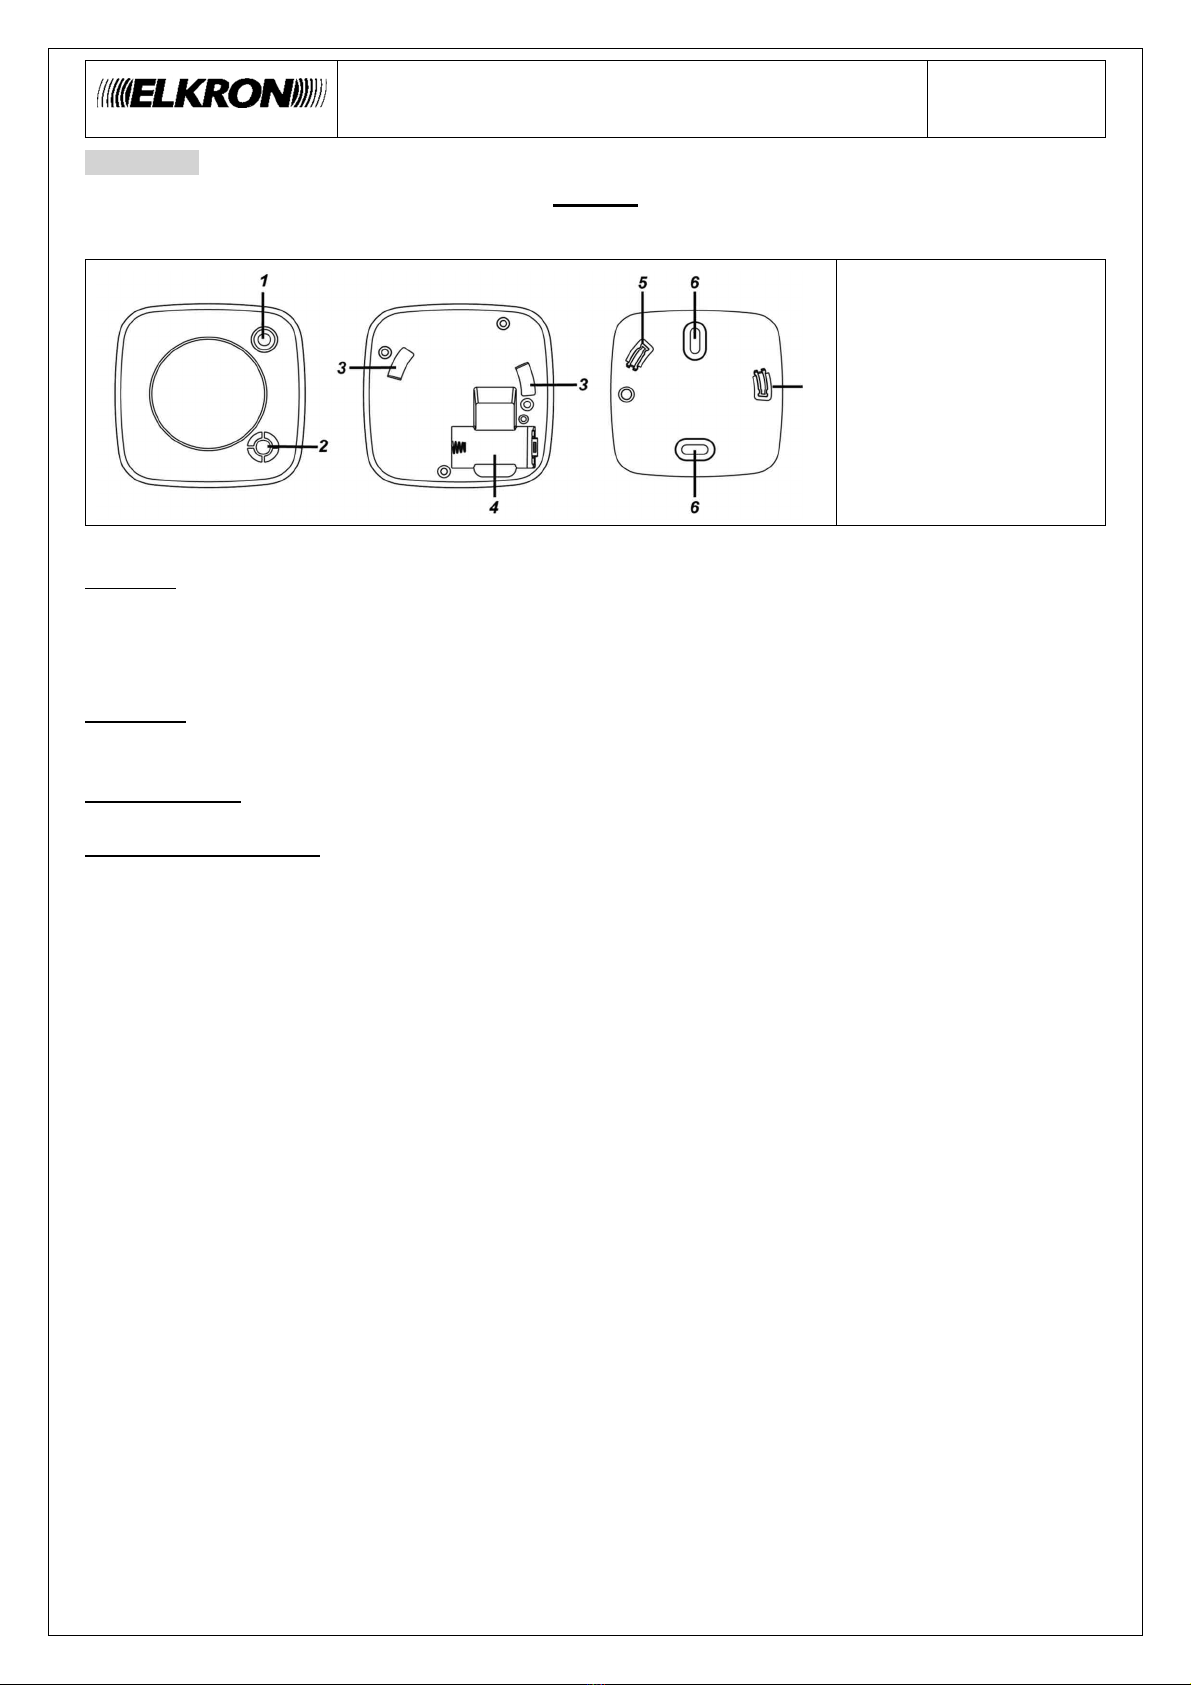
1. LED-Anzeige / Test-Taste
2. Summer
3. Öffnungen für Befestigungen
4. Batteriefach
5. Befestigungen
6. Deckenmontagebohrungen
LED-Anzeige
Rote LED
Blinkzeichen alle zwei Sekunden, Initialisierungs- oder Kalibrierphase;
Drei kurze Blinkzeichen, wenn der Melder sich außerhalb der Reichweite befindet
Zwei Sekunden langes schnelles Blinken, der Melder befindet sich im Normalbetrieb
Schnelles Blinken, Rauchalarm
Orangefarbene LED
1 Blinkzeichen pro Sekunde: Kalibrierfehler
1 Blinkzeichen alle 45 Sekunden: Batterie fast entladen
Orangefarbene/Rote LED
1 Blinkzeichen alle 4 Sekunden: Batterie entladen
Einlern-/Test-Taste
Betätigen Sie diese Taste einmal, um:
einen Einlerncode zu versenden
ein Testsignal zu versenden
den Zustand der Rauchmelderkammer zu überprüfen
einen Alarm zu unterdrücken
Vorbereitung
Auf dem Steuergerät die Einlernfunktion aktivieren.
Setzen Sie die Batterie in das Gerät ein. Dieses sendet zwei Pfeiftöne aus und beginnt mit seiner Initialisierung, die eine
Minute in Anspruch nimmt. Während dieses Zeitraums blinkt die rote LED alle zwei Sekunden
Am Ende seiner Initialisierung sendet das Gerät einen Pfeifton aus, um den Beginn des internen Kalibriervorgangs
anzuzeigen, der einen Zeitraum von 1 bis 9 Minuten in Anspruch nimmt, während dem die rote LED alle zwei Sekunden
blinkt. Während dieses Zeitraums KEINE Einlernvorgänge ausführen.
Sobald die Kalibrierung abgeschlossen ist, sendet das Gerät einen bitonalen Pfeifton aus und die rote LED schaltet sich
aus, um ihren Normalbetrieb aufzunehmen.
Die Test-Taste betätigen, um das Signal an das Steuergerät zu übertragen
Wenn das Steuergerät das Signal vom Detektor empfängt, blendet es die entsprechenden Informationen des Geräts ein.
Zum Abschließen des Einlernvorgangs auf das Handbuch des Steuergeräts Bezug nehmen.
Funktionstest
Bei jedem Betätigen der Test-Taste aktiviert der Melder einen Test der korrekten Funktionsweise
Funktioniert der Sensor regulär, blinkt die rote LED kurz, um zu bestätigen, dass die Kommunikation mit dem Steuergerät
erfolgreich war. Gleich nach dem Blinken werden drei töne ausgesendet, um zu bestätigen, dass auch die Eigendiagnose
des Melders zu einem positiven Ergebnis gekommen ist.
Sendet der Summer keinen Ton aus, könnte der Rauchmelderkammer zu überprüfen verschmutzt oder außer Betrieb
sein.
Blinkt die rote LED nach dem Betätigen der Test-Taste eine Sekunde lang schnell und sendet einen bitonalen Ton aus,
hat das Steuergerät das Testsignal korrekt erhalten und die Bestätigung an das Gerät versandt. Erfolgt keine Bestätigung
von Seiten des Steuergeräts blinkt die rote LED dreimal.
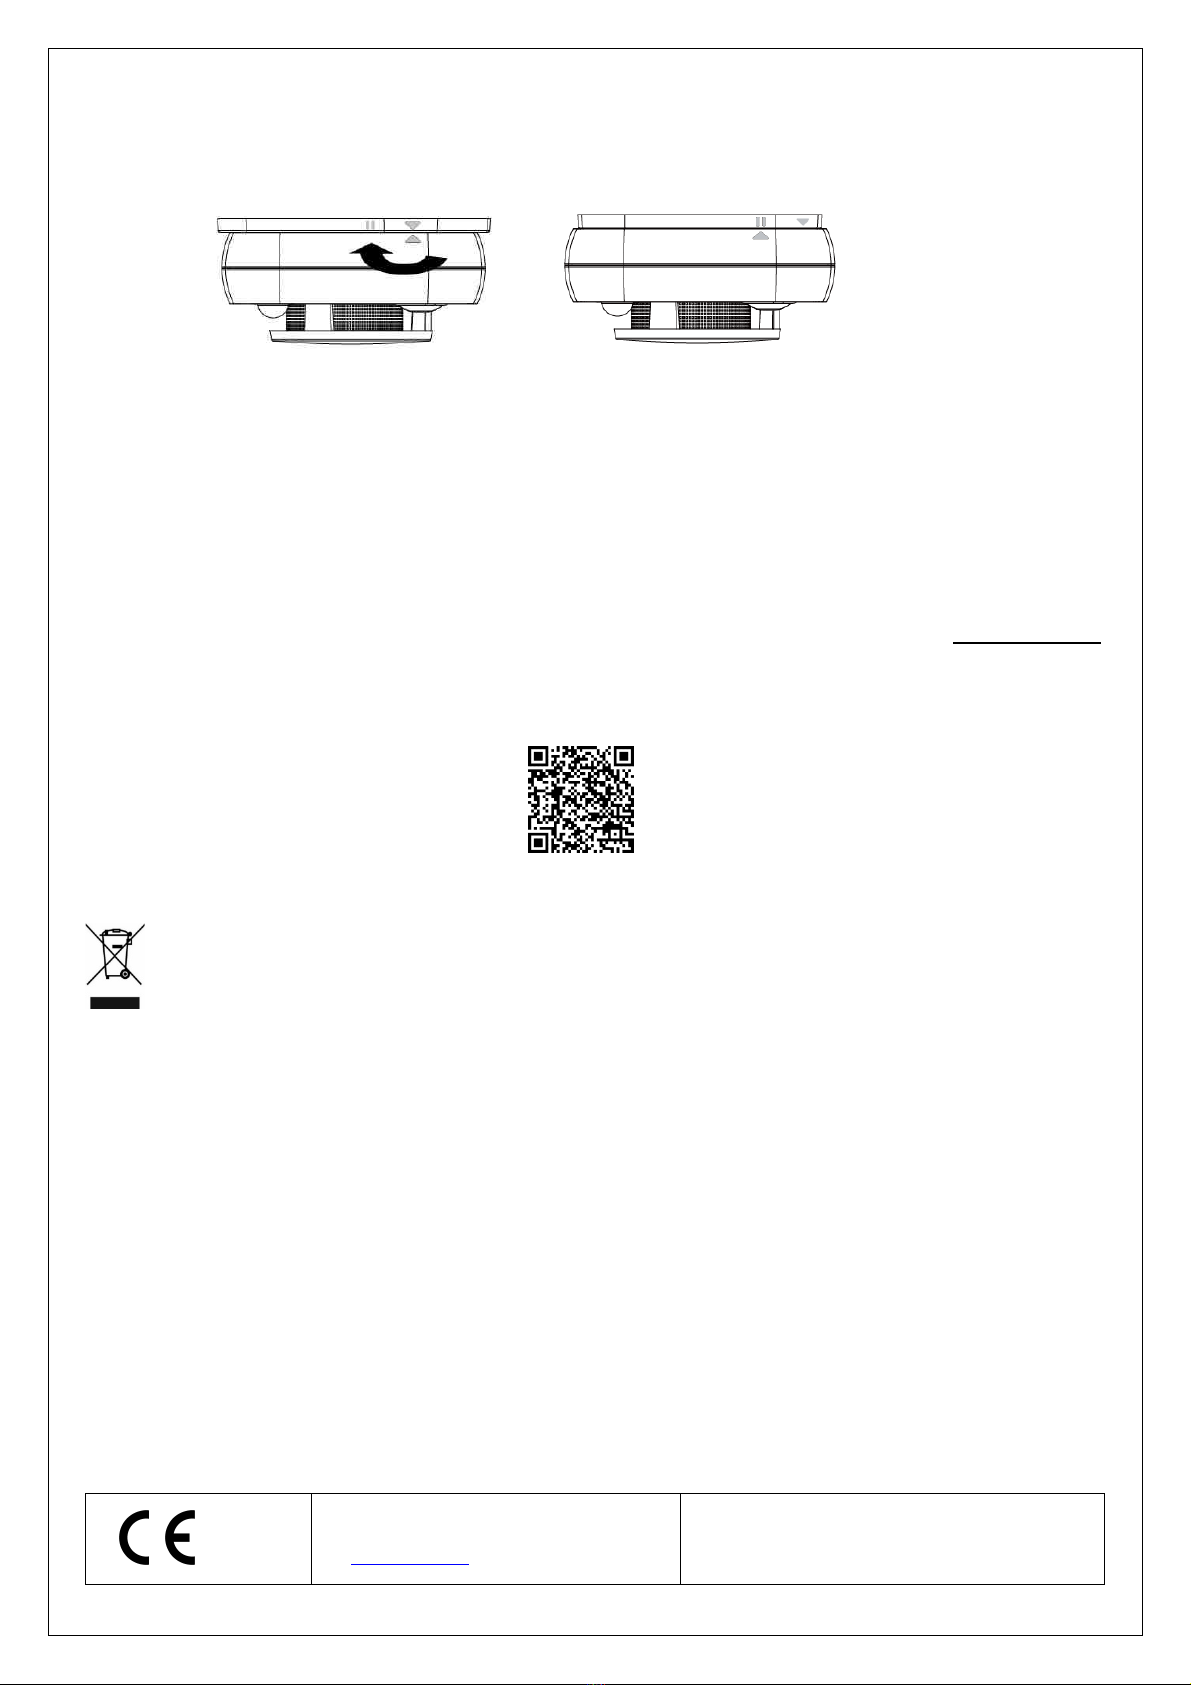
Montage
1. Stellen Sie die Montageposition fest, in der das Gerät korrekt vom Steuergerät erreichbar ist (führen Sie zuerst
einen Test durch).
SCHNELLANLEITUNG
DS80SD8Z-003
5

2. Verwenden Sie die Öffnungen in der Basis des Geräts als Schablone.
3. Befestigen Sie das Gerät mit Schrauben und Dübeln.
4. Beziehen Sie sich auf die in Abbildung A angegebenen seitlichen Kennzeichnungen und richten Sie die Öffnungen
des Sensors mit den Haken der Basis aus. Setzen Sie den Sensor in die Basis ein.
5. Drehen Sie den Sensor im Uhrzeigersinn, um ihn wie in Abbildung B zu blockieren.
(Abbildung A)(Abbildung B)
Wartung
Während des normalen Betriebs kann der Melder durch intermittierende Blinkzeichen der orangefarbenen LED die Notwendigkeit
der Wartung anzeigen. Eine Meldung wird auch an das Steuergerät versandt. Unter diesen Bedingungen muss die
Erfassungskammer unter Verwendung eines trockenen Tuchs oder dünnen Pinsels gereinigt werden, um die korrekte
Funktionsweise wiederherzustellen. Die Wartungsabstände hängen von den Umgebungsbedingungen ab, in denen der Melder
installiert ist.
VEREINFACHTE EU-KONFORMITÄTSERKLÄRUNG
Der Hersteller, URMET S.p.A., erklärt, dass der Funkgerätetyp: RAUCHMELDER SD600 der Richtlinie 2014/53/UE entspricht.
Der ungekürzte Text der EU-Konformitätserklärung steht unter der folgenden Internetadresse zur Verfügung: www.elkron.com.
KLICKEN SIE AUF DEN FOLGENDEN LINK DER ELKRON-WEBSITE, UM AUF DAS TECHNISCHE DATENBLATT
ZUZUGREIFEN UND DAS VOLLSTÄNDIGE HANDBUCH HERUNTERZULADEN:
KORREKTE ENTSORGUNG VON ALTGERÄTEN (Elektroschrott)
Diese Kennzeichnung auf dem Produkt, den Zubehörteilen oder der Dokumentation weist darauf hin, dass das
Produkt und die elektronischen Zubehörteile nicht mit anderem Hausmüll entsorgt werden dürfen.
Entsorgen Sie dieses Gerät und Zubehörteile bitte getrennt von anderen Abfällen, um der Umwelt bzw. der
menschlichen Gesundheit nicht durch unkontrollierte Müllbeseitigung zu schaden. Helfen Sie mit, das Altgerät und
Zubehörteile fachgerecht zu entsorgen, um die nachhaltige Wiederverwertung von stofflichen Ressourcen zu fördern.
ELKRON
Tel. +39 011.3986711 - Fax +39 011.3986703
www.elkron.com – mail to: [email protected]
ELKRON ist ein eingetragenes Warenzeichen von
URMET S.p.A.
Via Bologna 188/C – 10154 Torino (TO) Italy
www.urmet.com
MADE IN TAIWAN
Other manuals for SD600
1
Table of contents
Languages:
Other Elkron Smoke Alarm manuals

Elkron
Elkron FL100 User manual

Elkron
Elkron FDO500 User manual

Elkron
Elkron FO31WL User manual

Elkron
Elkron SD610 Assembly instructions

Elkron
Elkron FO31WL User manual

Elkron
Elkron SD600 Assembly instructions

Elkron
Elkron FAP54 User manual

Elkron
Elkron FDOT500 User manual

Elkron
Elkron SD200 User manual

Elkron
Elkron FLR500 User manual
Popular Smoke Alarm manuals by other brands

Polon-Alfa
Polon-Alfa DOP-6001R Installation and maintenance manual

Kidde
Kidde P3010CU user manual

elsner elektronik
elsner elektronik Salva KNX basic Technical specifications and installation instructions

BRK electronic
BRK electronic SC7010BA quick start guide

NookBox
NookBox P119037 installation guide

Dicon
Dicon 650M owner's manual