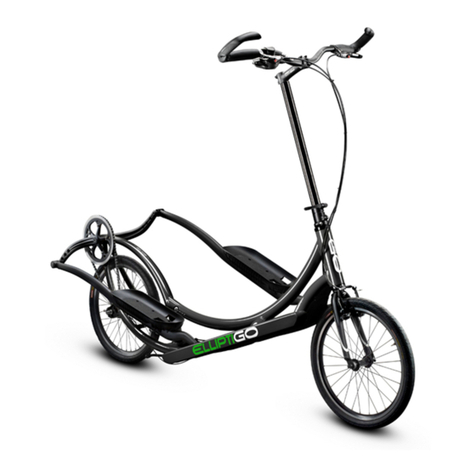
ElliptiGO Bike User manual

20
Bike Owner's Manual
F. Pre-Ride Safety Checklist
Before riding, always visually and physically inspect the ElliptiGO bike to
ensure that it is in good riding condition. With the ElliptiGO bike supported
on its kickstand, you should inspect the bike using the following checklist
prior to each ride:
1. Thoroughly examine the front and rear tires on both sides for signs of
damage (this will require you to spin the tire periodically to observe the
part that was contacting the ground). Use a tire gauge to ensure that each
tire is inflated to the proper pressure annotated on the tire’s sidewall.
Adjust the tire pressure if necessary.
2. Inspect the front wheel quick release system to make sure that the hub
is securely seated on the fork and that the quick release has been closed
properly with the appropriate amount of force. The mechanism should
emboss the fork-ends when closed to the locked position. See Section III. 1.
A. Quick Release Clamping Systems for details on how to ensure the quick
release is securely fastened.
WARNING! An improperly secured quick release lever on the front
wheel can allow the wheel to disengage from the fork. This condition is
exceptionally hazardous and will cause the rider to suffer a fall that will
almost certainly result in serious injury or death. BEFORE RIDING
ALWAYS ENSURE THE FRONT WHEEL QUICK RELEASE IS PROPERLY
SECURED.
3. With the kickstand retracted, raise the front end of the bike off of the
ground several inches and then drop it. Watch and listen for unusual
movements or noises as the bike strikes the ground. If you hear an unusual
noise, continue this test until you can locate the problem. Do not ride the
ElliptiGO bike until the problem is resolved. When in doubt, take the
ElliptiGO bike to a professional bicycle mechanic for service or contact our
service department at service@elliptigo.com.
4. Inspect the wheels to ensure that they are true. Spin each wheel and
watch it to make sure it does not have a side-to-side wobble. Also, make
sure that the wheel does not rub intermittently against one or both brake
pads. Any side to side wobble or intermittent rubbing indicates that the
wheel is out of true.
WARNING! A wheel that is not true can present a very dangerous
situation because it interferes with the proper functioning of the brakes.
It requires expertise and proper tools to correctly true a wheel. As a
result, you should always have a professional bicycle mechanic true your
wheels. Riding on a wheel that is not true could cause you to lose control
and suffer a fall.
5. Make sure that the rims are not damaged, that the tops of the rims are
securely engaging the tire at the rim bead, and that the rim braking
surfaces are clean and undamaged.
6. Inspect the spokes on the front and rear wheels to ensure that none are
missing, that they are all tight, and that they are all properly aligned.
7. Inspect the front and rear brake pads to ensure they are in good
condition and securely attached.
8. Actuate the front and rear brake levers while watching the brakes to
make sure that both are functioning properly and that each pad contacts
the wheel rim in the correct position. Check that the brake elbow is seated
into the brake quick release system and the brake cable is seated into the
top end of the elbow and is free from pinches or sharp turns. Ensure that
the brake pads contact the rim within the first inch of pulling on the levers
and each brake pad lands completely on the rim. No brake pad should
contact the tire or overhang off of the rim and you should be able to apply
full braking power before the levers contact the handlebars.
If your brakes are not working properly, do not ride the ElliptiGO bike.
Instead, take your bike to a professional bicycle mechanic to have the
brakes adjusted.
WARNING! Improper brake alignment and functioning can result in
the rider losing control of the ElliptiGO bike and suffering a fall, which can

21
Bike Owner's Manual
result in significant injury or death. Always make sure your brakes are
working properly before riding.
9. Thoroughly inspect the steering column to ensure that all components
are properly aligned and the quick release levers on the collar are securely
fastened. See Section II. 2. G. 2 Adjustable Steering Height for details on
how to properly adjust steering column components. See Section III. 1. A.
Quick Release Clamping Systems for details on how to ensure the quick
release is securely fastened.
WARNING! Failure to properly lock the steering column could result
in the unexpected collapsing of the steering column during riding. This
would certainly cause the rider to lose control of the ElliptiGO bike and
suffer serious injury or death from a resulting fall.
10. Ensure that the handlebars are aligned properly with the front wheel
and that the steering extender quick release is securely fastened. See
Section III. 1. A. Quick Release Clamping Systems for details on how to
ensure the quick release is securely fastened.
WARNING! Failure to secure the steering extender quick release
properly could result in an unexpected rotation or drop in the handlebar
height during a ride. This could cause the rider to lose control of the
ElliptiGO bike and suffer a fall, which can result in significant injury or
death.
11. Test the grips and bar ends (if any) on the handlebars. They should be
in good condition and securely fastened so that they cannot be rotated.
Improperly secured grips and bar ends can detach from the handlebars
during riding and cause the rider to lose control and fall.
12. Ensure that each end of the handlebar is capped with a smooth surface.
A handlebar end can have sharp edges that, if exposed, can cut a rider or
exacerbate injuries sustained during a fall.
13. Actuate the gear shifter, shifting up or down to ensure the gear shifter
is shifting smoothly in both directions.
14. Inspect the guide tracks to make sure that they are free from debris.
15. BY PLACING YOUR HAND ON THE FOOT PLATFORM rotate the drive
mechanism to ensure it is functioning properly.
CAUTION! NEVER GRAB THE REAR OF THE DRIVE ARM as your hand
can get caught between the drive arm and the cranks and suffer an injury
16. Visually inspect each drive arm carefully to ensure each has no visible
signs of damage, especially cracking. Make sure you inspect both to the
top and bottom of each drive arm. If a drive arm has visible signs of
damage or cracking, DO NOT RIDE the ElliptiGO bike. Instead, contact our
service department at service@elliptigo.com for support.
WARNING! Some ElliptiGO bikes are equipped with drive arms
made from a composite material commonly known as carbon fiber.
Although it is a strong and light material, when it fails, it tends to fail
catastrophically and with little or no warning. As a result, it is extremely
important to inspect the drive arms thoroughly before riding to ensure
that there are no signs of cracking. If you spot damage on a drive arm,
DO NOT RIDE the ElliptiGO bike. Instead, contact our service department
at service@elliptigo.com for support.
17. Visually inspect the frame to ensure it is free from damage.
18. Check the adjustment on the internal hub. Shimano 11-speed: Make
sure that the gear shifter is in 6th gear and then look into the alignment
window. Ensure that the yellow indicators are aligned. Shimano 8-speed:
Make sure that the gear shifter is in 4th gear and then look into the
alignment window. Ensure that the yellow indicators are aligned.
Sturmey-Archer 3-speed: Make sure that the gear shifter is in 2nd gear and
ensure that the tip of yellow arrow is between the two yellow marks. If the
yellow indicators or arrow are not aligned, take your ElliptiGO bike to a
professional bicycle mechanic or ElliptiGO technician to have the hub
adjusted.
WARNING! NEVER RIDE ON AN INCORRECTLY ADJUSTED HUB. If
your hub is not properly adjusted, it can malfunction during normal

22
Bike Owner's Manual
riding. For example, it can unexpectedly come out of gear, fail to shift, or
shift unexpectedly. Any of these situations can cause the rider to lose
control of the ElliptiGO bike and suffer a fall.
19. Ensure that the chain has the appropriate amount of tension and is
clean and lubricated. With rotation of the chain, you should feel “tight
spots” and “loose spots” because the large and small cogs are not perfectly
round. The chain has the appropriate amount of tension when it is tight
without binding thru the entire revolution of the crank arm.
20. Check that the bolts holding on the rear wheel and internal hub are
tightened appropriately. For torque specification refer to Appendix C: -
"Torque Requirements for Screws and Fasteners".
21. If you have a foot retention device mounted on your drive arm foot
platform, ensure that it is properly adjusted for the shoes you are wearing.
22. Ensure that you have a set of spare parts including at least one
replacement tube, tools, and a pump securely and safely fastened to you
or the ElliptiGO bike.
23. Finally, do a thorough once over of the entire ElliptiGO bike, including
checking each screw, bolt, fastener, and quick release system to make sure
nothing is loose, damaged or appears like it will not function properly. To
make sure that the many fasteners on your ElliptiGO bike are correctly
tightened, refer to Appendix C: Torque Requirements for Screws and
Fasteners.
WARNING! It is very important that your screws and fasteners are
properly tightened. Not applying enough force increases the chance that
they will become loose and fail to perform their function properly,
increasing the risk of a failure. Over tightening them can damage the
fastener, elevating the risk of a failure. The failure of a fastener may
cause the rider to lose control of the ElliptiGO bike and suffer a fall.
Ensuring that your screws and fasteners are tightened correctly requires
the skillful use of a torque wrench and we strongly recommend having a
professional bicycle mechanic tighten them. If you would prefer to
tighten the screws and fasteners yourself, you must use a calibrated
torque wrench and ensure you reach the correct torque as specified in
Appendix C: Torque Requirements for Screws and Fasteners.
From time to time, it is possible that you will need to adjust screws or
fasteners during a ride. In these rare situations, you must exercise the
utmost of care and we recommend having a professional bike mechanic
check the fasteners you adjusted as soon as you can.
G. Adjusting the Fit
The ElliptiGO bike is designed to be adjustable to fit a wide range of riders
and has four adjustable features:
1. Adjustable stride length
2. Adjustable steering height
3. Rotatable handlebars
4. Oversized foot platforms
Before you begin to ride, it is important to properly adjust these features to
the appropriate positions.
Other manuals for Bike
1
Other ElliptiGO Bicycle manuals


