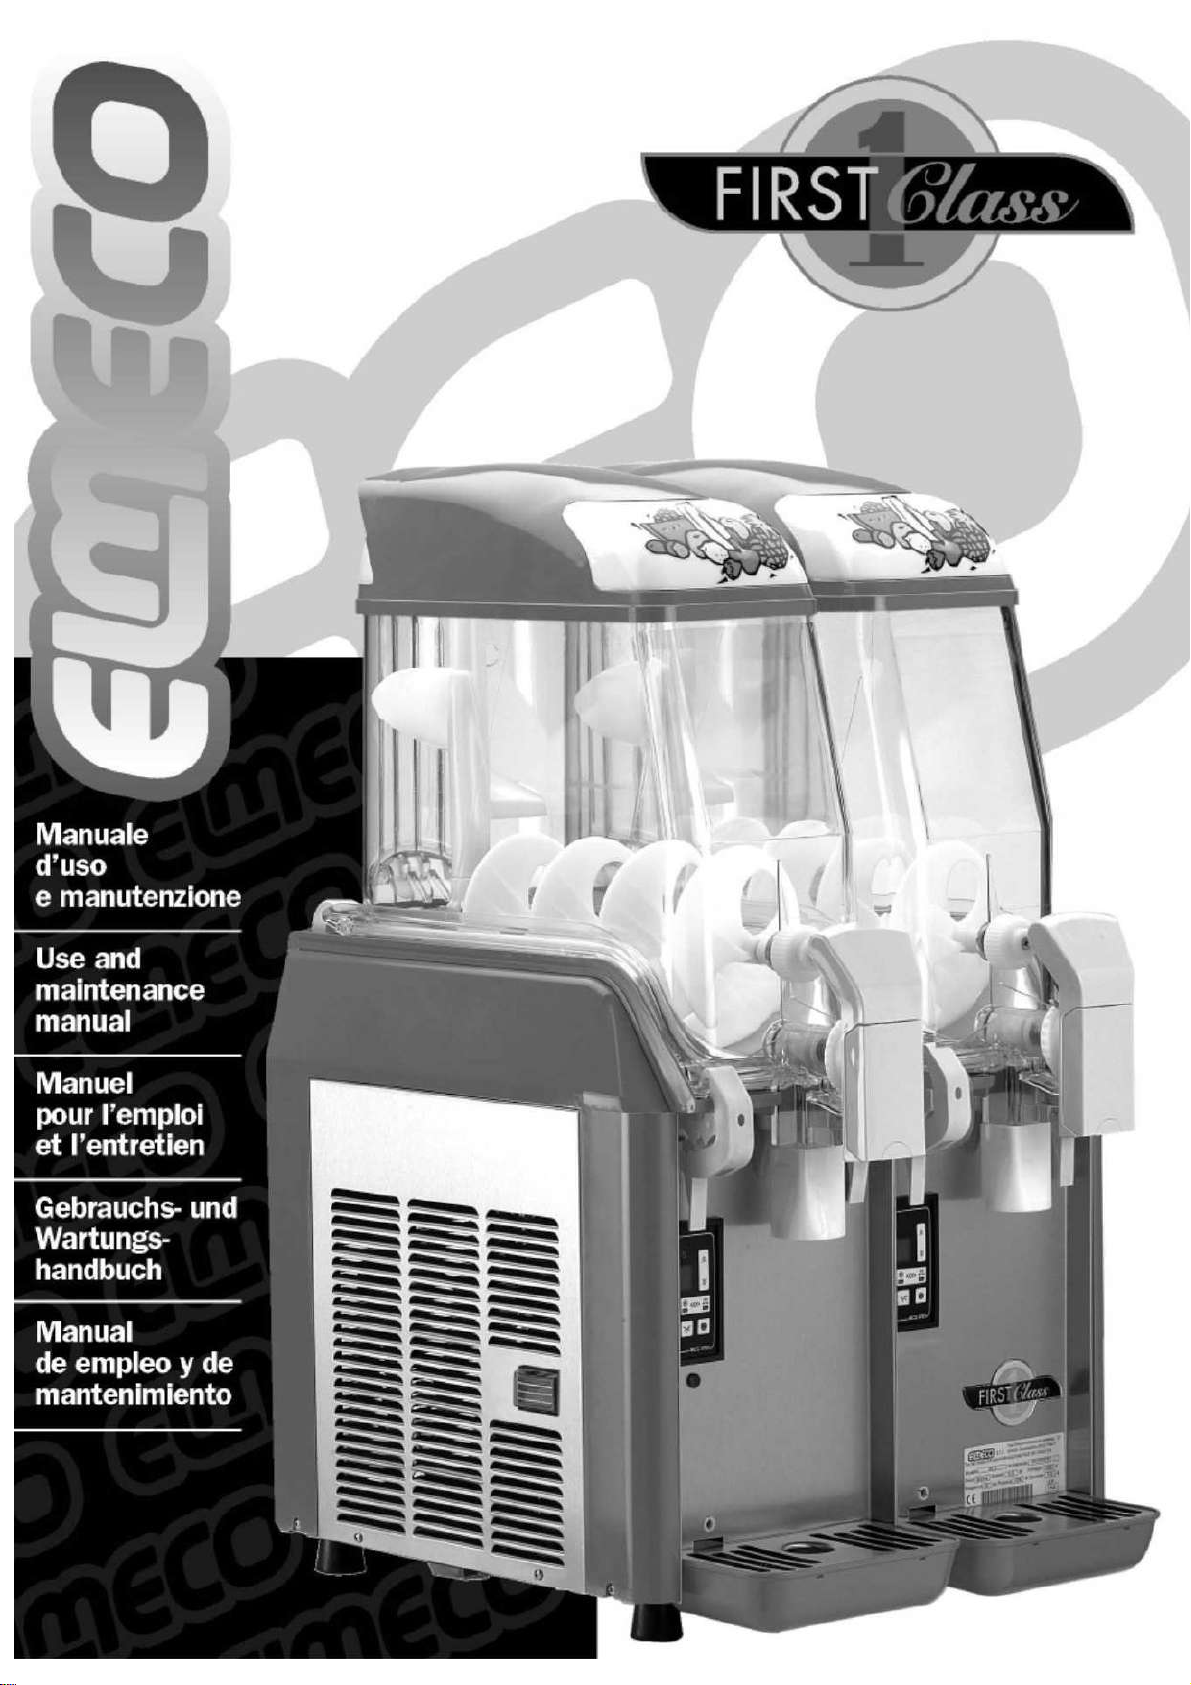
ELME AFCM-3 User manual
un

- 1 -
I
Indice
Una scelta di qualità…………… 2
Istruzioni e avvertenze
generali…………………….……. 3
Installazione del nuovo
apparecchio……………….……. 4
Pulizia……………………………. 5
Comandi e segnalazioni First
Class………………………..…… 6
Come iniziare la produzione di
granita, sorbetto o bibita
fredda………………….………… 7
Defrost timer………….………… 8
Comandi e segnalazione First
Class Millennium..…………….... 9
Come iniziare la produzione di
granita, sorbetto o bibita fredda
First Class Millennium..………... 12
Regole fondamentali di
sicurezza……………….…………
13
Smaltimento del vecchio
apparecchio…………….………. 13
Assistenza tecnica……….…….. 13
Installazione FC acqua………… 14
Problem Solving…………….….. 15
Procedura riarmo
pressostato………………….….. 16
Procedura sostituzione
coppiglia…………………………. 17
Certificato di garanzia………….. 83
Impianto elettrico……………….. 89
Impianto elettrico Millennium….. 90
Impianto frigorifero……………... 93
Esploso………………………….. 95
Descrizione Codici……….…….. 96
GB
Index
A quality choice…………………. 18
General instructions and
warnings…………………………. 19
Installing the new
machine…..……………….…….. 20
Cleaning…………………………. 21
First Class controls and
signals……….…………………... 22
How to start the production
slush, sherbets or cold drinks…. 23
Defrost timer………….…………. 23
First Class Millennium controls
and signals .…………………….. 24
How to start the production of
slush, sherbets or cold drinks
with FC Millennium.…….………. 27
Important security
rules……………………….……... 28
Old machine disposal………….. 28
Technical assistance…………... 28
FCW installation………………... 29
Problem Solving…………….….. 30
Pressure switch refit
procedure…..………………….... 31
Cotter pin
substitution……………………… 32
Warranty certificate…….………. 84
Electric system…………….….… 89
Millennium electric system ……. 90
Refrigerating system…………... 93
Exploded view………….……….. 95
Codes description……………… 96
F
Index
Un choix de qualité……………... 33
Instructions et remarques
générales………………….…….. 34
Installation de l’appareil……….. 35
Nettoyage……………….………. 36
Commandes et signaux du First
Class……………………………... 37
Comment commencer la
production de granité, sorbet ou
boisson froide.......….......……… 38
Defrost timer....………….……… 39
Commandes et signaux du First
Class Millennium….……………..
40
Comment commencer la
production de granité, sorbet ou
boisson froide avec First Class
Millennium..……………………... 43
Règles fondamentales de
sécurité……….……….………… 44
Mise au rebut du vieil
appareil…………….……………. 44
Service après-vente…….….…... 44
Installation des FCW………….... 45
Problem Solving…………….…...
46
Procédé mise en marche
pressestat..……………….……... 47
Remplacement de la
goupille…………………………... 48
Certificat de garantie…..……….. 85
Installation électrique….……….. 89
Installation électrique
Millennium……………………….. 90
Installation frigorifique…...…….. 93
Vues éclatées……………….….. 95
Codes et description…..……….. 97
D
Inhaltsverzeichnis
Eine Qualitätswahl……..……..... 49
Anweisungen und allgemeine
Hinweise………………..……...... 50
Installation der neuen Maschine
……………….……..................... 51
Reinigung……………….……..... 52
Bedientasten und Meldungen
First Class.................................. 53
Herstellung von Gramolaten,
Sorbets und eisgekühlten
Getränken.......…........................ 54
Defrost timer………….……….... 55
Bedientasten und Meldungen
First Class Millennium................ 56
Produktionsbeginn für
Gramolaten, Sorbets oder
Kalten Getränken First Class
Millennium.................................. 59
Grundlegende
Sicherheitsmassnahmen...…….. 60
Entsorgung der alten
Geräts………………..……......... 60
Technischer
Kundendienst………………....... 60
Installation der FCW.................. 61
Problem Solving……………....... 62
Rückstellung des
Druckwächters…..……………... 63
Ersetzen des
splints........……………………… 64
Garantieschein…………………. 86
Elektrik…………………..……..... 89
Elektrik Millennium……..……..... 90
Kühlanlage………………..…...... 93
Explosions-Darstellung……....... 95
Beschreibung der
Ersatzteile……………………..... 97
E
Índice
Una elección de calidad……..... 65
Instrucciones y advertencias
generales………………….......... 66
Instalación del nuevo
aparato…………...…...……….... 67
Limpieza………………….…....... 68
Mandos y señalizaciones First
Class...................................…... 69
Cómo iniciar la producción de
granizado, sorbete o bebida
fría...........................………….... 70
Defrost timer………..………....... 71
Mandos y señalizaciones First
Class Millennium.....………..….. 72
Cómo iniciar la producción de
granizado, sorbete o bebida fría
con First Class Millennium…….. 75
Normas fundamentales de
seguridad………..…..………...... 76
Eliminación del viejo
aparato…………..……..……...... 76
Asistencia técnica………....….... 76
Instalación de FCW..............….. 77
Problem Solving……………....... 78
Procedimiento de
restablecimiento del
presostato.................................. 79
Sustitución del
pasador.............………………… 80
Certificado de garantía……….... 87
Instalación eléctrica………......... 89
Instalación Eléctrica
Millennium.................................. 90
Aparato Frigorífico………...….... 93
Despiece……………..………..... 95
Código Descripción….……........ 98
- 18 -
ENGLISH
A quality choice
Choosing Elmeco, and in
particular First Class, the
new and only
multifunctional machine
with double augers,
demonstrates your attention
to innovation. Thanks for
understanding the
importance of working
with a company that does
not consider “quality” as an
abstract word. For Elmeco
quality is a concrete
commitment. It actually
means to clinch the
attention to the innovation
that characterized us as the
creators of the first slush
machine and that today
confirms our leadership in
the technical forefront. For
our company “Quality”
also means working trying
to always improve from a
management and
organizational point of
view following the Vision
2000 certification, and it
finally means to care about
the customers and to
dedicate investments and
resources to continuously
meet their needs.
On the other hand, for
those who decided to
choose Elmeco, quality
means being able to work
with reliable and lasting
products, to count on a
precise and qualified
assistance in order to work
with increasing satisfaction
and earnings.
- 19 -
ENGLISH
General instruction
and warnings
Before switching on the
machine carefully read the
information in this service
manual; this way you will be
able to install, use and maintain
the machine.
Keep the use and assembly
instructions, even for the next
buyer. The manufacturer
declines any responsibility for
damages deriving from the non-
observance of the following
instructions.
Install the machine according to
the assembly instructions. The
power supply must correspond
to the data on the plate on the
front side of the machine
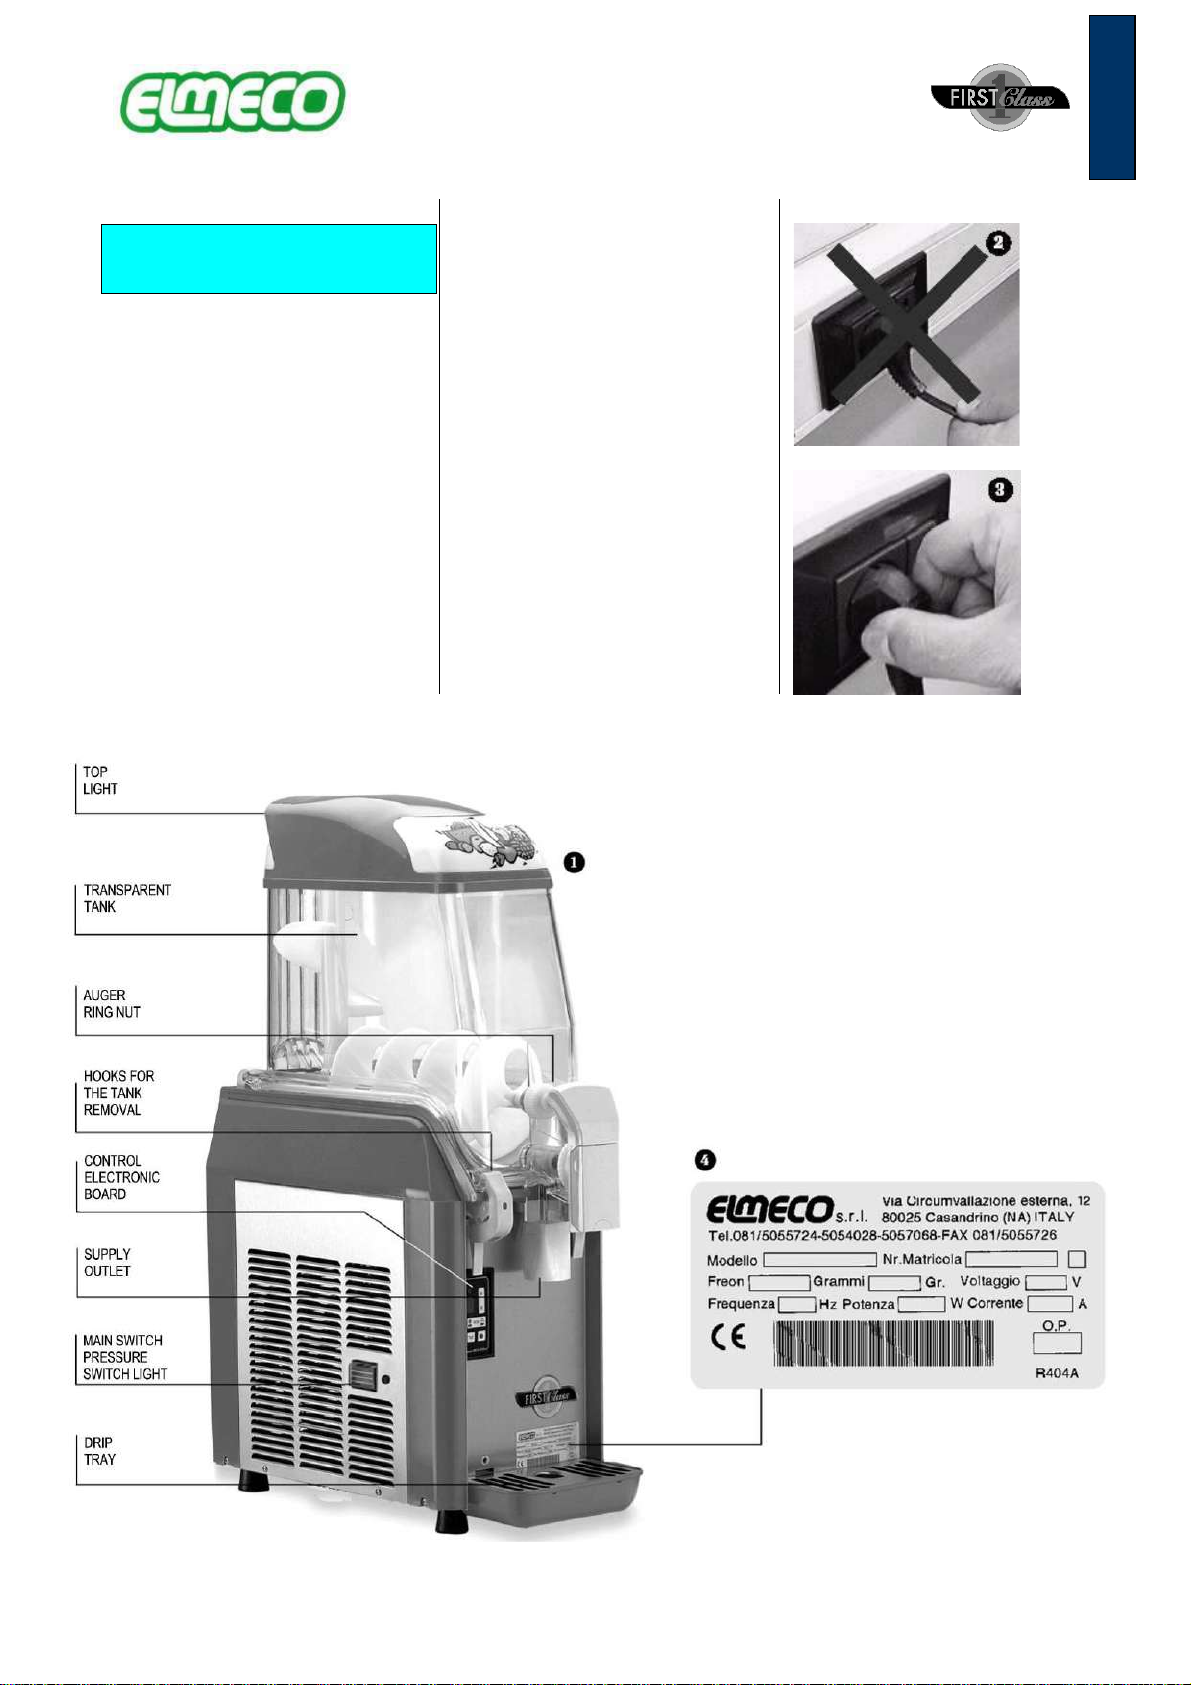
behind the drip tray (pic. 1).
- 20 -
ENGLISH
During maintenance and
cleaning, or in case of bad
functioning, disconnect the
machine from the power plug
(by pulling the plug and not the
cable) (pic. 2 and 3 pag.19).
Only specialized and
authorized staff can repair the
machine. Not perfect repairing
can be dangerous for the user.
Contact Elmeco for information
concerning the closer
authorized assistance centre.
Installing the new
machine
This machine for the production
of cold drink, slush, and
sherbets the absolute
homogeneity of the product and
the possibility to regulate its
density thanks to an innovative
electronic control. Before
installing the machine, verify
that:
• First Class is not placed by
an heat source;
• The machine has not been
damaged during
transportation. In case of
doubt, contact the supplier;
• The power supply system is
endowed with a grounding
that respects the rules of
law;
• The power supply system
capacity is adequate to the
maximum power of the
machine, as indicated on the
plate (pic. 4 pag.19).
In case of doubt, contact only
qualified staff.
In order to install the machine,
carefully read the following
instructions.
Warnings
This machine is only for the use
it has been manufactured for.
Any other usage is to be
considered as improper and
dangerous.
Machine description (pic. 1
pag.19):
• Top light
• Transparent tank
• Auger ring nut
• Hooks for the tank removal
• Control electronic board
• Supply outlet
• Main switch
• Pressure switch light
• Drip tray
• Plate data
Installation
It is suggested that the machine
is installed only by qualified
staff. A wrong installation can
cause damage to people or
things, for which things the
manufacturer declines any
responsibility.
Once the machine is unpacked,
verify the integrity of the
machine. The packaging
elements (plastic bags,
expanded polystyrene, nails,
etc.) must not be left at children
reach as they might be
dangerous.
Remove the protection plastic
stripes also from the internal
side of the grids.
The Supplier is reserved to bring alterations without notice.
The relevant data the power are indicative. To do reference to the data of plate data restored on the machine.
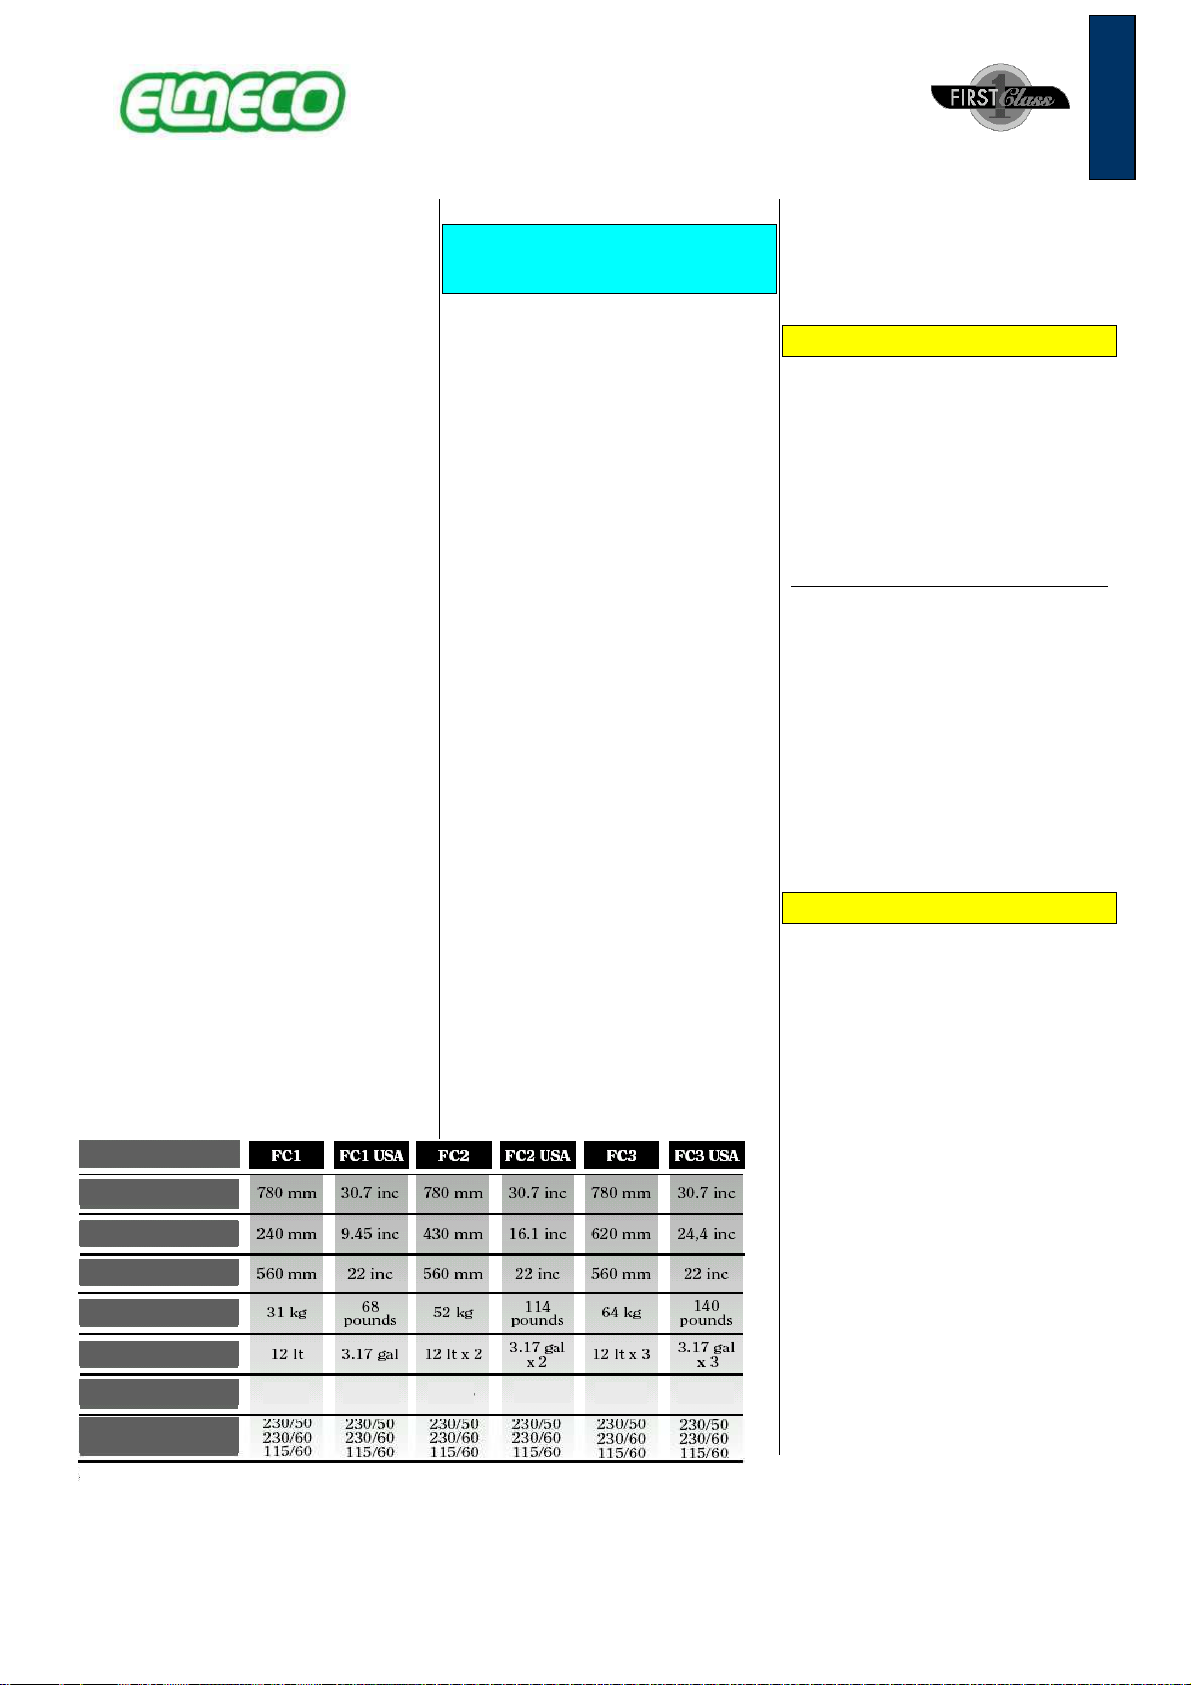
450 w
0,61 hp
900 w
1200 w
0,61 hp
0,61 hp
MODEL
HEIGHT
VOLTAGE HZ
POWER
CAPACITY
WEIGHT
DEPTH
WIDTH
- 21 -
ENGLISH
We do not recommend to
connect the machine through
adaptors, multiple plugs and/or
extensions. If necessary, use
only materials that conform to
the safety rules in force, as for
the current intensity up to what
indicated on the plate (pic. 4
pag. 19).
Place the machine so as to
avoid any heat source to be
close to the grids. Verify that
there is a free space of 25 cm
at least around the machine
(pic. 5 pag. 99).
After connecting the machine to
the power supply and switching
on the main switch, verify that
air comes out from the side
grids (pic. 6 pag.99).
Right usage
Before switching on the
machine, it is necessary to
clean it as indicated in the
“Cleaning” paragraph.
Cleaning
Cleaning is very important for
the life and maintenance of the
machine; we recommend to
periodically clean the parts that
are in contact with the product
using the following procedure.
Warning!
Switch off the main switch
and disconnect the power
plug (pic. 7 pag. 99) before
starting any operation.
Use a solution of cold water
and sodium hypochlorite
(bleach) with a 10 grams (1/2
spoon) for 1 liter of water ratio.
Rinse with lukewarm water.
Warning! A greater quantity
of beach could damage the
material of the auger.
Warning! If the plastic parts
are washed in the
dishwashing machine, verify
that the temperature is not
higher than 85°C or 185°F,
because they could be
damaged.
Do not use any abrasive
powder.
Tank cleaning procedure
See the picture at the end of
this manual.
• Empty the tanks by opening
the outlets and blocking
them (pic. 8 pag. 99),
moving the little letter from
the left to the right.
• Remove the lamp (pic. 9
pag. 99), pour water in the
tanks and then empty them.
• Remove the auger ring nut
(pic. 10 and 11 pag. 99).
• Remove the tank
unscrewing the hooks grips
(pic. 12 pag. 99), if present,
and opening the hooks (pic.
13 pag. 99); lift the tank as
shown in pic. 14 and 15
pag. 99.
• Unscrew the ring nut (pic.
16 pag. 99) in order to
remove the vertical auger
(pic. 17 pag. 99).
• Remove the horizontal
auger; this way the inox
side of the tank is
completely open and ready
to be cleaned (pic. 18 and
19 pag. 99).
• Remove the outlet (pic. 20,
21, 22, 23 pag. 100) and
the tank gasket (pic. 24
pag. 100):
• Remove the lever cover
(pic. 20 pag. 100) by
pushing “PUSH”
downward; and remove
the lever (pic. 21 pag.
100);
• Rotate the ring nut
clockwise (pic. 22 e 23
pag. 100) and pull the
outlet.
• Dip the dismantled parts in
the solution of water and
bleach.
• Wash and dry.
• Wet the gasket before
inserting it in place (pic. 24
pag. 100), be careful to
place the gasket joint in one
of the back corners of the
tank in the proper
allocation.
• Reassemble everything.
• When you put the tank back
in its place verify that the
low tension contact wires
are in the guides of the
terminal board. If they are
not, the lamp and the
augers will not work (pic. 25
pag. 100).
• Connect the machine to the
power supply.
Warning!
Any time the covers (lamp)
are removed, for security
reasons, the augers and the
cooling system will stop
working.
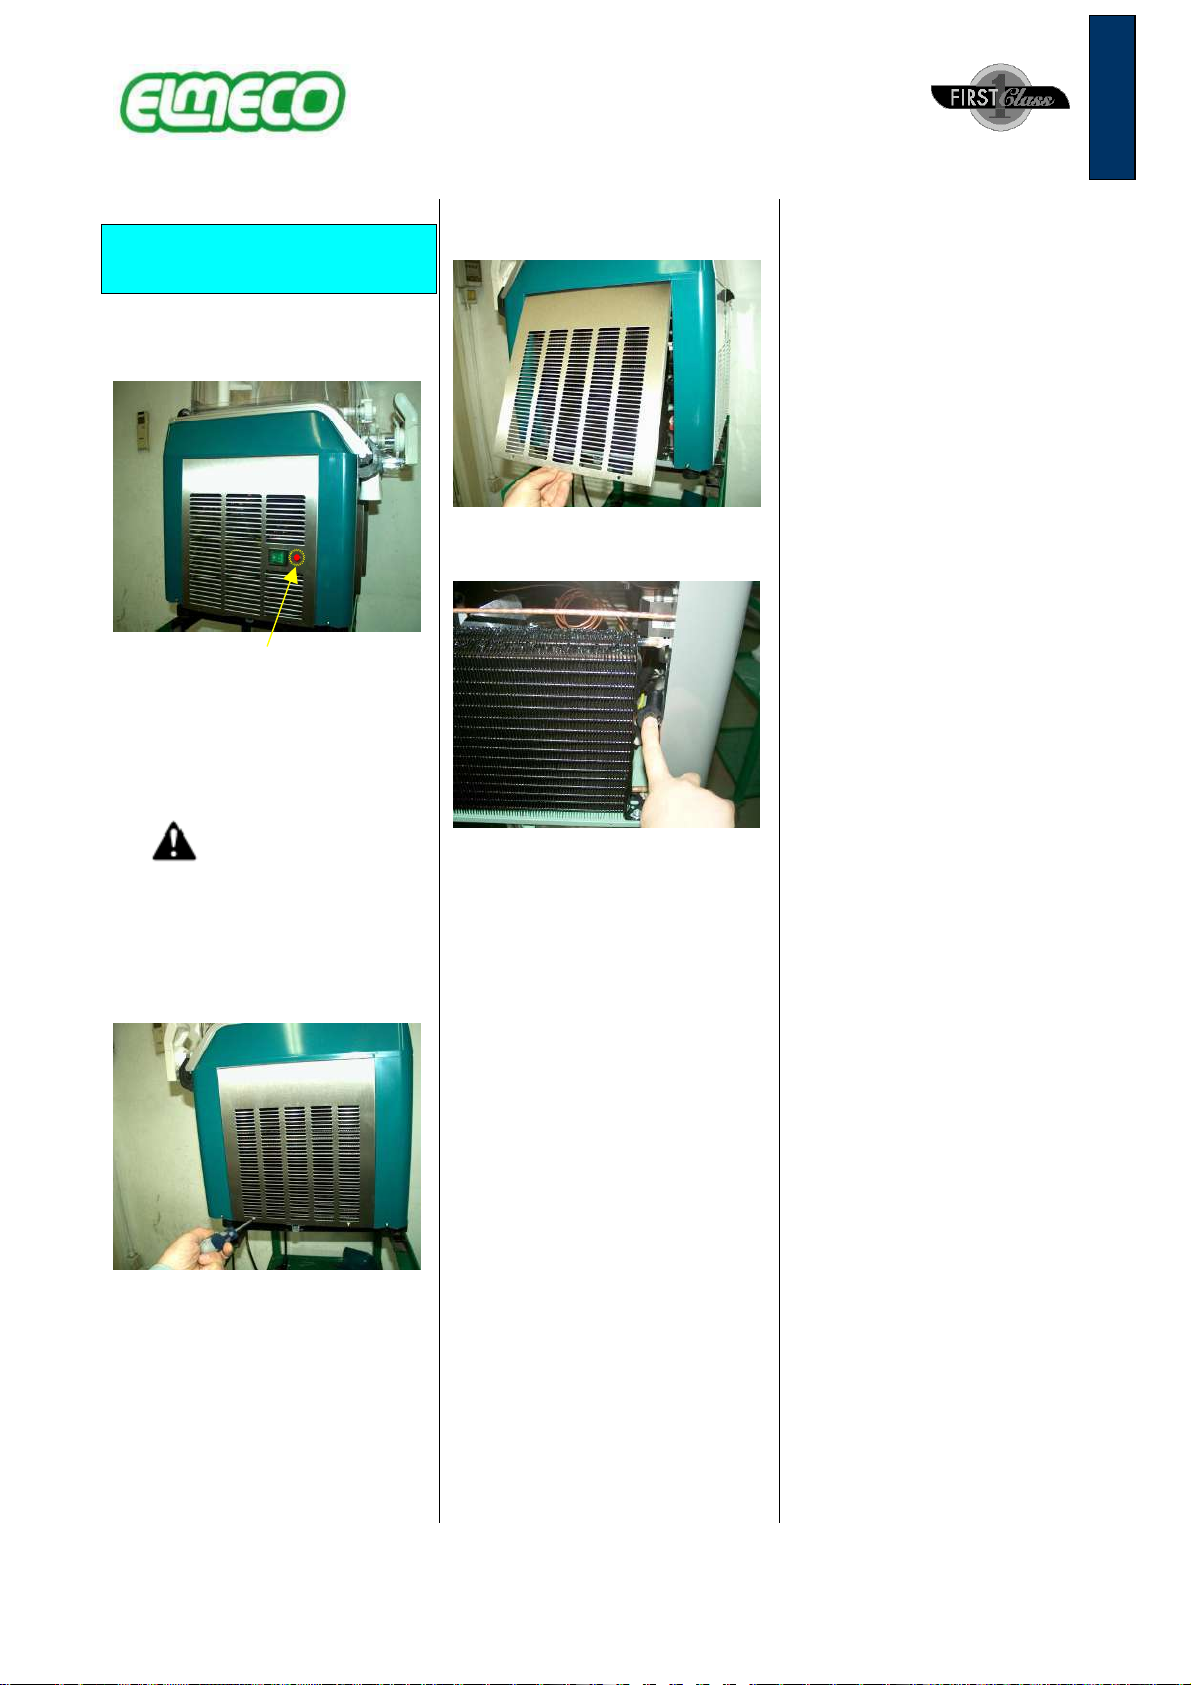
Condenser cleaning
procedure
Remove the side panel of the 2
or 3 tanks machine, or the back
panel of the one tank machine
by unscrewing the screws on
the bottom and clean the
radiator with a soft brush or (if
possible) with compressed air.
- 22 -
ENGLISH
Outlet restriction
First Class has a new
accessory called Restriction
(pic. 28 pag. 100), it is a
shaped piece that is applied on
the ending part of the
transparent tank outlet. It has
the following advantages:
• The product, liquid (clod
drink) or semi-liquid (low
density slush), is canalized
directly in the glass;
• The restriction is easy to
pull out, therefore, it is
possible to easy wash the
ending part of the outlet
without having to dismantle
the whole transparent tank,
with a consequent decrease
of the machine cleaning
times. In summary, the only
part which is not
refrigerated, where an
accumulation of the product
is more likely to happen,
can be now removed and
washed.
This restriction has some
gaskets (O-ring) that must be
wet with water before inserting
them on the outlet terminal part.
This is to make the introduction
easier and to avoid that O-ring
goes outside their proper
locations.
On the restriction there is the
image of an arrow and of a
glass that, while inserting it,
must face the operator.
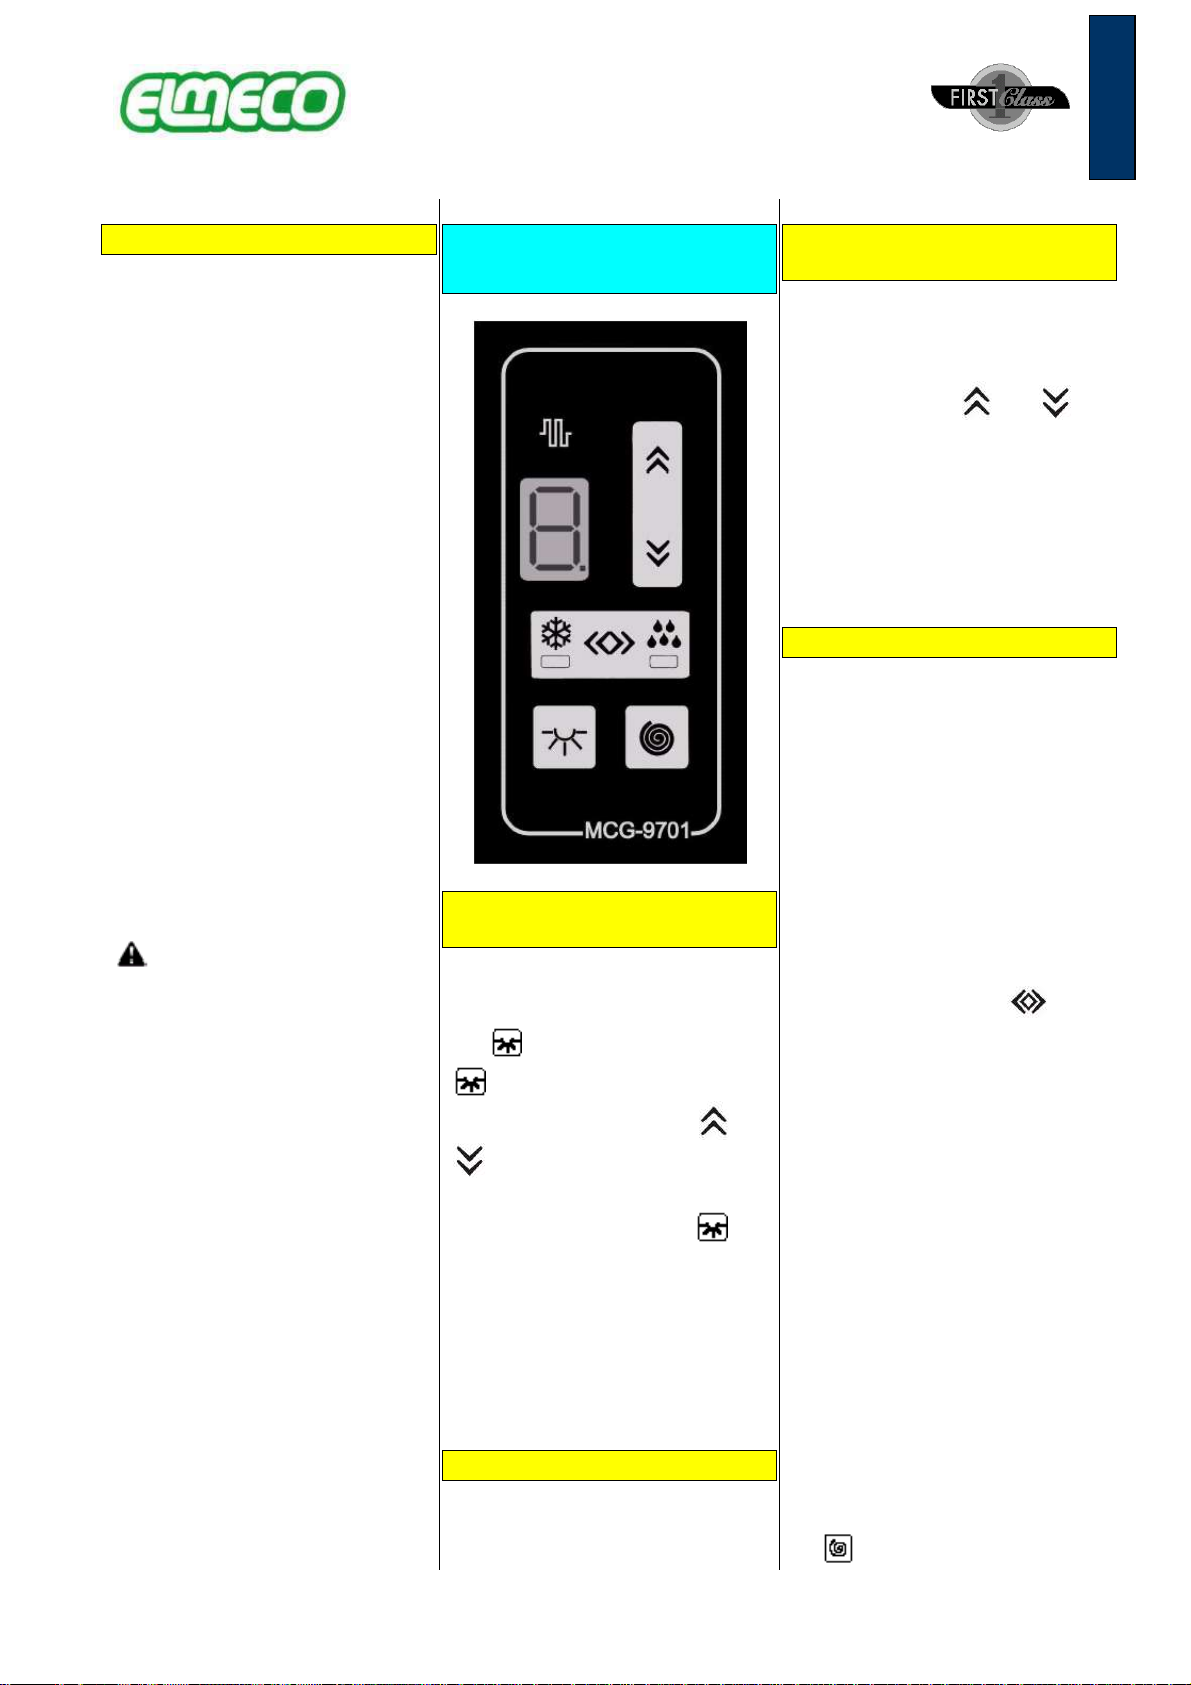
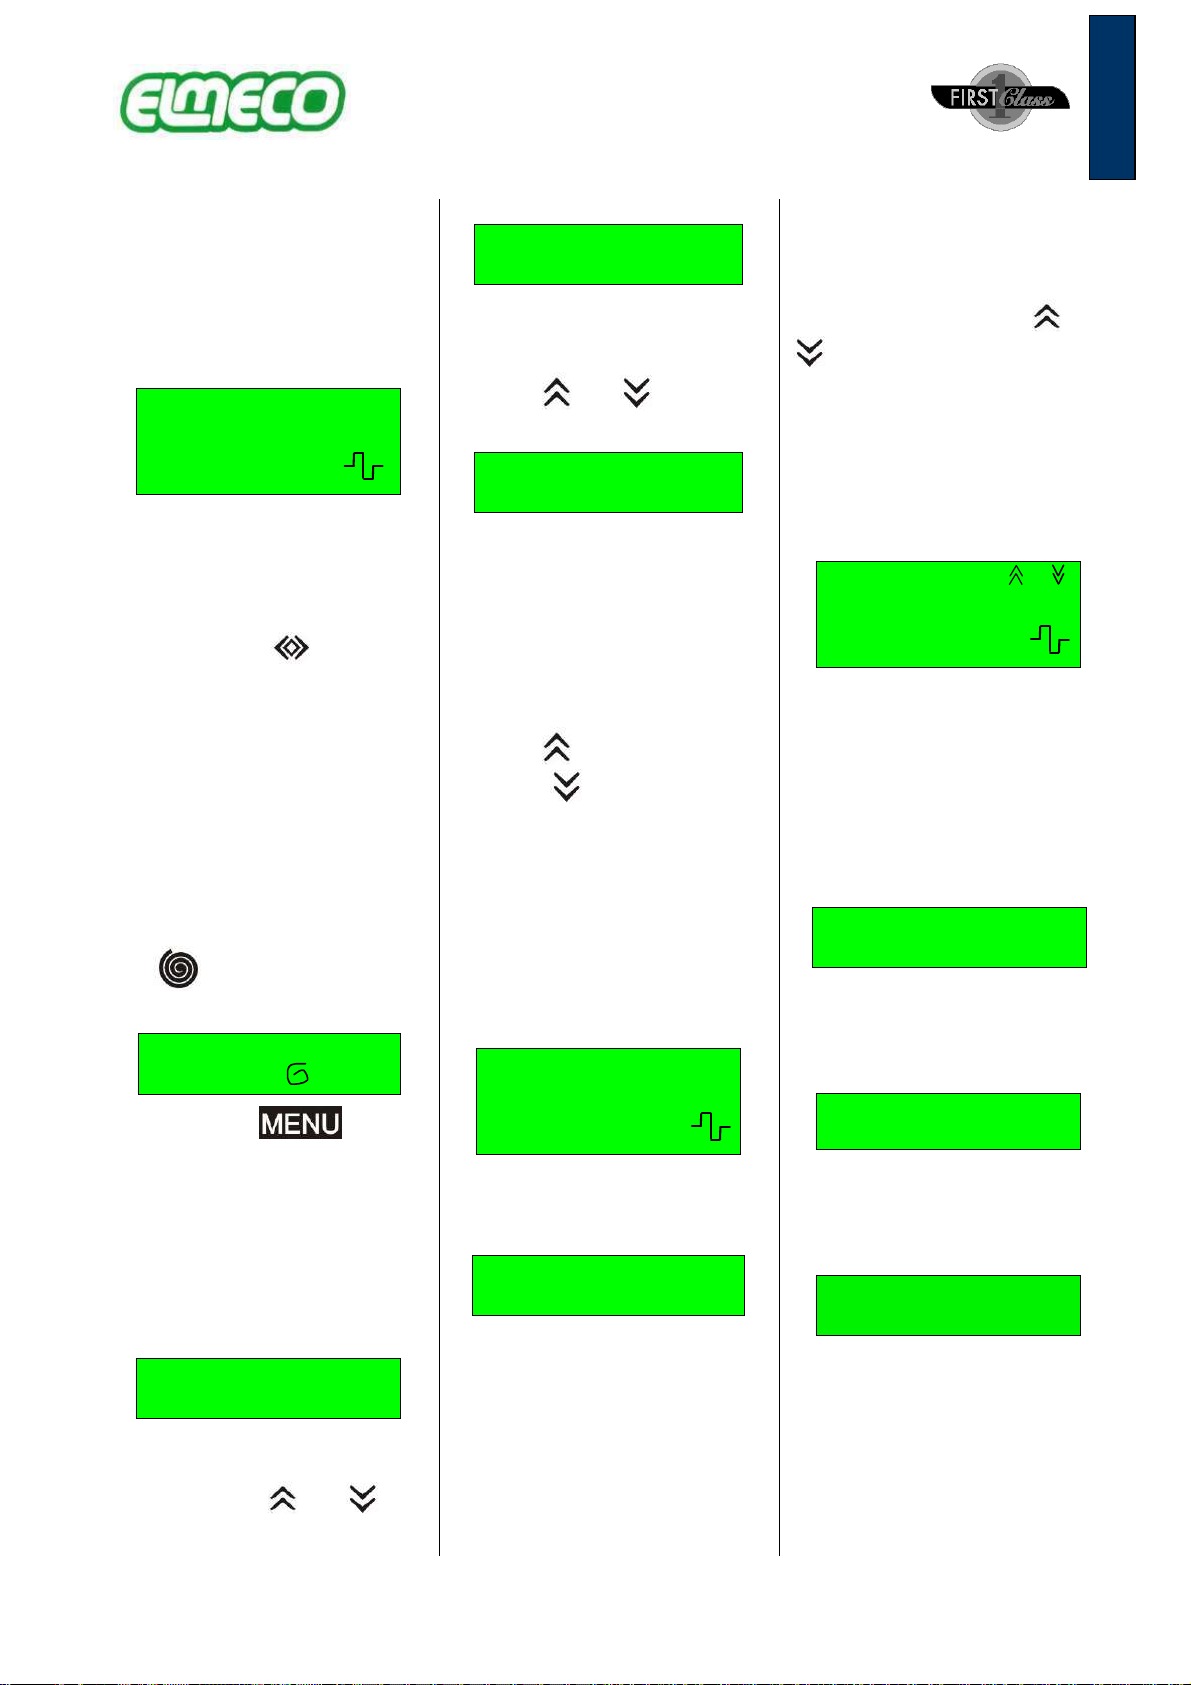
First Class controls
and signals
Lamp light On / Off Intensity
regulation
The light of the lamp can be
turned on and off by pressing
the button; if you keep the
button pressed and at the
same time you press the or
buttons, it is possible to
increase or decrease the light
intensity; if you keep the
button pressed, the display will
signal the light status. It will turn
off if the pressure of the button
caused the light to be turned off
and it will show a number that
indicates the level of the lamp
light intensity (2 min - 9 max).
Operator security
If you open the tank lifting the
lamp, the augers will stop.
Keyboard, augers and cooling
system block
It is possible to block the
keyboard. You unblock or block
the buttons by lifting the lamp
and pressing the and
buttons at the same time; the
block status is signaled on the
display through the decimal
point lighting.
For technical reason the
keyboard is unlocked when the
machine is switched off.
Gear electronic stop bypass
As you already know, for
security reasons, when a tank
is open, the augers stop
turning. However, the augers
stop can be also caused by a
malfunctioning of 1 and/or 2
contacts, or by the accidental
lost of one of the contact during
the cleaning phase; in this
case, it is possible to activate
the electronic bypass function
by pressing the granita-cold
drink selection button until
the augers start turning again.
In this situation, if you lift the
cover, the augers keep on
turning and the keyboard block
is deactivated; this is why the
electronic bypass is to be
considered only as a temporary
remedy and not as a definitive
solution which is, instead, the
substitution of the defective
contact or the installation of the
lost one.
Once the contact has been
substituted or installed again,
use the following procedure in
order to deactivate the
electronic bypass:
• Lift the cover: the augers go
on turning;
• Stop the augers pressing the
button;
- 23 -
ENGLISH
• If you press the button,
press the button: the
augers will turn;
• Wait for the augers to stop,
and then release the two
buttons;
• Replace the cover: the
auger will start moving
again.
System has been reset.
Self-diagnostics
Consult the Problem Solving
Section.
Configuration memory
All the functioning modes and
the regulations set are
registered in a non-volatile
memory which is active even
without power; therefore, when
you switch on the machine, the
tank keeps the configuration it
had when you switched it off, a
part from the keyboard lock (as
already said).
inimum level signal
All machines are endowed with
a probe that detects the product
minimum level in the tanks.
When the product is below this
level, the light of the lamp starts
blinking. If the product level
does not change, the light will
stop blinking after a minute.
How to start the
production of slush,
sherbets or cold drinks
Clean the machine as
described in the previous
paragraph.
Remove the covers and pour
the mix in the tanks.
Warning: When switching on
the machine, the poured
product must not be lower
than 10 °C in order to allow a
correct calibration of the
electronic kit.
Switch on the main switch (see
pic- fig. 7-pag. 99 at the end of
this manual).
Switch on the augers switch
.
Press the button in order
to select “slush” (slush led
lighting ) or “cold drink”
(cold drink led lighting).
In “slush” mode, in order to
increase the product density,
use the button, in order to
decrease it, use the button.
In “cold drink” mode, in order to
increase the product
temperature, use the button,
in order to decrease it, use the
button.
Here you are the table with the
correspondence between the
values on the display while in
“cold drink” mode and the °C/°F
degrees.
In order to turn on the lamp
light, press the button.
Warning: in order to have
slush, sherbets or cold drink,
you need a small quantity of
sugar per liter. The
recommended quantity is
generally reported in the
usage instructions. In case of
natural products, we suggest
to use a quantity that goes
from 12 and 22%.
If the horizontal auger is
blocked because of ice blocks
due to a lack of sugar or to
other reasons, such as foreign
bodies in the tank, the vertical
auger can undergo a break.
Warning: If the temperatures
exceed 35°C Elmeco is not
responsible for the
refrigerator performance
(that will be slower) and for
the correspondence between
the temperature selected on
the electronic board and the
drink temperature.
Timer defrost
(optional)
See the pictures at the end of
this manual.
“Timer defrost" function is
optional.
The machine is endowed with a
clock timer that, if properly
regulated, changes the "slush"
function in "cold drink" and
viceversa. This function grants
a cold product with a 5 °C
temperature (+/-1°C), even
during the night (Night Mode),
with a great advantage
especially for milk-based
products.
The Timer Defrost function is
not activated on the machine:
°C °F
2 2 – 6 35.6 – 42.8
3 3 – 7 37.4 – 44.6
4 4 – 8 39.2 – 46.4
5 5 – 9 41.0 – 48.2

- 24 -
ENGLISH
pins placed on the external side
of the commutation disk. Each
pin represents a range of 15
minutes. The setting and the
activation of the Night Mode
and Day Mode is done when
the machine is installed in the
following way:
• FC1 and FC3 left side panel
opening; FC2 back panel
opening;
• local time setting on the
timer. This setting is done
by turning the commutation
disk clockwise until the local
hour reached the arrows
marked with “F”;
• Night Mode and Day Mode
hour setting. This setting is
done by placing the pin
toward the centre of the
commutation disk;
• left side or back panel
closing
If a "d" appears on the display
on the electronic board, it
means that the Night Mode
function is active.
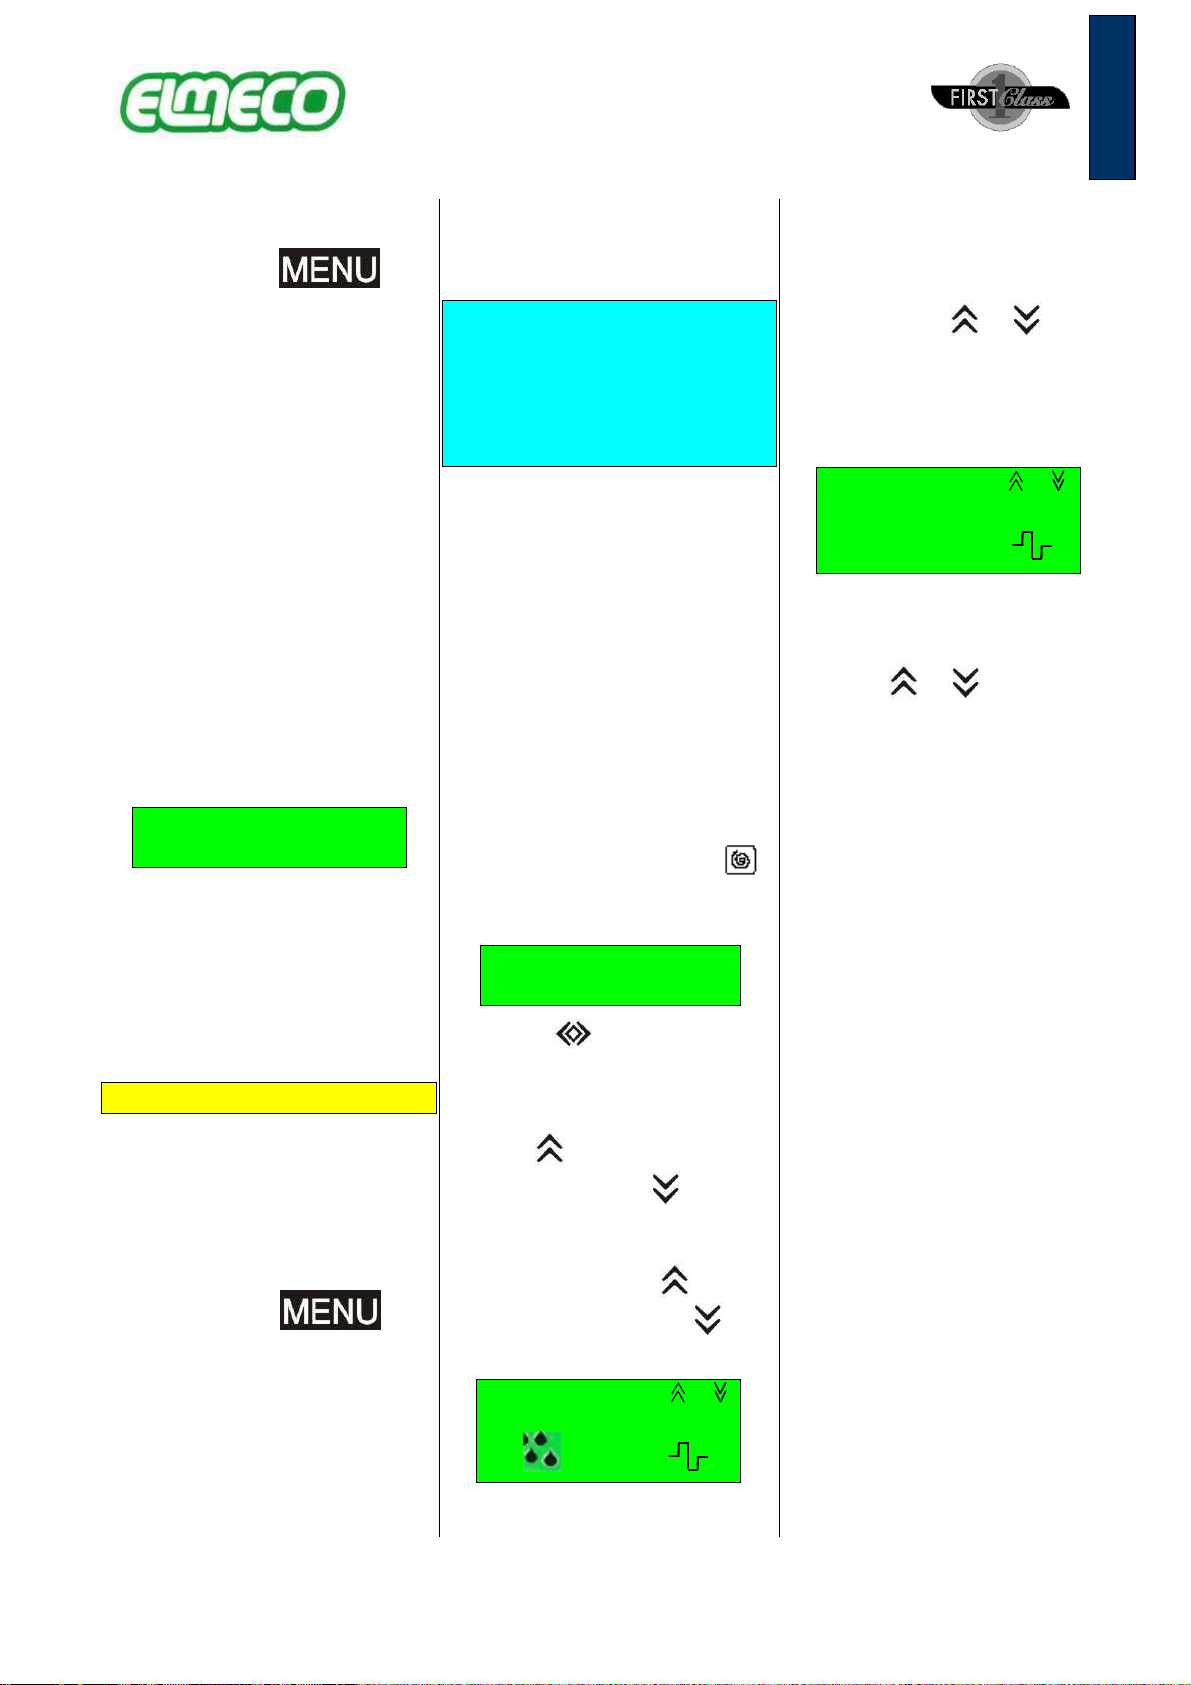
First Class Millennium
controls and signals
When you switch on the
electronic board, the display will
show
ELMECO / ITALIA
(0.15)
Where 0.15 indicates the tank
review number.
FC Millennium has a BASIC
version that only has the
electronic board like the one
shown before, and an
ADVANCED version that ha
san additional electronic kit in
the machine with additional
features connected to time.
WARNING: The screen with
the “/” symbol indicates that
the values are shown
alternatively.
After the screen shown above
the initial screen will be
displayed:
StandBy
Press
WARNING: The electronic
board will keep the settings it
had when the machine was
switched off.
When the tank is in stand-by
mode, the augers and the
cooling system are off. The
augers and the gear motor can
be turned on by pressing the
button. The screen will
show:
Motor on
Press < <> >
If you press the button, the
screen will display as follows:
Select / Degrees /
--
Y
(where Y is a variable number
between –5 and 15 for Cold
Drink Mode, which indicates the
temperature in °C at which the
product must be prepared).
Using and you can
increase or decrease the
temperature of the product. The
recommended temperature is
7°C .
If you press the button, the
screen will display as follows:
Select / Density /
--
*X
(where X is a variable number
between 0 and 9 and indicates
the density of the slush). If you
use the and buttons it is
possible to increase or
decrease the slush density
value.
- 25 -
ENGLISH
WARNING: If, when the
electronic board is in Slush
Mode, the product
temperature is greater than
5°C, the following screen will
be displayed:
Auto / Setting / Wait
*X
This screen indicates that the
calibration process is taking
place. The calibration process
will take one minute to
complete.
If you press the button
(Cooling off- cold drink-
slush) you can switch the
machine functioning modes
alternatively. Each time you
press the button, the different
screens of cold drink – slush
and cooling off alternate. In this
latter position only the augers
rotate and no other action is
taken.
If you press the auger rotation
key , the display will
appear as follows:
StandBy
Press
By holding the button
for one second you will enter
the selection menu.
Please note that unless you
give any further instruction to
the electronic board in more 10
seconds time, the display will
automatically go back to the
initial screen.
LAMP
OFF / ON
This screen allows you to turn
ON or OFF the light in the lid,
by pressing the and
buttons of the electronic board.
ByPass
OFF / ON
In this screen you can activate
or deactivate the bypass
function by pressing the
increase and decrease
keys.
LowLevel
OFF / ON
This screen allows you to turn
ON or OFF the Low Level
control function (automatic
decrease of slush’s density to
no.1, when the level probe is
not covered with product for
more than 20 minutes); you can
do that by pressing the
increase key or the
decrease key. If you add
some product (liquid that
touches the level probe), the
function will be deactivated and
the slush preparation will reach
the density value that was
previously set on the electronic
board. When this function is
active, you will see the
following display:
Please/refill/LOWLEVEL
*1L
As for the selection menu, the
next screen is like the one
below:
KeyBoard
UNLOCK / LOCK
This screen allows you to
activate (LOCK) or deactivate
(UNLOCK) the “keyboard lock”
function by pressing the or
buttons. This function is
suitable in self-service places,
in order to avoid people from
changing the values set. When
the keyboard is locked, the
electronic board will show a
“dot” on the display as shown
on the screen below:
select/ Density / --
*X ■
If the machine is turned OFF
and ON, the electronic board
will be in LOCK position again.
WARNING: The keyboard
lock can be activated if the
electronic board is in
“Standby" or “MotorOn”
mode.
Washing
OFF / ON
Turning OFF and ON of the
washing function. If the function
is active, the electronic board
will show the screen below;
Washing
■
in this condition all buttons and
the cooling functions are NOT
active, a pat from the MENU
button.
TIME
hh:mm
This screen shows the time set
on the machine. If it is different
from the place where the
machine is installed, you can
change it by following the steps
below:
- 26 -
ENGLISH
1) press the button; 2) the
first value will start to blink. If
you want to change the value,
you need to press the
button; 3) if you press the
button; 4) the second value will
start to blink. If you want to
change the value, you need to
press the button; 5) if you
press the button; 6) the
third value will start to blink. If
you want to change the value,
you need to press the
button; 7) press the
button; 8) the fourth value will
start to blink. If you want to
change the value, you need to
press the button; 9) press
the button to exit this
function. The time will be
saved.
WARNING: During the time
adjustment, the date
(MM/DD/YY) will appear on
the upper line. It can be
different from the date of the
place where the machine is
installed, but the machine
will work without any
problem.
NOTE: First Class Millennium
BASIC does not display this
screen and all other screens
here reported in the dotted
square. These will only be
active in the ADVANCED
version.
Defrost function: On the screen
you can see the defrost ON and
OFF time and the defrost
temperature alternatively. The
first screen indicates the value
of cold drink used in defrost
mode (set to 7°C); this screen
is used only for information.
The second screen (ON – OFF)
indicates the defrost function
start (ON) and stop (OFF) time.
If the two values are the same,
the function is deactivated. In
order to change the ON and
OFF time, follow the steps
below:
1) press the button; 2) the
first value of the upper line will
start to blink. If you want to
change the value, you need to
press the button; 3) repeat
the steps 1) and 2) until all ON
and OFF values are set; 4)
press the button to
exit the change function. The
time will be then saved.
Max Temp
T= _°C
In this screen you can activate
or deactivate the Critical
Temperature Control function.
When the critical temperature
value is ( _ ), the function is
deactivate; if you want to
activate it, you need to:
1) press the button; 2) set
the value pressing the
button; 3) press the
button to exit the change
function.
When you switch the machine
on, if the product temperature is
greater than the one set, the
display will blink and show:
Product
T > X
The “X” value represent the
critical temperature. In order to
stop stop the warning signal,
please press the
button.
CLEANING
000d - ---
In this screen you can activate
or deactivate the Cleaning
warning function. This function
is used if the user wants the
machine to show a clear
warning on the display that
reminds to clean the machine.
If the Cleaning warning function
is on (000d----) it is deactivated.
In order to activate it: 1) press
the button; 2) the first
value will start to blink. If you
want to change the value, you
need to press the button; 3)
press the button again 4)
the second value will start to
blink. If you want to change the
value, you need to press the
button. 5) press the
button; 6) the third value will
start to blink. If you want to
change the value, you need to
press the button; 7) press
the button to exit the
change function.
When the machine is turned on
and the values (---) are zero,
the display will blink showing
the cleaning warning:
CLEANING
REQUIRED
Clean the tank as described in
the usage manual pag. 21;
DEFROST
T=07°C ON 00:00
OFF 00:00
- 27 -
ENGLISH
In order to stop the warning
signal, press the
button; thus the count down will
start again for the next warning.
000d = time in days for the
cleaning warning to appear
- --- = count down (day to the
warning)
EXEMPLES:
100d = after 100 days the
machine will inform that it must
be cleaned up
050d = after 50 days the
machine will inform that it must
be cleaned up
007d = after 07 days the
machine will inform that it must
be cleaned up.
REFILL
ON / OFF
For machines with auto re-fill
set up ONLY! (This should be
ON only if the machine has the
auto refill installed). In this
screen you can activate or
deactivate the auto refill control
signal.
Alarms functions
First Class Millennium is
endowed with a direct signalling
of the problems found. When
the electronic board blinks, it
indicates that there is an active
alarm. To see what alarm is,
please press the
button for 1 second.
In the “Problem Solving”
section, you can see a
complete list of all possible
alarms at pag. 30.
If more than one alarm is
active, these will be indicated
with more messages that
appear alternatively.
How to start the
production of slush,
sherbets or cold drink
with First Class
Millennium
Clean the machine.
Remove the covers and put the
mix in the tanks.
Warning: the temperature of
the poured product must not
be lower than 10 °C in order
to allow a correct calibration
of the electronic kit that will
be indicated as described in
the previous paragraph.
Switch on the main switch (see
picture - 7 at the end of this
guide).
Switch on the auger switch .
The following screen will be
displayed:
Motor On
Press < <> >
Press the button to select
“slush” or “cold drink”.
With the “slush” mode, you can
increase the product density
with the button and
decrease it with the button.
With the “cold drink” mode, you
can increase the product
temperature with the button
and decrease it with the
button.
select/ Degrees / --
5
Cold drink.
It is possible to change the
product temperature from –5 to
15 °C using the or
buttons to increase or decrease
it respectively.
Warning: The recommended
temperature value is 7°C.
select/ Density / --
* 5
Slush.
It is possible to change the
product density from 1 to 9
using the or buttons to
increase or decrease it
respectively.
- 28 -
ENGLISH
Important security
rules
• Do not touch the machine
when you have wet hands
and/or feet.
• Do not use the machine
with bare feet.
• Do not allow children or
incompetent people to use
the machine.
• Do not leave the machine
exposed to atmospheric
agents.
• Do not pull the power
supply cable to disconnect
the machine from the
electric power.
• Do not remove the panels
before disconnecting the
machine from the electric
power.
Old machine disposal
The out-of-use machines must
be disabled. Disconnect the
plug from the electrical network
and cut the cable.
Ecological instructions
All refrigerating machines must
be disposed by the communal
disposal service or by an
equivalent private authorized
company. Take care not to
damage the rigid tubes of the
refrigerator until they are taken
back in order to be carefully
and ecologically disposed.
All packaging materials used
can be disposed without any
danger.
Technical assistance
The repairing of the machine
must be carried out by an
authorized service centre, using
only original spare parts.
- 29 -
ENGLISH
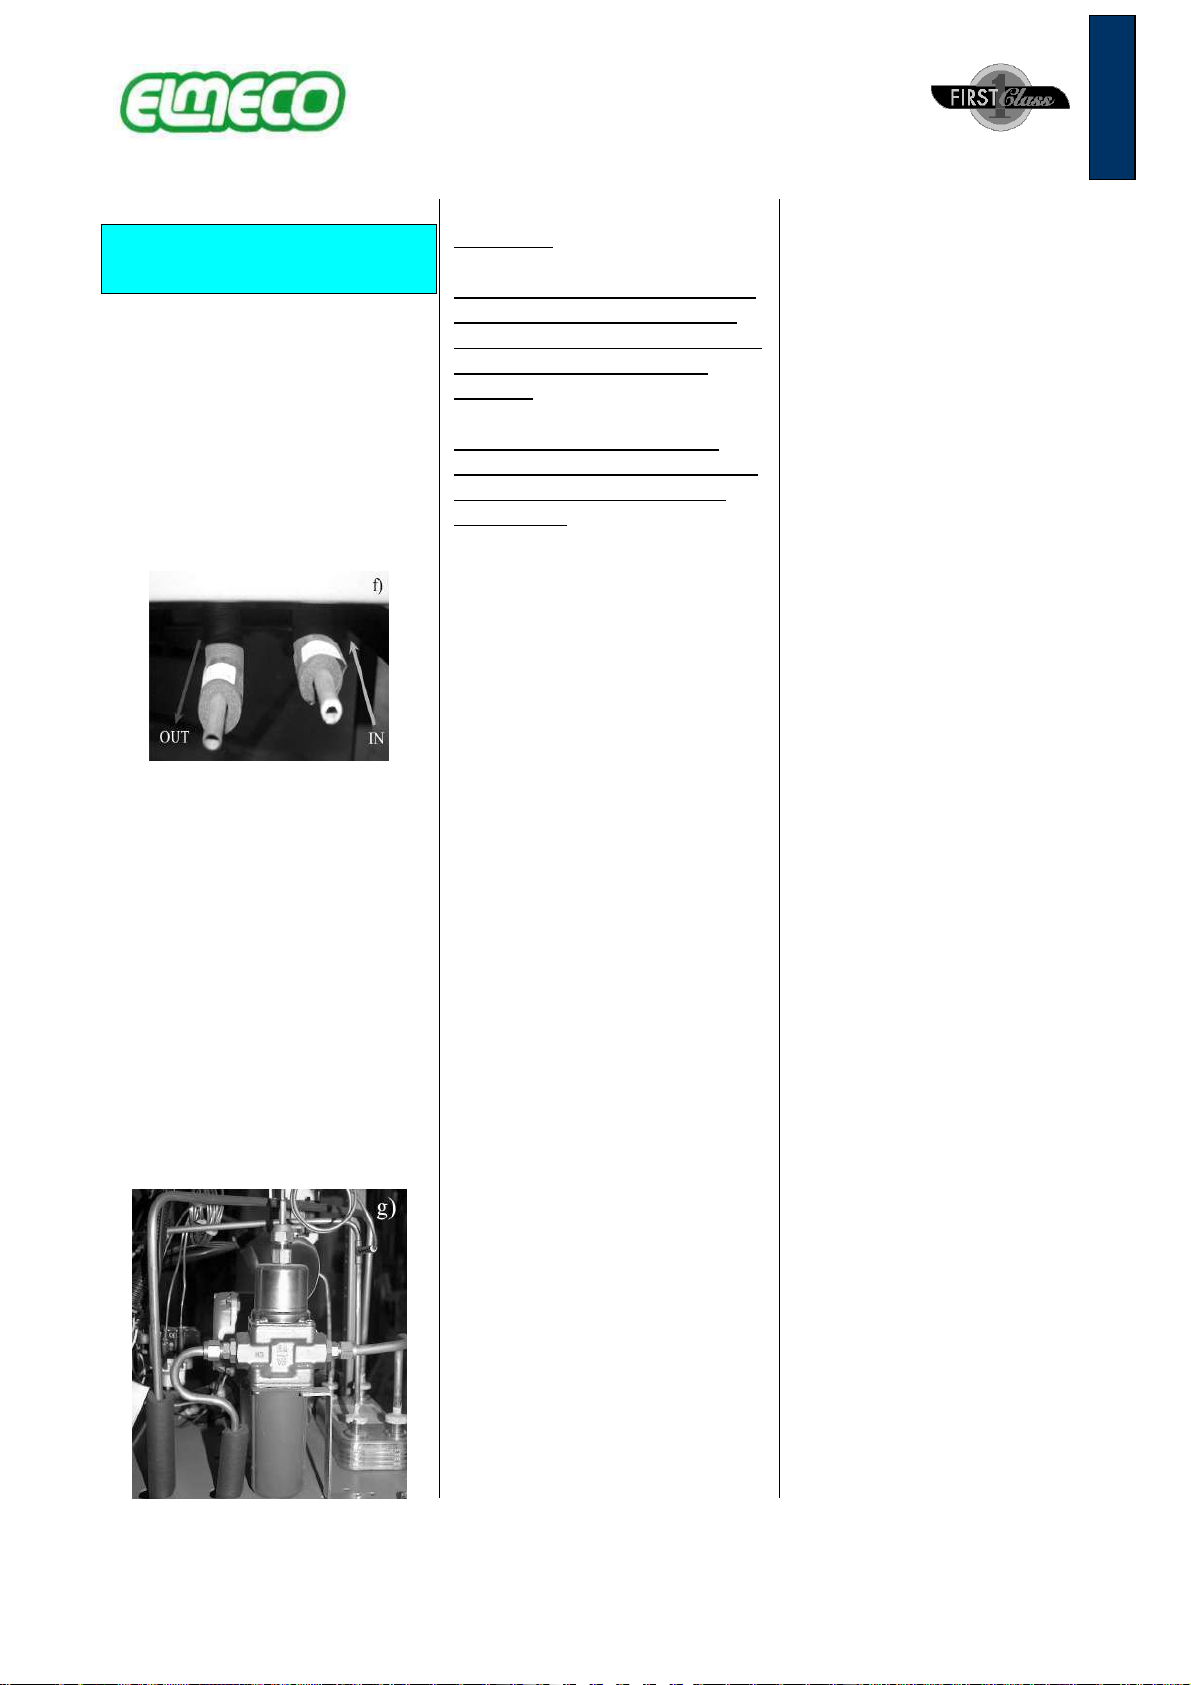
FCW installation (water
cooling system)
If the First Class you bought is
endowed with the water cooling
system, it is necessary to follow
these instructions.
On the machine front side
(outlet side)
There are some water exit (left)
and entrance pipes (right) as
shown in the pic. f .
The quantity of water
necessary for the functioning
can change according to the
product cooling phases, with
higher values when starting the
slush production and values
that are close to zero when you
want to keep the slush. We
therefore recommend to
connect the machine to the
water network with the
maximum capacity, thus the
pressure switch valve (pic. g) in
the machine will regulate the
flux according the real
necessity.
Important:
It is not possible to connect the
FCW water entrance with the
input of another machine based
on a water cooling system
(series).
It is not possible to connect
several machines based on the
water cooling system on the
same outlet.
- 30 -
ENGLISH
First Class Problem Solving
The electronic board displays "1
blinking"
Verify that the cable connecting the electronic board to the gear motor magnetic revolution counter is
firmly fixed to both elements. In case it needs to be substituted: disconnect the two connectors of the
old cable both from the reader and the electronic board; place the new cable with some insulating tape
or a small band on the existent electric installation. Disconnect
the power electric cable
The electronic board displays "2
blinking"
Replace the cable that connects the thermostat probe to the electronic board verifying that there is not
oxide on it; if so, clean the contacts and if the problem still exists, it is necessary to substitute the
thermostat probe. Disconnect
the power electric cable
The electronic board displays "8
blinking"
The electric power is not linear; there could a fluctuation of the entry tension due to tension changes, to
extensions or to multiple plugs to which First Class is connected. If the power tension is regular,
provide First Class with a single connection in order to solve the problem; if First Class in connected to
an autofill system, it is necessary to switch off and on First Class in order to make it work correctly
again. Disconnect
the power electric cable
The tank does not make cold, the
cooling light is off
1. Switch off the slush machine with the main switch;
2. discharge the product, if it is cold, and put in the tank a product with a temperature higher than
15°C;
3. wait 5 minutes at least and switch on the machine again.
The electronics calibration is automatic.
The augers do not turn in the tank
and the electronic board does not
work properly.
The cotter pin (item 35 of the exploded view pag. 95) broke down. For the cotter pin substitution
procedure see pag. 32 Disconnect
the power electric cable
During the augers rotation you
can hear a creaking. This noise derives from the vertical and horizontal augers gears. You can avoid this by simply go on
using the machine or putting some Vaseline on the plastic gears.
The machine does not make cold
and the slush and the pressure
switch light is ON. The pressure switch intervened. In order to refit it see pag. 31 Disconnect
the power electric cable
The MILLENNIUM electronic
board blinks. If you press the
MENU button for a second, it
displays : “ALARM THERMAL “
Replace the cable that connects the thermostat probe to the electronic board verifying that there is not
oxide on it; if so, clean the contacts and if the problem still exists, it is necessary to substitute the
thermostat probe. Disconnect
the power electric cable
The MILLENNIUM electronic
board blinks. If you press the
MENU button for a second, it
displays : "ALARM MOTOR "
Verify that the cable connecting the electronic board to the gear motor magnetic revolution counter is
firmly fixed to both elements. In case it needs to be substituted: disconnect the two connectors of the
old cable both from the reader and the electronic board; place the new cable with some insulating tape
or a small band on the existent electric installation. Disconnect
the power electric cable
The MILLENNIUM electronic
board blinks. If you press the
MENU button for a second, it
displays : "ALARM VOLTAGE”
The electric power is not linear; there could a fluctuation of the entry tension due to tension changes, to
extensions or to multiple plugs to which First Class is connected. If the power tension is regular,
provide First Class with a single connection in order to solve the problem; if First Class in connected to
an autofill system, it is necessary to switch off and on First Class in order to make it work correctly
again. Disconnect
the power electric cable
The MILLENNIUM electronic
board blinks. If you press the
MENU button for a second, it
displays : " ALARM LEVEL”
Level probe (item 16 of the exploded view pag. 95) missing or cover contact/level probe/terminal board
(item 37 of the exploded view pag. 95) not correct. Disconnect
the power electric cable
The MILLENNIUM electronic
board blinks. If you press the
MENU button for a second, it
displays : " ALARM REFILL”
You can see this alarm only if the REFILL screen is ON. The alarm appear when the level probe does
not read the presence of the liquid in the tank, for longer than 2 minutes. In order to reset the alarm and
let the level control restart, switch off and on the electronic board with the button.
Disconnect
the power electric cable
The MILLENNIUM electronic
board blinks. If you press the
MENU button for a second, it
displays : " ALARM DATE”
This alarm appear if the electronic board finds a problem on the date setting. In order to adjust the date
you need to use the programmer module.
NOTE. First Class Millennium Basic does not have this alarm.
Disconnect
the power electric cable
The MILLENNIUM electronic
board blinks. If you press the
MENU button for a second, it
displays: "ALARM SOLVED"
This window will show up when one or more alarms will be solved. Disconnect
the power electric cable
- 31 -
ENGLISH
Pressure switch refit
procedure
When the pressure switch light,
near main switch in ON,
Pressure switch light
This indicates that the pressure
switch intervened to deactivate
the compressor. In order to refit
this device, it is important to
follow the instructions below:
1° Disconnect the power
cable.
2°Unscrew the crossed screws
at the bottom of the right side
panel from the side of the
condenser.
3°Slip the panel.
4°Press the button on the
pressure switch.
5°Close the panel and turn on
the machine again.
- 32 -
ENGLISH
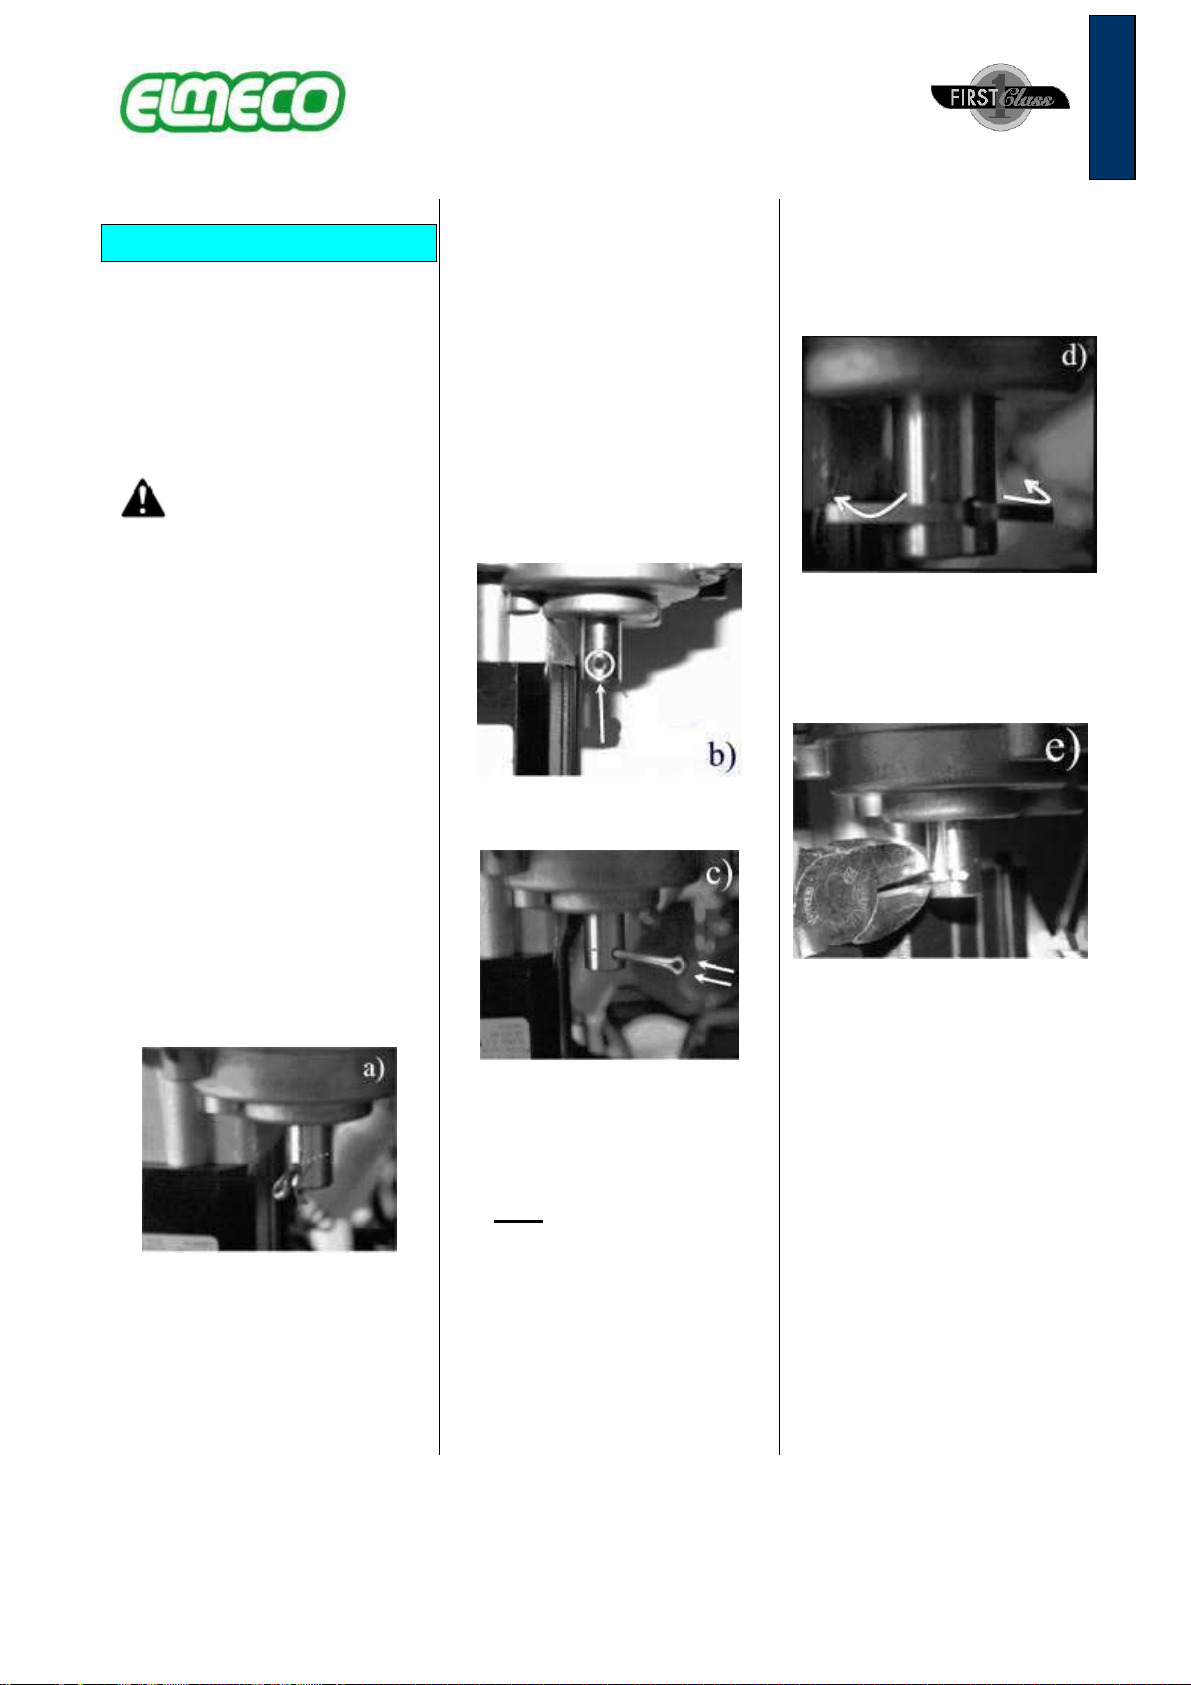
Cotter pin substitution
If the machine works but the
augers do not turn, it is possible
that the cotter pin, (item 35 of
the exploded view at pag. 95)
that connects the gear motor to
the transmission shaft, broke
down.
Disconnect the power
electric cable
After removing the back and
side panels, you can see the
breakdown trying to lift the ring
that fix the vertical auger (item
28 of the exploded view pag.
95). It can happen that it is
blocked or that, if you lift it, it
carries away the transmission
shaft with it (item 29 of the
exploded view pag. 95).
In the first case, it is necessary
to control that the transmission
shaft base is as high as the
gear motor (exit shaft). The lift
pin could be in the hole of the
gear motor slow shaft but it
should be deformed or broken
(see pic .a)
In the second case, the hole in
the gear motor should be
completely empty and some
remnants of the split pin will
certainly lie in the machine.
It is therefore necessary to
install a new split pin.
Place the transmission shaft so
as its hole is aligned with the
one present on the gear motor
exit shaft; it should be evident
when they are aligned;
Insert the split pin as shown in
the pic. c;
Verify that the head of the split
pin, in its rotation, does not
touch the gear motor and
respects a minimum distance.
Warning: do not reuse, in any
case, the old split pin;
With the help of a pliers, fold
the two ends of the split pin
downward as indicated by the
arrows in the pic. d;
Then, with a nippers, cut the
extremities in excess in order to
avoid a contact with the gear
motor during the rotation (see
pic. e).
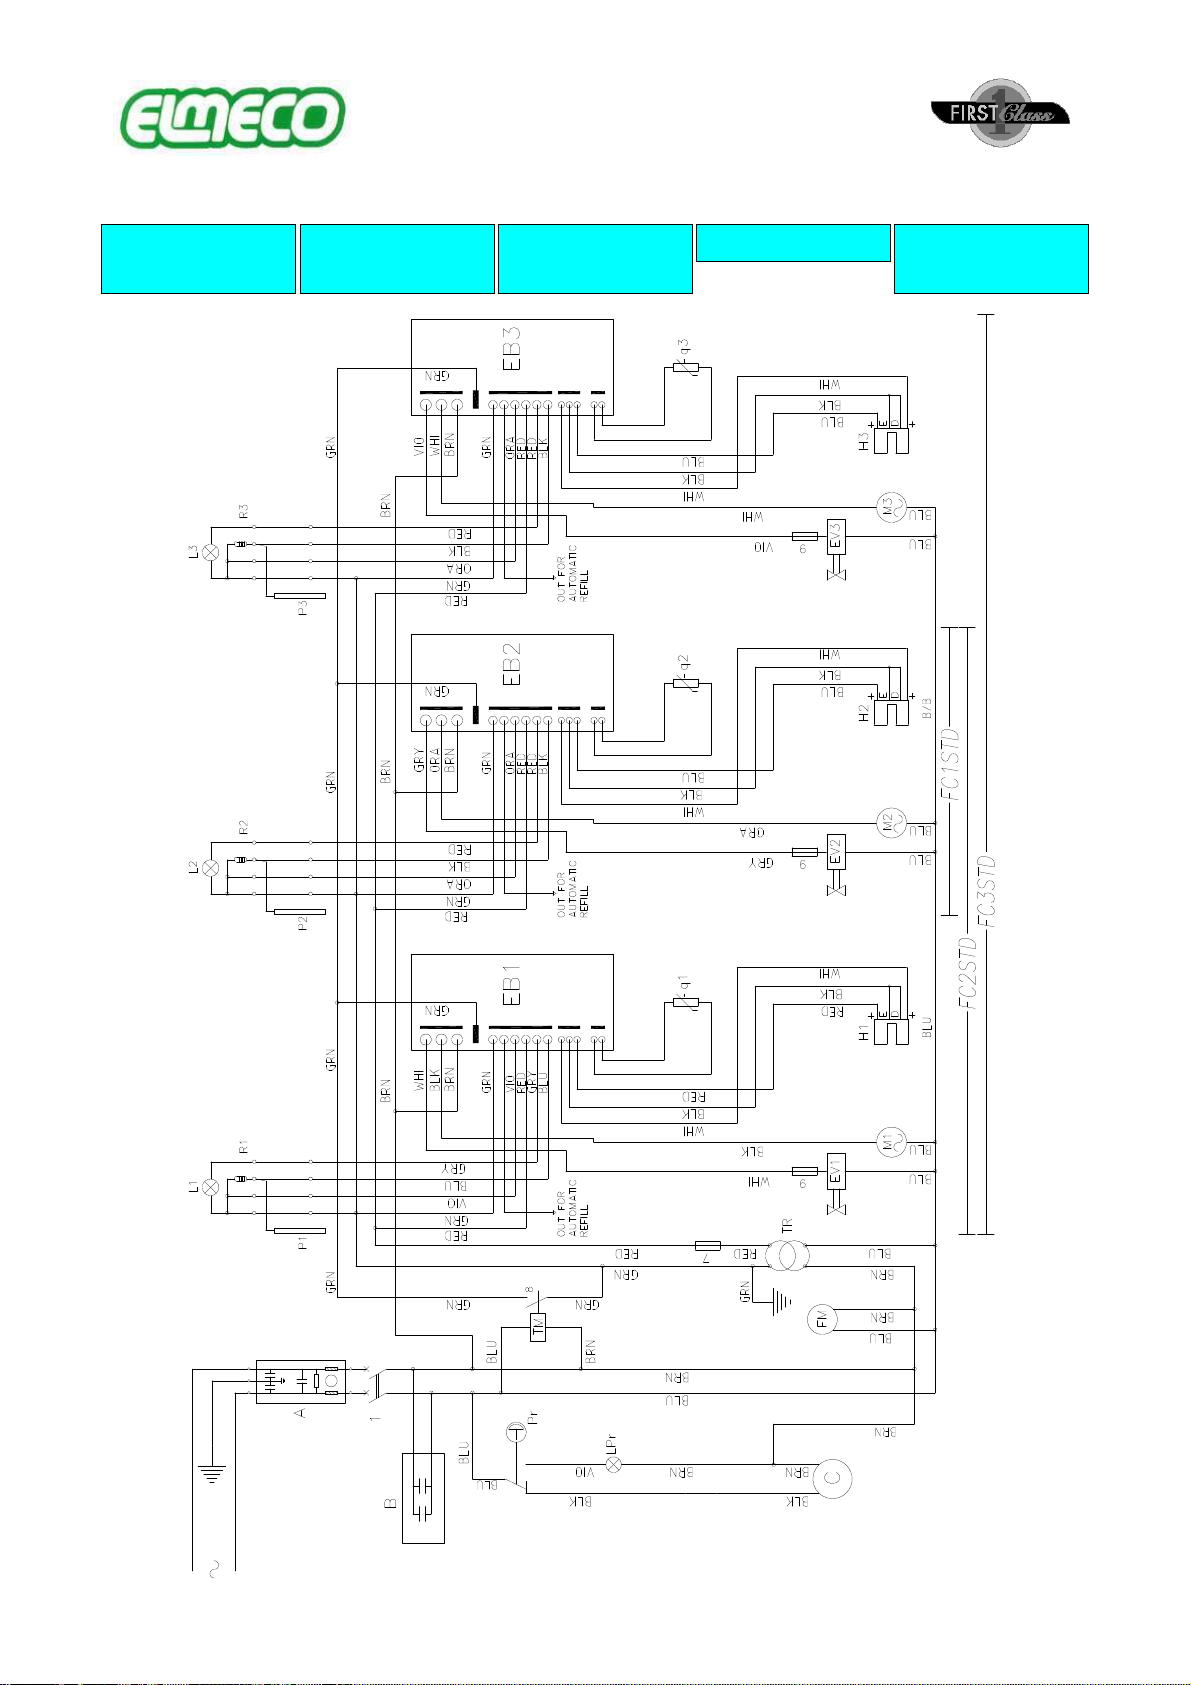
- 89 -
Impianto
Elettrico
Electric
System
Installation
Electrique
Elektrik
Instalación
Eléctrica
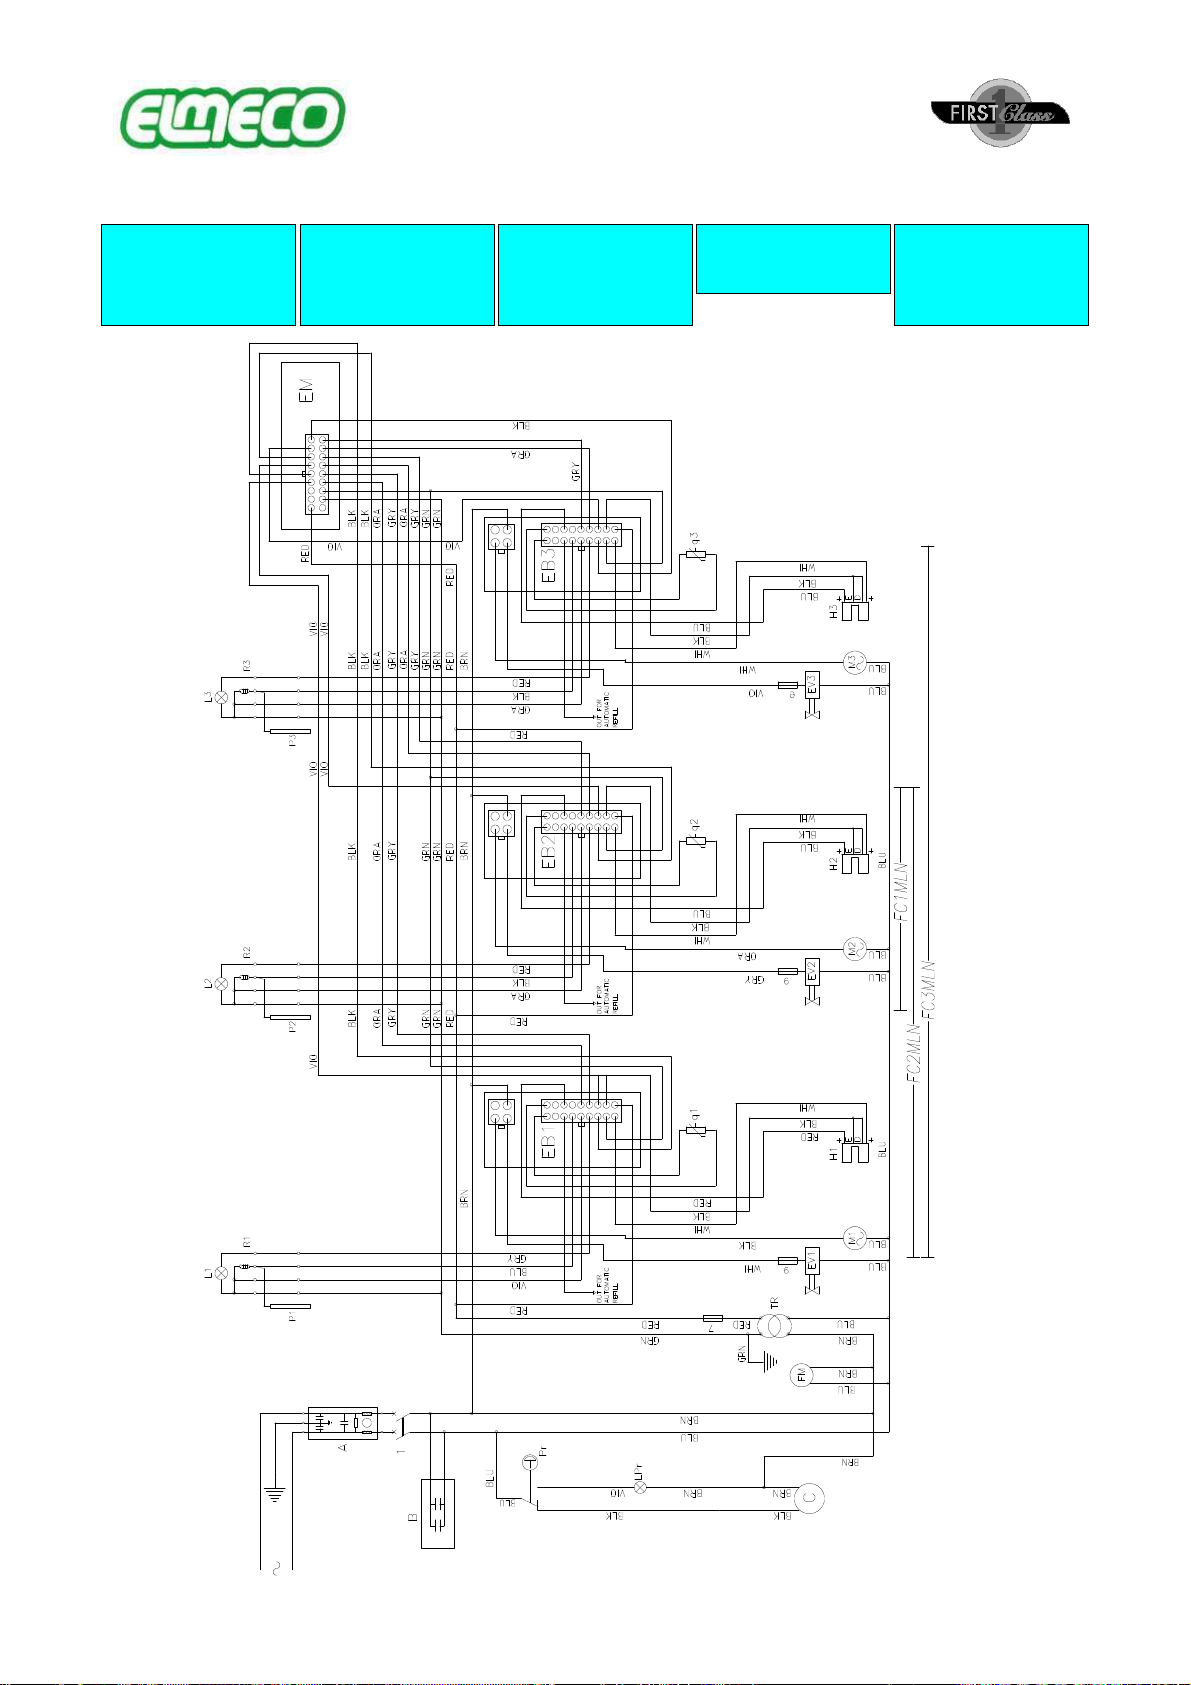
- 90 -
Impianto
Elettrico
Millennium
Millennium
Electric
System
Installation
Electrique
Millennium
Elektrik
Millennium
Instalación
Eléctrica
Millennium
This manual suits for next models
1
Other ELME Commercial Food Equipment manuals


