elmeg IP120 User manual
elmeg IP120 / en / elmeg IP120_v1/ Cover_front.fm / 16.03.2015
Version 2, 27.05.2010
1
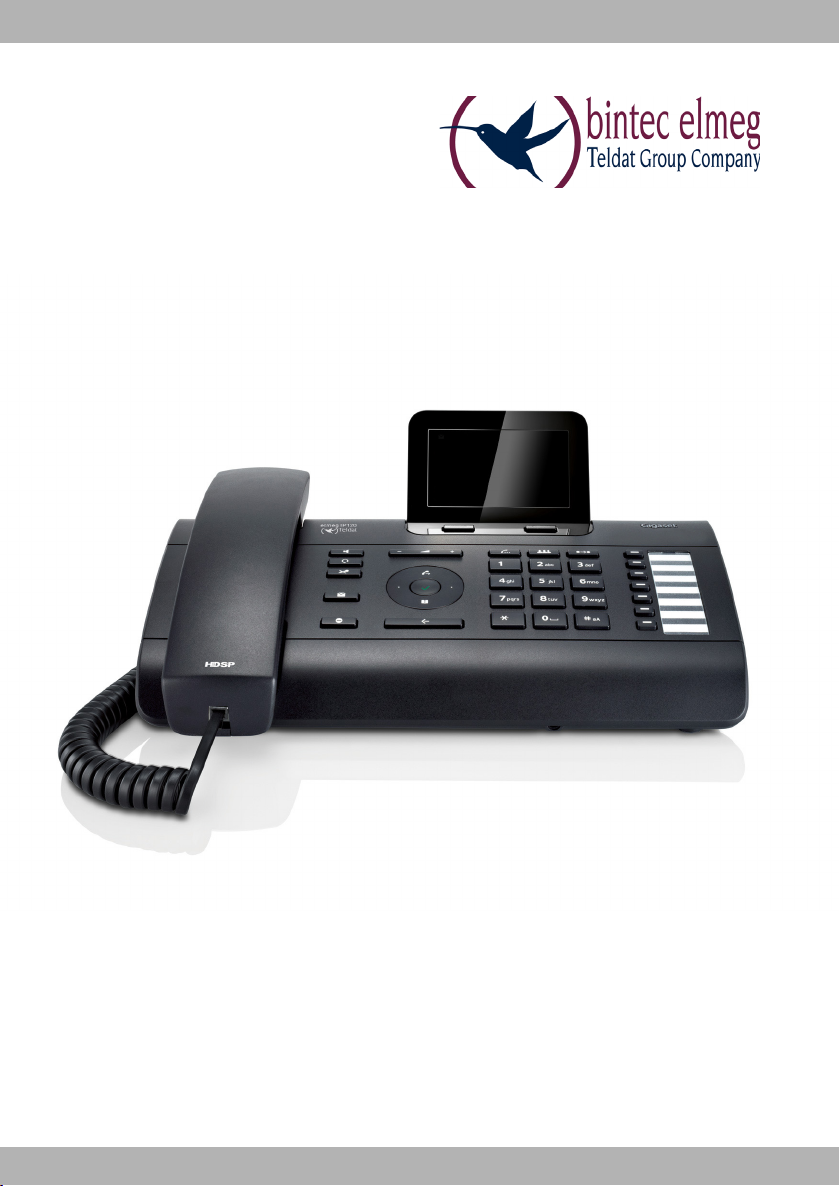
elmeg IP120
bintec elmeg User guide
Copyright© Version 2.0, 2015 bintec elmeg GmbH
User Guide
elmeg IP120

elmeg IP120 / en / elmeg IP120_v1 / Cover_front.fm / 16.03.2015
Version 2, 27.05.2010
2elmeg IP120
bintec elmegUser guide
Legal Notice
Aim and purpose
This document is part of the user manual for the installation and configuration of bintec elgmeg
devices. For the latest information and notes on the current software release, please also read our
release notes, particularly if you are updating your software to a higher release version. You will find
the latest release notes under www.bintec-elmeg.com.
Liability
This manual has been put together with the greatest possible care. However, the information con-
tained in this manual is not a guarantee of the properties of your product. bintec elmeg GmbH is
only liable within the terms of its conditions of sale and supply and accepts no liability for technical
inaccuracies and/or omissions.
The information in this manual can be changed without notice. You will find additional information
and also release notes for bintec elmeg devices under www.bintec-elmeg.com.
bintec elmeg devices make WAN connections as a possible function of the system configuration.
You must monitor the product in order to avoid unwanted charges. bintec elmeg GmbH accepts
no responsibility for data loss, unwanted connection costs and damage caused by unintended
operation of the product.
Trademarks
bintectrademarks and the bintec logo, artem trademarks and the artem logo, elmeg trademarks
and the elmeg logo are registered trademarks of bintec elmeg GmbH.
Company and product names mentioned are usually trademarks of the companies or manufactur-
ers concerned.
Copyright
All rights reserved. No part of this manual may be reproduced or further processed in any way with-
out the written consent of bintec elmeg GmbH. The documentation may not be processed and, in
particular, translated without the consent of bintec elmeg GmbH.
You will find information on guidelines and standards in the declarations of conformity under
www.bintec-elmeg.com.
How to reach bintec elmeg GmbH
bintec elmeg GmbH
a Teldat Group Company
Südwestpark 94, D-90449 Nürnberg, Deutschland,
Telefon: +4991196730, Fax: +499116880725
Internet: www.bintec-elmeg.com
© bintec elmeg GmbH 2015, All rights reserved. Rights of modification reserved.

elmeg IP120 / en / elmeg IP120_v1 / Intro.fm / 16.03.2015
Version 2, 27.05.2010
3elmeg IP120
bintec elmeg elmeg IP120 – More than just a telephone
elmeg IP120 – More than just a telephone
Your elmeg IP120 is an IP phone designed for professional use.
uEasy to set up
Use the automatic configuration via the hybird phone system. Both function keys and SIP
configuration can be configured and auto-provisioned via the hybird phone system.
uWeb user interfaces for telephony and configuration
Operate and configure your telephone from your PC with ease.
uHigh Definition Sound Performance – HDSP
Make phone calls with brilliant sound quality.
uPhone functions for the professional user
Use the call divert, conference call, automatic ringback, call reject and Do Not Disturb (DND)
functions.
uMultiple directories
Manage your personal directory with up to 200 entries. Use an LDAP directory or online
directories on the Internet.
uNetwork connection
Connect your telephone to the local network via Ethernet. Connect a PC using your tele-
phone as a 100 MBit Ethernet switch.
uProtect the environment
Reduce environmental pollution with the power-saving power adapter.
uIndividual settings
Load your own ring tones.
Assign functions or frequently used numbers to the keys.
Further information about your phone can be found at www.bintec-elmeg.com.

elmeg IP120 / en / elmeg IP120_v1 / overview.fm / 16.03.2015
Version 2, 27.05.2010
4elmeg IP120
bintec elmegPhone overview
Phone overview
1Mute key Activate/deactivate microphone (mute) £S. 36
2Headset key Make call via headset £S. 34
3Speaker key Activate/deactivate speaker £S. 36
4Volume key Depending on the operating mode: Adjust the volume of the
speaker, receiver, headset or ringer
£S. 36
5Display keys Activate display functions £S. 24
6Message Centre Open call and message lists £S. 55
7Do Not Disturb key Do Not Disturb (DND) function £S. 37
8Navigation key Scroll through lists and entries. In idle status: £S. 26
ÈOpen redial list. £S. 44
‰Confirm or start action, select entry £S. 26
ZOpen directory £S. 47
9End call/back key End/reject call; cancel function;
go back one menu level (press briefly);
return to idle status (press and hold)
£S. 27
10 Consultation key Initiate/end consultation call, put participant on hold £S. 39
11 Star key Display special characters
Activate/deactivate ring tone
During text entry
During dialling
£S. 25
£S. 32
£S. 37
Keys
6 7 914 1510 128
21 3 4 5
11 13

elmeg IP120 / en / elmeg IP120_v1 / overview.fm / 16.03.2015
Version 2, 27.05.2010
5elmeg IP120
bintec elmeg Phone overview
Understanding Light Emitting Diodes (LEDs)
Understanding the display
Understanding the display symbols
12 Conference key Initiate conference call £S. 39
13 Hash key Switch text mode (upper and lower case letters, numbers)
Activate/deactivate keylock
£S. 25
14 Transfer key Transfer call to another party £S. 40
15 Function keys Programmable keys £S. 102
AFlashes Incoming call. £S. 34
Lights up Call is being made via the speaker. £S. 36
BLights up Call is being made via the headset. £S. 34
CLights up The microphone is muted. £S. 36
EFlashes New message in the Message Centre. £S. 55
GLights up "Do Not Disturb" function is activated. £S. 37
SFlashes Incoming call on the number programmed to this key. £S. 33
Lights up Call is being made on the number programmed to this key.
ÓNew message in the Message Centre. £S. 55
^The microphone is muted. £S. 36
@Call is being made via the speaker. Flashing: Incoming call. £S. 31
ôHeadset connected £S. 19
óRinger deactivated. £S. 59
Ñ"Do Not Disturb" function is activated. £S. 37
]Telephone in conference call. £S. 39
ÕSecure connection. £S. 35
ÔHDSP quality connection. £S. 35
ÃNew messages on the network mailbox. The number is displayed to the
right.
£S. 54
™Missed calls. £S. 44
Other icons may appear depending on the function. These are displayed alongside the corresponding
description.
Application area
Display functions (£S. 24)
T
T
Display symbols (£below)
Date
You set the time and date format using the Web configurator (£S. 106).
U
New Messages
(£S. 55)
U
U
Missed calls (£S. 44)
Calls Lines
18/02/2011
Ã05
Ó^@ôóÑ]ÕÔ
™
11:45
18 MyName
Time U
T
Own number / Name U

elmeg IP120 / en / elmeg IP120_v1 / IVZ.fm / 16.03.2015
Version 2, 27.05.2010
6elmeg IP120
bintec elmegContents
Contents
elmeg IP120 – More than just a telephone . . . . . . . . . . . . . . . . . . . . . . . . . . . . . . . . . . . . . 3
Phone overview . . . . . . . . . . . . . . . . . . . . . . . . . . . . . . . . . . . . . . . . . . . . . . . . . . . . . . . . . . . . . 4
Keys . . . . . . . . . . . . . . . . . . . . . . . . . . . . . . . . . . . . . . . . . . . . . . . . . . . . . . . . . . . . . . . . . . . . . . . . . . . . . . . . . . . . . . 4
Understanding Light Emitting Diodes (LEDs) . . . . . . . . . . . . . . . . . . . . . . . . . . . . . . . . . . . . . . . . . . . . . . . 5
Understanding the display . . . . . . . . . . . . . . . . . . . . . . . . . . . . . . . . . . . . . . . . . . . . . . . . . . . . . . . . . . . . . . . . 5
Following safety precautions . . . . . . . . . . . . . . . . . . . . . . . . . . . . . . . . . . . . . . . . . . . . . . . . . 8
Using the phone in different scenarios . . . . . . . . . . . . . . . . . . . . . . . . . . . . . . . . . . . . . . . . 9
First steps . . . . . . . . . . . . . . . . . . . . . . . . . . . . . . . . . . . . . . . . . . . . . . . . . . . . . . . . . . . . . . . . . . 11
Check the package contents . . . . . . . . . . . . . . . . . . . . . . . . . . . . . . . . . . . . . . . . . . . . . . . . . . . . . . . . . . . . . 11
Setting up and connecting the device . . . . . . . . . . . . . . . . . . . . . . . . . . . . . . . . . . . . . . . . . . . . . . . . . . . . 12
Wall mounting . . . . . . . . . . . . . . . . . . . . . . . . . . . . . . . . . . . . . . . . . . . . . . . . . . . . . . . . . . . . . . . . . . . . . . . . . . . 18
Connecting a headset . . . . . . . . . . . . . . . . . . . . . . . . . . . . . . . . . . . . . . . . . . . . . . . . . . . . . . . . . . . . . . . . . . . . 19
Setting up the device (for the first time) . . . . . . . . . . . . . . . . . . . . . . . . . . . . . . . . . . . . . . . . . . . . . . . . . . 20
Proceeding . . . . . . . . . . . . . . . . . . . . . . . . . . . . . . . . . . . . . . . . . . . . . . . . . . . . . . . . . . . . . . . . . . . . . . . . . . . . . . 23
Using the phone . . . . . . . . . . . . . . . . . . . . . . . . . . . . . . . . . . . . . . . . . . . . . . . . . . . . . . . . . . . . 24
Operating via the keypad and display menu . . . . . . . . . . . . . . . . . . . . . . . . . . . . . . . . . . . . . . . . . . . . . . 24
Menu tree . . . . . . . . . . . . . . . . . . . . . . . . . . . . . . . . . . . . . . . . . . . . . . . . . . . . . . . . . . . . . . . . . . . . . . . . . . . . . . . 29
Operating via the PC . . . . . . . . . . . . . . . . . . . . . . . . . . . . . . . . . . . . . . . . . . . . . . . . . . . . . . . . . . . . . . . . . . . . . 30
Making calls . . . . . . . . . . . . . . . . . . . . . . . . . . . . . . . . . . . . . . . . . . . . . . . . . . . . . . . . . . . . . . . . 31
Calling . . . . . . . . . . . . . . . . . . . . . . . . . . . . . . . . . . . . . . . . . . . . . . . . . . . . . . . . . . . . . . . . . . . . . . . . . . . . . . . . . . . 31
Receiving incoming calls . . . . . . . . . . . . . . . . . . . . . . . . . . . . . . . . . . . . . . . . . . . . . . . . . . . . . . . . . . . . . . . . . 34
Ending a call . . . . . . . . . . . . . . . . . . . . . . . . . . . . . . . . . . . . . . . . . . . . . . . . . . . . . . . . . . . . . . . . . . . . . . . . . . . . . 35
Using functions when making a telephone call . . . . . . . . . . . . . . . . . . . . . . . . . . . . . . . . . . . . . . . . . . . 35
Making a call to multiple participants . . . . . . . . . . . . . . . . . . . . . . . . . . . . . . . . . . . . . . . . . . . . . . . . . . . . . 38
Setting up call divert (CD) . . . . . . . . . . . . . . . . . . . . . . . . . . . . . . . . . . . . . . . . . . . . . . . . . . . . . . . . . . . . . . . . 41
Using the call lists . . . . . . . . . . . . . . . . . . . . . . . . . . . . . . . . . . . . . . . . . . . . . . . . . . . . . . . . . . . 44
Viewing entries . . . . . . . . . . . . . . . . . . . . . . . . . . . . . . . . . . . . . . . . . . . . . . . . . . . . . . . . . . . . . . . . . . . . . . . . . . 44
Dialling a number from a list . . . . . . . . . . . . . . . . . . . . . . . . . . . . . . . . . . . . . . . . . . . . . . . . . . . . . . . . . . . . . 45
Copying an entry from the call list to the directory . . . . . . . . . . . . . . . . . . . . . . . . . . . . . . . . . . . . . . . . 46
Deleting an entry or list . . . . . . . . . . . . . . . . . . . . . . . . . . . . . . . . . . . . . . . . . . . . . . . . . . . . . . . . . . . . . . . . . . 46
Using directories . . . . . . . . . . . . . . . . . . . . . . . . . . . . . . . . . . . . . . . . . . . . . . . . . . . . . . . . . . . 47
Using the local directory . . . . . . . . . . . . . . . . . . . . . . . . . . . . . . . . . . . . . . . . . . . . . . . . . . . . . . . . . . . . . . . . . 47
Using an LDAP directory . . . . . . . . . . . . . . . . . . . . . . . . . . . . . . . . . . . . . . . . . . . . . . . . . . . . . . . . . . . . . . . . . 50
Using online directories . . . . . . . . . . . . . . . . . . . . . . . . . . . . . . . . . . . . . . . . . . . . . . . . . . . . . . . . . . . . . . . . . . 51
Managing messages . . . . . . . . . . . . . . . . . . . . . . . . . . . . . . . . . . . . . . . . . . . . . . . . . . . . . . . . 54
Managing voice mails on the network mailbox . . . . . . . . . . . . . . . . . . . . . . . . . . . . . . . . . . . . . . . . . . . . 54
Accessing messages via the Message Centre . . . . . . . . . . . . . . . . . . . . . . . . . . . . . . . . . . . . . . . . . . . . . . 56
Operating door interphones . . . . . . . . . . . . . . . . . . . . . . . . . . . . . . . . . . . . . . . . . . . . . . . . . 57

elmeg IP120 / en / elmeg IP120_v1 / IVZ.fm / 16.03.2015
Version 2, 27.05.2010
7elmeg IP120
bintec elmeg Contents
Configuring basic settings . . . . . . . . . . . . . . . . . . . . . . . . . . . . . . . . . . . . . . . . . . . . . . . . . . . 58
Setting the date and time . . . . . . . . . . . . . . . . . . . . . . . . . . . . . . . . . . . . . . . . . . . . . . . . . . . . . . . . . . . . . . . . 58
Setting the ringer . . . . . . . . . . . . . . . . . . . . . . . . . . . . . . . . . . . . . . . . . . . . . . . . . . . . . . . . . . . . . . . . . . . . . . . . 59
Activating/deactivating advisory tones . . . . . . . . . . . . . . . . . . . . . . . . . . . . . . . . . . . . . . . . . . . . . . . . . . . 61
Renaming or deleting ring tones . . . . . . . . . . . . . . . . . . . . . . . . . . . . . . . . . . . . . . . . . . . . . . . . . . . . . . . . . 61
Setting the display . . . . . . . . . . . . . . . . . . . . . . . . . . . . . . . . . . . . . . . . . . . . . . . . . . . . . . . . . . . . . . . . . . . . . . . 62
Setting the language . . . . . . . . . . . . . . . . . . . . . . . . . . . . . . . . . . . . . . . . . . . . . . . . . . . . . . . . . . . . . . . . . . . . . 63
Resetting the device to the default settings . . . . . . . . . . . . . . . . . . . . . . . . . . . . . . . . . . . . . . . . . . . . . . . 64
Showing information on the device . . . . . . . . . . . . . . . . . . . . . . . . . . . . . . . . . . . . . . . . . . . . . . . . . . . . . . 64
Configuring settings for the local network . . . . . . . . . . . . . . . . . . . . . . . . . . . . . . . . . . . 65
LAN settings . . . . . . . . . . . . . . . . . . . . . . . . . . . . . . . . . . . . . . . . . . . . . . . . . . . . . . . . . . . . . . . . . . . . . . . . . . . . . 66
Web configurator – configuring the phone on a PC . . . . . . . . . . . . . . . . . . . . . . . . . . . 71
Starting the Web configurator . . . . . . . . . . . . . . . . . . . . . . . . . . . . . . . . . . . . . . . . . . . . . . . . . . . . . . . . . . . . 71
Understanding the Web configurator menu tree . . . . . . . . . . . . . . . . . . . . . . . . . . . . . . . . . . . . . . . . . . 72
Configuring phone settings via the Web configurator . . . . . . . . . . . . . . . . . . . . . . . . . 74
Network and connectors . . . . . . . . . . . . . . . . . . . . . . . . . . . . . . . . . . . . . . . . . . . . . . . . . . . . . . . . . . . . . . . . . 74
Telephony . . . . . . . . . . . . . . . . . . . . . . . . . . . . . . . . . . . . . . . . . . . . . . . . . . . . . . . . . . . . . . . . . . . . . . . . . . . . . . . 85
Messaging . . . . . . . . . . . . . . . . . . . . . . . . . . . . . . . . . . . . . . . . . . . . . . . . . . . . . . . . . . . . . . . . . . . . . . . . . . . . . . . 97
Services . . . . . . . . . . . . . . . . . . . . . . . . . . . . . . . . . . . . . . . . . . . . . . . . . . . . . . . . . . . . . . . . . . . . . . . . . . . . . . . . . 98
Function keys . . . . . . . . . . . . . . . . . . . . . . . . . . . . . . . . . . . . . . . . . . . . . . . . . . . . . . . . . . . . . . . . . . . . . . . . . . . 103
System settings . . . . . . . . . . . . . . . . . . . . . . . . . . . . . . . . . . . . . . . . . . . . . . . . . . . . . . . . . . . . . . . . . . . . . . . . . 106
Checking the status of the phone . . . . . . . . . . . . . . . . . . . . . . . . . . . . . . . . . . . . . . . . . . 115
Accessories . . . . . . . . . . . . . . . . . . . . . . . . . . . . . . . . . . . . . . . . . . . . . . . . . . . . . . . . . . . . . . . 117
Service (Customer Care) . . . . . . . . . . . . . . . . . . . . . . . . . . . . . . . . . . . . . . . . . . . . . . . . . . . 117
Questions and answers . . . . . . . . . . . . . . . . . . . . . . . . . . . . . . . . . . . . . . . . . . . . . . . . . . . . . . . . . . . . . . . . . 117
Appendix . . . . . . . . . . . . . . . . . . . . . . . . . . . . . . . . . . . . . . . . . . . . . . . . . . . . . . . . . . . . . . . . 118
Caring for your telephone . . . . . . . . . . . . . . . . . . . . . . . . . . . . . . . . . . . . . . . . . . . . . . . . . . . . . . . . . . . . . . . 118
Contact with liquid . . . . . . . . . . . . . . . . . . . . . . . . . . . . . . . . . . . . . . . . . . . . . . . . . . . . . . . . . . . . . . . . . . . . . 118
Authorisation . . . . . . . . . . . . . . . . . . . . . . . . . . . . . . . . . . . . . . . . . . . . . . . . . . . . . . . . . . . . . . . . . . . . . . . . . . . 118
Using insert strips . . . . . . . . . . . . . . . . . . . . . . . . . . . . . . . . . . . . . . . . . . . . . . . . . . . . . . . . . . . . . . . . . . . . . . . 119
Using Gigaset QuickSync – additional functions for the PC interface . . . . . . . . . . . . . . . . . . . . . . 119
Specifications . . . . . . . . . . . . . . . . . . . . . . . . . . . . . . . . . . . . . . . . . . . . . . . . . . . . . . . . . . . . . . . . . . . . . . . . . . . 119
Open Source Software . . . . . . . . . . . . . . . . . . . . . . . . . . . . . . . . . . . . . . . . . . . . . . . . . . . . 120
General . . . . . . . . . . . . . . . . . . . . . . . . . . . . . . . . . . . . . . . . . . . . . . . . . . . . . . . . . . . . . . . . . . . . . . . . . . . . . . . . . 120
Information on license rights and copyright . . . . . . . . . . . . . . . . . . . . . . . . . . . . . . . . . . . . . . . . . . . . . 120
License text . . . . . . . . . . . . . . . . . . . . . . . . . . . . . . . . . . . . . . . . . . . . . . . . . . . . . . . . . . . . . . . . . . . . . . . . . . . . . 120
Glossary . . . . . . . . . . . . . . . . . . . . . . . . . . . . . . . . . . . . . . . . . . . . . . . . . . . . . . . . . . . . . . . . . . 126
Index . . . . . . . . . . . . . . . . . . . . . . . . . . . . . . . . . . . . . . . . . . . . . . . . . . . . . . . . . . . . . . . . . . . . 138

elmeg IP120 / en / elmeg IP120_v1 / security.fm / 16.03.2015
Version 2, 27.05.2010
8elmeg IP120
bintec elmegFollowing safety precautions
Following safety precautions
Warning
Be sure to read this user guide and the safety precautions before using your telephone.
Use only the power adapter indicated on the device.
Using your telephone may affect nearby medical equipment. Be aware of the
technical conditions in your particular environment, e.g., doctor's surgery.
If you use a medical device (e.g., a pacemaker), please contact the device manu-
facturer. They will be able to advise you regarding the susceptibility of the device
to external sources of high frequency energy (for the specifications of your bin-
tec-elmeg product see "Technical Data").
The devices are not splashproof. For this reason do not install them in a damp
environment such as bathrooms or shower rooms.
Do not use the devices in environments with a potential explosion hazard
(e.g., paint shops).
If you give your phone to a third party, make sure you also give them the user
guide.
Remove faulty devices from use or have them repaired by our Service team, as
these could interfere with other wireless services.
Please note
The Ethernet cable supplied is intended for connecting a PC. To connect the telephone to the
local network use shielded cables exclusively.
elmeg IP120 / en / elmeg IP120_v1 / starting.fm / 16.03.2015
Version 2, 27.05.2010
9elmeg IP120
bintec elmeg Using the phone in different scenarios
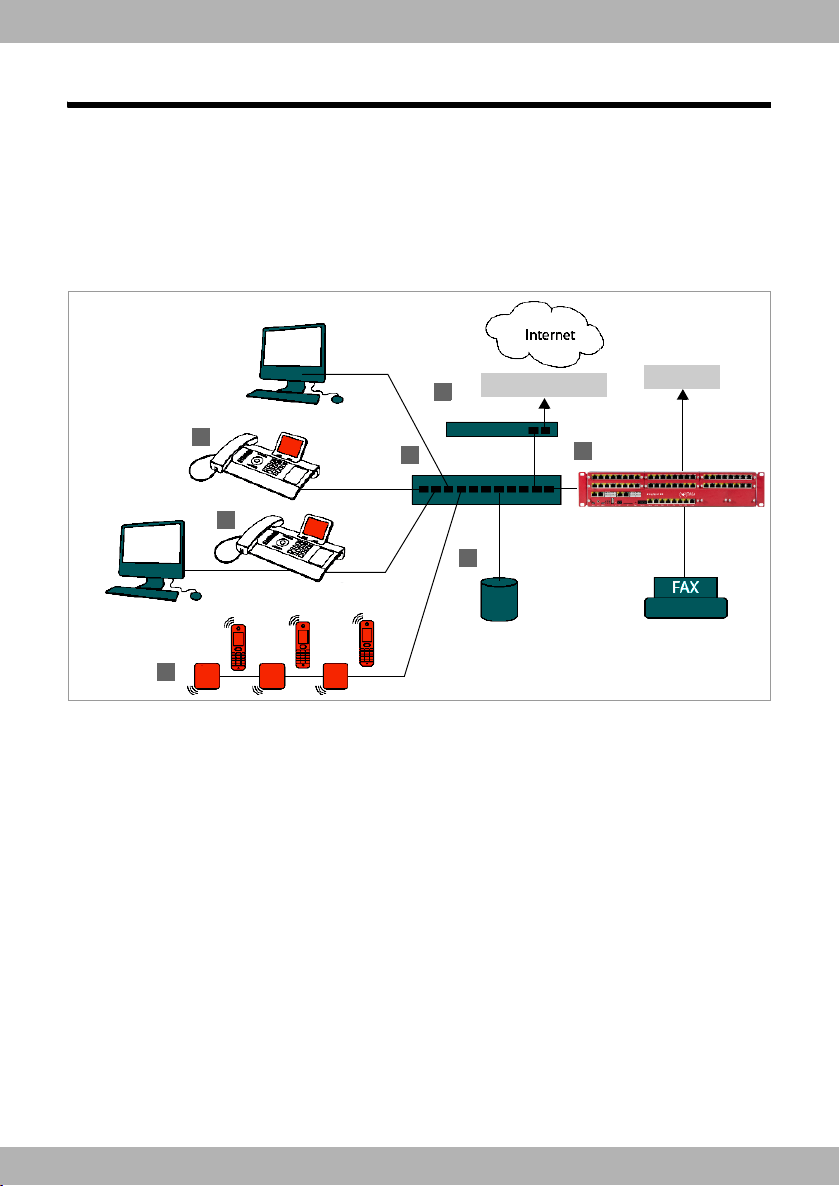
Using the phone in different scenarios
Using your phone in a professional environment with phone system and server
structure
If you use your elmeg IP120 in a corporate network with a telephone infrastructure, your phone
incorporates functions and data from the phone system and servers.
In a corporate environment, the VoIP accounts and most of the settings are configured centrally
by the phone system.
§§1§§ elmeg IP120 telephone
§§2§§ elmeg IP120 telephone with integrated switch.
Your PC is connected directly to the phone, providing you with an additional LAN connection
in your network.
§§3§§ DECT IP bases for connection to DECT handsets
§§4§§ Ethernet switch
Supports Quality of Service (QoS), 100 Mbit or Gigabit Ethernet and PoE (Power over Ether-
net).
§§5§§ Phone system (e.g., hybird 600)
Forms Internet telephony, ISDN or S2M connections. Analogue devices can be connected. A
network connection is established using Ethernet.
§§6§§ Acts as a gateway to the Internet for the connected devices. Routes VoIP calls from the phone
system to the Internet.
DSL connection
1
2
3
45
6
7
ISDN, S2M

elmeg IP120 / en / elmeg IP120_v1 / starting.fm / 16.03.2015
Version 2, 27.05.2010
10 elmeg IP120
bintec elmegUsing the phone in different scenarios
§§7§§ File, e-mail and workgroup servers, or NAS systems, can be seamlessly integrated into the
phone system architecture. As a result:
– Invitations to conference calls can be organised via the phone system
– The phone system can be backed up to a server or the system can be started via the net-
work
– Online directories (LDAP) can be managed centrally
Using your phone in a simplified environment without a phone system
You can also use your elmeg IP120 without a phone system.
§§1§§ elmeg IP120 telephone with integrated switch.
Your PC is connected directly to the phone, providing you with an additional LAN connection
in your network.
§§2§§ Acts as a gateway to the Internet for the connected devices. Routes VoIP calls from the phone
to the Internet.
§§3§§ The SIP provider transfers calls from the Internet and establishes a connection with the
standard telephone network.
In this scenario, you must manually configure the VoIP accounts for your phone. You can create
up to 6 VoIP accounts on your phone.
Internet
Connection
ISDN,
S2M
SIP provider
1
3
2

elmeg IP120 / en / elmeg IP120_v1 / starting.fm / 16.03.2015
Version 2, 27.05.2010
11elmeg IP120
bintec elmeg First steps
First steps
Check the package contents
Telephone: elmeg IP120
Receiver with cable for connection to the phone
Ethernet cable for connecting a PC
Wall bracket and
Tool for fixing the handset retainer when mount-
ing the device on the wall.
Insert strips for labelling
the function keys (with protective film)
Optional:
Power adapter for connecting the phone to the
mains power supply (if required)
with three different plug-in modules
(Europe, Great Britain, USA)
The device is powered by PoE (Power over Ether-
net) if it is connected to a switch with PoE-func-
tionality (£S. 16).

elmeg IP120 / en / elmeg IP120_v1 / starting.fm / 16.03.2015
Version 2, 27.05.2010
12 elmeg IP120
bintec elmegFirst steps
Setting up and connecting the device
The phone is designed for use in dry rooms in a temperature range of ±0°C to +45°C.
¤Set up the phone at a central point where a connection to the local network is available.
Firmware update
Whenever there are new or improved functions for your elmeg IP120, firmware updates are
made available for you to download to your phone via hybird phone system (S. 113). If this
results in operational changes to your phone, a new version of this user guide or the necessary
amendments are published on the Internet at www.bintec-elmeg.com.
Select the product to open the relevant product page for your telephone, where you will find
a link to the user guide.
To find out what version of firmware is currently loaded on your phone, see S. 115.
Warning
uNever expose the elmeg IP120 to the following:
heat sources, direct sunlight or other electrical appliances.
uProtect your elmeg IP120 from moisture, dust, corrosive liquids and fumes.
Please note
You can also mount your elmeg IP120 on the wall (£S. 18).
elmeg IP120 / en / elmeg IP120_v1 / starting.fm / 16.03.2015
Version 2, 27.05.2010
13elmeg IP120
bintec elmeg First steps
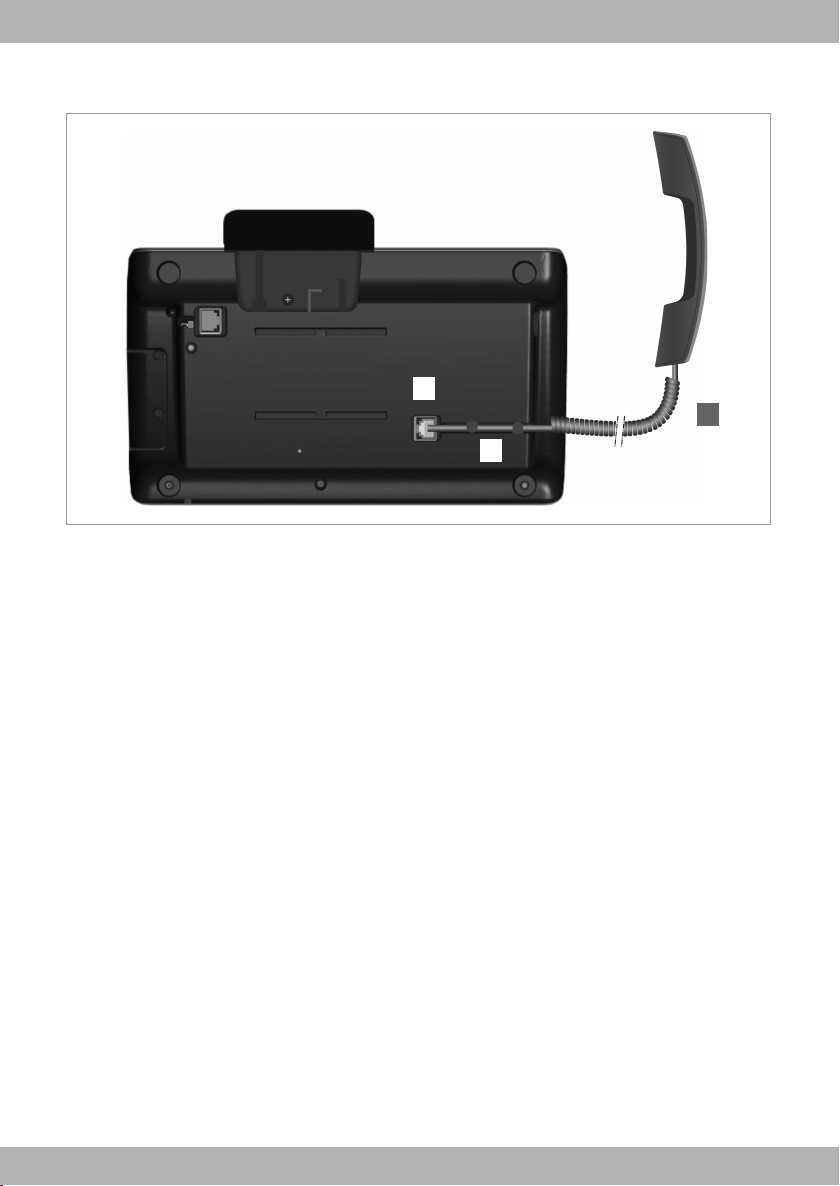
Connecting the receiver
§§1§§ Insert the connector, which can be found on the longer straight end of the connection cable,
into the connection port on the bottom of the phone.
§§2§§ Place the straight part of the cable in the cable recess provided.
§§3§§ Insert the other jack on the connection cable into the port on the receiver.
1
2
3

elmeg IP120 / en / elmeg IP120_v1 / starting.fm / 16.03.2015
Version 2, 27.05.2010
14 elmeg IP120
bintec elmegFirst steps
Connecting the network cable
To make calls via VoIP, your phone must have Internet access. This connection is established in
the local network via a gateway.
You connect your phone to the same local network as the gateway. See the Using the phone
in different scenarios section on S. 9 for an overview of the different options.
§§1§§ Attach one end of the Ethernet cable to the right-hand LAN port on the rear of the
phone.
§§2§§ Attach the other end of the Ethernet cable to a LAN port on your network Ethernet
switch or on the router itself.
Please exclusively use a shielded cable for the connection.
Warning
If you connect your elmeg IP120 to a PoE-capable Ethernet switch (PoE class IEEE802.3af), it will
be supplied with power via PoE (Power over Ethernet). The PoE network must not exceed the
premises boundaries.
21

elmeg IP120 / en / elmeg IP120_v1 / starting.fm / 16.03.2015
Version 2, 27.05.2010
15elmeg IP120
bintec elmeg First steps
Connecting the PC
Your phone has an integrated two-port switch. This allows you to connect your PC to the local
network via the phone and avoid using additional connection ports on the switch or router.
The Ethernet cable supplied is intended for this connection. Do not use this cable to connect
the telephone to the local network (£S. 14).
§§1§§ Connect an Ethernet cable to the left-hand LAN port on the rear of the phone.
§§2§§ Connect the other end of the Ethernet cable to a LAN port on the PC.
Please note
You can operate and configure your elmeg IP120 using this or any other PC within the local net-
work. For more information please see the chapter Web configurator – configuring the
phone on a PC,£S. 71. The elmeg IP120 can be auto-provisioned in cooperation with a
hybird. For more information please see the hybird documentation.
2
1

elmeg IP120 / en / elmeg IP120_v1 / starting.fm / 16.03.2015
Version 2, 27.05.2010
16 elmeg IP120
bintec elmegFirst steps
Connecting a device to the mains power supply (if required)
Your elmeg IP120 is supplied with sufficient power by PoE (Power over Ethernet) and does not
need to be connected to the mains power supply. Prerequisite: The device is connected to an
Ethernet switch with PoE functionality (PoE class IEEE802.3af) (£S. 14).
To connect your device to the mains power supply, if required, a power adapter is supplied with
three different plug-in modules for Europe, Great Britain and the USA. First attach the appropri-
ate plug-in module to the power supply unit.
§§1§§ Slide the required plug-in module into the recess on the underside of the power supply unit
until it clicks into place.
§§2§§ To remove the plug-in module again, press on the button marked Push and pull the plug-in
module out of the power supply unit.
§§1§§ Connect the power adapter to the port on the rear of the phone.
§§2§§ Then insert the plug into the mains socket.
Warning
Use only the power adapter supplied.
Please note
You can safeguard your device against theft by fitting a Kensington lock. The corresponding
hole can be found on the rear of the device (§§3§§).
Europe
Great Britain
USA
1
2
2
1
3

elmeg IP120 / en / elmeg IP120_v1 / starting.fm / 16.03.2015
Version 2, 27.05.2010
17elmeg IP120
bintec elmeg First steps
Connecting extension modules (optional)
You can increase the number of programmable keys using extension modules (max. two; can
be ordered as accessories £S. 117). Each module includes 14 additional programmable keys.
The function keys can be programmed using the Web configurator (£S. 102).
The package contains:
uOne extension module
uOne connection frame with four fastening screws
uOne connection cable
uInsert strips
§§1§§ Position the extension module to the right of the phone (on left when viewed from below),
so that the module and phone are the same height and meet in the centre.
§§2§§ Insert the clasps on the connection frame into the respective notches on the phone and
module and push the connection frame upwards until it clicks into place. Secure the connec-
tion frame with the screws provided.
§§3§§ Establish the connections using the cable supplied.
Extension module
1
3
Extension module elmeg IP120
2

elmeg IP120 / en / elmeg IP120_v1 / starting.fm / 16.03.2015
Version 2, 27.05.2010
18 elmeg IP120
bintec elmegFirst steps
Wall mounting
It is also possible to mount the elmeg IP120 on the wall using the supplied wall bracket.
¤Unplug the cables from the phone before you begin.
Please note
If the extension module does not work after installation, restart your device (disconnect it from
the mains power supply and reconnect it).
If you attach more than one extension module, the device must be connected to the mains
power supply via a power adapter.
1 2
3 4
143 mm
5mmø
¤Drill two dowel holes and insert dowels.
You can use the wall bracket as a drilling
template.
¤Thread the cables through the cable
guides on the back of the bracket and
screw it to the wall.
¤Remove the handset retainer from the
cradle using the tool provided, and
replace it with the ridge pointing
upwards.
¤Attach the phone to the wall bracket by
first hooking it onto the hooks at the bot-
tom and then tilting the top back towards
the wall and pushing it downwards.
¤Reconnect the cables.
elmeg IP120 / en / elmeg IP120_v1 / starting.fm / 16.03.2015
Version 2, 27.05.2010
19elmeg IP120
bintec elmeg First steps
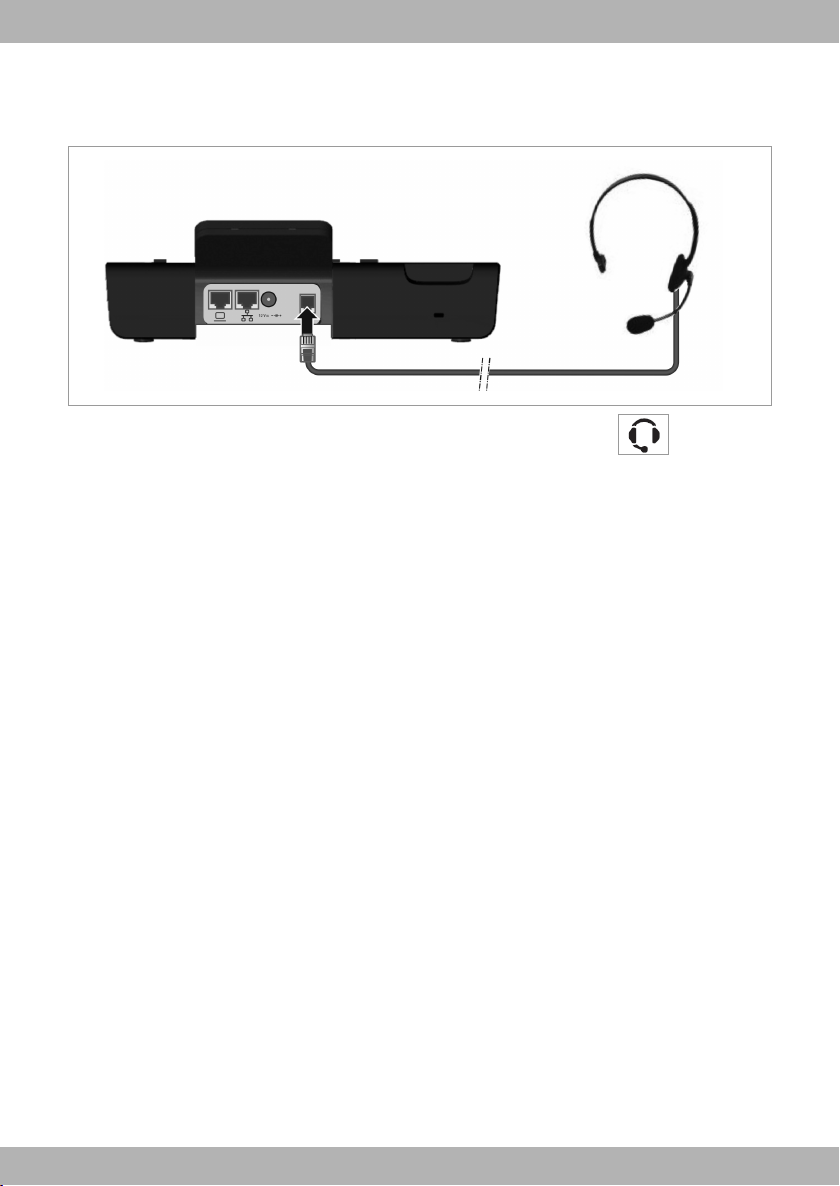
Connecting a headset
You can connect a headset via the RJ9 connector of your elmeg IP120.
¤Connect the cable for the headset to the RJ9 connector on the phone.

elmeg IP120 / en / elmeg IP120_v1 / starting.fm / 16.03.2015
Version 2, 27.05.2010
20 elmeg IP120
bintec elmegFirst steps
Setting up the device (for the first time)
Your device will start automatically as soon as it is connected to the mains power supply.
Please be aware that the device is powered by PoE (Power over Ethernet). This means that it is
supplied with power as soon as it is connected to an Ethernet switch with PoE-functionality.
The first time you use the device, an installation wizard will start automatically and guide you
through the necessary installation steps.
Configuring language and time zone settings
When you have made your selection, press the end key Ito return to the last entry screen.
You can correct your selection if necessary.
¤Use the navigation key to select the required
language. To do this, press up or down on
the navigation key q.
Further information about the navigation
key can be found on £S. 26.
¤Press the display key under §OK§ to confirm
your selection.
You can also use the OK function on the nav-
igation key (by pressing ‰in the centre of
the key).
¤Use the navigation key to select the required
time zone.
¤Press the display key under §OK§ to confirm
your selection.
¤
Please note
The date and time are automatically set by a time server. The time server is a provisionable
parameter which is set by default via DHCP by the hybird phone system. You can select a time
server using the Web configurator or deactivate this function (£S. 106).
Select your Language
OK
Deutsch
English
Francais
Select Time Zone
OK
(GMT) GMT, Dublin, London
(GMT+01:00) Amster-
(GMT+02:00) Athens, Cairo, Is-
Other manuals for IP120
1
Table of contents
Other elmeg IP Phone manuals


