ELNA Lock L4 User manual


Chdre cliente,
Vous avez choisi une surjeteuse de la plus
haute qualit6 qui fera de vos heures de
couture des heures de joie et de d6tente.
Nous vous en f6licitons et souhaitons qu'elle
vous procure des satisfactions renouvel6es.
Avant de coudre, veuillez 6tudier attentive-
ment le manuel d'instruction. ll vous aidera
d mieux comprendre et mieux utiliser votre
nouvelle machine.
Manuel d'lnstruction
pour la surjeteuse
elna LOCK overtock
Type L-4
L4
Dear Customer,
You have chosen an overlock sewing machine
of the highest quality which will turn your
hours of sewing into hours of pleasure and
relaxation.
We congratulate you on your choice and hope
that it will give you lasting satisfaction.
Before you start to use your machine, please
take a few minutes to study this instruction
manual. You will find that it will be time
well spent in understanding your new
machine.
lnstruction Manual
ror elna LOCK overtock
sewing machine
Type L-4

INTRODUCTION
S6curit6
Conform6ment aux recommandations des instances dlectri-
ques. de s6curitd et de standardisation, cette surjeteuse
doit €tre ddbranchde de la source d'alimentation dlectrique en
enlevant la fiche de la prise de courant lorsqu'on quitte la
machine, qu'on a fini de coudre, qu'on enfile la machine. lors
de l'entretien ou encore de rdparations ou de remplacement
des accessoires ou des pidces m6caniques,
Cstte machins correspond aux prescriptions CEE 761889.
Service aprds-vente
Si un renseignement compl6mentaire vous 6tait n6cessaire,
n'h6sitez pas d vous adresser d votre concessionnaire Elna.
Un personnel qualifi6 sera heureux de vous rdpondre. En
vertu des conditions de garantie, il est le seul compdtent pour
toute i ntervention technique.
INTRODUCTION
Safety
ln con?ormity with the recommendations of safety and
electrical control boards and standards associations, the
sewing machine must be disconnected from the electric
power supply, by removing the plug from the outlet socket,
whenever the machine is left unattended, when it is being
threaded or serviced, or whenever mechanical, electrical parts
or accessories are replaced,
This machine corresponds to the EEC Regulations 761885'
After-sales Service
lf you should need any additional information, do not
hesitate to ask your Elna dealer. His qualified staff will be
pleased to answer your questions, ln accordance with the
terms of the guarantee, they are the only people authorized
to attend to any technical adlustments whatsoever on an Elna
sewing machine.
Divers
Gardez ce manuel d'instruction dans un lieu s0r pour votre
future r6fdrence.
Toutes modif ications 6ventuelles demeurent r6serv6es.
Contenu
Ce manuel d'instruction vous permet de vous familiariser avec
le fonctionnement de votre surieteuse Elna Lock et la
couture de base que vous pouvez effectuer avec les
accessoi res standards.
General
Please keep this instruction manual in a sa{e c ace for future
reference.
All rights to make any modifications rG€-'ed.
Contents
This instruction manual enables you :c 'a-]iliarize yourself
with the operation and handling of vo-' Eina Lock sewing
machine and with the basic sewing l'3: -^ be done by using
the standard accessories.
2

Pages
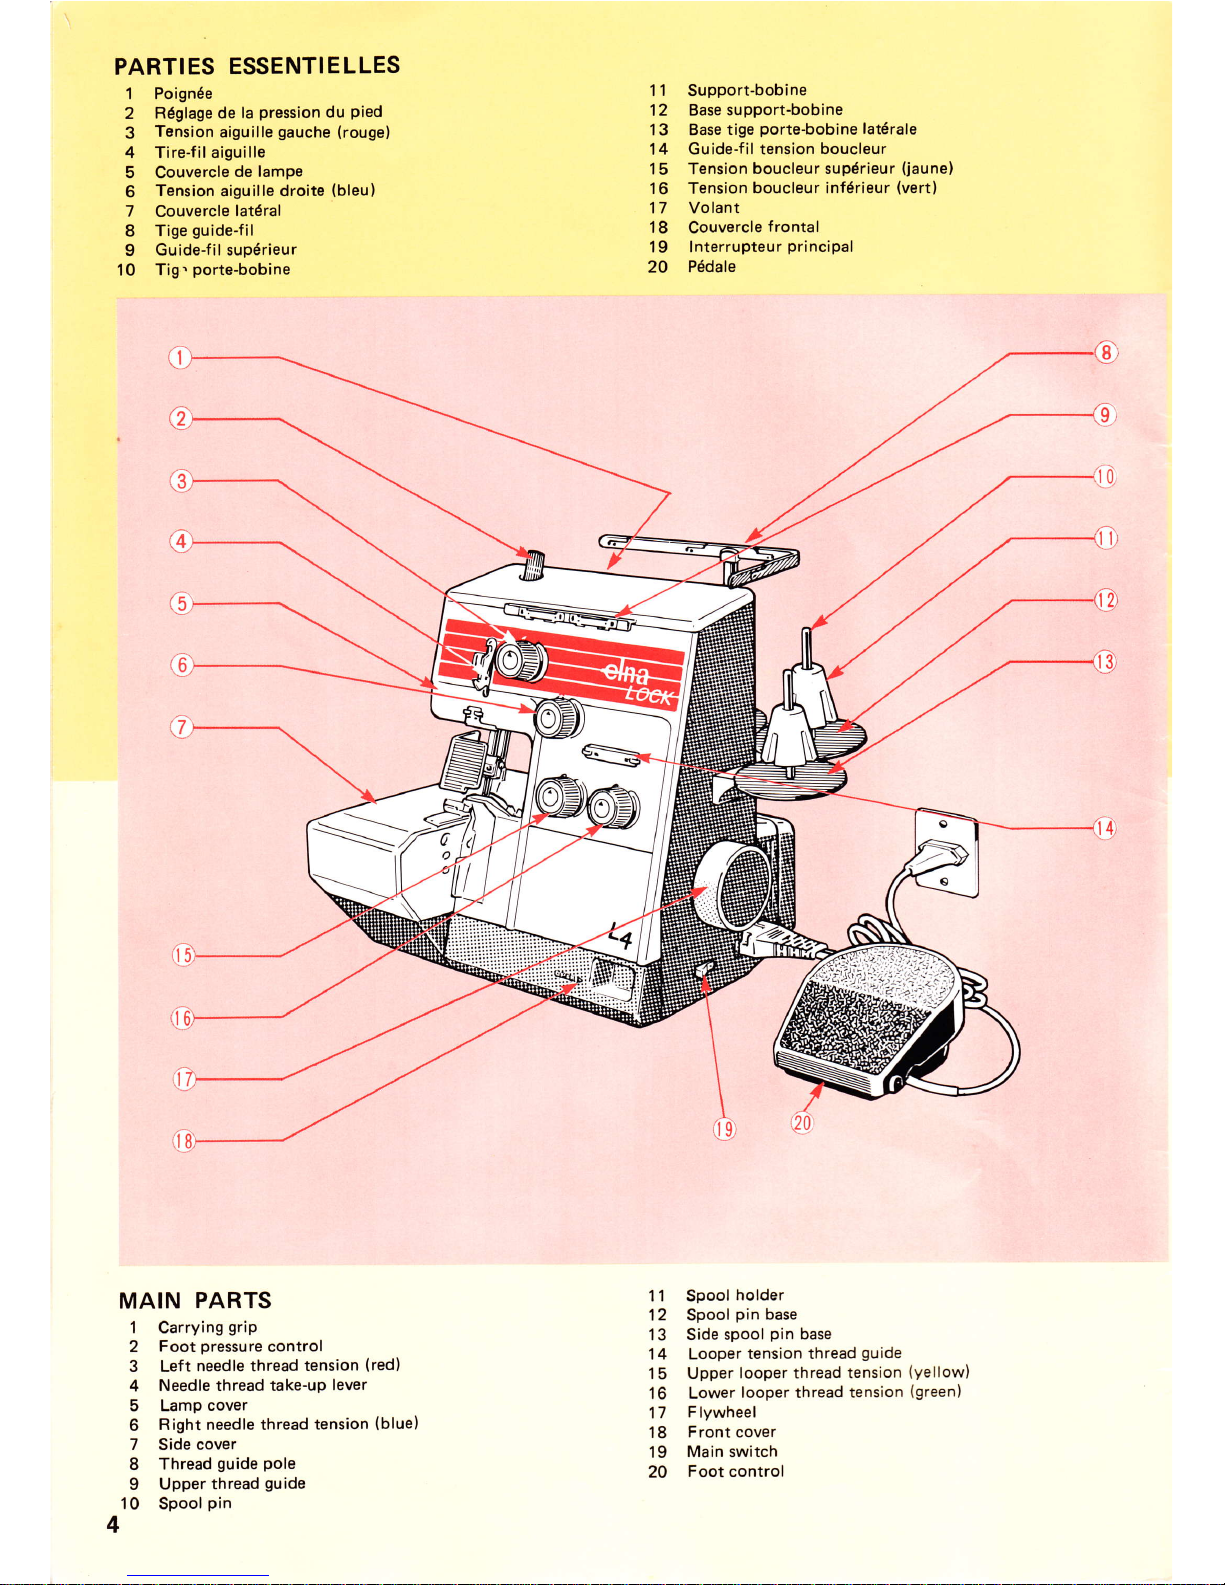
Partiesessentielles. .. '..... '4-5
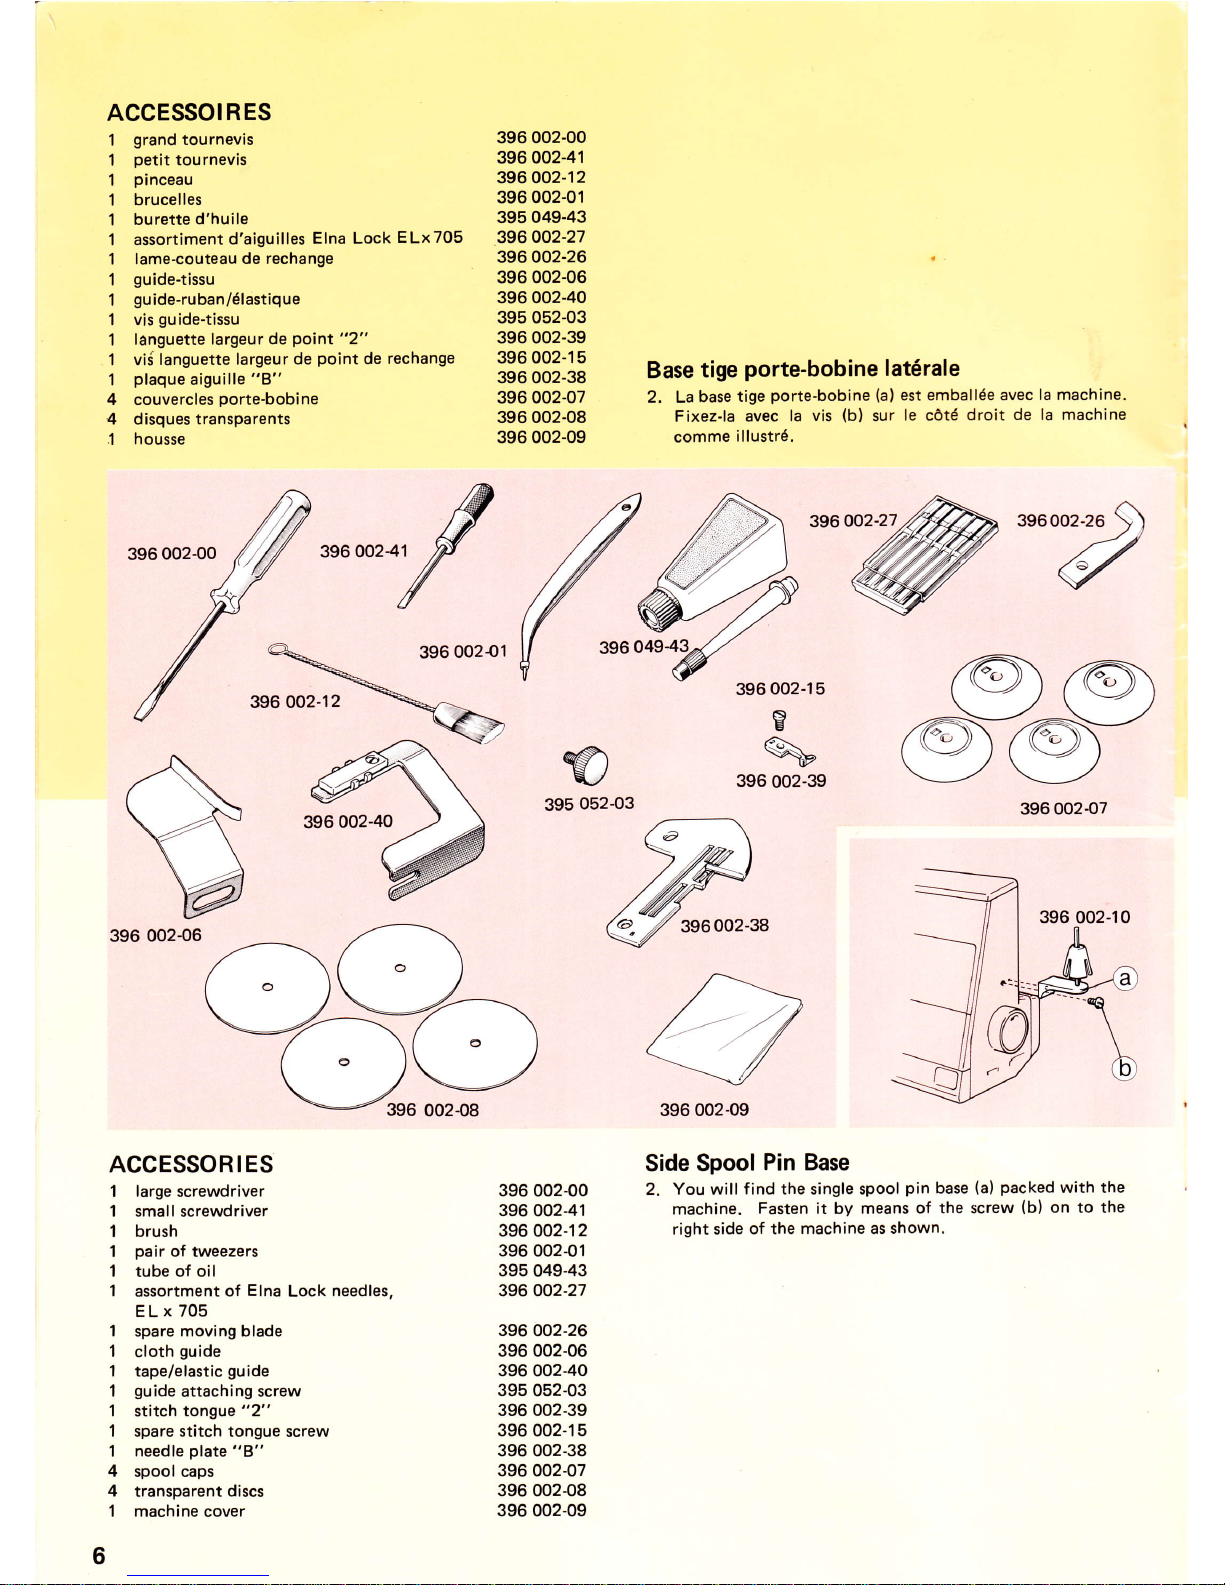
Accessoires. .'.6.
-Support-bobinelat6ral. .....6
Lubrification ....'." 7
Changementd'aiguilles. .,.....' 7
Fonctionnement.,.. .......,8
-Lumilredecouture ....... I
-lnterrupteurdes6curit6 .....8
Prdparationdel'enfilage ..,..... 9
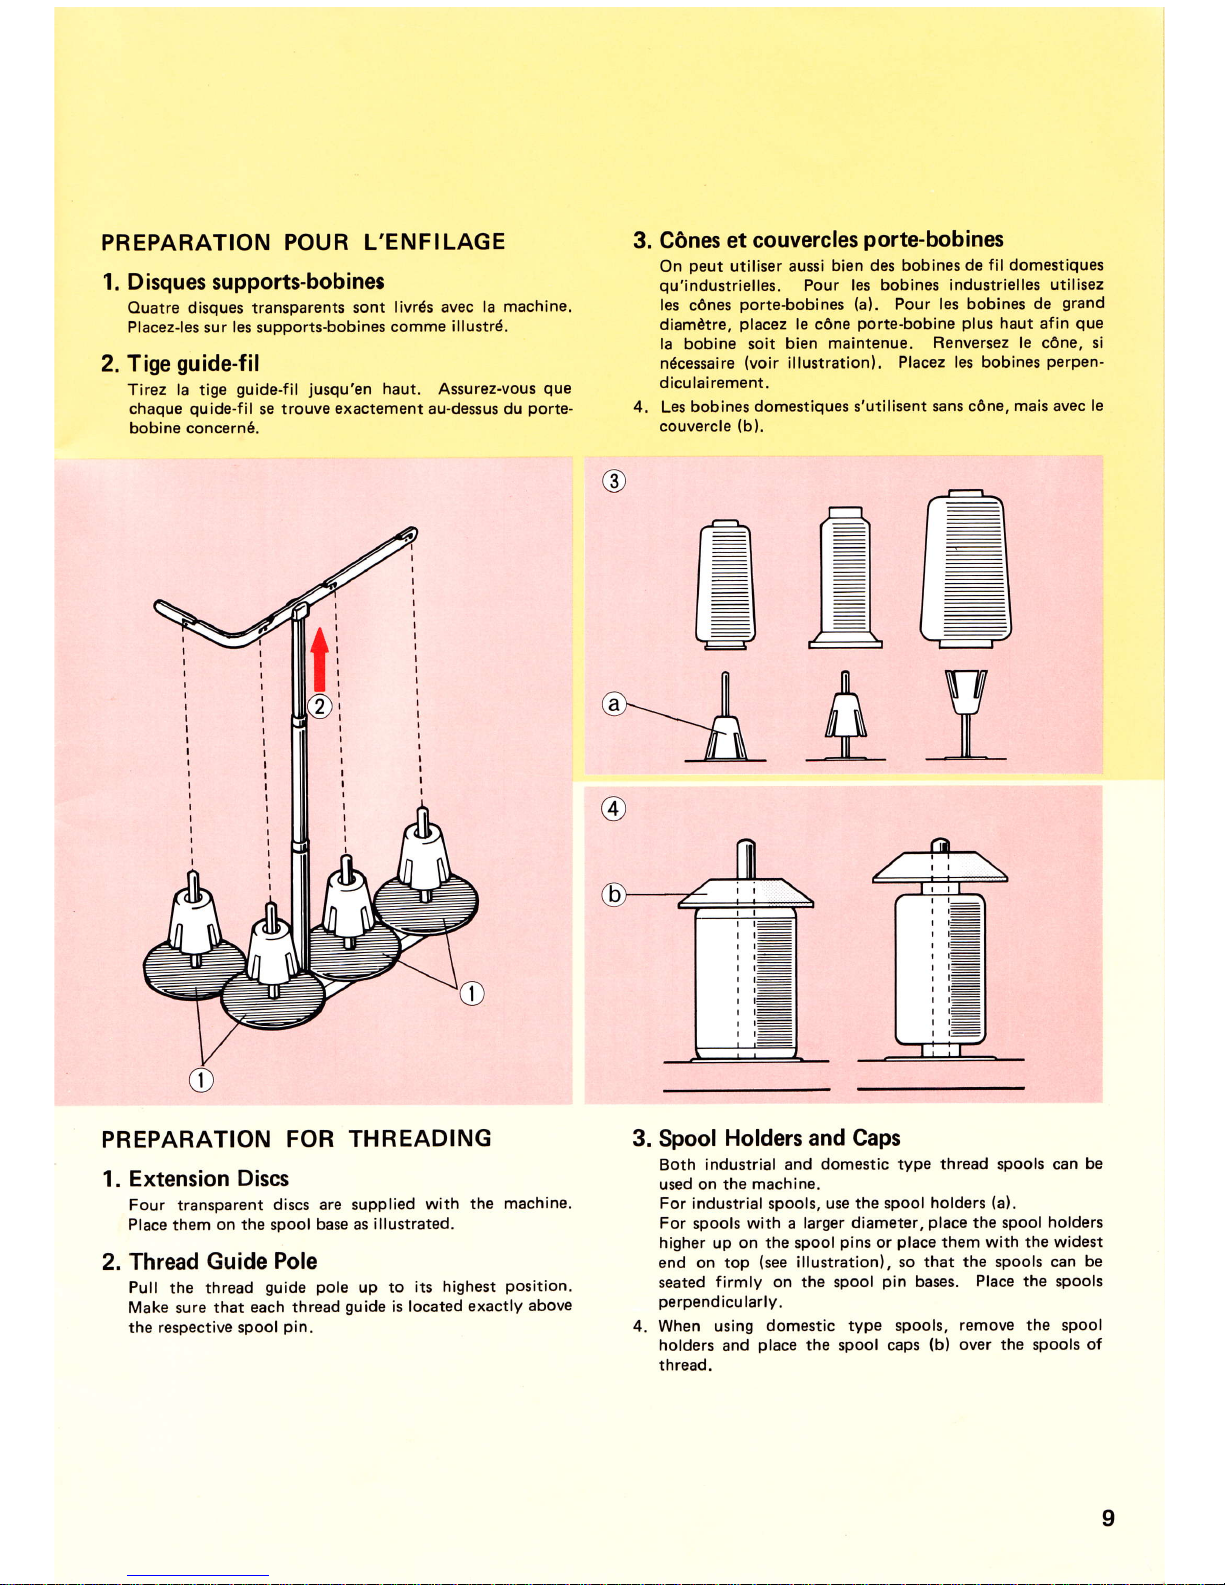
-Disquessupport-bobine ..... I
-Tigeguide-fil ..... ......I
-C6nesetcouverclesporte-bobine. . ., . . 9
Enfilagedelamachine ...,,.10-12
-Boucleurinf6rieur ......10-1 1
-Boucleursup6rieur ...., 10-11
-Aiguilledroite ,..12
-Aiguillegauche. ..,,,....12
Changementdefils. .,..12
Essaidecouture. ... . ..13
R6glage des tensions . . 14-15
R6glage de la longueur des points . . . 15
Positionnementdeslames-couteau,,....16
Pages
MainParts ...4-s
Accessories
- Side spool pin base
Lubrication
Changing the Needles
Operation
- Sewing light . .
-Safetyswitch. .,........
Preparation f or Threading
- Extension discs
- Thread guide pole
- Spool holders and caps
ThreadingtheMachine . . .. . 10-'12
- Lower looper . 10-1 1
- Upper looper . 10-11
-Rightneedle ....12
-Leftneedle ......12
ChangingtheThreads ...12
Testsewing ...13
Adjusting the Thread Tensions 14-15
AdjustingthestitchLength. .....15
PositioningtheCuttingBlades. ...16
Pages
Couture de tissus particulierement lourds . . . . 17
Overlock d 3 f ils avecl aiguille (en utilisant la plague
aiguille"A") .......18
Utilisationdesaccessoires . . , . . . .19
Plaqueaiguille"B"... ....19
Ourletrould ..,2O
Guide-tissu. , , .. . . . . .21
-Couturesanscouteau ,.,.,..21
-Coutureaveccouteau ..,..,21
Languette largeur de poinl "2" et guide -
ruban/6lastique . 22-23
- Overlock avec cordonnet . . . .22
-Overlockavecruban ..,.,.,23
-Overlockavec6lastique ..,..23
Autresapplications...,......,24
Tableau de r6glage . . 26-27
Entretien. . ...28
- Nettoyage de la machine . . . .28
- Remplacement de la lame-couteau mobile .28
- Remplacement de l'ampoule . , . . . . . . 28
Petitsd6rangementsetcommenty rem6dier., . .,, . .,29
REPERTOIREALPHABET]OUE ..,, .,,.31
Pages
SewingExtra-HeavyFabrics .....17
3-Thread Overlock with 1 Needle (Using
the Needle Plate "A") . . . 18
SewingwithAccessories ..... 19-23
NeedlePlate"B".. ....19
RolledHemminS.... ........20
Clothcuide .........21
-Sewingwiththecutteroff . . .. .....21
-sewingwiththecutteron .........21
StitchTongue "2" andTape/ElasticGuide . . . . . . 22-23
-Cordedoverlocking .......22
-Overlockingwithtape ......23
-Overlockingwithelastic ....23
OthersewingApplications .. '...24
StitchselectionChart . ....26-27
Maintenance ........28
-Cleaningthemachine ....,.28
-Replacingthemovingblade . .......28
-Changingthelightbulb.. ' ' '24
Causesof andRemediesforMinorDisorders .. . ... . ' 29
ALPHABETICALINDEX .......31
6
6
7
7
8
8
I
I
9
I
9
3

PARTIES ESSENTIELLES
1 Poign6e
2 Rdglage de la pression du Pied
3 Tension aiguille gauche (rouge)
4 Tire-fil aiguille
5 Couvercle de lampe
6 Tension aiguille droite (bleu)
7 Couvercle latdral
8 Tige guide-fil
9 GuideJil sup6rieur
10 Tig. porte-bobine
11 Support-bobine
12 Base support-bobine
1 3 Base tige porte-bobine lat6rale
14 Guide-f il tension boucleur
'l 5 Tension boucleur supdrieur (jaune)
16 Tension boucleur infdrieur (vert)
17 Vo lant
18 Couvercle frontal
19 lnterrupteur principal
20 Pddale
MAIN PARTS
1 Carrying grip
2 Foot pressure control
3 Left needle thread tension (red)
4 Needle thread take-up lever
5 Lamp cover
6 Right needle thread tension (blue)
7 Side cover
8 Thread guide pole
9 Upper thread guide
10 Spool pin
11 Spool holder
12 Spool pin base
13 Side spool pin base
14 Looper tension thread guide
15 Upper looper thread tension (yellow)
16 Lower looper thread tension (green)
17 F lywheel
18 Front cover
19 Main switch
20 Foot control
4

29
30
31
32
33
34
35
21
22
23
24
25
26
27
28
29
30
31
32
33
34
35
Levier pied presse-6toff e
Protection des yeux et des doigts
Bride aiguille
Aiguille droite
Aiguille gauche
Boucleur supdrieur
Languette largeur de point "'l "
Lame-couteau mobile
Pied presse-6toffe
Plaque aiguille
Lame-coutedu fixe
Rdglage de la largeur de coupe
Bouton de d6gagement lame-couteau
Boucleur inf6rieur
Bouton longueur de point
21 Presser foot lever
22 Eye and finger protection
23 Needle clamp
24 Right needle
25 Left needle
26 Upper looper
27 Stitch tongue "1 "
28 Moving blade
Presser foot
Needle plate "A"
Fixed blade
Cutting width control
Cutter release knob
Lower looper
Stitch length knob

ACCESSOIRES
grand tournevis
petit tournevis
pinceau
brucelles
burette d'huile
assortiment d'aiguilles Elna Lock ELx705
lame-couteau de rechange
guide-tissu
gu ide-ru ban/6lastique
vis guide-tissu
languette largeur de point "2"
vif languette largeur de point de rechange
plaque aiguille "8"
couvercles porte-bobine
disques transparents
housse
4
4
1
396 002-00
396 002-41
396 002-1 2
396 002-01
395 049-43
396002-27
396 002-26
396 002-06
396 002-40
395 052-03
396 002-39
396 002-1 5
s)6 002-38
396 002-07
a96 002-08
396 002-09
396 002-00
396 002-41
396 002-1 2
396 002-01
395 049-43
396002-27
396 002-26
396 002-06
396 002-40
395 052-03
396 002-39
396 002-1 5
396 002-38
396 002-07
396 002-08
396 002-09
Base tige porte-bobine lat6rale
2. La base tige porte-bobine (al est emball6e avec la machine.
Fixezla avec la vis (b) sur le c6t6 droit de la machine
comme illustr6.
ACCESSORTES
1 large screwdriver
1 small screwdriver
1 brush
1 pair of tweezers
1 tube of oil
1 assortment of Elna Lock needles,
EL x 705
1 spare moving blade
1 cloth guide
1 tape/elastic guide
I guide attaching screw
1 stitch tongue "2"
1 spare stitch tongue screw
1 needle plate "B"
4 spool caps
4 transparent discs
1 machine cover
Side Spool Pin Base
2. You will find the single spool pin base (a) packed with the
machine. Fasten it by means of the screw (b) on to the
right side of the machine as shown.
6
396 002-00
396 002-06

@
@
@
LUBRIFICATION
3. Ouvrez le couverle frontal (c) en le poussant a droite et en
le basculant contre vous. Ouvrez le couvercle lat6ral (bl
en le faisant pivoter a gauche,
4. Ouand vous utilisez votre Elna Lock pour la premidre fois
ou aprds un certain temps, appliquez 5 d 10 gouttes
d'huile sur le point (4) situd sous la poign6e de transport
et une goutte d tous les autres points indiqu6s. Befermez
les couvercles. Essuyez l'huile en surplus sur la surface de
couture.
LUBRICATION
3. To open the front cover (c), pull it to the right and then
swing it open downwards. To open the side cover (d),
swing it open to the left.
4. When using your Elna Lock for the first time or if you
have not used it for some time, put 5 to 10 drops of oil
on the point (e) under the carrying grip and a single
drop on all the other points indicated. Close the covers.
Wipe off any oil remaining around the sewing area.
CHANGEMENT DES AIGUILLES
5. Utilisez les aiguilles Elna Lock EL X 705 ou du systdme
130/705H (15x 1). Voir 6galement pages 26-27,
Pour changer les aiguilles, abaissez le pied presse-6toffe et
levez l'aiguille jusqu'd sa position la plus haute en tournant
le volant vers vous. D6vissez les vis bride-aiguille (f ) au
moyen du petit tournevis (g) pour enlever les aiguilles
us6es. Prenez les nouvelles aiguilles en les tenant avec leur
partie plate sur l'index et poussez-les jusqu'au fond'
Revissez .fortement. Assurez-vous que les aiguilles ne
frolent pas la plaque aiguille en tournant le volant vers
vous.
CHANGING THE NEEDLES
5. Use Elna Lock needles, EL x 705 or system 130/705H
(15 x 1).
See also pages 26-27.
To change the needles, raise the needle bar to its highest
position by turning the flywheel towards you, leaving the
presser foot down. Loosen the needle clamp screw (f)
with the small screwdriver (g) to remove the oid needles.
Hold the new needles with the f lat side away from you
and push them up as far as they will go. Tighten the
screws firmly. Make sure that the needles clear the needle
plate by turning the flywheel towards you by hand.
7
EL x 705

FONCTIONNEMENT
La p6dale (a) cont16le le moteur et la vitesse de couture. Plus
on presse sur la pddale plus la vitesse augmente. Appuyez
avec tout le pied et non seulement avec la pointe du pied.
LumiOre de couture
La lumidre de couture (b) est situ6e d gauche dans la tdte de
la machine. La consommation de l'ampoule (15W maxi.) est
indiqu6e sur le couvercle pivotant,
lnterrupteur de s6curit6
L'interrupteur principal (cl enclenche et ddclenche l'alimen-
tation du moteur et de la lumidre. Enclenchez-le pour faire
marcher la machine et d6clenchez-le dds que vous ne cousez
plus.
OPERATION
The foot control (a) regulates motor and sewing speeds. The
greater the pressure on the control, the higher the speed.
Press preferably with the sole of the foot (and not with the
toes).
Sewing Light
The sewing light (b) is situated in the left end of the machine
head. The input of the light bulb (15w maximum) is marked
on the swing-open lamp cover.
Safety Switch
The main switch (c) turns the light on or off, as well as the
supply of electric current to the motor. Switch on to run the
machine and off when you are not sewing.
I

PREPARATION POUR L'ENFILAGE
1. D isques supports-bobines
Quatre disques transparents sont livr6s avec la machine,
Placez-les sur les supports-bobines comme illustrd.
2. Tige guide-fil
Tirez la tige guide-fil jusqu'en haut. Assurez-vous que
chaque quide-fil se trouve exactement au-dessus du porte-
bobine concern6.
PREPARATION FOR THREADING
1. Extension Discs
Four transparent discs are supplied with the machine.
Place them on the spool base as illustrated,
2. Thread Guide Pole
Pull the thread guide pole up to its highest position.
Make sure that each thread guide is located exactly above
the respective spool pin.
3. C6nes et couvercles porte-bobines
On peut utiliser aussi bien des bobines de f il domestiques
qu'industrielles. Pour les bobines industrielles utilisez
les c6nes porte-bobines (al. Pour les bobines de grand
diamdtre, placez le c6ne porte-bobine plus haut afin que
la bobine soit bien maintenue. Renversez le c6ne, si
ndcessaire (voir illustrationl. Placez les bobines perpen-
dicu lairement.
4. Les bobines domestiques s'utilisent sans c6ne, mais avec le
couvercle {bl.
3. Spool Holders and Caps
Both industrial and domestic type thread spools can be
used on the machine.
For industrial spools, use the spool holders (a).
For spools with a larger diameter, place the spool holders
higher up on the spool pins or place them with the widest
end on top (see illustration), so that the spools can be
seated firmly on the spool pin bases. Place the spools
perpendicu larly.
4. When using domestic type spools, remove the spool
holders and place the spool caps (b) over the spools of
thread.
@z-+
|
-l
|
-l
t-l
l-l
l-l
l-l
|
-l
l:l
:tr7
l
E
E
A
I

@
10

ENFILAGE DE LA MACHINE
Avant de faire quoi que ce soit, d6branchez la machine du
r6seau salon lss prescriptions de s6curit6, page 2.
Suivez scrupuleusement les passages d'enfilagd selon le
sch6ma figurant e I'int6rieur du couvercle frontal, en
suivant la s6quence 1 -2 - 3 - 4.
ll est important d'enf iler dans l'ordre suivant:
1. Fil du boucleur sup6rieur - guide-fils jaunes
2. Fil du boucleur inf6rieur - guide-fils verts
3. Fil de l'aiguille droite - guide-f ils bleus
4. Fil de l'aiguille gauche - guide-f ils rouges
Un mauvais enf ilage provoquerait plusieurs probldmes comme
des points saut6s et des casses de fil.
Utilisez la paire de brucelles qui se trouve dans la boite
d'accessoires. Elle vous facilitera l'enfilage.
Enfilage du boucleur sup6rieur - En iaune sur le tableau et
sur les guide-fils
1. 'firez le fil de la bobine comme indiqu6 sur l'illustration,
d'abord derridre la lamelle du guide-fil supdrieur (b),
passez-le par les autres guide-fils et la tension du boucleur
sup6rieur, et enfilez-le dans le trou du boucleur supdrieur
en suivant tous les passages de (a) d (i). Tirez le fil en
arridre. sous le pied presse-dtoffe, en laissant d6border d
gauche environ 10 cm de fil.
2. Lorsqu'il s'agit d'un fil tr6s fin, d'un nylon laineux ou
d'un fil ayant tendance d se tordre, il est indiqu6 de le
passer comme illustrd par le trou suppldmentaire (a) en
haut du guide-f il sup6rieur pour l'emp€cher de s'emm€ler.
3. Pour bien engager les fils entre les platines de la tension,
tirez d'un petit coup sec dans la direction indiqude, tout
en tenant l'autre bout des fils.
THREADING THE MACHINE
First of all, disconnect the machine from the main supply
according to the "Safety" recommendations on page 2.
Follow the threading paths carefully, in accordance with the
charts inside the front cover, in the sequence 1 - 2 - 3 - 4-
It is important that threading is carried out in the following
sequence:
1. Upper looper thread - Yellow thread guides
2. Lower looper thread - Green thread guides
3. Right needle thread - Blue thread guides
4. Left needle thread - Red thread guides
lncorrect threading will result in several problems such as
skipped stitches and thread breakages.
To facilitate threading, use the pair of tweezers which will be
found in the accessory case.
Threading the Upper Looper - Coloured yellow on the chart
and on the thread guides
1, Draw thread from the spool, as shown on the diagram,
first behind the blade of the upper guide (b), then
through the other thread guides and the upper looper
tension, and threading it through the hole in the upper
looper, steps (a) to (i). Draw the thread back under the
presser foot, leaving about 10 cm of thread on the left.
2. For very fine thread, very light thread such as woolly
nylon, or a thread which tends to twist, it is advisable to
thread through an additional hole close to the slot (a) on
the top thread guide as shown, to avoid tangling.
3. To engage the threads properly between the tension discs,
give the threads a sharp tug in the direction indicated,
holding the other end of the threads.
Enfilage du boucleur inf6rieur - En vert sur le tableau et sur
les guide-fils
1. Suivez le mdme proc6d6 que nous venons de ddcrire et
qui est montrd sur le sch6ma, c.-Ad. passez le fil par les
guide-fils et la tension de fil inf6rieure, en suivant tous les
passages de (A) d (G).
4. Amenez le boucleur inf6rieur e sa position d'extrdeme
droite en tournant le volant d la main,
5. Tirez le levier guide-fil du boucleur inf6rieur vers la droite
et engagez le fil dans le guide (l), passez-16 ensuite par le
trou (Jl d I'extrdme droite du boucleur.
6. Repoussez le levier completement i gauche - c'est
important. Tirez le fil en arridre, sous le pied presse-
6toffe, en laissant ddborder d gauche environ 10 cm
de fil.
Threading the lowsr Looper - Coloured green on the chart
and on the thread guides.
1, Follow a similar procedure toabove,asalso shown on the
diagram, passing the thread through the thread guides and
lower thread tension, steps (A) to (G).
4. Bring the lower looper to its right position by turning
the flywheel towards You bY hand.
5. Pull the lever of the lower looper thread guide to the right
and hook the thread on to the guide (l), then pass it
through the hole (J) at the far right end of the looper.
6. Push the lever back to the left as far as it will go -
important. Draw the thread back under the presser foot,
leaving about 10 cm of thread to the left.
11

Enfilage de l'aiguille droite - En bleu sur le sch6ma et les
guide-f ils.
1. Mettez la barre-aiguille dans sa position supdrieure et
ouvrez le couvercle de protection vers la gauche. Passez
le fil dans I'ordre montr6 sur le sch6ma, en allant de (Al
a (Fl. Enfilez l'aiguille de I'avant I l'arriCre et guidez
le fil sous le pied presse4toffe en laissant d6passer environ
10 cm vers la gauche.
Enfilage de l'aiguille gauche - En rouge sur le sch6ma et les
gu ide-f ils.
Suivez le m€me proc6d6 que cidessus et selon le schCma.
Passez le fil par les guide-fils et la tension de l'aiguille gauche
et enfilez l'aiguille gauche en suivant tous les passages de (a)
e (h).
Pour obtenir de bons r6sultats de couture, vfriliez - avant de
coudre - si tous les fils passent dans l'ordre par chaque guide-
fil et s'ils sont bien engagds entre les deux platines de chaque
tension.
Threading the Right Needle - Coloured blue on the chart
and on the thread guides.
1. Raise the needle bar to its highest position and swing the
eye and finger protection open to the left. Pass the
thread through in the order as shown in the diagram, steps
(A) to (G). Finally,thread the right needle from front to
back and then under the presser foot, leaving about 1 0 cm
of thread to the left.
Threading tho Left Needle - Coloured red on the chart
and on the thread guides.
Follow a similar procedure to above, as also shown on the
diagram, passing the thread through the thread guides and
left needle tension and finally thread the left needle, steps
(a) to (h).
Before starting to sew, check again that all the threads have
been properly passed through every thread guide and are well
engaged between the two tension discs of each tension
control, to ensure good sewing results.
N,B. S'il s'avdrait n6cessaire d'enfiler d nouveau le boucleur
infdrieur, enlevez au pr6alable les fils d'aiguilles pour
6viter tout enchevetrement.
CHANGEMENT DE FILS
2..Si la machine est ddja enfil6e et que vous souhaitez
changer de fil. nouez les nouveaux fils des boucleurs
inf6rieur et supdrieur aux anciens fils et ceci entre la tige
guide-fil et le guide-fil sup6rieur. ll ne vous reste qu'a
tirer les fils l6gdrement derridre I'aiguille pour faire passer
les noeuds. Ensuite vous enf ilez les fils d'aiguilles.
N.B. Should it be necessary at any time to re-thread the
lower looper, always remove the threads from the
needles first, to avoid tangling.
CHANGING THE THREADS
2. lf the machine has already been threaded and you wish
to change the threads, tie the new lower and upper
threads to the old threads, between the thread guide
pole and top thread guide. Then simply pull the threads
gently behind the needle until the knots have passed
through. Next, thread the needle threads.
@
12

@
@
ESSAI DE COUTURE
Une fois la machine enf il6e, proc6dez comme suit:
3. Passez les 4 fils sous le pied prosse-6toffe comme illustr6,
baissez le pied et faites quelques points en tournant le
volant d la main contre vous (toujours sans tissul. Puis
actionnez la pddale et cousez une chaine de 3 i 4 cm,
tout en tenant les fils vers la gauche. Maintenant la
machine est prete i coudre.
4. Placez un morceau de tissu devant le pied presse-6toffe
baiss6, i l'endroit o0 il doit €tre cousu. et actionnez la
pddale. Ne tirez pas mais guidez ldgdrement le tissu,
TEST SEWING
After the machine has been threaded, start sewing in the
following sequence:
3. Pass tho 4threads underthe foot 6 shown on thedrawingj
Lower the presser foot, make a few stitches by turning
the flywheel tovrrards you by hand (without material
under the foot). Then press on the foot control to make
3 to 4 cm of chain, holding the threads on the left. The
machine is now ready to sew.
4. Place a scrap of fabric in front of the lowered presser
foot at the position to be stitched then depress the foot
control. Do not pull the fabric; guide it gently.
5. Lorsque vous arrivez d la fin du tissu, ne levez pas encore
le pied presse-6toffe, mais continuez d coudre lentement
sur 5 cm environ pour obtenir une chaine de fil. Coupez
le fil avec le coupe-fil (selon illustration). Tout est prdt
pour la prochaine couture. Vous pouvez la commencer I
partir du bord du tissu en le pr6sentant devant le pied
presse-6toffe baiss6.
Si les points ne se forment pas correctement, rdglez les
tensions selon les indications des pages suivantes.
N,B. Ne levez pas le pied presse4toffe i la f in de la couture
mais cousez toujours une chaine de fil d'au moins 3
cm.
5. When you reach the end of the fabric, do not raise the
presser foot but continue sewing at a low speed for
about 5 cm beyond the end of the fabric so that the
machine produces a chain of thread. Then cut the thread
with the thread cutter (see illustration). You are then
ready to start the next seam. You can start overlocking
from the edge of the fabric iust by feeding it into the
front of the lowered presser foot.
lf the stitches are not formed correctly, adjust the tensions
in accordance with the instructions on the next pages.
N,B. Do not raise the presser foot at the end of a seam
but always sew a chain of thread at least 3 cm long.
13

@@
c
REGLAGE DES TENSIONS
Le r6glage des tensions doit 6tre adapt6 au genre et A l'6pais-
seur du fil et du tissu. Tournez le bouton de tension pour
faire correspondre les num6ros indiquds d la f ldche du
bouton. En tournant les boutons de tension sur les numdros
croissants, la tension augmente, en tournant sur les ndmdros
ddcroissants, la tension diminue.
1. Tension 6quilibr6e (voir dessin)
a-b) A l'endroit du tissu, les fils d'aiguille sont couch6s
(comme une couture droite) sur le fil du boucleur
supdrieur. A l'envers, ils sont A peine visibles dans le
fil du boucleur inf6rieur.
c) Le fil du boucleur sup6rieur doit €tre couch6, bien
tendu, d I'endroit du tissu et s'entrelacer au bord avec
le fil du boucleur inf6rieur.
ADJUSTING THE THREAD TENSIONS
The thread tensions should be adjusted depending on the
type and thickness of both thread and fabric. Turn the
tension knobs referring to the numbers on the dials above
the arrows on the knobs; turning to a higher number will
increase the thread tension and to a lower number decrease
it.
t, A balanced tension (see drawing)
a-b) The needle threads should lie mainly on the top side
of the fabric (just like a row of normal straight
stitches) on the upper looper thread, and lust visible
in the lower looper thread on the underside of the
fabric.
c) The upper looper thread should lie flat on the top side
of the fabric and lock with the lower looper thread on
the edge of the material.
dl Le fil du boucleur inf6rieur doit 6tre couch6. bien
tendu, A I'envers du tissu et s'entrelacer au bord avec le
fil du boucleur sup6rieur.
2. Si le fil de I'aiguille gauche (a) est trop l6che et bien
visible d I'envers du tissu, augmentez la tension du fil de
I'aiguille gauche et/ou diminuez la tension d'un - ou des
deux - fils des boucleurs.
g. Si te fil de l'aiguille droite (b) est trop lSche et bien visible
i l'envers du tissu, augmentez la tension du f il de l'aiguille
droite.
4. Si le fil du boucleur supdrieur (c) est ldche et ddborde sur
l'envers du tissu, augmentez la tension du boucleur
sup6rieur et/ou diminuez la tension du boucleur inf6rieur.
5. Si le fil du boucleur infdrieur (d) est l6che et ddborde sur
l'endroit du tissu, augmentez la tension du boucleur
inf6rieur et/ou diminuez la tension du boucleur sup6rieur.
N,B, Une tension du fil d'aiguille trop forte ferait froncer le
tissu.
d) The lowei looper thread should lie flat on the under-
side of the fabric and lock with the upper looper
thread on the edge of the material.
2. lf the left needle thread (a) is too loose and clearly visible
on the underside of the fabric, increase the left needle
thread tension and/or decrease either or both looper
thread tensions.
3. lf the right needle thread (b) is too loose and clearly
visible on the underside of the fabric, increase the right
needle thread tension.
4. lf the upper looper thread (c) is loose and pulled over to
the underside of the fabric, increase the upper looper
tension and/or decrease the lower looper tension.
5. lf the lower looper thread (d) is loose and pulled up onto
the top side of the fabric, increase the lower looper
tension and/or decrease the upper looper tension.
N.B. lf the needle thread tensions are too tight, the material
will pucker.
14

e
@
CHANGEMENT DE LA LONGUEUR DE
POINT
6, Ouvrez le couvercle lat6ral. Tournez le volant vers vous
jusqu'A ce que vous puissiez voir les numdros 1 et 5 sur la
molette (e). Tournez la molette numdrot6e (e) sur la
longueur de point d6sir6e.
ADJUSTING THE STITCH LENGTH
6. To adjust the stitch length, first open the side cover.
Turn the flywheel towards you until the numbers 1 to 5
on the stitch length dial (e) can be seen. Turn the num-
bered dial to the desired length position.
REGLAGE DE LA PRESSION DU PIED
PRESSE-ETOFFE
7. Dans la position oi la marque infdrieure (f) du bouton de
pression est align6e avec la marque du couvercle, la pres-
sion du pied presse-dtoffe est adaptCe d presque tous
les tissus et ne ndcessite que rarement d'€tre rdglCe.
Pourtant, pour des tissus d'une finesse ou d'une 6paisseur
extreme vous pouvez peut€tre la r6gler guelque peu.
Pour des tissus trds glissants, serrez ldgerement le bouton
pour augmenter la pression; pour des tissus extensibles,
diminuez la pression en le desserrant.
Les repdres sur le bouton permettent de vdrifier si la pres-
sion augmente ou diminue.
- Marque sup6rieure align6e a'vec marque du couvercle
= pression forte.
- Marque infdrieure alignde avec marque du couvercle
= pression moyenne.
- Bord infdrieur du bouton allgnd avec marque du
couvercle = faible pression.
ADJUSTING THE PRESSURE OF THE
PRESSER FOOT
7. With the lower guide line (f) of the pressure knob aligned
with the mark on the upper cover, the pressure of the
presser foot is suitable for most kinds of fabrics and
very rarely needs adiustment. For very special types of
fabrics. however, you might at times want to adjust the
pressure slightly.
For very slippery fabrics, tighten the knob slightly to
increase the pressure and for very stretchy fabrics, loosen
it to decrease the pressure,
The guide marks on the knob enable you to see at a
glance whether you have more or less pressure.
- Upper guide mark aligned with mark on upper cover
= strong pressure.
- Lower guide mark aligned with mark on upper cover
= medium pressure.
- Bottom edge of the knob aligned with mark on upper
cover = lower pressure.
(D
W
15

@
o
REGLAGE DES LAMES-COUTEAU
Les lames-couteau sont pr€r6gl6es i l'usine de sorte que vous
poUvez ex6cuter presque tous l€s travaux de couture sans
changer leur position. Pourtant, pour certains tissus -
particulidrement fins, raides ou extensibles -, vous pouvez
changer la position des lames*outeau.
1. Pour changer la position des lames, poussez i fond le
bouton (a) et tournez-le vors vous jusqu'i ce qu'il bute,
pour lib6rer la lame-couteau mobile, puis libdrez le
bouton.
2. Desserrez la vis (b) avec le grand tournevis et tournez le
bouton de la largeur de coupe (cl en avant et en arridre
pour d6placer la lame fixe vers la droite ou vers la gauche.
Ne forcez le bouton (c) ni dans un sens ni dans I'autre.
Bloquez la vis (bl.
Engagez de nouveau la lame mobile au moyen du bouton
(al.
POSITIONING THE CUTTING BLADES
The cutting blades are pre-set at the factory so that most
sewing jobs can be done without changing their position.
However, for certain materials, such as very sheer, very stiff
or very stretchy fabrics, you might at times prefer to adjust
the position of cutting blades.
1. To change the position of the blades. push the cutter
release knob (a) in, to the right. as far as possible and turn
it towards you as far as it will go, in order to disengage
the moving blade. Then release the knob.
2. Loosen the screw (b), using the large screwdriver, and
turn the cutting width control (c) backwards or forwards
to shift the fixed blade to the right or left. Do not turn
the cutting width control (c) by force in either direction.
Tighten the screw (b) firmly. Release the cutter release
knob to re-engage the moving blada.
3, Faites un essai de couture sur un morceau de tissu et
comparez le rdsultat avec l'illustration ci-dessous.
(Al Correct,
(B) La largeur de coupe est plus 6tro[fe que celle du
point, Ddplacez les lames vers la dlbite en tournant
le bouton de r6glage en arridre.
(C) La largeur de coupe est plus large que la largeur de
point. Dans ce cas, le tissu risque de s'enrouler,
Ddplacez les lames vers la gauche en tournant le
bouton de rdglage vers vous.
N.B. La position des lames-couteau n'est pas la m€me
3. Sew a scrap of the fabric to check the sewing result.
referring to the above illustration.
(A) Correct
(B) The cutting width is narrower than the stitch width.
Move the blades to the right by turning the cutting
width control towards the back.
(C) The cutting width is wider than the stitch width. ln
this case, the material might be rolled. Move the
blades to the left by turning the cutting width
control towards you.
N.B. The position of the cutting blades is different when
sewing with the needle plate "B" - See page 19.
16

COUTURE DE TISSUS PARTICULIERE-
MENT LOURDS
4, Bloquez le support de la lame-couteau avant de vous
attaquer aux tissus lourds, baissez la barre-aiguille au
point mort bas et ouvrez le couvercle lat6ral. Serrez la vis
(d) pour bloquer le support de la lame+outeau mobile.
N'o-ubliez pas de redesserrot cette vis aprds avoir cousu ces
tissdq,.:libdrant ainsi la lame pour la couture courante.
SEWING EXTRA.HEAVY FABRICS
4. Before sewing extra-heavy fabrics, it is advisable to lock
the moving blade holder. Lower the needle bar to its
lowest position and open the side cover. Tighten the
screw (d) to lock the moving blade holder.
Af ter sewing extra-heavy f abrics, always loosen this
screw to unlock the blade f or normal sewing,
ru
I
e
17

OVERLOCK A 3
AIGUILLE
(EN UTILISANT
ttAr.l
1. Avec la plaque aiguille "A" dont la machine a ddid Ctd
6quip6e d l'usine, vous pouvez coudre un overlock d 4 fils
d'une largeur de 5 mm en utilisant les deux aiguilles.
2. En utilisant seulement l'aiguille gauche, votre machine
vous coud un overlock d 3 fils d'une largeur de 5 mm.
3. En utilisant seulement l'aiguille droite, vous pouvez 6gale-
nrent coudre un overlock d 3 f ils d'une largeur de 2.8 mm.
N.B, Chaque fois que vous cousez avec 3 f ils.Otez l'aiguille
qui n'est pas enfilde.
3-THREAD OVERLOCK WITH
ONE NEEDLE
(USING THE NEEDLE PLATE "A")
1. With the needle plate "A" already fitted on the machine
at the factory, if you thread both needles. your machine
can sew a 4-thread overlock 5 mm wide.
2. Using the left needle only, it can sew a 3-thread overlock
5 mm wide.
3. Using the right needle only, it can also sew a 3-thread
overlock 2.8 mm wide.
N.B. Whenever sewing with 3-threads, remove the needle
you are not using.
FILS ET UNE
LA PLAOUE AIGUILLE
@
@
o
18

@
@
e
UTILISATION DES ACCESSOIRES
PLAOUE AIGUILLE "B"
La plaque aiguille "B" se trouve dans le sachet d'accessoires
de votre machine,
4. Avec cette plaque aiguille et en utilisant les 2 aiguilles,
vous pouvez coudre un overlock d 4 fils d'une largeur de
3.8 mm.
5. En utilisant seulement l'aiguille gauche, vous pouvez
coudre un overlock d 3 fils d'une largeur de 3.8 mm.
6. En utilisant seulement l'aiguille droite, vous pouvez 6gale-
ment coudre un overlock trds fin d 3 fils d'environ 1.6
mm de large.
SEWING WITH ACCESSORIES
NEEDLE PLATE 'B'
You will find the needle plate'B' in your accessory case
packed with the machine.
4. With this needle plate and using 2 needles, your machine
can sew a 4-thread overlock 3.8 mm wide.
5. Using the left needle only, it can sew a 3-thread overlock
3.8 mm wide.
6. Using the right needle only, it can also sewa very narrow
3-thread overlock about 1.6 mm wide.
Pour coudre avec la plaque aiguille "B":
7. Desserrez la vis (a). Pour enlever la plaque aiguille "A".
tirez-la un peu en avant pour la soulever ensuite, lns6rez
la plaque aiguille "8" et serrez la vis (al,
8. Lib6rez la lame-couteau mobile en vous r6f6rant d la page
16. Desserrez la vis (b) et d6placez la lame fixe d gauche
en tournant le bouton de largeur de coupe (cl vers vous
jusqu'd ce qu'il bute mais sans insister (ne forcez le
bouton (c) ni dans un sens ni dans l'autre). Bloquez la
vis (b).
Faites un essai de couture et rdadaptez la position de couoe
au besoin.
To sew using the needle plate "9"'
Loosen the screw (a). To remo\€ the needle plate "A",
pull it to the front slightly and then lift it up. Fit the
needle plate tighten the screw (a).
Disengage the moving blade, referring to page 16. Loosen
screw (b) and shift the fixed blade to the left by turning
the cutting width control (c) towards you until it stops,
without forcing it. (Never turn the cutting width control
{c) by force in either direction}. Tighten the screw (b)
firmly.
Sew a scrap of the fabric and re-adjust the cutting position,
if necessary,
7.
8.
19
This manual suits for next models
1
Table of contents
Other ELNA Sewing Machine manuals

ELNA
ELNA 5200 User manual

ELNA
ELNA 3210 JEANS - User manual

ELNA
ELNA easy cover User manual

ELNA
ELNA 344 - User manual

ELNA
ELNA Carina User manual

ELNA
ELNA 1600 User manual

ELNA
ELNA EnVision 8006 Wiring diagram

ELNA
ELNA eXcellence 730 User manual

ELNA
ELNA eXpressive 970 User manual

ELNA
ELNA 6005 heirloom edition User manual