ELNA 8600 User manual


1
IMPORTANT SAFETY INSTRUCTIONS
Your Elna 8600 embroidery sewing machine is designed and constructed for HOUSEHOLD use
only. Read all instructions before using this machine.
DANGER – To reduce the risk of electric shock:
1. Your sewing machine should never be left unattended when plugged in. Always unplug the
machine from the electrical outlet immediately after using and before cleaning.
2. Always unplug before replacing light bulb. Replace bulb with same type rated 12 Volts, 5 watts.
3. Do not reach for the machine if it has fallen into water. Unplug immediately.
4. Do not place or store machine where it can fall or be pulled into a tub or sink. Do not place it in
or drop it into water or other liquid.
WARNING – To reduce the risk of burns, fire, electrical shock or injury:
1. Do not allow machine to be used as a toy. Supervision is necessary when this machine is used
by or near children.
2. Use this sewing machine only for its intended use as described in this manual. Only use
attachments recommended by the manufacturer as described in this manual.
3. Never operate this machine if it has a damaged cord or plug, is not working properly, has been
dropped or damaged or dropped into water. Return the machine to the nearest authorized dealer
or service center for examination, repair, electrical or mechanical adjustment.
4. This machine is equipped with a special connection cord which, if damaged, must be replaced
by an identical cord. This can be obtained from your dealer.
5. Never operate the sewing machine with any air opening blocked. Keep ventilation openings of
the sewing machine and foot control free from the accumulation of lint, dust and fibers.
6. Never drop or insert any object into any opening.
7. Do not use outdoors.
8. Do not operate where aerosol (spray) products are being used or where oxygen is being
administered.
9. To disconnect, turn machine off and remove plug from outlet.
10. Do not unplug by pulling on cord. To unplug, grasp the plug, not the cord.
11. Keep fingers away from all moving parts, especially the needle.
12. Always use the proper needle plate. The wrong plate can cause the needle to break.
13. Do not use bent needles.
14. Do not pull or push fabric while stitching. This may deflect the needle causing it to break.
15. Switch the sewing machine off when making any adjustment in the needle area, such as
threading needle, changing needle, threading bobbin, changing presser foot, etc.
16. Always unplug the sewing machine from the electrical outlet when removing covers, lubricating
or making any other servicing adjustments mentioned in the instruction manual.
SAVE THESE INSTRUCTIONS
IMPORTANT
Be sure to keep machine away from static electricity, heat sources, humidity and direct sunlight.
USA only
Your machine comes equipped with a polarized plug (one prong wider than the other). A polarized plug
reduces the risk of electrical shock. This plug is intended to fit into a polarized outlet. If the plug does not
fit fully into the outlet, reverse the plug. If it still does not fit, contact a qualified electrician to install the
proper outlet. Do not modify the plug in any way.
Use only foot control 21371 (UL, CSA).

2
Shell Tuck ...................................................................... 63
Twin Needle Sewing ................................................. 64-65
Satin Stitch Window Keys ............................................. 66
Satin Stitches – Single Repeat with Programmed
Lockstitch and Elongation ..................................... 67
Combining a Sequence with Mirror
Image and Auto-lock .............................................. 67
Reset Combined Sequence to Beginning ..................... 68
Adjusting Stitch Width or Length of an Individual Stitch
Within a Sequence ................................................ 68
Editing a Sequence ....................................................... 69
Alphabet Selection Window Keys ................................. 70
Sewing Alphabets .......................................................... 71
Check Memorized Sequence ........................................ 72
Files – Saving, Opening and Deleting ..................... 72-74
Quilting
Piecing Fabrics Together ............................................... 75
Quilt Guide ..................................................................... 75
Quilt Stitch ..................................................................... 76
Buttonhole Appliqué ...................................................... 76
Free Motion Quilting or Stippling .................................. 77
Stippling Stitch ............................................................... 77
Patchwork ...................................................................... 78
French Knots ................................................................. 78
Heirloom
Pintucks ......................................................................... 79
Bridging (Fagoting) ........................................................ 79
Hemstitches ................................................................... 80
Fringing .......................................................................... 81
Drawn Work ................................................................... 81
Smocking ....................................................................... 82
SECTION IV – Embroidery Sewing
Getting Ready to Embroider.......................................... 83
Adjusting the Needle Thread Tension ........................... 84
Embroidery Hoops ......................................................... 85
Stabilizers ...................................................................... 85
Templates ...................................................................... 86
Securing Fabric in Hoop ........................................... 86-87
Attaching Hoop to Carriage ........................................... 88
Thread Holder................................................................ 89
Embroidering Small Areas ............................................. 89
Embroidery Design Selection Window Keys ........... 89-90
How to Select a Built-in Design................................ 91-92
Sewing a Single Built-in Design .................................... 93
Ready to Sew Window After Embroidery Begins.......... 94
Alphabets .................................................................. 95-96
Sewing Alphabets ..................................................... 97-98
Alphabet Corrections ..................................................... 99
2 Letter or 3 Letter Monograms .................................. 100
Sewing with PC Design Cards (Optional) ................... 101
Edit Window .......................................................... 102-104
Combine a Built-in Design with Alphabet ............. 105-106
Files – Saving, Opening and Deleting ................. 107-109
Embroidering with Optional Free Arm Hoop C ........... 110
SECTION V – Taking Care of Your Machine
Cleaning .................................................................111-112
Changing the Light Bulb .............................................. 112
STITCH and EMBROIDERY CHARTS ...... 113-115
OPTIONAL ACCESSORIES ............................. 116
TROUBLESHOOTING ............................... 117-118
INDEX ......................................................... 119-121
NOTE: Information found in this instruction manual is
current at the time of printing. Elna reserves the right to
change and update specifications and information as
needed.
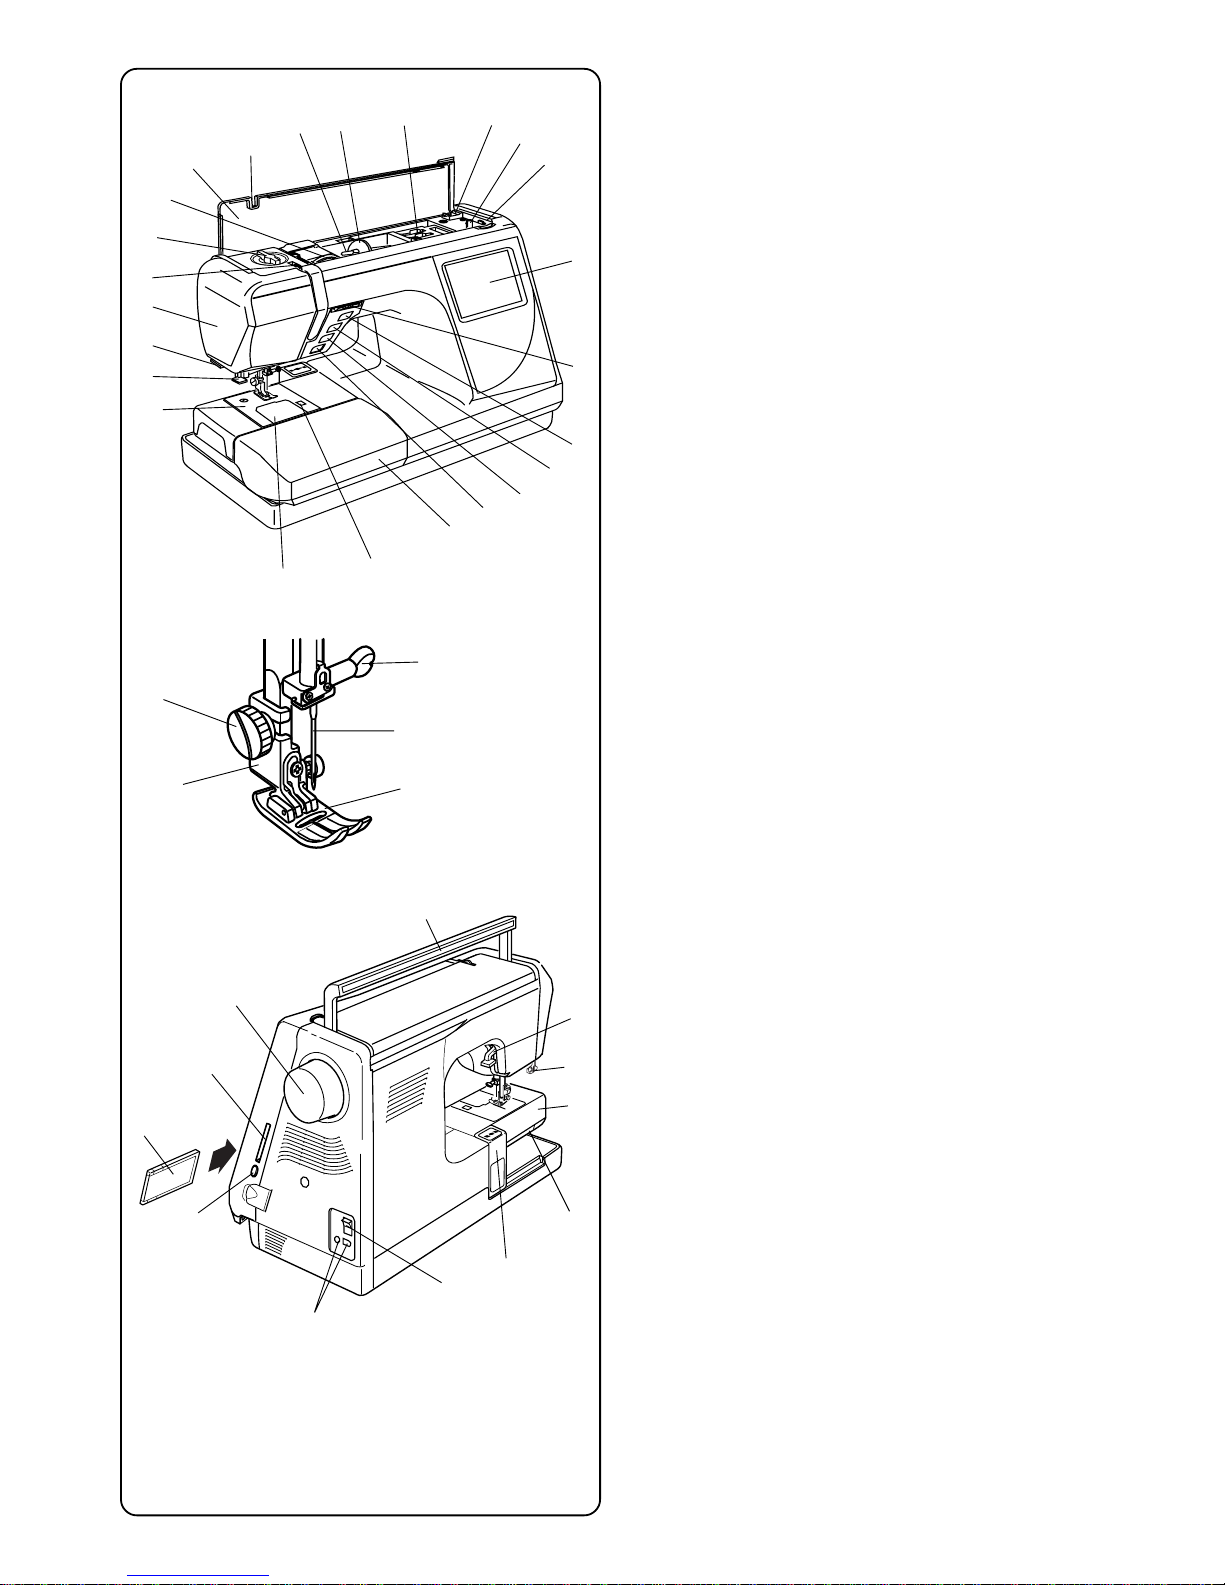
SECTION I – Machine Parts and Functions
Part Names ...................................................................... 3
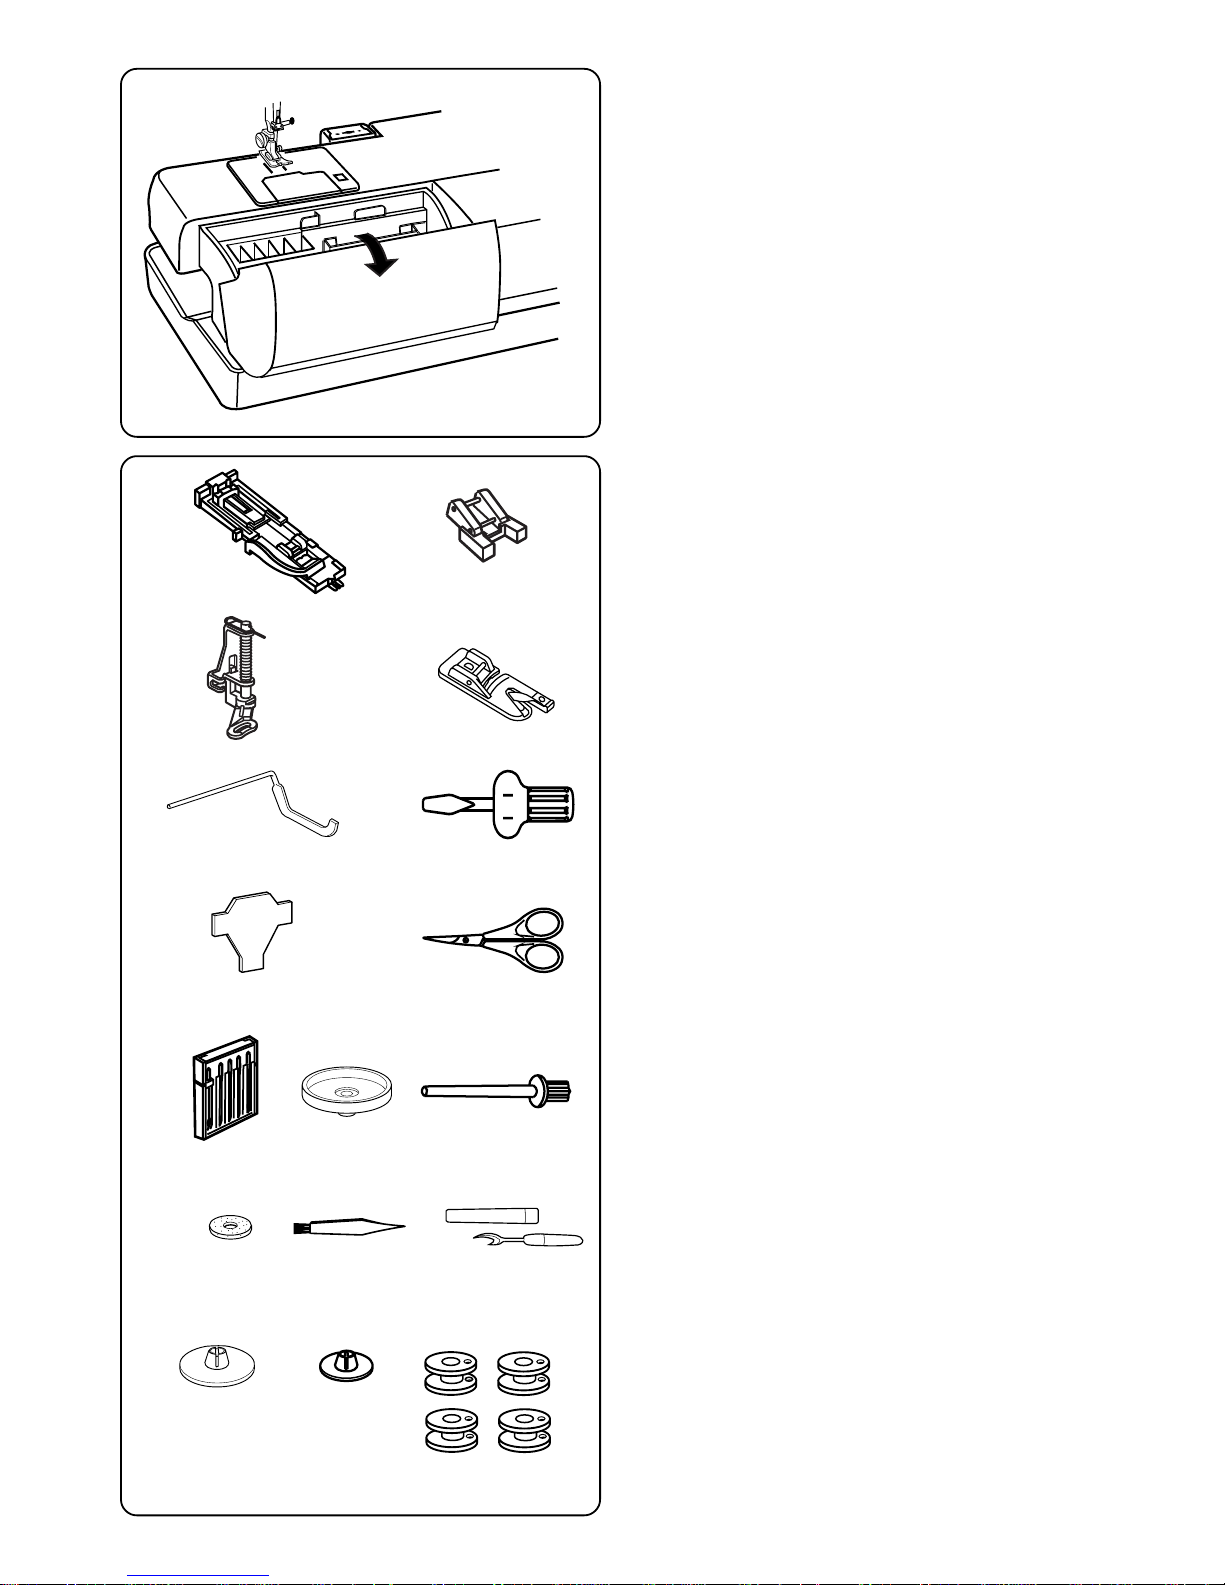
Standard Accessories................................................... 4-5
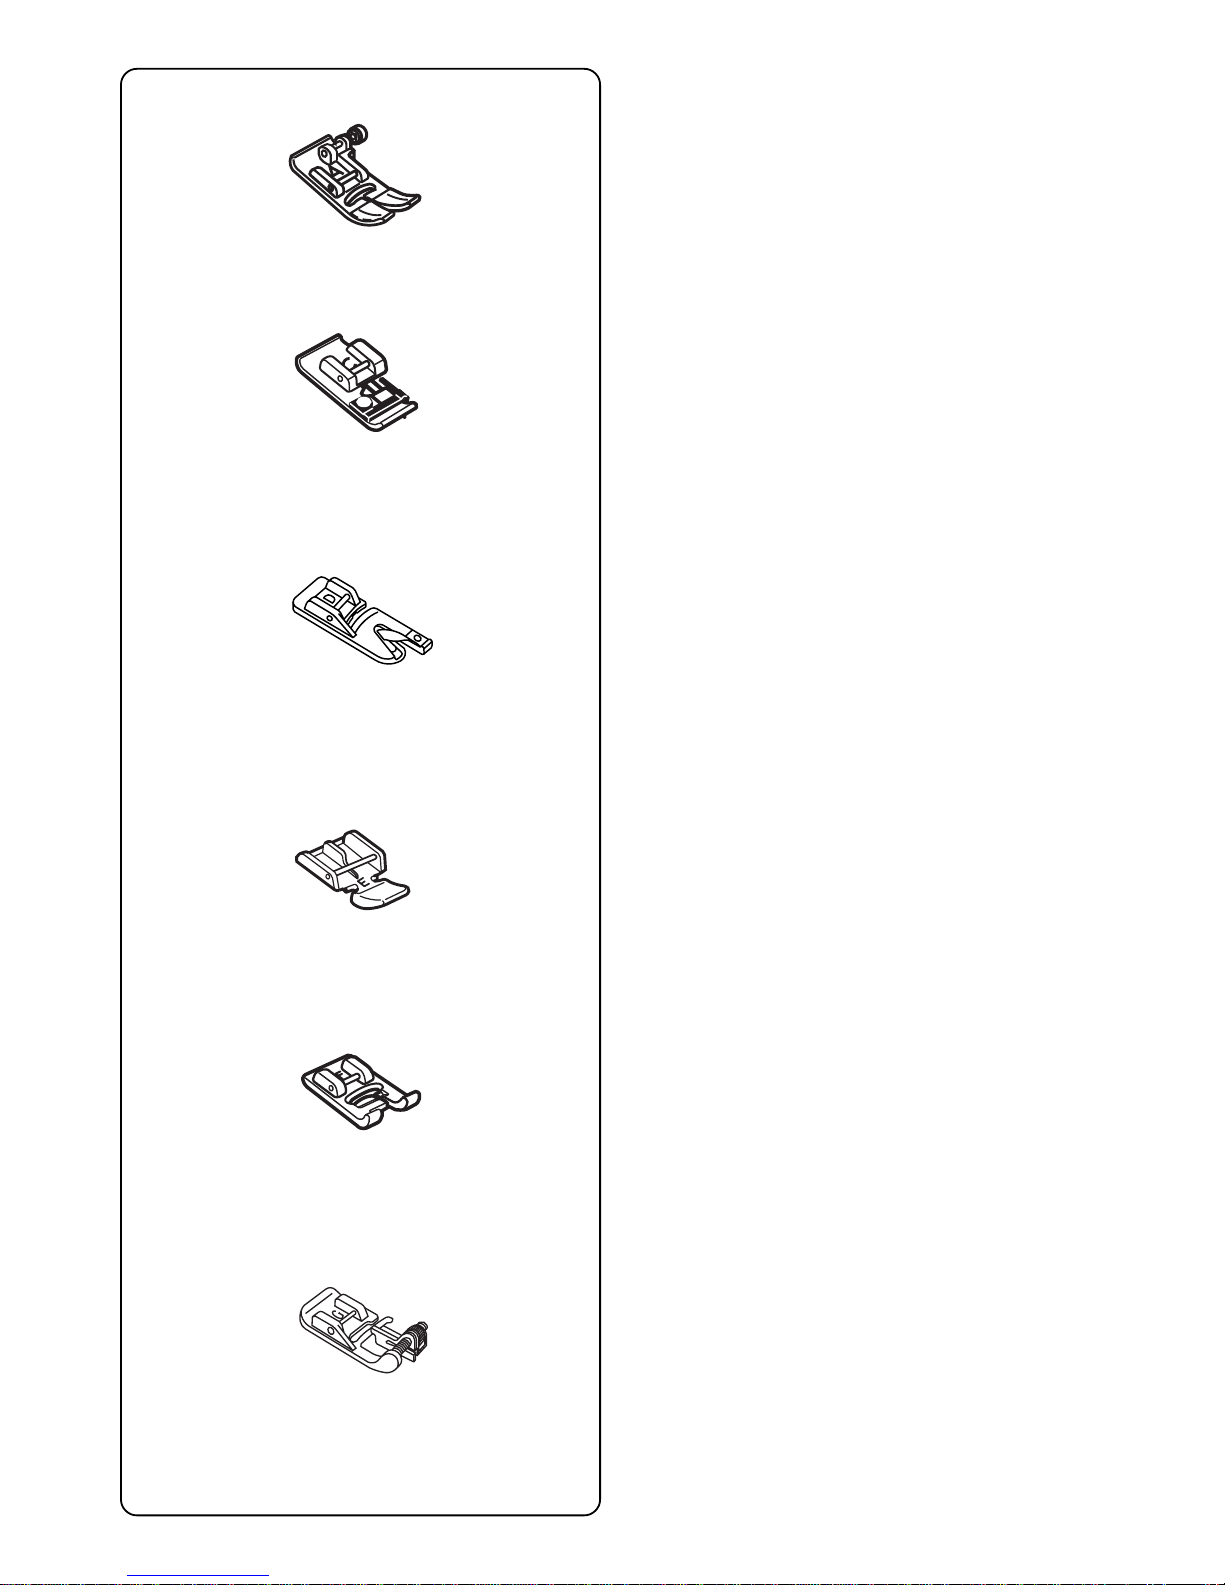
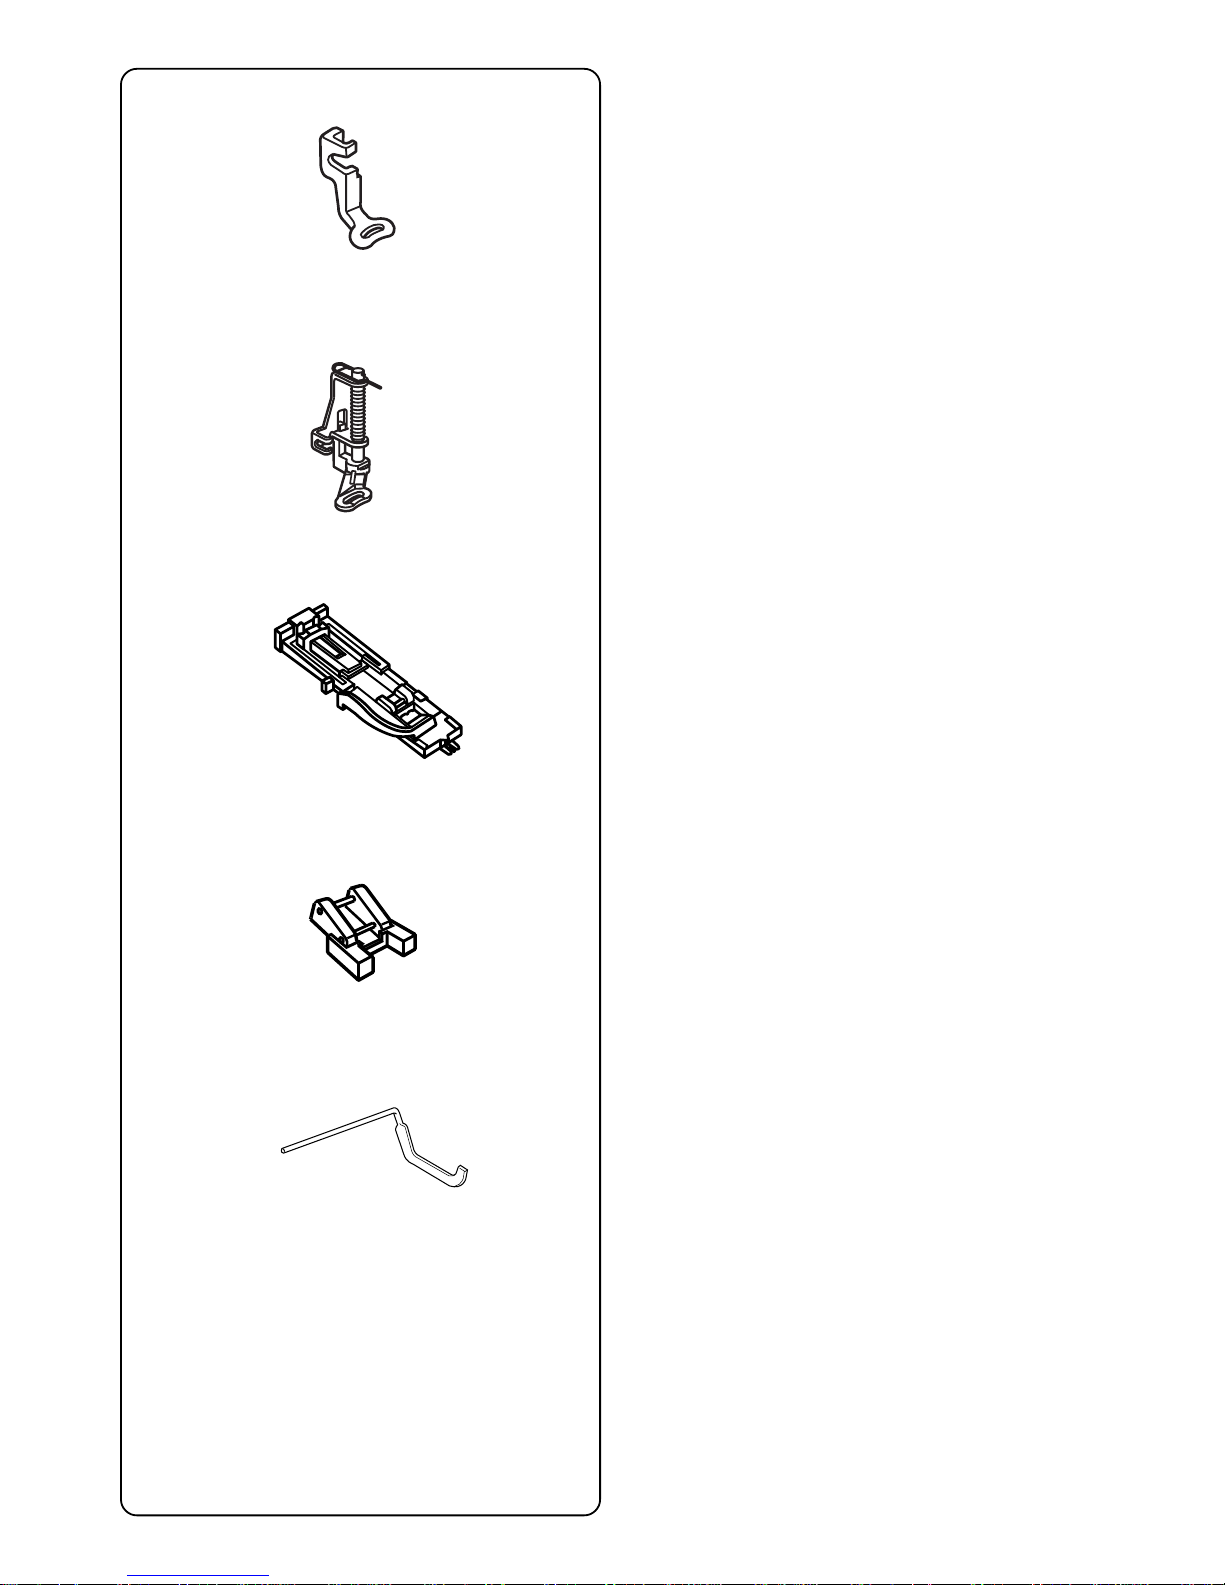
Presser Foot and Accessory Definitions ...................... 6-7
Extension Table and Free Arm ........................................ 8
Controlling Sewing Speed ............................................... 9
Foot Pressure Dial ........................................................... 9
How to Drop the Feed Dog ........................................... 10
Presser Foot Lever and Additional Presser
Foot Clearance ........................................................ 10
Attaching and Removing Presser Feet ......................... 11
Attaching and Removing Shank .................................... 11
Seam Allowance Lines .................................................. 11
Needle Thread Tension ................................................. 12
Using the Fine Adjustment Screw ................................. 13
SECTION II – Getting Ready to Sew
Connecting Machine to Power Supply .......................... 14
LCD Touch Screen ........................................................ 15
Main Function of Keys ................................................... 16
Operation Keys .............................................................. 17
SET Preference Keys ............................................... 18-20
How to Access On Screen Information ......................... 21
Selecting the Correct Needle and Thread .................... 22
Changing Needles ......................................................... 22
Needle Definitions ......................................................... 23
Winding a Bobbin ..................................................... 24-25
Additional Spool Pin ...................................................... 24
Inserting the Bobbin ...................................................... 26
Threading the Machine.................................................. 27
Built-in Needle Threader ............................................... 28
Drawing Up the Bobbin Thread ..................................... 29
SECTION III – Traditional Sewing
Traditional Sewing Window Keys .................................. 30
How to Select a Stitch and What
the Symbols Represent ......................................... 31
Straight Stitch ................................................................ 31
Starting to Sew .............................................................. 31
Changing Sewing Direction ........................................... 32
Finishing Off a Seam ..................................................... 32
Cutting the Threads ....................................................... 32
Adjusting Needle Position or Stitch Length .................. 33
Sewing on Heavy Fabrics ............................................. 34
Gathering ....................................................................... 34
Zipper Insertion ........................................................ 35-37
Rolled Hem .................................................................... 38
Zigzag Stitch .................................................................. 39
Overcasting ................................................................... 39
Satin Stitch Appliqué ..................................................... 40
3-Step Zigzag ................................................................ 40
Mending a Tear .............................................................. 41
Applying Elastic ............................................................. 41
Blind Hem Stitches ........................................................ 42
Lingerie Stitch ................................................................ 43
Basting Stitch................................................................. 43
Triple Seam ................................................................... 44
Stretch Seam ................................................................. 44
Double Overlock Stitch .................................................. 45
Super Overlock Stitch.................................................... 45
Super Stretch Stitch ...................................................... 46
Buttonholes ............................................................... 47-55
How to Sew on a Button ................................................ 56
Darning ..................................................................... 57-58
Bartacks ......................................................................... 59
Arrowtack ....................................................................... 60
Eyelets ........................................................................... 60
Decorative Stitch Window Keys ............................... 61-62
Saddle Stitch ................................................................. 63
TABLE OF CONTENTS

3
SECTION I
Machine Parts and Functions
Part Names
1. Stitch chart
2. Top cover
3. Spool pin
4. Spool holder, large
5. Storage compartment
6. Bobbin winder cutter
7. Bobbin winder spindle
8. Bobbin winder stop
9. LCD touch screen
10. Speed control lever
11. Up/down needle key
12. Auto-lock key
13. Reverse key
14. Start/stop key
15. Extension table (accessory storage box)
16. Bobbin cover plate release button
17. Bobbin cover plate
18. Needle plate
19. Built-in needle threader
20. Thread cutter and holder
21. Face plate
22. Thread take-up lever
23. Foot pressure dial
24. Thread tension dial
25. Needle clamp screw
26. Needle
27. Presser foot
28. Shank
29. Thumbscrew
30. Carrying handle
31. Presser foot lever
32. Buttonhole lever
33. Free arm
34. Feed dog lever
35. Carriage (embroidery only)
36. Power switch
37. Machine sockets
38. Card eject button
39. Design card
40. Design card slot
41. Flywheel (always turn towards you)
12345678
9
10
11
12
13
14
15
16
17
18
19
20
21
22
23
24
25
26
27
28
41
29
30
31
32
33
34
35
36
37
38
39
40

4
Standard Accessories
Extension Table (Storage Box)
Accessories are stored inside the extension table. Pull lid
towards you to open the storage box.
1. R: Automatic buttonhole foot
2. T: Button sewing foot
3. P2: Embroidery/darning foot
4. D: Hemmer foot
5. Quilt guide
6. Screwdriver
7. Screw key
8. Scissors
9. Set of needles
10. Spool stand
11. Additional spool pin
12. Spool pin felt
13. Lint brush
14. Seam ripper
15. Spool holder, large (attached to machine)
16. Spool holder, small
17. Bobbins (5 total)
12
34
56
78
91011
12 13 14
15 16 17

5
Storage Compartment under Top Cover
(Lift up and back)
Handy storage area for individual pieces
18. F: Satin stitch foot
19. E: Zipper foot
20. P: Embroidery foot
21. Shank (attached to machine)
22. A: Standard metal foot (attached to machine)
23. G: Blind hem foot
24. C: Overlock foot
25. Embroidery hoop and template (A)
26. Embroidery hoop and template (B)
27. Foot control
28. Instruction book
29. Template sheets
30. Power supply cord
31. Dust cover
32. Built-in design menu sheet
F
C
G
A
E
P
18 19
24
23
22
20
21
25 26 27
28 29 30
31 32

6
Presser Foot and Accessory Definitions
A: Standard Metal Foot
This foot comes attached to your machine. It is mainly
used for straight stitches and zigzag stitches longer than
1.0. The button locks the foot in a horizontal position
helping to sew over multiple layered seams.
C: Overlock Foot
Prevent fabric edges from raveling by finishing the edge
with a zigzag stitch. The brush on the foot helps the
stitch lie flatter and reduces puckering. Use with medium
weight fabrics.
D: Hemmer Foot
Insert the fabric into the spiral on this foot. The spiral
rolls the fabric, creating a rolled hem. An easy,
professional way to sew hems.
E: Zipper Foot
Use when sewing zippers into place. The grooves on the
underside ensure the foot glides over the zipper coil.
Attach either to the left or right of the needle to sew each
side of the zipper.
F: Satin Stitch Foot
The cutout on the underside of the foot is designed to
accommodate dense stitch formation. Ideal when sewing
satin and decorative stitches.
G: Blind Hem Foot
The guide on the foot helps ensure that the needle
catches only one or two fibers of the hem, resulting in an
invisible hemline.
A
C
D
E
F
G

7
P: Embroidery Foot
Automated embroidery requires using a hoop and
securing the fabric inside it so it is held taut. The carriage
mechanism must be able to move the hoop/fabric freely;
this foot allows that movement.
P-2: Embroidery/Darning Foot
Skipped stitches are no longer a concern when sewing
free motion embroidery, stippling, darning and
monogramming. The spring-loaded foot moves up and
down at the same time as the needle.
R: Automatic Buttonhole Foot
Place button in foot to determine the buttonhole size.
The machine will automatically sew the corresponding
buttonhole.
T: Button Sewing Foot
No matter the shape, sew buttons on in one quick and
easy step. Special properties of foot are the open front
and grips on the underside.
Quilt Guide
The quilt guide is helpful when sewing parallel, evenly
spaced rows of stitching. May be used with an optional
walking foot.
P
P-2
R
T

8
Extension Table and Free Arm
Extension Table
The extension table provides more sewing space to
make sewing easier. The extension table can be easily
removed for free arm sewing.
To Remove:
Lift out extension table away from the machine, as
shown.
To Attach:
Place tabs over slots and push down on table.
Free Arm
Free arm sewing is good for circle areas like sleeves,
waistbands and pant legs.
NOTE: Move the carriage if you need to use the entire
length of the free arm. See page 19.
NOTE: Always embroider with the extension table
attached unless using optional free arm hoop C. See
page 110.

9
Controlling Sewing Speed
Sewing speed can be varied with the foot control. The
harder you press on the foot control, the faster the
machine runs.
The maximum sewing speed can be varied by sliding the
speed control lever. For a faster speed, slide it to the
right; for a slower speed, slide it to the left.
Foot Pressure Dial
Align the foot pressure dial qwith the setting mark w.
Set the pressure at “3” for regular sewing.
Reduce the pressure to “2” for appliqué, cutwork, drawn
work, basting and embroidery.
Velours and knits with a lot of stretch may require a “1”
setting.
q
w

10
How To Drop the Feed Dog
The feed dog automatically drops down when basting
stitch 7, button sewing 20 or embroidery mode is
selected.
The feed dog must always be up for regular sewing. The
feed dog can be dropped out of position for special
sewing techniques: free motion embroidery, stippling,
etc.
Locate the feed dog lever on the back of the free arm.
Slide the lever either to the left (down) qor to the right
(up) w. To bring up the feed dog, hand turn the flywheel
after sliding lever to the left.
NOTES:
If the feed dog is down, a warning message will appear
in the LCD screen when sewing begins.
When you select a different stitch with the feed dog
down, in most instances the feed dog will automatically
reset to the up position.
Presser Foot Lever and Additional Presser Foot
Clearance
Raise and lower the foot with this lever q. You can raise
the presser foot about 6.5 mm (1/4˝) higher than the
normal up position for easier removal of the hoops or
presser foot or to place heavy fabrics under the presser
foot. Pull the presser foot lever qup beyond the normal
up position.
Before sewing can occur the presser foot must be
lowered to close the tension discs. If you attempt to sew
with the foot in the up position, the LCD screen will show
a warning message to remind you to lower the foot.
w
q
qw
q

11
Attaching and Removing Presser Feet
Press the “Up/down Needle” key until the needle is in the
raised position.
Turn OFF the power switch. Raise the presser foot and
press the red button qon back of the shank. The
presser foot will drop off.
Place the selected presser foot so the pin eon the foot
lies just under the groove wof the shank. Lower the
presser bar and attach the foot.
Attaching and Removing Shank
Turn OFF the power switch. Raise the presser bar.
Turn the thumbscrew qcounterclockwise with the
screwdriver. Pivot shank towards rear and remove the
shank.
To attach, from the rear of the presser bar pivot shank
opening around presser bar and turn thumbscrew
clockwise to tighten.
Seam Allowance Lines
The lines on the needle plate, free arm and bobbin cover
plate help you measure seam width.
The numbers indicate the distance (in millimeters and
inches) between the center needle position 3.5 qand
the seam allowance line w. Use the seam allowance line
as a guide for the fabric edge e.
q
we
q
w
e
q

12
Needle Thread Tension
The “AUTO” tension dial setting is appropriate for most
sewing situations in traditional sewing mode. The
“AUTO” setting on the needle thread tension dial should
be aligned with the setting mark q. Keep the dial set on
“AUTO” unless directed otherwise in this manual.
Correct Tension - Straight Stitch
The ideal straight stitch will have threads locked between
the two layers of fabric, as shown left (magnified to show
detail).
If you look at the needle thread w(top thread) and
bobbin thread e(bottom thread), you will notice that
there are no gaps. Each stitch is smooth and even.
Occasionally the needle thread tension needs to be
adjusted. Examples:
—stiff or heavy fabric
—sewing more than two layers of fabric
—type of stitch
—thread
q
w
e
!
"
54
6
• Tension is too tight
The bobbin thread shows through on the topside of the
fabric and it will feel bumpy.
Turn the dial to a lower number to loosen the needle
thread tension.
• Tension is too loose
The needle thread shows through on the underside of
the fabric and it will feel bumpy.
Turn the dial to a higher number to tighten the needle
thread tension.
• Adjusting Tension for Zigzag and Satin Stitches
The upper thread tension should be slightly looser when
sewing a zigzag or a satin stitch. The upper thread
should appear slightly on the underside of the fabric.

13
Using the Fine Adjustment Screw
Choice of fabrics and threads may affect the stitch
formation when sewing decorative stitches, letters and
numbers or classic 4 step programmable buttonhole 19.
The fine adjustment screw can be used to either
lengthen or shorten the stitch.
qFine adjustment screw
wStandard mark
eSetting mark
To fine tune, use a screwdriver to move the setting mark.
•If stitches are too short r, correct by turning the
screw in the direction of “+”.
•If stitches are too long t, correct by turning the
screw in the direction of “–”.
•If letters are overlapped y, correct by turning the
screw in the direction of “+”.
•If letters are too spread out u, correct by turning the
screw in the direction of “–”.
19 Classic 4 Step Programmable Buttonhole (Applies
only to this style)
Always make the adjustment according to the left side.
•If left side of buttonhole is less dense (too open) i
compared to right side, correct by turning the screw
in direction of “+”.
•If left side of buttonhole is more dense (too closed)
ocompared to right side, correct by turning the
screw in direction of “–”.
•If eyelet overlaps !0, correct by turning the screw in
direction of “+”.
•If eyelet is open !1, correct by turning the screw in
direction of “–”.
q
w
e
rt
(+) (–)
y
u
(+) (–)
io
(+) (–)
(+) (–)
!0 !1

14
SECTION II
Getting Ready to Sew
Connecting Machine To Power Supply
Machine has an auto voltage system and will
automatically adjust to any local power supply voltage
between 100 and 240V, 50/60 Hz. Always use the power
supply cord that came with the machine.
To connect machine to power supply, turn off the power
switch q. Insert the foot control plug wand machine
plug einto the machine and the power supply plug r
into the wall socket.
Your machine may come equipped with a polarized plug
(one prong wider than the other). A polarized plug
reduces the risk of electrical shock. This plug is intended
to fit into a polarized outlet. If the plug does not fit fully
into the outlet, reverse the plug. If it still does not fit,
contact a qualified electrician to install the proper outlet.
Do not modify the plug in any way.
NOTE: After turning off the machine, wait 5 seconds
before turning it on again.
NOTE: Foot control cannot be connected when using
embroidery mode.
For Your Safety
Do not use extension cords or plug adapters.
Do not touch plug with wet hands.
Always turn off the power/light switch first and then
unplug from the electrical outlet. Examples:
•when leaving the machine unattended
•when cleaning the machine
Always turn off the power/light switch:
•when attaching or removing parts such as
needle, presser foot, needle plate
Do not place anything on the foot control.
Do not place heavy items on cords. Do not subject cords
to heat. Do not use damaged cords. Have the cord
repaired immediately.
While the machine is in operation, always keep your eye
on the sewing area and do not touch any moving parts
such as the thread take-up lever, flywheel or needle.
ON
OF
F
q
w
e
r

15
IMPORTANT:
Before turning on your machine, clear
your table surface of anything that might
obstruct the carriage movement. If your
machine is in a cabinet, check that the
machine is even or above the cabinet
surface. (The carriage could possibly hit
the cabinet and disturb the sewing result.)
TURN ON THE POWER SWITCH.
LCD Touch Screen
The LCD touch screen will briefly show the machine
identification window and automatically open the
traditional sewing window with straight stitch 1 selected.
NOTE: After turning on the machine there is
approximately a six second delay before the LCD touch
screen becomes visible. (This is the required boot up
time and is not a malfunction.)
NOTE: Only a light touch is required when making a
selection on the LCD touch screen. Do not touch the
surface of the screen with any hard or sharp object,
such as pencils, pens, screwdrivers, etc.
Use a soft dry cloth to wipe clean the screen.
A Z
2 3 45 6
7 8 9 10 11 12
A
Auto
Adjust
3
1
SETSET
2 3 45 6
7 8 9 10 11 12
1
SET
?
Straight Stitch

16
Main Function of Keys
qStart/Stop Key (changes color to indicate
function)
Press this (green) key to start the machine. In
traditional sewing, the first few stitches will be sewn
at a slow speed and then machine sews at the speed
set by the speed control lever. Press (red) key again
to stop machine.
NOTE: The foot control must be detached to use this
key in traditional sewing.
wReverse Key
If you are sewing 1 (straight stitch), 2 (zigzag stitch)
or 3 (3-step zigzag stitch), press and hold this key.
The machine will sew in reverse until you release the
key while using either the foot control or Start/Stop
key.
* Press this key when sewing any other stitch
(except for stitches 13 to 22) and the machine will
immediately lockstitch and stop.
eAuto-Lock Key
Press this key while sewing 1 (straight stitch), 2
(zigzag stitch) or 3 (3-step zigzag stitch) and the
machine will sew a few stitches in place (lockstitch)
and stop automatically.
* Press this key when sewing any other stitch
(except for stitches 13 to 22) and the machine will
complete the stitch, lockstitch and stop.
rUp/Down Needle Key
If the needle is up when you press this key, the
needle will go down to its lowest position.
If the needle is down when you press this key, the
needle will go up to its highest position.
NOTE: The Elna 8600 is equipped with a safety feature
that will automatically shut down the machine to prevent
overheating if it is running overloaded. Follow the
instructions that appear in the LCD touch screen should
this occur.
q
w
e
r

17
A Z
Straight Stitch
45 6
7 8 9 10 11 12
A
Auto
Adjust
3
1
SET
SET
SET
?
23
2 3
2 3
Operation Keys
qTraditional Sewing Key
Press this key to switch from embroidery sewing to
traditional sewing.
wEmbroidery Sewing Key
Press this key to switch from traditional sewing to
embroidery sewing.
eOpen File Key
Press this key to open files containing saved
sequences in traditional sewing or saved design
layouts in embroidery sewing. See pages 74 and
109.
rSet Preference Key
Press this key to access the machine settings for
screen contrast, sound volume, eco mode, inch/mm,
language, adjust key positions, free arm length and
to reset all settings to default.
Other machine settings that pertain only to
embroidery sewing are: maximum sewing speed,
sewing light, thread selection, format.
tInformation Key
Press this key to find quick helpful tips for: fine
tuning adjustment, changing needles, inserting the
bobbin, sewing buttonholes, threading machine and
winding a bobbin.
q
w
e
r
t

18
SET Preference Keys
These functions can be set according to your
preferences: screen contrast, sound volume, eco mode,
inch/mm, adjust key position, free arm length, set
maximum embroidery speed, sewing light, thread
selection, format and language.
Touch the “SET” preference key qto access and
personalize the machine settings.
1. Screen contrast
The LCD touch screen has an adjustable backlight
so the contrast can be lightened or darkened. Touch
the “+” key to darken and the “–” key to lighten.
2. Sound
The beep volume default setting is 5 but it can be
adjusted between 0 (off) and 10 (loud). Touch the “+”
key to increase and the “–” key to decrease or turn
off.
3. Eco Mode
After turning on the machine, this energy saving
feature will darken the LCD touch screen and turn off
the sewing light if the machine has not been used.
Simply touch the LCD screen for the screen and light
to turn back on. The eco mode default setting is 10
minutes, but it can be adjusted between 1 and 30
minutes. Touch the “+” key to increase and the “–”
key to decrease. If you want to turn off the eco
mode, touch the “+” key until “OFF” appears in the
display.
4. Inch/millimeter
Choose to have the measuring unit for designs
readout in either inch or millimeters. The default unit
setting is millimeters. Touch either the “inch” or “mm”
key.
5. Touch the “Next” key.
NOTE: Any change in the set preference window must
be “registered” to be activated. Only touch the
“Register” key (6) after making all changes desired.
A Z
Straight Stitch
45 6
7 8 9 10 11 12
A
Auto
Adjust
3
1
SET
SET
SET
?
23
2 3
2 3
Screen Contrast
+
inch/mm
5
+
Eco Mode
SET
inch mm
Register
10min
1
2
3
4
65
q

19
7. Adjust key positions
If the touch keys in the LCD touch screen do not
react to your touch, the keys may need to be
adjusted or realigned.
Touch the “Yes” key to open the adjust key position
window.
Key Position Adjustment
Sewing Light
+
Maximum Speed Set
SET
Register
650
spm
Yes
Free Arm Length
7
8
9
10
Key Position Adjustment
PRESS MARK ( )
+
Key Position Adjustment
END
The first of five black plus (+) symbols will appear.
Touch the black symbols in the order that they
appear.
After the fifth black symbol is touched, the END
message appears. Wait a few moments and the set
preference window reappears.
8. Free Arm Length
Touch these keys to either reposition the carriage
and expose the entire length of the free arm or to
return the carriage to the store position.
9. Set maximum embroidery speed
The maximum embroidery speed default setting is
650 spm (stitches per minute). Designs featuring
narrow zigzag stitches may need to be sewn at a
slower speed for best results. Touch the “–” key to
decrease and “+” key to increase.
10. Sewing light
You can operate the machine with the sewing light
on or off. Touch this key to change between the two
settings.
Touch the “Next” key.
Other manuals for 8600
1
Table of contents
Other ELNA Sewing Machine manuals

ELNA
ELNA 3210 JEANS - User manual

ELNA
ELNA Elnita ec 30 User manual

ELNA
ELNA 7300 - User manual

ELNA
ELNA eXplore 220 User manual

ELNA
ELNA eXperience 550 User manual

ELNA
ELNA 500 ELECTRONIC User manual

ELNA
ELNA eXcellence 720 User manual

ELNA
ELNA eXcellence 782 User manual

ELNA
ELNA eXcellence 710 User manual

ELNA
ELNA xquisit User manual