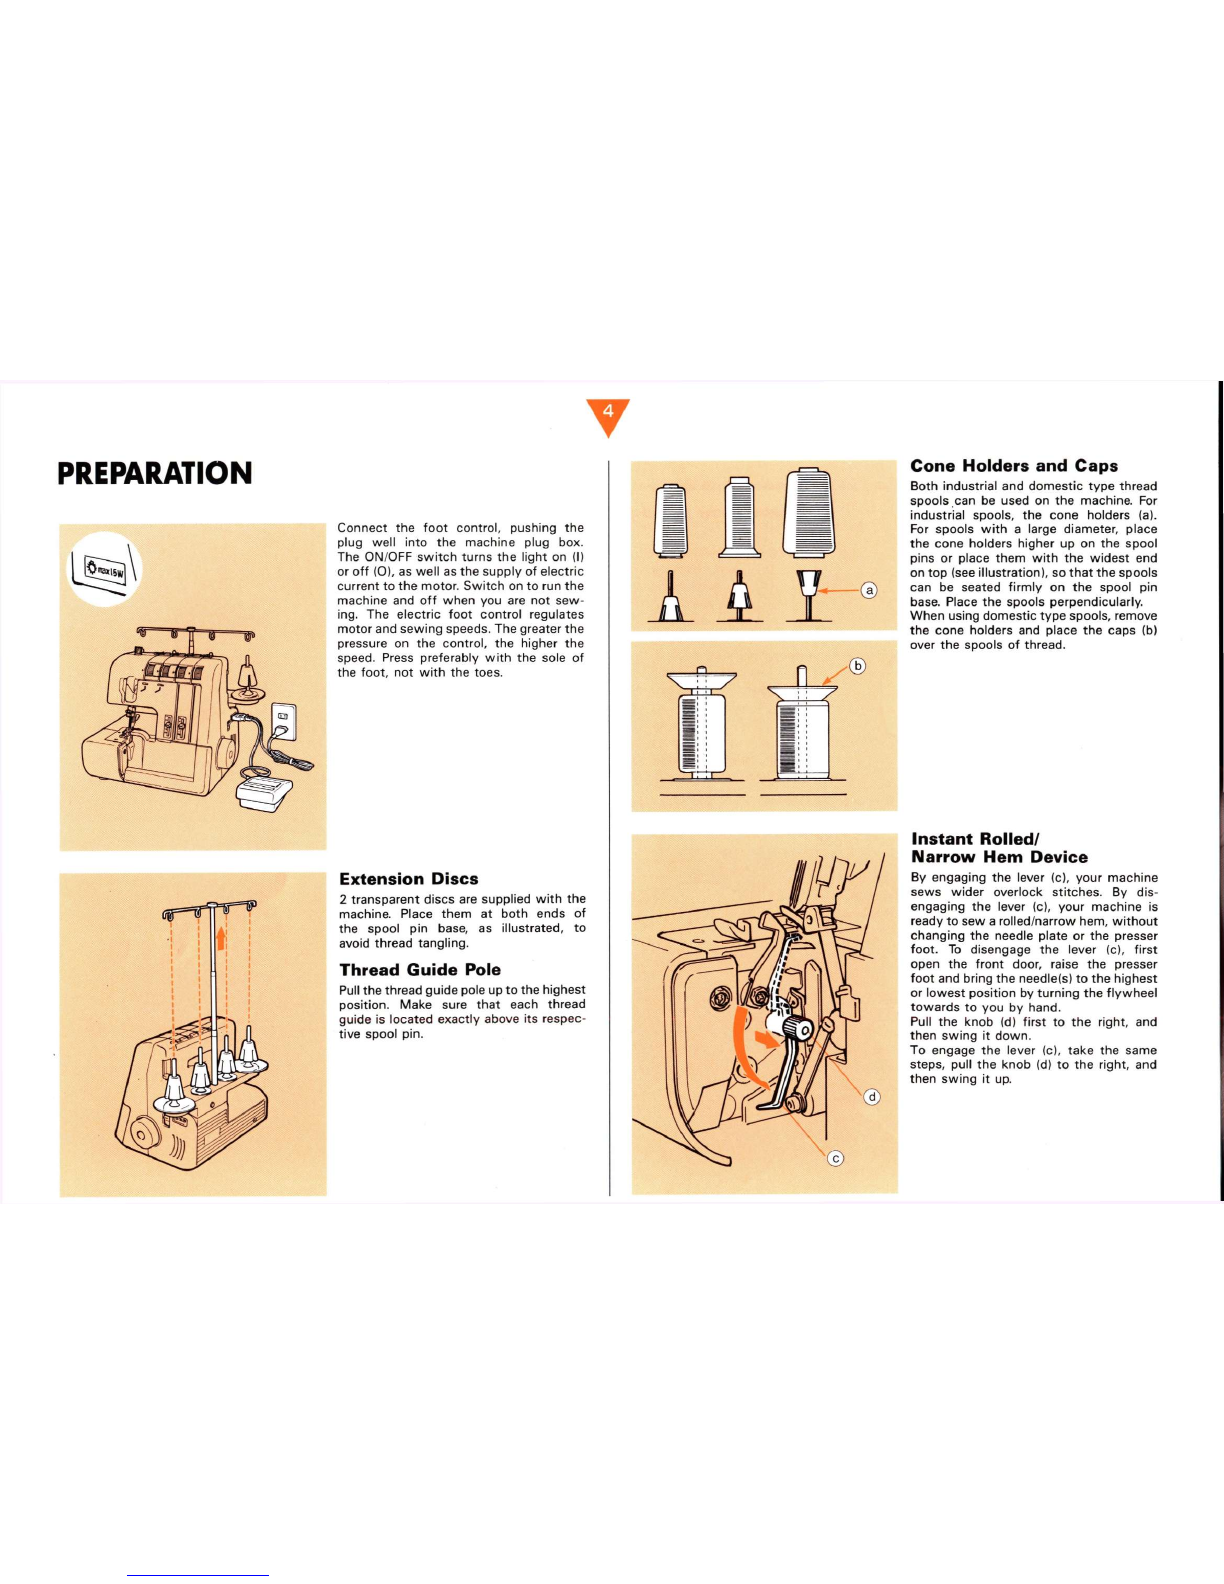
ELNA 624DSE User manual

INSTRUCTION
MANUAL
624?
6142604

IMPORTANT
SAFETY
INSTRUCTIONS
When
using
anelectricalappliance,
basic
safetyprecautions
should
always
befollowed,
includingthefollowing:
Read
allinstructionsbefore
using
themachine.
To
reducethe
risk
ofelectric
shock:
-Themachineshouldneverbeleftunattendedwhenpluggedin.
-Alwaysunplugthemachinefromtheelectricoutletimmediatelyafterusingand
beforecleaning.
-Alwaysunplugthemachinebeforereplacingthebulb.Alwaysreplacethebulbwith
thesametyperated15Wattsmaximum.
\A / A ONI IK\{^Toreducethe
risk
of
burns,
fire,
VV/AI
\lNilNV^electric
shock
orinjuryto
persons:
-Donotallowthemachinetobeusedasa toy.Paycloseattentionwhenthemachine
isusedbyorhearchildren.
-Usethemachineonlyforitsintendeduseasdescribedinthismanual.Useonly
attachmentsrecommendedbythemanufacturerascontainedinthismanual.
-Neveroperatethemachineifithasa damagedcordorplug,ifitisnotworking
properly,ifithasbeendroppedordamagedordroppedintowater.Returnthemachine
tothenearestauthorizeddealerorservicecenterforexamination,repair,electrical
ormechanicaladjustment.
-Neveroperatethemachinewithanyairopeningsblocked.Keepventilationopenings
ofthesewingmachineandfootcontrolfreefromaccumulationoflint,dustandloose
cloth.
-Keepfingersawayfromallmovingparts.Specialcareisrequiredaroundthesewing
needleandmovingblade.
-Donotusebentneedles.
-Donotpullorpushfabricwhilestitching.Itmaydeflecttheneedlecausingittobreak.
DANGER
-Switchthemachineoff(O)whenmakinganyadjustmentsintheneedlearea,such
asthreadingneedle,changingneedle,threadinglooper,orchangingpresserfootand
thelike.
-Alwaysunplugthemachinefromtheelectricaloutletwhenremovingcovers,lubricat-
ingorwhenmakinganyotheruserservicingmentionedintheinstructionmanual.
-Neverdroporinsertanyobjectintoanyopening.
-Donotuseoutdoors.Alwaysstorethemachineindoors.
-Donotoperatewhereaerosol(spray)productsarebeingusedorwhereoxygenis
beingadministered.
-Todisconnect,turnallcontrolstotheoffposition,thenremoveplugfromoutlet.
-Donotunplugbypullingon
cord.
Tounplug,grasptheplugnotthe
cord.
-Themachineshouldbedisconnectedfromtheelectricitysupplywhennotinuse.
-Ifthepowercordofthemachineisdamaged,itmustbereplacedbya specialcord
byyournearestauthorizeddealerorservicecenter.
"SAVETHESE
INSTRUCTIONS"
For
U.S.A.
-Thefootcontroltype4C-335Band/or4C-316Bshouldbeusedwiththemachine.
-Thisappliancehasa polarizedplug(onebladewiderthantheother).
Toreducetheriskofelectricshock,thisplugisintendedtofitina polarizedoutlet
onlyoneway.Iftheplugdoesnotfitfullyintheoutlet,reversetheplug.Ifitstill
doesnotfit,contacta qualifiedelectriciantoinstalltheproperoutlet.Donotmodify
thepluginanyway.

DearCustomer,
Youhavechosenanoverlooksewingmachineofthehighestquality,whichwill
makeyourhoursofsewingbecomehoursofpleasureandrelaxation.
Wecongratulateyouonyourchoiceandhopethatitwillgiveyoulasting
satisfaction.Beforeyoustarttouseyourmachine,pleasetakea fewminutes
tostudythisinstructionmanual.Youwillfindthatitwillassistyouinyour
completeunderstandingofthefunctionsandcapabilitiesofyouroverlook
machine.
Ifyouwishtoobtainmoreinformation,pleasedonothesitatetocontactyour
dealerwhoisfullyqualifiedtoansweryourquestions.Furthermore,your
dealershouldalsobecontactedforalltechnicalinterventionswhichareunder
warranty.Thankyouforchoosinga 600seriesoverlooker.
Kindestregards,
Themanufacturer
Household
OverlookSewingMachines
Models
624DSE,
614DE& 604E
TABLE
OF
CONTENTS
Front
View&
Main
Parts
MainParts2
Frontdoor3
Sidedoor3
Standard
Accessories
3
Preparation
ExtensionDiscs4
ThreadGuidePole4
ConeHoldersandCaps4
InstantRolled/NarrowHemDevice4
Needles5
PresserFootLever5
Snap-onSewingFoot5
ThreadingtheMachine
ThreadingtheUpperLooper6
ThreadingtheLowerLooper6
ThreadingtheRightNeedle7-
ThreadingtheLeftNeedle7
ChangingtheThreads7
Test
Sewing
4-ThreadOverlook8
SafetyDevice(Model624)8
Adjustments
ThreadTensions9
StitchLength10
DifferentialFeed(Models624& 614)10
CuttingWidth(Models624& 614)11
FootPressure11
Disengaging/Re-engagingtheMovingBlade11
Utility
Stitches
3-Thread/4-ThreadOverlook12
3-ThreadRolled/NarrowHem12
DecorativeTopstitching/Flatlock13
SewingEdge-to-Edge13
Pin-Tucks13
2-ThreadOvercast(Model624)13
2-ThreadRolledHem(Model624)14
OtherSewingApplications
TurningOutsideCornerswithoutCuttingtheThreads15
OverlookingInsideCorners15
TurningCurvedEdges16
RemovingStitchesfromSewnFabric16
SewingExtraHeavyFabrics16
Stitch
SelectionChart18-19
Maintenance
CleaningandOiling20
Lubrication20
ChangingtheLightBulb21
ReplacingtheMovingBlade21
Minor
Disorders
22
AlphabeticalIndex23

y
FRONT
VIEW&
MAIN
PARTS
Main
Parts
©Pressurecontrolknob
@Leftneedlethreadtension(blue)
@Rightneedlethreadtension(red)
@Upperlooperthreadtension(yellow)
©Lowerlooperthreadtension(green)
©Threadguidepole
©Tensionreleaselever(Model624)
®Spoolpin
©Coneholder
©Spoolpinbase
©ON/OFFswitch
@Stitchlengthslide
©Differentialfeedcontrolslide(Models624& 614)
@Needleclamp
©Presserfoot
®Needleplate
©Sidecover
@Frontdoor
@Flywheel
®Footcontrol

Front
Door
©Upperlooper
©Lowerlooper
@Instantrolled/narrowhemdevice
©Leftneedle
©Rightneedle
©Movingblade
©Feeddogs
©Fixedblade
SideCover
@Carryinggrip
©Lampcover
©Sewinglight(15wattsmaximum)
©Cuttingwidthdial(Models624& 614)
©Movingbladereleaselever
@Presserfootlever
STANDARD
ACCESSORIES
Accessoryboxandaccessoriesincludedwiththemachine:
©Wrenchforreplacingmovingblade
@Allenscrewdriver1.5mm
@Cleaningbrush
@Tweezers
©Oiltube
©AssortmentofneedlesELx705
©Sparemovingblade
©2-threadconverter(Model624)
©Spoolcaps
©Transparentdiscs
©Dustcover
@Screwdriver
©Accessorybox
@Wastetray(Model624)
396001-
13
396002-
69
396001-69
396001-62
396001-70
396001-51
396001-60
396001-
19
396002-
07
396001-
37
396002-
09
396001-71
396001-72
396001-74
SpecialAccessories
Yourdealerwillbepleasedtogiveyoufurtherdetails.

PREPARATION
Connectthefootcontrol,pushingthe
plugwellintothemachineplugbox.
TheON/OFFswitchturnsthelighton(I)
oroff(0),aswellasthesupplyofelectric
currenttothemotor.Switchontorunthe
machineandoffwhenyouarenotsew-
ing.
Theelectricfootcontrolregulates
motorandsewingspeeds.Thegreaterthe
pressureonthecontrol,thehigherthe
speed.
Presspreferablywiththesoleof
thefoot,notwiththetoes.
Extension
Discs
2transparentdiscsaresuppliedwiththe
machine.Placethematbothendsof
thespoolpinbase,asillustrated,to
avoidthreadtangling.
Thread
GuidePole
Pullthethreadguidepoleuptothehighest
position.
Makesurethateachthread
guideislocatedexactlyaboveitsrespec-
tivespoolpin.
Cone
Holdersand
Caps
Bothindustrialanddomestictypethread
spoolscanbeusedonthemachine.For
industrialspools,theconeholders(a).
Forspoolswitha largediameter,place
theconeholdershigheruponthespool
pinsorplacethemwiththewidestend
ontop(seeillustration),sothatthespools
canbeseatedfirmlyonthespoolpin
base.
Placethespoolsperpendicularly.
Whenusingdomestictypespools,remove
theconeholdersandplacethecaps(b)
overthespoolsofthread.
Instant
Rolled/
NarrowHemDevice
Byengagingthelever(c),yourmachine
sewswideroverlockstitches.Bydis-
engagingthelever(c),yourmachineis
readytosewa rolled/narrowhem,without
changingtheneedleplateorthepresser
foot.Todisengagethelever(c),first
openthefrontdoor,raisethepresser
footandbringtheneedle(s)tothehighest
orlowestpositionbyturningtheflywheel
towardstoyoubyhand.
Pulltheknob(d)firsttotheright,and
thenswingitdown.
Toengagethelever(c),takethesame
steps,
pulltheknob(d)totheright,and
thenswingitup.

Needles
Youroverlooksewingmachinehasbeen
designedsothatitcanbeusedwith
ordinaryhouseholdsewingmachine
needles,130/705H(15x1),butitisnever-
thelessadvisabletouseneedlesELx
705,
forthebeststitchingresults.They
areneedlesfordomesticuseandcan
alsobeusedwithallordinaryhousehold
sewingmachines.Fornormalorthick
fabric,usesize90andforsheerfabric
size80needles.Tochangetheneedles,
raisetheneedlebartothehighest
posi-
tionbyturningtheflywheeltowardsyou,
leavingthepresserfootdown.Loosen
theneedleclampscrews(a)withthe
Allenscrewdriver(b),toremovetheold
needles.
Holdthenewneedleswiththeflatside
awayfromyouandpushthemupasfar
astheywillgo.Tightenthescrewsfirmly.
Makesurethattheneedlesclearthe
needleplatebyturningtheflywheelto-
wardsyoubyhand.
Presser
Foot
Lever
Toraisethepresserfoot,swingthelever
(c)
downandyoucanseetheroundmark
inred,asillustrated.
Tolowerthepresserfootswingthelever
(c)
up.
N.B.
Forsewingfluffyorfairlythickfabric,
theextralift(2mm)willbeavailableby
swingingthelever(c)downagain.
Snap-on
SewingFoot
Toremovethefoot,raisetheneedlebar
andpresserbartotheirhighestpositions,
thenpushthelever(d)ontheshank.
Tolockthefootontotheshank,place
thefootundertheshankandlowerthe
presserbar.

THREADING
THEMACHINE
First
ofall,
disconnect
themachine
from
theelectric
outlet
according
tothe
"Important
SafetyInstructions"onpage "0".
Followthethreadingpathscarefully,inaccordancewiththechartsinsidethefront
door,inthesequence
1-2-3-4.
Itisimportantthatthreadingiscarriedoutinthefollowing
sequence:
1.
Upperlooperthread- Yellowthreadguides
2.
Lowerlooperthread- Greenthreadguides
3.Rightneedlethread- Redthreadguides
4.
Leftneedlethread- Bluethreadguides
Incorrectthreadingwillresultinseveralproblemssuchasskippedstitchesandthread
breakage.
Beforestartingtothread,makesurethattheinstantrolled/narrowhemdeviceiswell
engagedontheneedleplate.
f
ThreadingtheUpperLooper
-Colouredyellowonthechartandonthe
thread
guides.
1.
Drawthethreadfromthespool,as
shownonthediagram,passthethread
throughtheguides(A)and(B).
2.
Drawthethreaddownbetweenthe
twotensiondiscsoftheyellowtension
control,
thenthroughtheotherthread
guidesandtheholeintheupperlooper,
steps(C)to(G).Drawthethreadback
underthepresserfoot,leavingabout
10cmofthreadtotheleft.
Threadingthe
Lower
Looper
-Colouredgreenonthechartandon
thethread
guides.
1.
Followa similarprocedureasabove,
andalsoshownonthediagram,steps
(a)
to(e).
2.
Bringthelowerloopertoitsright
positionbyturningtheflywheelby
hand.
3.Pushthelever(f)downandhook
thethreadontheguide(g),push
thelever(f)uptothewokingposition,
thenpassthethreadthroughtheeye
(h)
atthefarrightendofthelooper.
4.
Drawthethreadbackunderthepress-
erfoot,leavingabout10cmtothe
left.

ThreadingtheRightNeedle
-Colouredredonthechartandon
thethread
guides.
Raisetheneedlebartothehighest
position.
Passthethreadthroughthe
guides(A)to(C).Passthethread
throughtheopenslotofthetake-up
levercover(D)anddowntotheguides
(E)
and(F).Finallythreadtheright
needlefromfronttoback,thenunder
thefoot,leavingabout10cmofthe
threadtotheleft.
ThreadingtheLeftNeedle
-Colouredblueonthechartandon
thethread
guides.
Followa similarprocedureasabove,
andalsoshownonthediagram,
passingthethreadthroughthethread
guidesandleftneedletensionand
finallythreadtheleftneedle,steps
(a)
to(f).
Beforestaringtosew,checkagainthat
allthethreadshavebeenproperlypassed
througheverythreadguideandarewell
engagedbetweenthetwotensiondiscs
ofeachtensioncontrol,toensuregood
sewingresults.
N.B.
Shoulditbenecessaryatanytimeto
re-threadthelowerlooper,alwaysremove
thethreadfromtheneedlesfirst,toavoid
tangling.
Changing
the
Threads
Ifthemachinehasalreadybeenthreaded
andyouwishtochangethethreads,tie
thenewthreadstotheoldthreadsbe-
tweenthethreadguidepoleandthetop
threadguides.Firstrelease(Model624)
orloosenthetensions,thenpullthe
looperthreadsgentlybehindtheneedle
untiltheknotshavepassedthrough.
Nextpulltheneedlethreadgentlyand
bringtheknotstothefrontoftheneedles.
Cutthethreadatbothendsoftheknots
andpassthemthroughtherespective
eyesoftheneedles.
N.B.
Itisadvisabletoraisethetensionrelease
leversothatthetwotensiondiscsof
theredandbluetensioncontrolsopen.
Youcanpulltheneedlethreadsinfront
oftheneedleseasily(Model624).

TEST
SEWING
4-ThreadOverlook
Afterthemachinehasbeenthreaded,
startsewinginthefollowingsequence:
1.
Makesurethatthefrontdoorisclosed.
Passthe4 threadsunderthefoot
asshowninthedrawing.Lowerthe
presserfoot,makea fewstitches
byhand,turningtheflywheeltowards
you(withoutfabricunderthefoot).
Pressonthefootcontroltomake3
to4 cmofoverlookchain,holding
thethreadsontheleft.Themachine
isnowreadytosew.
3.Placea scrapoffabrictobestitched
infrontofthepresserfoot,thende-
pressthefootcontrol.Donotpull
thefabric;guideitgently.
4.
Whenyoureachtheendofthefabric,
donotraisethepresserfoot,continue
sewingatlowspeedforabout10cm
beyondtheendofthefabricsothatthe
machineproducesa chainofthread.
Thencutthethreadwiththethread
cutter(seeillustration).You arethen
readytostartthenextseam.You can
startoverlockingfromtheedgeof
thefabricjustbyfeedingitintothe
frontoftheloweredpresserfoot.
5.Ifthestitchesarenotformedcorrect-
ly,checkifthethreadingroutesare
correctfirstandadjustthetensions
inaccordancewiththeinstructions
onthenextpages.
N.B.
Donotraisethepresserfootattheend
ofa seambutalwayssewa chainofthread
atleast10cmlong.
SafetyDevice
(Model
624)
Thefrontdoorisprovidedwitha safety
device.Ifitisopen,themachinewillnot
work.

ADJUSTMENTS
The
thread
tensions
should
beadjustedaccordingtothetypeand
thickness
of
both
threadandfabric.Turnthetensionknobsreferringtothenumbersonthe
dials;
turning
toa highernumber
will
increase
thethreadtensionandtoa lowernumber
decrease
it.
Thread
Tensions
underside
,4.®®
topside
®1
\© s
®1
1.A balancedtension
(a)-(b)Theneedlethreadslieonthe
topsideofthefabric(justlikea row
ofnormalstraightstitches)onthe
upperlooperthread,andjustvisible
inthelowerlooperthreadonthe
undersideofthefabric.
(c)
Theupperlooperthreadliesflaton
thetopsideofthefabricandlocks
withthelowerlooperthreadonthe
edgeofthefabric.
(d)
Thelowerlooperthreadliesflaton
theundersideofthefabricandlocks
withtheupperlooperthreadonthe
edgeofthefabric.
2.
Iftheleftthread(a)istoolooseand
clearlyvisibleontheundersideofthe
fabric,increasetheleftneedlethread
tensionand/ordecreaseeitherorboth
looperthreadtensions.
3.Iftherightneedlethread(b)istoo
looseandclearlyvisibleontheunder-
sideofthefabric,increasetheright
needlethreadtension.
4.
Iftheupperlooperthread(c)islooseand
pulledovertotheundersideof
thefabric,increasetheupperlooper
tensionand/ordecreasethelower
loopertension.
5.Ifthelowerlooperthread(d)isloose
andpulledupontothetopsideof
thefabric,increasethelowerlooper
tensionand/ordecreasetheupper
loopertension.
N.B.
Ifthethreadtensionsaretootight,the
fabricwillpucker.

Stitch
Length
Mostoverlooksewingprojectscanbe
donewiththestitchlengthsetat2 to3.
However,youcaneasilychangethestitch
lengthbyshiftingthestitchlengthslide
(a)
between0.5and4,asdesired.
®
Differential
Feed
(Models624& 614)
1.
Yourmachineisequippedwithtwo
feeddogs(a)and(b),eachofwhich
movesindependently.However,when
thedifferentialfeedcontrolslide(c)
issetat1.0,bothfeeddogsmove
togethertothesamelength.
Bypushingthedifferentialfeedslide
(c)
downtoa highernumber,thefront
feeddog(a)movesthefabricfaster,
asshown.Thishelpstopreventknitted
orstretchfabricsfrompuckeringand
wavingduringsewing.
0
3.Bypushingthedifferentialfeedslide
(c)
uptoa lowernumber,thefrontfeed
dog(a)movesthefabricmoreslowly,
asshown.Thishelpstopreventsheer
andlightweightfabricsfrompuckering.
Alwaystestsewona scrapofyourfabric
beforestartinggarmentorcraftconstruc-
tions.
N.B.
Adjustmentstothedifferentialfeedcan
bemadewhilesewing.

Cutting
Width
(Models624& 614)
Thecuttingbladesarepre-setatthe
factorysothatmostoverlooksewing
projectscanbedonewithoutchanging
theirposition.Forveryspecialfabric
types,
however,youmightattimes,want
toadjustthecuttingwidth.
1.
Tochangethecuttingwidth,bringthe
needlebartothehighestposition.
2.
Turnthecuttingwidthdialupwards
toincreasethewidth,ordownwardsto
decreaseit.
3.Sewa scrapofthefabrictocheckthe
sewingresult,referringtotheillust-
rations.
f /
®
i
(a)
Correct
(b)
Thecuttingwidthisnarrowerthan
thestitchwidth.Turnthedialupwards
toincreasethecuttingwidth.
(c)
Thecuttingwidthiswiderthanthe
stitchwidth.Inthiscase,thefabric
mightberolledortheneedlethread
tensionmiqhtbecomeloose.Turnthe
dialdownwardstodecreasethecutt-
ingwidth.
©
A
Foot
Pressure
Withtheguideline(a)ofthepressure
controlknobevenwiththetopcover
surface(b),thefootpressureissuitable
formostkindsoffabricsandrarely
needsadjusting.Forspecialfabrictypes,
however,youmightattimeswantto
adjustthepressureslightly.
1.
Forveryslipperyfabrics,tightenthe
knobclockwiseslightlytoincrease
thepressure.
2.
Forverystretchablefabrics,loosen
itcounter-clockwisetodecreasethe
pressure.
Withthelowerguideline(c)ofthe
pressureknobathigherlevelthanthe
topcoversurface,lowerpressurefor
verystretchablefabricsisavailable.
Disengaging/Re-engaging
the
Moving
Blade
Bydisengagingthemovingblade,you
canenjoyvarioussewingtechniques.
1.
Todisengagethemovingblade,first
openthefrontdoor.
2.
Pushthemovingbladereleaselever
(a)
totherightandthemovingblade
willstopat(b)position.
3.Turnittowardsyoubyhand.
4.
Tore-engagethemovingblade,push
themovingbladereleaselevertothe
rightandturnittowardstheback,
thenreleasethelever.

UTILITY
STITCHES
3-Thread/4-ThreadOverlook
-Usingtheleftneedle,a 3-threadover-
lock7.0mmwidecanbesewn.
-Usingbothneedles,a 4-threadover-
lock7.0mmwidecanbesewn.
-Usingtherightneedle,a 3-threadover-
lock3.7mmwidecanbesewn.
N.B.
Wheneversewingwith3-thread,remove
theneedleandtightentheneedleclamp
screwyouarenotusing.
3-ThreadRolled/NarrowHem
Bydisengagingtheinstantrolled/narrow
hemdevice,yourmachineisreadytosew
arolledornarrowhemonlightweight
andsheerfabrics.
Thetensionsettingsfortherolledor
narrowhemareslightlydifferentfrom
thoseoftheregular3-threadoverlock.
Refertothefollowingillustrations.
(A)Rolledhem(Rightneedleonly)
Decreasetheupperlooperthread
ten-
sionslightlyandincreasethelower
threadtensionasrequiredsothatthe
upperlooperthread(a)iscompletely
rolleddowntotheundersideofthe
fabric.
(B)
Narrowhem(Rightneedleonly)
Increasebothlooperthreadtensions
slightlysothatthelooperthreadsare
firmlylockedtogetherontheedgeof
thefabric.
Sewona scrapoffabricandadjust
thetensionsaccordingtotheillustration,
dependingonthedesiredfinish.Itis
recommendedtousestretchthreads,
suchaswoollynylonintheupperlooper
orbothloopers.
N.B.
Ifthefabrictendstopucker,guideit
bygentlypullingittothebackwithyour
lefthand,andatthesametimelightly
holdingitwithyourrighthand,forgood
stitchingresults.

DecorativeTopstitching
/Flatlock
(Leftneedleonly)
Fortopstitchingwith3 threads,adjust
thethreadtensionssothatthelowerlooper
threadliesstraightattheedgeofthefabric
bygreatlylooseningtheneedlethread
tensionandslightlylooseningtheupper
looperthreadtension.
1.Disengagethemovingblade
(seepage11).
2.
Foldthefabricalongthelinetobe
topstitchedandsewoverthefolded
edge.
3.Unfoldthefabric,pulltheendsofthe
threadtotheundersideandpressflat.
Thefinalappearancecanbeenhanced
byusinga heavydecorativethread
suitableforoverlookuseinthelooper(s).
Byusingthe2-threadconvertoronthe
upperlooper,2-threadflatlockwillbe
available(Model624).
Sewing
Edge-to-Edge
Aligntheedgesofthetwopiecesoffabric,
withtheirwrongsidesfacingeachother,
andproceedina similarmannerasabove.
Unfoldandpress.Byusingdifferentco-
louredfabricsandthreads,anattractive
"patchwork"effectcanbeachieved.
Pin-Tucks
Disengagethemovingblade(seepage11)
Foldthefabricalongthelinetobepin-
tucked,
sewalongthefoldededgeand
press.
2-Thread
Overcast
(Model
624)
Withthe2-threadconvertor(a)and
usinga singleneedle,yourmachinecan
sewa 2-threadovercastwhichisoften
usedforovercastinga singlelayerof
fabricfordecorativetopstitching(flatlock),
etc.
1.Removetheneedleyouarenotusing
(thesameasfor3-threaduse)and
theupperthreadfromthemachine.
2.
Tofitthe2-threadconvertoronto
theupperlooper(b),firstinsertthe
tipoftheconvertorintotheupper
loopereyefromtheback,thensnap
theotherendsecurelyintothehole
(c)
oftheupperlooper.
Thetensionsettingsforthe2-thread
overcastaredifferentfromthoseof3-
threaduse.Pre-settheneedleandlower
looperthreadtensioncontrolsat0.5and
6.0,respectively.

3.A balancedtension
(d)
Theneedlethreadliesflatandstraight,
totheleft,andlockswiththelower
looperthreadonthetopsideofthe
fabricandasa flatV-shapeonthe
underside.
(e)
Thelowerlooperthreadliesflatonthe
topsideofthefabricandlocksonthe
edgewiththeneedlethread.
Tohavetheneedlethread(d)pulled
upoverthefabricedgetothetop
sideofthefabric,increasetheneedle
threadtensionand/orthelowerthread
tension.
5.Tohavethelowerlooperthread(e)
pulleddownoverthefabricedgeto
theundersideofthefabric,increase
thelowerloopertensionand/ordecrease
theneedlethreadtension.
2-ThreadRolledHem
(Model
624)
Withthe2-threadconvenorandusing
therightneedle,yourmachinecansew
a2-threadrolledhem.Tightentheneedle
tensionsothatthelowerlooperthread
iscompletelyrolleddowntotheunderside
ofthefabric.

OTHER
SEWING
APPLICATIONS
TurningOutside
Corners
without
Cuttingthe
Threads
1.Whenyoureachtheendofthefabric,
stopstitchingwiththeneedleabove
thefabric.Raisethepresserfoot.Gently
pullthechainofthreadoutfromthe
needleplate,leaving2 or3 loopsof
threadonthestitchfinger.Turnthe
fabric,lowerthepresserfootandcom-
mencestitchinginthenewdirection.
2.
Whenoverlockingandtrimmingatthe
sametime,cutthefabricbyhand
alongthenewstitchinglineforabout
3cm,beforeturningthefabric.Itis
preferabletomakea smallcuttomark
thesecondstitchline,beforestarting
tosew.
OverlookingInside
Corners
1.
Whenoverlockinganinsidecorneron
apocket,etc.,clipabout3 to.4mm
intothecorner.
2.
Foldthefabricinto,a straightedge,
asshown,andsewalongtheedge,
trimmingverylittle,ifnecessary.
3.Openandpressthefabric.

TurningCurved
Edges
1.
Forinsidecurves,guidethefabric
gently,applyingpressurewithyour
lefthandatpoint"A"inthedirection
ofthearrow,andatthesametime
applyinga littlepressureintheop-
positedirectionwithyourrighthand
atpoint"B".
2.
Foroutsidecurves,sewina similar
manner,butapplyingthepressurein
theoppositedirections.
r
Removing
Stitches
from
Sewn
Fabric
1.
Sniptheneedlethread(s)atintervals.
Thengentlypullthelooperthread; the
stitchingwillunravelandbeeasyto
remove.
Sewing
Extra
Heavy
Fabrics
Beforesewingextraheavyfabrics,itis
advisabletolockthemovingblade.
Removethesewingfoot(seepage5).
Loosenthescrews(a)withthescrew-
driver(b)sothattheneedleplatecan
betakenoff.
Tightenthescrew(c)withtheAllen
screwdriver(d)tolockthemovingblade.
Refittheneedleplateandthesewing
foot.
Aftersewingextraheavyfabrics,always
loosenthisscrewslightly,tounlockthe
bladefornormalsewing.

NOTES
A

STITCH
SELECTION
CHART
•
Thethreadtensionvalues,stitchlength,needleposition(s)
anddifferentialfeedarebasicsettingsandmustbe
adjustedorcorrecteddependingonthefabricandthe
threads.
Stitches
©© © ©
BlueRedYellowGreen
©Rightneedlethread
tensionvalues
©Leftneedlethread
tensionvalues
Needleposition(s)
L= Left
R= Right
4THREAD
©Upperlooperthread
tensionvalues
@Lowerlooperthread
tensionvalues
Stitchlength
Differentialfeed
Positionof
movingblade
Positionof
instantrolled/narrowhemdevice
STRETCHKNIT3 THREAD3 THREADWIDE
This manual suits for next models
2
Table of contents
Other ELNA Sewing Machine manuals