Elnur Gabarron TPG-IR User manual

Exit
pProgram
selection
Absence mode
Transmission
Compulsory
mode
+ Adjustment +
-Adjustment -
OK Validation
Comfort
mode
Economy mode
Frost protection
mode
The remote control allows setting temperature values
and operation schedules in order to configure the
heaters through infrareds.
The main functions are:
-Hourly programming (weekly
programming)
-Setting temperature values in the
premises
-Temporal suspension of automatic
programming
Various preset programs in the IR remote control are
to be transmitted through IR to every heater available
in the premises.
Contents:
-Remote control unit
-Remote control holder
-Battery set
1
INTRODUCTION
2
STARTING
Screen
Keys
select/validate
Main keys
Baseboard
Validation keys:
Open the battery lid located at the back part of the
remote control.
1. Remove the battery lid.
2. Remove the battery protection film.
The remote control must turn on.
3. Install back the battery lid.
Picture: remove the battery protection film.
The batteries discharge is indicated on the LCD
displayby the specific sign:
The backlit of the display is off once the remote
control batteries are discharged.
There is one minute time lapse to replace the
batteries before losing time and program settings.
The remote control unit has:
-4 main keys (wide keys)
-AUTO: key AUTO
-PROG: programming key
-Time settings key
-Temperature setting key
-Other 4 keys, select validation, its function
corresponds to the picture indicated at the
Bottom of the display.
3
PROGRAMMING
Main keys are priority keys over validation keys.
MANDO A DISTANCIA INFRARROJO
TPG-IR

4
TIME SETTINGS
-Press the watch key , the days 1 to 7 will start
blinking.
-Choose the corresponding number of the day of the
week: 1 for Monday, 2 for Tuesday, etc.
-Validate pressing OK.
The screen will pass to the hour selection.
The hour digits will blink (left side).
-Program the actual hour pressing the keys +or –
-Validate pressing OK
The screen will pass to selection of minutes.
The digits of minutes will blink (right side).
-Program the actual minutes pressing the keys +or –
-Validate pressing OK
The remote control is waiting the transmission to the
receivers. Direct the remote control unit at the receiver
(the heater) and press the key , the transmission will
start (processing ----)
5
TEMPERATURE SETTINGS
The default temperature settings are:
-Comfort -19°C, Economy -16°C and Frost Protection -7
°C (not programmable)
-Adjust with +or –by 0,5°C steps.
Comfort temperature adjustment (5°C to 30°C).
-Press the Temperature Key on the remote control,
first Comfort temperature will be offered.
-Increase pressing +or decrease pressing -.
-Validate, pressing OK.
Economy temperature adjustment (5°C to 30°C).
-The remote control will switch to the Economy
temperature.
-Increase pressing +or decrease pressing -.
-Validate pressing OK.
The remote control will wait for the transmission to the
receivers. Direct the remote control unit at the receiver (the
heater) and press the key , the transmission will start
(processing ----)
Frost Protection temperature (7°C).
-The remote control will switch to the Frost
Protection Temperature with the value 7°C.
-Validate, pressing OK.
6
PROGRAMS
Factory set programs P1 to P3:
Monday-Friday Weekend
Programs P1 to P3 are not to be modified, they
are factory set.
The remote control has:
-3 preset programs, P1, P2, P3 and
-3 programs to be set by the user P4, P5, P6
In order to modify a program (P4 to P6):
-Press the keys Comfort /Economy /Frost
Protection to select the mode.
-The cursor will move from one hour to another,
meanwhile the screen will show the reference hour.
Note: by default the non-programmed timeline is set to
Frost Protection.
-Validate with OK in order to pass to the next day
and repeat the steps up to the day 7 (Sunday).
In order to transmit
programs to the heater:
-Press the AUTO Key
Arriving at day 7 the remote control will offer the
next program.
Comfort
Economy
Frost Prot.
=
=
=
(empty)
The user should go to programs P4 to P6 in order to
create user-defined programs.
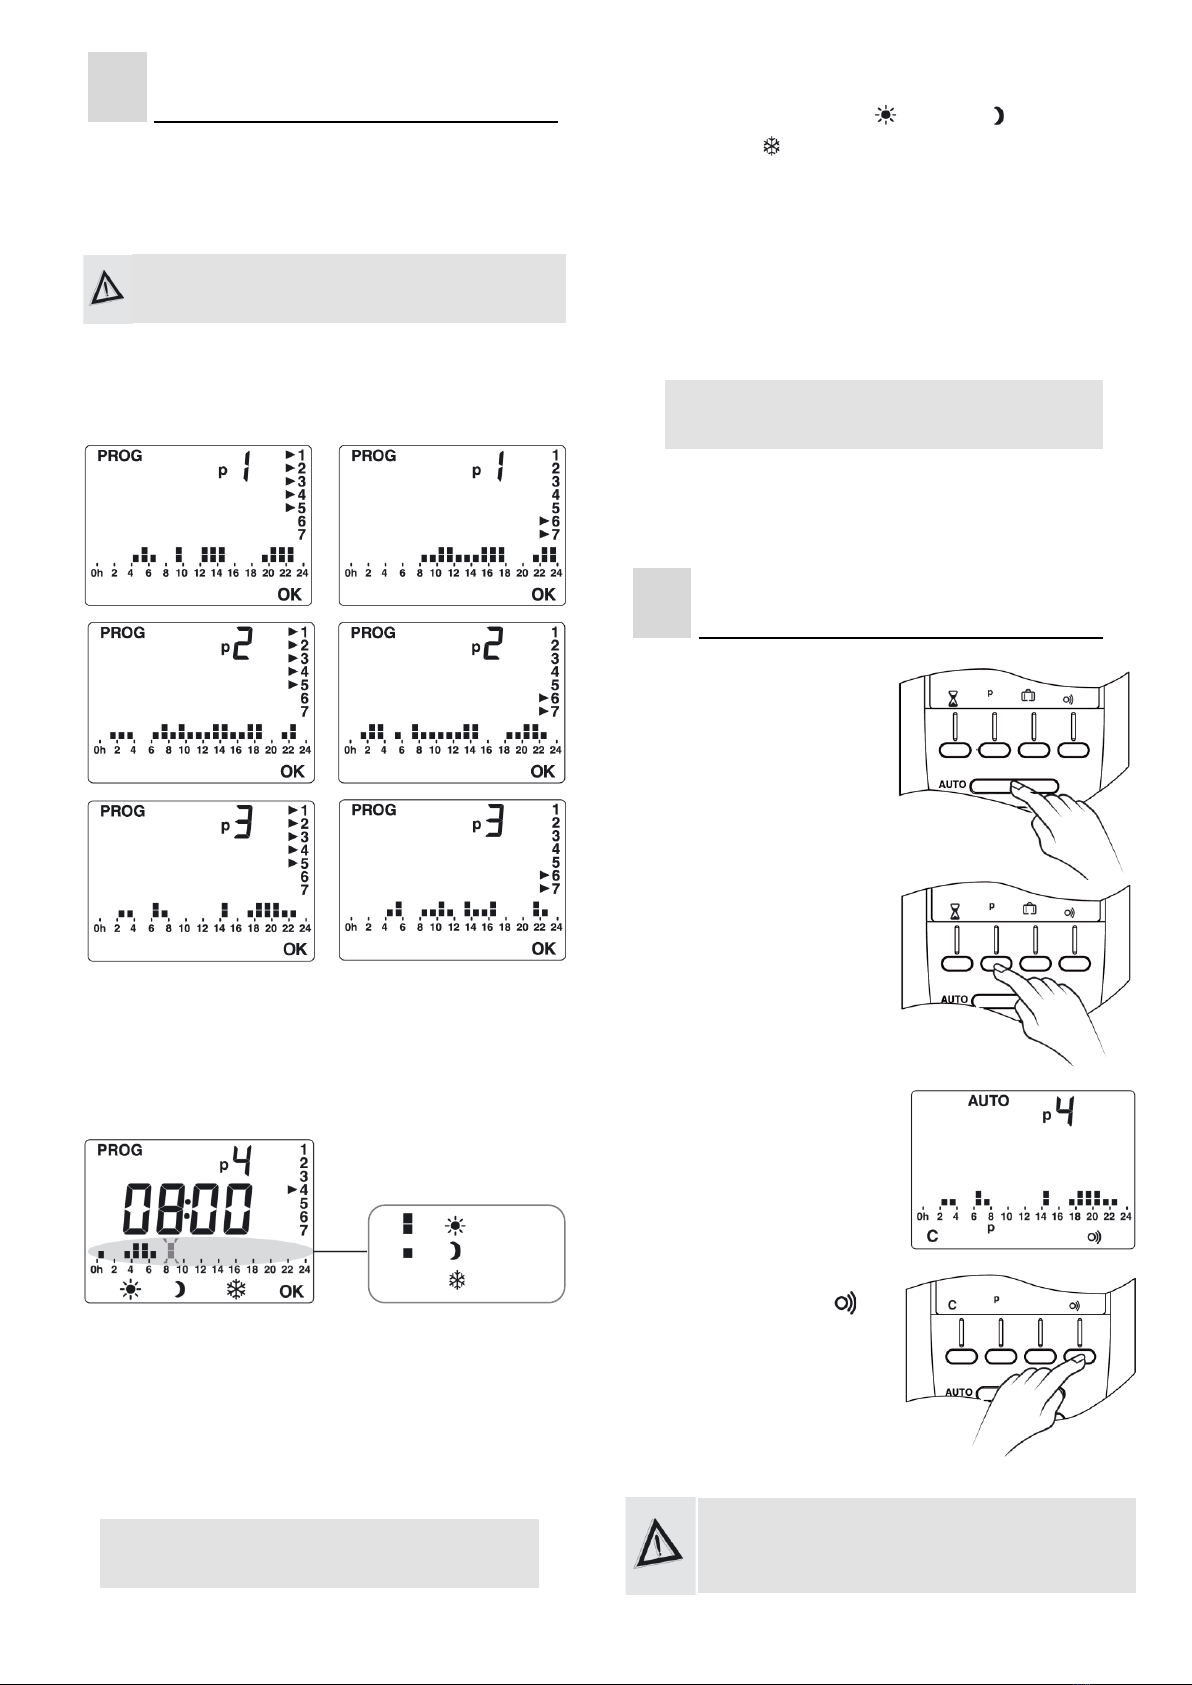
Example of programing:
-Press the key PROG.
-The remote control will offer the first preset
program (P1).
-Pressing OK for two times, follow with the next
program (P2).
Note: it is possible to reduce the programming
pressing the key AUTO.
The long pressing OK key will copy the current
day setting to the next day.
7
AUTO Mode
-Press the key P in order
to select the program to
be transmitted.
Example for P4
-Direct the remote
control unit towards the
receiver, press the
key. The transmission
will start (processing...).
-Wait for the approval of
the emitter by display
illumination.
In case if there had not been implemented no
programs from P4 to P6, all the values will be in
Frost Protection.

8
PROGRAM STANDBY
9
KEYBOARD LOCK
It is possible to temporarily interrupt the operation in
automatic mode applying one of two following
procedures:
Forced mode: allows imposing the desired
temperature value between 5 to 30°C during certain
time period among 30 minutes and 72 hours.
Standby (short periods)
-Press the key .
-Adjust the temperature
from 5 °C to 30 °C with
+or –(in 0,5 °C steps).
-Validate pressing OK.
-Direct the remote control towards the receiver,
press the key, the transmission will start
(processing ----).
-Wait for the approval of the emitter by display
illumination.
Standby (long periods)
-Press the key .
-Adjust the number of
the days from 1 to 365
with +or –(1 day
steps).
-Validate pressing OK.
Absence mode: allows establishing the frost
protection function during the absence period
between 1 and 365 days.
When the time of any of these procedures is over, the
emitters will continue with the program selected
previously.
In order to revoke any of these procedures:
Press the key to set AUTO mode.
In order to lock the remote control unit keyboard:
-Press simultaneously during 3 seconds, the 2
central validation keys until the “bloc” message
will be displayed.
Note: in time of lock, pressing a key a “bloc”
message will be displayed.
To unlock: the same thing is made,
-Press simultaneously during 3 seconds the 2
central validation keys.
10
TECHNICAL FEATURES
-Optical range: 3 meters directly.
-Power supply: 2 alkaline batteries R03 type.
-Autonomy: two years of regular service.
-Dimensions: 145 x 61 x 18 mm.
-Operation temperature +5C/+55C
-IP 3
-Box: ABS-PC
-Weight (with batteries): 150 g.
Note: the used batteries must be properly disposed
in the specific containers for batteries recycling.
Declares that the product is in compliance with the requirements of the EC directives: CEE 89/336 (electromagnetic
compatibility and CEE 73/23 modified CEE 93/68 (Electric Security).
As a part of the policy of continuous product improvement Elnur S.A reserves the right to alter specifications without notice.
www.elnur.es
ELNUR s.a.
Pol. Ind. “El Nogal” c/ Villa Esther, 11
28110, ALGETE –Madrid - Spain


