ELSPRO N8LED User manual

N8LED
NIGHTLED
ELSPRO LED Large Area Lighting
Operating Instructions

Contents
2
Contents
1General....................................................................3
1.1 Information about the Operating Manual..................3
1.2 Symbols in the Manual.............................................3
1.3 Liability .....................................................................4
1.4 Disposal....................................................................4
1.5 Manufacturer's Address............................................4
2Safety.......................................................................5
2.1 Proper Use...............................................................5
2.2 Personnel Qualifications...........................................5
2.3 Special Dangers to Children.....................................5
2.4 Dangers to People....................................................6
2.5 Electrical Current......................................................6
2.6 Fuse Protection Notices ...........................................7
2.7 Dangers to the Device..............................................7
2.8 In the Event of Danger..............................................7
2.9 In Case of Defect......................................................7
2.10 During Operation......................................................7
3Overview .................................................................8
4From Unpacking to Connection.......................... 10
4.1 Unpacking ..............................................................10
4.2 Setup......................................................................11
4.3 Connection.............................................................13
5Disassembly .........................................................15
6Chain Suspension / Upward Illumination........... 16
7Carrying Bag and Case........................................ 17
8Faults..................................................................... 19
8.1 All LED Modules do not illuminate..........................19
8.2 One LED Module does not illuminate.....................19
8.3 Replace LED Module..............................................19
8.4 Replace LED Driver................................................20
9Cleaning and Care................................................21
10 Inspections Before Every Use.............................22
11 Technical Data...................................................... 23

General
3
1 General
1.1 Information about the
Operating Manual This operating manual enables you to safely and
properly operate the LED – Lamp N8LED.
The N8LED consists of a sturdy aluminum con-
struction and various accessories.
(These various combinations are hereinafter
referred to as N8LED)
Carefully read through this operating manual
before using the N8LED for the first time. Take
good care of the operating manual.
Failure to comply with this operating manual can
lead to severe injury or damage to the N8LED.
1.2 Symbols in the Ma-
nual DANGER! Electrical Current!
Indicates dangerous situations resulting from
electrical current which can lead to death or se-
vere injury if they are not avoided.
WARNING!
Identifies possible dangerous situations which
can lead to death or severe injury if they are not
avoided.
CAUTION!
Identifies notices of dangers which could result
in damage to the N8LED.
NOTICE!
Highlights tips and other useful information.

General
4
1.3 Liability All specifications and instructions are given in
consideration of our previous experience and
findings, according to our best knowledge.
The manufacturer accepts no liability for
damages resulting from failure to comply with
instructions, improper use, unauthorized
modifications, technical changes or the use of
unapproved spare parts.
Technical changes in connection with the im-
provement of usage characteristics and further
development reserved.
1.4 Disposal When the end of use has been reached, particu-
larly when functional faults occur, make the obso-
lete N8LED unusable.
Dispose of the N8LED in accordance with the
environmental regulations applicable in your
country. Electrical waste may not be disposed of
together with household waste. Contact the
ELSPRO Elektrotechnik GmbH & Co. KG for
advisement regarding recycling.
1.5 Manufacturer's
Address ELSPRO Elektrotechnik GmbH & Co. KG
Kleinhülsen 47
D-40721 Hilden
Tel.: +49 (0)2103/9710-10
Fax: +49 (0)2103/9710-80
E-mail: info@elspro.de
Internet: www.elspro.com
Internet: www.n8led.com
Service Hotline:
Tel.: +49 (0)2103/9710-10
Fax: +49 (0)2103/9710-80
Internet: www.elspro.com

Overview
5
2 Safety
2.1 Proper Use
The N8LED can be used as interior and exterior
lighting. The N8LED is protected against:
• Penetration by granular foreign objects (e.g.
sand),
• Spraying water from all directions.
The N8LED is equipped with country-specific
connectors according to the version. Safe use is
only possible with the compatible power con-
nectors.
The N8LED is designed for industrial use.
The use of the N8LED in areas subject to ex-
plosion hazards is prohibited.
2.2 Personnel Qualificati-
ons
Only people who can be expected to be
sufficiently qualified and to reliably perform
their work are allowed as operating person-
nel:
Electrical specialists
Trained personnel
Persons whose responsiveness is influ-
enced, such as by drugs, alcohol or medi-
cation, are not allowed to operate the de-
vice.
Take note of the age and occupation-specific
regulations applicable at the site of use when
choosing personnel.
2.3 Special Dangers to
Children
Do not leave the N8LED open unsuper-
vised when children or persons who cannot
gauge the risks are in the vicinity.
Children or persons who cannot gauge the
risks may not use the N8LED. Close it up in
such a case.
Packaging materials may not be used as
toys. There is danger of suffocation.

Overview
6
2.4 Dangers to People
WARNING!
Before every use, ensure that all screw and
plug connections are tightly connected.
When using the lamp on a stand, secure
the stand by fastening with cables.
WARNING!
Ensure that no lines are crushed; there is
risk of a short-circuit.
Use no explosive or easily flammable mate-
rials in the vicinity of the N8LED. There is
risk of fire or explosion.
2.5 Electrical Current DANGER! Electrical Current!
The N8LED serves for lighting. There is a fun-
damental risk of electrical shock in this con-
text. Therefore, take special note of the follo-
wing in particular:
Never touch the plug with wet hands.
Always pull directly on the power plug in
order to remove it from the socket. Never
pull on the power cable, as it could break.
Never kink, clamp, drive over or bring the
power cable into contact with heat sources .
Only use extension cords which are de-
signed for the power consumption of the
power consumer.
The device is only protected against spray-
ing water. Never immerse it in water or oth-
er liquids. The water would soak into the
device immediately.

Overview
7
2.6 Fuse Protection Noti-
ces
The N8LED is equipped with a thermal
over-current protection switch. This discon-
nects the current as soon as the current
flow is too high.
DANGER! Electrical Current!
The thermal over-current protection switch
does not disconnect the current supply. Voltage
is still connected to the N8LED even after the
thermal over-current protection switch has
triggered.
Therefore:
Always remove the supply before making
changes to the N8LED otherwise, a dangerous
situation may occur.
2.7 Dangers to the Device The aluminum housing of the N8LED is
designed to be extremely sturdy. Neverthe-
less, hard impacts can lead to damage to
the aluminum housing, components and at-
tachments or to the supply line.
2.8 In the Event of Danger Immediately disconnect the supply line of
the N8LED from voltage in case of danger
or accidents.
2.9 In Case of Defect Never operate a defective N8LED. There is
risk of electrical shock.
NOTICE!
Use only original spare parts. Warranty and
any liability claims are void upon the use of
other spare parts.
2.10 During Operation WARNING!
Never leave the device unsupervised. This
prevents accidents!
Always leave the cover closed during op-
eration.
Overview
8
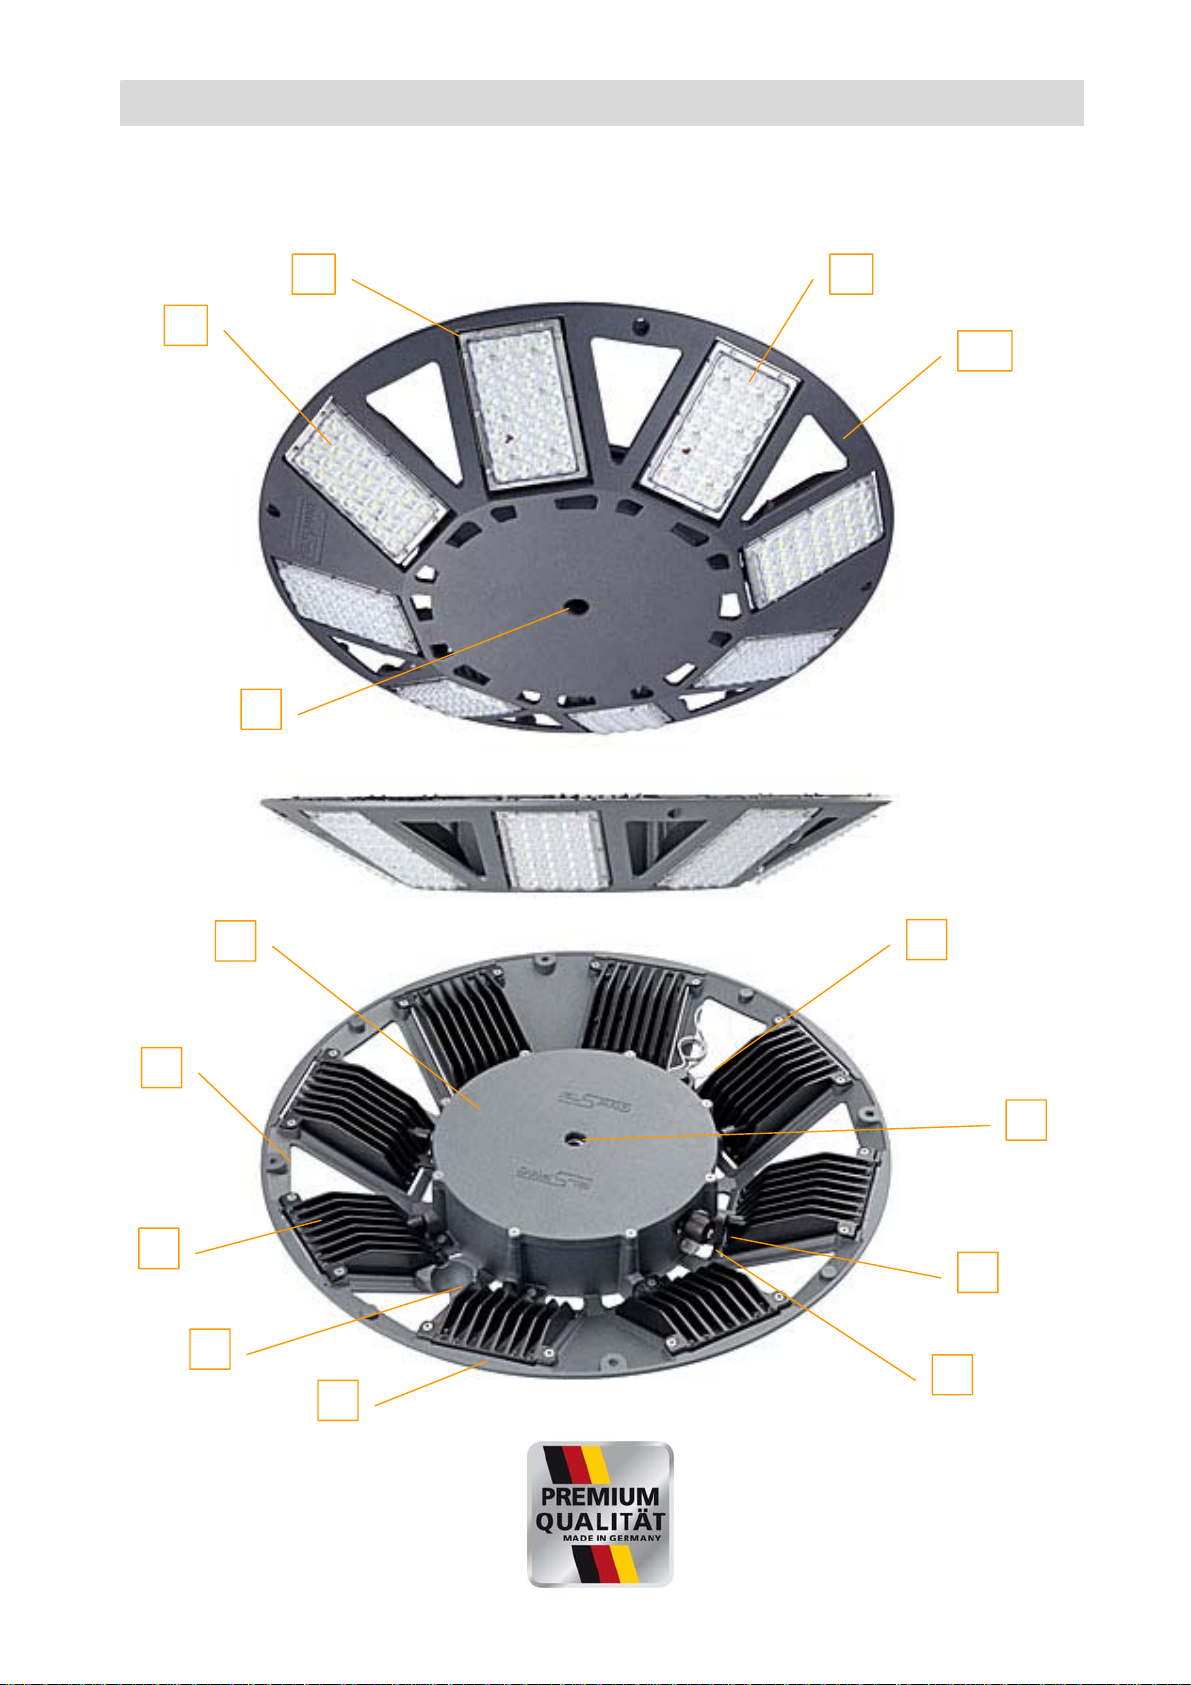
3 Overview
4
1
7
6
2
3
8
9
10 13
5
9
11 12

Overview
9
No. 1 Aluminum lamp housing
No. 2 Depression for receiving the line stopper
No. 3 Aluminum cooling element including LED module
No. 4 Eye hook receptacle
No. 5 Aluminium lamp cover
No. 6 Scraper ring lamp fastening and spring cotter pin
No. 7 230 V connector
No. 8 Thermal over-current protection switch
No. 9 Stand receptacle – adapter for DIN peg
No. 10 LED board
No. 11 Stainless steel frame
No. 12 Polycarbonate lens optic 120°
No. 13 Finger grips
Other color variants available:

From Unpacking to Connection
1
0
4 From Unpacking to Connection
4.1 Unpacking Unpack the N8LED and inspect the contents
for completeness.
Scope of supply:
1 N8LED
1 stand adapter for DIN peg
assembly
1 supply line with plug system
and stopper
1 bag (optional)
1 chain set (optional)
1 Operating manual
Dispose of packaging material which is no longer needed according to the
regulations applicable in your country.
If you should discover transport damage, immediately contact your dealer.
NOTICE!
Report any defect as soon as it is recognized. Damage compensation claims can
only be validated during the applicable complaint periods.

From Unpacking to Connection
11
4.2 Setup
Insert the stand adapter
for DIN peg into the lamp
receptacle until the ex-
pansion flanges expand
and lock. The adapter has
a flat side which must cor-
respond with the lamp re-
ceptacle so that the
adapter fits into the lamp.
The stand adapter can be
inserted from both sides,
so it is possible to cast
light downward or upward.
Remove the spring
cotter pin from its rest
position and insert it into
the opening of the stand
adapter. The spring cot-
ter pin prevents the ex-
pansion flanges of the
stand adapter from be-
ing unlocked and thus
doubly secures the lamp
to the adapter.
From Unpacking to Connection
1
2
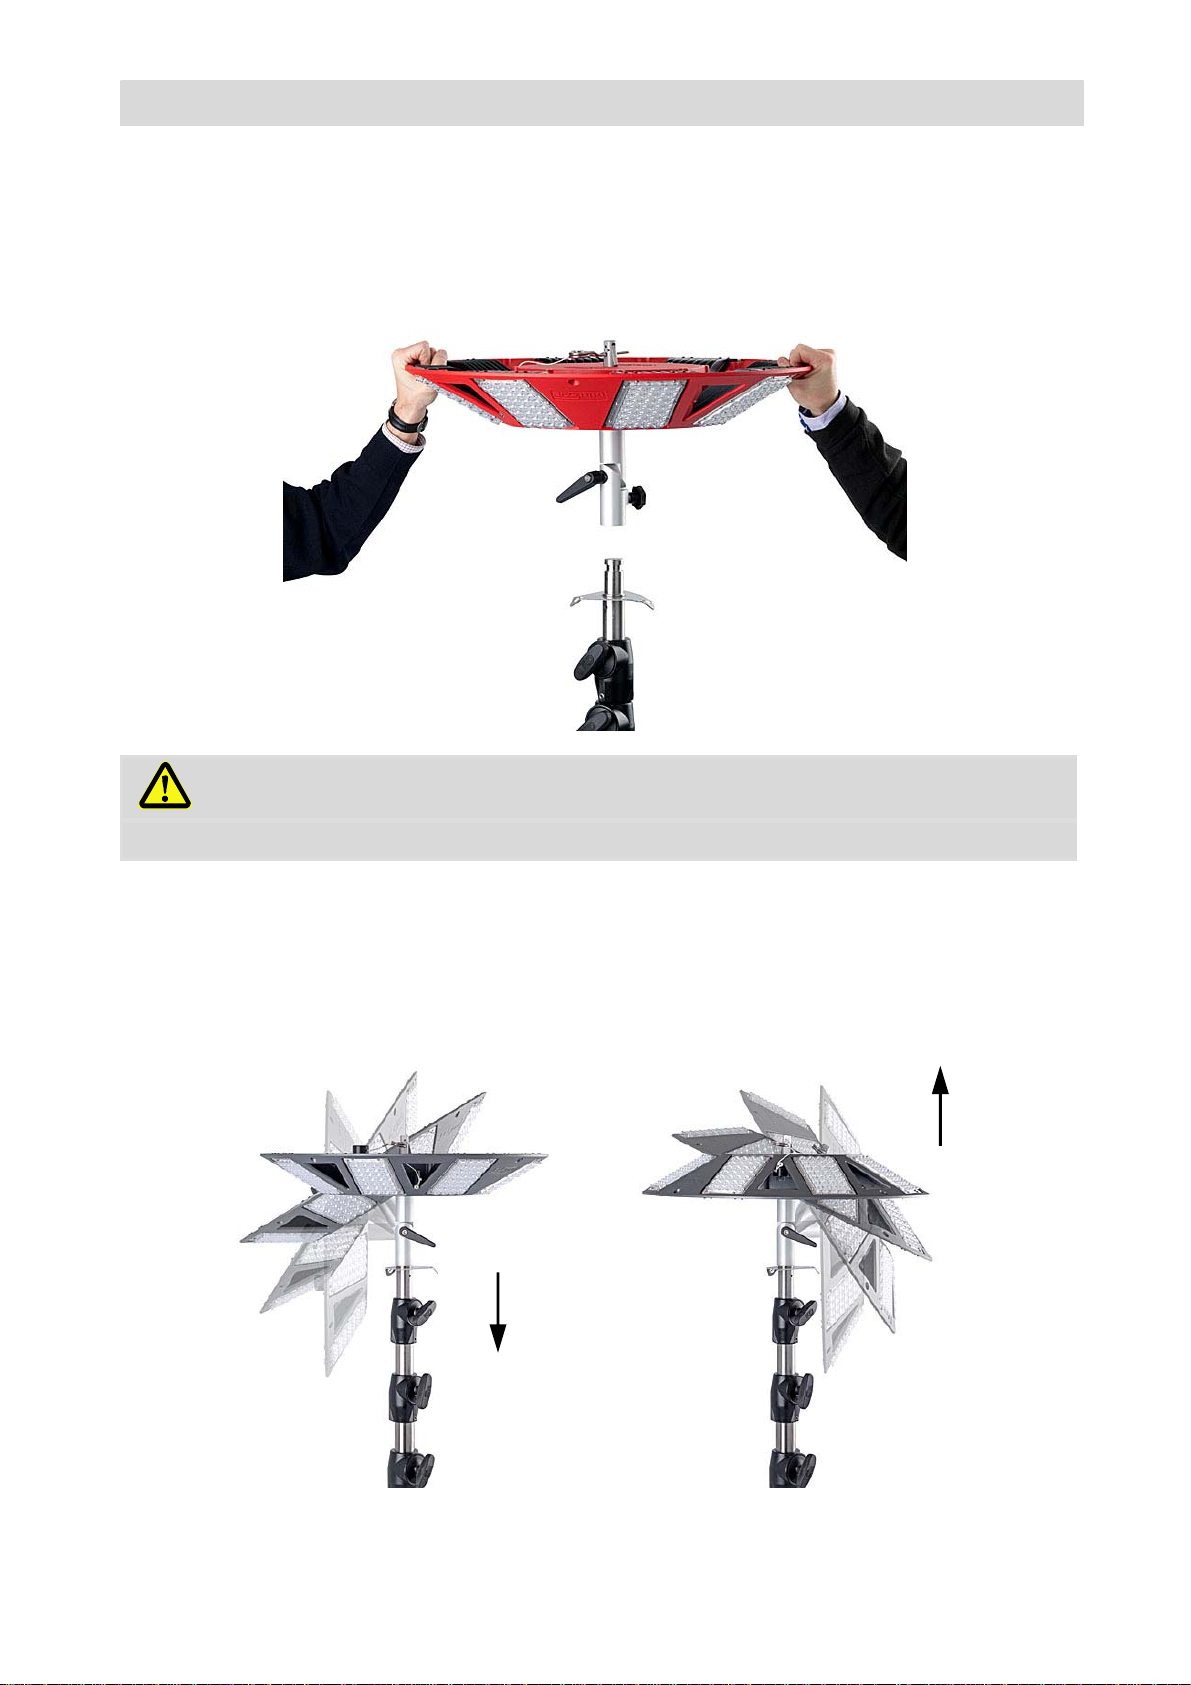
Then place the lamp on the DIN peg and secure with the star screw
WARNING!
Danger of tipping when aligning the N8LED in the case of uncontrolled handling!
Secure the lamp when adjusting the tilt joint by holding the shell with one hand.
The N8LED can be aligned in various positions via the tilt joint of the stand
adapter, both downward as well as upward. To do so, simply loosen the ad-
justable clamping levers and retighten in the desired position.
From Unpacking to Connection
1
3
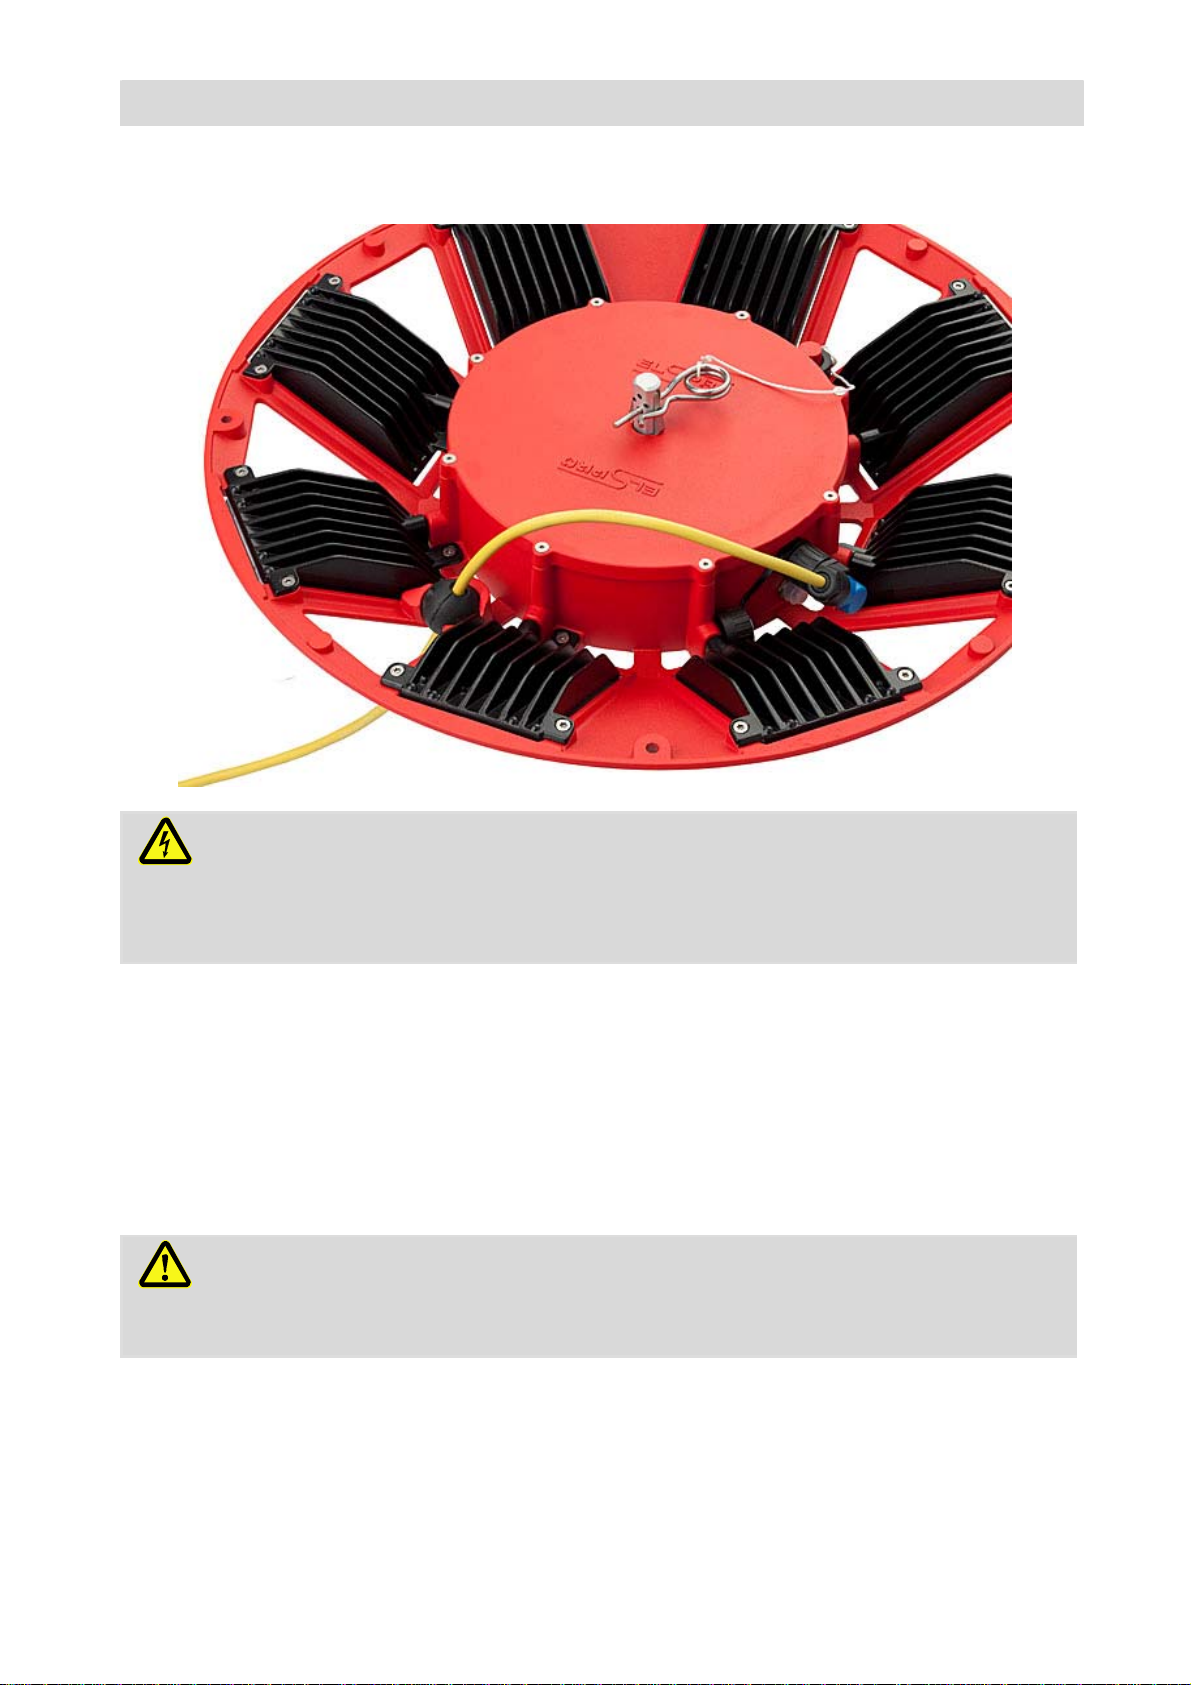
4.3 Connection
DANGER! Electrical Current!
The N8LED is operated by an alternating current. There is always risk of electrical
shock in this context. Therefore: Do not insert the power connector until the device
is properly plugged in!
Guide the supply line through the lamp opening in which the recess for the line
stopper is located.
Place the angle coupling of the supply line on the attachment plug of the lamp,
tighten the union nut and place the supply line stopper in the provided recess.
Plug the supply line plug into the supply socket.
Ensure that there is no dirt between the cooling fins, as this could destroy the
LEDs under certain circumstances. Regularly remove dirt and foliage.
WARNING! Tripping Risk!
Run the cables which lead to the N8LED so that no tripping hazards are created.
Cover the cable if necessary with a cable bridge.
If you use an extension cord, ensure that the connections do not lie in water
(e.g. in a puddle).

From Unpacking to Connection
14
Shown with stainless steel stand TW7840SA
WARNING!
The N8LED is equipped with modern, high-performance LEDs! The light of these
LEDs contains wavelengths, which can be dangerous to human eyes.
As a result: Never look directly into the LEDs from short distances!
According to DIN EN 62471, Photobiological Safety, the N8LED conforms to
the "Free Group" and is thus classified as harmless.

Disassembly
1
5
5 Disassembly
Pull the power plug from
the supply socket and
thereby disconnect the
N8LED from voltage.
Loosen the star screw of
the stand adapter and lift
the lamp from the DIN
peg.
Remove the spring cotter
pin from the stand adapt-
er.
Push the black ring over
the expansion flanges of
the stand adapter until it
contacts the cover.
Then pull the stand
adapter out of the N8LED.
Loosen the plug connec-
tion of the supply line on
the N8LED and remove
the supply line with the
stopper from the lamp.

Chain Suspension / Upward Illumination
1
6
6 Chain Suspension / Upward Illumination
The N8LED can be sus-
pended with the chain set,
article no. 828-600, from the
ceiling. To do so, the 4 ring
screws with self-securing
nuts are installed in the pro-
vided fastening holes.
Then mount the chains to the
ring screws with carabineer
hooks and gather the free
ends on a large carabineer
hook.
Then insert the chain to the
ceiling into the large carabi-
neer hook.
Latch two additional carabi-
neer hooks into one of the
four chains at a spacing of
one chain link, then set the
supply line stopper between
the two carabineer hooks by
guiding the line through the
carabineer hooks.
If the N8LED is aligned up-
ward, an eyelet is provided
on the housing for receiving
a carabineer which serves as
tension relief for the stopper.

Carrying Bag and Case
1
7
7 Carrying Bag and Case
The carrying bag serves to
store the N8LED and its sup-
ply line, accessories and op-
erating manual.
Lay the bag flat on a solid and
suitable surface with the text
up.
After opening the zipper, the
supply line and the operating
manual of the N8LED can be
removed.
Open the three Velcro clo-
sures on the intermediate
cover, under which, the
N8LED is located.
There is another bag with Velcro closure on the bottom under the N8LED in
which the accessories are stored (stand adapter, chain, etc.)

Carrying Bag and Case
1
8
Adjust the shoulder carrying strap to
your needs in order to be able to
safely and comfortably transport the
N8LED.
An additional carrying handle on the
edge of the bag makes handling the
bag easier.
Reinforcements incorporated into
the bag, protect your N8LED from
impacts
The aluminum frame case serves to
store the N8LED and its supply line,
accessories and operating manual.
This classical and sturdy aluminum
frame case is ideal for heavy duty
demands – including exterior use. It
provides you with great practical
benefits in mobile use.

Faults
19
8 Faults
8.1 All LED Modules do not
illuminate
Inspect whether the power cable of the
device is correctly inserted and whether
the supply socket is providing current.
Inspect whether the thermal over-current
protection switch has triggered. Attempt to
reactivate the protection switch.
If you cannot resolve the error, contact
repair services.
8.2 One LED Module does
not illuminate
Remove the cover of the N8LED by loos-
ening 8 cover screws with a Torx wrench,
size 25.
Inspect the fuse on the related LED driver
board; replace the fuse if necessary.
If you cannot resolve the error, contact
repair services.
8.3 Replace LED Module Remove the cover of the N8LED by loos-
ening the 8 cover screws with a Torx
wrench, size 25.
Loosen the two wires of the LED module
with a compatible screwdriver.
Loosen the three fastening screws of the
LED module with a Torx wrench, size 25.
Next, pull the complete module forward at
an angle and remove it.
Insert the new module and carry out the
previous steps in reverse.
Connect the red wire to the LED + contact
and the black wire to the LED - contact.

Faults
2
0
8.4 Replace LED Driver Remove the N8LED cover by loosening
the 8 cover screws with a Torx wrench,
size 25.
Loosen the four wires of the LED module
with a compatible screwdriver.
Loosen the three fastening screws of the
LED driver with a Torx wrench, size XX,
and remove the LED driver board.
Insert the new LED driver board and carry
out the previous steps in reverse.
Connect the red wire of the LED module to
the LED + contact and the black wire to
the LED - contact.
Connect the two wires of the transformer
to the AC 42V contacts of the LED driver
board.
Table of contents
Popular Lighting Equipment manuals by other brands


Knightsbridge
Knightsbridge GDL2 Installation & maintenance manual

ML Accessories
ML Accessories 12DCIP40 Installation & maintenance manual

EXIT Toys
EXIT Toys Pool domes user manual

Green image
Green image GC-2811PWM-US user manual

Everylite
Everylite EZBeam Series install guide

Knightsbridge
Knightsbridge VFR7EM Installation & maintenance manual

ParTech
ParTech MIGRO 100 Instruction Manual and Data Sheet

dun-bri GROUP
dun-bri GROUP Raider R65 Series quick start guide

DHA
DHA Four-channel DC Controller DMX Instruction & maintenance manual

CyberData
CyberData Singlewire InformaCast Series Operation guide

Ecco
Ecco EW4009 Installation and operation instruction

THRIVE AGRITECH
THRIVE AGRITECH Boost installation guide