Elvaco CMa11L User manual

CMa11L User’s Manual English137
CMa11L
User's Manual
English

CMa11L User’s Manual English
CMa11L User’s Manual English
page | 2 (22)
Content
1DOCUMENT NOTES ....................................................................................................................................... 3
COPYRIGHT AND TRADEMARK .............................................................................................................................. 3
CONTACTS........................................................................................................................................................ 3
2IMPORTANT USAGE AND SAFETY INFORMATION.......................................................................................... 4
3USING THIS MANUAL .................................................................................................................................... 5
PURPOSE AND AUDIENCE..................................................................................................................................... 5
ONLINE RESOURCES............................................................................................................................................ 5
SYMBOLS ......................................................................................................................................................... 5
4INTRODUCTION ............................................................................................................................................. 6
APPLICATION DESCRIPTION .................................................................................................................................. 6
5GETTING STARTED......................................................................................................................................... 7
PURPOSE.......................................................................................................................................................... 7
PRODUCT SPECIFICATION..................................................................................................................................... 7
MOUNT THE DEVICE ........................................................................................................................................... 7
DEMOUNT THE DEVICE........................................................................................................................................ 8
CONNECT THE DEVICE TO LORAWAN NETWORK...................................................................................................... 8
5.5.1 Product configuration ........................................................................................................................... 8
5.5.2 Network preparation ............................................................................................................................ 9
5.5.3 Activation and LED indications.............................................................................................................. 9
5.5.4 Deactivate/reboot sensor ................................................................................................................... 10
6ADMINSTRATION REFERENCE ......................................................................................................................11
PURPOSE........................................................................................................................................................ 11
SECURITY AND ACCESS CONTROL ......................................................................................................................... 11
CONFIGURATION OPTIONS ................................................................................................................................. 11
ADAPTIVE DATA RATE (ADR) ............................................................................................................................. 12
TRANSMIT INTERVAL......................................................................................................................................... 12
6.5.1 EcoMode ............................................................................................................................................. 12
6.5.2 Manual transmit interval .................................................................................................................... 13
6.5.3 MaxDTx............................................................................................................................................... 13
SDC DATA...................................................................................................................................................... 14
MESSAGE FORMATS ......................................................................................................................................... 14
6.7.1 Standard ............................................................................................................................................. 14
6.7.2 Compact.............................................................................................................................................. 15
6.7.3 JSON .................................................................................................................................................... 15
DOWNLINK..................................................................................................................................................... 16
7TROUBLESHOOTING .....................................................................................................................................17
NO TELEGRAMS ARE RECEIVED FROM THE SENSOR .................................................................................................. 17
TEMPERATURE VALUE IS INACCURATE................................................................................................................... 17
8TECHNICAL SPECIFICATIONS .........................................................................................................................18
9TYPE APPROVALS .........................................................................................................................................20
10 DOCUMENT HISTORY ...............................................................................................................................21
VERSIONS....................................................................................................................................................... 21
11 REFERENCES .............................................................................................................................................22
TERMS AND ABBREVIATIONS .............................................................................................................................. 22
NUMBER REPRESENTATION ................................................................................................................................ 22

CMa11L User’s Manual English
CMa11L User’s Manual English
page | 3 (22)
1 Document notes
All information in this manual, including product data, diagrams, charts, etc. represents information on
products at the time of publication, and is subject to change without prior notice due to product
improvements or other reasons. It is therefore recommended that customers contact Elvaco AB for the
latest product information before purchasing a CMa11L product.
The documentation and product are provided on an “as is” basis only and may contain deficiencies or
inadequacies. Elvaco AB takes no responsibility for damages, liabilities or other losses by using this
product.
Copyright and Trademark
© 2019, Elvaco AB. All rights reserved. No part of the contents of this manual may be transmitted or
reproduced in any form by any means without the written permission of Elvaco AB. Printed in Sweden.
CMa11L is a trademark of Elvaco AB, Sweden.
Contacts
Elvaco AB
Kabelgatan 2T
434 37 Kungsbacka
SWEDEN
Phone: +46 300 30250
E-Mail: [email protected]om
Elvaco AB Technical Support
Phone: +46 300 434300
E-Mail: support@elvaco.se
Online: http://www.elvaco.com

CMa11L User’s Manual English
CMa11L User’s Manual English
page | 4 (22)
2 Important usage and safety information
The following safety precautions must be observed during all phases of the operation, usage, service or
repair of any CMa11L product. Users of the product are advised to convey the following safety
information to users and operating personnel and to incorporate these guidelines into all manuals
supplied with the product. Failure to comply with these precautions violates safety standards of design,
manufacture and intended use of the product. Elvaco AB assumes no liability for customer’s failure to
comply with these precautions.
All instructions must be carefully read before CMa11L is installed and used. They contain important
information about how the product is used properly.
The installation of CMa11L should not be started before the technical specifications are fully understood.
The work must be performed in the order listed in this manual, and only by qualified personnel. The work
must also be done in accordance with national electrical specifications and applicable local regulations.
In order to avoid the product being damaged by static electricity, an ESD wristband should be worn when
handling the product.
The labelling of the product must not be changed, removed or made unrecognizable.

CMa11L User’s Manual English
CMa11L User’s Manual English
page | 5 (22)
3 Using this manual
Purpose and audience
This manual covers information needed to mount, configure and use the CMa11L indoor temperature and
humidity sensor for LoRaWAN. It mainly targets installers and system integators.
Online resources
To download the latest version of this user’s manual, please visit the Elvaco website at
https://www.elvaco.se/en/.
Symbols
The following symbols are used throughout the manual to emphasize important information and useful
tips:
The Note symbol is used to mark information that is important to take into consideration for
safety reasons or to assure correct operation of the sensor.
The Tip symbol is used to mark information intended to help you get the most out of your
product. It can for example be used to highlight a possible customization option related to the
current section.
CMa11L User’s Manual English
CMa11L User’s Manual English
page | 6 (22)
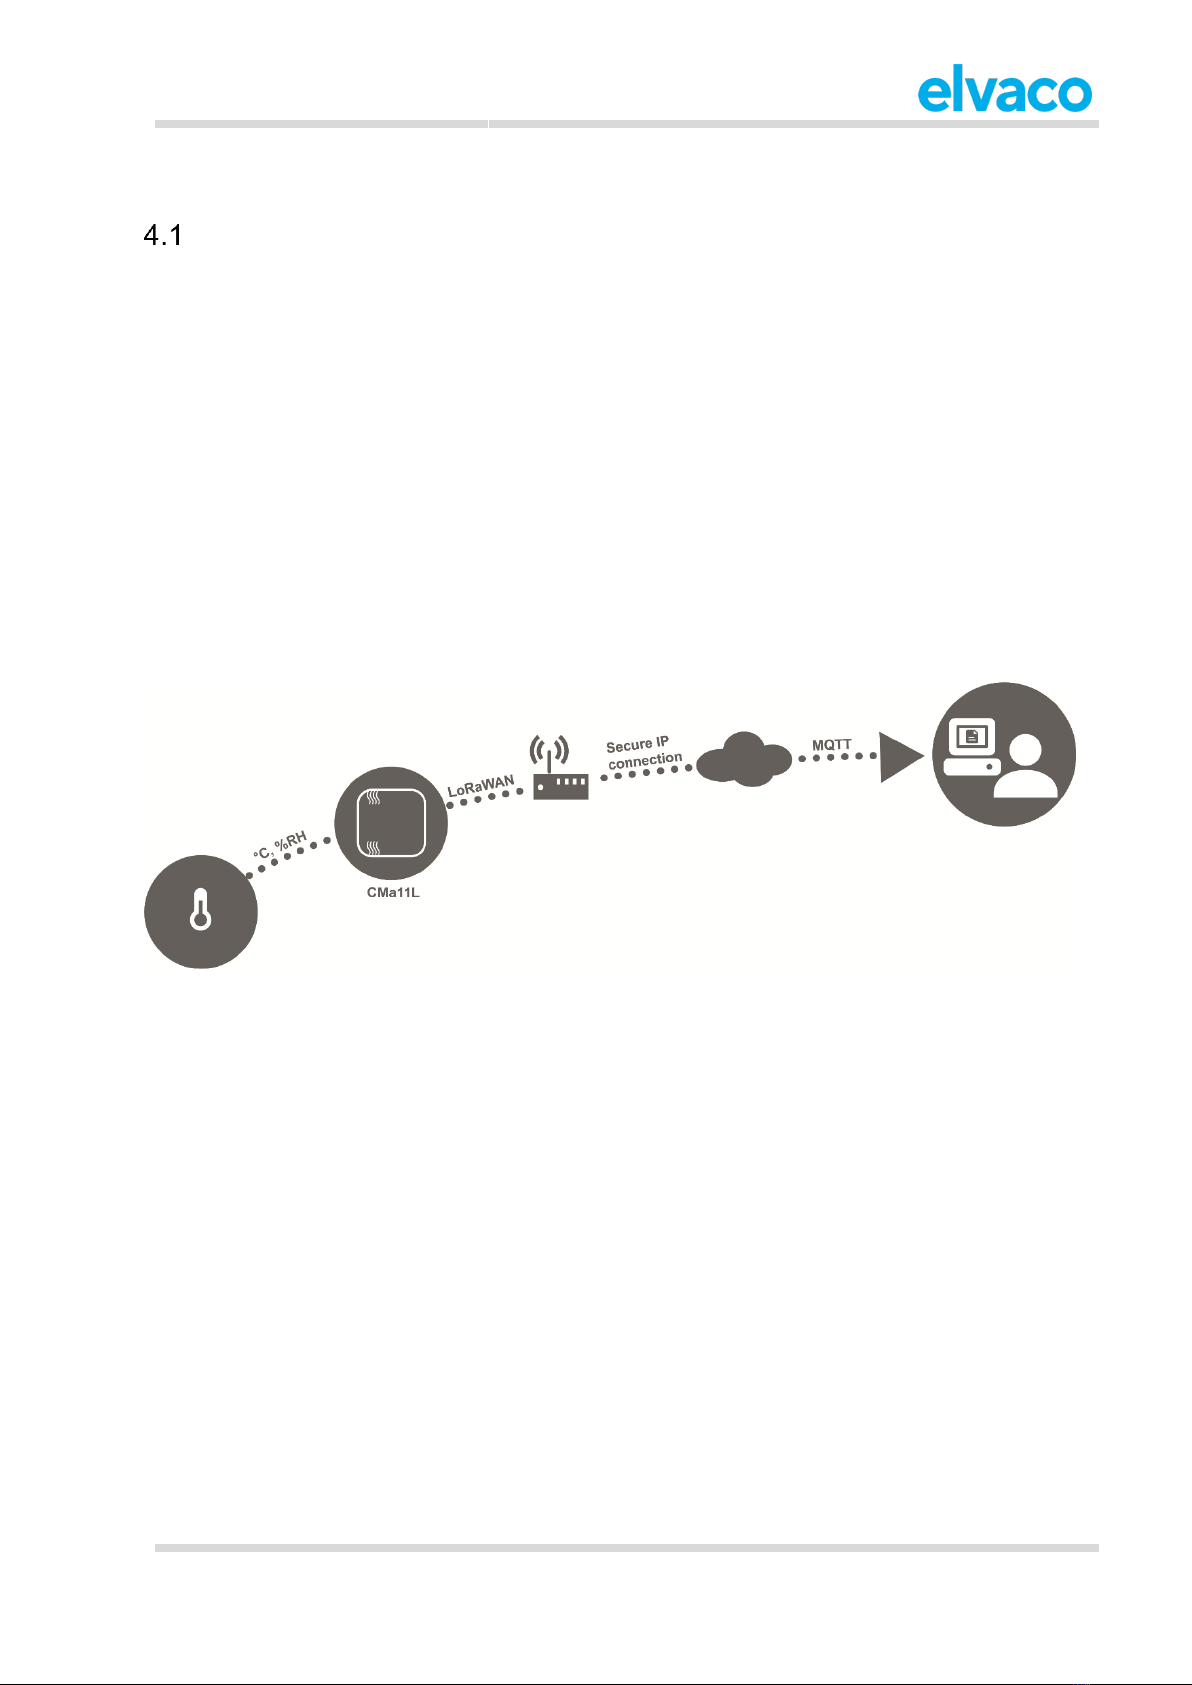
4 Introduction
Application description
Long range and extensive battery-life with LoRaWAN
CMa11L is a temperature and humidity sensor for high-accuracy measuring in indoor environments. The
sensor uses LoRaWAN, a low-power wide-area network (LPWAN) communication technique, to offer a
combination of long range and high energy-efficiency; by using EcoMode, the sensor achieves a
guaranteed battery-life of at least 12 years.
All data that is delivered from end-point to receiving application is encrypted with double layers of 128-bit
encryption keys to maximize security.
A completely digitalized metering chain
CMa11L supports Elvaco One-Touch Commissioning for secure and flexible deployment of your devices.
Simply download the Elvaco OTC App to claim your sensor and all product-specific keys are
automatically transferred to your user account.
Via the Elvaco OTC App, configuration profiles are easily created and shared with other users to make
the configuration of the sensors simple and faultless.

CMa11L User’s Manual English
CMa11L User’s Manual English
page | 7 (22)
5 Getting started
Purpose
This chapter provides instructions on how to get started with CMa11L. After reading and carefully
following each step of this chapter, the sensor will be installed and operational.
Product specification
Mount the device
CMa11L is mounted on a wall by using the holes on its back cover.
Avoid mounting the sensor near supplementary heat sources, such as kitchen stoves or in
direct sunlight.
Make sure to mount the product at least 1.5 meters above the floor and at least 1 meter
from nearest radiator.
Do not mount the product on an external wall or near a door. If mounted over a conduit pipe,
make sure that the pipe is filled to prevent air flow.
1. NFC antenna
2. Green LED
3. Red LED
4. Product label
5. Push button

CMa11L User’s Manual English
CMa11L User’s Manual English
page | 8 (22)
Demount the device
To demount the sensor, carefully insert the end of a screwdriver in the upper part of one of the enclosure
bottom holes, as illustrated by
Figure 1.
Figure 1: Demounting CMa11L
Connect the device to LoRaWAN network
5.5.1 Product configuration
The sensor is normally configured via the Elvaco OTC App, which is downloaded via the following link:
https://otc.elvaco.se/app. For more information about the Elvaco OTC App, please refer to the separate
Elvaco OTC App User’s manual available at Elvaco’s website.
To scan/configure to the sensor, start by locating the NFC antenna on your phone. Thereafter place it
next to the center of CMa11L and hold it still until the phone vibrates.
The Elvaco OTC App is only available for Android phones with Android 5.0 or later.
Table 1 provides a summary of all configurable parameter in CMa11L.
Parameter
Description
Default value
Device
Configuration lock
Used to prevent unauthorized access to the sensor.
When enabled, the device-specific Product Access Key
(PAK) is required to configure the device. The PAK is
assigned to the Elvaco OTC user login as part of
background process when claiming the device.
Open
Power mode
Used to activate/deactivate the sensor. Upon activation,
the sensor will automatically attempt to join the
LoRaWAN network. At delivery, the power mode of the
sensor will be “off”, i.e. no messages will be transmitted.
Off
Maximum daily
transmissions
(MaxDTx)
The maximally allowed number of transmissions of the
device per day. This setting only applies when
EcoMode is inactive.
Off

CMa11L User’s Manual English
CMa11L User’s Manual English
page | 9 (22)
EcoMode
When activated, the transmit interval is adapted to the
current signal conditions on the LoRaWAN network in
order to achieve a guaranteed battery-life of at least 12
years.
On
Transmit interval
Sets how frequently the sensor transmits data (with a
minimum limit of 5 minutes). This setting only applies
when EcoMode is inactive.
-
Message format
Sets the format of the message that is transmitted from
the sensor. See section 6.7 for more detailed
information.
Standard
SDC mode
Activates/deactivates the SDC functionality in the
module.
Off
SDC data
By using this field, a 4-character ASCII message can be
sent from the end-user to the receiving application. See
section 6.6 for more information.
-
LoRaWAN
Activation type
Sets the way the product joins the LoRaWAN. When
using OTAA (Over-the-air activation), LoRaWAN keys
are automatically generated when the sensor joins the
network. In ABP (Activation by personalization) mode,
keys are manually added and stay static over time.
OTAA
Join EUI/App EUI
The ID of the application where data from the sensor will
end up.
0x 00 00 00 00 00 00
00 00
Device address
64-bit number used by the sensor to identify itself on the
LoRaWAN network. The device address only has to be
configured in ABP mode. When using OTAA mode, it will
be automatically generated when the sensor joins the
LoRaWAN network.
Device-specific
Table 1: Configurable parameters
5.5.2 Network preparation
In order for the CMa11L to connect to the LoRaWAN network, the network server needs to be prepared
with key and device information. More specifically, the device EUI, the application key and the Join EUI of
the sensor needs to be registered in the network server when using OTAA mode. (In ABP mode, the
following information needs to be added: Application Session key, Network Session key, Device
address.)
All keys are generated in production and provided to the device owner when the sensor is claimed (via
the OTC App or via batch claim). For security reasons, keys cannot be read from the device via NFC.
Elvaco strongly recommends using OTAA mode in order to facilitate deployment and
minimize the risk of duplicated keys.
5.5.3 Activation and LED indications
When the product information has been registered in the network server and the sensor has been
activated, it will automatically connect to the LoRaWAN network. There are two ways to activate the
sensor:
1. Press and hold the Push button (5) on the back of the product for at least 5 seconds until the
green LED lights up.
2. Start the Elvaco OTC app and scan the sensor by placing the back of your phone next to the
front of the sensor. Navigate to the Apply tab and set Power mode to “Active”. Click Apply and
place the device on top of the sensor in the same way as when the device was scanned.

CMa11L User’s Manual English
CMa11L User’s Manual English
page | 10 (22)
Make sure to locate the NFC antenna on your phone before scanning the sensor. It should
be placed as close as possible to the sensor’s NFC antenna (1) to facilitate scanning of the
device.
Network join
When activated, the sensor will attempt to join the LoRaWAN network. Activation is indicated by a short
flash of the green and the red LED. When CMa11L succeeds in joining the LoRaWAN network, the green
LED will light up for 8 seconds, as indicated by Figure 2.
In case of failing eight join attempts, the sensor will wait for 60 minutes before initiating another join
attempt cycle in order to conserve battery. A new join attempt cycle can be manually started anytime by
pressing and holding the push button (5) for at least 5 seconds until the green LED lights up.
When the sensor has joined the LoRaWAN network, data will be transmitted every minute for 10 minutes
in order to calibrate to the appropriate data rate. After this initial calibration phase, the sensor will start
using its configured settings.
Figure 2: LED indication, network join
Soft start
In rare cases, if the battery is weak, the sensor will perform a soft start in order to be able to start up
despite the battery condition. It normally takes 10 minutes to complete. The phase is indicated by flashes
of the red LED every 10th second, as indicated by Figure 3.
Figure 3: Soft start
5.5.4 Deactivate/reboot sensor
To reboot the sensor, press and hold the push button (5) for 5-15 seconds. Release the button when the
green LED is lit.
To deactivate off the sensor, press and hold the push button for 15-20 seconds. Release the button when
the red LED is lit. The sensor can also be switched off by using the Elvaco OTC App.
Figure 4: Reboot/deactivate sensor
CMa11L User’s Manual English
CMa11L User’s Manual English
page | 11 (22)
6 Adminstration reference
Purpose
This section contains detailed information about available configuration options and message formats for
CMa11L.
Security and access control
CMa11L has a configuration lock feature which can be used to prevent unauthorized access to the
sensor. When the configuration lock has been enabled, a product access key (PAK) is required to
configure the sensor. For more information about security and access control for CMa11L, please refer to
the One-Touch Commissioning (OTC) documentation, available at Elvaco website.
Configuration options
CMa11L can be configured in two ways: via the Elvaco OTC App or via downlink. (See section 6.8 for
more information about how to use downlink.)
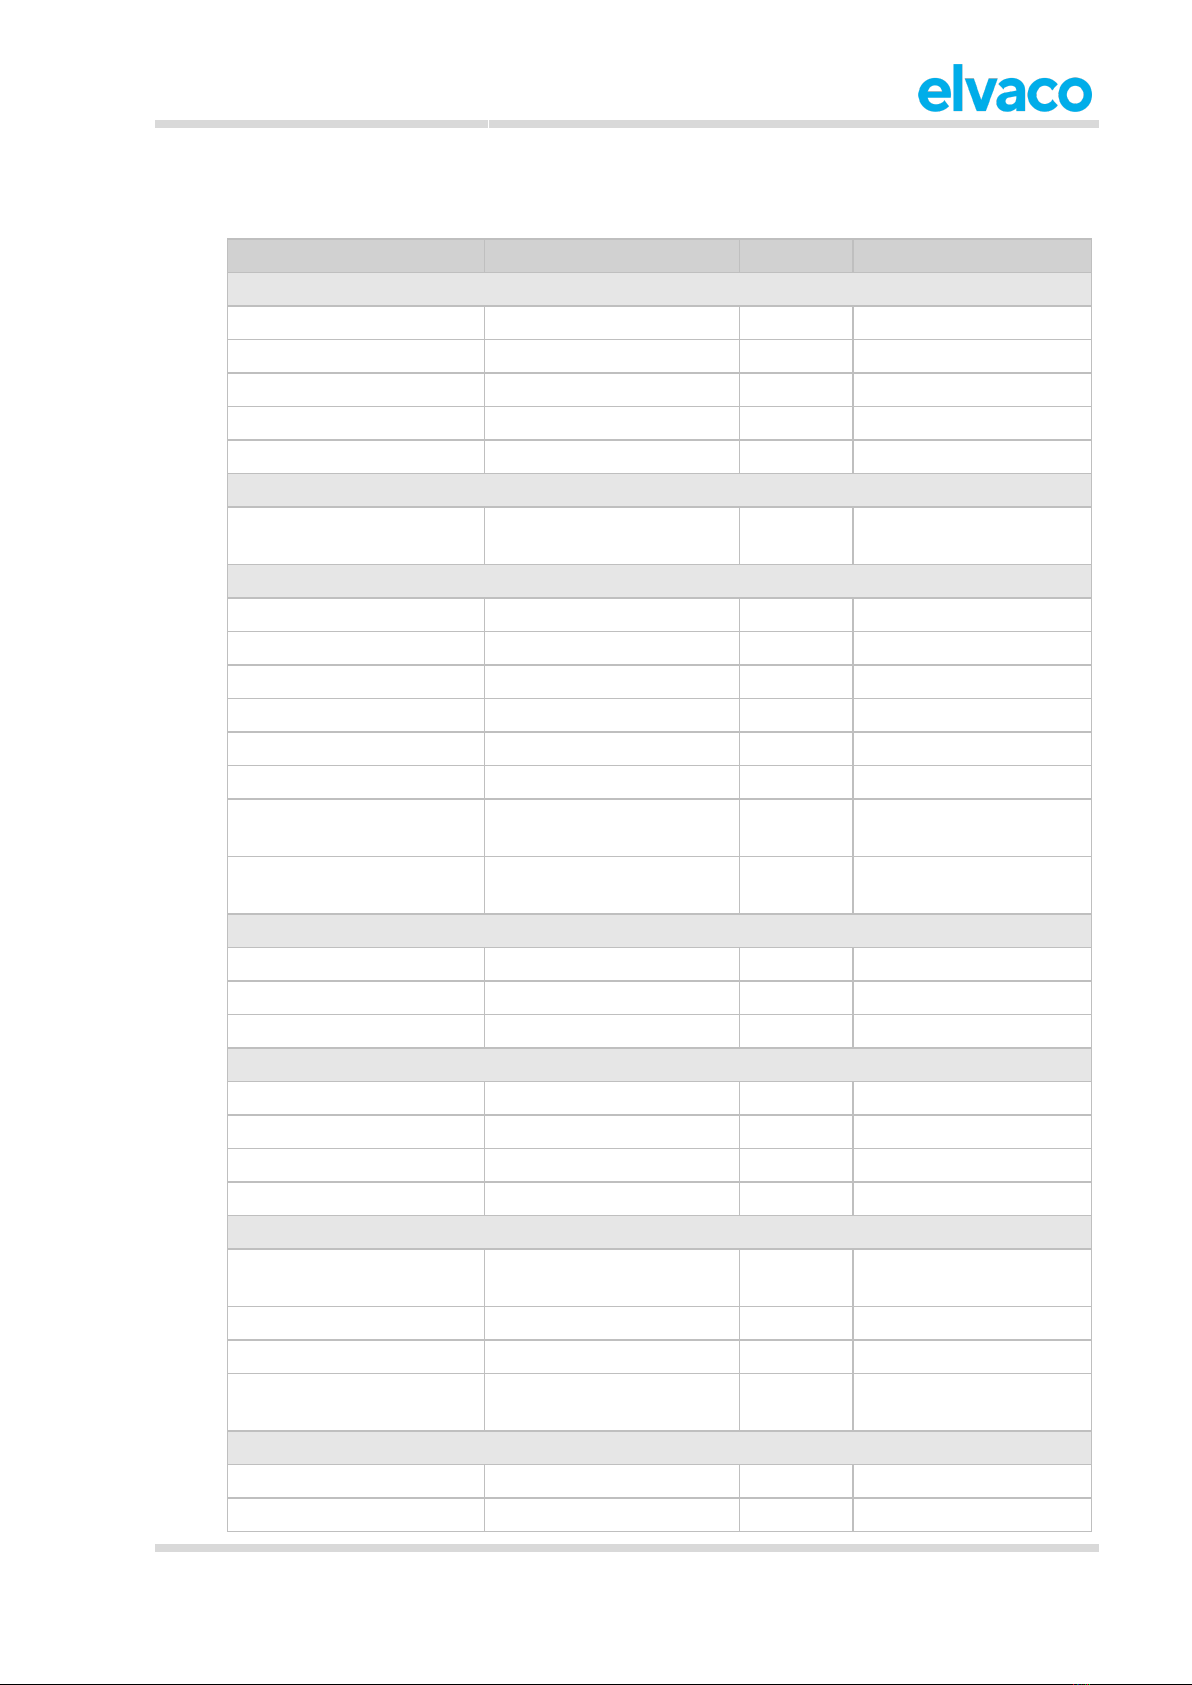
Table 2 provides a summary of all the parameters that can be read from and configured in CMa11L.
Parameter
Product status:
open
Product status:
locked + correct
PAK
Product status:
locked + no PAK
Downlink
configuration
Device
DevEUI
Readable
Readable
Readable
N/A
Firmware version
Readable
Readable
Readable
N/A
Status
Current Data Rate
Readable
Readable
Readable
N/A
RSSI (signal
strength)
Readable
Readable
Readable
N/A
Current
temperature
Readable
Readable
Readable
N/A
Current humidity
Readable
Readable
Readable
N/A
Network joined
Readable
Readable
Readable
N/A
Configuration
Configuration lock
Readable /
Writeable
Readable /
Writeable
Readable
Writeable
Power mode
Readable /
Writeable
Readable /
Writeable
Readable
N/A
MaxDTx
Readable /
Writeable
Readable /
Writeable
Readable
Writeable
EcoMode
Readable /
Writeable
Readable /
Writeable
Readable
Writeable
Transmit interval
(non-EcoMode
only)
Readable /
Writeable
Readable /
Writeable
Readable
Writeable
Message format
Readable /
Writeable
Readable /
Writeable
Readable
Writeable
CMa11L User’s Manual English
CMa11L User’s Manual English
page | 12 (22)
SDC mode
Readable /
Writeable
Readable /
Writeable
Readable
Writeable
SDC data
Readable /
Writeable
Readable /
Writeable
Readable /
Writeable
N/A
Factory reset
Writeable
Writeable
N/A
N/A
LoRaWAN
Activation type
Readable /
Writeable
Readable /
Writeable
Readable
N/A
Join EUI
Readable /
Writeable
Readable /
Writeable
Readable
N/A
Device address
Readable /
Writeable
Readable /
Writeable
Readable
N/A
Table 2: Readable and configurable parameters, CMa11L
Adaptive data rate (ADR)
Adaptive Data Rate (ADR) is part of the LoRaWAN standard where the network server determines the
optimal rate of communication for the sensor based on current radio conditions. In optimal cases, the
sensor will use the highest possible data rate (DR5) in order to maximize battery-life. When signal
conditions are poor, the data rate will be lower to increase the probability that the network server will
receive the message.
Transmit interval
The transmit interval of CMa11L is set automatically via EcoMode or manually. You can also set an upper
limit for the number of messages transmitted from the sensor each day by using the MaxDTx parameter.
6.5.1 EcoMode
By using EcoMode, a battery-life of at least 12 years is guaranteed. The achieved battery-life will depend
on the data rate used, which in turn is depends on current signal conditions. In EcoMode, the transmit
interval will be adapted to the current data rate, which means that the sensor will transmit data less
frequently in case of poor signal conditions in order to conserve battery. Table 3 summarizes the transmit
interval that will be used for different data rates in EcoMode.
Data rate
Transmit interval
DR0
120 minutes
DR1
60 minutes
DR2
20 minutes
DR3
15 minutes
DR4
10 minutes
DR5
5 minutes
Table 3: Transmit intervals in EcoMode
The guaranteed 12-year battery-lifetime is calculated from the first activation of the sensor.
If EcoMode has been disabled at any time, the 12-year battery life can no longer be
guaranteed.
CMa11L User’s Manual English
CMa11L User’s Manual English
page | 13 (22)
The 12-year battery-life guarantee only applies to message format standard and compact.
In order to achieve 12 years of battery life in EcoMode, the sensor
6.5.2 Manual transmit interval
The transmit interval can be set to a fixed value by inactivating EcoMode and setting the transmit interval
parameter. Table 4 provides a guideline for how long the battery of the sensor is expected to last for
different signal conditions and transmit interval settings.
Transmit
interval
DR0
DR1
DR2
DR3
DR4
DR5
Message format standard
5 minutes
1 year
2 years
4 years
8 years
14 years
20+ years
10 minutes
2 years
4 years
8 years
14 years
20+ years
20+ years
15 minutes
3 years
7 years
12 years
18 years
20+ years
20+ years
Message format compact
5 minutes
1 year
2 years
5 years
9 years
15 years
20+ years
10 minutes
2 years
5 years
9 years
16 years
20+ years
20+ years
15 minutes
4 years
7 years
13 years
20+ years
20+ years
20+ years
Message format JSON
5 minutes
1 year
2 years
4 years
7 years
11 years
18 years
10 minutes
2 years
4 years
7 years
12 years
18 years
20+ years
15 minutes
3 years
5 years
10 years
16 years
20+ years
20+ years
Table 4: Expected battery-life for different transmit intervals
6.5.3 MaxDTx
In some cases, it might be necessary to limit the number of daily transmissions that the sensor is allowed
to send. This can be done by using the MaxDTx parameter. For example, by setting MaxDTx to “24”, no
more than 24 telegrams will be transmitted every day. These will be evenly distributed, so in this case the
sensor will deliver hourly values. Table 5 provides a few examples.
MaxDTx configuration
Maximum number of transmissions
0
No limit
1
One per day
24
One per hour
48
One per 30 minutes
96
One per 15 minutes
Table 5: MaxDTx examples
CMa11L User’s Manual English
CMa11L User’s Manual English
page | 14 (22)
SDC data
The SDC data field can be used to write 4 ASCII characters to the sensor by the end-users. When SDC
mode is enabled, a telegram will be sent to the receiving application each time a new value is written to
the SDC data field. The SDC telegram is sent by confirmed uplink to enable the sensor to perform retries
if data is not received. Up to three retries will be performed. When a value has been written to the SDC
field, you can get information about the SDC telegram status via the “SDC status” field in the Elvaco OTC
App. Table 6 provides a description of the possible states of the parameter.
State
Description
OK
The SDC telegram has been
successfully received by the
network server.
Failed
All four attempts to deliver the SDC
telegram to the network server have
failed.
Sending
The SDC telegram is currently
being sent to the network server.
Table 6: SDC status parameter
The SDC functionality can easily be activated/deactivated in the sensor by switching SDC mode to on/off.
Message formats
CMa11L has three different message formats: Standard, Compact and JSON. Each message format is
described in detail in this section.
6.7.1 Standard
In message format Standard, the data is M-Bus encoded. The telegram contains information about
message format, temperature and relative humidity. Table 7 provides a detailed description of each field
in the telegram.
Byte index
Data
Description
0
0x00
Message format standard
1
0x02
Instantaneous temperature DIF
2
0x65
Instantaneous temperature VIF, external
temperature
3-4
0xnn nn
Instantaneous temperature x 100 °C
In case of error the temperature will be set to
-300.
5
0x01
Instantaneous relative humidity DIF
6
0xFB
Instantaneous relative humidity VIF, extension
table FB
7
0x1B
Instantaneous relative humidity VIFE
8
0xnn
Instantaneous relative humidity %RH
In case of error the relative humidity will be set
to 200.

CMa11L User’s Manual English
CMa11L User’s Manual English
page | 15 (22)
(9)
0x0F
End of standard M-Bus. Indicated that the rest
of the telegram is manufacturer-specific. This
byte is only included in the SDC telegram,
i.e. in the first telegram sent when the SDC
data field has been updated.
(10-13)
0xnn nn nn nn
SDC data. These bytes are only included in
the SDC telegram, i.e. in the first telegram
sent when the SDC data field has been
updated.
Table 7: Message format standard telegram
6.7.2 Compact
In message format Compact, the telegram has been compressed to make the telegram as small as
possible. Table 8 provides a detailed description of each field in the telegram.
Byte index
Data
Description
0
0x01
Message format compact
1-2
0xnnnn
Temperature x 100 °C, 2 decimals (lsByte ->
msByte)
In case of error the temperature will be set to
-300.
3
0xnn
Relative humidity %RH
In case of error the relative humidity will be set
to 200.
(4-7)
0x nn nn nn nn
SDC data. These bytes are only included in
the SDC telegram, i.e. in the first telegram
sent when the SDC data field has been
updated.
Table 8: Compact mode telegram
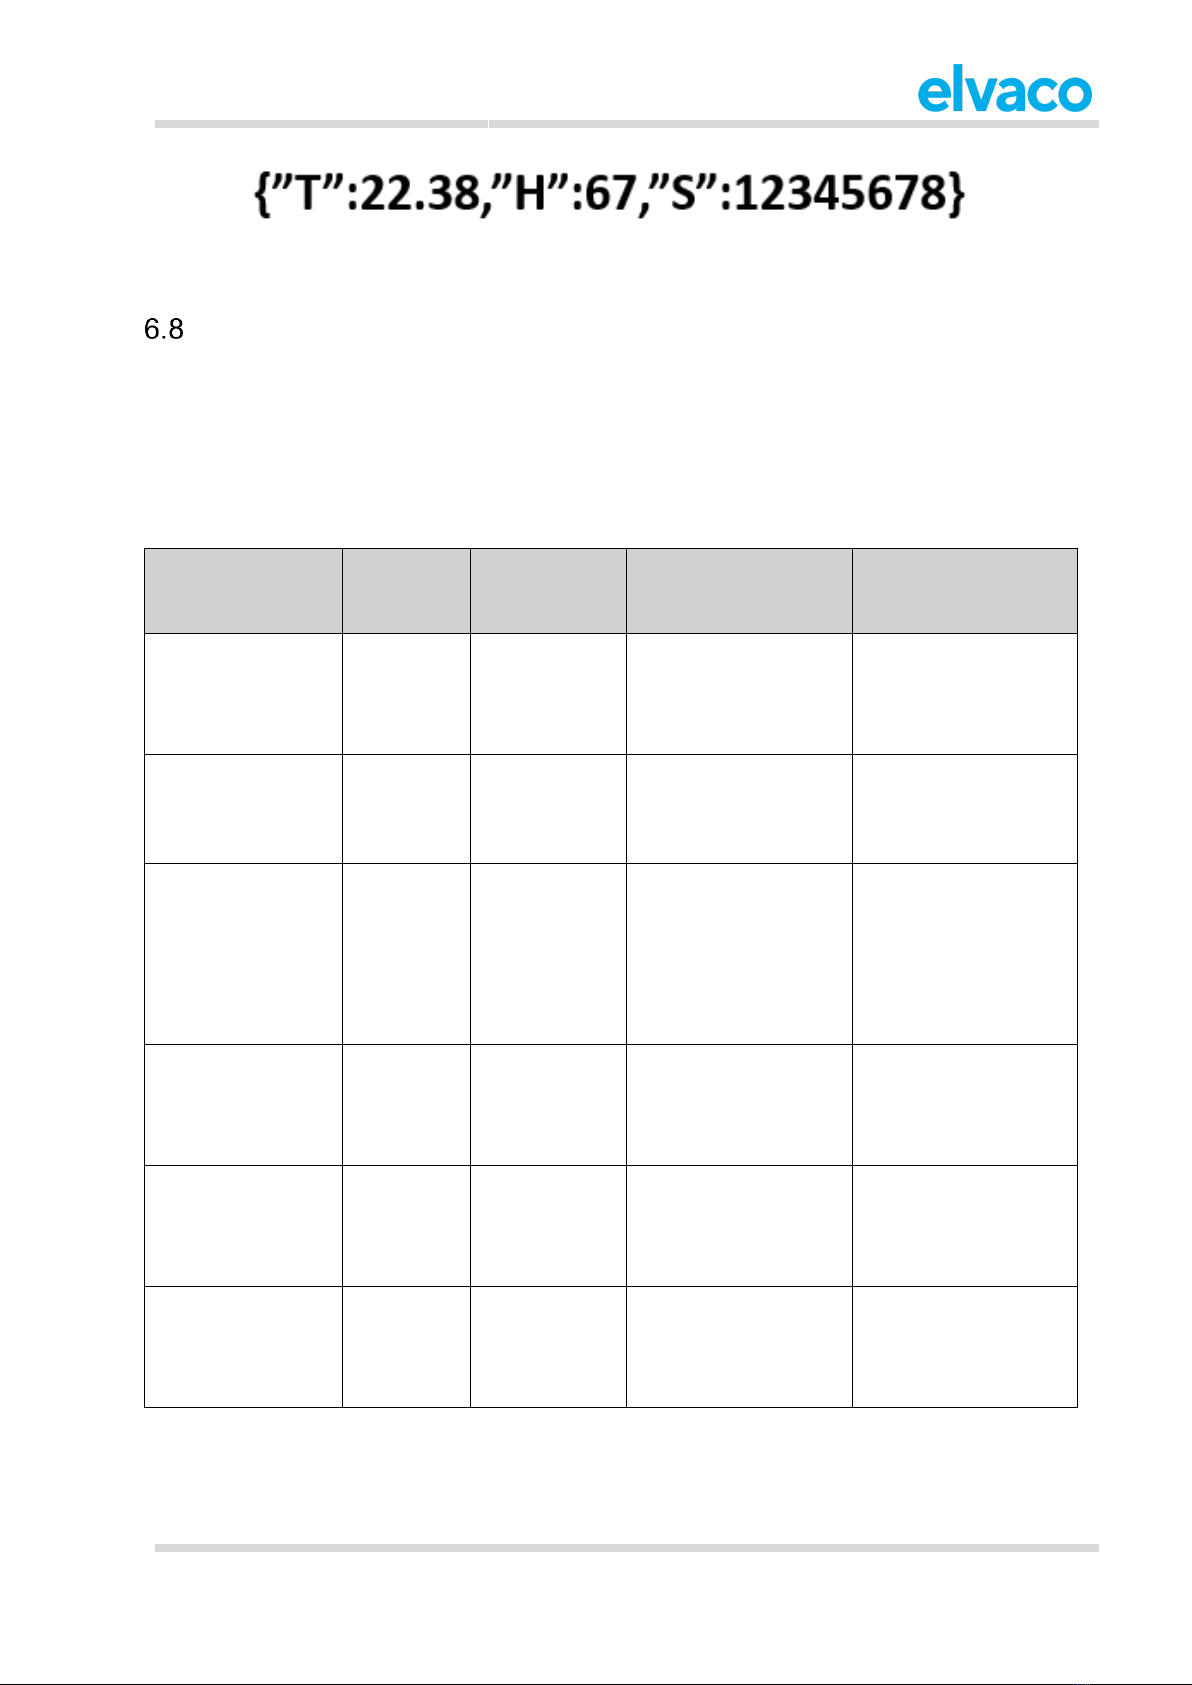
6.7.3 JSON
In message format JSON, the telegram is presented in plain text. Figure Figure 5 provides an example of
how the telegram is structured.
Figure 5: JSON mode telegram example
Each time the SDC data field is updated, an extended telegram will be transmitted from the sensor.
Figure 6 provides an example.
CMa11L User’s Manual English
CMa11L User’s Manual English
page | 16 (22)
Figure 6: JSON SDC telegram
Downlink
The sensor supports downlink for remote configuration via the network server. Commands sent by
downlink will be processed by the sensor at the next wake-up. Therefore, time-critical operations should
not be performed via downlink.
Downlink commands are sent on port 2 on the following format:
”0x00” ”TLV” “Number of bytes in configuration” “Configuration”
Table 9 provides a detailed description of the downlink commands available for CMa11L.
Parameter
TLV
Number of
bytes in
configuration
Configuration
Example
Configuration lock
0x05
0x01
0x00 = Enable
configuration lock
0x01 = Disable
configuration lock
0x00050101
(Enables configuration
lock)
Tx interval (only
applies when
EcoMode is
inactive)
0x06
0x02
0xNumber of minutes
(lsbyte-> msByte)
0x0006021E00
(Sets Tx interval to 30
minutes)
Message format
0x07
0x01
0x00 = Message
format standard
0x01 = Message
format compact
0x02 = Message
format JSON
0x00070101
(Sets message format
to compact)
SDC mode
0x08
0x01
0x00 = Disable SDC
mode
0x01 = Enable SDC
mode
0x00080100
(Disables SDC mode)
EcoMode
0x0F
0x01
0x00 = Disable
EcoMode
0x01 = Enable
EcoMode
0x000F0100
(Disables EcoMode)
MaxDTx
0x21
0x01
Maximum number of
transmissions per day
0x00210118
(Limits the number of
daily transmissions to
24)
Table 9: Downlink configurations

CMa11L User’s Manual English
CMa11L User’s Manual English
page | 17 (22)
7 Troubleshooting
No telegrams are received from the sensor
Verify that:
•The sensor has been activated.
•The sensor is within range of the LoRaWAN gateway.
•The sensor is not mounted inside a metallic cabinet.
•The sensor is not disturbed by other radio equipment.
•The Application key, the Join EUI and the Device EUI of the sensor has been correctly registered
in the network server.
Temperature value is inaccurate
Although the temperature sensor is normally very accurate, an incorrect positioning of the product can
sometimes result in unintended temperature variations. When mounting the sensor, verify that:
•The product is not mounted near any heat sources.
•The product is not mounted in direct sunlight
•The product is not mounted in a spotlight beam.
CMa11L User’s Manual English
CMa11L User’s Manual English
page | 18 (22)
8 Technical specifications
Type
Value
Unit
Comments
Mechanics
Casing material
ABS UL94-V0
-
White
Protection class
IP30
-
Dimensions (w x h x d)
80 x 80 x 25
mm
Weight
75
g
Mounting
Wall-mount
-
Electrical connections
Supply voltage
Battery (3.6 V)
-
Life span 12 years
(when using EcoMode)
Environmental specifications
Operating temperature
-20-55
°C
Operating humidity
0 -100
%RH
No condensation
Operating altitude
0-2000
m
Pollution degree
Degree 2
-
Usage environment
Indoors
-
Storage temperature
-40-85
°C
Measurement range,
temperature
-20-60
°C
Measurement range,
humidity
0-100
%RH
Radio characteristics
Frequency
868
MHz
Output power
14
dBm
Receiver sensitivity
-135
dBm
LoRaWAN characteristics
Device class
Class A
-
Bi-directional
LoRaWAN version
1.0.2
-
Activation
OTAA or ABP
-
Data rate
DR0-DR5
-
250 bit/s –5470 bit/s
Temperature sensor, margin of error
Temperature: +10 to +30
°C
+/- 0.2
°C
Temperature: 0 to +10 °C
+/- 0.4
°C
Temperature: -10 to +0 °C
+/- 0.5
°C
Temperature: below -10
°C or above +30 °C
+/- 1.5
°C
Humidity sensor, margin of error
Repeatability RH
+/- 0.1
%RH
Humidity: 10 to 90 %RH
+/- 2
%RH

CMa11L User’s Manual English
CMa11L User’s Manual English
page | 19 (22)
Humidity: below 10 %RH
or above 90 %RH
+/- 4
%RH
User interface
Green LED
Activation
Red LED
Super-cap indicator
-
Push button
Start-up/ reboot/
deactivate device
Configuration
NFC via Elvaco OTC App
or downlink
Table 10: Technical data

CMa11L User’s Manual English
CMa11L User’s Manual English
page | 20 (22)
9 Type approvals
CMa11L is designed to comply with the directives and standards listed below.
Approval
Description
EMC
EN 61000-6-2, EN 61000-6-3
LoRa Alliance
Certified by LoRa Alliance
Table 11: Type approvals
Other manuals for CMa11L
2
Table of contents
Other Elvaco Accessories manuals


Popular Accessories manuals by other brands


Shinko
Shinko DSW-200-CO2 Installation instructions manual

camry
camry CR 4469 user manual

edc
edc DT 500 instruction manual

PASCO
PASCO Motion Sensor II Product guide

SensComp
SensComp SonaSwitch MINI-A Installation and operation manual

Electro-Sensors
Electro-Sensors Electry-Sentry 1 Installation & operation manual