Elvid RigVision CM-7L User manual

USER
MANUAL
RIGVISION
7˝FIELD MONITOR
WITH SHUTTER RELEASE
CM-7L

2

INTRODUCTION
Thank you for choosing the Elvid 7˝ Field Monitor
with Shutter Release. The RigVision gives you a
crisp, clear, full color view on a screen that’s large
enough to help you bring focus to the details of
your creative vision that are lost on your camera’s
small screen. Whether you use the RigVision for
lmmaking or photography, the vibrant 7˝ display
allows you to comfortably preview and review
your work both in the eld or while working in the
studio.
3

High Resolution:
1024 × 600 pixels on
a 7˝ LCD Screen
Remote Focus & Shutter
Release:
Dedicated shutter release,
Autofocus, and Bulb
buttons to trigger your
camera
Backlit TFT:
Flicker-free and vibrant
even in low light conditions
Cable Clamp:
Holds your HDMI cables
close to the monitor body
without allowing them to
dislodge
160° View:
Get a great view with the
screen’s 160° viewing angle
HDMI Loop Through:
With HDMI Loop Through,
you can connect your
monitor to a second
monitor, allowing others to
follow the action without
the need for a converter or
splitter box.
Speaker & Headphones:
Easily check sound levels
through the built-in
speakers or the 3.5 mm
headphone jack
KEY
FEATURES
4

Fully Adjustable:
Adjust resolution, contrast,
position, and input options
Dual Power:
Operates on either AC
or battery power (both
included)
Versatile:
Accepts HDMI and
AV (Composite Cable)
connections
IR Remote:
Control the functions of
your monitor from the
palm of your hand with the
handheld IR remote
1/4˝ - 20 Mount:
The standard 1/4˝-20 mount
allows for mounting your
monitor many ways includ-
ing on the included shoe
mount ball head.
5

• RigVision 7 ˝ LCD Monitor
• NP-F750 Lithium Battery
• Battery Charger
• AC Power Adapter
• IR Remote
• Protective Neoprene Bag
• Shoe Mount Ball Head
• Sun Shield
• HDMI & Shutter Release
Cables:
1. RCC-C1
2. RCC-C2
3. RCC-N1
4. RCC-N2
5. RCC-S1
6. RCC-O1
7. RCC-P1
BOX
CONTENTS
6

• There are no user-
serviceable parts inside the
device. Do not attempt to
disassemble or perform any
unauthorized modication.
• Do not handle with wet
hands or immerse in or
expose to water or rain.
Failure to observe this
precaution could result in
re or electric shock.
• Keep out of the reach
of children. This device
contains small parts which
may pose a choking hazard.
• Observe caution when
handling batteries.
Batteries may leak or
explode if improperly
handled. Use only the
batteries listed in this
manual.
• Batteries are prone
to leakage when fully
discharged. To avoid
damage to the product,
be sure to remove the
batteries when leaving the
product unattended for
prolonged periods or when
no charge remains.
• Do not operate the
RigVision in the presence of
ammable gas or vapors.
• Do not use or leave the
device in conditions of
extreme heat, severe cold,
or high humidity.
• Turn off the camera’s
power and the RigVision’s
power before connecting or
disconnecting the cables.
• Dispose used batteries,
packaging, and old
devices in accordance
with appropriate local
environmental regulations.
SAFETY
WARNINGS
7

1. Provides the user with a
high-resolution, larger view to
aid composition
2. Lets you check composition
and autofocus when you can’t
reach the camera’s shutter
button
3. Review recorded images and
video
4. Assist when shooting at
extreme angles
PRODUCT
USAGE
8

INFRARED
REMOTE
MENU
VOL- VOL+OK
ZOOM EXIT
Mute Power On/Off
Exit Menus
Select Option
Sync
Access Menu
Zoom
Increase Volume;
Navigate Left In
Menus
Decrease Volume;
Navigate Right In
Menus
Up
Down
The Infrared Remote can be used to turn the
RigVision’s power on and off, adjust the volume, and
access and adjust all the menu settings.
9
The monitor can be used in a variety
of settings and congurations to pro-
vide the viewer with access to images
appearing on actual camera screen.
MONITOR
DIAGRAM
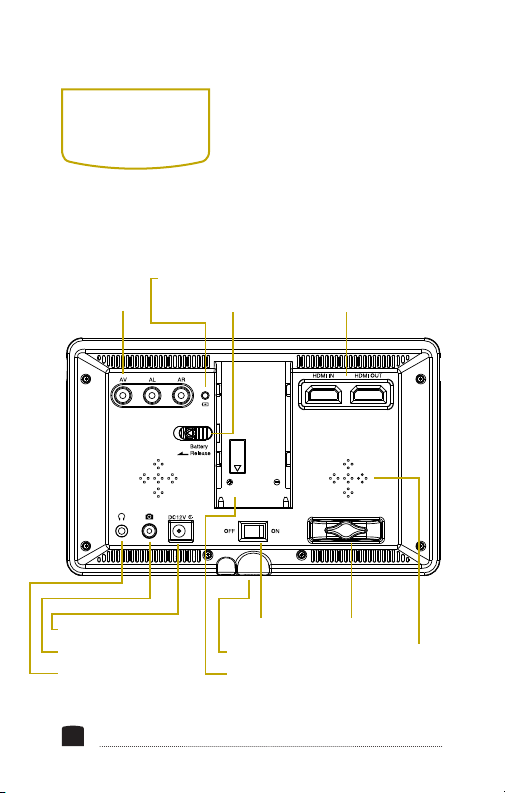
Power Port
AV Inputs
Camera Accessory Port
Battery Charging LED
Headphone Jack
On / Off Switch Cable Clamp
Tripod Socket Built in Speakers
Battery Port
Battery Release Switch HDMI In / Out Ports
10
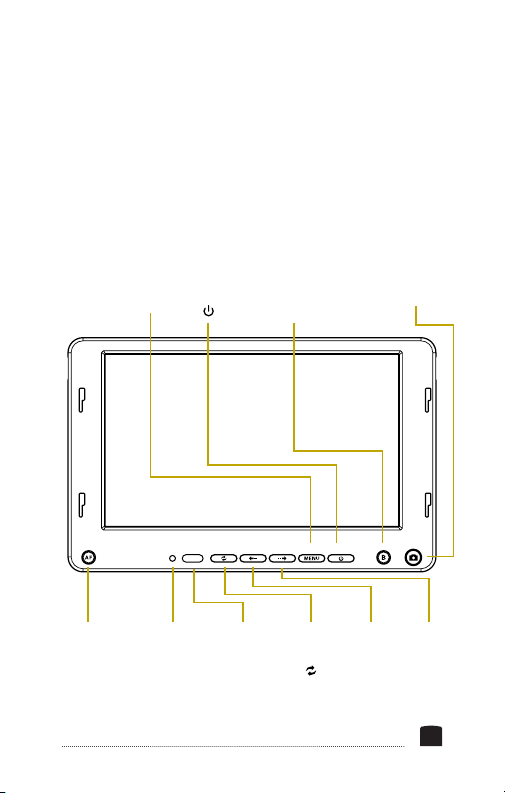
Shutter ButtonBulb Exposure
Button
Sleep
( )
Menu Button
Right
Button
Left
Button
Power Light IR ReceiverAF Button Source
Button
()
11

Charge the included battery
by placing it on the battery
charger and gently clicking
the battery into place.
Plug the charger into an
outlet. The status LED will
glow red while the battery
charges, and will turn
green once the charging is
complete.
Attach the charged battery
by placing it on the battery
port on the back of the
RigVision and pushing the
battery down, locking it
into place.
To remove the battery
from the RigVision for
charging or storage, push
the Battery Release switch
in the direction indicated
by the arrow, and slide the
battery up and out of the
battery port.
You can operate the
monitor with the included
AC adapter while charging
the battery on the back of
the unit simultaneously.
Plug the AC adapter into
the unit while the battery
is attached and check
the Battery Charging
LED on the back of the
RigVision. The light will
glow red while the battery
is charging, and will turn
green once the charging is
complete.
BEFORE YOU
BEGIN
12

To turn the unit on, move the ON/OFF rocker switch on the
back of the RigVision to the ON position. Move the ON/OFF
switch to the OFF position to power down after use.
Note: The ON/OFF rocker switch powers all functions on
and off. The SLEEP button ( ) on the front of the monitor
switches the LCD on and off. If the ON/OFF switch is left
in the ON position, the RigVision will continue to draw
battery power. If you will not be using the RigVision for an
extended period of time, be sure to set the ON/OFF switch
to the OFF position to conserve battery power.
POWERING
ON & OFF
13
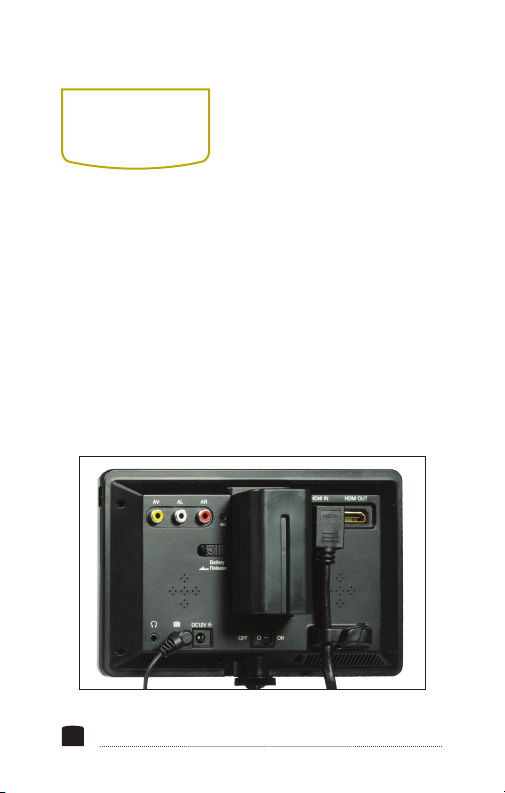
1. Turn off the camera and the RigVision.
2. Select the appropriate cable [HDMI or AV].
3. Insert the cable into the appropriate port located
on the back of the RigVision.
4. Attach the other end of the cable to the camera.
5. Turn on the camera and the RigVision.
THE VIDEO
CABLE
14

1. Turn off the camera and the RigVision.
2. Insert the cable into the camera accessory port located
on the back of the RigVision.
3. Connect the other end of the cable to your camera’s
shutter release jack.
4. Turn on the camera and the RigVision.
THE SHUTTER
RELEASE/AF
CABLE
15

The RigVision features an HDMI output port that
lets you send the original camera signal to another
monitor or device that supports HDMI input. To
take advantage of this feature, plug a Type A HDMI
cable into the HDMI Out port on the back of the
RigVision, and the other end of the cable into the
HDMI input of your compatible device.
USING THE
HDMI OUT
PORT
16

The cable clamp lets you
keep your right-angle
HDMI cables organized
and close to the body of
the RigVision. To use the
cable clamp, follow these
instructions:
1. Loosen the screw and pick up the clamp.
2. Place your cable in the corresponding groove.
3. Replace the clamp and tighten the screw until
secure. Be careful not to overtighten.
USING THE
CABLE CLAMP
Press the Source button ( ) to switch between
HDMI and AV input modes. The selected input mode
will appear in the top right corner of the screen.
SETTING
THE VIDEO
SOURCE
17

Single Shots
1. Turn on the RigVision.
2. Engage Live View mode on your camera.
3. To see focus before shooting, press and hold
the AF button and then release. The RigVision
will then display the focused shot for you
to look at. To shoot more quickly, push the
shutter button on the RigVision, and the
camera will begin to shoot as soon as the
camera nds focus.
4. To trigger the shutter, fully depress the
Shutter Release button.
*Please consult your camera manual to determine
auto focus capabilities of your camera during live
view.
TAKING A
PHOTO
18

Continuous Shots
1. Turn on the RigVision.
2. Set the camera to continuous mode.
3. Engage Live View mode on your camera.
4. Press the Bulb button on the RigVision. This
will trigger the camera to take continuous
photos until you press the Bulb button again.
Bulb Mode (Long Exposure)
1. Turn on the RigVision’s power.
2. Set the camera to bulb mode.
3. Engage Live View mode on your camera.
4. Press the Bulb button on the RigVision. The
shutter will remain open until you press the
Bulb button again.
Note: The RigVision will beep continuously while
Bulb mode is engaged.
19

Only cameras capable of starting video capture
through the camera’s shutter button will be able to
start video capture through the RigVision. Please
consult your camera’s manual to see if your camera
is capable of this action.
Adjusting the Volume
The volume of the RigVision’s speaker can be
adjusted via the display’s Left and Right buttons.
Using Headphones
To listen to your video recordings via headphones,
plug a pair of standard 3.5mm stereo headphones
into the RigVision’s headphone jack.
SHOOTING
VIDEO
SPEAKERS &
HEADPHONES
20
Table of contents
Other Elvid Monitor manuals

Elvid
Elvid OCM-7PWV User manual

Elvid
Elvid OCM-101-4KH User manual

Elvid
Elvid SKYVISION WCM-55-HD User manual

Elvid
Elvid FIELDVISION OCM-89-4KH User manual

Elvid
Elvid OCM-7B-D FieldVision User manual

Elvid
Elvid OCM-7P-HDR User manual

Elvid
Elvid WCM-758G SkyVision User manual

Elvid
Elvid OCM-7B-4KV2 User manual

Elvid
Elvid RIGVISION RVM-5P-HDR User manual

Elvid
Elvid Studiovision STV-150-4KH User manual


