Elvid OCM-7B-4KV2 User manual

USER
MANUAL
FIELDVISION
OCM-7B-4KV2
7˝4K IPS Monitor

2

3
The Elvid FieldVision 4KV2 is a lightweight 7-inch on-camera monitor
that’s capable of displaying signals up to UHD 4K (3840 × 2160) and
DCI 4K (4069 × 2160). The LCD panel’s native resolution of 1920 × 1200
provides a sharp image and facilitates precise color rendering. It offers
an aspect ratio of 16:10 (native) that you can set to your preferred size
along with four zoom presets. In addition, pixel-to-pixel mode gives you
the actual quality of 4K resolution in order to see the ne details of your
image. The FieldVision 4KV2 also accepts composite video and two-
channel audio with an A/V breakout cable (not included).
The on-screen menu makes it easy to adjust your image, and it offers
adjustments for brightness, contrast, hue, sharpness, color temperature,
and saturation. There are also broadcast-specic features like safety
frame markers and multiple display formats.
The FieldVision 4KV2 is equipped with advanced tools like Check Field to
help calibrate the monitor, a Focus Assist setting to ne-tune your focus,
and Camera mode to scale the incoming video signal when shooting on a
DSLR. Onboard programmable function buttons provide quick shortcuts
to the tools you want at your ngertips. There’s also an integrated
speaker and a 3.5 mm stereo headphone output for live audio monitoring.
A removable sunshade is included to minimize glare when shooting
outdoors.
THANK YOU FOR CHOOSING ELVID.
3

4
• Exposure to high sound levels
can cause permanent hearing
loss. Avoid listening at high
volumes for extended periods of
time.
• Keep this product away from
water and any ammable gases
or liquids.
• Do not expose this product to
humidity or extreme heat or
cold.
• Make sure this product is
powered off when plugging it
into a power source.
• Use only the correct,
recommended voltage.
• Do not attempt to disassemble
or repair this product.
• Do not place or store the
FieldVision 4KV2 facedown,
since this can damage the
screen.
• Handle this product with care.
Avoid any impacts to this
product.
• Do not block the vents in this
product.
• Disconnect this product from its
power source before storage and
during electrical storms.
• Do not use chemical solutions to
clean this product. Clean it with
only a soft, dry cloth.
• Keep this product away from
children.
• Make sure that this product
is intact and that there are no
missing parts.
• To avoid damage to this product,
be careful not to overtighten or
improperly thread any of the
threaded ttings.
• All images are for illustrative
purposes only.
PRECAUTIONS

5
TABLE OF
CONTENTS
Overview ..............................................................................................6-7
Product Contents .................................................................................. 8
Powering Options.............................................................................9-10
Using the OCM-7B-4KV2...............................................................11-12
The HDMI Lock .....................................................................................13
The Sunshade........................................................................................14
Front Panel Buttons ............................................................................15
Function Buttons .................................................................................16
The Menu ...............................................................................................17
Color Menu ......................................................................................18-19
On-screen Display (OSD) Menu .................................................20-21
Function Menu .............................................................................22-24
Function Button Shortcut Menu .....................................................25
Specications .................................................................................26-27
Troubleshooting............................................................................ 28-29
FCC Statement.....................................................................................30
Warranty................................................................................................31
6
FIELDVISION HR
4K
MODE MENU F3 F4/F2/F1
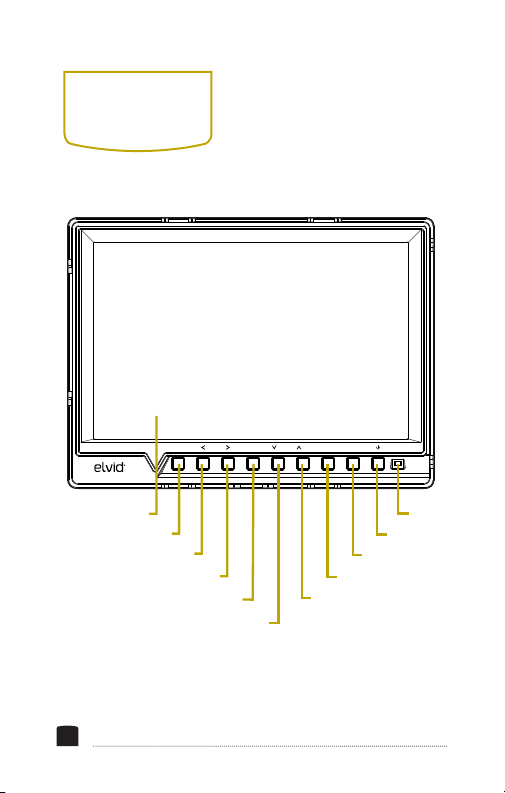
OVERVIEW
Left Nav/Vol -
Status LED
Screen
Menu button
F4 button
Up Nav/F2 button
F3 button
Right Nav/Vol +
Power button
Down Nav/F1 button
Mode button

7
USBOSDAVHDMIDC 12V
Sunshade slots
HDMI input
DC power input
HDMI lock mount
1/4″-20 threaded socket
Battery plate
Speaker
OSD controller port
Headphone jack
AV input
USB port
8
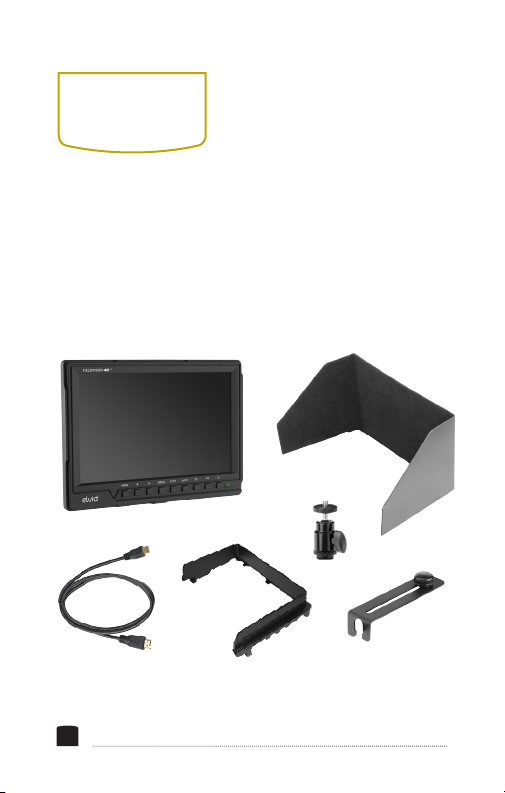
PRODUCT
CONTENTS
Note: For additional battery plates and adapters compatible with
other popular brands, visit elvidcinema.com.
·7 in. On-Camera Monitor
·Shoe-mount ball head
·Sunshade mounting frame
·Sunshade
·Mini HDMI to HDMI cable
·HDMI lock collar
·Sony L-Series battery mount
9
POWERING
OPTIONS
There are two ways to power the FieldVision 4KV2: AC power
or battery (not included).
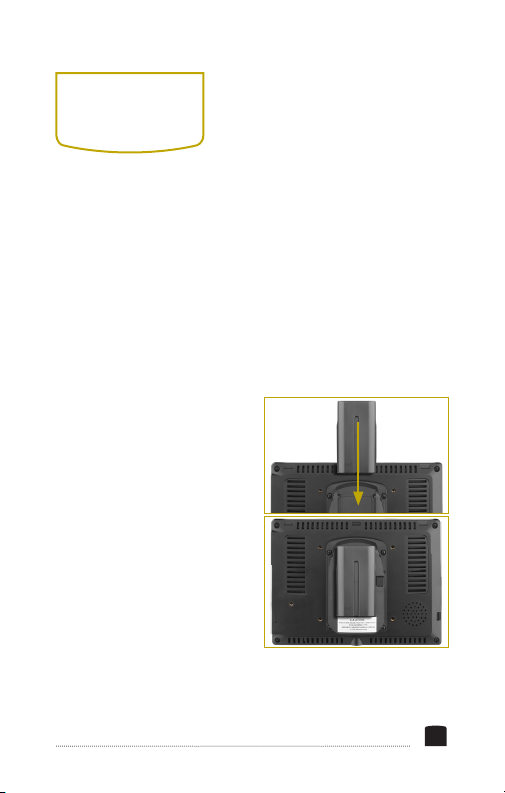
CAMERA BATTERY
The FieldVision’s built-in battery mounting plate accommodates
a Sony L-Series–type battery.
1. Place a compatible battery in
the battery plate. Make sure
the battery’s bottom contacts
are aligned with the contacts
in the battery plate.
2. Slide the battery forward
until it locks into place. The
indicator LED will glow red
when the power source is
connected.
To install a compatible battery,
follow these steps:

10
To turn on the FieldVision 4KV2, press the power button on
the front panel of the monitor. The FieldVision 4KV2 will
turn on and enter standby mode (yellow indicator LED).
A battery monitor appears at the top of the screen and
displays the remaining battery charge.
Note: The power indicator glows red in standby mode while
connected to a power source.
AC POWER
To run the FieldVision 4KV2 with AC power, use a 12 V DC
adapter (not included) to connect the FieldVision 4KV2’s
DC power input to your AC power source.
To turn on the FieldVision 4KV2, press the power button.
The FieldVision 4KV2 will turn on and enter ready mode,
and the power indicator LED will turn green.

11
MOUNTING THE FIELDVISION
4
KV
2
Use the FieldVision 4KV2’s 1/4″-20 threaded socket to attach
the monitor to your mounting system or the included ball
head. Make sure your bracket can support the monitor.
CONNECTING THE VIDEO SOURCE
HDMI Input: The FieldVision 4KV2 is equipped with an HDMI
input for use as a wired high-denition video monitor.
1. Use a compatible HDMI cable (such as the included mini to
full-size HDMI cable) to connect your HDMI video source to
the FieldVision 4KV2’s HDMI input.
2. Press the Mode button to cycle through the input modes
until HDMI appears on the monitor. If your HDMI video
source is sending a signal to the monitor, the image will
appear on-screen, and the power indicator LED will turn
green.
Attention: Whether you are monitoring sound through the
speaker, you can avoid audio feedback or sudden audio bursts
by turning down the internal speaker volume. Press and hold the
Left Nav button to lower the volume.
USING THE
OCM-7B-4KV2

12
Composite Video Input: To use your FieldVision 4KV2 as a
wired standard-denition video monitor, you’ll need an A/V
breakout cable (available separately).
1. Insert the 1/8″(3.5 mm) plug into the A/V input on the
side of the monitor.
2. Connect your composite video source to the yellow RCA
jack.
3. If desired, connect your audio source to the white (L) and
red (R) audio jacks.
4. Press the Mode button to cycle through the input modes
until AV appears on the monitor. If your composite video
source is sending a signal to the monitor, the image will
appear on-screen, and the power indicator LED will glow
green.
If your video source is not connected, the screen will display a
no-signal message.
Note: When using the composite video input, your audio
source must be plugged into the FieldVision 4KV2’s
composite audio input in order to monitor the sound.
To turn the screen off, press the power button. The screen will
go black, and the indicator LED will glow red to show that the
power is on and the screen is in sleep mode.

13
An HDMI lock is included with the FieldVision 4KV2 to reduce
stress on the HDMI plug and ensure that the plug isn’t pulled out
of the input while you’re shooting.
To install the HDMI lock, follow these steps:
1. Insert the HDMI cable into the HDMI port on the monitor.
2. Place the HDMI lock over the
cable so the opening on the
end of the plate ts onto the
cable and sits ush against
the cable’s strain relief.
3. Insert the HDMI locking screw
into the HDMI locking socket,
and tighten.
Note: Make sure the HDMI lock
holds the cable rmly in the
port. If the cable can wiggle in
the HDMI lock, the connection between your source and the
monitor could be interrupted.
THE
HDMI LOCK
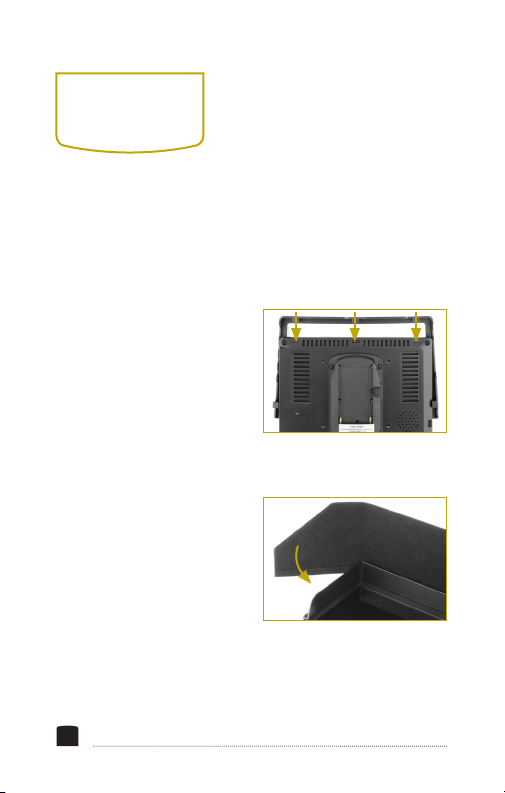
14
1. Match the pegs of the
mounting frame with the slots
on the back of the monitor.
2. Gently spread the ends of
the mounting frame, and
press them down onto
the monitor until the tabs lock into the
slots on the back of the monitor.
3. Unfold the sunshade and
press the at edge of
the fabric side onto the
touch-connect strip on
the mounting frame.
To remove the sunshade, pull it off of the mounting frame. You
can leave the frame attached for future use, or remove both it
and sunshade.
THE
SUNSHADE
The sunshade prevents glare on the monitor’s screen by
blocking out stray light, and it is useful when shooting outdoors.
To attach the sunshade to the monitor, follow these steps:

15
For greater efciency while using the FieldVision 4KV2, you
can use the buttons on the front of the monitor as shortcuts to
various functions, instead of cycling through the on-screen menus.
Mode Button: Selects between HDMI and A/V input signals.
Left Navigation/Vol – Button: Lowers the volume of the
monitor’s speaker. Press for incremental volume change. Press
and hold to slide the volume down to a minimum value of 0.
In menu mode, use this button to navigate to the previous
menu.
Right Navigation/Vol + Button: Raises the volume of the
monitor’s speaker. Press for incremental volume change. Press
and hold to slide the volume up to a maximum value of 100.
In menu mode, use this button to navigate to a submenu.
Menu Button: Press this to access the menu screen. When
the cursor is on one of the main menu items, press the menu
button to return to the live video feed. When accessing the
submenus, press the menu button to return to the previous
menu.
FRONT PANEL
BUTTONS

16
The four function buttons (F1–4) have preset shortcuts
assigned to them, but can be changed to accommodate your
specic needs. See Function Button Shortcut Menu below for
information on changing the function assignment for each
button.
F1 Button:Preset to Check Field. In Check Field mode,
only the one selected color will appear on-screen. Pressing
repeatedly scrolls through the screen colors (red, green, blue,
or mono).
F2 Button: Preset to Focus Assist. Pressing the button
toggles between focus assist mode and your live video feed.
F3 Button: Preset to Histogram. Press to activate. Indicates
the percentage of the image at a particular exposure level.
Press again to return to live video feed.
F4 Button: Preset for False Colors. Press to replace the true
colors of the image with standard colors that represent
exposure levels along with an on-screen chart. Press again to
return to the normal image.
FUNCTION
BUTTONS

17
THE MENU
To get the most out of the FieldVision 4KV2, make sure the
monitor’s settings are properly congured. All of the setting
congurations are located in the main menu, which has four
submenus: Color, On-screen Display (OSD), Function, and Function
Button Shortcut.
Menu Button: Pressing the menu button
• accesses the menu,
• returns to the previous menu or screen without making a
selection, and
• closes the menu.
Up and Down Navigation Buttons: When the menu is open, the
Up/Down buttons
• navigate the menu and
• adjust the value of a vertical submenu item.
Left and Right Navigation Buttons: When the menu is open,
the Left/Right buttons
• enter a submenu,
• adjust the value of a horizontal submenu item, and
• make a selection in a vertical submenu.

18
The color menu offers three preset picture modes (standard,
mild, and dynamic) as well as a user mode with adjustable
brightness, contrast, saturation, and sharpness settings.
In all picture modes, the values of color temperature and tint
can be adjusted to your specic needs. Other parameters that
can be adjusted appear black, and when selected with the
Up/Down buttons, a horizontal submenu icon appears next
to it.
Parameters that appear blue cannot be changed, and the Up/
Down buttons skip them when scrolling through the menu.
Picture Mode:Offers three presets for viewing the incoming
video signal: Standard (default), Mild, and Dynamic. When
User mode is selected, the values for brightness, contrast,
saturation, and sharpness can be adjusted manually.
Brightness:Adjusts the monitor’s brightness value from
0–100.
Contrast:Adjusts the value of contrast of the on-screen image
from 0–100.
COLOR MENU

19
Saturation:Adjusts the value of screen color saturation from
0–100.
Sharpness: Adjusts the value of ne detail of the picture from
1–100.
Color Temp.:Presets are 6500 (default) and 9300. When
User mode is selected, the values of red, green, and blue can
be set manually from 0–255.
Tint:Adjusts the tint value from 0–100.

20
Language:You can set the on-screen language to English
(default), Simplied Chinese, Spanish, Portuguese, French,
Dutch, German, and Japanese.
Aspect Ratio:Adjusts the aspect ratio of the incoming video
signal and how it is displayed on-screen. Available settings
are Panorama, Auto, 4:3, 16:9, Zoom 1, Zoom 2, and Just Scan.
The default setting is Panorama.
NO Signal:Set the color of the screen when there is no video
signal being received. Select blue, red, green, black, or white
screens. The default setting is blue.
OSD Trans:Set the menu’s level of opacity. You can adjust this
setting to low, middle, high, and off, with high being the most
transparent. The default setting is off, which makes the menu
opaque.
OSD H:Adjust the horizontal position of the on-screen menu
from 0 (ush with the left side of the screen) to 100 (ush
with the right side). The default setting is 50.
OSD V:Adjust the vertical position of the on-screen menu
from 0 (ush with the top of the screen) to 100 (ush with
the bottom). The default setting is 50.
ON-SCREEN
DISPLAY
(OSD)
Table of contents
Other Elvid Monitor manuals

Elvid
Elvid STUDIOVISION SRM-7X2-4KH User manual

Elvid
Elvid WCM-758G SkyVision User manual

Elvid
Elvid RigVision CM-7L User manual

Elvid
Elvid OCM-7PWV User manual

Elvid
Elvid RVM-7B-ALT User manual

Elvid
Elvid OCM-7B-D FieldVision User manual

Elvid
Elvid Studiovision STV-150-4KH User manual

Elvid
Elvid OCM-101-4KH User manual

Elvid
Elvid OCM-10-PSM User manual

Elvid
Elvid StudioVision STV-280-4KHDR User manual


