EMPORIA AMPLI40 User manual
USER GUIDE
AMPLI40
Amplified Big-Button Phone

02
Thank you for purchasing the Emporia
AMPLI40 big-button phone.
This user guide provides you with information that
you need to set up and start using your phone.
Please follow the simple instructions on the next
few pages in »Getting started« before making
your first call.
WELCOME

03
Your phone at a glance..................................................................................04
Getting started ..................................................................................................06
·Positioning the phone...........................................................................................06
·Connecting the receiver cord..............................................................................06
·Connecting the telephone line ...........................................................................06
Using the phone................................................................................................08
·Incoming calls .........................................................................................................08
·During a call.............................................................................................................08
·Making a call............................................................................................................09
·Redialling the most recently dialled phone number .....................................09
·Redialling .................................................................................................................09
One-touch memory keys ..............................................................................10
·Saving a one-touch memory key........................................................................10
·Making a call using a one-touch memory key ................................................10
·Change the picture for the one-touch memory keys ....................................10
Two-touch memory ......................................................................................... 11
·Saving a two-touch memory key ....................................................................... 11
·Making a call using a two-touch memory key ................................................ 11
Appendix .............................................................................................................. 12
·Safety precautions ................................................................................................. 12
·Care ........................................................................................................................... 12
·Contact with liquids............................................................................................... 13
·Disposal .................................................................................................................... 13
·Guarantee ................................................................................................................ 14
·Declaration of network conformity.................................................................... 15
·Declaration of conformity (DOC) ........................................................................ 15
CONTENTS

01
02
03
04
06
09
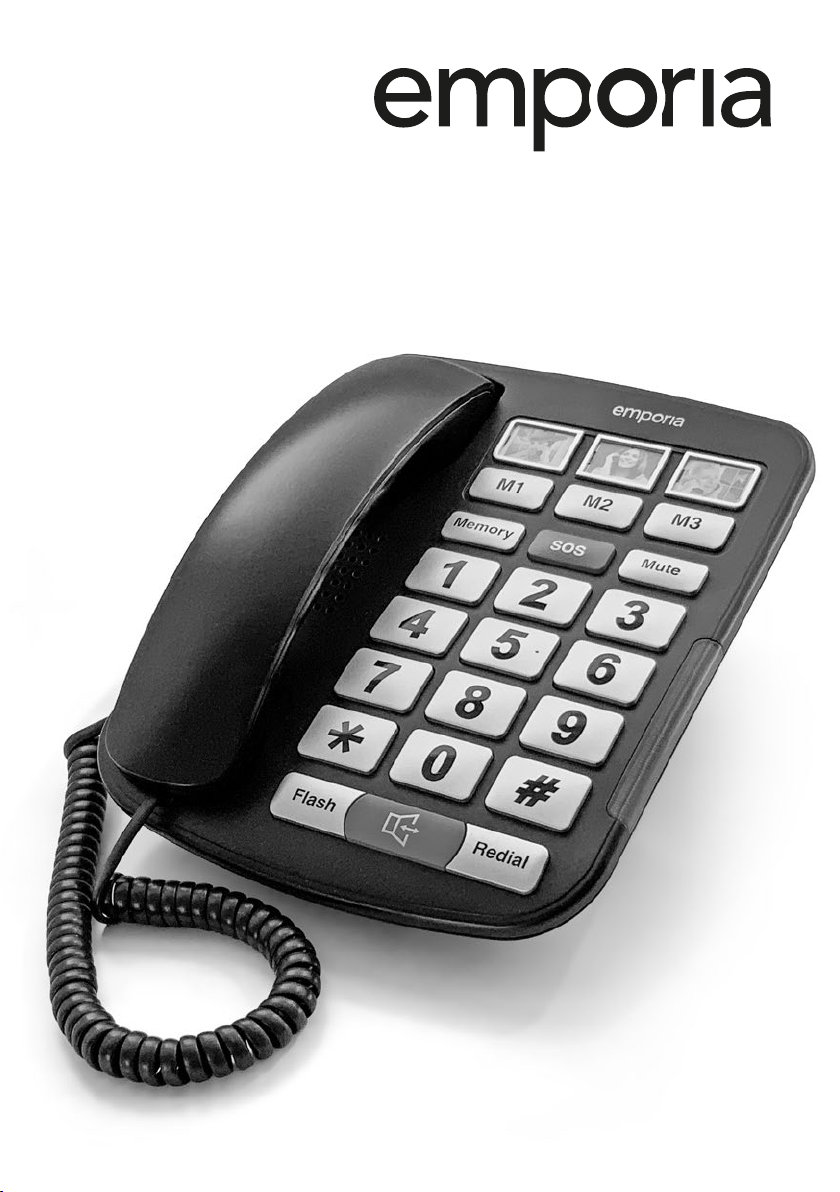
04 YOUR PHONE AT A GLANCE
01 Receiver hook switch
(line interruption)
02 Receiver cradle
If you're mounting the phone on a wall,
take this part out, turn it 180 degrees and
put it back in.
03 Loudspeaker
04 BOOST button
+40dB
This button allows you to instantly increase
the volume of the receiver. Theaudio-boost
function will be disabled automatically
when the call ends.
05 Number keys
Used to input phone numbers.
You can also assign one full phone number
to each of these keys. (Two-touch memory)
06 FLASH key
Flash
If you dial a number and the line is
engaged, press theFLASH key and
theREDIAL key to dial the number again.
07 HANDS-FREE key
You can use this key to accept a call,
startacall or turn hands-free mode on or
o during a call.

05
11
08
07 12
10
05YOUR PHONE AT A GLANCE
08 ONE-TOUCH MEMORY keys
You can use these keys to save and dial speed
dial numbers.
09 MEMORY key
Memory
Use this key to…
·… dial a number assigned to one of
thenumberkeys.
·… start saving numbers.
10 MUTE key
Mute
This key will mute the microphone during a call.
11 LED for incoming calls
The red LED will ash to indicate incoming calls.
12 REDIAL key
Redial
You can use this key to dial your most recently
dialled number again.
It also allows you to insert a dialling pause
when inputting a number.
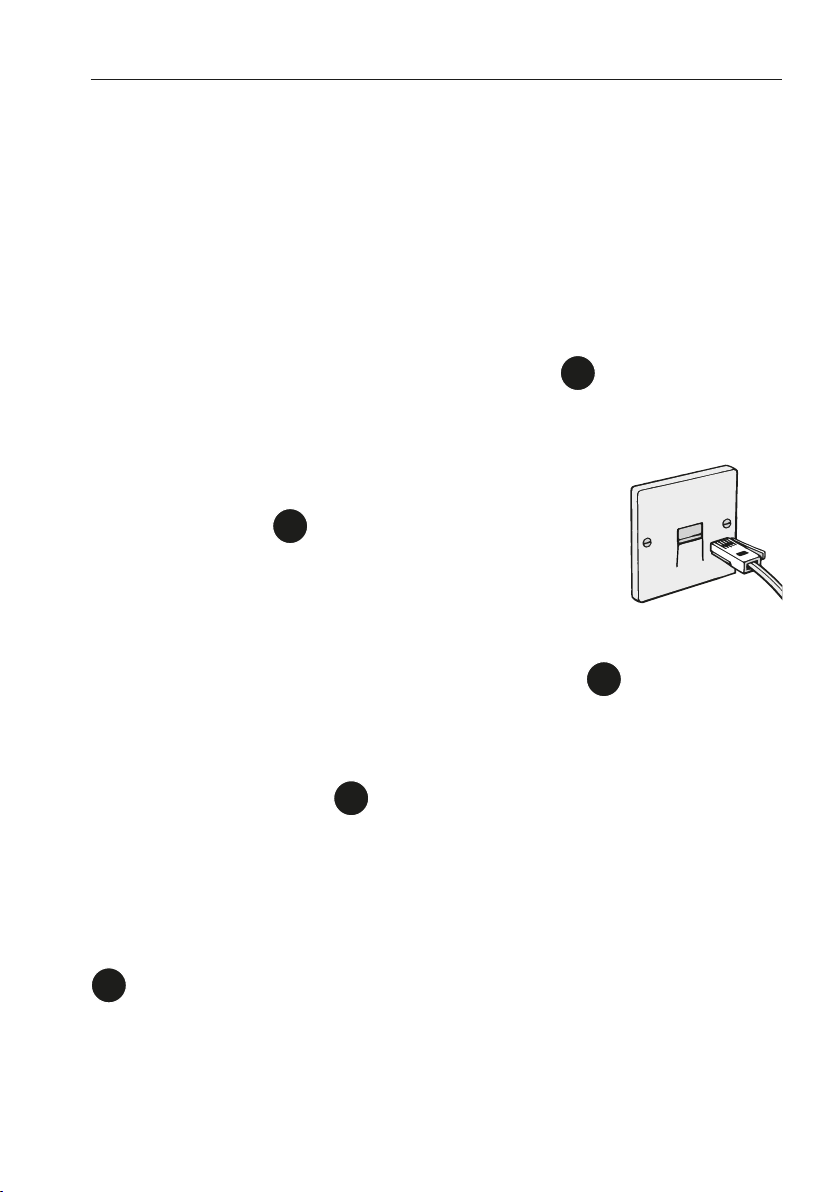
06 GETTING STARTED
Positioning the phone
·You need to position your phone within 2 metres of a phone socket
so the cable can reach.
·Do not place this product on unstable surfaces.
The phone could drop on the oor, which could cause serious
damage to it.
Connecting the receiver cord
Insert one end of the receiver cord into its port 01 on the left-hand
side of the phone and the other end into the receiver.
Connecting the telephone line
·Insert the transparent plug
into the LINE port 02 on the bottom of the phone.
·Plug the other end of the telephone line cord into
the wall socket.
Setting the ringer volume
Depending on your needs, slide the ringer switch 03 to HI (loud),
MID (medium) or LO (quiet).
Setting the receiver and hands-free volume
Slide the volume switch 04 to a position that meets your needs.
Pushing it up will increase the volume and sliding it down will
decrease the volume.
Wall mounting
If you wish, you can mount your phone on a wall.
05 Holes for the screws when the phone is wall-mounted.

01
02 03
05
04
07GETTING STARTED

08 USING THE PHONE
Incoming calls
> Accepting a call
When you receive a call, the phone will ring and the red LED will
ash. Simply pick the receiver up to answer the call.
Or press the HANDS-FREE key if you wish to answer in hands-
free mode.
> Ending a call
Simply put the receiver back on to the cradle or press the Receiver
hook switch (or press the HANDS-FREE key if you are are using
the phone in hands-free mode).
During a call
> Audio-boost function
The audio-boost function will raise the volume of the receiver
(handset only) to amplify the volume of the voice/sound.. The audio-
boost function will be disabled automatically when the call ends.
Press the BOOST button
+40dB
to turn the audio-boost function on or o.
> Hands-free mode
In hands-free mode, you can talk to someone on the phone without
having to hold the receiver. In addition, other people in the room can
follow your conversation thanks to the loudspeaker.
·To answer and end a call in hands-free mode,
simply press the HANDS-FREE key .
·To turn hands-free mode on during a call, press the HANDS-FREE
key and place the receiver back in the cradle.
·To turn hands-free mode o during a call, lift the receiver and
presstheHANDS-FREE key .

09USING THE PHONE
> Muting the microphone
If you need to do something during a call, such as have a short
conversation with another person, and you don't want the person
you're speaking to on the phone to hear, press the MUTE key
Mute
to
mute voice transmission.
·Press the MUTE key
Mute
again to enable the person you're talking to
on the phone to hear you again.
Making a call
·Pick up the receiver and wait until you hear the dial tone.
·Enter the phone number.
OR
·If you want to use hands-free mode, press the HANDS-FREE key .
Wait until you hear the dial tone.
·Enter the phone number.
Redialling the most recently dialled phone
number
·Pick up the receiver and wait until you hear the dial tone.
·Press the REDIAL key
Redial
.
Redialling
If you dial a number and the line is engaged, press theFLASH key
Flash
followed by theREDIAL key
Redial
to dial the number again.
10 ONE-TOUCH MEMORY KEYS
You can assign seven of your most important phone numbers to
theONE-TOUCH MEMORY keys .
Saving a one-touch memory key
To save a number to a ONE-TOUCH MEMORY key ,
please follow these simple steps:
·Pick up the receiver and press the MEMORY key
Memory
until you hear a
conrmation tone.
·Enter the phone number.
·Press your chosen ONE-TOUCH MEMORY key .
·Place the receiver back on the cradle.
To abort the process to saving a number, simply replace the receiver
on to the cradle. This will abort changes and keep the original
settings.
Making a call using a one-touch memory key
·Pick up the receiver and wait until you hear the dial tone.
·Press your chosen ONE-TOUCH MEMORY key .
OR
·If you want to use hands-free mode, press the HANDS-FREE key .
Wait until you hear the dial tone.
·Press your chosen ONE-TOUCH MEMORY key .
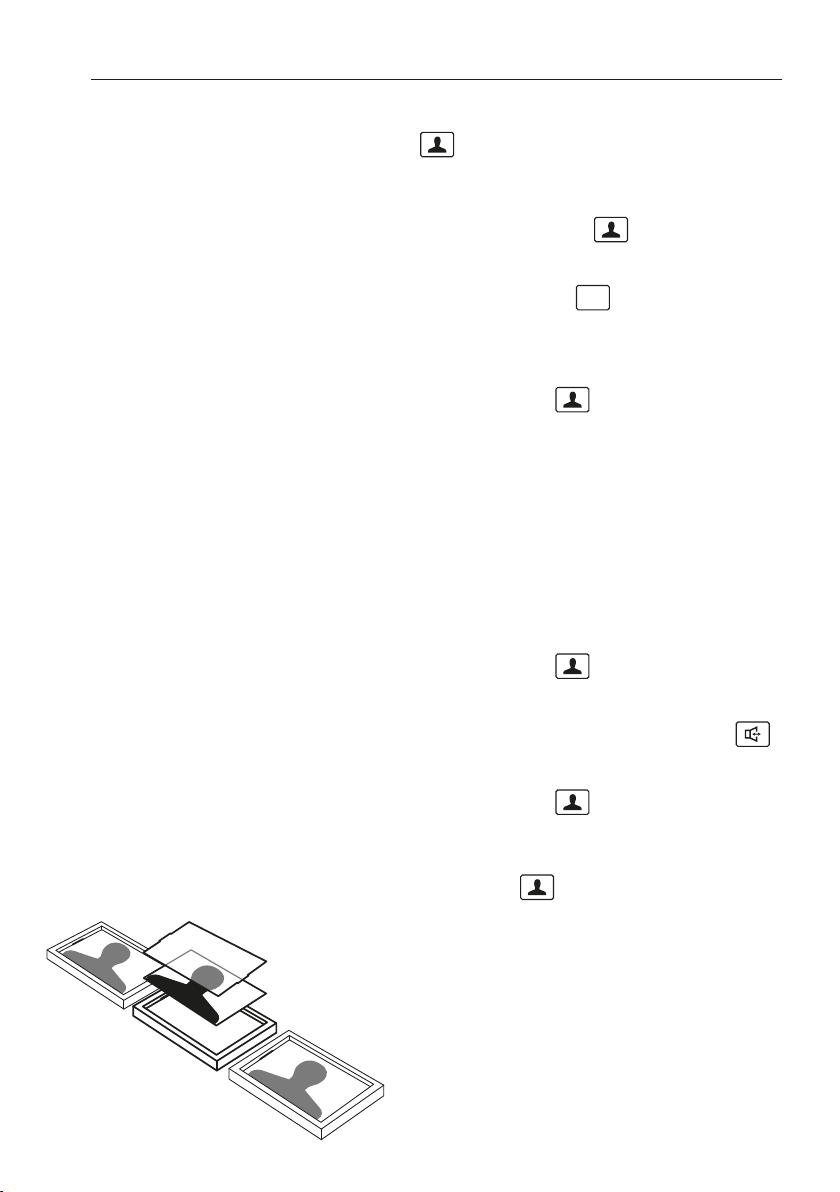
Change the picture for the one-touch memory keys
On top of the ONE-TOUCH MEMORY keys , there are 2 layers,
onepicture and one transparent PVC sheet.
To change the picture, the PVC must be removed
with a pointed blunt object. Then place back the
favourite picture (in correct size, 23× 16 mm)
and x it with the removed PVC sheet.

11
You can assign 10 of your most frequently dialled numbers to
theindividual number keys .
Saving a two-touch memory key
To save a number to a memory, please follow these simple steps:
·Pick up the receiver and press the MEMORY key
Memory
until you hear a
conrmation tone.
·Enter the phone number.
·Press the MEMORY key
Memory
again.
·Press your chosen number key .
(, , , , , , , , or )
·Place the receiver back on the cradle.
To abort the process to saving a number, simply replace the receiver
on to the cradle. This will abort changes and keep the original
settings.
Making a call using a two-touch memory key
·Pick up the receiver and wait until you hear the dial tone.
·Press the MEMORY key
Memory
.
·Then press your chosen number key .
OR
·If you want to use hands-free mode, press the HANDS-FREE key .
Wait until you hear the dial tone.
·Press the MEMORY key
Memory
.
·Then press your chosen number key .
TWO-TOUCH MEMORY

12
Safety precautions
·Read through the safety precautions
and the user guide before using your
phone.
·The device's feet do not usually leave
any marks on surfaces. However, due
to the many dierent varnishes and
polishes available for furniture, contact
marks on the surfaces cannot be
completely ruled out.
·Never expose the phone to heat sources,
direct sunlight or other electrical devices.
·The device is not splashproof. For
this reason, do not install it in damp
environments such as bathrooms or
shower rooms.
·Protect your phone from moisture, dust,
corrosive liquids and vapours.
·If the device is defective, stop using it or
have it repaired by our Service team.
Care
·Wipe your phone with a damp cloth or
an anti-static cloth. Do not use solvents
or microbre cloths.
·Never use a dry cloth, because this can
create a static charge.
·In rare cases, contact with chemical
substances can cause changes to the
device’s exterior. Due to the wide variety
of chemical products available on the
market, it was not possible to test every
substance.
·Damage to high-gloss nishes can be
carefully rectied using display polishes
for mobile phones.
APPENDIX

13APPENDIX
Contact with liquids
What to do if your phone comes into
contact withliquids:
·Allow the liquid to drain from the
device. Pat all parts of the device dry.
·Place the device in a warm, dry place for
at least 72 hours (not in a microwave,
an oven or somewhere similar) with the
keypad facing down.
Once it has fully dried out, you will
normally be able to use it again.
Disposal
·All electrical and electronic products
should be disposed of separately
from the municipal waste stream via
designated collection facilities provided
by the government or your local
authority.
·This crossed-out wheelie bin symbol
on the product means the product
is covered by Directive 2012/19/EU.
·Disposing of your old device correctly
by taking it to a designated collection
facility will help prevent potential
negative consequences for the
environment and human health.
Also, used electrical and electronic
equipment cannot be reused or
recycled if it isn't disposed of in this
manner.
·For more detailed information about
disposing of your old device, please
contact your local authority's refuse
centre or the original supplier of
theproduct.

14 APPENDIX
Guarantee
·Without prejudice to any claim the
customer may have in relation to
the retailer, the customer is given a
manufacturer’s guarantee with the
terms and conditions set out below:
·This guarantee applies to new devices
purchased in the European Union. For
products sold in the United Kingdom
and in the Republic of Ireland, the
guarantee is issued by
Emporia UK and Ireland Limited,
1st Floor, Building 2 Croxley Business
Park, Watford, England.
·If a new device and/or its components
exhibit defects resulting from
manufacturing and/or material faults
within 12months of purchase, the
device will either be replaced with a
new, up-to-date device or repaired.
Forparts subject to wear and tear, such
as batteries, this guarantee is valid for
sixmonths from the date of purchase.
·This guarantee will not cover device
defects caused by improper care or
use and/or failure to comply with
information in the user guides provided.
·If you ever wish to invoke the
guarantee, you will need to present
your purchase receipt and the date of
your purchase as evidence.
·To invoke the guarantee, please call our
hotline.

15APPENDIX
Declaration of network conformity
·Brand name: emporia
·Model: AMPLI40, AMPLI40-UK
·Item description: Corded telephone
We, emporia telecom GmbH + CoKG, Industriezeile 36, 4020 Linz, Austria,
declare that the item described above is designed and suitable for the following
telephone networks, and take sole responsibility for this.
Operation outside of these countries cannot be guaranteed.
¢Austria ¢Greece £Norway
¢Belgium £Iceland ¢Portugal
¢Denmark ¢Ireland ¢Spain
¢Finland £Liechtenstein ¢Sweden
¢France ¢Luxembourg ¢Switzerland
¢Germany ¢Netherlands ¢United Kingdom
Declaration of conformity (DOC)
·Manufacturer: emporia telecom GmbH + CoKG
Industriezeile 36, 4020 Linz, Austria
·Importer: emporia UK and Ireland limited · 1st Floor, Building 2
Croxley Business Park, Watford, England, WD1 8 8YA
·Website: www.emporiatelecom.co.uk or www.emporiatelecom.ie
·Brand name: emporia
·Model: AMPLI40, AMPLI40-UK
·Item description: Corded telephone
We, emporia telecom GmbH + CoKG (Industriezeile36, 4020Linz, Austria)
hereby declare that the telecommunication or radio device complies with
Directive 2014/53/EU.
The EU declaration of conformity can be viewed in full on this web page:
http://www.emporia.eu/doc
Responsible for the accuracy of this information:
Eveline Pupeter,
CEO, emporia Telecom
01 July 2020

Customer service and assistance
Please feel free to contact our Service team.
We are happy to assist you.
·By phone: Repairs and guarantee claims:
Monday to Thursday 09:00 - 16:00 · Friday 09:00- 13:00
UK service hotline +44 · 1923 · 947778
IE service hotline +353 · 1 · 592 6339
Please have your proof of purchase ready.
AMPLi40_BDA-ENG-V1 · 092020 Misprints, errors and technical changes excepted.
EMPORIA Telecom GmbH & Co. KG
Industriezeile 36 · 4020 Linz · Austria
www.emporia.eu
Emporia Service Centre
www.emporiatelecom.co.uk
www.emporiatelecom.ie
Table of contents
Other EMPORIA Telephone manuals


