EMU CONE - 2004 User manual

ASSEMBLY INSTRUCTIONS
EMU Group S.p.A.
06055 Marsciano (Perugia) - ITALY - Tel.075.874021 - Fax.075.8743903
INFORMAZIONI TECNICHE:
Assemblare lampadina con attacco E27 e potenza max 150 W.
Emu Group SpA dichiara che questo prodotto conforme alle seguenti direttive: 2014/30/UE,
2014/35/UE
Se il cavo flessibile esterno di questo apparecchio viene danneggiato, deve essere sostituito
esclusivamente dal costruttore, dal suo servizio di assistenza, o da personale qualificato
equivalente, al fine di evitare pericoli. CONE - 2004
IST.485/A
Tensione: 230 V - 50/60 Hz - Max Temperatura: 40°C IP55
TECHNICAL INFORMATION:
Assemble light bulb with E27 connection and max power 150 W.
Emu Group SpA declares that this product complies with the following directives: 2014/30/EU,
2014/35/EU
If the flexible external cable of this appliance gets damaged, it must be replaced exclusively by
the manufacturer, by the customer services assistance team, or by personnel with equivalent
qualifications, in order to avoid risks.
Voltage: 230 V - 50/60 Hz - Max Temperature: 40°CIP55
INFORMATIONS TECHNIQUES :
Monter l'ampoule avec culot E27 et puissance max 150 W.
Le groupe Emu Group SpA déclare que ce produit est conforme aux directives suivantes :
2014/30/UE, 2014/35/UE
Si le câble flexible externe de cet appareil est endommagé, il doit être exclusivement remplacé
par son fabricant, par son service d'assistance ou par le personnel qualifié équivalent afin
d'éviter tout danger.
Tension : 230 V - 50/60 Hz - Température max : 40°CIP55
TECHNISCHE INFORMATIONEN:
Glühbirnen mit E27-Anschluss und max. Leistung von 150 W montieren
Emu Group SpA erklärt, dass dieses Produkt den folgenden Richtlinien entspricht: 2014/30/EU,
2014/35/EU
Falls das externe flexible Kabel dieses Geräts beschädigt sein sollte, darf es ausschließlich durch
den Hersteller, seiner Serviceabteilung oder gleichwertig qualifiziertem Personal ausgewechselt
werden, um Gefahren zu verhindern.
Spannung: 230 V - 50/60 Hz - Max. Temperatur: 40°CIP55
INFORMACIONES TÉCNICAS:
Ensamblar lamparita con unión E27 y potencia máx 150 W.
Emu Group SpA declara que este producto está conforme con las siguientes directivas:
2014/30/UE, 2014/35/UE
Si el cable flexible externo de este aparato se daña, debe ser sustituido exclusivamente por el
fabricante, por su servicio de asistencia, o por personal cualificado equivalente, con la finalidad
de evitar peligros.
Tensión: 230 V - 50/60 Hz - Máx Temperatura: 40°CIP55

A X 1
B X 7
B
C
PREMESSA:
Rimuovere accuratamente il prodotto dalla sua confezione. Controllare che il prodotto
non sia danneggiato e che funzioni correttamente. Non tentare di riparare o modificare il
prodotto da soli, ciò farebbe decadere la garanzia. Inserire la spina in una presa di
alimentazione di rete provvista di contatto di messa a terra.
INSTALLAZIONE A PAVIMENTO:
Il prodotto può essere installato direttamente a
pavimento con l'impiego di n.4 tasselli idonei per
l'utilizzo sul materiale del pavimento stesso (fig. 1). I
tasselli vanno inseriti nei fori della piastra del
componente A e fissati a terra secondo le indicazioni del
produttore dei tasselli.
ATTENZIONE! I tasselli non sono compresi nella
confezione della lampada, in quanto sono specifici alla
tipologia di pavimento del cliente. E' bene farsi
consigliare la tipologia più adatta dal rivenditore di
fiducia.
C X 1
INSTALLAZIONE TRAMITE ZAVORRA:
Il prodotto può essere installato tramite l'impiego dell'optional ZAVORRA art.2005 (fig.2).
Collegare i connettori uscenti dai tubolari dei
componenenti A e D (i quali uniscono i cavi
elettrici dei due componeneti), avvicinando gli
stessi componeneti l'uno all'altro. Verificare
che la connessione sia ben salda.
Far entrare l'asta del componente A
all'interno del componente D e fissare il
collegameno avvitando la vite F.
Serrare la vite F.
Assemblare il paralume H avvitando n.4 pz di boccola L alle n.4
viti saldate sulla piastra della struttura portante.
Serrare le boccole sulle viti del componente D.
Si consiglia di eseguire questa fase di montaggio con
almeno due persone.
Assemblare la lampadina prescelta al porta-lampada e successivamente fissare il
diffusore al paralume, spingendo e girando il paralume su se stesso per un breve tratto.
ATTENZIONE! Utilizzare solo lampadina con attacco E27 e potenza minore di 150W
D X 1
E X 1
F X 1
G X 4
H X 1
Avvitare i sottopiedi regolabili B alla
zavorra C. Inserire il componente A
all'interno della feritoia della zavorra
C, facendo attenzione a non
danneggiare il tubolare durante lo
scorrimento, e fissarlo avvitando n.4
viti G (eseguire questa operazione
con due persone).
2
3
4
1
L X 4
H
L
E
H
art.2005
A
D
F
12
L X 4
A
G
L

B
C
GENERAL CONDITIONS:
Carefully remove the product from its packaging. Check that the product is intact and
working properly. Do not attempt to repair or alter the product on your own, this may
void the warranty. Insert the plug to a mains power socket equipped with an earth.
INSTALLING ONTO THE FLOOR:
The product can be installed directly onto the floor by
using n.4 fixing pins especially designed for use with the
floor material itself (fig. 1). The fixing pins insert into the
holes of the base of component A and can be fixed to
the ground as detailed in the indications provided by the
manufacturer of the fixing pins.
CAUTION! The fixing pins are not included in the lamp
pack, since they are adapted to the floor type of each
customer. It is recommended to seek advice regarding
the most suitable type from a trusted retailer.
INSTALLING USING A WEIGHTED BASE:
The product can be installed with an optional WEIGHTED BASE art.2005 (fig.2).
Connect the connectors that protrude from
the tube pieces of components A and D
(which join the electrical wires of the two
components), bringing the same parts
together one to the other. Check that the
connection is strong.
Push the pole of component A inside
component D and fix together by tightening
screw F.
Lock screw F.
Assemble lampshade H tightening n.4 bushing pieces to n.4
screws fixed onto the base of the frame structure.
Screw the bushings onto the screws of component D.
It is advisable for this stage of assembly to be carried out by
at least two people.
Assemble the chosen light bulb onto the lamp holder and after fix the lampshade
diffuser, pushing and turning the shade on itself for a short thread.
CAUTION! Only use a light bulb with E27 connection and power less than 150W
Tighten the adjustable feet rests B to
the weighted base C. Insert
component A into the slot of
weighted base C, being careful not to
damage the tube piece whilst sliding
it in, and fix it by tightening n.4 G
screws (do this task with two
people).
E
H
A
D
F
H
L
1
2
3
4
34
A
G
L
A X 1
B X 7
C X 1
D X 1
E X 1
F X 1
G X 4
H X 1
L X 4
art.2005
L X 4

A X 1
B
C
INTRODUCTION :
Retirer soigneusement le produit de son emballage. Contrôler que le produit n’est pas
endommagé et qu’il fonctionne correctement. Ne pas tenter de réparer ou de modifier le
produit par vous-même, sous peine d’annulation de la garantie. Brancher la prise dans
une prise d'alimentation électrique dotée d'un contact de mise à la terre.
INSTALLATION AU SOL :
Le produit peut être installé directement au sol à l'aide
de 4 chevilles adaptées à l'utilisation pour le matériau du
sol (fig. 1). Les chevilles doivent être insérées dans les
trous de la plaque de la pi ce A et fixées au sol
conformément aux indications du fabricant des chevilles.
ATTENTION ! Les chevilles ne sont pas fournies avec la
lampe, celles-ci étant spécifiques au type de sol du
client. Veiller à obtenir des conseils avisés sur la
typologie de cheville la plus adaptée à l'utilisation par un
distributeur de confiance.
INSTALLATION PAR LA BASE :
Le produit peut être installé à l'aide de la BASE optionnelle, art.2005 (fig.2).
Raccorder les connecteurs sortants des tubes
des pi ces A et D (lesquels relient les câbles
électriques des deux pi ces), en rapprochant
les deux pi ces l'une de l'autre. Vérifier que la
connexion soit bien solide.
Faire entrer la tige de la pi ce A à l'intérieur
de la pi ce D et fixer en vissant la vis F.
Serrer la vis F.
Monter l'abat-
jour H en vissant les 4 bagues sur les 4 vis soudées
sur la plaque de la structure portante.
Serrer les bagues sur les vis de la pi ce D.
Il est conseillé de procéder à ces phases de montage avec
au moins deux personnes.
D X 1
E X 1
H X 1
Visser les pieds réglables B à la base
C. Insérer la pi ce A à l'intérieur de la
fente de la base C, en veillant à ne
pas endommager le tube pendant le
déroulement, puis fixer en vissant 4
vis G (effectuer cette procédure avec
deux personnes).
art.2005
A
D
F
H
L
Monter l'ampoule sélectionnée au préalable sur le culot puis fixer le diffuseur à l'abat-jour,
en tirant et en poussant un peu l'abat-jour sur lui-même.
ATTENTION ! Utiliser exclusivement des ampoules avec culot E27 et une puissance inférieure
à 150W.
E
H
6
5
A
G
L
A X 1
B X 7
C X 1
D X 1
E X 1
F X 1
G X 4
H X 1
L X 4
art.2005
L X 4
2
3
4
1

B
C
EINLEITUNG:
Das Produkt sorgfältig aus seiner Verpackung nehmen. Sicherstellen, dass am Produkt keine
Schäden vorhanden sind und dass es korrekt funktioniert. Versuchen Sie nicht das Produkt zu
reparieren oder Änderungen vorzunehmen, da dies einen Garantieverlust zur Folge hat. Den
Stecker in eine Netzsteckdose, die mit Erdungskontakt versehen ist, einfügen.
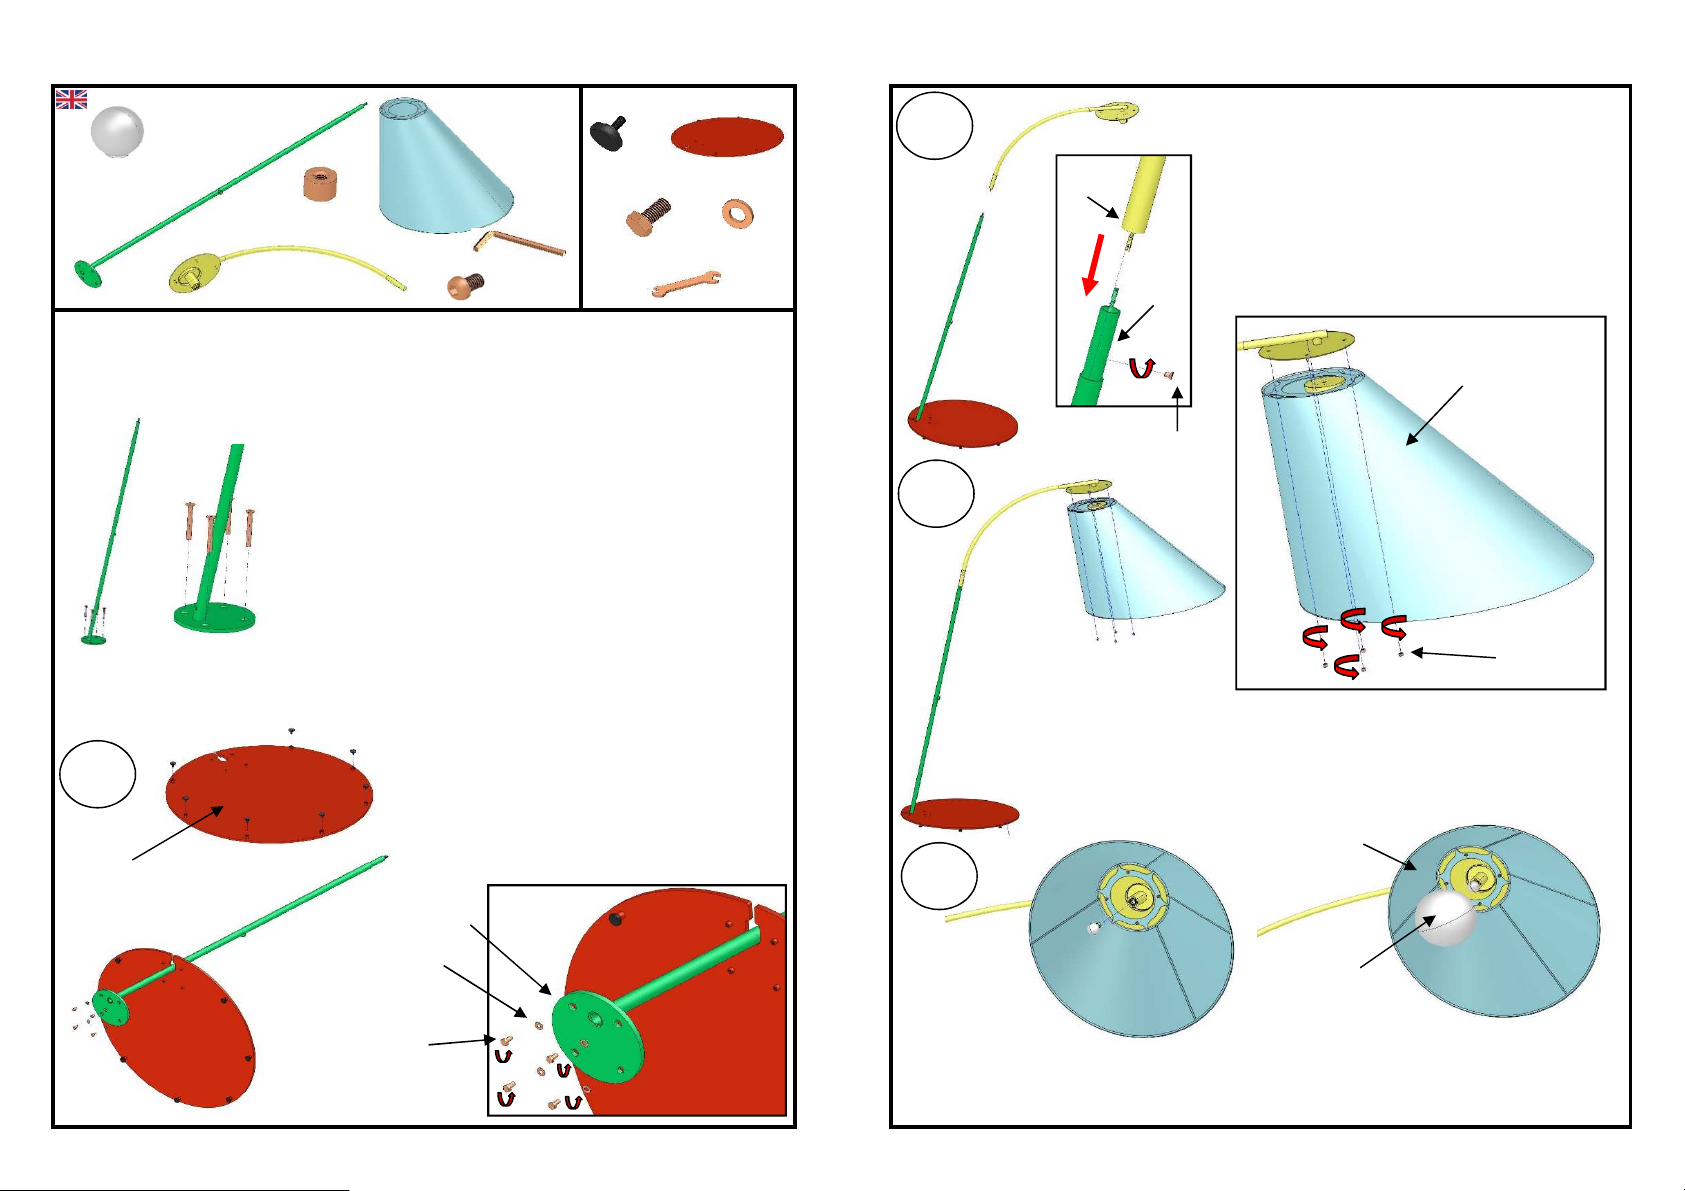
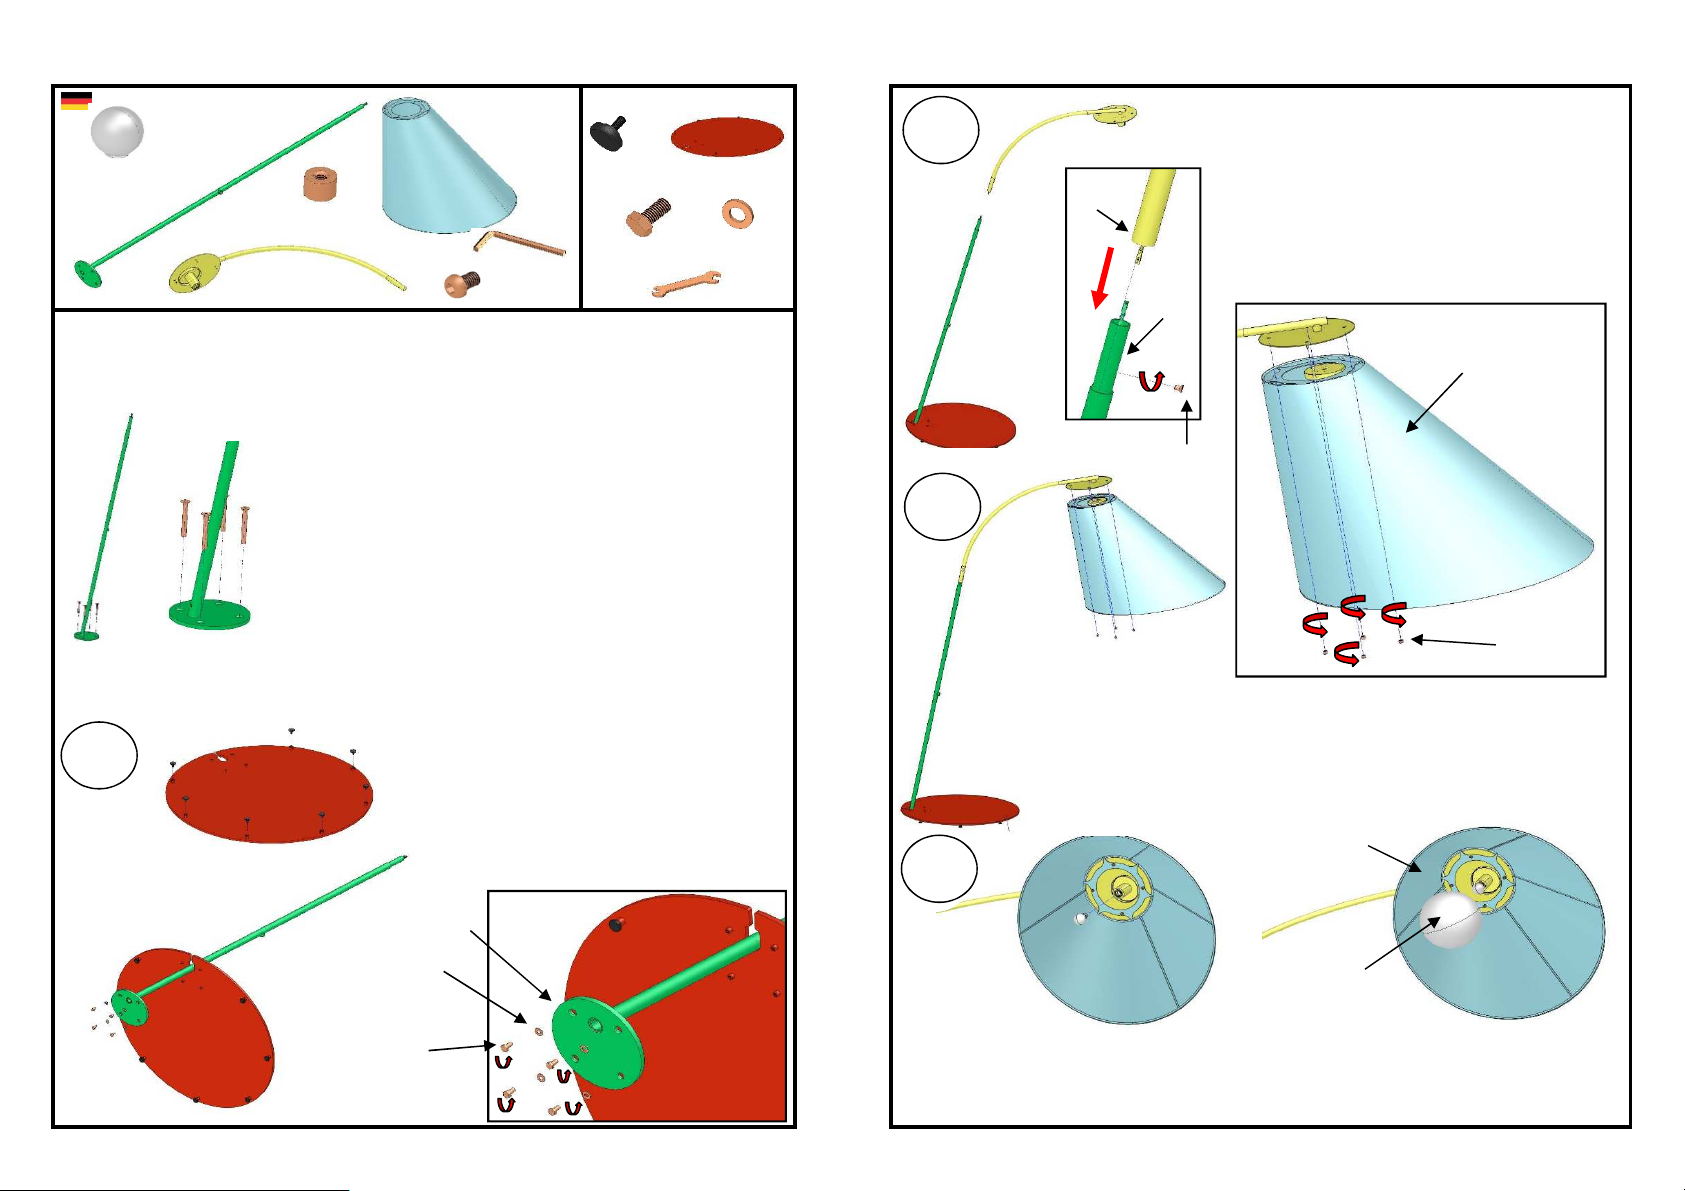
BODENINSTALLATION:
Das Produkt lässt sich direkt auf dem Boden mithilfe von 4
Dübeln befestigen. Diese sind für die Anwendung auf dem
Bodenmaterial selbst geeignet (Abb. 1). Die Dübel werden in
die Bohrungen der Platte der A-Komponente eingeführt und
entsprechend den Angaben des Dübelherstellers am Boden
befestigt.
ACHTUNG! Die Dübel sind nicht im Lieferumfang der Lampe
enthalten, da sie sich spezifisch für den jeweiligen Bodentypen
des Kunden eignen müssen. Es empfiehlt sich, sich bezüglich
des am besten geeigneten Typen von Ihrem Händler des
Vertrauens beraten zu lassen.
INSTALLATION MITTELS BALLASTVORRICHTUNG:
Das Produkt lässt sich mit der optionalen BALLASTVORRICHTUNG Art. 2005 installieren (Abb. 2).
Die Steckverbinder, die aus den Rohrverbindungen
der A- und D-Komponenten heraustreten (diese
verbinden die elektrischen Kabel der beiden
Komponenten), anschließen und diese
Komponenten einander annähern. Es ist zu
prüfen, dass die Verbindung fest ist.
Die Stange der Komponente A in die Komponente
D stecken und die Verbindung durch Anziehen der
Schraube F befestigen.
Schraube F festziehen.
Den Lampenschirm H montieren, indem 4 Stücke der Buchse L an
den 4 an der Platte der Trägerkonstruktion angeschweißten
Schrauben angeschraubt werden.
Die Buchsen an den Schrauben der Komponente D festziehen.
Es empfiehlt sich, diese Montagephase mit
mindestens zwei Personen durchzuführen.
Die vorab ausgewählte Glühbirne an der Lampenfassung anbringen und anschließend den
Lichtschirm am Lampenschirm befestigen, indem dieser kurz angedrückt und auf sich
selbst gedreht wird.
ACHTUNG! Es sollten nur Glühbirnen mit E27-
Anschluss und einer Leistung von weniger als
150W verwendet werden.
Die verstellbaren Stützfüße B an die
Ballastvorrichtung C anschrauben. Die
Komponente A in den Schlitz der
Ballastvorrichtung C einfügen. Dabei ist
darauf zu achten, dass die
Rohrverbindung beim Einschieben
nicht beschädigt wird, und es mit 4
Schrauben G sichern (dieses Verfahren
ist von zwei Personen durchzuführen).
H
L
A
D
F
E
H
78
A
G
L
A X 1
D X 1
E X 1
H X 1
art.2005
A X 1
B X 7
C X 1
D X 1
E X 1
F X 1
G X 4
H X 1
L X 4
art.2005
L X 4
4
1
2
3

B
C
INTRODUCCIÓN:
Retirar con cuidado el producto de su envase. Asegúrese de que el producto no esté
dañado y que funcione correctamente. No intente reparar ni modificar el producto por su
cuenta, ello conlleva la cancelación de la garantía. Introducir el enchufe en una toma de
alimentación de red provista de contacto de puesta a tierra.
INSTALACIÓN EN EL SUELO:
El producto puede ser instalado directamente en el suelo
con el empleo de 4 tacos idóneos para el uso sobre el
material del suelo mismo (fig. 1). Los tacos deben ser
introducidos en los agujeros de la plancha del
componente A y fijados en tierra según las indicaciones
del fabricante de los tacos.
¡ATENCIÓN! Los tacos no están incluidos en el empaque
de la lámpara, ya que son específicos al tipo de suelo del
cliente. Es bueno hacerse aconsejar el tipo más apto por
el revendedor de confianza.
INSTALACIÓN MEDIANTE BALASTRO:
El producto puede ser instalado mediante el empleo del opcional BALASTRO art.2005
(fig.2).
Conectar los conectores salientes de los
tubulares de los componentes A y D (los
cuales unen los cables eléctricos de los dos
componentes), acercando los mismos
componentes uno al otro. Verificar que la
conexión esté bien firme.
Hacer entrar el asta del componente A dentro
del componente D y fijar la conexión
enroscando el tornillo F.
Apretar el tornillo F.
Ensamblar el pantalla H enroscando 4 piezas de casquillo a los 4
tornillos soldados en la plancha de la estructura portante.
Apretar los casquillos en los tornillos del componente D.
Se recomienda realizar esta fase de montaje con
al menos dos personas.
Ensamblar la lamparita preseleccionada al porta-lámpara y luego fijar el difusor a la
pantalla, empujando y girando la pantalla sobre sí misma por un corto tramo.
¡ATENCIÓN! Utilizar solo lamparita con unión E27 y potencia menor de 150W
Enroscar las partes de abajo de las
patas regulables B al balastro C.
Introducir el componente A dentro
de la ranura del balastro C, prestando
atención a no dañar el tubular
durante el desplazamiento, y fijarlo
enroscando 4 tornillos G (realizar
esta operación con dos personas).
H
L
A
D
F
E
H
910
A
G
L
A X 1
D X 1
E X 1
H X 1
art.2005
A X 1
B X 7
C X 1
D X 1
E X 1
F X 1
G X 4
H X 1
L X 4
art.2005
L X 4
1
2
3
4
Table of contents
Languages: