Enable Lifecare Oxford Up Operator's manual

Oxford Up
®
To avoid injury, read user manual
prior to use.
USER INSTRUCTION MANUAL
Product name
to go here
Product description to go here
USER MANUAL
enablelifecare.com.au
Oxford ®
Up
User Instruction Manual
Oxford®Up
To avoid injury, read user manual prior to use.
Gebruikershandleiding
Oxford®Up
Lees voor gebruik de handleiding om letsel te voorkomen.
Manuel d’utilisation
Oxford®Up
Pour éviter les blessures, lisez le manuel de l’utilisateur avant utilisation.
Benutzerhandbuch
Oxford®Up
TZur Vermeidung von Verletzungen das
Benutzerhandbuch bitte vor dem Gebrauch lesen.
Manual de instrucciones del usuario
Oxford®Up
Para evitar lesiones, lea el manual del usuario antes de usar el producto.

Oxford Up
®2
Contents
1. Introduction 3
2. Assembly & Commissioning Instructions 4
3. Safety Precautions 5
4. Operating Instructions 7
5. Maintenance Schedule 15
6. Technical Specifications 16
7. Warranty 17

Oxford Up
®3
1. Introduction
The Oxford Up is an assistive standing and transfer device, designed for moving a person over short
distances. This might be from bed to chair, chair to wheelchair or to and from a toilet/commode, for
example. The Up has a compact footprint, enabling eective use, even in confined spaces.
The packing consists of a strong, purpose built carton that is used for both export and domestic
markets to ensure the safe arrival of the product.
To properly maintain your product please refer to the maintenance schedule included in this
document. If you are at all unsure what your country’s servicing requirements are, please check with
your authorised distributor and/or a local government agency.
The Oxford Up carries the CE mark and complies with the following EC
directives:
The CE mark:
• Medical Device Directive MDR 2017/745
The Oxford Up is intended for use by an individual who has the ability to stand unassisted or with
minimal assistance. It will enable their transfer from one resting surface to another, such as from a
bed to a chair. It is an active product for users who can contribute eort to the standing and transfer
process. By encouraging user particpation, the Up is a valuable rehabilitation aid, improving natural
function and tone. The Up is designed for indoor use and for transfers on flat surfaces, over short
distances only.
Oxford Professional products are designed and tested for a minimum service life of ten (10) years,
subject to the use and maintenance procedures stated in this manual. Use, other than in accordance
with these instructions, may compromise service life.
Statement of Intended Use
Expected Service Life
Oxford Up
®4
2. Assembly & Commissioning Instructions
• Oxford Up
• User Guide (This document)
Place the carton in a clear working area and open carefully. The carton contains:
Carton Contents
Preparation for Use
Oxford®
Up
4
English
2. Assembly & Commissioning Instructions
Carton Contents
Place the carton in a clear working area and open carefully. The carton contains:
•Oxford Up
•User Guide (This document)
Preparation for Use
WARNING
The Oxford Up will need to be lifted with care. You may need assistance to lift the Oxford
Up from its carton.
The Up requires no additional assembly once removed from its packaging; it is ready for use in
accordance with the guidelines and daily checks contained in this document.
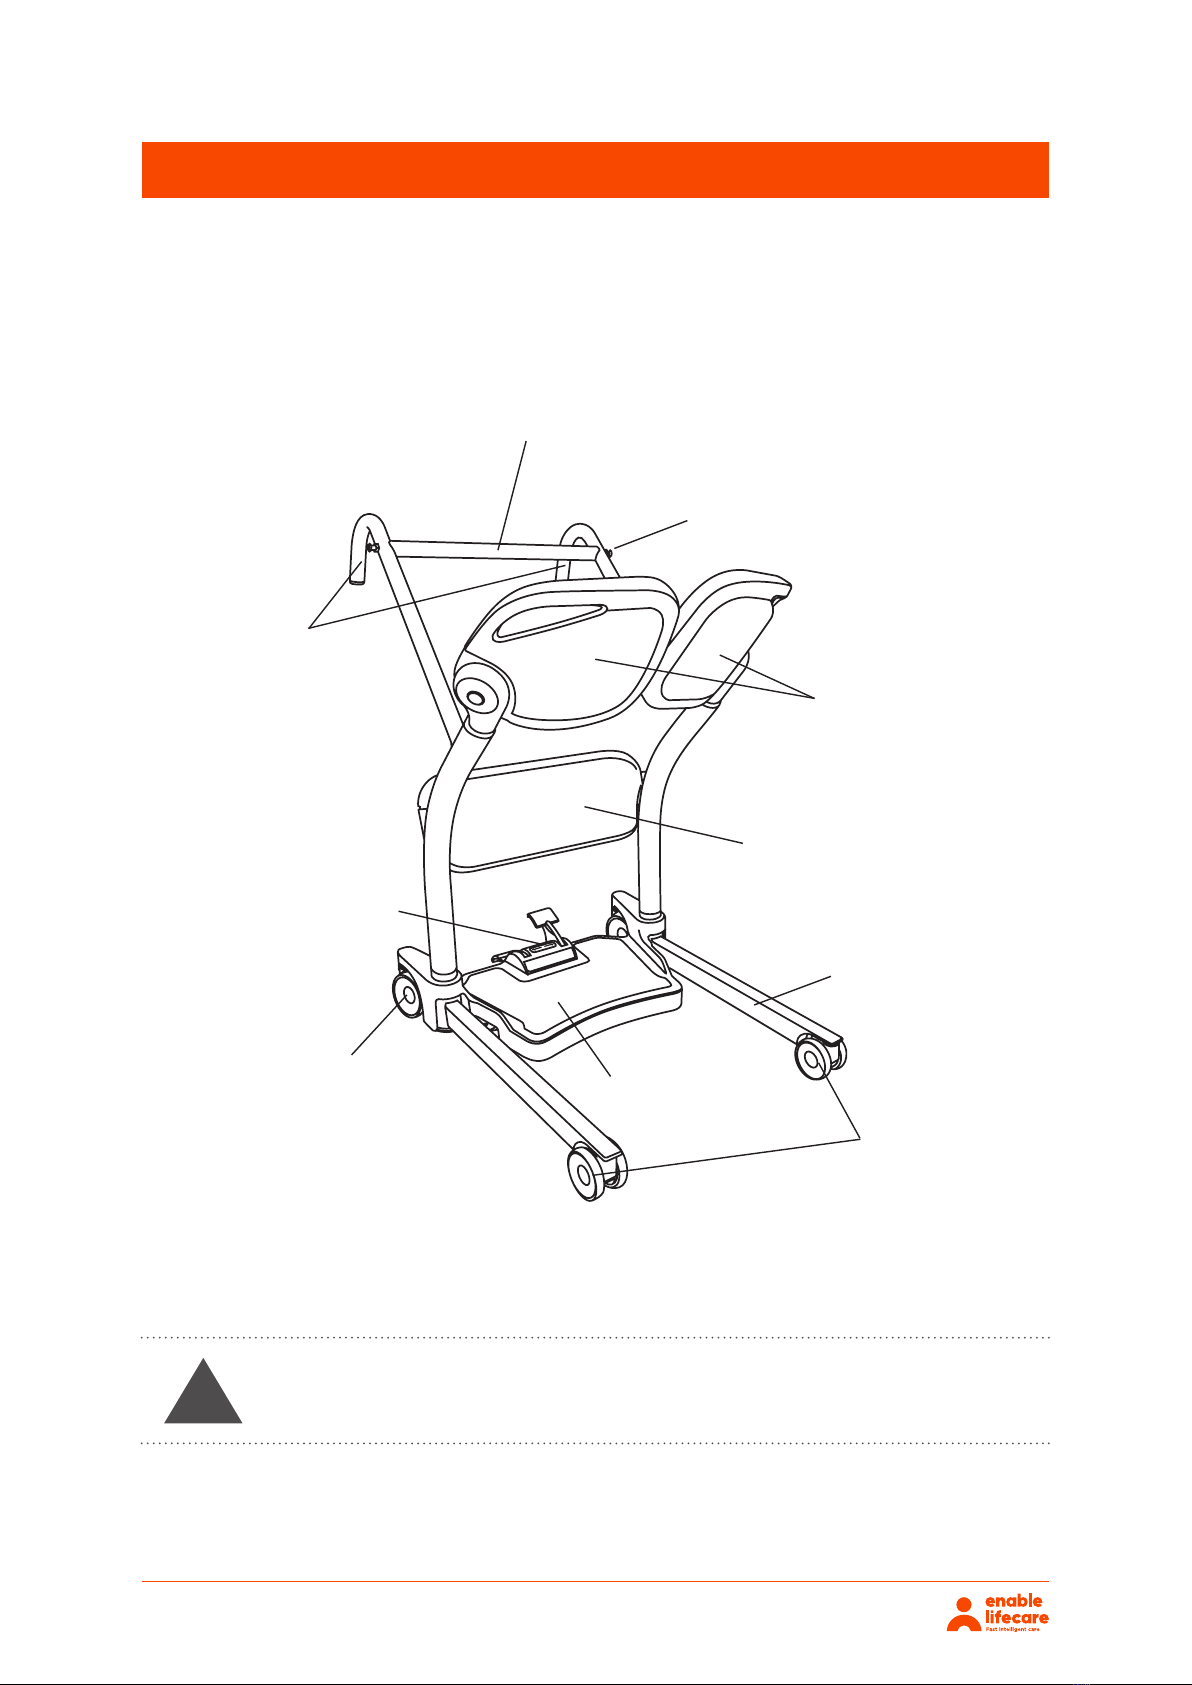
Push Handles
Patient Handle Hold Bar
Clip Sling Attachment Point
Swing-away Seat Pads
Knee Pad
Leg
Front Castors
Footplate / Base
Braked Rear Castor
Leg Open / Close Pedals
WARNING The Oxford Up will need to be lifted with care. You may need
assistance to lift the Oxford Up from its carton.
!
The Up requires no additional assembly once removed from its packaging; it is ready for use in
accordance with the guidelines and daily checks contained in this document.

Oxford Up
®5
3. Safety Precautions
Please read and follow the safety precautions listed below. The operation and use of Oxford products
is simple and straightforward. Following these few basic safety precautions will make transfer
operations easy and trouble free.
WARNING: Important safety information for hazards that might cause serious injury.
CAUTION: Information for preventing damage to the product.
NOTE: Information to which you should pay special attention.
READ AND UNDERSTAND THE USER INSTRUCTIONS BEFORE USING YOUR UP.
WARNING
!
• ALWAYS carry out a full and thorough risk assessment prior to using the Up.
• In order to use the Up safely, the patient must display the following abilities:
• The Up is intended for short transfers on flat/even floors.
• ALWAYS plan your transfer operations before commencing.
• ALWAYS carry out the DAILY CHECK LIST before using this product.
• ALWAYS familiarise yourself with the operating devices and safety features of this product before
use.
• DO NOT use a sling or belt unless it is recommended for use with the device.
• ALWAYS check the sling/belt is suitable for the particular patient and is of the correct size and
capacity.
• NEVER use a sling/belt which is frayed or damaged.
• ALWAYS fit a sling/belt according to the user instructions provided.
• ALWAYS check the safe working load of the product(s) is/are suitable for the weight of the patient.
• ALWAYS carry out transfers according to the instructions in the user manual.
• NEVER attempt to bypass a safety feature because it seems easier to operate the product.
• NEVER force an operating or safety device. All devices are easy to use and do not require excessive
force to operate. If a device is not working easily there will be a reason. Forcing will only strain or
damage the product and may compromise safety.
• ALWAYS apply both brakes after positioning the Up into position in front of the patient prior to
asking them to stand.
• When transferring to or from a wheeled/movable surface such as a commode, wheel chair or bed,
ensure the brakes (of that surface) are applied to avoid any inadvertent movement and ensure a
safer, more stable transfer.
• Support their own body weight while standing
• Maintain balance for an extended period while standing (with support)
• A firm grip in order to grasp the frame handles for support and stability
• Ability to understand and carry out instruction

Oxford Up
®6
• DO NOT attempt to manoeuvre the device by pushing on the patient.
• ALWAYS manoeuvre the device using the handle provided. DO NOT attempt to apply side force to
the base or frame of the device in order to manoeuvre.
• DO NOT push a loaded device at speeds exceeding a slow walking pace (3 kilometres/ hour 0.8
metres/second).
• DO NOT push the device over wet surfaces, uneven or rough ground or surfaces littered with
debris, particularly when loaded.
• DO NOT attempt to push or pull a loaded device over a floor obstruction of which the castors are
unable to ride over easily.
• DO NOT bump the device down steps, loaded or unloaded.
• DO NOT attempt to negotiate a loaded device on a slope which exceeds 1:12 (approximately 5
degrees). Joerns Healthcare recommend a second helper is present when moving a patient on a
slope.
• DO NOT park a loaded device on ANY sloping surface.
• DO NOT transfer a patient unless you are trained and competent to do so.
• Your device is for patient standing and transfers. DO NOT use it, or allow it to be used, for any other
purpose.
• DO NOT use this product for self transfers; a patient must always be assisted by caregiver(s).
• ENSURE the carergiver(s) wear appropriate footwear when using this product.
• OXFORD RECOMMENDS THE USE OF GENUINE OXFORD PARTS. Oxford sling/belt and transfer
products are designed to be compatible with one another. For country specific guidance on
sling/belt use and compatibility, please refer to the sling/belt label or contact your local market
distributor or Joerns Healthcare.
Oxford Up
®7
4. Operating Instructions
The seat pads are designed to swing-away allowing easy access for the patient when standing. There
is an integrated handle on the back of each seat pad to facilitate this.
Once the patient is in position and standing, the seat pads can be swung back into the seated position,
allowing the patient to sit down.
The legs of the Up can be opened and closed to allow easier positioning around furniture. To open the
legs, push down the left hand pedal. To close, push down the right hand pedal.
Each castor can be braked independently by pressing down firmly on the integrated brake pedal.
To release the brakes, simply manoeuvre the pedal back up.
1. Swing-away Seat Pads
2. Opening & Closing the Legs
3. Applying the Brakes
Oxford®
Up
7
English
4. Operating Instructions
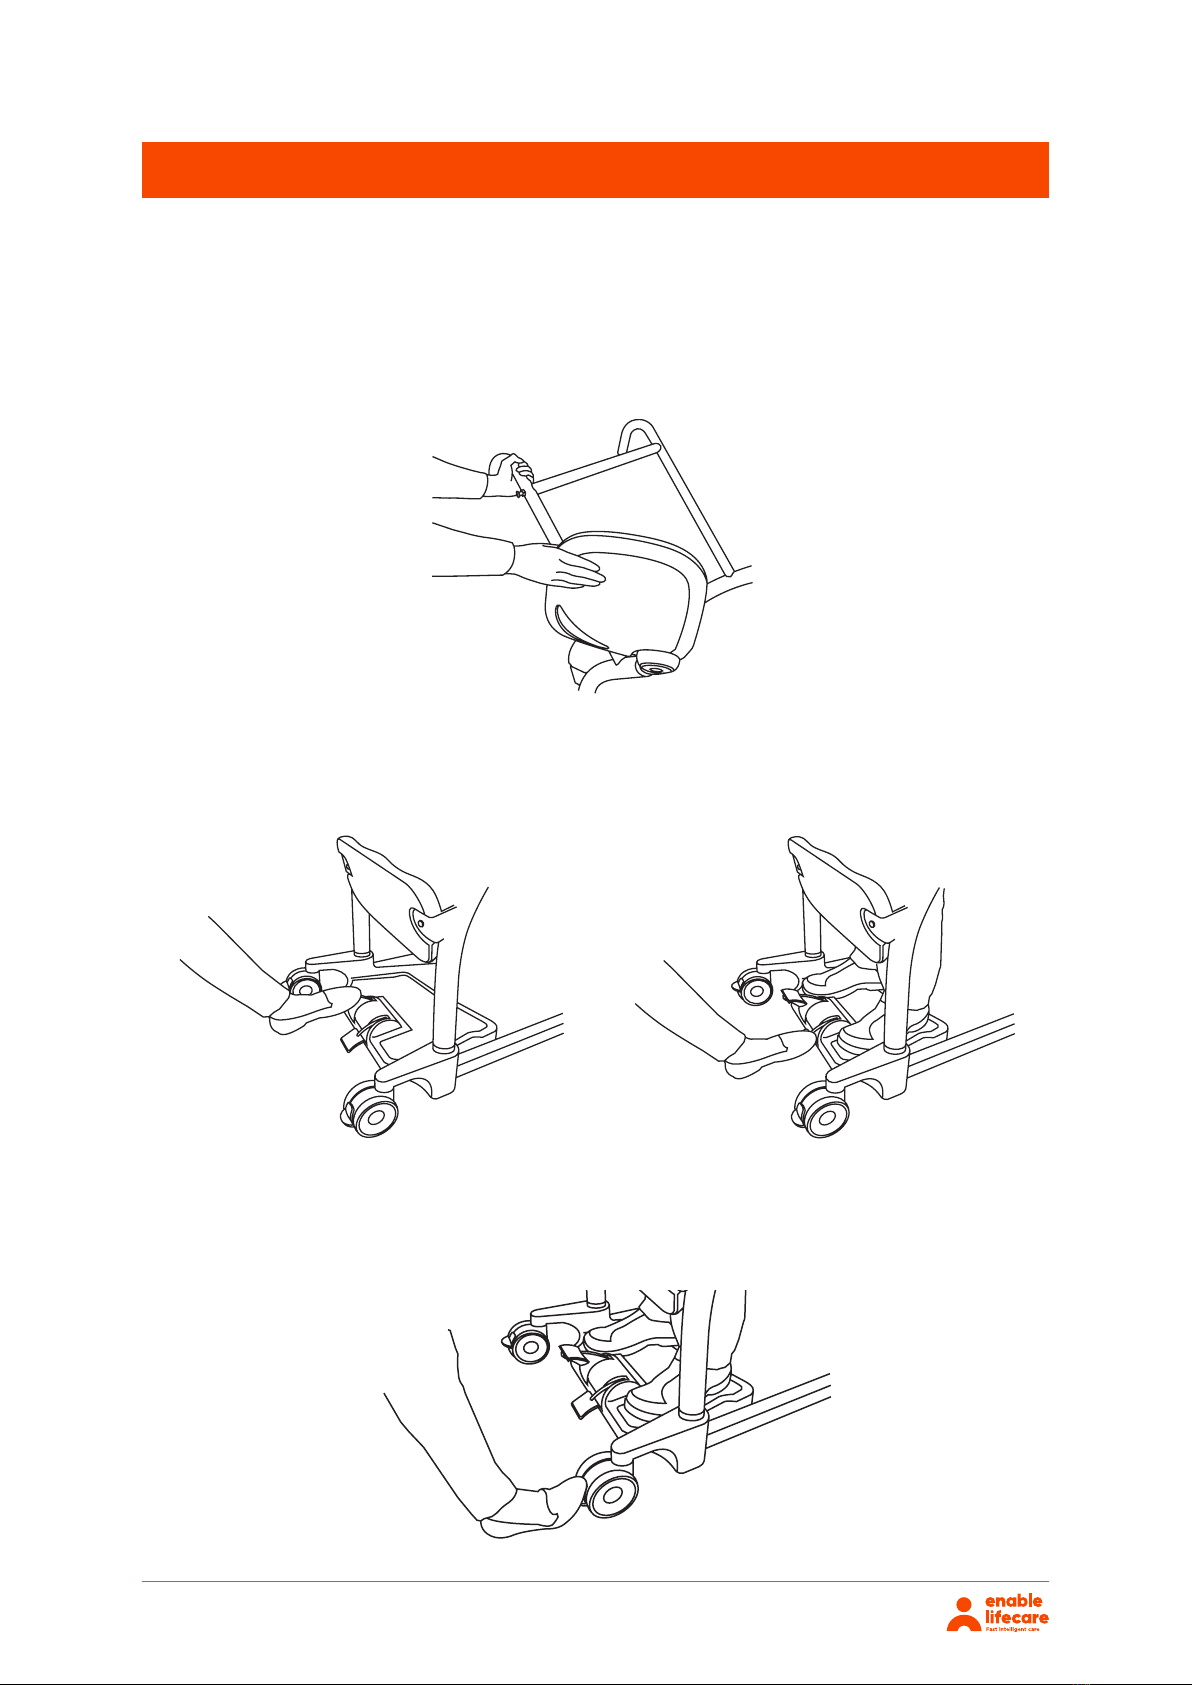
1. Swing-away Seat Pads
The seat pads are designed to swing-away allowing easy access for the patient when standing.
There is an integrated handle on the back of each seat pad to facilitate this.
Once the patient is in position and standing, the seat pads can be swung back into the seated
position, allowing the patient to sit down.
2. Opening & Closing the Legs
The legs of the Up can be opened and closed to allow easier positioning around furniture. To
open the legs, push down the left hand pedal. To close, push down the right hand pedal.
3. Applying the Brakes
Each castor can be braked independently by pressing down firmly on the integrated brake pedal.
To release the brakes, simply manoeuvre the pedal back up.
Oxford®
Up
7
English
4. Operating Instructions
1. Swing-away Seat Pads
The seat pads are designed to swing-away allowing easy access for the patient when standing.
There is an integrated handle on the back of each seat pad to facilitate this.
Once the patient is in position and standing, the seat pads can be swung back into the seated
position, allowing the patient to sit down.
2. Opening & Closing the Legs
The legs of the Up can be opened and closed to allow easier positioning around furniture. To
open the legs, push down the left hand pedal. To close, push down the right hand pedal.
3. Applying the Brakes
Each castor can be braked independently by pressing down firmly on the integrated brake pedal.
To release the brakes, simply manoeuvre the pedal back up.

Oxford Up
®8
The following guidance applies no matter what the surface you are transferring from, whether it be a
chair, wheelchair, bed, toilet or commode.
Maintain a dialogue with the patient, ensuring they understand what is happening and they are
comfortable and at ease.
If a sling has been deemed necessary as part of the risk assessment, ensure you have the appropriate,
compatible style and size.
Rotate the swing-away seat pads into the open position to allow patient access.
To gain improved access around large chairs and bulky commodes, open the legs of the Up before
approaching the patient.
4. Approaching the Patient with the Oxford Up
WARNING ALWAYS carry out a full and thorough risk assessment prior to using
the Up.
!
Oxford®
Up
8
English
4. Approaching the Patient with the Oxford Up
The following guidance applies no matter what the surface you are transferring from, whether it
be a chair, wheelchair, bed, toilet or commode.
WARNING
ALWAYS carry out a full and thorough risk assessment prior to using the Up.
Maintain a dialogue with the patient, ensuring they understand what is happening and they are
comfortable and at ease.
If a sling has been deemed necessary as part of the risk assessment, ensure you have the
appropriate, compatible style and size.
Rotate the swing-away seat pads into the open position to allow patient access.
To gain improved access around large chairs and bulky commodes, open the legs of the Up
before approaching the patient.
Oxford Up
®9
Carefully wheel the Up into position, in front of the patient, placing their feet on the footplate with
their knees resting comfortably against the cushioned knee pad.
Once the patient is comfortably in position, apply both castor brakes.
Oxford®
Up
9
English
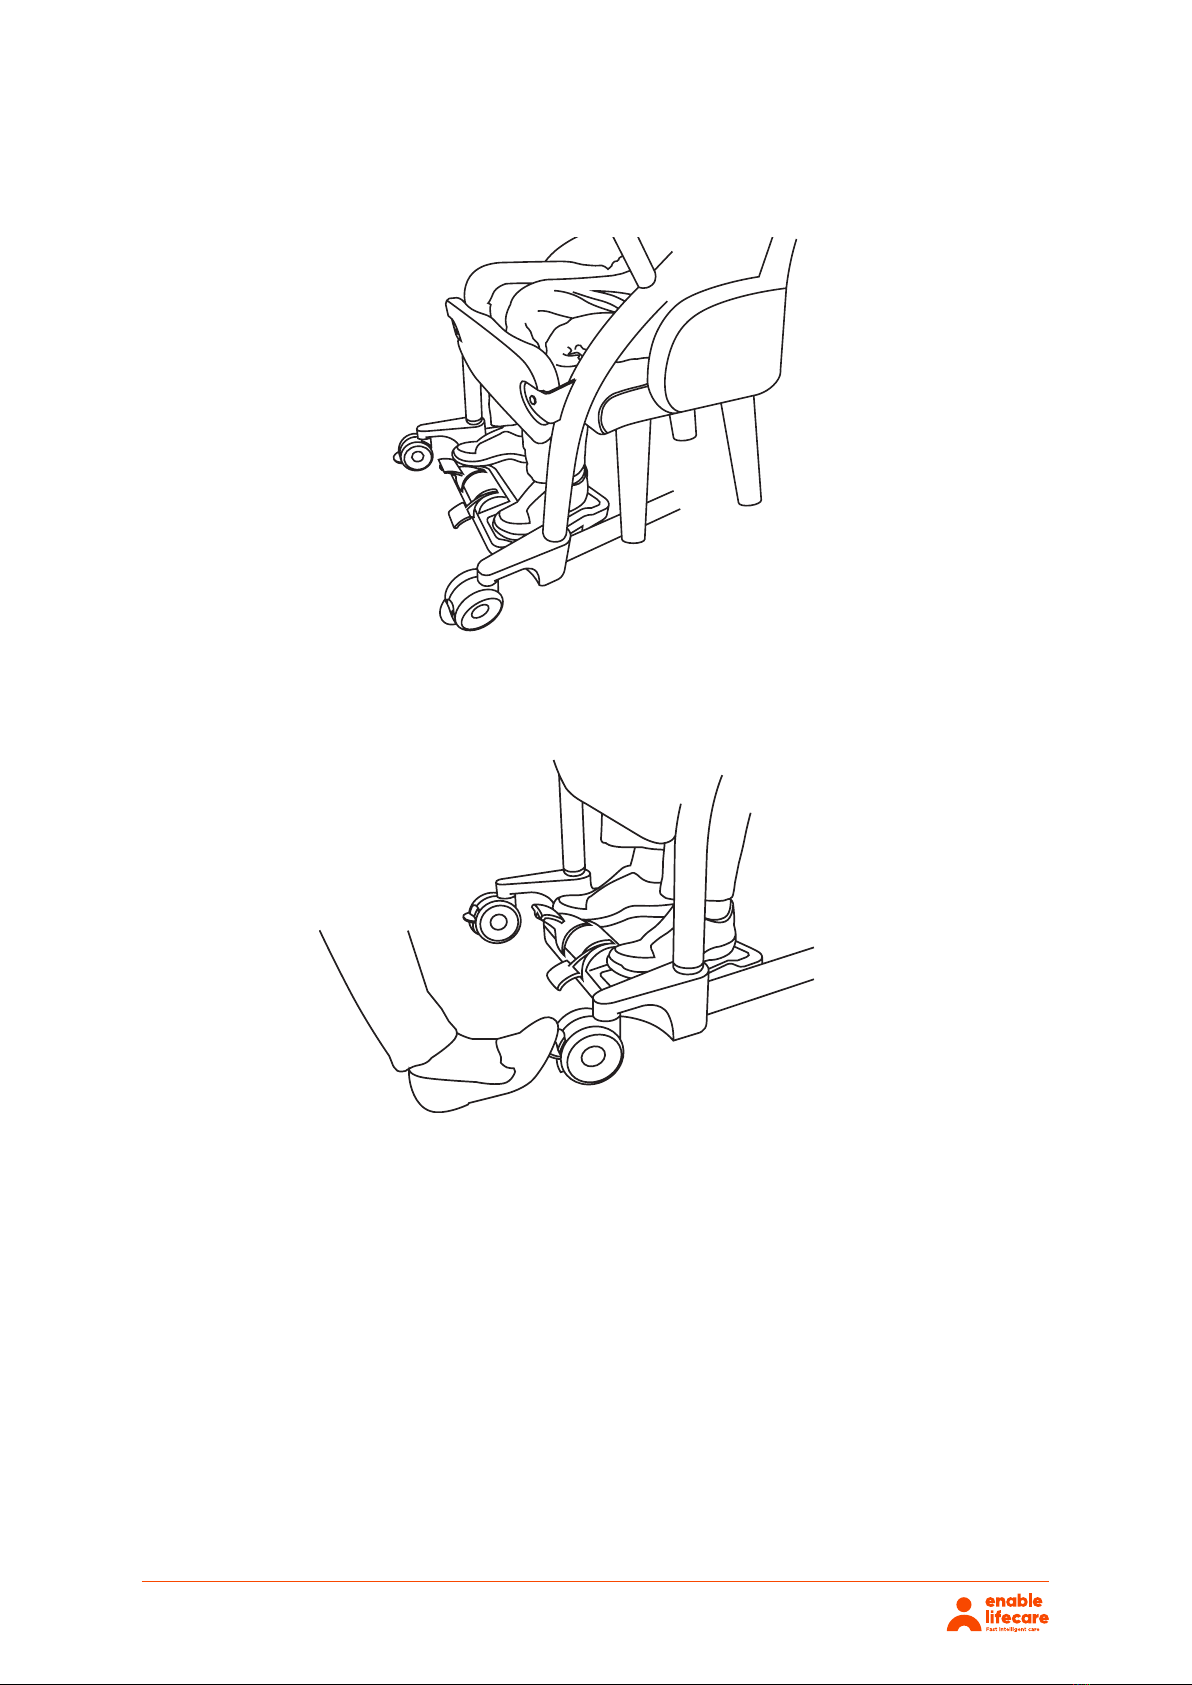
Carefully wheel the Up into position, in front of the patient, placing their feet on the footplate with
their knees resting comfortably against the cushioned knee pad.
Once the patient is comfortably in position, apply both castor brakes.
Oxford®
Up
9
English
Carefully wheel the Up into position, in front of the patient, placing their feet on the footplate with
their knees resting comfortably against the cushioned knee pad.
Once the patient is comfortably in position, apply both castor brakes.

Oxford Up
®10
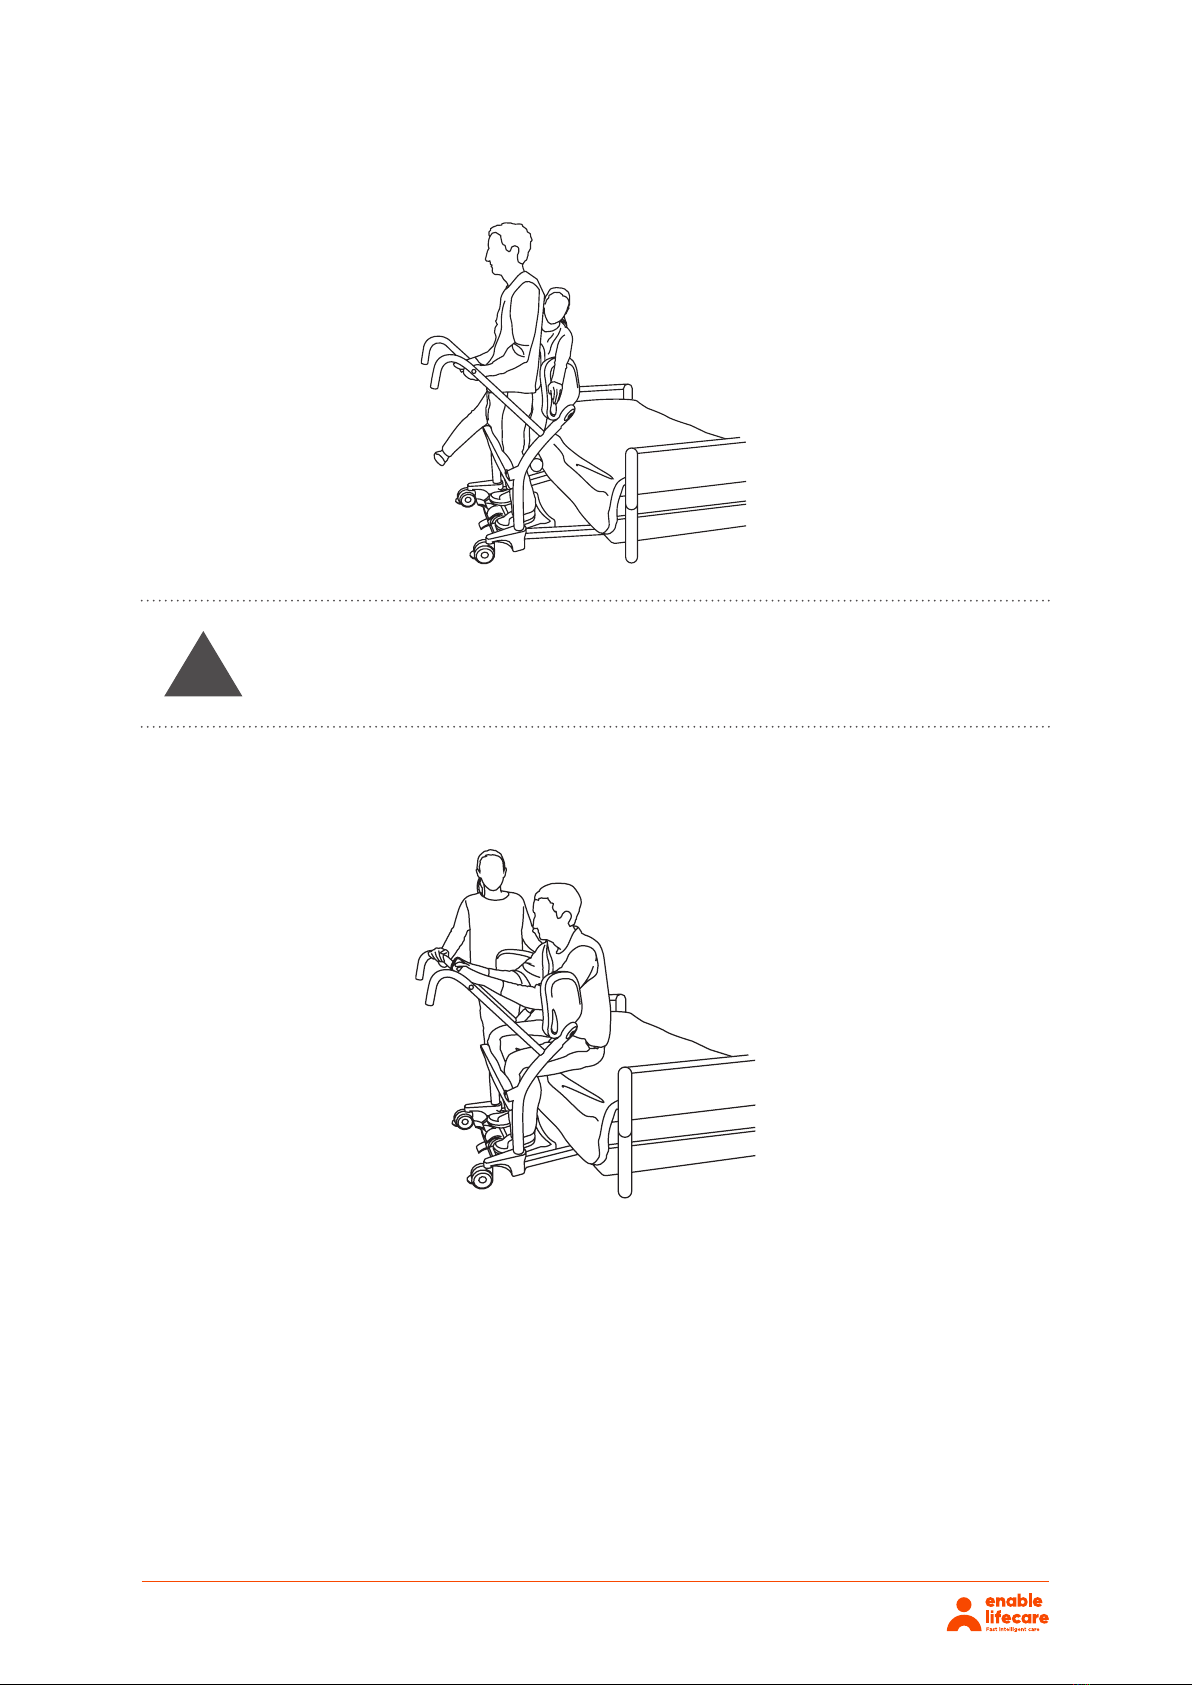
When transferring to or from a wheeled/movable surface such as a commode, wheelchair or bed,
ensure the brakes (of that surface) are applied to avoid any inadvertent movement and ensure a
safer, more stable transfer.
Ask the patient to grasp the crossbar and prepare to raise themselves to a standing position. Oer
words of encouragement and provide assistance as required.
NOTE: The patient’s knees should remain in contact with the knee pad throughout the standing and
transfer process.
Once the patient is standing, rotate the swing-away seat pads into the seated position before asking
the patient to carefully lower themselves into a seated position.
The following guidance applies regardless of the surface you are transferring to, whether it be a chair,
wheelchair, bed, toilet or commode.
5. Assisted Standing and Transfers with the Oxford Up
WARNING
!
Oxford®
Up
10
English
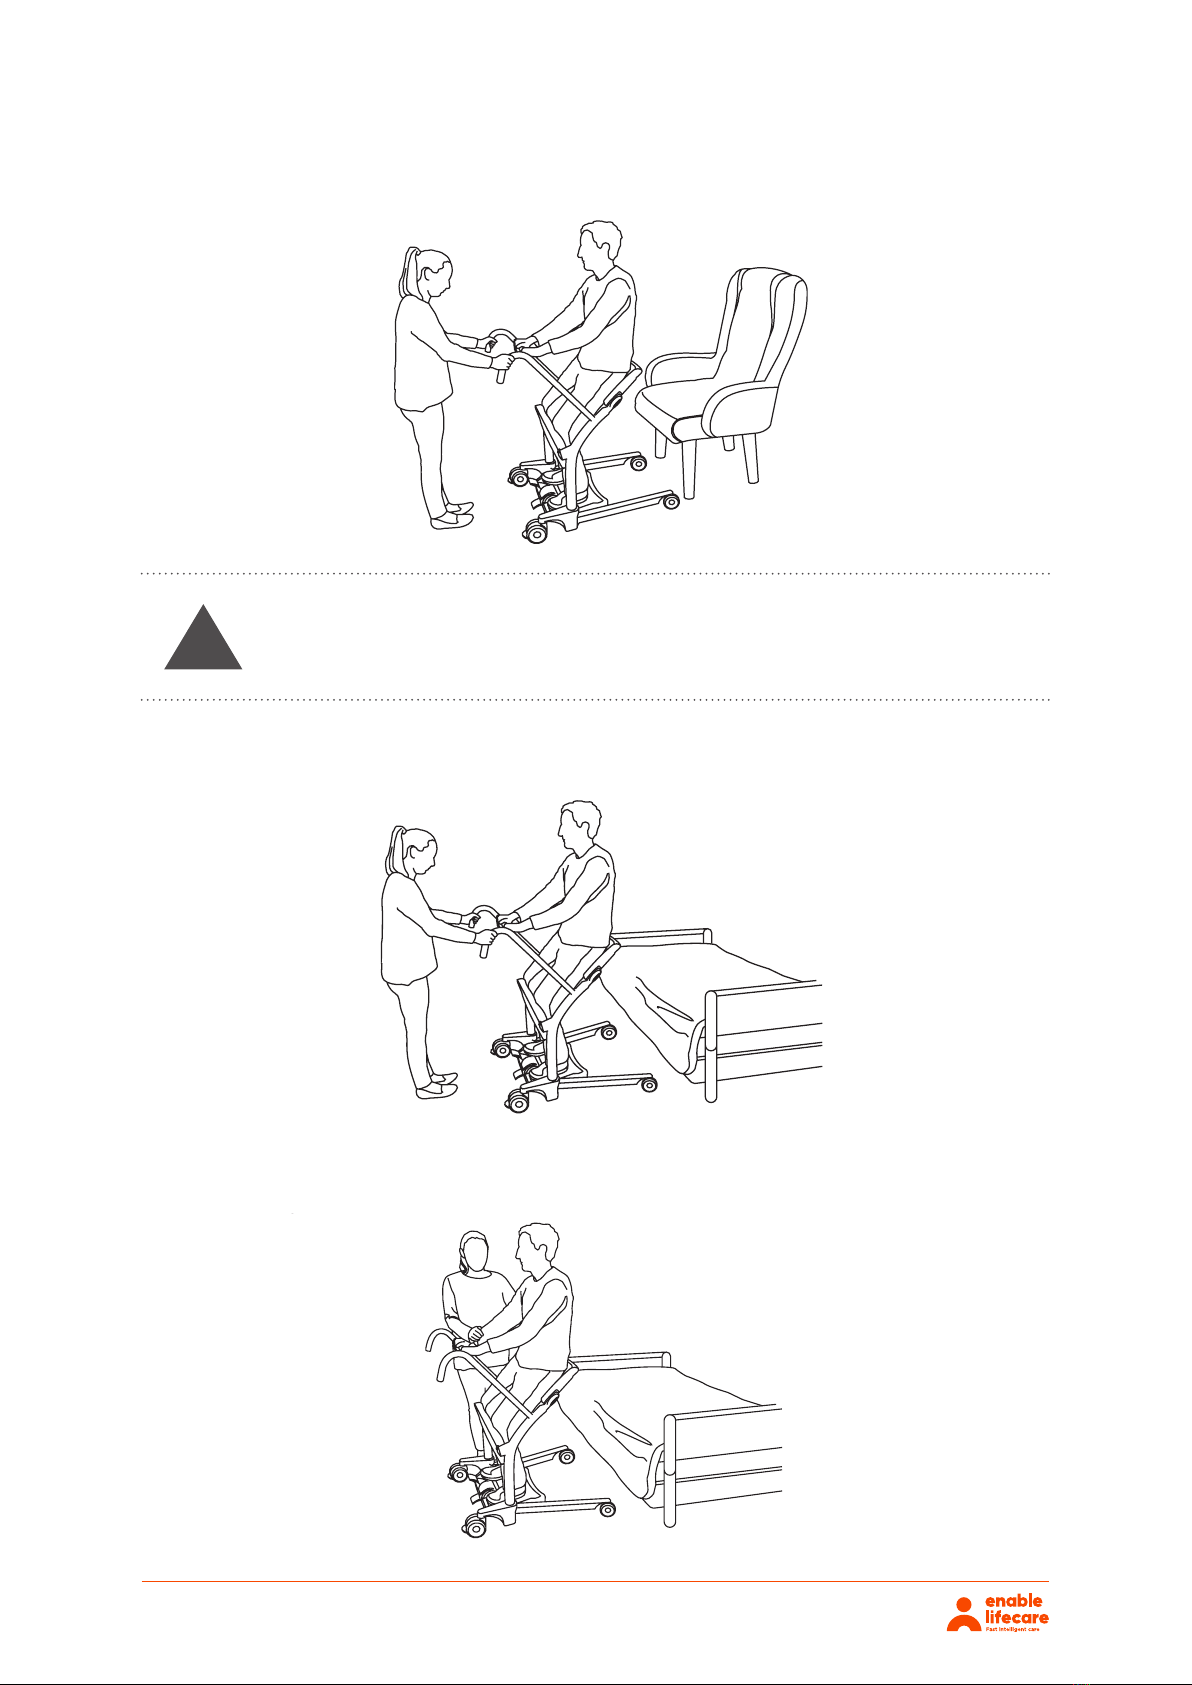
5. Assisted Standing and Transfers with the Oxford Up
The following guidance applies regardless of the surface you are transferring to, whether it be a
chair, wheelchair, bed, toilet or commode.
WARNING
When transferring to or from a wheeled/movable surface such as a commode, wheelchair
or bed, ensure the brakes (of that surface) are applied to avoid any inadvertent movement
and ensure a safer, more stable transfer.
Ask the patient to grasp the crossbar and prepare to raise themselves to a standing position. Offer
words of encouragement and provide assistance as required.
NOTE: The patient’s knees should remain in contact with the knee pad throughout the standing and
transfer process.
Once the patient is standing, rotate the swing-away seat pads into the seated position before asking
the patient to carefully lower themselves into a seated position.
Oxford®
Up
10
English
5. Assisted Standing and Transfers with the Oxford Up
The following guidance applies regardless of the surface you are transferring to, whether it be a
chair, wheelchair, bed, toilet or commode.
WARNING
When transferring to or from a wheeled/movable surface such as a commode, wheelchair
or bed, ensure the brakes (of that surface) are applied to avoid any inadvertent movement
and ensure a safer, more stable transfer.
Ask the patient to grasp the crossbar and prepare to raise themselves to a standing position. Offer
words of encouragement and provide assistance as required.
NOTE: The patient’s knees should remain in contact with the knee pad throughout the standing and
transfer process.
Once the patient is standing, rotate the swing-away seat pads into the seated position before asking
the patient to carefully lower themselves into a seated position.
Oxford Up
®11
Ensure the patient is comfortable and fully supported before releasing the brakes and proceeding
carefully with the transfer.
Wheel the patient directly in front of the target surface and apply the brakes. Open the Up’s legs to
help navigate and get close to wider furniture including bulky commodes and armchairs.
Ask the patient to grasp the crossbar and raise themselves into a standing position, providing
assistance if required.
Oxford®
Up
11
English
Ensure the patient is comfortable and fully supported before releasing the brakes and proceeding
carefully with the transfer.
WARNING
When transferring to or from a wheeled/movable surface such as a commode, wheelchair
or bed, ensure the brakes (of that surface) are applied to avoid any inadvertent movement
and ensure a safer, more stable transfer.
Wheel the patient directly in front of the target surface and apply the brakes. Open the Up’s legs
to help navigate and get close to wider furniture including bulky commodes and armchairs.
Ask the patient to grasp the crossbar and raise themselves into a standing position, providing
assistance if required.
WARNING
When transferring to or from a wheeled/movable surface such as a
commode, wheelchair or bed, ensure the brakes (of that surface) are
applied to avoid any inadvertent movement and ensure a safer, more
stable transfer.
!
Oxford Up
®12
Once the patient is standing, rotate the swing-away seat pads into the up position, providing a barrier-
free space in behind.
Oxford®
Up
12
English
Once the patient is standing, rotate the swing-away seat pads into the up position, providing a
barrier-free space in behind.
WARNING
When transferring to or from a wheeled/movable surface such as a commode, wheelchair
or bed, ensure the brakes (of that surface) are applied to avoid any inadvertent movement
and ensure a safer, more stable transfer.
With the patient continuing to grasp the crossbar, ask them to carefully lower themselves on to the
target surface, providing assistance as necessary.
With the patient continuing to grasp the crossbar, ask them to carefully lower themselves on to the
target surface, providing assistance as necessary.
WARNING
When transferring to or from a wheeled/movable surface such as a
commode, wheelchair or bed, ensure the brakes (of that surface) are
applied to avoid any inadvertent movement and ensure a safer, more
stable transfer.
!
Oxford Up
®13
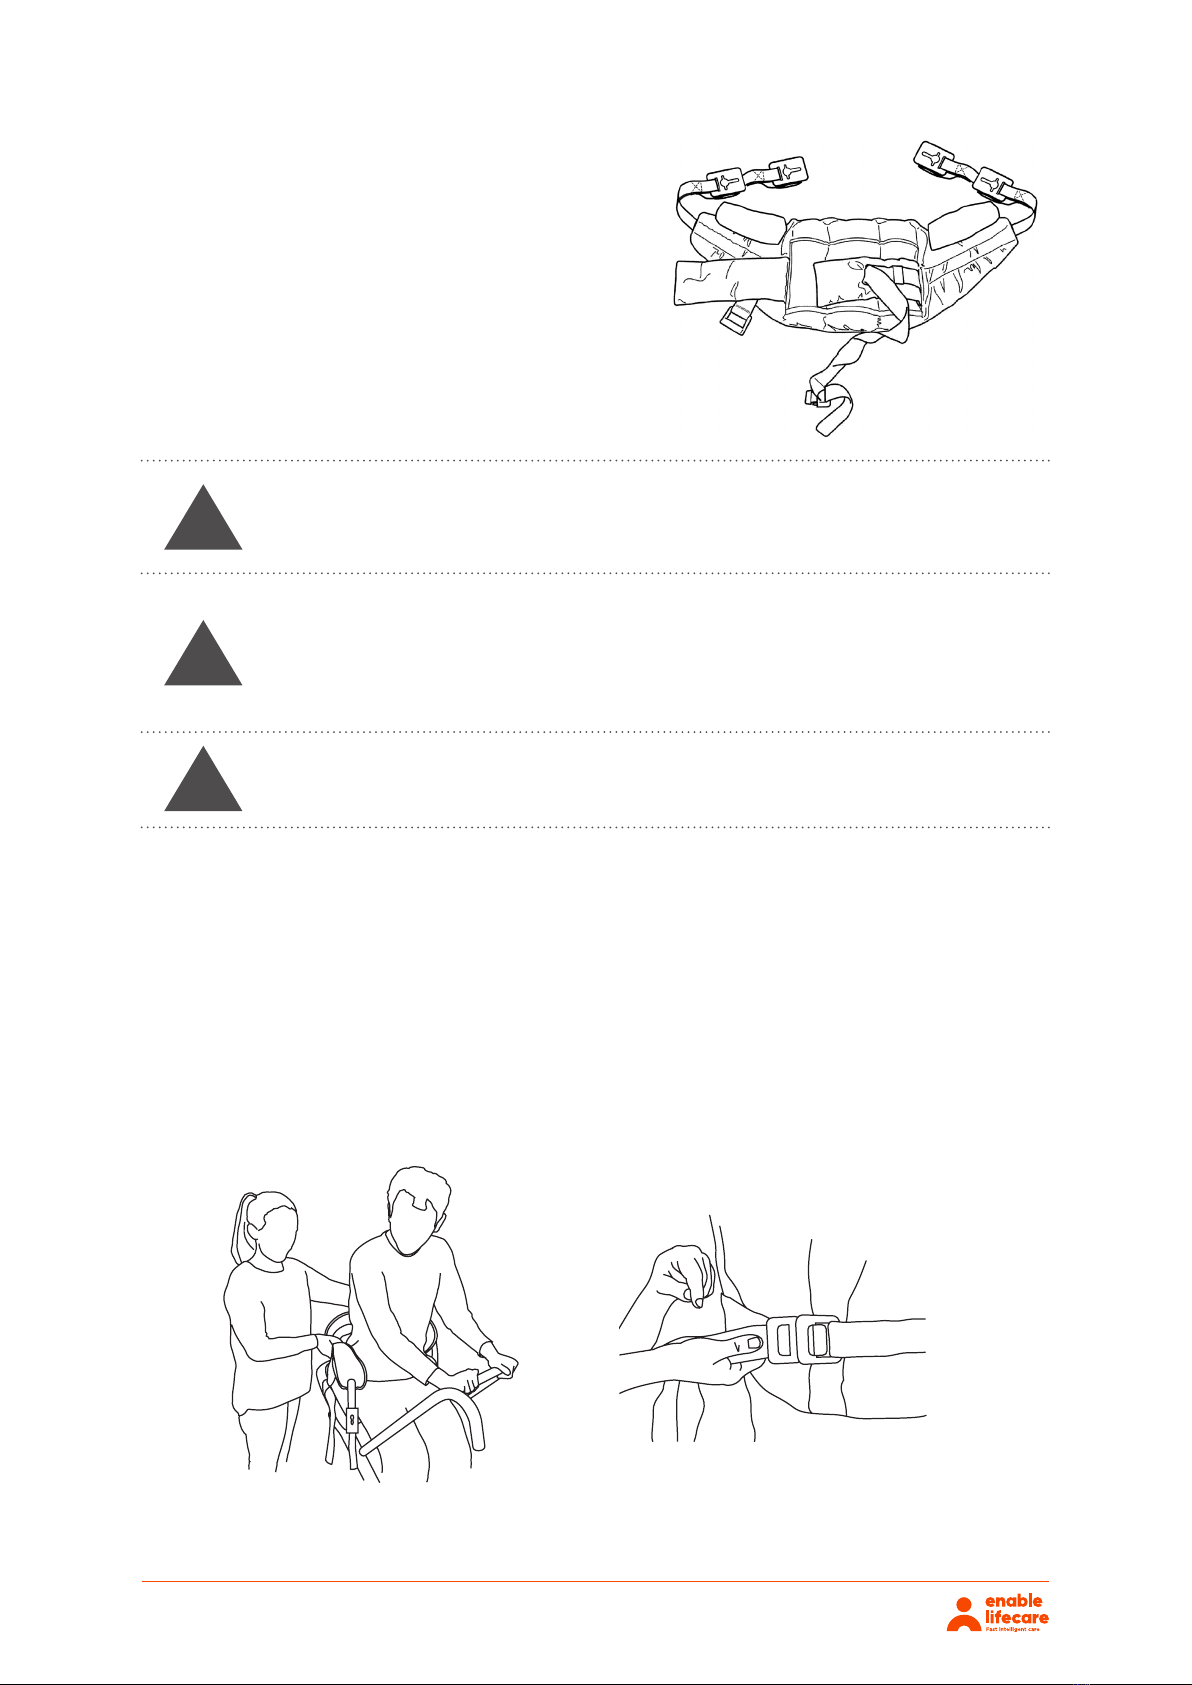
The Oxford Deluxe Standing sling with clips is
suitable for use with the Oxford Up. Various sizes
are available depending on patient requirements.
NOTE: For full fitting instructions, please refer to the user guide supplied with each sling.
If your patient would benefit from additional reassurance and support, the Oxford Deluxe Standing
sling with clips can be used in combination with the Up.
Place the sling around the patient just above the waist line and secure the waist belt around the
patient using the clip. This strap need not be tight. It is there to hold the sling in position whilst
attaching the sling to the Up. Ensure that the client’s arms are outside the sling.
6. Sling Compatibility & Attachment
Fitting Instructions:
Oxford®
Up
13
English
6. Sling Compatibility & Attachment
The Oxford Deluxe Standing sling with clips is
suitable for use with the Oxford Up. Various sizes
are available depending on patient requirements.
WARNING
Joerns Healthcare recommends that slings be checked regularly and particularly before
use for signs of fraying or damage. DO NOT use slings that are worn or damaged.
WARNING
OXFORD RECOMMENDS THE USE OF GENUINE OXFORD PARTS. Oxford sling, lift and
transfer products are designed to be compatible with one another. For country specic
guidance on sling use and compatibility, please refer to the sling label or contact your local
market distributor or Joerns Healthcare.
WARNING
Refer to maximum weight capacity of product. Sling capacity is limited by the maximum
capacity of the product it is used on.
Fitting Instructions:
NOTE: For full fitting instructions, please refer to the user guide supplied with each sling.
If your patient would benefit from additional reassurance and support, the Oxford Deluxe Standing
sling with clips can be used in combination with the Up.
Place the sling around the patient just above the waist line and secure the waist belt around the
patient using the clip. This strap need not be tight. It is there to hold the sling in position whilst
attaching the sling to the Up. Ensure that the client’s arms are outside the sling.
WARNING
WARNING
WARNING
Joerns Healthcare recommends that slings be checked regularly and
particularly before use for signs of fraying or damage. DO NOT use
slings that are worn or damaged.
Refer to maximum weight capacity of product. Sling capacity is
limited by the maximum capacity of the product it is used on.
OXFORD RECOMMENDS THE USE OF GENUINE OXFORD PARTS.
Oxford sling, lift and transfer products are designed to be compatible
with one another. For country specific guidance on sling use and
compatibility, please refer to the sling label or contact your local
market distributor or Joerns Healthcare.
!
!
!

Oxford Up
®14
When fitted to the patient, the sling is connected to the clip attachment pins by using the Securi3 clip
system (step by step guide as follows). To remove, simply reverse this procedure.
NOTE: Use the appropriate clip to achieve a natural seated position that provides good, comfortable
support without pulling the paitent forward or allowing them to lean back and become unbalanced.
Continue with the transfer accoridng to the guidance in this document.
PLEASE NOTE:
Oxford®
Up
14
English
When tted to the patient, the sling is connected to the clip attachment pins by using the Securi3 clip
system (step by step guide as follows). To remove, simply reverse this procedure.
NOTE: Use the appropriate clip to achieve a natural seated position that provides good,
comfortable support without pulling the paitent forward or allowing them to lean back and
become unbalanced.
Continue with the transfer accoridng to the guidance in this document.
PLEASE NOTE:
1. Attach Securi3 clips to the attachment
pins as described in the illustration shown.
2. Ensure all green safety loops are visible
before transferring.
SECURI3 CLIP SYSTEM
1. Attach Securi3 clips to the
attachment pins as described in the
illustration shown.
2. Ensure all green safety loops are
visible before transferring.

Oxford Up
®15
5. Maintenance Schedule & Daily Check List
Joerns Healthcare strongly recommends the following checks be carried out on a daily basis and
before using the Up.
Please contact your local authorised Oxford service provider to arrange replacement parts and
repairs. If you are unsure of the organisation you need to contact, our customer service team will
be more than happy to assist you. Contact details can be found on the reverse cover of this manual.
Using a clean, damp cloth, wipe clean with ordinary soap and water and/or any hard surface
disinfectant. Harsh chemical cleaners or abrasives should be avoided as these may damage the
surface finish of the product.
- ENSURE the product moves freely on its castors.
- ENSURE both brakes are operational and engage correctly.
- ENSURE the legs open and close correctly.
- EXAMINE the sling attachment points for excessive wear. If in doubt - do not use.
- EXAMINE slings for fraying or other damage. DO NOT use any sling if damaged or if the sling
shows signs of wear.
- INSPECT the frame and base for signs of cracks, damage or distortion.
Daily Check List:
Spare Parts & Repairs:
Cleaning:
All Oxford products are designed for minimum maintenance, however some safety checks and
procedures are required. A schedule of DAILY tasks are detailed below.
Daily checks and regular inspection will ensure your product is kept in optimum safe working
condition. A list of spare parts is available upon request.
WARNING JOERNS HEALTHCARE RECOMMENDS THE USE OF GENUINE
OXFORD PARTS.
!
Oxford Up
®16
6. Technical Specifications
Safe Working Load 200kgs
Overall Width 640mm
Overall Height 1065mm
Overall Length 955mm
Legs Open - External Width 850mm
Legs Open - Internal Width 730mm
Legs Closed - External Width 480mm
Legs Closed - Internal Width 350mm
Leg Height 95mm
Ground Clearance 15mm
Overall Height Of Base (Footplate) 65mm
Knee Pad Height (To top of knee pad) 465mm
Turning Radius 1165mm
Front Castors 75mm
Rear Castors 100mm
Outside this environment functionality and safety may be compromised.
Total 22.5kgs
Temperature 5°C to 40°C
Relative humidity 20% to 90% @ 30°C - not condensing
Temperature -20°C to +60°C
Relative humidity 20% to 90% @ 30°C - not condensing
Weights:
Operating:
Storage:
Environmental Conditions:

Oxford Up
®17
7. Warranty
Joerns Healthcare has an established network of authorised distributors and service agents who
will be pleased to handle all of your purchasing, warranty, repair and maintenance enquiries. It is
recommended that our products are commissioned by your authorised distributor or service agent.
The distributor or service agent operates the warranty programme, so it is important to keep a record
of their name, address and telephone number so they can be contacted should any problem arise.
If you are in any doubt as to where your product was purchased, Joerns Healthcare can trace the
supplier if you quote the serial number of the product.
All warranty claims are subject to the correct use and maintenance in accordance with the user
instruction manual provided with each product. Damage caused by use in unsuitable environmental
conditions or failure to maintain the product in accordance with user and service instructions is not
covered. Your statutory rights remain unaected.
REMEMBER:Contact your authorised distributor or service agent for purchases, repairs, servicing
and certified maintenance.
Your distributor:

Oxford Up
®
ENABLE LIFECARE PTY LTD
T 1300 370 370
enablelifecare.com.au
At Enable we source quality,
aordable and innovative
products globally and have
them available for fast delivery.
But we do more than just
provide products.
We give the knowledge and
support to help our customers
grow their business and deliver
better life care.
Table of contents
Popular Mobility Aid manuals by other brands


Disney baby
Disney baby Music & Lights WA027 user guide

Otto Bock
Otto Bock Walk Star Instructions for use

Pressalit Care
Pressalit Care MATRIX R2120 Operation and maintenance manual

Pride Mobility
Pride Mobility SilverStar Wheelchair/Scooter Lift owner's manual

BIOS LIVING
BIOS LIVING Glider Plus instructions

Medline
Medline MDS86850ESAR STEP-BY-STEP ASSEMBLY GUIDE