Endon EL-MILOS Manual

• Re-fitthetubesandthesidepanels.NOTE:Whenfitting
the side panels –please make sure that there is a gap
between the side panels and the door as shown. This
gap is required so that the door does not contact, and
damage,thesidepanelswhenitisopened.Makesure
thatallrubberwashersareusedunderthefixingscrews
–toprotectthefittingagainstwateringressandthatno
cablesaretrapped.
• Positiontheshelvesasrequired.Toloosentheshelves,
turn the knurled nuts CLOCKWISE. Move them to the
desiredslotsthenturnthemANTI-CLOCKWISEtosecure.
Turn on the power and test the lights (pull cord) and
shaversocket.
Commissioning Instructionleaflet
Milos Mirror
EL-MILOS(56589)
Wasteelectricalproductsshouldnotbedisposedofwithhouseholdwaste.Pleaserecyclewherefacilitiesexist.
CheckwithyourLocalAuthorityorretailerforrecyclingadvice.
Recycling advice
Safety information
EndonLightingLS90SE
• Werecommendcleaningwithasoftdrycloth.Donotuse
solventsorabrasivecleanersasthesecoulddamagethe
finish.
• Mirror–Useadampclothoraproprietyglasscleaner.
Donotuseabrasivematerialsasthesewilldamagethe
finish.
Live Voltages may be present in this unit even when turned of or when completely disconnected.Foryoursafety,
alwaysswitchoffthesupplybeforechanginglightbulbs,orcleaning.
Themirrormustbereplacedimmediatelyshoulditbecomecrackedordamaged.Thisfittingmust
notbeusedwithoutthemirrorinplace.
• The shaver socket is powered by a 20W isolating
transformer and is only intended for use with electric
shavers, electric toothbrush chargers and similar
products.
• Anyapplianceconnectedtothesocketmustnotexceed
the20Wpoweroutputasthiscouldcausedamageand
overheatingtooccur.
• Alwayscheckyourapplianceinstructionstoensurethe
powerrequirementsarelessthan20W.
Shaver Socket Instructions
Iss.414102016
ReplaceCrackedShade
Thankyouforpurchasingthislightfitting.Pleasereadtheinstructionscarefullybeforeusetoensuresafeandsatisfactory
operationofthisproduct.Pleaseretaintheseinstructionsforfuturereference.
Warning
This is a Class 1 product and must be earthed
Pleasereadtheseinstructionscarefullybefore
commencinganywork.
Thisunitmustbefittedbyacompetentandqualified
electrician.
InstallinaccordancewithIEEWiringregulationsand
currentBuildingRegulations.
Topreventelectrocutionswitchoffatmainssupply
beforeinstallingormaintainingthisfitting.Ensureother
personscannotrestoretheelectricalsupplywithoutyour
knowledge.
Thislightfittingshouldbeconnectedtoafusedcircuit.
Ifreplacinganexistingfitting,makeacarefulnoteofthe
connections.
Thisproductisnotsuitablefordimming.
ThisproductisratedatIP44.
Thisfittingisheavyandyouwillrequireassistance
inconnectingittothesupplyandsecuringittothe
mountingsurface.
Becarefulduringhandlingandmaintenancetoavoid
breakageoftheglassparts.
Specification
Voltage: 240V50Hza.c.
Lamp: 2x15WG13T8
IPrating: 44
Layout
• Planthedesiredlayoutofthisfittingcarefully,ensuring
thecableswillreachthedistancebetweenthejunction
boxandthelightfitting.
• Avoidlocatinganycablesinpositionsthatwouldcause
ahazard.Positioncablesandjunctionboxes(not
supplied)awayfromareaswheretheymaybeatrisk
frombeingcut,trappedordamaged.Ensurethereare
nopipesorcablesbeneaththemountingsurface.
• Cablesinwallsmustbeprotectedusingsuitable
conduitorplastictrunking.
• Themainssupplycablemusthaveaminimumcross
sectionalareaof1.0mm².
• Thisproducthasspecialprotectionagainsttheingress
ofmoistureandisIP44rated.
Existingfittingsmustbecompletelyremovedbefore
installationofanewproduct.Beforeremovingtheexisting
fitting,carefully note the position of each set of wires.
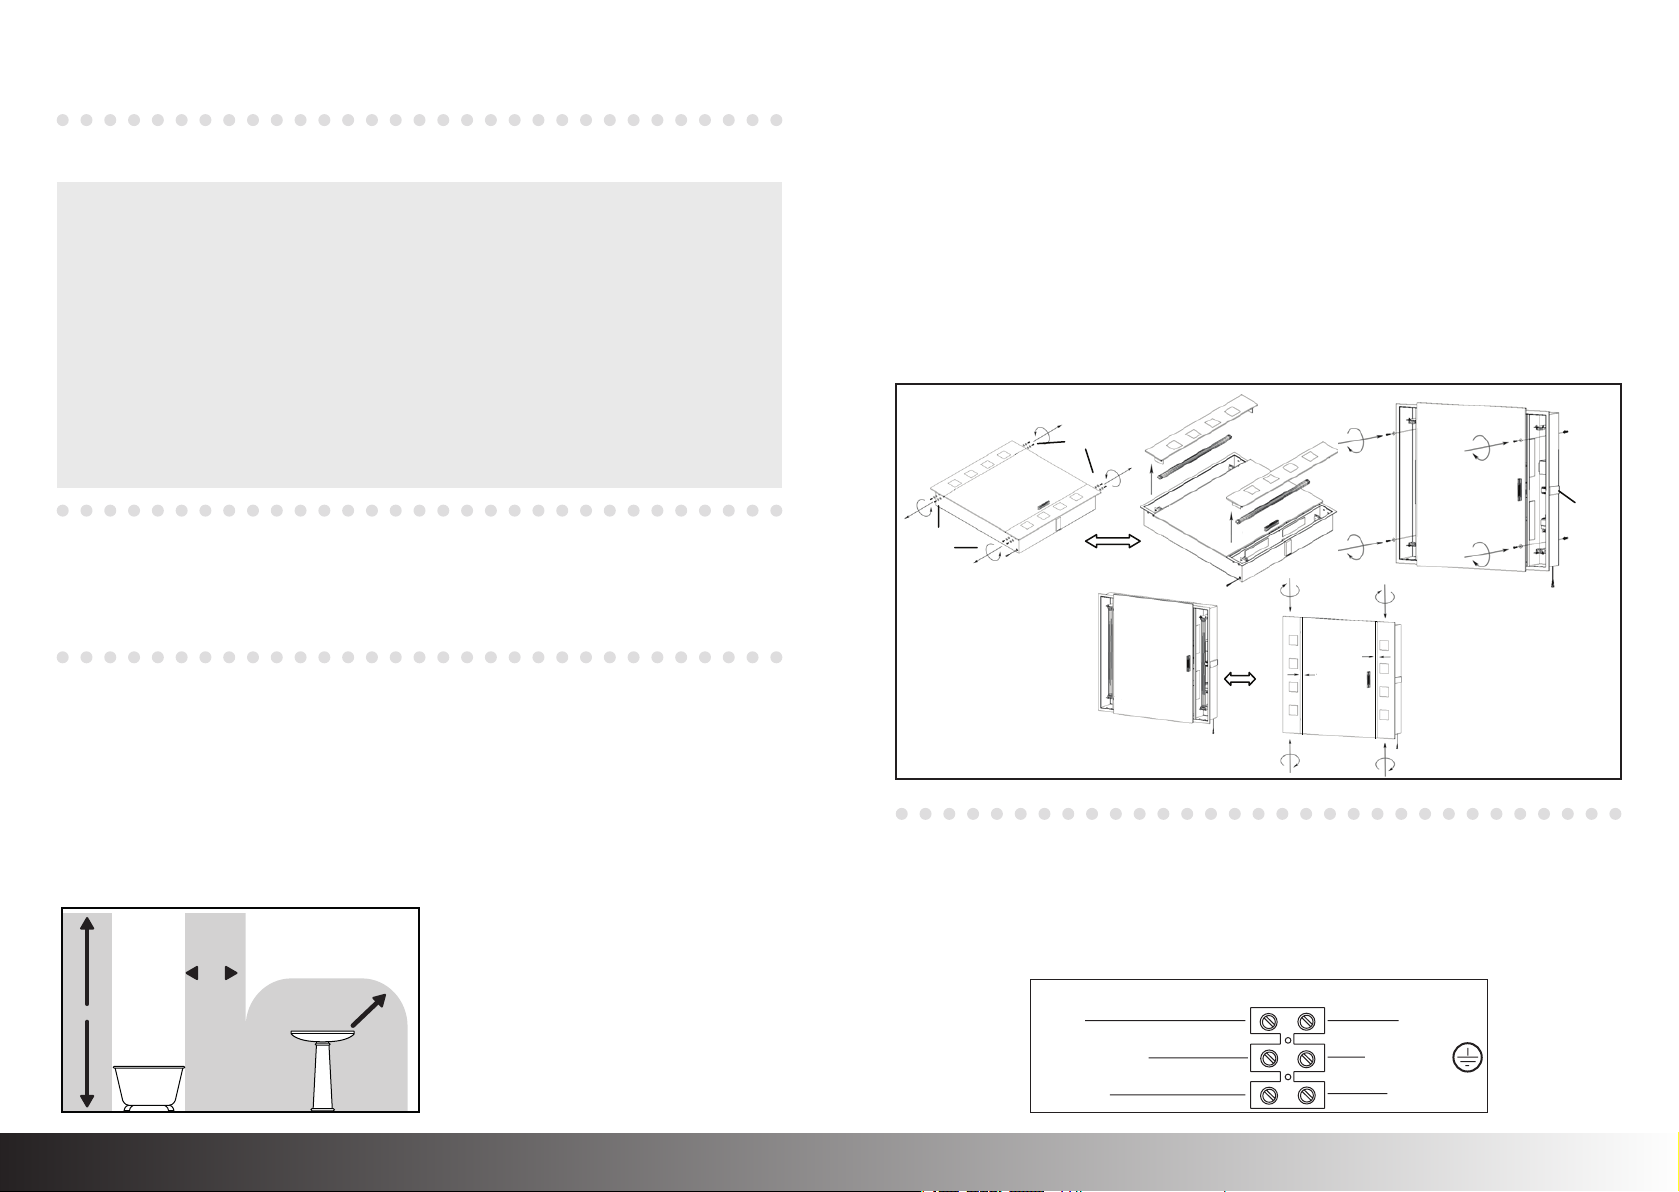
• Diagram1:Makesurethattheshelves/bracketsare
keptinasafepositionuntilrequired.Removethemirror
sidepanelsbyremovingthe4sidescrewassemblies
(A),retaintheseforre-use.Carefullytakeoutthetwo
fluorescenttubes.
• Unpackthedoor,andaffixtothehingesusingthe8
shortscrewsandwashers.
• Diagram2:Markoutthe4mountingpositionsas
shown,anddeterminethepositionofthecable
entry.Drillandplugthemountingsurface.Bringthe
mainscablethroughtherubbergrommetintheback
housingandsecurethebackhousingtothemounting
surface–makingsurethatthesidesareverticaland
thetopishorizontal.NOTE: The rubber grommet
must be used at the cable entry point to ensure
that the water ingress protection of the fitting is
maintained.
• Wireasbelow.
Installation
Havingcorrectlyidentifiedthewiringfromyourexistinglight
fitting,pullthewirethroughtheholeandconnecttothe
connectionblockinsidetheproductinthefollowingway:
Wiring Check that...
• Youhavecorrectlyidentifiedthewires
• Theconnectionsaretight
• Noloosestrandshavebeenleftoutoftheconnection
block.
ThisproductissuitableforuseinZones1,2andoutside
Zonesofabathroom.Seediagram.Ifthisunitisbeingfitted
inaroomcontainingabathorshower,a30mARCDmust
beused,inaccordancewithIEEregulations.
PleaseseethelatestversionofBS7671:“Requirements
forElectricalInstallations”formoreinformation.
SUPPLY
NEUTRAL
LIGHT FITTING
BLUE(N)
EARTH(GREEN/YELLOW) GREEN/YELLOW
BROWN(L)
SWITCHEDLIVE
OUTSIDE ZONES
ZONE
2
ZONE
1
0.6m
0.6m
2.25m
Ceiling
Diagram 1
(A)
(A)
Diagram 2
Shaver
socket
Diagram 3
1-3mm
2.5-3mm
This manual suits for next models
1
Other Endon Personal Care Product manuals


