Endres Akkulift User manual

Operating Instructions
Akkulift®Bath lift
FELIX
English

2· English
Content
Akkulift®– Product description............................................................. 3
For your own safety........................................................................ 4
Important information ..................................................................... 4
Important safety regulations ............................................................... 5
Note concerning Electromagnetic Compatibility (EMC) ...................................... 5
Installation and use ........................................................................ 6
Unpacking ............................................................................... 6
Inserting the Akkulift®into the bathtub ...................................................... 7
Attaching /removing covers ............................................................... 10
Installation head rest (optional) ........................................................... 11
Hand control ............................................................................ 12
Operating the Akkulift®in the bath......................................................... 13
Removing the lift from the bathtub ........................................................ 14
Maintenance and care..................................................................... 16
Maintenance of the Akkulift®.............................................................. 16
Maintenance of covers ................................................................... 16
Assembly of new cushion plugs for cover of Akkulift®....................................... 16
Maintenance of the charging unit ......................................................... 17
Charging of 12-Volt storage battery (to be connected directly to the charger) .................. 17
Transport / mobile use .................................................................... 18
Transport in a dismantled condition ....................................................... 18
Transport in an interlocked condition ...................................................... 18
Supplement .............................................................................. 19
Technical data .......................................................................... 19
Troubleshooting ......................................................................... 21
Disposal................................................................................ 22
Warranty ............................................................................... 22
Spare parts and accessories for Akkulift®.................................................. 23
Explanation of symbols .................................................................. 24
Product label............................................................................ 24
Information about this manual ............................................................ 24
Index – in alphabetical order .............................................................. 25
Addresses............................................................................26 · 80

English · 3
Many thanks for choosing our product Akkulift®.
From now on, this sturdy, high-quality product will
make it a lot easier for you to get in and out of
your bath tub.
Akkulift®mainly consists of high-quality, recyc-
lable light-weight plastic. It is therefore easy to
transport, easy to store and simple to use – at
home, at the nursing home, or on journeys.
The storage battery is accommodated in a robust
ABS plastic housing. It can be easily inserted into
the compartment.
Using the hand control, which floats on the water,
comfortable raising and lowering is possible in
the normal sitting position. Akkulift®can also be
adjusted to variable positions.
The drive is housed in a sealed hood, the control
electronics in the sealed hand control. It is there-
fore also possible to use Akkulift®with the shower
facility in the bath.
The sturdy collapsible frame enables the chair to
be raised and lowered from 3” to 16.1” (inches)
height. The lifting rod effects the raising/lowering
movement of the seat top after pushing the Up-
and Down-buttons.
The backrest with drive, which can be tilted for-
ward, is notched into the seat of the chair and
automatically locks when it is raised. Therefore,
the backrest cannot be tilted unintentionally.
Due to an integrated power control, Akkulift®only
lowers if there is still sufficient power available to
raise it.
Akkulift®– Product description

4· English
◗ Important information
• Akkulift®must not be used as a ladder or as
a means for getting into and out of any place
other than the bath; nor should it be employed
as a stand, lifting device or for any other simi-
lar purpose. It may only be used for bathing
persons inside the bath.
•
Akkulift®must be inaccessible to children and
animals.
•
Repairs must only be undertaken by authorized
specialists or the manufacturer. On non-compli-
ance, any guarantee claims will become invalid.
For further information please read the supple-
ment.
•
Only raise or lower the lifting rod when the
backrest is upright and notched in!
For your own safety
• Always remove the storage battery before trans-
porting Akkulift®.
• If Akkulift®has been exposed to low tem-
peratures for a longer period of time
(e.g. longer storage in a vehicle during the
winter), allow it to warm up to room tempera-
ture before use, in order to avoid damages.
•
Akkulift®should be cleaned directly after use
(preferably under a hot shower) in order to
maintain the Akkulift®in a perfect, hygienic con-
dition.
• Do not use any detergents containing acetic
acid for cleaning the Akkulift®.
•
The charging unit must only be used outside the
bathroom in a dry environment. The charging
unit must only be used for charging the storage
battery supplied together with Akkulift®.
• Please read the enclosed instructions for
the battery charger thoroughly before use
and observe the instructions all by means!
•
The charging unit must not be connected to the
electrical outlet until the storage battery has
been correctly connected.
•
The battery has to be charged before the
first use of Akkulift®and should be charged
after each use!
•
Only use the storage battery supplied with
Akkulift®to operate it.
•
The contacts of the storage battery must not
come into contact with metal parts (danger of
exploding or catching fire).
•
Used storage batteries must be disposed of in
the proper manner. Storage batteries must not
come into contact with open fire (danger of ex-
ploding!).
➤ Attention!
Safe bathing with Akkulift®is only en-
sured if the operating instructions are
read carefully and the given information
is strictly observed.
➤
These operating instructions
should be kept in a safe place!

English · 5
For your own safety
•
The Akkulift®, charging unit and storage battery
are of robust construction, but should not be
allowed to fall. Should any visible or audible da-
mage be detected, Akkulift®must no longer be
used. In this case please contact your dealer.
We recommend, filling in the dealer contact in-
formation on the last page of this manual.
•
For further information, technical details and
addresses, please read the entire operating in-
structions.
• In the event of a failure, please read the supple-
ment to these operating instructions and the
“Troubleshooting” chapter. Make sure to obser-
ve the information and instructions given there.
For your own safety you should not use Akku-
lift®in the meantime, until the fault has been re-
medied.
◗Important safety regulations
a) Always sit in the middle of the lift , stretch your
legs forward slightly and place your free hand
either on the edge of the bath or on your lap.
Using the other hand, regulate the Akkulift®
movement up or down.
b) Whilst raising or lowering Akkulift®, do not place
your hands between the edge of the bathtub
and Akkulift®or under the seat of the chair, as
this can cause injuries.
c) Persons with severe physical handicaps or
mentally disturbed persons should never be
left unattended in the bath.
d) Before using the bath lift, a test run should be
carried out (for raising, lowering and stopping,
and also for checking the Emergency-Stop,
the red button on the hand control).
e) If a malfunction has occurred, please do not
operate Akkulift®, but contact your dealer and
ask him to remedy the problem.
f) Do not take any objects into the bathtub when
bathing!
◗Note concerning Electromagnetic
Compatibility (EMC)
The electrical drives are confirmed to be compliant
with the protection requirements set forth in The
Council Directive for the Harmonization of Legal
Stipulations of the Member States concerning
Electromagnetic Compatibility (86/336/EWG).
However, the occurrence of electrical interference
cannot be ruled out completely under certain con-
ditions, i.e. in particular, if mobile phones or other
electrical devices are used.
In the vicinity of the bath lift, do not operate any
life-preserving or life-supporting devices or any
devices that may cause health hazards for users
in the event of malfunctions. Such devices may
be subject to electrical interference under certain
conditions, or they may adversely affect the
proper functioning of the bath lift.
If you should detect any malfunctions or unusual
behavior of your bath lift or in the vicinity or during
the operation of other electrical devices, please
make the bath lift inoperative and notify your
specialized dealer.

6· English
◗ Unpacking
Please check the shipping carton for complete-
ness. The carton should contain the following
parts:
1. Backrest with drive and hand control unit
2. Collapsible frame with base plate incl. central
suction cup (black)
3. Backrest plate
4. Charging unit
5. Storage battery
6. Operating instructions
7. 4 x Suction cup (transparent) for assembling
on the underside of base plate
Installation and use
If one of these parts should be missing,
please inform your dealer.
Unpack the charging unit first, then unpack the
remaining parts. The shipping carton should be
kept for later use (i.e. transporting and storing
Akkulift®).
Prior to starting up the device for the first time
we recommend to charge the storage battery.
Please observe the information given in section
“Charging the Storage Battery”.

English · 7
Installation and use
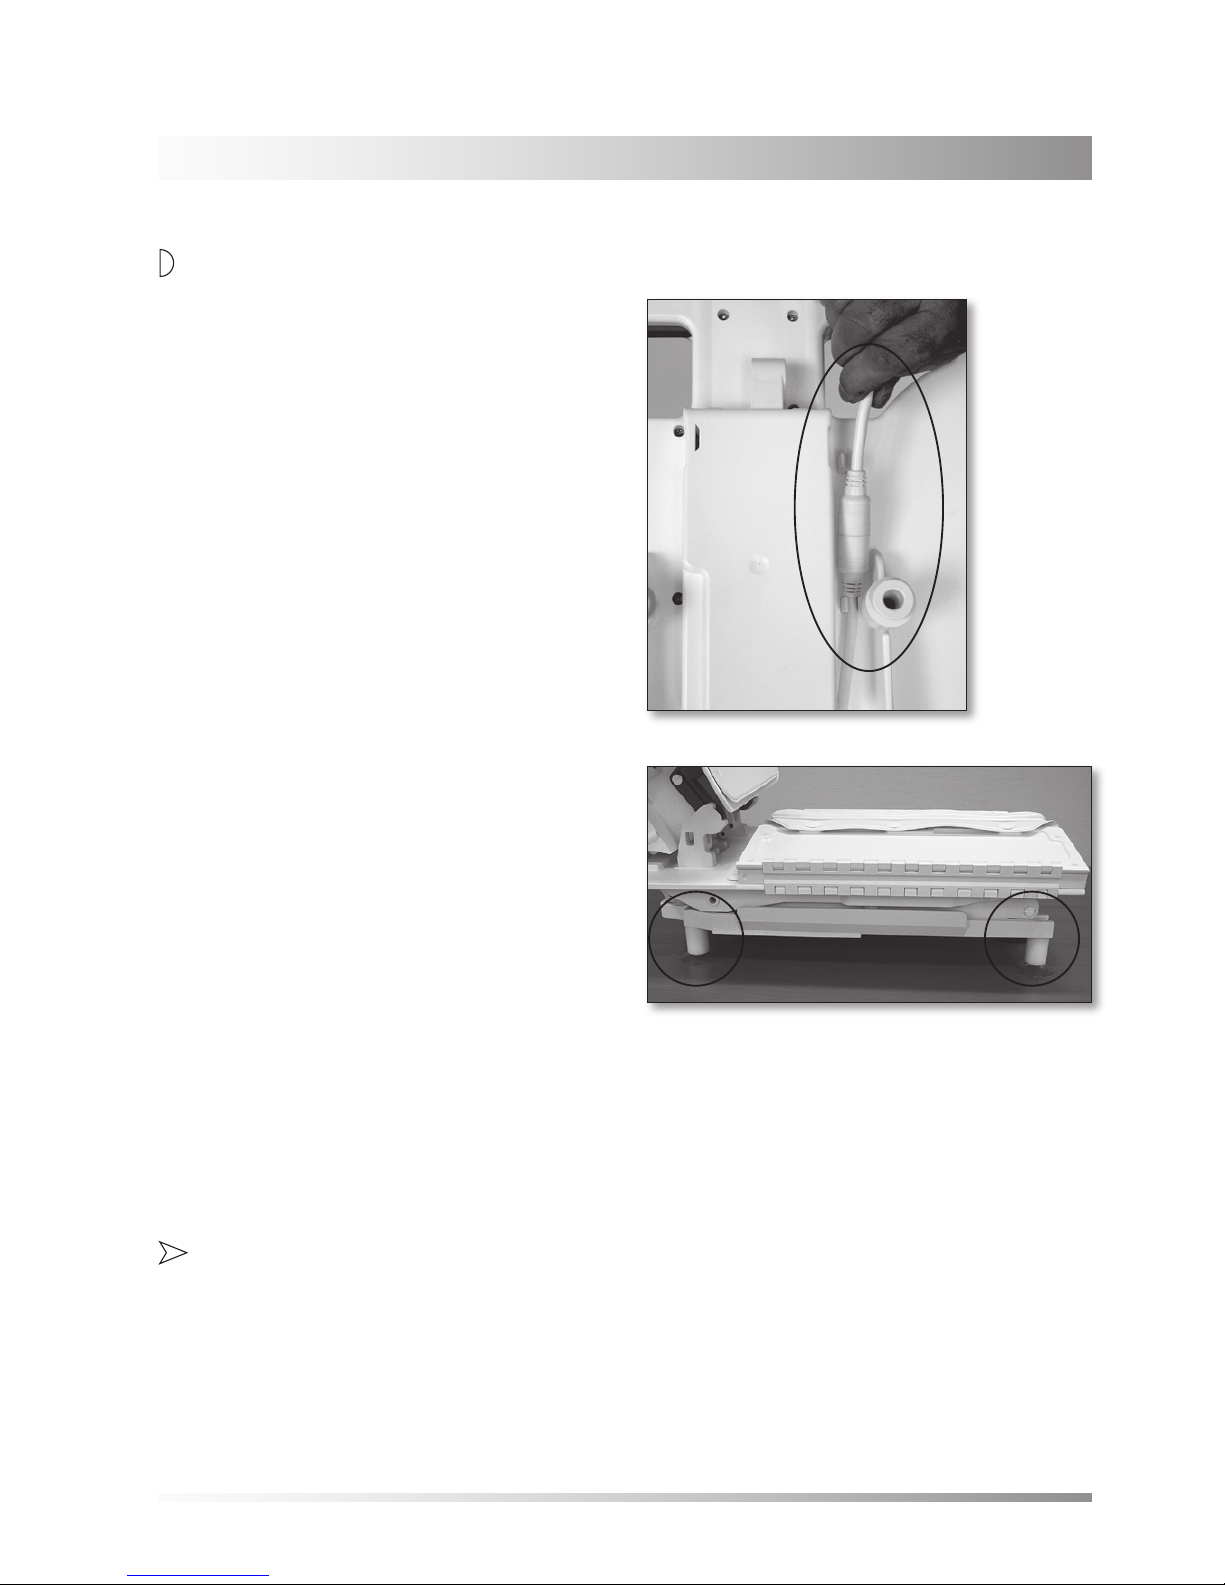
◗
Inserting the Akkulift®
into the bathtub
1. Assemble the suction cups to the base plate.
The venting clips need to be positioned so they
face all outward so they can be reached for
removal of the lift from the bathtub.
2. Make sure that the bottom of the empty bath-
tub is clean. Remove any non-slip mats from
the bathtub.
3. Insert the seat frame - with the assembled suc-
tion cups at the underside of the base plate –
into the empty bathtub. The rear suction cups
should be located at the bevelled edge of the
bathtub.
4. Make sure that the lever for the central suction
cup (black) is in a raised position.
Now press down the suction lever (“PRESS”)
of the front mid suction cup for fixing the bath
lift in the bathtub. This automatically adjusts
the mid suction cup to the bottom of the bath-
tub and fixes it into position (see figure).
➤ Please note:
The suction cups at the underside of the Akkulift®
must be clean and dry, and the bath lift must
also be placed onto a clean dry bath surface. We
recommend that you frequently clean the suction
cups and bathtub to ensure that the bath lift is
securely held in place.
8· English
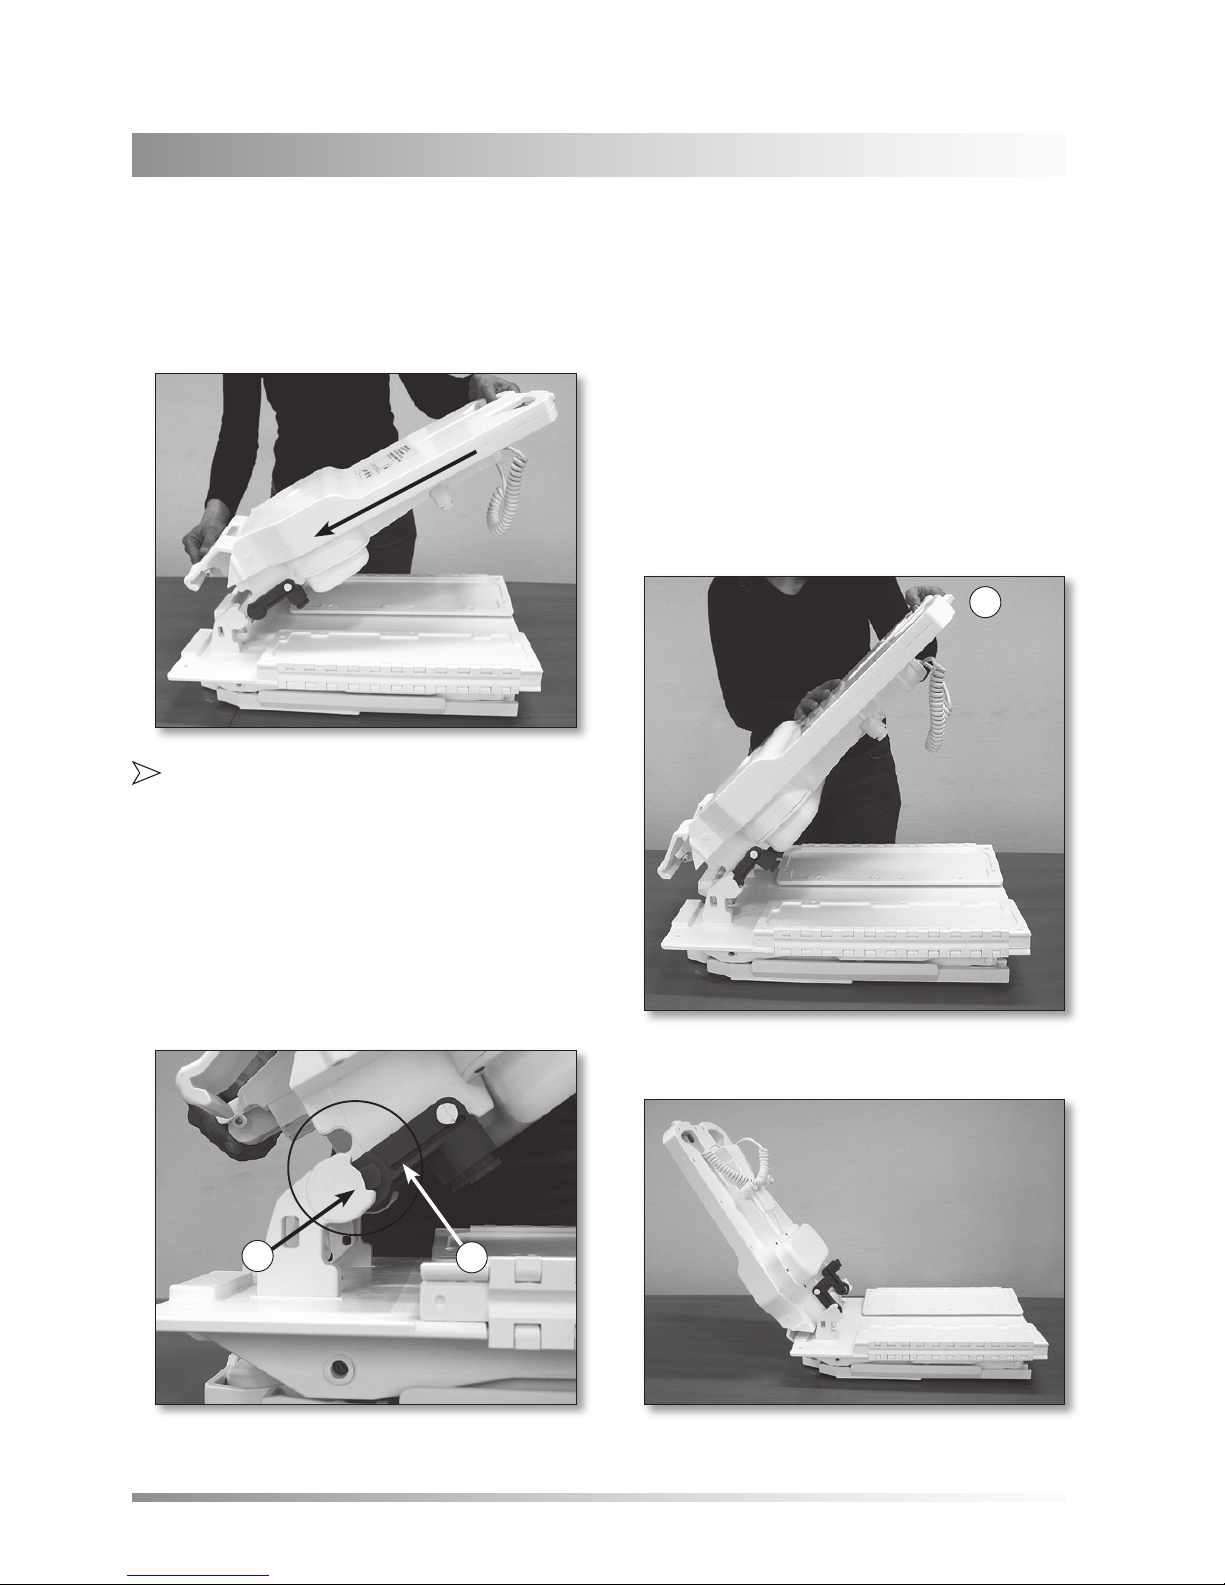
5. Then insert the guide pins of the backrest into
the bearing blocks of the frame, as shown.
Installation and use
6. Take the hand control in one hand and pull
it away from the lift until the cable is slightly
tensioned.
7. Take the hand grip with the other hand
and fold up the backrest until it reaches the
stop position of the base plate (see figure).
➤
Attention: Always make sure that both
guide pins are inserted in the bearing
blocks!
bearing block · guide pin (red) (((((
hand grip
12
1
≈
English · 9
Installation and use
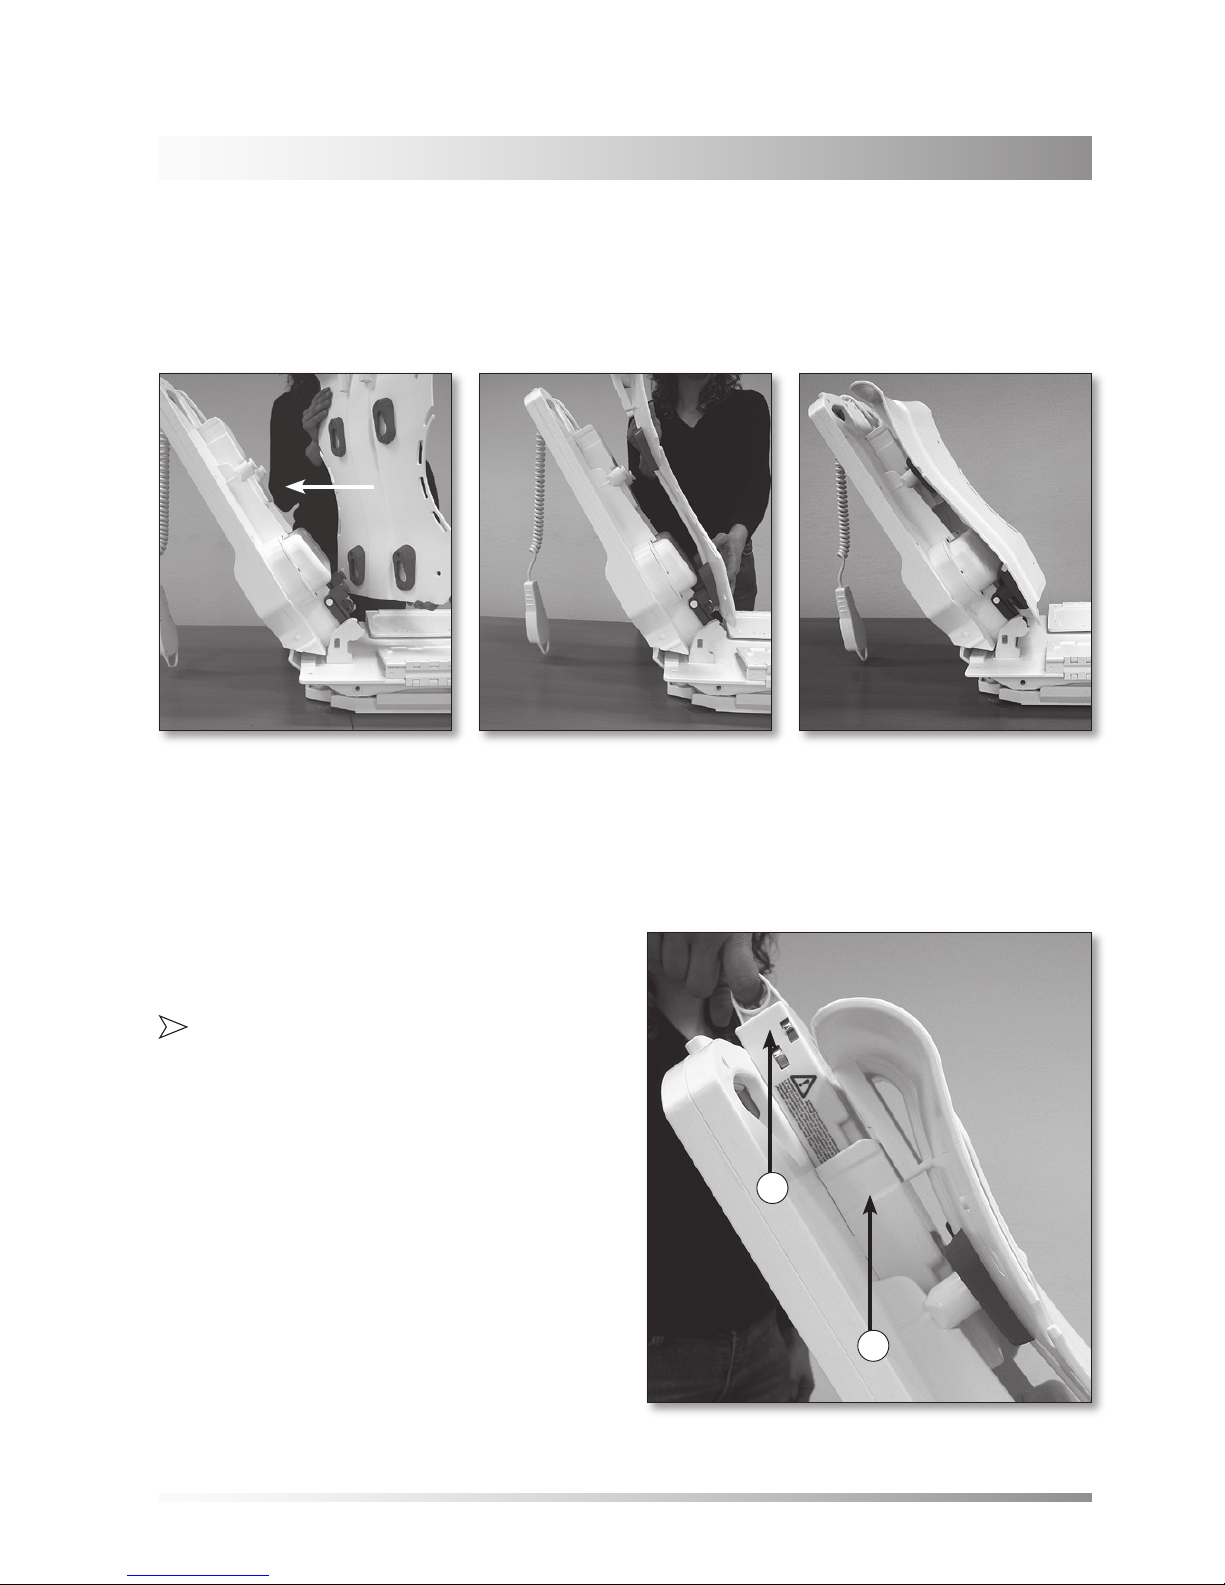
8. Hold the backrest plate over the four fastening
bolts and press it down to its end position.
9. Insert the storage battery in the battery com-
partment (figure).
➤ Note: If the bathtub wall on the side of the
backrest is vertical and, consequently, there
is a risk that the backrest is pushed against
it, the lift must be installed outside the bathtub
and driven to its upper position before it is
placed into the bathtub again. However, it
may be possible that the backrest can no lon-
ger be tilted back during the bath, because
the distance between the backrest and bath-
tub wall is too close.
Due to the special arrangement of the fastening
points for the backrest, the backrest cannot be
placed-on incorrectly.
battery · battery compartment
1
2
10 · English
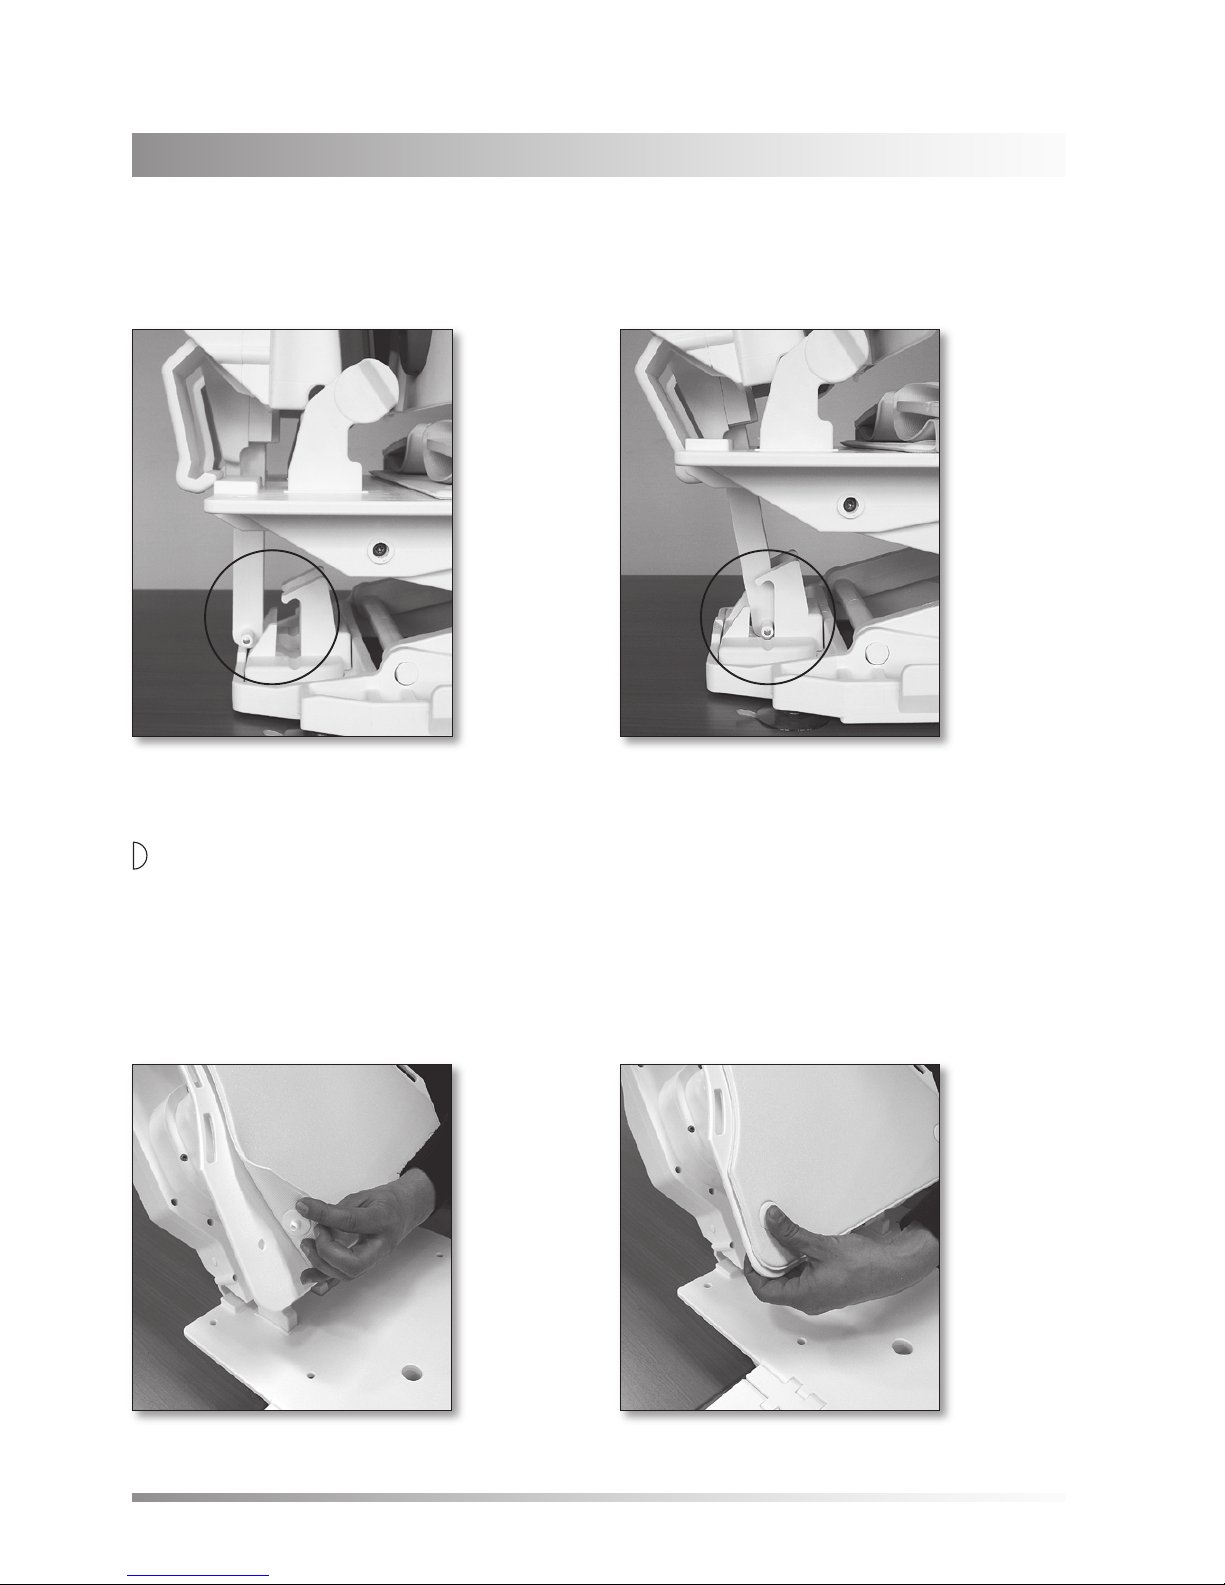
10. Make sure that the lifting rod is in its correct
position in the unlock ramp (see figures).
Installation and use
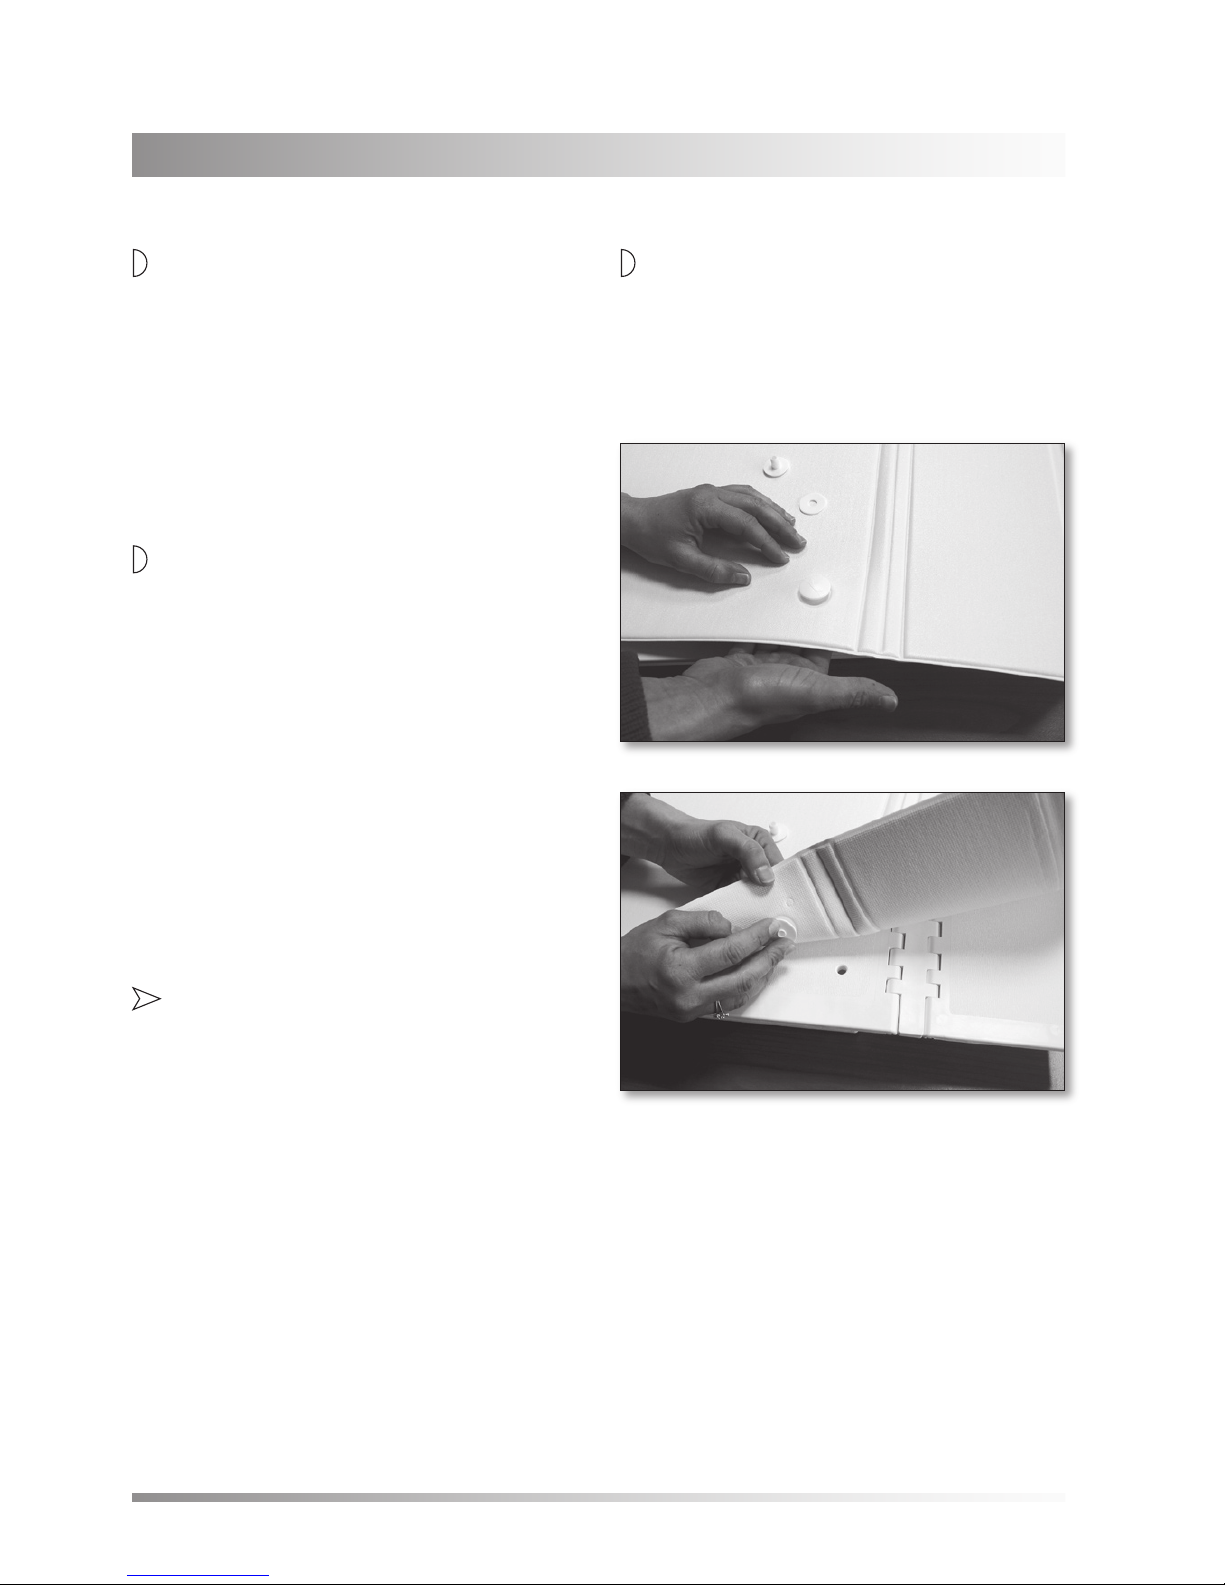
◗ Attaching /removing covers
The covers can be attached and removed very
easily.
• To fix the cover, place it correctly on the backrest
plate / seat and press the fastening buttons com-
✓
Backrest Cover
pletely into the openings of the backrest plate /
seat and side flaps (figure).
Backrest Cover
wrong correct
English · 11
Installation and use
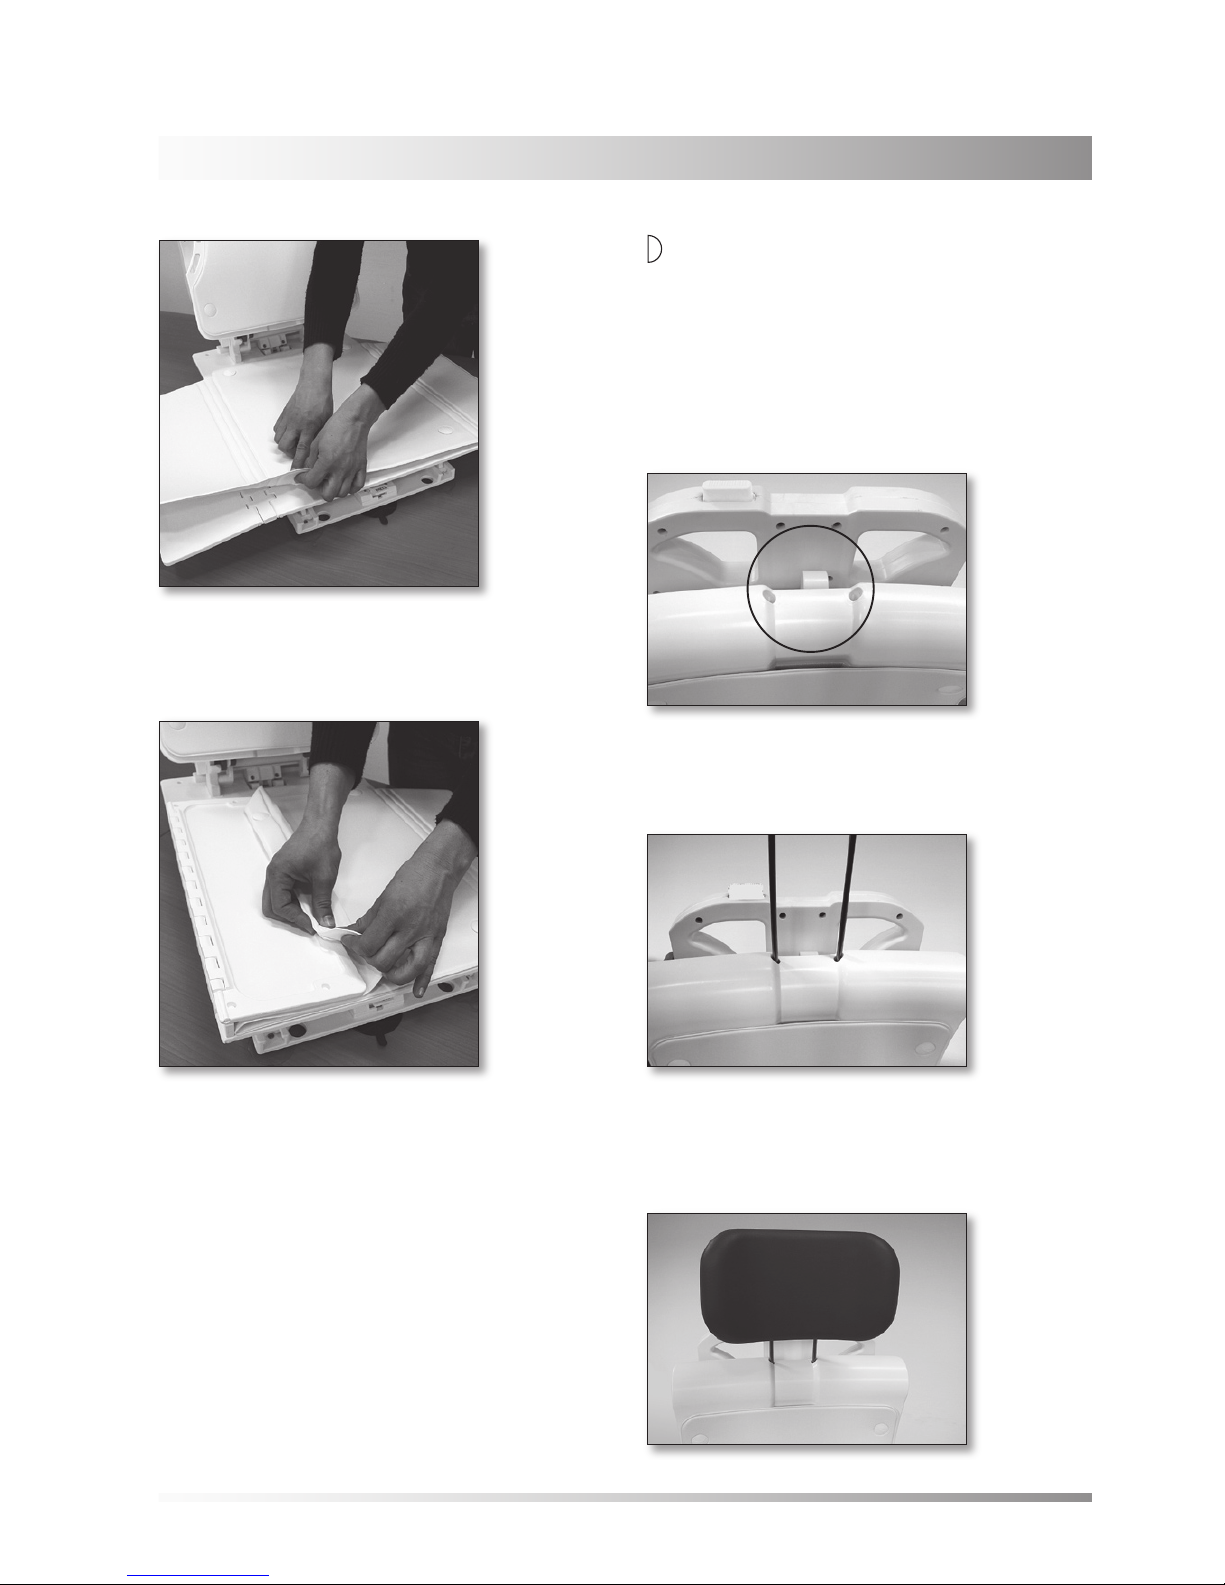
Seat Cover
• The cover can be removed by pulling the faste-
ning knobs from the side flaps and seat with two
fingers.
The bath lift can also be used without covers.
Seat Cover
◗ Installation head rest (optional)
Insert the two guide rods of the headrest into the
two holes on the top of the backrest plate. The
headrest can be stagelessly adjusted to the
desired height.

12 · English
◗ Hand control
The capacity of a fully charged storage battery is
max. 20 baths, depending on the user’s weight.
During these baths the green control lamp of the
hand control is illuminated.
As soon as the charging level of the storage bat-
tery falls to factory-defined value, the color of
the control lamp changes to yellow, and the lamp
flashes slowly, which means that there is only
sufficient power for one more bath. After that, the
storage battery should be recharged according
to the instructions given under “Charging the Sto-
rage Battery” .
If the device is used during the yellow phase of
the control lamp of the storage battery, the color
of the lamp may change to red, and the lamp may
start flashing at fast intervals. This indicates that
the lift will now move upward to ensure that the
handicapped person can leave the bath safely. If
this condition occurs, the storage battery must
be charged immediately (see “Charging the
Storage Battery”).
The charging status of the storage battery is mo-
nitored by electronic control elements. After one
lifting movement the storage battery needs ap-
prox. 30 seconds to recover and is subsequently
checked by the control elements. Therefore, at
the end of a bath, wait for approx. 20 seconds
and check the color of the hand control lamp.
GREEN Lamp: Lift is ready for operation.
YELLOW Lamp:
Limited readiness for operati-
on (sufficient power for just 1
more bath).The storage battery
should be charged now.
RED Lamp:
The lift is no longer ready for
operation and will only move
upward for leaving the bath.
The storage battery must be
charged now.
Installation and use
• Emergency stop-button (red):
If there is any situation in which it is necessary
to stop all functions of the bath lift, press the red
emergency button. To reset you have to press the
“ON”-button again.
The bath lift switches off automatically after
approx. 30 minutes, but if you want to switch it off
manually then use the red button.
DOWN-button (blue)
Emergency Stop (red)
Control lamp
UP-button (orange)
ON-button
1 4
5
2
3
English · 13
Installation and use
◗ Operating the Akkulift®in the bath
1. Before starting up your Akkulift®, make sure
that the battery is inserted in the battery com-
partment and the hand control is correctly con-
nected (plug-type connection – see figure).
Press the ON-button at the hand control. The
green lamp is illuminated.
2. Press the orange key (“UP”-button). The
backrest is moved into an upright position first;
then the lift raises to its end position and swit-
ches off automatically. When the button is re-
leased, the lift is stopped, thus making it possi-
ble to move to intermediate stop positions.
3. Fold out the side flaps until they rest on the
sides of the bathtub.
4. If the bathtub is too tall to allow side flaps to lay
flat then you can use available height adapters
(purchase separately) to raise your lift to the
proper height. Height adapters must not be
used without suction cups.
5. Help the disabled person to sit down on Akku-
lift®.
6. To lower Akkulift®, press the blue key (“DOWN”-
button). The lift lowers until it reaches its end
position and switches off automatically. When
the button is released, the lift is stopped, ma-
king it possible to move to intermediate stop
positions.
➤
Attention: Release the blue button imme-
diately if the backrest is pushed against
the wall of the bathtub!
In case of an emergency, press the red
buttononthehand control.Thenall move-
ments come to a halt. To reset you have
to press the “ON”-button again!
Akkulift ®with height adapters (optional)
14 · English
7. After bathing, press the orange key (“UP”-but-
ton) of the hand control in order to raise the lift
back to a convenient height (the max. position
is the upper stop position).
Make sure that the side flaps do not get
caught at any bathtub fittings or handles.
8. Help the disabled person to leave the bathtub.
The bath lift switches off automatically after
approx. 30 minutes, but if you want to switch it
off manually then use the red button (LED is then
off).
➤ Note:
When moving up or down, the disabled per-
son should lean back against the backrest
and put his or her hands on the lap.
If the lift is to remain inside the bathtub,
then remove the battery from the battery
compartment. This will prevent unintended
discharging of the storage battery.
Installation and use
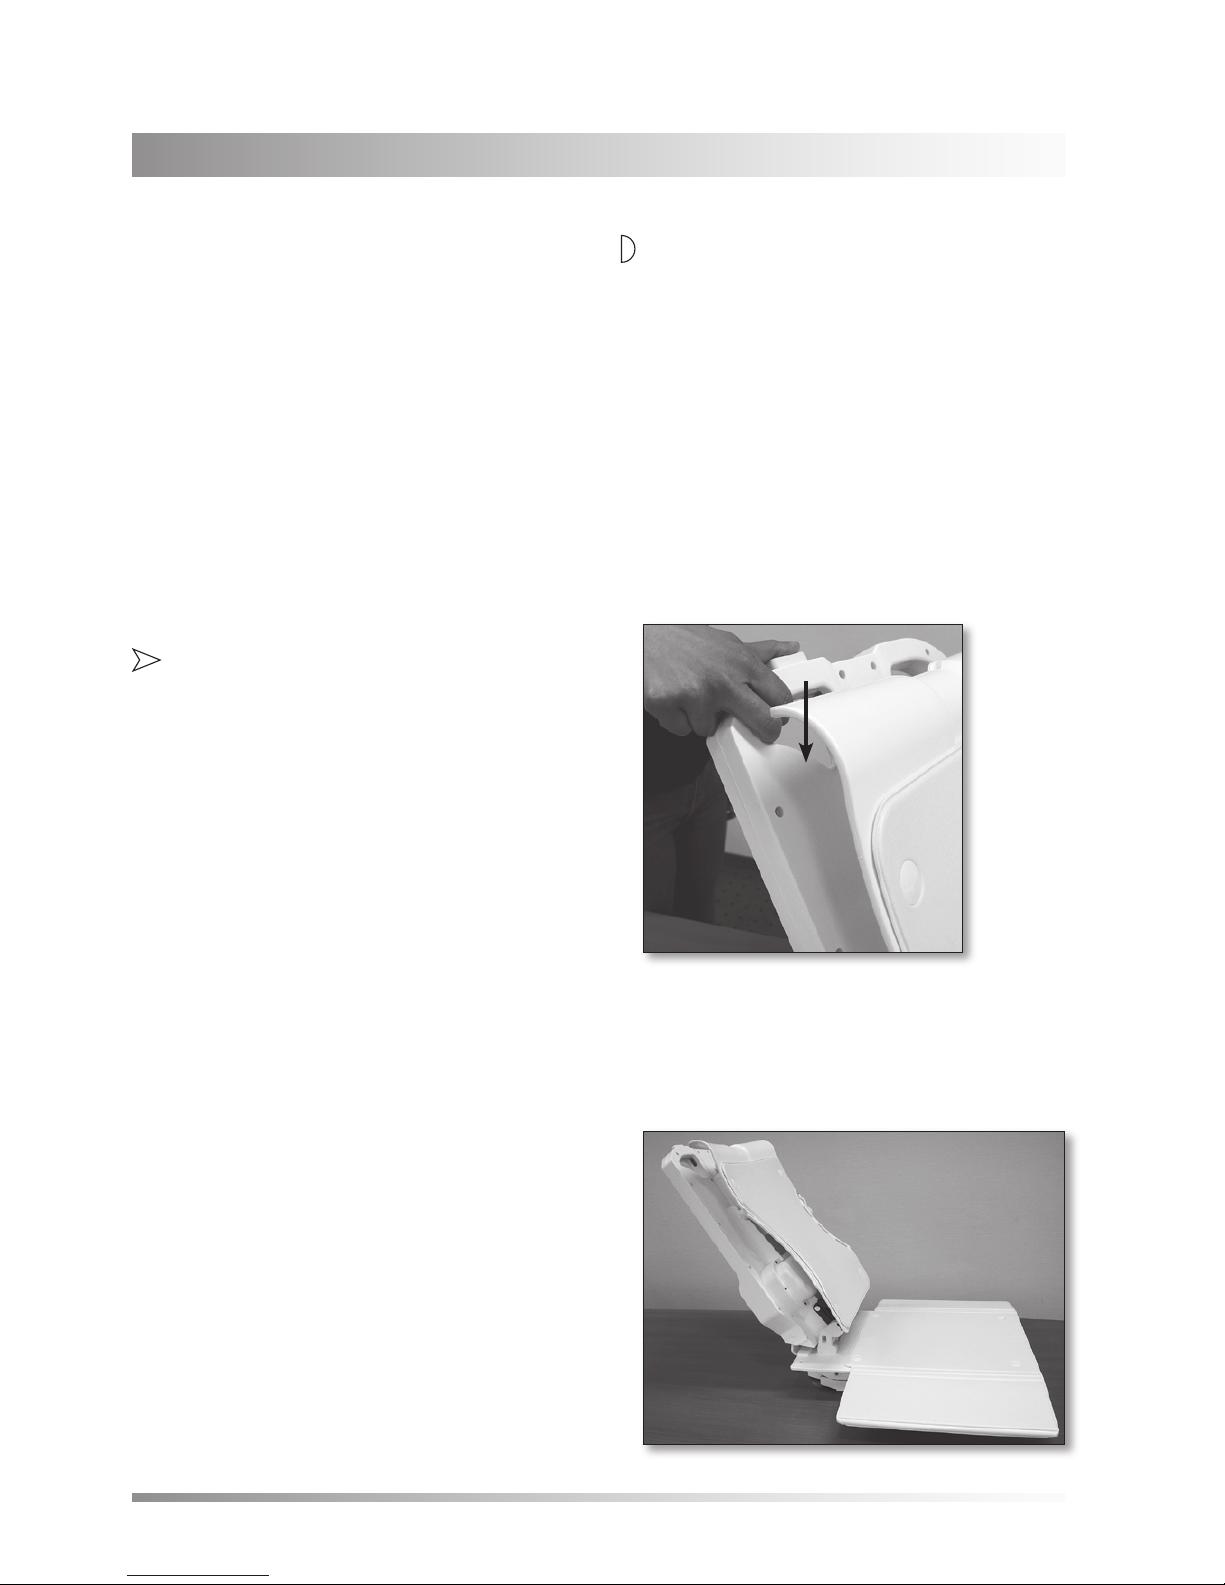
◗ Removing the lift from the bathtub
Using the hand control, first lower Akkulift®to its
lowest position. Tilt back the backrest until the
drive stops automatically in its end position. Make
sure that the backrest does not push against the
wall of the bathtub. Then remove the battery
from the battery compartment.
1. The backrest is unlocked by pressing the un-
lock button on the top of the backrest down-
wards (figure).
2. Then fold down the backrest while keeping the
button pressed and simultaneously folding the
backrest towards the seat until it rests on the
seat (figure). Use the provided handle.
≈
English · 15
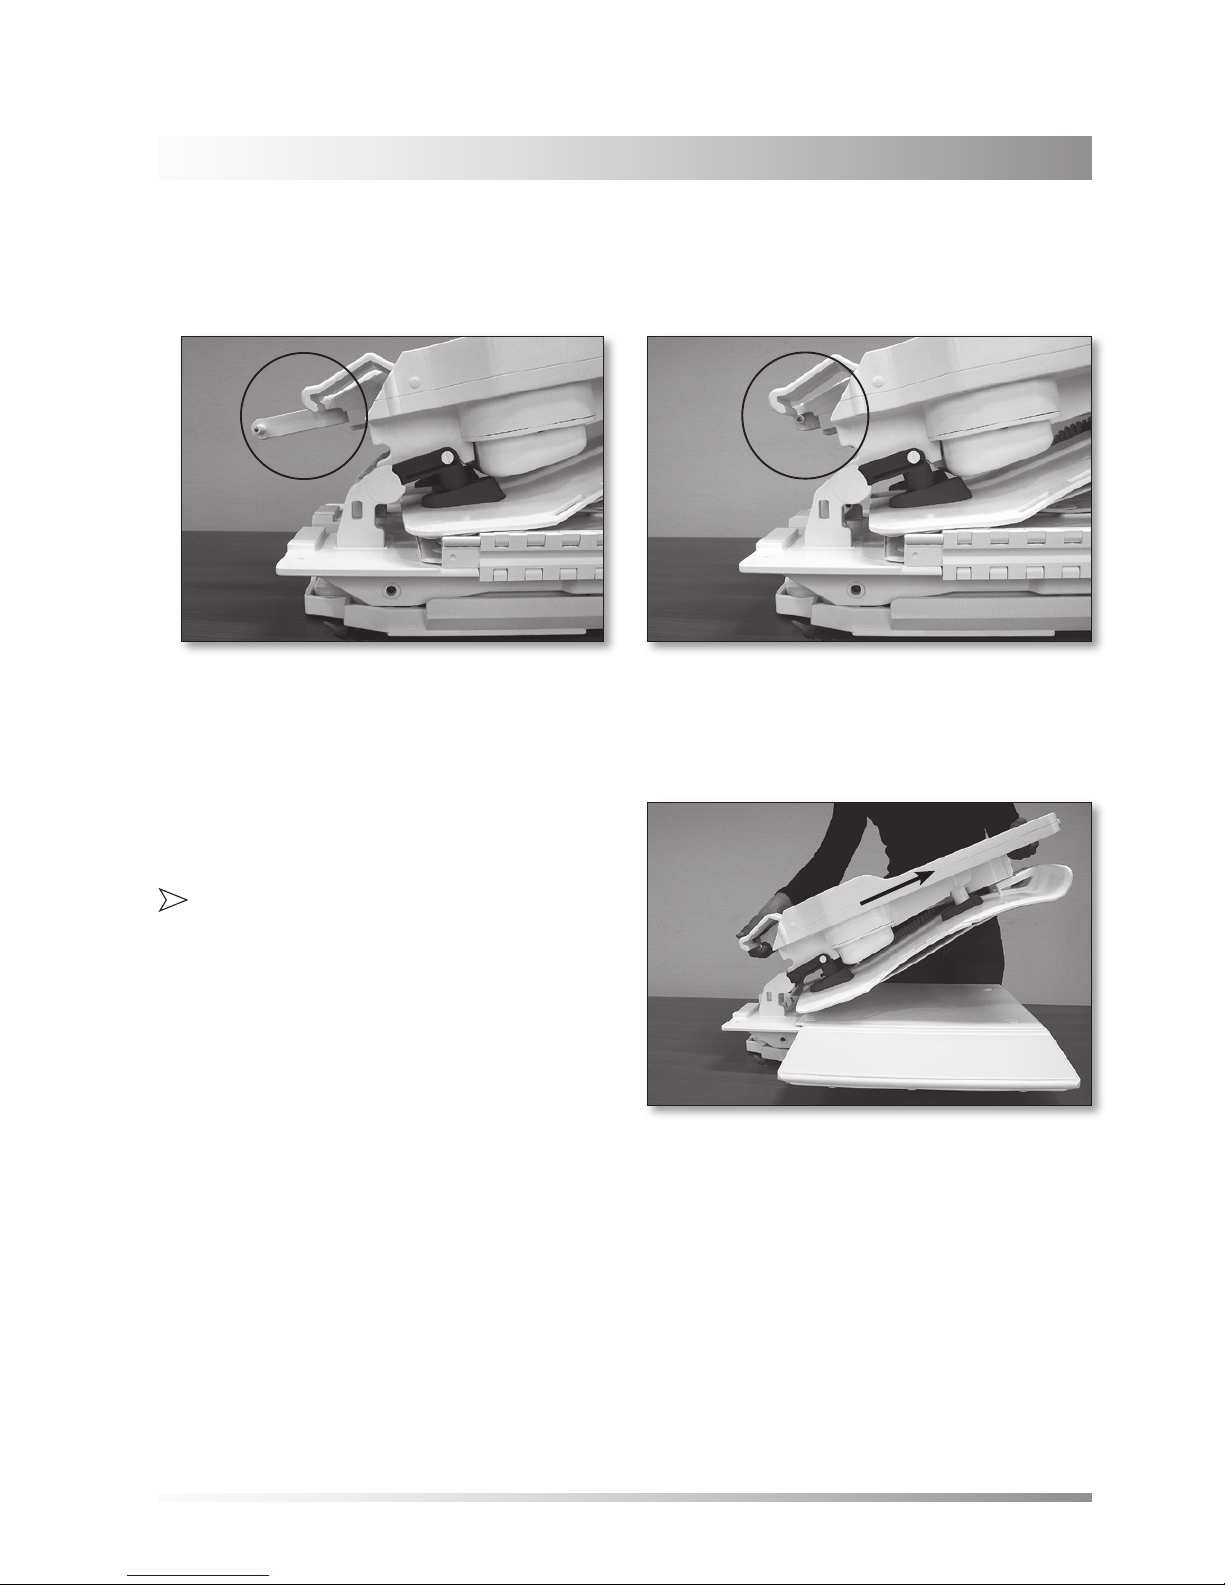
Installation and use
3. Make sure that the lifting rod is retracted
(figures).
4. The backrest can now be removed from the
frame in the direction of the arrow shown.
➤
Note: The backrest cannot be removed
from the frame when it is completely folded
down to the seat, because the backrest is
then in a locked position again! Lift the
backrest to the angle as shown (fig.) and
pull in direction of arrow.
5. Loosen all suction cups from the bathtub by
pulling at the venting clip/tab on each of the
suction cups. Lift the base from the tub.
✓
wrong correct
16 · English
◗ Maintenance of the Akkulift®
Akkulift®is equipped with bearings and running
surfaces which are completely maintenance-free
and do not require any lubrication. However, the
lift should be cleaned thoroughly under the sho-
wer after each bath. To clean the bath lift without
covers either use disinfectant or bathroom clea-
ner.
◗ Maintenance of covers
The material of the unbuttonable covers are very
hygienic by its smooth surface and antibacterial
characteristic.
To maintain the covers in a perfect condition
frequent cleaning is required, either by hand or by
washing machine – the covers can be machine-
washed up to 140° F using a non-bio washing
powder/detergent which does not contain any
enzymes. Please be aware that any oil-based pro-
ducts that you add to your bath water may stain
the covers. Failure to clean your covers regularly
may cause your covers to discolor.
➤ Note: Any form of discoloration is not cove-
red under our warranty, as consumables are
excluded.
The covers can be removed very easily for clea-
ning.
Do not tumble-dry the covers, but hang them
up to dry.
In addition, a commercially available disinfectant
can be used.
Please observe the manufacturer’s instructions.
Maintenance and care
◗
Assembly of new cover plugs
for cover of Akkulift®
Guide the new plug through the opening of the
cover (from top to bottom) and press it into the
washer at the underside of the cushion.
English · 17
Maintenance and care
◗ Maintenance of the charging unit
The charging unit does not require any mainte-
nance. The housing must only be cleaned with
mild detergents, which are free from solvents, or
by means of a damp cloth. Make sure that no li-
quid penetrates the charging unit. Before starting
up the charging unit again, always make sure that
the unit is completely dry. If necessary, store the
unit in a dry, ventilated place for several hours
without connecting it to line power.
➤ Attention:
Always pull the line power plug before clea-
ning the charging unit!
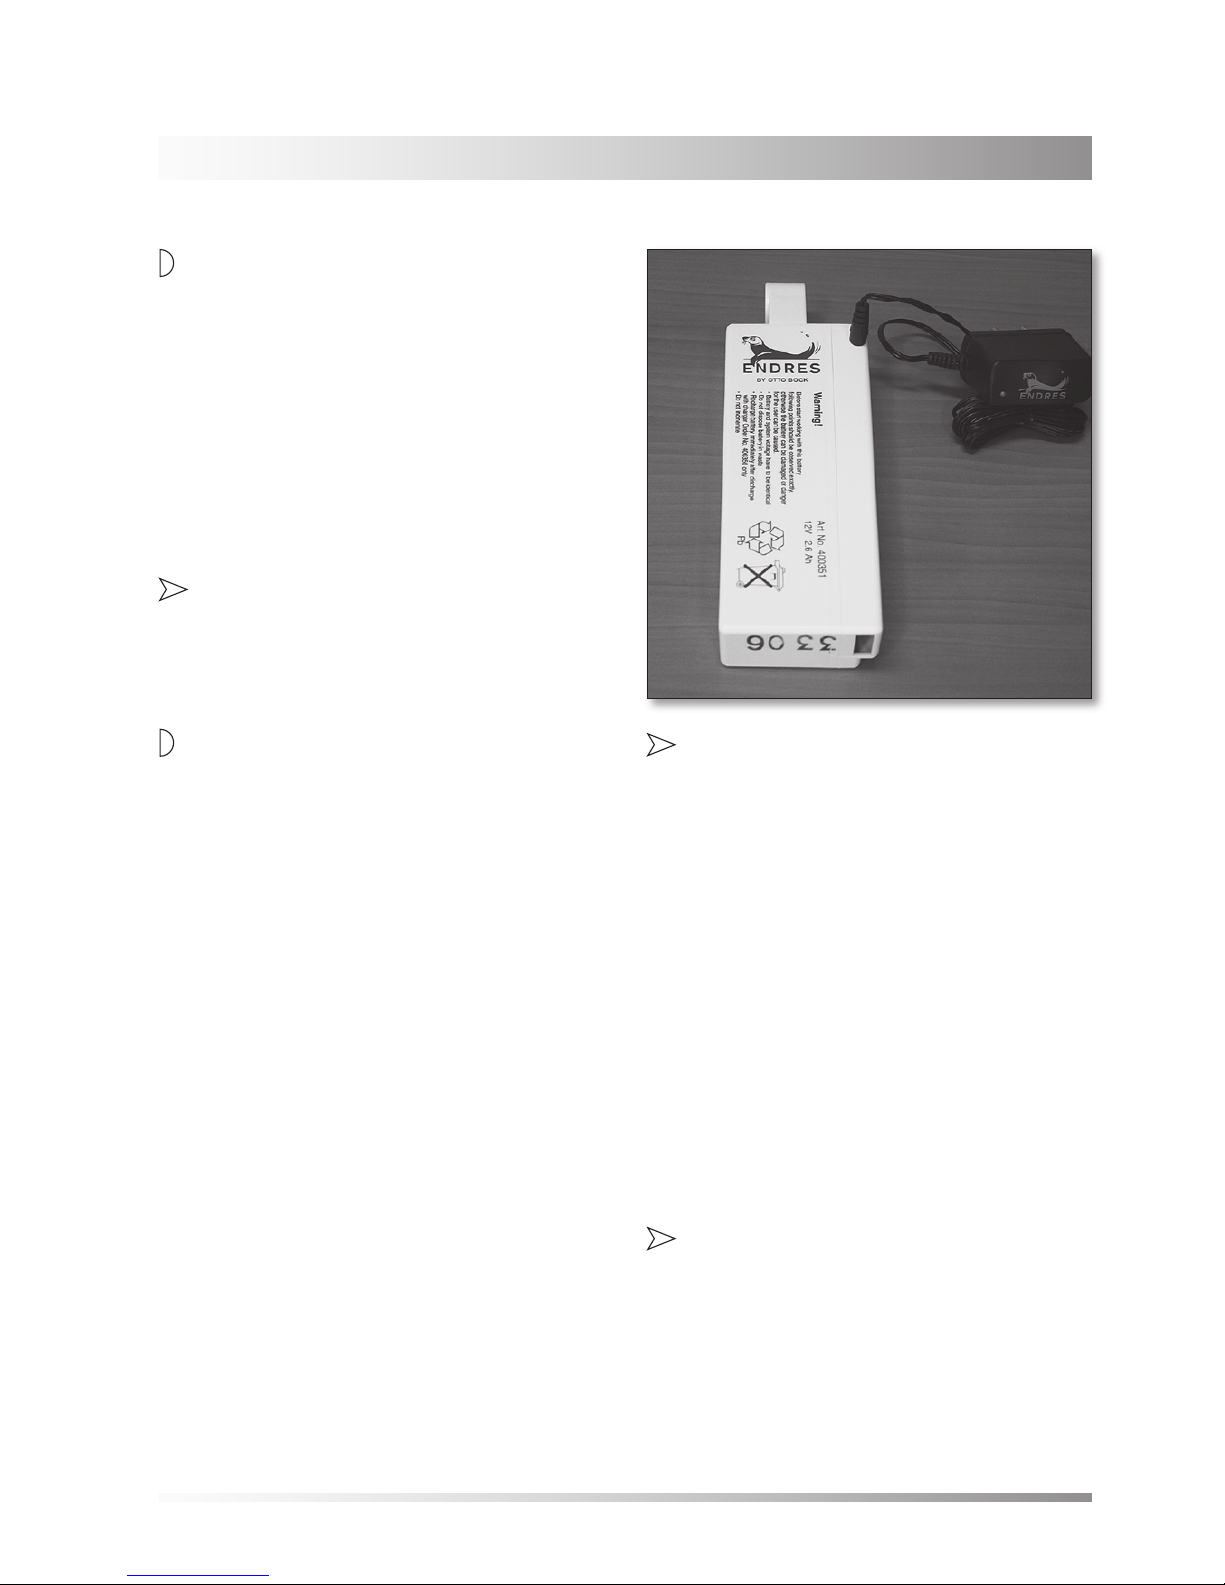
◗
Charging of 12-Volt storage battery
(to be connected directly to the charger)
Due to technical changes and improvements
please read the enclosed instructions for the
battery charger thoroughly before use!
1. Connect the 3.5 mm phone plug to the asso-
ciated socket of the battery (figure).
2. Plug the power plug of the charger (type
400350) into the outlet. The charging process
will be started automatically.
3. Check if the battery charging indicator is lit up
(LED lights).
4. For the meaning of the LED colors pls. see
separate instructions for the battery charger.
5. Always unplug the line power cord first after
charging is complete..
6. Then disconnect the charging unit from the
battery.
➤Important remarks:
• If the battery charging indicator should not be lit
up after the battery has been
connected, please check the following points:
– Interconnection (check if the DC jack has
been fully inserted into the charging unit)
– Battery condition (batteries that have re-
mained uncharged for a longer period of time
may sulphatise and lose their ability to be char-
ged)
• Always use the unit indoors and protect it against
water and humidity.
Never use the instrument in bathrooms.
• Never attempt to charge non-chargeable bat-
teries.
➤Warning:
• Explosive gases may develop when charging
lead batteries. Do not expose to open fire and
avoid sparks.
• If the battery charger should be damaged,
please return it to the supplier for examina-
tion.
18 · English
Transport /mobile use
Please observe the following instructions for mo-
bile use of the device:
1. Take the storage battery out of the battery
compartment and store it separately.
2. Secure the lift against sliding or slipping during
transportation.
3. If Akkulift®was exposed to low temperatures
(e.g. storage in a vehicle during the winter),
allow it to warm up to room temperature before
use and recharge it, if necessary.
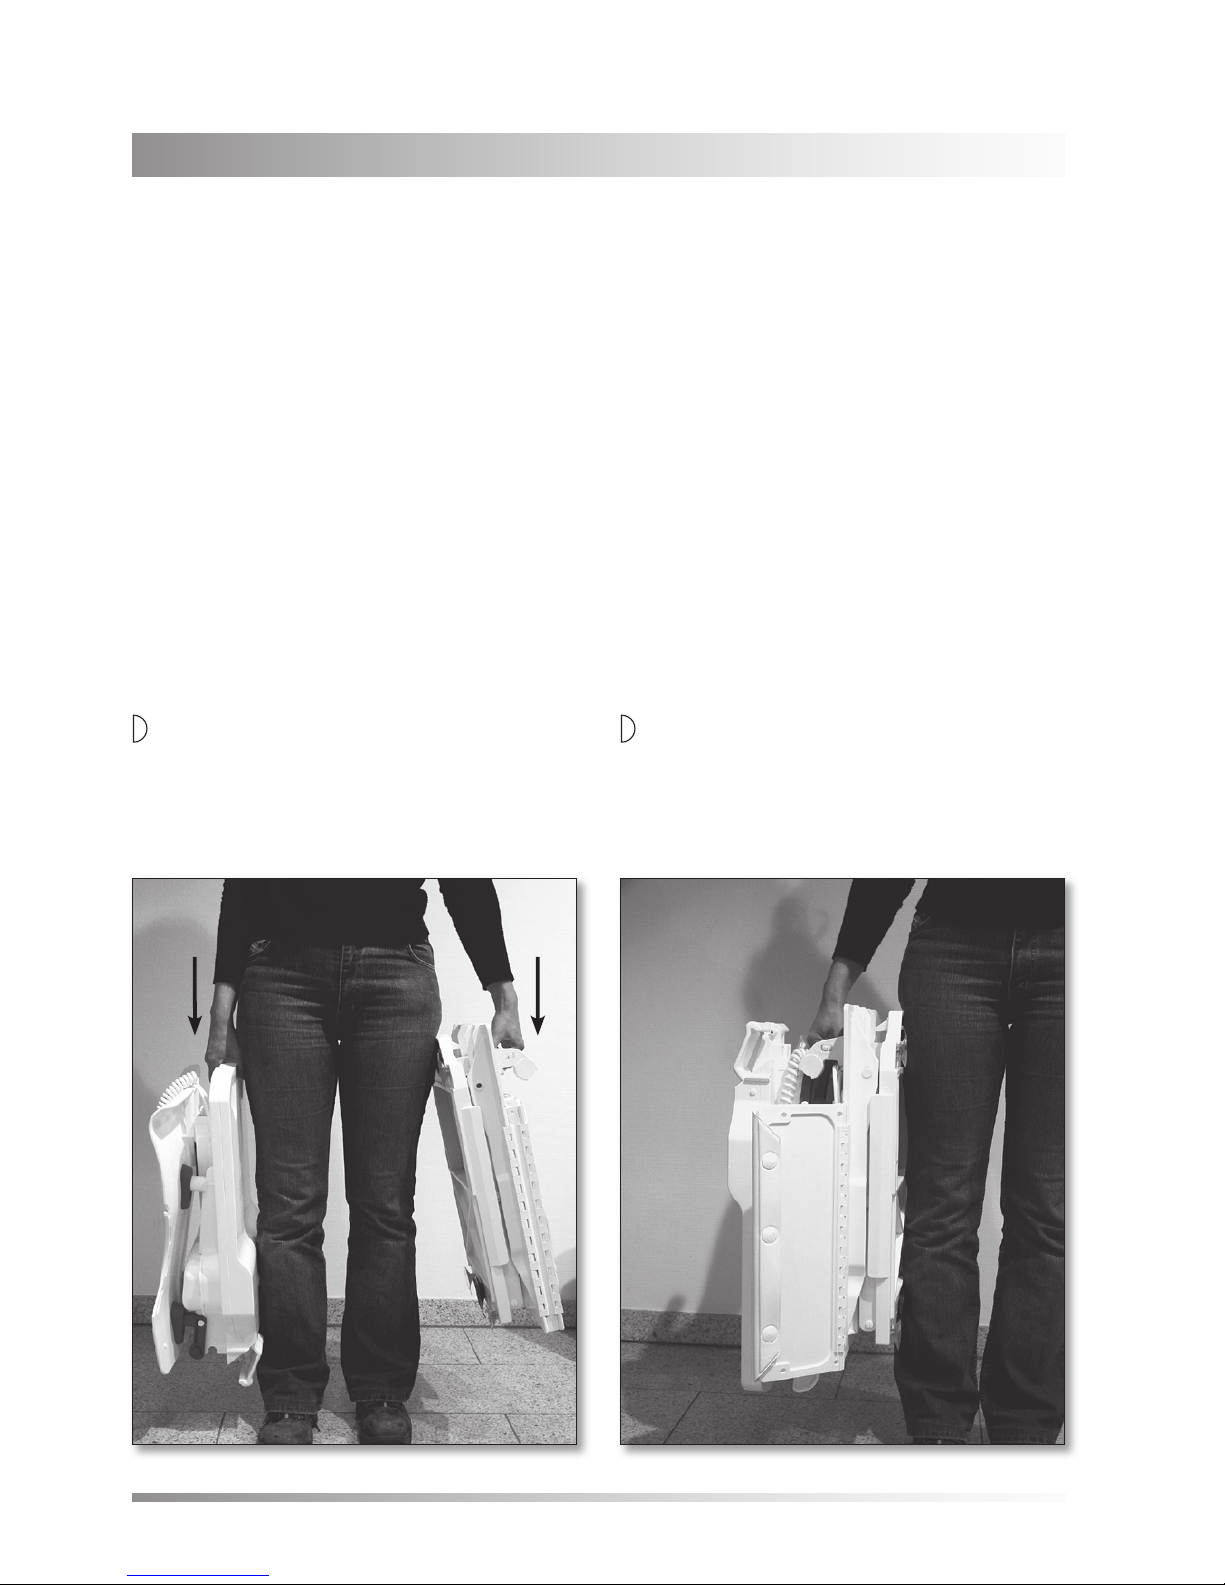
◗ Transport in a dismantled condition
The seat and backrest can be held at both hand-
les for convenient transport (see arrows).
◗Transport in an interlocked condition
The bath lift can also be transported as a unit.

English · 19
Supplement
◗ Technical data Akkulift®
Overall length (backrest in reclined position) approx. 33.8”
Overall width (seat incl. side flaps) approx. 27.5”
Width of seat approx. 14.5”
Depth of seat approx. 17.7”
Overall length of seat approx. 22.75”
Sitting height min. approx. 3”
Sitting height max. approx. 16.1”
Height of backrest approx. 22”
Width of backrest approx. 12.5”
Angle of inclination (backrest) 12° to 40°
Width of base plate approx. 12.2”
Length of base plate approx. 21.5”
Load, max. 308 lbs.
Weight, incl. storage battery approx. 34.8 lbs.
Weight storage battery approx. 2.2 lbs.
Motor unit (without battery) approx. 15 lbs.
Seat unit approx. 17.6 lbs
Duration of lifting/lowering movement approx. 25 seconds (each)
Operating voltage 12 V
Storage battery 12 V 2 – 2.6 Ah (rechargeable)
(see labeling on the housing)
Automatic shutdown 60 minutes max.
Protection class IP54
General
• General operating conditions:
Ambient temperature +50 ...........+ 122°F
Relative air humidity 10..............100 %
Air pressure 700 hPa .....1060 hPa
• Transport and Storage:
Temperature +50 ...........+ 86°F
Relative air humidity 10..............100 %
Air pressure 700 hPa .....1060 hPa
20 · English
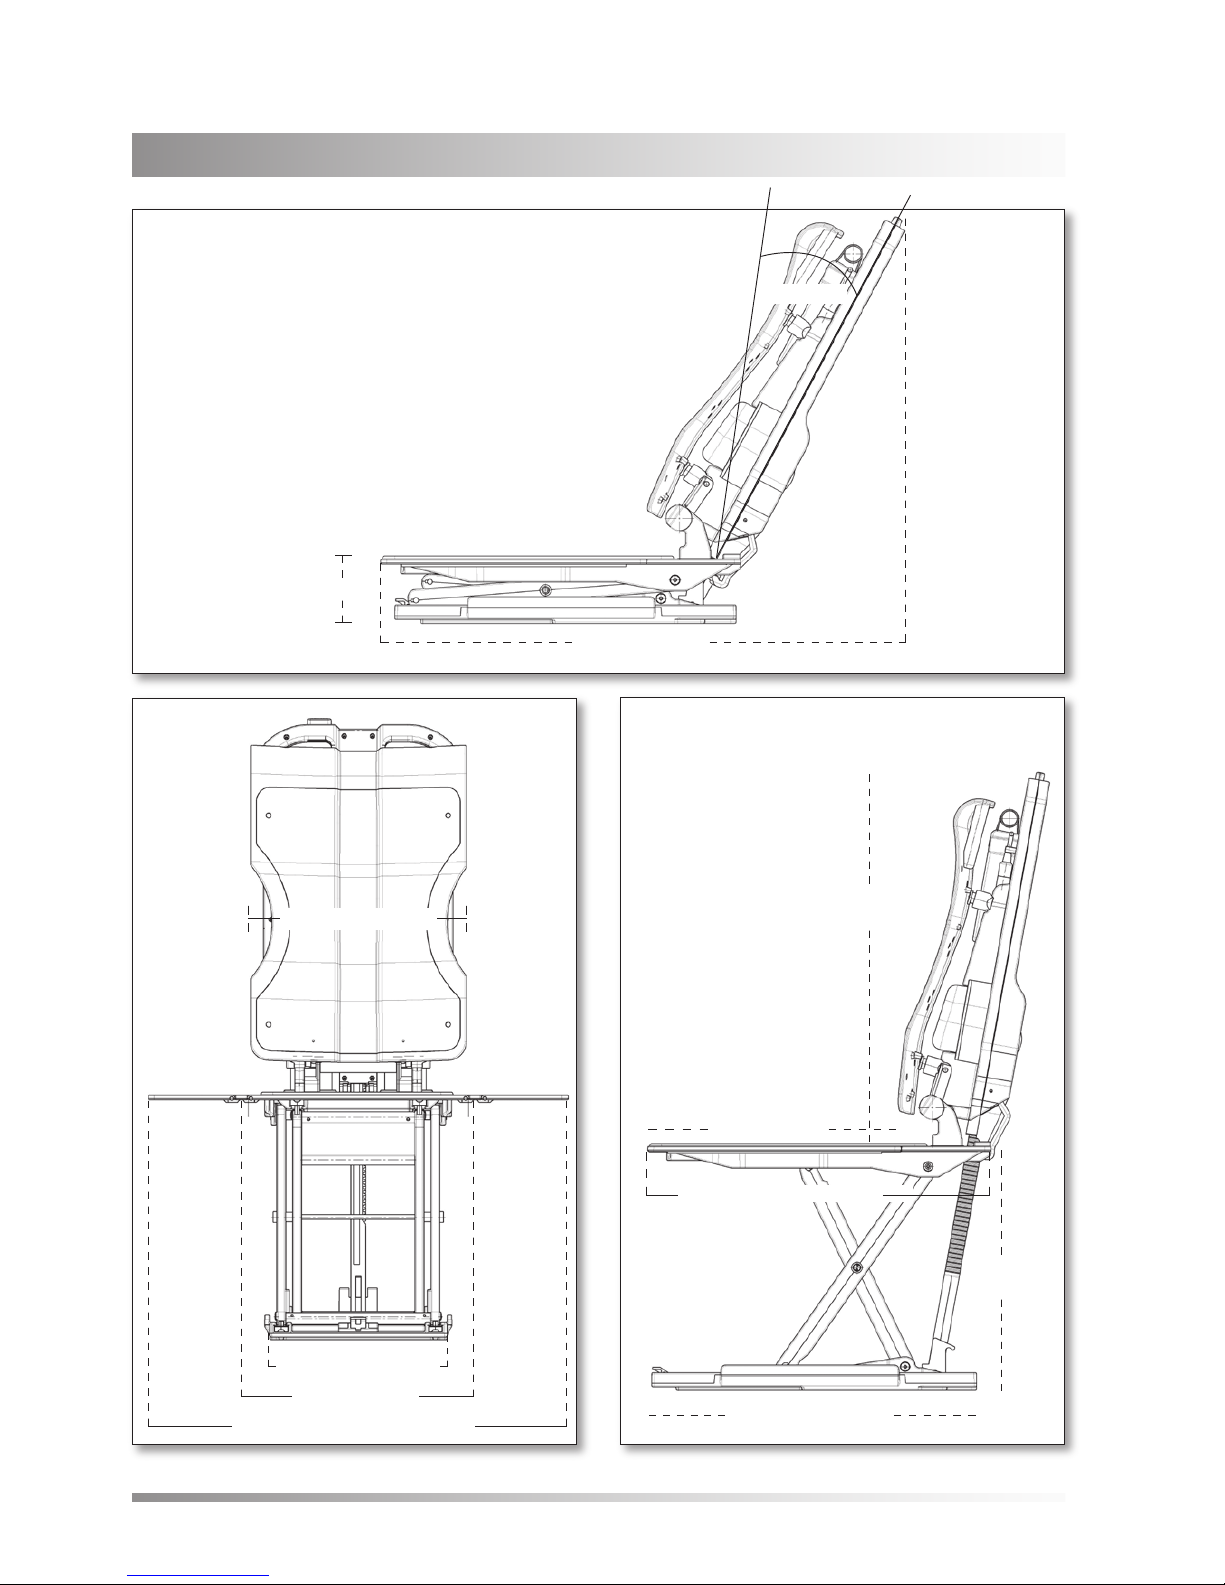
Supplement
width of seat 14.5 ”
overall width (incl. side flaps) 27.5”
width of base plate 12.2”
height of backrest
22”
depth of seat 17.7”
sitting height
max. 16.1”
length of base plate 21.5”
overall length of seat 22.75”
12° – 40°
sitting height min. 3 ”
angle of inclination
(backrest)
33.8”/overall length
(backrest in reclined position)
width of backrest 12.5”
Table of contents
Popular Mobility Aid manuals by other brands


HartMobility
HartMobility TITAN TSG600 Assembly/installation instructions

Mopedia
Mopedia RS910 instruction manual

Drive DeVilbiss Healthcare
Drive DeVilbiss Healthcare VITATURN K Instructions for use

Garaventa
Garaventa STAIR-TRAC SA-2 owner's manual

TrueCare
TrueCare Upright Mobility Walker instructions

uniprox
uniprox JT01 instruction manual