Endurance RWP2000-01 User manual

INSTALLATION AND OPERATION
MANUAL
WORMGEARHANDWINCH
TO PREVENT SERIOUS INJURY,
READ AND UNDERSTAND ALL WARNINGS AND INSTRUCTIONS BEFORE USE.
Due to continuing improvements,actual product may differ slightly from the product described herein.
210- 13198 26th Ave, Surrey British Columbia V3S3V7
[email protected] www.shop-endurance-marine.com Toll Free: 1-877-535-0669

Operating Instructions & Parts Manual
Please read and save these instructions. Read carefully before attempting to assemble, install, operate or maintain the product described.
Protect yourself and others by observing all safety information. Failure to comply with instructions could result in personal injury and/or
property damage! Retain instructions for future reference.
Unpacking
RWP2000-01 and RWP2000-02
3/16” 1/4” 5/16"
Winch drum capacity
for steel cable
(ft)
Model
Number Application Capacity
(lbs)
Gear
ratio
Handle
force
(lbs)
Remark Net
Weight
(lbs)
Specifications
Model Model
Cable
Layer
Rated Line Pull
with 1/4" cable with 5/16" cable
RWP2000-01
RWP2000-02
Description
Model RWP2000-02
Description
Model RWP2000-01
Field of application
Worm Gear Winch model RWP2000-02 is
suitable for lifting,raising, and pulling of
various loads without jerking and are mainly
used as a trailer winch.
It is not tested for building hoists.
It is not suitable for continues operation.
It is not approved for stages and studios.
It is not approved for lifting persons.
It is not approved for motor-driven operation.
Field of application
Worm Gear Winch model RWP2000-01 is
suitable for horizontal towing and pulling
only.
It is not permitted for lifting load.
It is not permitted for hoisting load.
It is not permitted for lowering down load.
It is not designed for stage and studio
applications.
It is not designed for personnel mobiling
application.
It is not designed for motor driven operation.
It is not designed for continuous operation.
After unpacking the winch, inspect carefully
for any damage that may have occurred during
transit. Check for loose, missing, or damaged
parts. Shipping damage claims must be filed
with carrier. Winch handle and winch enclosed
should be ready to install.
RWP2000-01
RWP2000-02
pulling
Lifting
2000
2000
≤48.4
≤45
140 ft.
-
77 ft.
77 ft.
52 ft.
52 ft.
manual
auto-brake
RWP2000-01
RWP2000-02 (lbs)
RWP2000-01 RWP2000-02
(lbs)
31
37
1st
Mid
Full
Model
with 3/16" cable
RWP2000-01
RWP2000-02 (lbs)
24:1
32:1
-
-
-
2000
1700
1300
2000
1700
1300
2000
1700
1300
2000
1500
1200
2000
1500
1200
1

2
Safety warning and precaution
1. KEEP WORK AREA CLEAN AND DRY
Cluttered, or wet work areas can cause
injuries.
2. KEEP CHILDREN AWAY FROM
WORK AREA
Do not allow children to handle this
winch.
3. DO NOT USE THIS WINCH IF
UNDER THE INFLUENCE OF
ALCOHOL OR DRUGS
Read warning labels on the winch to
determine if your judgement of
reflexes are impaired while taking
drugs. If there is any doubt, do not
attempt to use this winch.
4. USE EYE AND HAND PROTECTION
Wear safety impact eyeglasses and
heavy duty work gloves when using
this winch.
5. DRESS SAFELY
Do not wear loose clothing or
jewelry, as they can become caught
in moving parts. Wear a protective
hair covering to prevent long hair
from becoming caught in moving
parts. If wearing a long sleeve shirt,
roll sleeves up above elbows.
6. DO NOT OVERREACH
Keep proper footing and balance at
all times to prevent tripping, falling,
back injury, etc.
7. STAY ALERT
Watch what you are doing at all times.
Use common sense. Do not use this
winch when you are tired.
8. CHECK FOR DAMAGED PARTS
Before using this winch, carefully check
that it will operate properly and
perform its intended function. Check
for damaged parts and any other
conditions that may affect the operation
of this winch. Replace or repair damaged
or worn parts immediately.
9. REPLACEMENT PARTS AND
ACCESSORIES
When servicing, use only identical parts.
Only use accessories intended for use
with this winch.
10.MAINTENANCE
For your safety, service and maintenance
should be performed regularly by a
qualified technician.
WARNING:
The warnings, precautions and
instructions discussed in this Manual
cannot cover all possible conditions
and situations that may occur. It must
be understood by the operator that
common sense and caution are factors
which cannot be built into this product,
but must be supplied by the operator.
Special warnings and
precautions
1. CAUTION: Never exceed the
maximum load capacity specified
for each model.
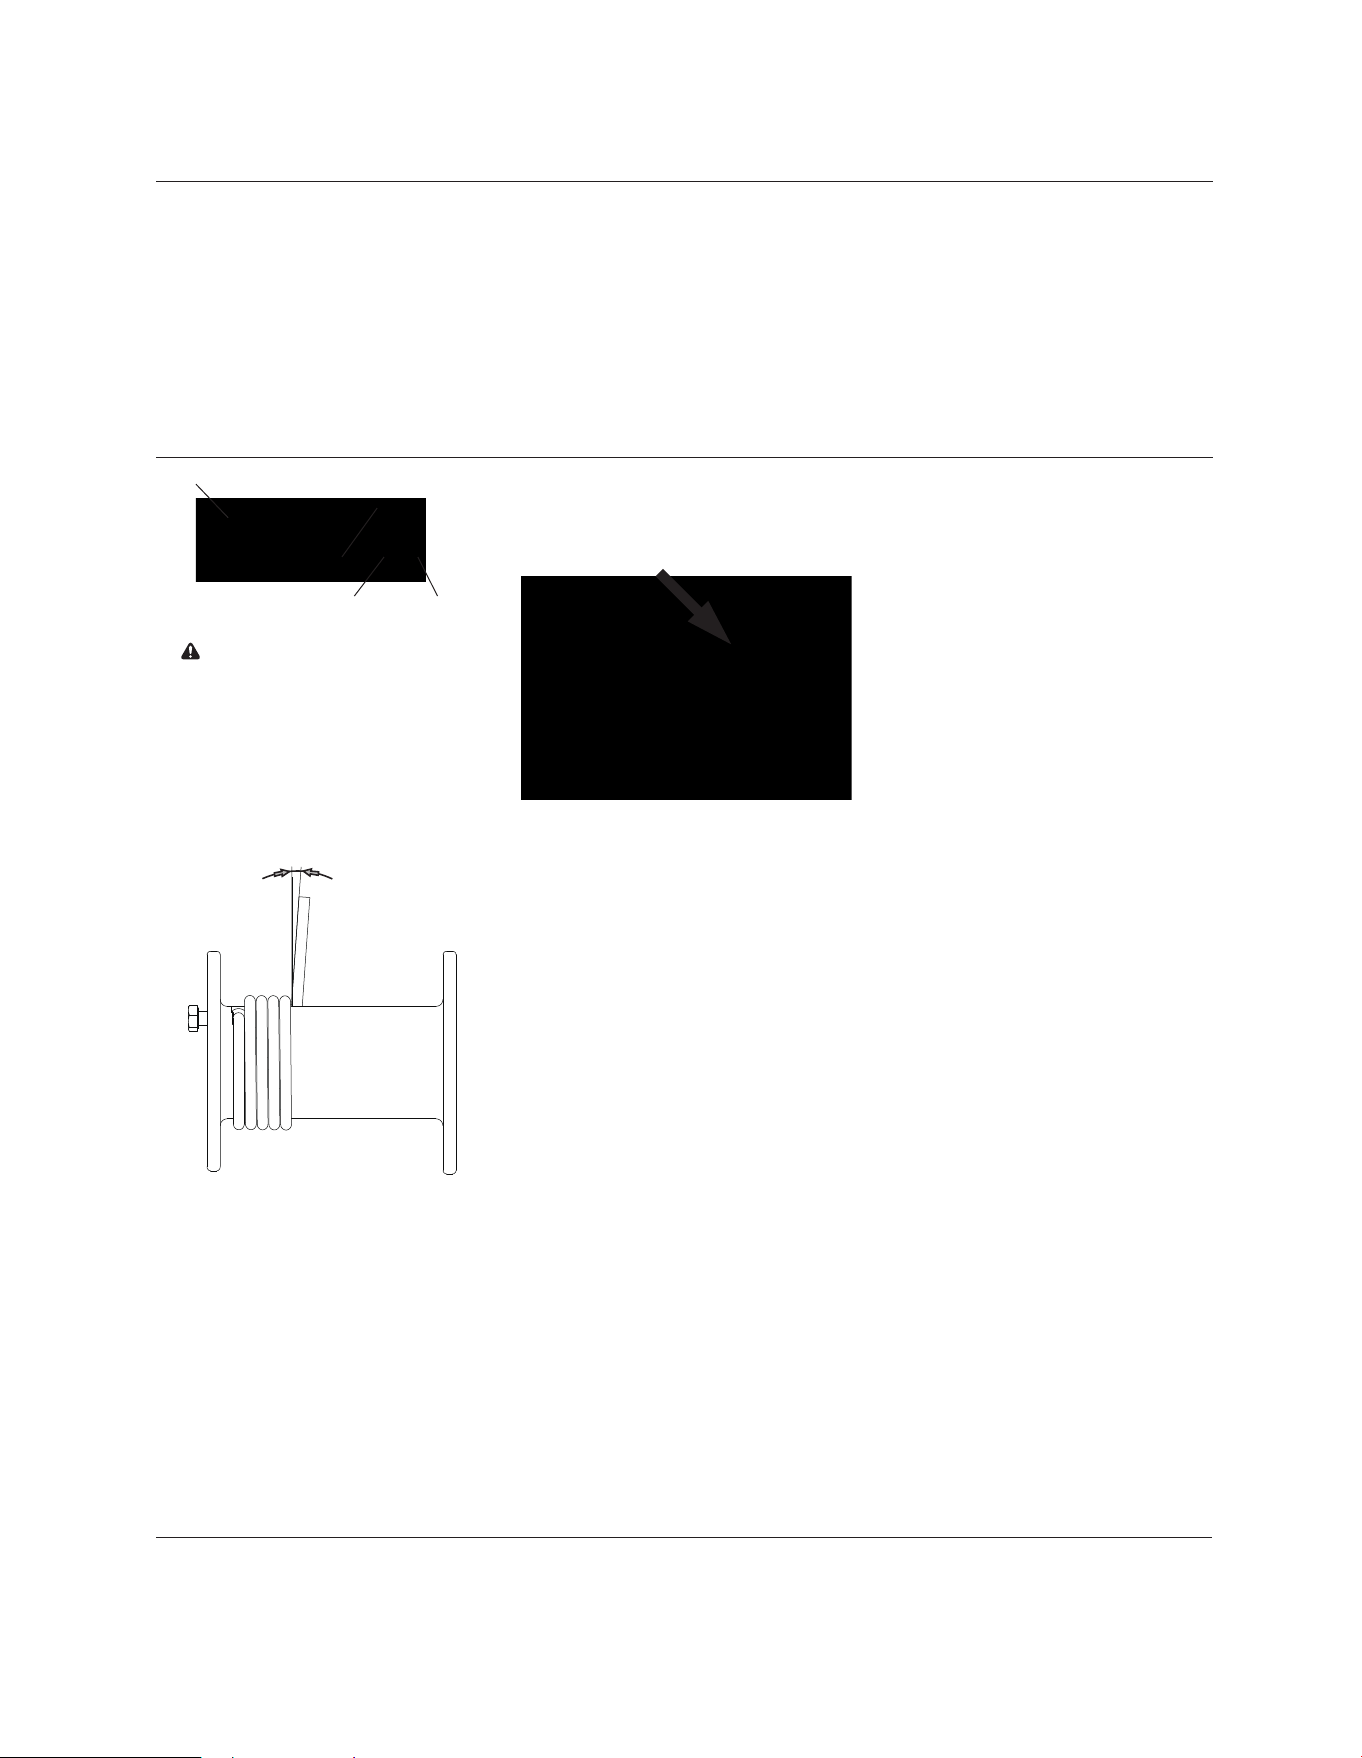
3. AVOID SIDEWAYS CABLE SLIP
The cable under a load should
only be wound on to the drum to
such an extent that a minimum
space of 2 times the cable diameter
remains on the drum flange
(see Figure 1). Winch overloading
and a sideway cable slip will here
be avoided.
2. AUTOMATIC MECHANICAL
BRAKE REQUIREMENT
The minimum tractive force (pulling
load) required for a proper braking
function on the winch is 55 lbs
(25kgs). Without this minimum
load, the braking function will
not take place.
Figure 1
4. ALWAYS LEAVE AT LEAST 5
WRAPS OF THE CABLE ON
THE DRUM
Failure to do so may break cable
connection to drum and may
result in serious accident.
(see Figure 2)
Figure 2
5. DO NOT OIL OR GREASE THE
BRAKE MECHANISM
Oil or grease will make the winch
reduce or lose brake function.
6. ALWAYS USE PROPER
COUPLINGS WHEN CONNECTING
THE WINCH CABLE HOOK TO A
LOAD.
7. MAKE SURE THE WINCH BASE
IS PROPERLY BOLTED TO A
STRUCTURE (OR VEHICLE)THAT
CAN HOLD WINCH AND WINCH
LOAD
Failure to bolt down the winch
properly can result in personal
injury and/or property damage.
8. DO NOT USE ANY ATTACHMENTS
to extend the length of the winch
cable.
9. AFTER MOVING AN OBJECT WITH
THE WINCH, SECURE THE OBJECT.
DO NOT RELY ON THE WINCH TO
HOLD AN OBJECT FOR AN
EXTENDED PERIOD OF TIME.
RWP2000-01 and RWP2000-02
5 wraps
m=freeboard≥2d(mm)
D
d
m
F
W

Model RWP2000-01 and RWP2000-02
10. DO NOT APPLY A LOAD to the winch
when the winch cable is fully extended.
The cable anchor on the winch is not
capable of holding the maximum rated
load capacity.
11. STAND BACK
Stay out of the direct line that the
winch cable slips or breaks, it will
“whip lash” along this line.
winch cable is pulling. In the event the
FITTING THE CABLE:
FITTING THE CABLE for RWP2000-01:
Push the steel cable into Drum cable
hole. Let the cable extrude out of the
hole by 15mm (not exceeding drum
circumference). Screw the cable
tightly.(Figure 7)
Assembly
1. Loosen the thumbscrew and slide the
handle toward the Adjustable handle
holder as shown
(see Figure 4)
2. Line up the notch in the handle with the
point of the Hex in the Holder.
3. Slide the handle and Holder install
onto the Hex drive on the brake until
the flat of the handle lines up with the
groove in the Hex drive. (see Figure 5-1,
5-2)
thumbscrew
notchnotch
slide Adjustable
handle holder
Figure 4
Figure 3
Figure 5-1
groove
Figure 5-2
Figure 6
slide handle out to desired length
and tighten thumbscrew
Handle Installing for RWP2000-01
4. Slide the handle outward away from
the Holder to the desired length then
tighten the thumbscrew. (see Figure 6)
Handle Installing for RWP2000-02
1. Insert Handle Assembly into the
handle Socket. Adjust the handle
length to suit the operation.
2. Tighten the set screw to hold it in
place.
3. Insert Cotter Pin into the pin hole
at the end of the handle and bend
it to secure in place.
FITTING THE CABLE for RWP2000-02:
Put the ball-headed steel cable into
Drum cable slot. Let the cable extrude
out of the slot by 20mm (not exceeding
drum circumference).
Screw the cable tightly.(Figure 8 )
Drum
Screw
Steel Cable
Figure 7
Figure 8
handle flat lines up
with groove
3
4
RWP2000-01 and RWP2000-02
WARNING
Fit the winch with the fleet angle
no more than 4°(Figure 10)
Figure 9
cable
cable clamp
Spring latch Hook
Figure 10
Figure 11
The belt breaking strain must be at
least 3 times the pulling capacity
and 7 times the lifting capacity of
the winch.
Grommet
Thimble
FITTING POSITION OR DIRECTION
OF OPERATION
≤4°
Lubricating
Lubricate the bearing regularly
with 2 to 3 drops of SAE 30
non-detergent oil

5
Overall dimension (Inches)
RWP2000-01 8 10 3/8
5 91/2
75/8
21/2
33/43/84 5
Model A B C D E F G
H I J
Model A
RWP2000-02
137/8
71/4
15 91
/8115
/8
5
81/233/43/84
21/25 61/812
B C D E F G
H I J K L M S
Model RWP2000-01 and RWP2000-02
Ø
Ø
Ø
A
B
DE
F
J
G
H
I
C
S
M
L
F
C
B
A
D
E
I
H
J
K
G

Repair Parts List for Manual Winch
Ref. Ref.
No. Description Qty. No. Description Qty.
(*) Not available as a repair part.
Operating Instructions and Parts Manual RWP2000-01 and RWP2000-02
Please provide following information:
-Model number
-Serial number (if any)
-Part description and number as shown in parts list
6
Repair Parts Illustration for RWP2000-01
1
2
3
4
5
6
7
8
9
10
11
12
13
14
15
16
17
Front Cover
Spring Pin 5x24
Bolt M8x80
Nut M8
Worm
Worm Gear
Copper Disc
Square-head Screw Plug 1/8-27
Spring Pin 6x32
Spring Pin 4x32
Handle Assembly
Socket-handle
Dry Bushing
Square-head Screw Plug 3/8-27
Flat Key A type 8x7x25
Set Screw 1/8-27
Back Cover
1
2
4
4
1
1
2
1
1
1
1
1
2
2
1
3
1
18
19
20
21
22
23
24
25
26
27
28
29
30
31
32
33
Square-head Screw M8x12
Set Screw M8x12
Tapered Cotter 8x60
Drum Assembly
Screw M8x16
Nut M8
Frame
Output Shaft
Cotter Pin 4x25
Label -Model
Label -Handle
Label -Caution
Label -Oil
Label -Warning
Label -Spool
1
1
1
1
1
1
1
1
1
1
1
1
1
3
1
1
1
2
3
4
56789 10
11
12
14
15
16
17 18
19 20 21 22
23 24
25
27
13
26
30
31
31
33
28
32
29

Repair Parts List for Manual Winch
Ref. Ref.
No. Description Qty. No. Description Qty.
Operating Instructions and Parts Manual RWP2000-01 and RWP2000-02
7
Please provide following information:
-Model number
-Serial number (if any)
-Part description and number as shown in parts list
Repair Parts Illustration for RWP2000-02
1
2
3
4
5
6
7
8
9
10
(*) Not available as a repair part.
11
12
13
14
15
16
17
18
19
20
2
2
1
1
1
1
1
1
1
1
Reducer Assembly
Hex Input Assembly
Key
Handle Medallion Assembly
Nut M10
Screw M8x20
Drum Assembly
Tapered Cotter 8x64
Frame
Flange Bearing
1
1
1
1
4
1
1
1
1
1
Square-head Screw M16x40
Nut M16
Label ( warning-do not adjust brake when )
Name Plate
Label ( code number)
Labe ( warning to avoid injury or property damage )
Label ( warning-keep hands away from drum )
Seal Plug R 1/8)
Label ( warning )
Label ( model/capacity)
210- 13198 26th Ave, Surrey British Columbia V3S3V7
[email protected] www.shop-endurance-marine.com Toll Free: 1-877-535-0669
This manual suits for next models
1
Table of contents
Other Endurance Winch manuals

Popular Winch manuals by other brands

Fransgard
Fransgard V6521 manual

HyQuest Solutions
HyQuest Solutions BAROSSA DDT700 user manual

HADEF
HADEF 42/87E Installation, Operating and Maintenance Instruction

POWERWINCH
POWERWINCH 212 owner's manual

HERKULES
HERKULES SHZ 125/250 operating instructions

Haklift
Haklift VAVINTH300EL Original instructions


