Fransgard V6521 User manual

Fransgård
Manual
US
Farm tractor winch
V-6521

1
LIST OF CONTENTS Page
Technical specifications............................................................................. 1
Safety instructions ..................................................................................... 2
Fitting......................................................................................................... 2
Lubrication and maintenance .................................................................... 2
Instructions for use .................................................................................... 2
Danger / warning ....................................................................................... 3
Adjusting the clutch ................................................................................... 4
Instructions for mounting the wire ............................................................. 5
Safety manual.......................................................................................7-16
Spare parts list........................................................................................18-
TECHNICAL SPECIFICATIONS
Pulling power..............................................................6500 kg / 14300 Lbs.
Clutch........................................................................... 500 cm². / 0.5 sq. ft.
Transmission ................................................................. 2x5/8" roller chain.
Wire ........................................................................................11 mm. / 0.4”
Wire speed ..............................................................0,6 - 1,5 m/s / 2 –5 ft..
PTO shaft....................................................................................540 r./min.
Weight included cable & PTO ........................................461 kg / 1016 Lbs.

2
SAFETY INSTRUCTIONS
The machines may only be used by qualified
operators.
Before starting working, check that the tractor
and the machines are standing on a fixed
horizontal base. The owner and the user are
responsible for the fact that no unauthorised
persons are in the working area. The timber
winch must be lowered to the ground when the
winch is in operation.
The steel wire should be inspected daily, and if
it is frayed it should be replaced.
Please note that steel wires, slides, end
hooks, etc. that are used in connection with
skidding timber are wearing parts and are
therefore not covered by the guarantee.
The protective supplied must be fitted before
you start the machine.
The connection pins at pos.2 page 14, must be
inspected for wear at regular intervals and at
least twice a year. If necessary they must be
replaced, since the actuating lever may stick
with worn pins.
FITTING
The forestry winch is mounted in the 3-point
linkage of the tractor.
Adjust length of top-link to prevent the machine
from hitting the drivers cabin.
Check length of PTO. shaft both in working
and transport position, shorten if necessary.
Fit the wire by leading it over the uppermost
roller onto drum.
Fix onto drum by means of the lock no. 5 page
12.
Roll out the cable completely and stretch it
while winding it onto the drum.
Screens removed for servicing the machine
must be reinstalled before the machine in used
again.
LUBRICATION AND MAINTENENCE
Lubricate the PTO. shaft once daily.
Lubricate the chain once every week.
No oil on clutch lining (15509).
The turning plate at the top pulley has to be
greased once every day.
INSTRUCTIONS FOR USE
Make sure that:
- the cable is properly fixed
- the cable is not damaged
- the PTO. shaft is properly mounted and
adapted in such a way that the angle of the
PTO. shaft is as small as possible.
- the clutch in properly adjusted so in the fact
that the wire drum does not revolve until the
clutch line is activated.
Winching:
Lower the winch so in the fact that it stands on
the butt plate, fit forestry chain onto the log,
and fit the forestry chain either onto the hook
or onto the slide on the cable, position yourself
in a place you have good view, pull clutch line
slowly.
Transport:
Place the logs on the chain beam of the
forestry winch. Lift the winch.
Do not transport logs directly in the cable,
always use forestry chains.

3
DANGER!
Read before operation this machine!.
It is the owner’s responsibility to instruct all equipment operators and support personnel in the
operation of winch.
WARNING!
1) Do not attempt to operate this winch
without proper training.
2) Do not operate this machine until the
owner’s manual has been completely read
and understood.
New owner’s manual is available from
your Dealer or the factory phone
+ 45 98 63 21 22
(North America: 450 654 6126). If the
warning decals become illegible, new
decals can also be ordered.
3) Keep hands, feet and clothing away from
power driven parts!
4) Ensure that the cable is in good conditions
before operating the winch. If the cable
breaks, parts of it can fly both toward and
away from the winch. Ensure that all
bystanders are out of reach of the cable
when the winch is used.
5) Never handle cable without shutting of
power-take off!
6) Do not transport logs direct in the cable -
use the log towing bar.
7) This machine has been constructed to skid
and push together timber that has been
felled and is lying on the ground and may
not be used for other purposes. The
machine must not be used to pull vertical
trees or trees that are wedged or jammed,
as this is extremely dangerous.
8) Check moving parts. They should be
fastened in place, in good working
condition and all shields and guards must
be in place.
9) Familiarize yourself with the controls and
how to stop the winch and tractor in an
emergency.
10) Do not let children or incapable persons
operate the winch.
11) Do not wear loose clothing, loose sleeves,
neckties or long uncovered hair around
moving parts of machinery.
12) Park the winch and tractor on level ground
for winching.
13) Operate the winch from a control rope at
least 6 m. to the side of the machine.
Do not operate the winch from the tractor
seat.
14) Ensure that other people do not become
endangered when you are using the
winch.
15) Do not leave the tractor running
unattended.
16) Disengage the PTO an turn the tractor off
before you service the winch. Remove the
keys so the tractor cannot be started up
accidentally.
17) Use only original Fransgård replacements
parts, do not make any modifications.
18) Inform everyone who works with the winch
about risks and how they can avoid
accidents.
19) Stay alert!. Do not operate when fatigued.
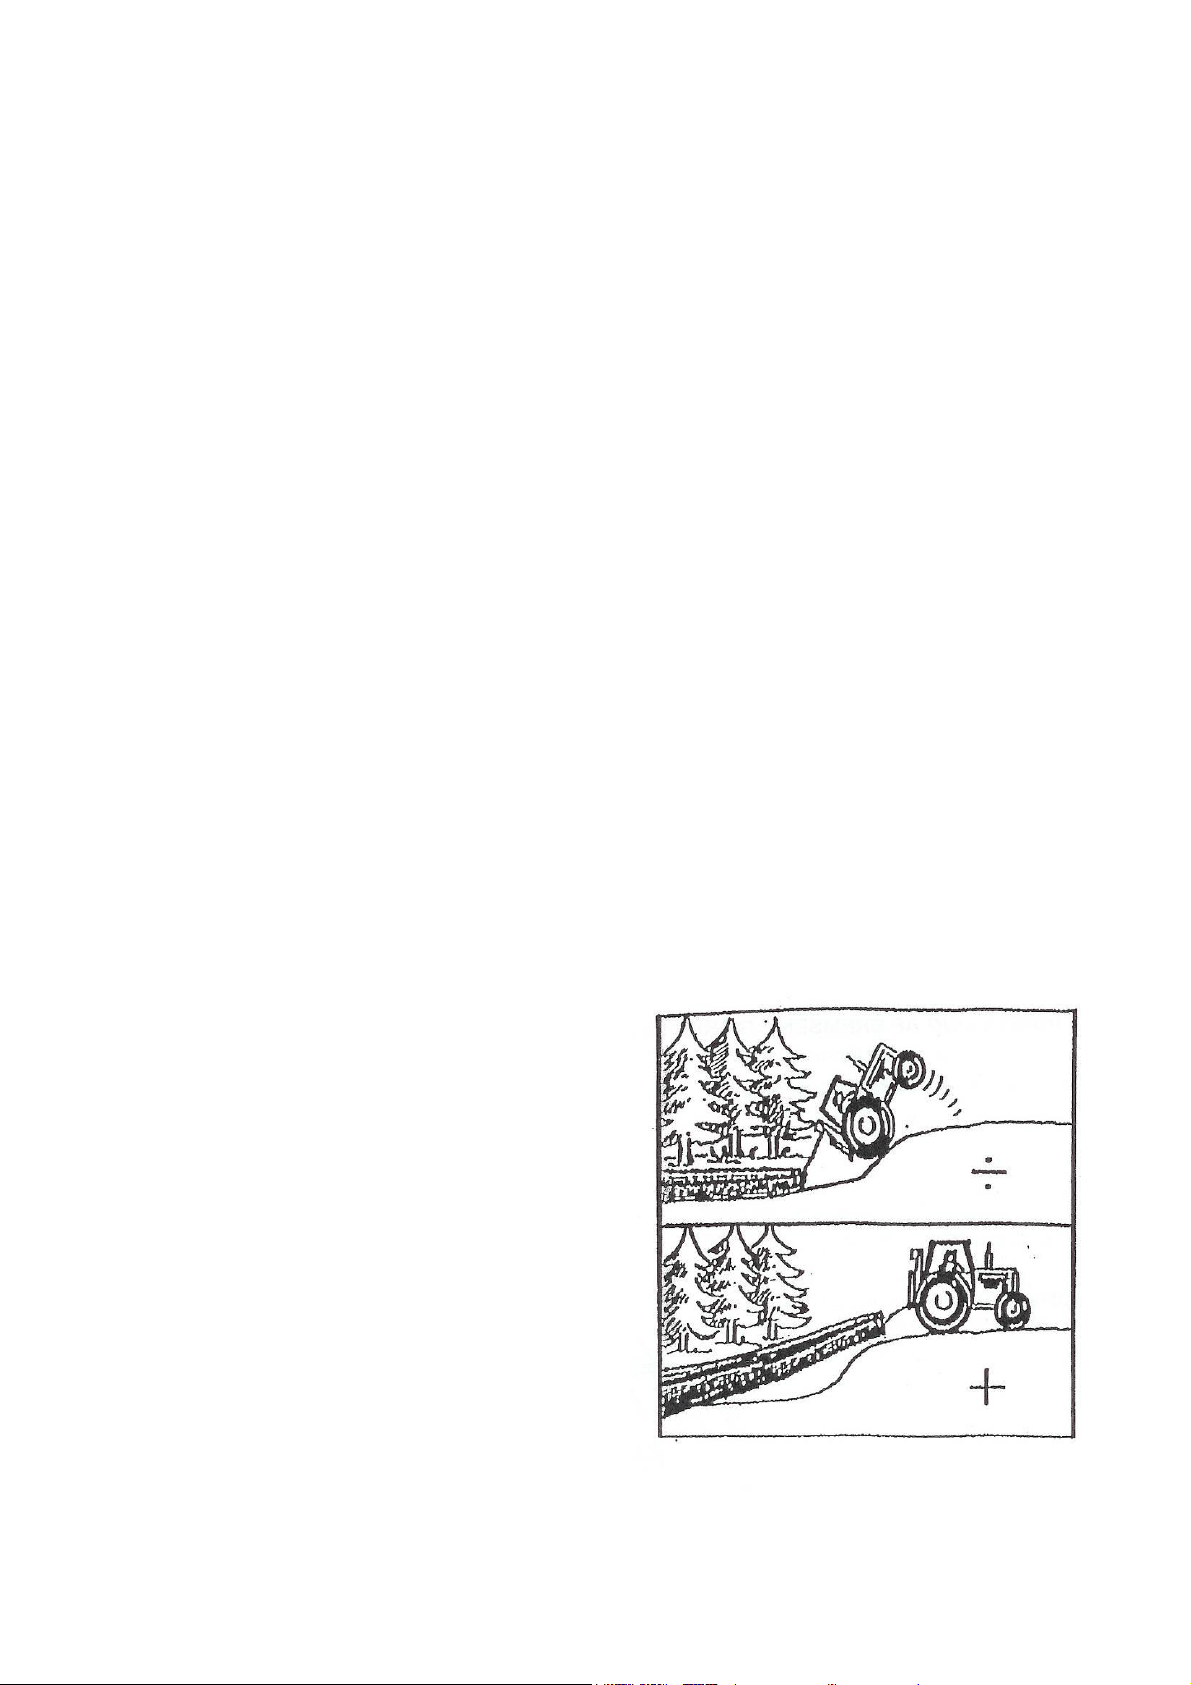
20) Do not winch at sideways angles
exceeding 30 degrees (see drawing).
21) Failure to heed the warnings printed on
the winch or in the owner’s manual might
result serious injury or death.
22) The tractor should not be set in motion
without the “buttends” of the logs (that
have been winched) being raised off the
ground. If this is not done and an obstacle
hits the butt end of the log (s), then the
tractor may turn over and severe injuries
may result.

4
ADJUSTING THE CLUTCH
The clutch is adjusted at the factory.
If it is necessary to adjust it do so as follows:
1. Loosen lock nut no. 1 and bolt no. 2.
2. Hold lever no. 3 against stop, tighten both bolts no. 2 until slight resistance is felt.
3. Release lever no. 3, turn both bolts no. 2 3/4 turn and tighten lock nut no. 1.

5

6
INSTRUCTIONS FOR MOUNTING THE WIRE.
1.) Pull about 1 metre of the wire 1out through hole 2and back through hole 3and out through hole 4.
2.) Mount the wire fixing block 5(making sure that only 5 mm of the wire are introduced into the fixing
block) and fasten with the allen screw and the unbraco wrench supplied.
3.) Then pull the wire back so in fact that the wire fixing block is inside of the toothed rim and close to
hole 4.

7
Safety, Maintenance and Operation Tips for
North American winch Models:
V3021 –V3521 - V4021 –V5021 and V6521
Failure to heed the warnings printed on the winch or in the owner’s
manual might result serious PHYSICAL injury.
NOTICE: THIS SECTION MUST BE READ PRIOR TO USING THIS MACHINE
The owner’s operator and repair manual,
included with the machine, must also be read
prior to using this machine

8
SAFETY INSTRUCTIONS
The machines may only be used by qualified operators.
Prior to operating this winch, make sure that the tractor and the winch are on a stable, level surface, to
avoid tipping over, when the unit is under load. The user is responsible for assuring that no
unauthorized persons are in the working area. The timber winch must be lowered to the ground when
the winch is in operation.
The steel wire cable should be inspected daily, and if it is frayed it should be replaced immediately.
The protective screen, supplied with the unit, must be installed before you start operating the winch.
The pressure pins (p/n 15503) at pos.3 on page 14, must be inspected for wear at regular intervals or
at least twice a year. If necessary, they must be replaced, since the clutch lever may stick with worn
pins.
INITIAL INSTALLATION
Mounting to the tractor’s linkage system:
The forestry winch is to be mounted on the 3-point linkage of the tractor.
Adjust length of top-link to prevent the protection screen from hitting the tractor’s cabin.
Verify the length of the P.T.O. shaft both in working and transport position, shorten if necessary.
Inspect the P.T.O. regularly to make sure all the guards are in good condition and replace if necessary.
Mount the PTO to the tractors PTO output shaft. Connect the safety chain
to the machine, so it will not turn and get caught to any clothing.
REMEMBER! Inspect the PTO safety shield for any damages, before and
when operating the machine. Change the safety shield if
necessary.
Adjusting the Lift Arms and top links: The lift arms should be attached to the lower lift arms when
the winch is set on level ground. Then proceed to attach the top link. The top link must be adjusted in
such a way so the winch may sit vertical when it is set to the ground.
Also, make sure that the protection screen does not hit the tractor cab, when the winch is lifted
with the 3-point hitch. If this is the case, adjust the top link accordingly.
The P.T.O must be cut to a proper length, so it does
not “bottom out” and bind. Remove the PTO to
perform this operation. If the PTO is not cut to the
proper length, it may cause damage to the PTO,
gearboxes etc. See illustration for proper
measurements.
a = clearance when attached to tractor; should be
30mm /1.20 inches
b = overlap; should be 200mm / 7.87 inches
8 inches

9
Installing and/or replacing the wire cable (if the winch is initially delivered without the cable
installed)
During the initial cable installation or when replacing a worn wire cable, unroll the cable completely,
making sure there are no twists in it. (see diagram A)
Then proceed to install the wire cable on the cable drum by leading it over the top pulley and down
though the tube located under the pulley to the cable drum. (fig. 1 in drawing 1) There are three holes
in the side wall of the cable drum, run the wire cable out through hole no 2, back in through hole no. 3
and out through hole no. 4 (fig. 2, 3 and 4 in drawing)
Lock the cable to the wire drum by means of the locking lug (which is in the plastic bag where the
owner’s manual was stored; there is also an Allen Key and set crew in the same bag). Pass the cable
through lug, with a maximum of 3/16” (5mm) of cable exceeding the length of the lug, and tighten the
set screw securely with the Allen Key that is supplied with the lock lug. Then pull the remainder of the
cable into the cable drum.
Do not leave any excessive cable hanging out from the lock lug since it may get snagged when the
winch is operated.
Next, attach the hook end of the wire cable with a choker chain to a fixed object (tree, another
implement, etc.).Then with the PTO operating at 500 rpm engage the winch with the Green pull cord
and pull the tractor towards the fixed object. This will enable the cable to be wrapped evenly and tightly
on the cable drum.
This is critical in ensuring the wearing life of the cable, and smooth operation of the winch.
This procedure should be repeated occasionally, also when you note that the wire cable is
loosely wrapped on the cable drum or it is difficult to pull the cable out, when logs are to be
tied.
Drawing ”A” Unrolling New cable
Drawing ”B” Attaching cable to wire drum
Fransgard uses a specially designed cable that resists abrasion from being dragged on the ground.
Therefore it is highly recommended that an original Fransgard wire cable be used as a replacement for a
LONGER WEARING LIFE AND BETTER VALUE FROM YOUR PURCHASE.

10
Installing the Chokers/Sliders: After installing the cable, release 4 –5 ft. of cable, by unlocking the
cable drum locking latch which is running on the cable drum sprocket. Remove the bolt joining the two
pieces of the choker/slider. Place the rounded part on the cable, then slip the flat slotted part in
between the rounded part and tighten with the bolt and Nylon lock nut. These must be tightened
securely to prevent the choker/slider from slipping over the crimped sleeve attaching the end-hook to
the cable. Slip the choker/slider down to the hook to make sure it doesn’t slide over the crimped
sleeve. If it does then tighten the bolt even more. FAILURE TO DO SO MAY DAMAGE THE CABLE
DURING THE WINCHING OPERATION (Cables are considered a wearing part and are not covered
under the warranty agreement. Note: If your winch was delivered with the cable and choker/sliders
installed, make sure the choker/slider bolt has been tightened securely as described below in Fig. A
Fig. A
Protection Screen
Screens removed for servicing the machine, must be reinstalled prior to using to using the winch
again.
The machine should never be operated with the protective screen removed.
Make sure your three-point hitch is properly adjusted so when the winch is put in a raised position with
the three-point hitch, the protection screen does not hit the tractor cabin.
INSTRUCTIONS FOR USE
Prior to operating the winch, make sure that:
- the cable is properly installed, and the cable is wound tight on the cable drum
- the cable is not damaged, with broken strands that might cause the cable to break when it is pulling a
load.
- the P.T.O. shaft is properly mounted and adapted in such a way that the angle of the P.T.O. is as
straight as possible to prevent breakage and additional wear to the joints.
- the clutch is properly adjusted as to ensure the cable drum does not turn until the Green power cord
is pulled.
Bolt Not Tightened
Note cable hook crimped
sleeve is inside of choker
The bolt has been tightened
properly. Note crimpled cable
lug will not pass through the
“throat” of the choker.

11
Winching:
Lower the winch so that it rests on the butt plate. Activate the tractor PTO set it to run at approx. 500
rpm.
Unlock the cable drum, by pulling the cable drum latch.
Pull out the desired length of cable towards the logs that are to be pulled.
Tie the forestry chain around the log, and lock the forestry chain either on to the hook or in the slot of
the slider/choker, which has been previously installed properly on the cable( as per Fig. A , above),
Never wind the cable directly around the log that you wish to pull, since this will permanently damage
the cable. You must only use the choker chains, for this purpose.
Return to the tractor, Flip the cable drum locking latch so it will ride on the cable drum sprocket, and
prevent the load from slipping, if the engine on the tractor was to stall. Then position yourself at a
distance from the winch and where you have good view of the logs being pulled and are away from
any flying stones or debris that could be projected as the logs are being pulled in.
Fig. C
Pull the Green power cord slowly to engage the clutch and begin the pulling process. Make sure that
you pull this cord so that the clutch arm lever comes to rest against its stop (as indicated by the arrows
to the right in fig. C).
If an obstacle is hit, the clutch will slip, when this occurs, release the Green power cord, all winching
action will cease, enabling you to go and remove the obstacle and then resume operation.
When the logs have been brought up to the winch, remove the chains from the cable and/or
end hook.
Attach them to the tow bar. When attaching logs to the tow bar on the skid plate, keep enough
slack on the chains so the logs will not bind against the skid plate when making turns (this will
bend the tow bar), also make sure the butt ends of the logs are lifted off the ground when the
winch is raised with the three-point lift of the tractor, to avoid tipping over, with the tractor, if an
obstacle is hit
Do not haul logs directly with the cable, always attach the forestry chains to the tow bar, this
will lower the center of gravity of the tractor and prevent tipping over with the tractor.
Furthermore this will prevent damaging the cable, top pulley, and main shaft of the cable drum,
since the clutch will not release when the cable drum locking latch is engaged.

12
Transport:
Lift the winch with the 3-point linkage and proceed with caution.
Avoid sharp turns, to avoid tipping the tractor and/or prevent breaking the forestry chains when the
logs bundle-up against the skid plate.
LOGS MUST ALWAYS BE ATTACHED TO THE TOW BAR WITH THE FORESTRY CHAINS WHILE
IN TRANSPORT POSITION. THIS WILL LOWER THE CENTER OF GRAVITY OF THE TRACTOR
AND PREVENT THE TRACTOR FROM TIPPING OVER, IF AN OBTACLE IS HIT, AND PREVENT
SEVERE DAMAGE TO THE WINCH!
LUBRICATION AND MAINTENANCE
•Lubricate the PTO shaft once daily.
•Lubricate the drive chain once every week with a small amount of grease only. NEVER USE
OIL, these liquid lubricants may seep down and get on the clutch lining, which is located directly
below the drive chain. No oil should ever be used, since it might penetrate the clutch lining
(15509) surface, and would cause the clutch to slip.
•Clean off the dirt and grease the TOP Pulley support table, once every day, to enable the pulley
to pivot freely. This will prolong the life of the wire cable and the pulley. Use grease only.
•Use only original Fransgård replacements parts, do not make any modifications. The drive chain
is a metric chain, which is hardened to avoid stretching under load, other drive chains will
stretch and wear out the main drive gear. The outside wraps of the cable are made of special
hardened steel (Warrington seal). This cable is designed specifically for this application since
most cables are not designed to be dragged on the ground, stones etc. These are just a few of
the several reasons why you should demand and only use Fransgard genuine replacement
parts when servicing your product.
•Lubricate the cable using a very small amount of grease on a rag and wipe the cable, when it is
fully extended. AVOID USING OIL SINCE IT WILL IMPREGNATE THE CLUTCH SURFACE
OF THE CABLE DRUM AND CAUSE THE CLUTCH TO SLIP.

13
Clutch adjustment:
•The friction clutch system is adjusted at the factory prior to shipment.
•Under normal conditions it should perform without any adjustment for well over 1000 working
hours.
•If it is noted that the clutch is slipping with minimal loads, even though the green power cord is
fully pulled, so the clutch arm rests against the stop, then a clutch adjustment may be
necessary.
Fig. B
Procedure for adjusting the clutch
IMPORTANT: REMOVE THE PTO FROM THE WINCH
1. Loosen Nut ”A” and Nut ”B” as show in Fig. B above, Never loosen Nut ”C” unless your
dismantling the main cable drum shaft. (This is to be done by an authorized dealer only)
2. Pull the Green Pull Cord until the clutch cam lever (p/no 15504) rests against the stop and
hold the pressure on the clutch
3. Tighten bolts ”A” &”B” until a resistance is met. Then release the Green pull Cord.
4. Tighten bolts ”A” & ”B” an additional ¾” turn each
5. Tighten nuts ”A” &”B”. Install and engage the PTO shaft, and the winch is now ready to
operate
Nut C
Never loosen
Nut A
Bolt A
Nut B
Bolt B

14
DO’S AND DONT’S FOR SAFETY AND LONGER MACHINE WEAR
DANGER! WARNING!
DO:
Read the original manual before operation this machine!
It is the owner’s responsibility to instruct all equipment operators and support personnel in the
operation of winch.
FOR OPERATING WINCH:
1) Keep hands, feet and clothing away from power driven parts!
2) Ensure that the cable is in good conditions before operating the winch. If the cable breaks, parts of
it can fly both toward and away from the winch.
Ensure that all bystanders are out of reach of the cable when the winch is used.
3) Never perform maintenance on the cable without shutting off the power-take off!
4) Check moving parts. They should be fastened in place, in good working condition and all shields
and guards must be in place.
5) Familiarize yourself with the controls and how to stop the winch and tractor in an emergency.
6) Park the winch and tractor on level ground for winching.
7) Operate the winch from a control rope at least 12 feet to the side of the machine.
8) Ensure that other people do not become endangered when you are using the winch.
9) Disengage the PTO an turn the tractor off before you service the winch. Remove the keys so the
tractor cannot be started up accidentally.
10) Inform everyone who works with the winch about risks and how they can avoid accidents.
11) Stay alert! Do not operate when fatigued.
12) The tractor should never be set in motion without the “butt-ends” of the logs (that have been
winched) being raised off the ground. If this is not done and an obstacle hits the butt end of the log
(s), then the tractor may turn over and severe injuries may result.
13) Only use forestry chains, to tie the logs, never directly attach a cable around a log, since this put a
”kink” in the cable, and reduce its breaking load permanently.
14) Never use wire rope slings, since they cannot be locked into the tow bar while in transport, which
lowers the center of gravity and prevents tipping over, when going uphill or uneven ground.
15) Always pull the Green power cord sufficiently to ensure that the clutch engagement lever rests
against the stop. This ensures that full pressure will be exterted on the clutch, and full power will
be exerted in hauling in the logs. Otherwise, you could ”glaze” the or burn the clutch lining

15
DO NOT:
1) Do not attempt to operate this winch without proper training and knowledge of the working features
of this winch
2) Do not operate this machine until the owner’s manual has been completely read and understood.
New owner’s manual are available from your Dealer or the factory phone + 45 98 63 21 22
(North America: 450 654 6126). If the warning decals become illegible, new decals can also be
ordered.
3) Do not transport logs direct in the cable - use the log towing bar. This can cause severe damage
to the winch!
4) Do not use the winch for other uses than winching and skidding trees.
5) Do not let children or incapable persons operate the winch.
6) Do not wear loose clothing, loose sleeves, neckties or long uncovered hair around moving parts of
machinery.
7) Do not operate the winch from the tractor seat. Operator could be hit by flying objects during the
winching operation since the protection screen does not protect the operator when the winch is
lowered to the ground for operation. Note: The tractor operator is protected when the winch is
raised with the three-point linkage in transport mode.
8) Do not leave the tractor running unattended.
9) Do not winch at a side angle exceeding 30°, the tractor may tip over causing physical injury. Also
use the bottom pulley (optional on model V3004/V-3507) when pulling logs that are located lower
than the winch surface. This will lower the center of gravity of the tractor, and avoid tipping over.
10) Oil or similar liquid lubricants should never be used on this winch. (SEE SECTION ON
LUBRIFICATION & MAINTENANCE)
Failure to heed the warnings printed on the winch or in the owner’s
manual might result serious PHYSICAL injury, and severe damage to
the machine.
This product was designed to provide a safe and efficient means of
performing your forestry tasks. Operating and servicing this product
properly will provide you with many years of satisfying results.

16
Delivery Check
List
Winch Model: ___________ Serial No.: ____________
Dealer Check List on delivery of winch
1) PTO cut and installed on tractor with proper overlap of
Safety guard and shafts to prevent the Shaft from “binding” or “
bottoming-out” when the winch is raised with the three-point hitch [ ]
2) The three-point hitch is to be adjusted properly so that the Protection
screen does not hit the tractor cabin when the winch is raised [ ]
3) Operating and Safety Instructions reviewed with Purchaser [ ]
4) Purchaser advised that the choker chains be removed from the cable when [ ]
the logs have been pulled in and how to attach the chains properly to the
tow bar before moving with the tractor, for safety and preventing severe
damage to the winch.
5) Purchaser advised how to activate pulling procedure with Green power cord [ ]
and ensuring the clutch lever comes to rest tightly against stop to apply
full pressure on the clutch discs.
6) Advise the purchaser not to put oil on the drive chain, but only a little bit [ ]
of grease, occasionally, since clutch lining is 1”below the drive chain.
7) The support table under the top pulley must be greased and free of dirt [ ]
and debris, so the top pulley will swivel easily and prevent additional wear
to cable and top pulley
Dealer Signature __________________, Purchaser Signature ________________________
Printed Name ______________________, Printed Name
___________________________
Dealership Name _______________________________,
Street Address __________________________, Street Address
___________________________
Town, State, Zip __________________________, Town, State, Zip
__________________________
Date: _____________
Note: (Dealer, please keep copy and return original to Distributor to activate the
Winch warranty within 30 days of the sale)

17

18
This manual suits for next models
4
Table of contents
Other Fransgard Winch manuals
Popular Winch manuals by other brands

POWERWINCH
POWERWINCH 316 owner's manual

Mile Marker
Mile Marker HI9000 Installation & operator's manual

Portable Winch
Portable Winch PCA-1264 user manual

Bulldog Security
Bulldog Security DC Series instruction manual

Ingersoll-Rand
Ingersoll-Rand BU7A Parts, operation and maintenance manual

Harken
Harken Performa 20 STP Installation and maintenance manual