Enduraplas SWIFT BLENDER User manual

OWNER’S MANUAL
SWIFT BLENDER™
Version 1.0 Copyright © Enduraplas. All Rights Reserved.
Product Codes:
CHSSB001
SWIFT BLENDER
CHSSB001

2Swift Blender™
English
CONTENTS
INTRODUCTION 3
WARNINGS 4 - 7
GETTING STARTED 8 - 11
STORING/WINTERIZING 12
TROUBLESHOOTING 13
WARRANTY 14 - 17
PARTS BREAKDOWNS 18 - 27
!

3Version 1.0
English
INTRODUCTION
Congratulations! You now own an Enduraplas chemical mixing
station. Durable design and construction assure you a lifetime of
extreme performance.
Take a look through this owner’s manual to learn how the pros
use their Enduraplas chemical mixing station.
Discover More Helpful Tips:
blog.enduraplas.com/liquid-storage-transport
Watch Instruction Videos:
www.youtube.com/enduraplas

4Swift Blender™
English
WARNINGS
1. To ensure your own safety and that of others, you must
comply with all relevant environmental, work place health,
safety legislation and codes of practice.
2. Select and wear appropriate Personal Protection Equipment in
accordance with the label of the product you intend to use.
3. Once the mixing operation has been completed,
decontaminate the spray tank and spray accessories. Dispose
of tank rinsing’s in compliance with current environmental,
work place health and safety regulations.
4. Personal Protection Equipment must still be worn while
decontaminating your sprayer as per warning 3 above.
5. Improper or careless use of this mixing station can cause
serious injury. Minors should never be allowed to use
this sprayer. This mixing station should not be used when
bystanders or animals are in the area. This mixing station
should never be used while children are in the area.
6. Never leave the mixing station unattended without turning off
the pump, relieving the line pressure, and flushing the mixing
station of any harmful chemicals.
!

5Version 1.0
English
Discover More Helpful Tips:
blog.enduraplas.com/liquid-storage-transport
Watch Instruction Videos:
www.youtube.com/enduraplas
7. You must be in good mental health to operate this mixing
station and not be under the influence of alcohol or any drugs
that could impair your vision, physical strength, dexterity,
judgment, or other mental capacity.
8. No modifications and/or alterations may be made to this
mixing station. Any such modifications not only void the
warranty but can make the unit dangerous to anyone
operating the pump.
9. Always inspect hoses and piping to avoid burst injuries.
10. Clean out and fully flush the tank between switching
chemicals.

6Swift Blender™
English
WARNINGS !
Safety and Operating Instructions
SAFETY INSTRUCTIONS
DUE TO RISK OF SEVERE PERSONAL INJURY, DO NOT USE THIS EQUIPMENT UNTIL YOU
HAVE COMPLETELY READ AND FULLY UNDERSTAND HOW TO FOLLOW ALL OF THESE
WARNINGS AND INSTRUCTIONS.
SHARP POINT AND BLADES POSE A RISK OF PUNCTURE AND LACERATION. USE
GLOVES AND EXTREME CAUTION WHEN POSITIONING HANDS AND ARMS TO AVOID
COMING IN CONTACT WITH THE BLADE. MAKE SURE FOOTING IS STABLE AND
BALANCED BEFORE OPERATION.
HIGH PRESSURE WATER USED WITH CHEMICALS POSES A RISK OF SPLASH WITH
CHE
MICAL RESIDUE. ALWAYS WEAR SAFETY GLASSES TO REDUCE THE RISK THAT WATER
AND CHEMICAL COULD COME IN CONTACT WITH YOUR EYES.
AGRICULTURAL CHEMICALS POSE NUMEROUS HAZARDS. BE SURE TO READ,
UNDERSTAND AND FOLLOW ALL WARNINGS AND INSTRUCTIONS BY THE CHEMICAL
MANUFACTURER OR SUPPLIER REGARDING THE USE OF EACH CHEMICAL.
ALWAYS USE ALL PERSONAL PROTECTIVE EQUIPMENT SPECIFIED BY THE CHEMICAL
MANUFACTURER OR SUPPLIER WHICH MAY INCLUDE BUT NOT BE LIMITED TO CHEMICAL
PROTECTIVE GLOVES, EYE PROTECTION, PROTECTIVE FOOTWEAR AND CLOTHING, AND
NIOSH APPROVED RESPIRATORY PROTECTION.
ALWAYS POSITION THE HANDLE AND LID OPENING OF THE CHEMICAL CONTAINER IN
THE VERTICAL AND UPRIGHT POSITION WHEN OPERATING THE BLADE IN ORDER TO BE
ABLE TO HAVE A FIRM GRIP ON THE CONTAINER.
SLOWLY OPEN RINSE SUPPLY VALVE TO MAKE SURE ONLY ENOUGH WATER PRESSURE
IS APPLIED AND NOT TO OVER PRESSURE. TOO MUCH WATER PRESSURE COULD CAUSE
YOU TO LOSE GRIP ON THE CHEMICAL CONTAINER, SPLASH CHEMICAL OR CAUSE THE
RINSE HEAD TO FAIL
. ONLY PARTIAL OPENING OF THE RINSE VALVE MAY BE NECESSARY.
NEVER OPERATE THE RINSE HEAD WITH THE TANK LID OPEN AND WITHOUT THE
LIQUID CHEMICAL CONTAINER POSITIONED OVER THE RINSE HEAD TO AVOID SPRAY OF
WATER OR CHEMICAL OUT OF THE TANK.

7Version 1.0
English
THE BLADE IS DESIGNED FOR USE WITH 2.5 GALLON JUGS AND LARGER. DO NOT
USE WITH SMALLER JUGS THAN 2.5 GALLON AND USE EXTREME CAUTION WITH
SMALLER CONTAINERS TO AVOID HANDS AND ARMS COMING IN CONTACT WITH SHARP
POINT AND BLADES.
THE BLADE'S SHARP EDGES ARE DESIGNED TO LAST A LONG TIME WITHOUT
SHARPENING. IN CASE BLADES NEED TO BE SHARPENED, USE GLOVES AND EXTREME
CAUTION WHEN HANDLING AND REMOVING BLADE ASSEMBLY TO AVOID LACERATION
AND PUNCTURE WOUND. CONTACT ECK FABRICATION FOR NEW BLADE ASSEMBLY.
TO AVOID THE RISK OF SEVERE INJURY, INCLUDING LACERATION AND PUNCTURE
WOUND, NEVER REACH INTO THE TANK TO RETRIEVE ANY OBJECT OR CONTAMINATE
WITHOUT FIRST SAFELY REMOVING THE BLADE.
Steps of Operation
TO AVOID SERIOUS PERSONAL INJURY, BE SURE TO READ, UNDERSTAND AND FOLLOW ALL
SAFETY INSTRUCTION LISTED ABOVE AND ALL STEPS LISTED BELOW.
1. Firmly grab liquid chemical jug with one hand on the handle and one hand on the lid of the jug; for bags
of dry chemical firmly hold two corners of the bag with two hands.
2. Suspend jug or bag centered vertically straight up from the tip of the Blade.
3. With speed Press container down onto Blade until container is half way down blades or until sufficient
puncture has occurred so contents can empty. Use care not to push too far to avoid hands and arms
coming in contact with the sharp point and edges of the Blade.
4. Once liquid chemical has emptied from the container, while keeping firm hold of the container, open
rinse supply valve slowly and introduce only enough water pressure to apply rinse. Do not use rinse
for dry product application. chemical.
5. After running the rinse system for the time specified by the chemical manufacturer or supplier, turn off
rinse supply valve and allow container to drain completely as directed by the chemical manufacturer or
supplier.
6. Pull straight up on container and remove it from the Blade and discard as directed by the chemical
manufacturer or supplier.
7. Successful Operation!

8Swift Blender™
English
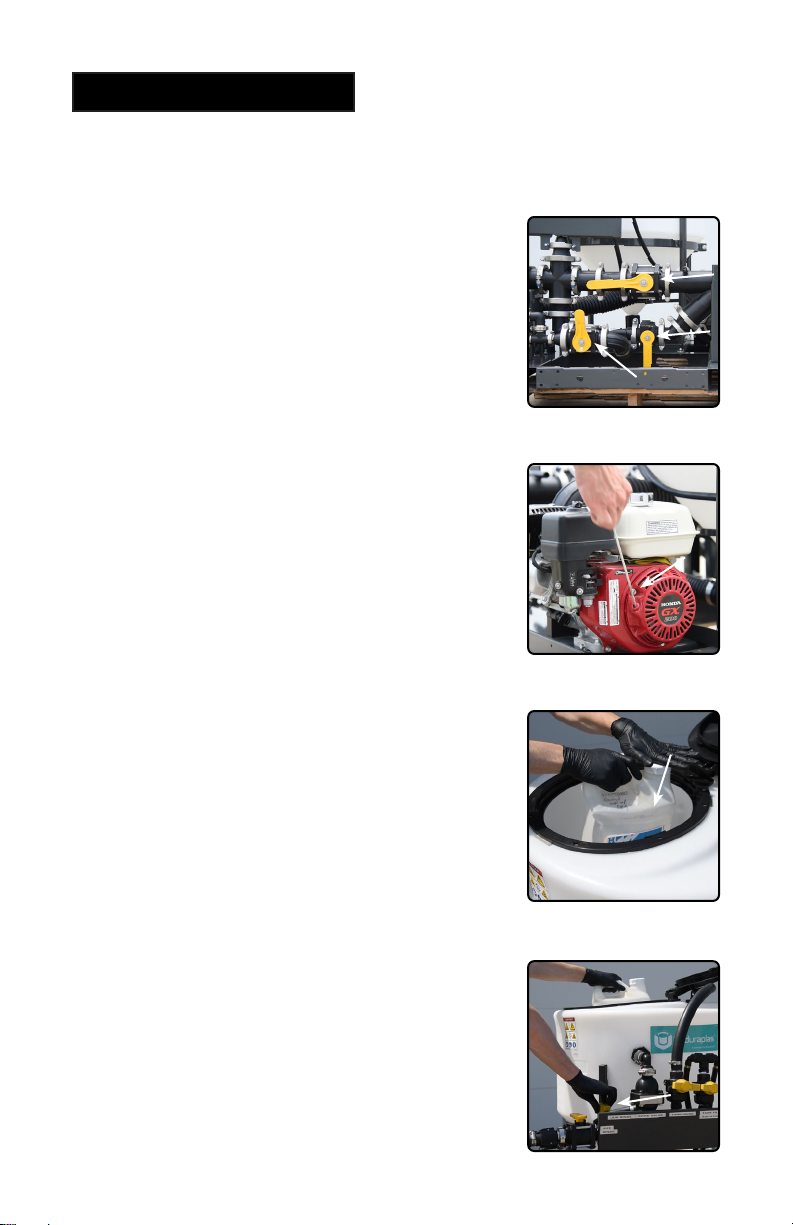
2) Fill your engine with oil.
Operating the Chemical Mix Station
GETTING STARTED
1) Fill your engine with gasoline.
Jug rinse
Spike valve Tank rinse
Tank fill agitation
Auxiliary rinse
Bulk tote valve 1 & 2
Main valve
Venturi valve
3-way source valve

9Version 1.0
English
3) Remove safety items from the knife.
Operating the Chemical Mix Station
6) Hook up the supply hose and discharge
hose.
GETTING STARTED
4) Run water through the system to check for leaks caused
by shipping damage.
5) Strap the unit down to your truck.
10 Swift Blender™
English
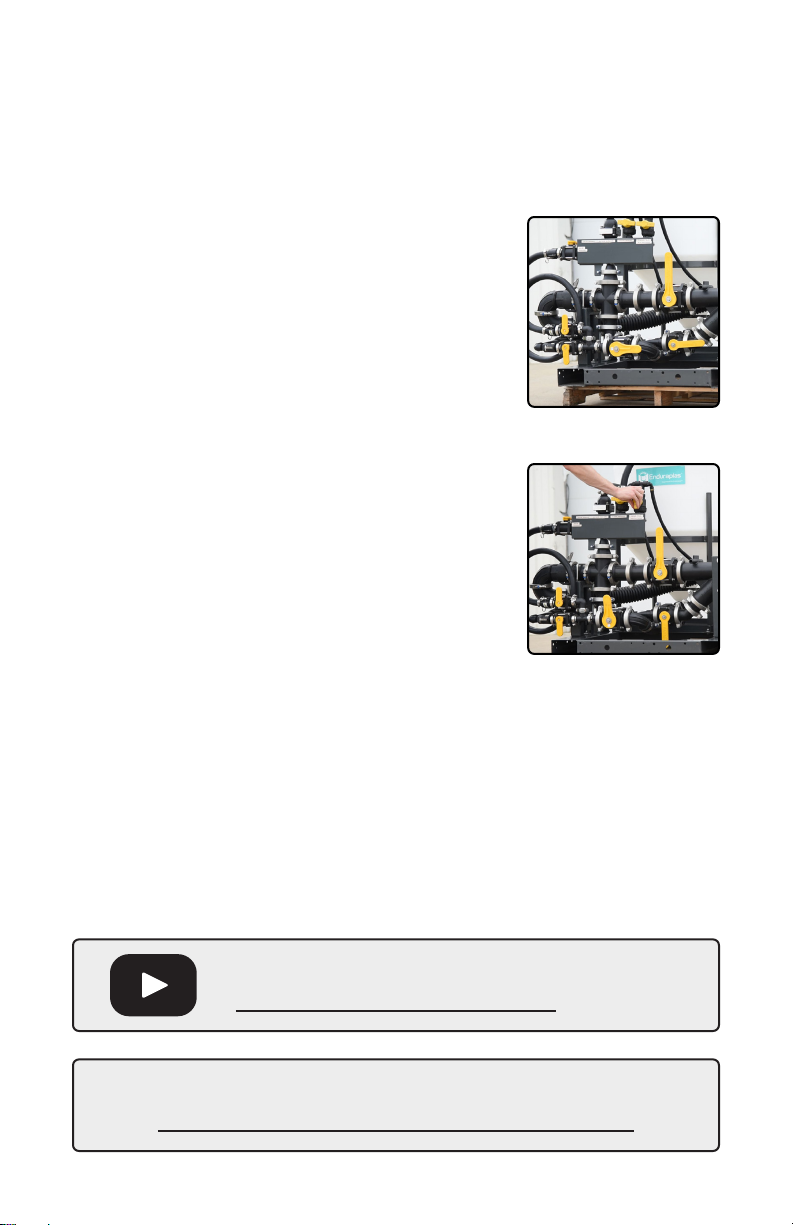
8) and start the pump.
10) To rinse the jug, open the jug rinse
valve while firmly holding the jug on the
knife to avoid chemical spillage. Let the jug
rinse for 10 seconds before turning the jug
rinse valve back off.
Operating the Chemical Mix Station
GETTING STARTED
9) Open the lid, spear the jug onto the jug
knife emptying all contents..
7) Close the 3-way source valve and the
Venturi valve, open the main valve.
11Version 1.0
English
Discover More Helpful Tips:
blog.enduraplas.com/liquid-storage-transport
Watch Instruction Videos:
www.youtube.com/enduraplas
11) To empty the mixing tank, close the
main valve, open the venturi valve, switch
the 3-way source valve to draw from the
mixing tank. Then start your pump.
12) To properly dissolve dry chemical and
increase mixing quality, turn off all valves,
and turn on the agitation valve after adding
your chemical to the tank.

12 Swift Blender™
English
STORING/WINTERIZING
1) Drain Tank
Fill your tank with clean water and start your pump and open the
main valve (after, you can also open the 3-way source valve and
the venturi valve to blow out those lines). Let the pump run until
the tank is completely drained.
2) Blow out Plumbing Lines
Using compressed air, blow out the hose lines to remove all water
from the system.
3) Flush with Anti-freeze
Pour a small amount of anti-freeze into your tank and run the
pump for a minute or so to let the anti-freeze through the sys-
tem.
4) Store Unit Inside
Close the output valve so the remaining anti-freeze does not leak
out. Store the mixing station inside to keep it out of the elements.

13Version 1.0
English
TROUBLESHOOTING
CONDITION CAUSE REMEDY
Pump will not
prime
1) Insufficient motor
RPM
2) Air leak on suction
plumbing
3) Issues with the
fittings
1) Increase motor RPM
until pump primes
2) Tighten/replace
fittings
3) Ensure the suction
and discharge valves
are open and camlocks
are tightened
Pressure drops/
fluctuates during
standard
operation
1) Restriction on suction
line
2) Pump sucking air
1) Inspect tank and
suction lines and
remove restriction
2) Tighten fittings

14 Swift Blender™
English
WARRANTY
LIMITED WARRANTY
1. Poly Tank Limited Warranty -Subject to other terms in this Limited
Warranty, Manufacturer warrants to the original end user that this
Tank will be free from material defects caused during the
manufacturing process for a period of 5 years from the Purchase
Date provided such warranty to the original end user shall be
extended to 10 years from the Purchase Date if the original end
user registers the Tank with Manufacturer within 30 days of the
Purchase Date. To register the Limited Warranty, registration must
be completed in accordance with the requirements set forth at
enduraplaswarranty.com
Other Products and Parts Limited Warranty -Subject to other
terms in this Limited Warranty, Manufacturer warrants to the
original end user that products and parts manufactured by
Manufacturer (other than tanks) will be free from material defects
caused during the manufacturing process for a period of 1 year
from the Purchase Date unless otherwise expressly stated in
writing by Manufacturer that an extended warranty applies.
2. Other Warranties Disclaimed and Excluded
THERE ARE NO WARRANTIES, EXPRESS OR IMPLIED,
WHICH EXTEND BEYOND THE LIMITED WARRANTY HEREIN
STATED, AND MANUFACTURER EXPLICITLY DISCLAIMS AND
EXCLUDES ANY AND ALL OTHER WARRANTIES INCLUDING
BUT NOT LIMITED TO WARRANTIES OF MERCHANTABILITY,
FITNESS FOR PARTICULAR PURPOSE, CUSTOM OR USAGE
OF TRADE, AND COURSE OF DEALING. NO AGENT,
EMPLOYEE OR REPRESENTATIVE OF MANUFACTURER HAS
AUTHORITY TO BIND MANUFACTURER TO ANY
REPRESENTATION OR WARRANTY EXCEPT AS STATED IN
THIS LIMITED WARRANTY.

15Version 1.0
English
3. Limitation of Liability under the Limited Warranty -In addition to
those warranties disclaimed and excluded in clause 2 above,
Manufacturer expressly further limits its warranty and liability
under the Limited Warranty as set forth below in this clause 3.
3.1. The liability of Manufacturer under this Limited Warranty is
excluded to the extent that any defect has been caused or
contributed to by:
a) any accident, contamination, tampering, willful damage,
abuse, modification, improper storage, improper use
(including but without limitation the storage of material) or
negligent act of, or omission by, any person other than
Manufacturer;
b) the improper installation of the Goods, or deterioration of
the base on which any of the Goods rest or are mounted
to;
c) any damage to the Goods caused by storm, wash away,
landslide, mudslide, lightning, or any other natural
phenomenon, vermin or other pests, and any
undermining of the base of the Tank through any cause
whatsoever;
d) the repositioning of the Goods from their original
installation;
e) weathering or degradation of the Goods due to extreme
climatic conditions;
f) improper installation of extra fittings;
g) any staining or discoloration, including from trees or ash
fall-out from fires or other causes;
h) a Tank not being placed on a base that is free of any
protruding objects of any kind;
i) a Tank being used for any purpose other than the storage
of suitable liquids at the ambient temperatures.

16 Swift Blender™
English
3.2. Without limiting the generality of clause 3.1:
a) Manufacturer will not be liable for any personal injury,
indirect or incidental damages, consequential losses, loss
of liquids, loss of profit or any like claims whatsoever
arising from any use of, or incidental to, or repairs to any
of the Goods by a party other than Manufacturer;
b) to the extent that any component or material (including,
but without limitation the polyethylene) used in the
manufacture of any of the Goods is supplied and/or
manufactured by a third party, the liability of Manufacturer
is limited to Manufacturer’s right of redress (if any)
against the third-party supplier/manufacturer;
c) Tanks feature a vented lid at the time of manufacture.
Any subsequent pressurization of the Tank by removing
the vent, sealing the vent, or otherwise will cause this
Limited Warranty as to such Tank to be null and void.
d) The liability of Manufacturer under this Limited Warranty
is limited to, at Manufacturer's discretion:
e) providing a replacement Good (including shipping but
excluding other replacement costs);
f) refunding an amount equal to a sum equal to the current
Retail price divided by the months in the warranty,
multiplied by the months remaining in the warranty
period;
g) repairing the Good at no cost.
4. Proof of Purchase -The original invoice or other similar proof of
purchase of the applicable must be provided by Purchaser to
Manufacturer when making a claim under this Limited Warranty.
Warranty claims must be received in writing by Manufacturer
within the Limited Warranty period.

17Version 1.0
English
5. Claims and Questions -If you have questions about this Limited
Warranty or to make a warranty claim, contact Manufacturer at:
6. Definitions -For this Limited Warranty the following definitions
apply:
a) Manufacturer means Enduraplas LLC.
b) Purchase Date means the date upon which the
applicable goods were purchased by the original end
user.
c) Purchase Price means the actual price paid for the Tank
by the original Purchaser.
d) Tank means the storage Tank manufactured by
Manufacturer and purchased by the original end user
Purchaser being the subject matter of the Limited
Warranty.
e) Good(s) mean Tanks and/or other products or parts
manufactured by Enduraplas LLC.
f) Limited Warranty means this written Limited Warranty.
7. State Law -Some states do not allow the exclusion or limitation of
incidental or consequential damages, so the above limitation and
exclusion may not apply to certain parties. Some states do not
allow limitation on how long an implied warranty lasts, so the
above limitation may not apply to certain parties. This limited
warranty gives specific legal rights and other rights, which vary
from state to state, may also apply.
8. Governing Law -This Limited Warranty will be governed by the
laws of the State of Minnesota, without giving effect to any choice
of law rule that would cause the application of the laws of any
other jurisdiction

18 Swift Blender™
English
OVERVIEW
A
C
D
E
F
G
Flow Meter Kit
CHSSBFM01
Pump & Engine Kit
add
-3P
to part# (CHSSB001-3P)
View B
View C
DETAIL
C
SCALE
2 : 35
DETAIL
D
SCALE
2 : 35
View A
View D
19Version 1.0
English
OVERVIEW
A
C
D
E
F
G
Flow Meter Kit
CHSSBFM01
Pump & Engine Kit
add
-3P
to part# (CHSSB001-3P)
View B
View C
DETAIL
C
SCALE
2 : 35
DETAIL
D
SCALE
2 : 35
View A
View D

20 Swift Blender™
English
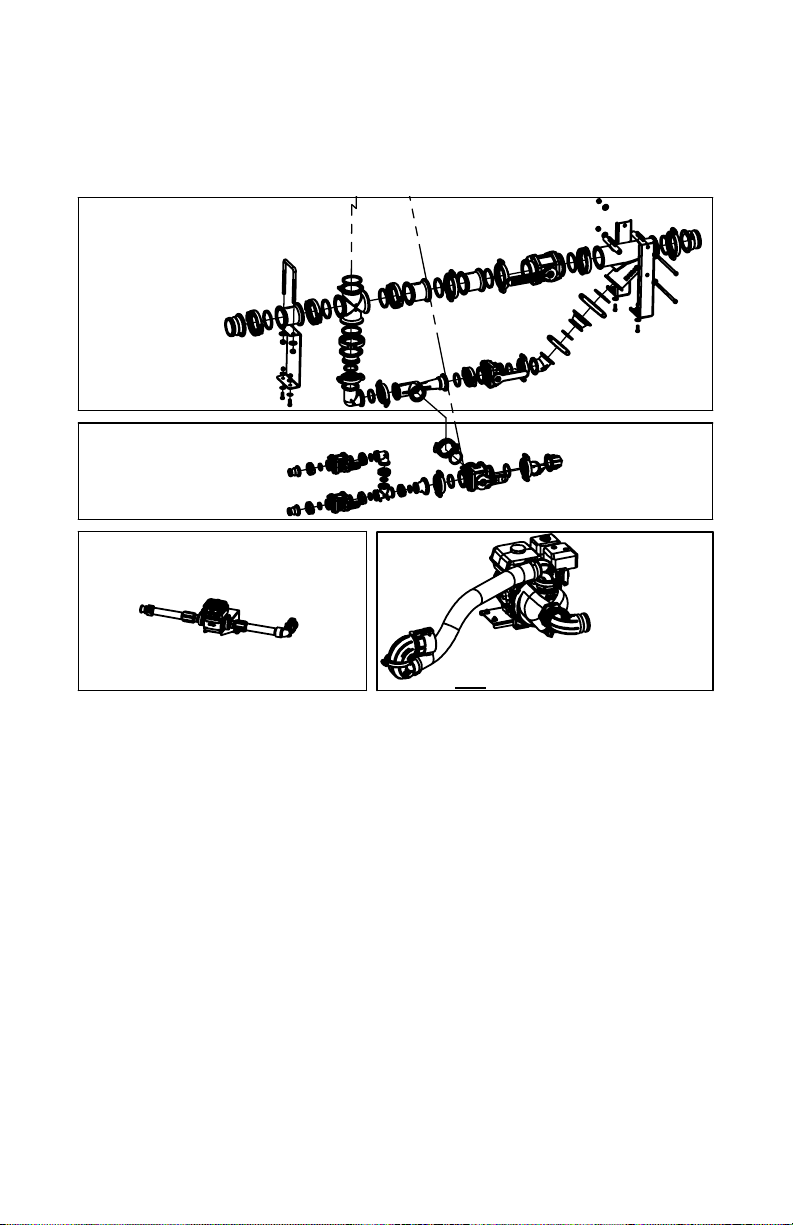
DETAIL
A
SCALE
2 : 35
7
37
869
39
42
9
6
38
55
70
40
43
68
54
72
23
53
22
66
1
63
65
64
5
71
56
67
41
54
39
39
37
49
64
63
65
View A
DETAIL VIEW A
This manual suits for next models
1
Table of contents
Other Enduraplas Industrial Equipment manuals


Popular Industrial Equipment manuals by other brands

ABB
ABB HT562900 Operation manual

ABB
ABB A100-H Series Original assembly instructions

ABB
ABB HT570190 Operation manual

Siemens
Siemens SIRIUS 3RA243-8X.32-1 Series Original operating instructions

Plymovent
Plymovent DRAFTMAX BASIC ULTR A Installation and user manual

ABB
ABB CE5 D Series operating instructions

Holmatro
Holmatro CORE hose C U Series manual

Terex
Terex Genie Super Hoist Operator's manual

riverhawk
riverhawk IM-186 instruction manual

Carlisle
Carlisle IntelliSpray IS30 Installation and quick start guide

SMC Networks
SMC Networks EX260-MPN1 instruction manual

Rockwell Automation
Rockwell Automation 194R-SC1 Operating


