Energate FZ100C User manual

THIS DOCUMENT CONTAINS CONFIDENTIAL INFORMATION PROPRIETARY TO ENERGATE INC. NO PART OF ITS CONTENTS MAY BE DISCLOSED OR CONVEYED TO,
USED BY, OR COPIED TO A THIRD PARTY WITHOUT PRIOR WRITTEN CONSENT BY ENERGATE INC. PRINTED COPIES WILL BE CONSIDERED UNCONTROLLED.
AW000873-G 1
Installation Guide for
Energate Thermostats
Foundation Marketing releases 1.2 & 1.3 (Firmware v3.3 & v3.4)

THIS DOCUMENT CONTAINS CONFIDENTIAL INFORMATION PROPRIETARY TO ENERGATE INC. NO PART OF ITS CONTENTS MAY BE DISCLOSED OR CONVEYED TO,
USED BY, OR COPIED TO A THIRD PARTY WITHOUT PRIOR WRITTEN CONSENT BY ENERGATE INC. PRINTED COPIES WILL BE CONSIDERED UNCONTROLLED.
AW000873-G 2
Legal Declarations
© 2013 Energate Inc. All Rights Reserved.
Installation Guide for Energate Thermostats.
Information in this document is subject to change without notice.
Energate assumes no responsibility for any errors that may appear in this document. ENERGATE INC. DISCLAIMS ALL
WARRANTIES WITH RESPECT TO THIS DOCUMENT, EXPRESSED OR IMPLIED, INCLUDING BUT NOT LIMITED TO THOSE OF
MERCHANTABILITY OR FITNESS FOR A PARTICULAR PURPOSE. IN NO EVENT SHALL ENERGATE DEVICE BE LIABLE,
WHETHER IN CONTRACT, TORT, WARRANTY, OR UNDER ANY STATUTE OR ON ANY OTHER BASIS FOR SPECIAL,
INCIDENTAL, INDIRECT, UNITIVE, MULTIPLE OR CONSEQUENTIAL DAMAGES IN CONNECTION WITH OR ARISING FROM
THIS DOCUMENT, INCLUDING BUT NOT LIMITED TO THE USE THEREOF.
Notice to Purchaser
Pioneer Z100 Smart Thermostat, Foundation Smart Thermostat and AS20 Auxiliary Switch are covered by US Patent
Numbers 7504972, 7737762, 7922100 and corresponding claims in their non-US counterparts, owned by Energate Inc
in addition to other patents pending. No right is conveyed expressly, by implication, or by estoppel under any other
patent claim.
Trademarks
Energate is a registered trademark. AS20 Auxiliary Switch, Energate Wall Plate, ZIP Connect, Energate ZIP Connect,
Pioneer, Pioneer Z100, Pioneer Z100 Smart Thermostat, Foundation and Foundation Smart Thermostat & Home Energy
Gateway are trademarks of Energate or its subsidiaries in the U.S. and/or certain other countries.
All other trademarks are the sole property of their respective owners.
September 2013

THIS DOCUMENT CONTAINS CONFIDENTIAL INFORMATION PROPRIETARY TO ENERGATE INC. NO PART OF ITS CONTENTS MAY BE DISCLOSED OR CONVEYED TO,
USED BY, OR COPIED TO A THIRD PARTY WITHOUT PRIOR WRITTEN CONSENT BY ENERGATE INC. PRINTED COPIES WILL BE CONSIDERED UNCONTROLLED.
AW000873-G 3
Warranty
LIMITED WARRANTY OF ENERGATE INC.
Energate Inc. Warrants that this product will be free from defects in material and workmanship for a period of one (1)
year from the date of the original purchase of this product from Energate Inc. (the “Warranty Period”).
THIS WARRANTY DOES NOT INCLUDE DAMAGE TO THE PRODUCT RESULTING FROM ACCIDENT OR MISUSE. ENERGATE
INC. DISCLAIMS ALL WARRANTIES AND CONDITIONS. EXPRESS OR IMPLIED, AS TO THIS PRODUCT’S MERCHANTABILITY,
PRODUCTIVENESS OR FITNESS FOR ANY PARTICULAR PURPOSE, INCLUDING ANY AND ALL WARRANTIES ARISING BY
STATUTE OR OTHERWISE IN LAW OR FROM A COURSE OF DEALING OR USAGE OF TRADE.
If this product becomes defective during the Warranty Period, Energate Inc. shall have the option, in its sole discretion,
to either repair the product or replace the product.
This warranty shall be solely for the benefit of the party that purchases this product directly from Energate Inc. or one
of Energate’s recognized distributors and is not assignable without the express written consent of Energate Inc.
To obtain warranty service, please contact your electricity service provider. A return authorization is required on all
returns relating to a warranty claim. Energate Inc. reserves the right to charge the purchaser of this product for the
costs of shipping replacement products or parts. In the event that any part of this product is replaced by Energate Inc.
during the Warranty Period, any and every warranty that might be applicable to the replacement part[s) shall expire on
the date of the expiry of the Warranty Period.
ENERGATE INC.’S ENTIRE AGGREGATE LIABILITY FOR LOSSES AND DAMAGES FOR ANY CAUSE RELATED TO OR ARISING
OUT OF THE PURCHASER’S PURCHASE AND/ OR USE OF THE PRODUCT WILL IN NO EVENT EXCEED THE PURCHASE PRICE
PAID FOR THE PRODUCT. IN NO EVENT WILL ENERGATE INC. BE LIABLE FOR: (A) ANY INDIRECT, SPECIAL, INCIDENTAL,
CONSEQUENTIAL OR PUNITIVE LOSS OR DAMAGE, OR OTHER ECONOMIC LOSS OF ANY KIND, IN ANY CASE, EVEN IF
ADVISED OF, OR IF ENERGATE INC. COULD REASONABLY FORESEE, THE POSSIBILITY THEREOF. THE LIMITATIONS,
EXCLUSIONS AND DISCLAIMERS IN THIS AGREEMENT SHALL APPLY IRRESPECTIVE OF THE NATURE OF THE CAUSE OF
ACTION, DEMAND, OR PROCEEDING INCLUDING BUT NOT LIMITED TO, BREACH OF CONTRACT, NEGLIGENCE, TORT,
STRICT LIABILITY OR ANY OTHER LEGAL OR EQUITABLE THEORY.

THIS DOCUMENT CONTAINS CONFIDENTIAL INFORMATION PROPRIETARY TO ENERGATE INC. NO PART OF ITS CONTENTS MAY BE DISCLOSED OR CONVEYED TO,
USED BY, OR COPIED TO A THIRD PARTY WITHOUT PRIOR WRITTEN CONSENT BY ENERGATE INC. PRINTED COPIES WILL BE CONSIDERED UNCONTROLLED.
AW000873-G 4
Table of Contents
1 Introduction ...................................................................................................................................................................7
1.1 Operating the Foundation Thermostat................................................................................................................. 8
1.2 Operating the Z100 Pioneer Thermostat ............................................................................................................ 12
2 General Installation Procedures ................................................................................................................................. 15
3 New Installation .......................................................................................................................................................... 17
3.1 Removing battery tab on installation.................................................................................................................. 17
3.2 Mounting the Thermostat................................................................................................................................... 17
3.3 Mounting the Outdoor Temperature Sensor...................................................................................................... 18
3.4 Cleaning the Thermostat..................................................................................................................................... 18
3.5 Removing Pioneer Z100 Thermostat Front Housing from Backplate ................................................................. 18
3.6 Placing the Foundation Thermostat on the Mounting Bracket .......................................................................... 19
3.7 Removing the Foundation Thermostat from the Mounting Bracket.................................................................. 19
4 Foundation Thermostat Wiring................................................................................................................................... 20
5 Z100 Pioneer Thermostat Wiring................................................................................................................................ 21
5.1 Conventional System........................................................................................................................................... 21
5.2 Heat Pump........................................................................................................................................................... 21
6 Configuring the Thermostat Settings.......................................................................................................................... 22
6.1 Conventional Settings ......................................................................................................................................... 22
6.2 Heat Pump Settings............................................................................................................................................. 23
7 Standard Configurations ............................................................................................................................................. 26
7.1 Furnace with Air Conditioner .............................................................................................................................. 26
7.2 Furnace with No Air Conditioner ........................................................................................................................ 27
7.3 Air Conditioner with No Furnace ........................................................................................................................ 28
7.4 Heat Pump: Single-Stage with No Auxiliary Stage............................................................................................... 29
7.5 Heat Pump: Two-Stage with No Auxiliary Stage ................................................................................................. 30
7.6 Heat Pump: Single-Stage with Auxiliary Stage .................................................................................................... 31
7.7 Heat Pump: Two-Stage with Auxiliary Stage....................................................................................................... 33
8 Special Configurations................................................................................................................................................. 35

THIS DOCUMENT CONTAINS CONFIDENTIAL INFORMATION PROPRIETARY TO ENERGATE INC. NO PART OF ITS CONTENTS MAY BE DISCLOSED OR CONVEYED TO,
USED BY, OR COPIED TO A THIRD PARTY WITHOUT PRIOR WRITTEN CONSENT BY ENERGATE INC. PRINTED COPIES WILL BE CONSIDERED UNCONTROLLED.
AW000873-G 5
8.1 No Common Wire at Thermostat........................................................................................................................ 35
8.2 Dual Transformer Equipment.............................................................................................................................. 39
8.3 Zone Control Systems ......................................................................................................................................... 41
9 Options and Accessories ............................................................................................................................................. 42
9.1 Wall Plate ............................................................................................................................................................ 42
9.2 Outdoor Temperature Sensor............................................................................................................................. 43
9.3 Air Filter Sensor................................................................................................................................................... 43
9.4 Heat Pump Fault Sensor...................................................................................................................................... 44
9.5 ZIP Connect ......................................................................................................................................................... 44
9.6 Meter Data Collector (Foundation models FZ100C and FZ100CF only).............................................................. 46
9.7 Pager Module (Foundation Models FZ100 and FZ100CF Only) .......................................................................... 47
9.8 Wi-Fi Module....................................................................................................................................................... 49
10 Testing the System...................................................................................................................................................... 52
10.1 Conventional System Test................................................................................................................................... 52
10.2 Heat-Pump System Test...................................................................................................................................... 53
11 Provisioning the Thermostat and Optional Equipment .............................................................................................. 54
11.1 Provisioning Thermostat Communication with a ZigBee Gateway..................................................................... 54
11.2 Pairing the Foundation Thermostat and Meter Data Collector .......................................................................... 58
11.3 Provisioning the Pager Module........................................................................................................................... 59
12 Troubleshooting.......................................................................................................................................................... 62
12.1 Troubleshoot the Thermostat Installation.......................................................................................................... 62
12.2 Troubleshoot Provisioning a Gateway ................................................................................................................ 63
12.3 Troubleshoot the ZIP Connect ............................................................................................................................ 63
12.4 Troubleshoot the Link to the Meter Data Collector............................................................................................ 65
12.5 Troubleshoot the Meter Data Collector Hardware............................................................................................. 66
12.6 Troubleshoot the Pager Module Installation and Provisioning .......................................................................... 68
12.7 Troubleshooting the Wi-Fi Module Installation and Provisioning ...................................................................... 68
12.8 Return to Material Authorization (RMA) Procedure........................................................................................... 70
13 Unsupported Configurations ...................................................................................................................................... 71
14 Frequently Asked Questions ....................................................................................................................................... 72

THIS DOCUMENT CONTAINS CONFIDENTIAL INFORMATION PROPRIETARY TO ENERGATE INC. NO PART OF ITS CONTENTS MAY BE DISCLOSED OR CONVEYED TO,
USED BY, OR COPIED TO A THIRD PARTY WITHOUT PRIOR WRITTEN CONSENT BY ENERGATE INC. PRINTED COPIES WILL BE CONSIDERED UNCONTROLLED.
AW000873-G 6
14.1 Installation Questions ......................................................................................................................................... 72
14.2 User Questions.................................................................................................................................................... 73
15 Energate Technical Support ........................................................................................................................................ 76

THIS DOCUMENT CONTAINS CONFIDENTIAL INFORMATION PROPRIETARY TO ENERGATE INC. NO PART OF ITS CONTENTS MAY BE DISCLOSED OR CONVEYED TO,
USED BY, OR COPIED TO A THIRD PARTY WITHOUT PRIOR WRITTEN CONSENT BY ENERGATE INC. PRINTED COPIES WILL BE CONSIDERED UNCONTROLLED.
AW000873-G 7
1 Introduction
This document is intended for the use of installers who are installing the following Energate PCT thermostats that
support the ZigBee Smart Energy protocol:
FZ100 & FZ100C Foundation
Z100 Pioneer 2
Z100 Pioneer 1
This document describes the typical installation scenarios and provides advice for handling unusual situations. For a
description of how to operate the thermostat, see 1.1 Operating the Foundation Thermostat.
Some Foundation models offer additional features, such as the ability to collect electricity consumption information
from an optional meter data collector attached to your electricity meter. This guide specifies the Foundation models
that support them whenever these additional features are discussed.
Foundation model numbers are printed on the radio module on the back of the thermostat.
If you have questions that are not answered by this document, please contact Energate using the information provided
in 15 Energate Technical Support.

THIS DOCUMENT CONTAINS CONFIDENTIAL INFORMATION PROPRIETARY TO ENERGATE INC. NO PART OF ITS CONTENTS MAY BE DISCLOSED OR CONVEYED TO,
USED BY, OR COPIED TO A THIRD PARTY WITHOUT PRIOR WRITTEN CONSENT BY ENERGATE INC. PRINTED COPIES WILL BE CONSIDERED UNCONTROLLED.
AW000873-G 8
1.1 Operating the Foundation Thermostat
1.1.1 Navigating the Controls
Button
Button Name
Functions
Home
Switches between the Thermostat and the Energy mode home screens.
Exits and cancels any changes within a menu, and returns to the last visited
home screen.
Wakes up the unit.
Menu/Select
Displays a menu.
Selects the highlighted item.
Navigates to the next step in a wizard.
Confirms messages.
Wakes up the unit.

THIS DOCUMENT CONTAINS CONFIDENTIAL INFORMATION PROPRIETARY TO ENERGATE INC. NO PART OF ITS CONTENTS MAY BE DISCLOSED OR CONVEYED TO,
USED BY, OR COPIED TO A THIRD PARTY WITHOUT PRIOR WRITTEN CONSENT BY ENERGATE INC. PRINTED COPIES WILL BE CONSIDERED UNCONTROLLED.
AW000873-G 9
Up
and
Down
In the Thermostat mode, adjusts the target temperature.
In the Energy mode, adjusts conservation settings.
Moves the highlighted selection in a menu.
Wakes up the unit.
THIS DOCUMENT CONTAINS CONFIDENTIAL INFORMATION PROPRIETARY TO ENERGATE INC. NO PART OF ITS CONTENTS MAY BE DISCLOSED OR CONVEYED TO,
USED BY, OR COPIED TO A THIRD PARTY WITHOUT PRIOR WRITTEN CONSENT BY ENERGATE INC. PRINTED COPIES WILL BE CONSIDERED UNCONTROLLED.
AW000873-G 10
1.1.3 Thermostat Home Screen
By default, the backlight dims when the Thermostat home screen switches to Standby mode.
1.1.4 Energy Home Screen
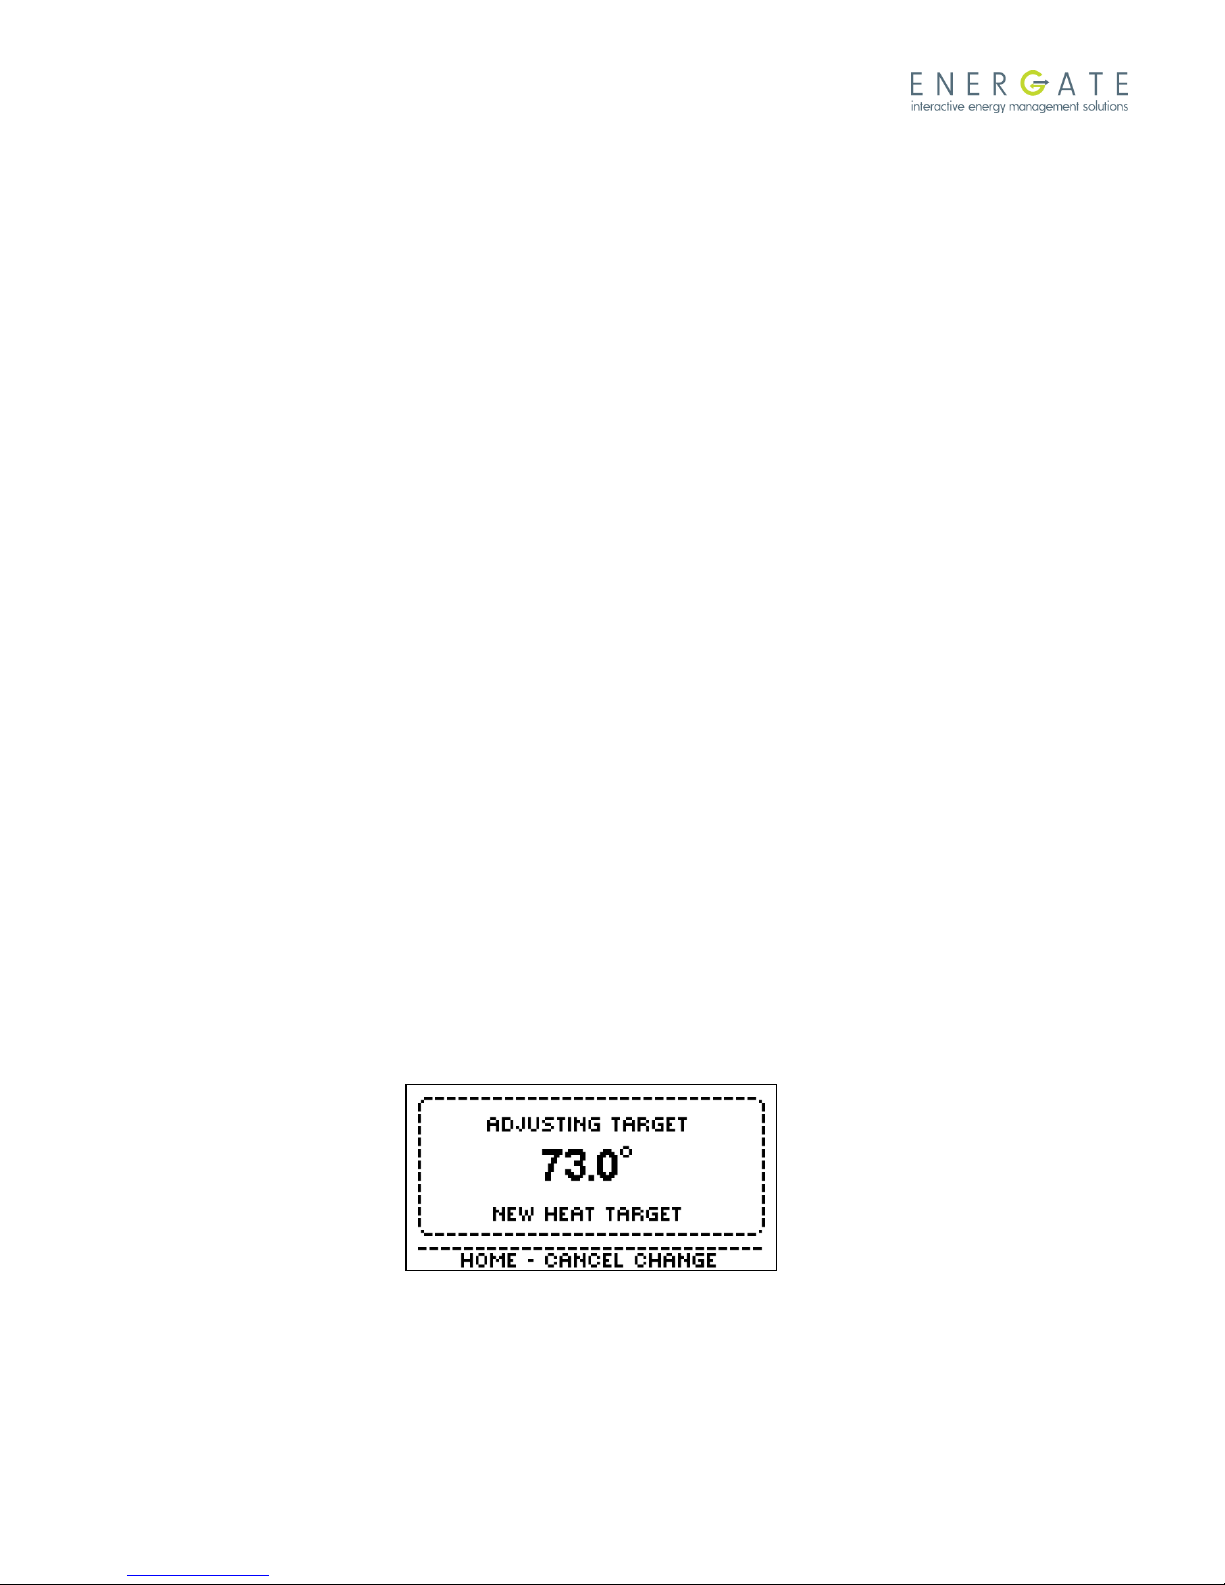
1.1.5 Manually Setting the Temperature (Temporary Hold)
THIS DOCUMENT CONTAINS CONFIDENTIAL INFORMATION PROPRIETARY TO ENERGATE INC. NO PART OF ITS CONTENTS MAY BE DISCLOSED OR CONVEYED TO,
USED BY, OR COPIED TO A THIRD PARTY WITHOUT PRIOR WRITTEN CONSENT BY ENERGATE INC. PRINTED COPIES WILL BE CONSIDERED UNCONTROLLED.
AW000873-G 11
By default, the thermostat follows a schedule. Use the following steps to override the schedule using a temporary hold:
1. Press the Up or Down buttons to adjust the target temperature.
This setting remains until the next setpoint change in your schedule. A setpoint is the start time for the change
and its target temperature.
2. To cancel a hold, press the Up or Down buttons, and then press the Menu/Select button and follow the
prompts.
The Foundation thermostat can also operate using a fixed temperature, without a schedule. For information, see the
user guide.
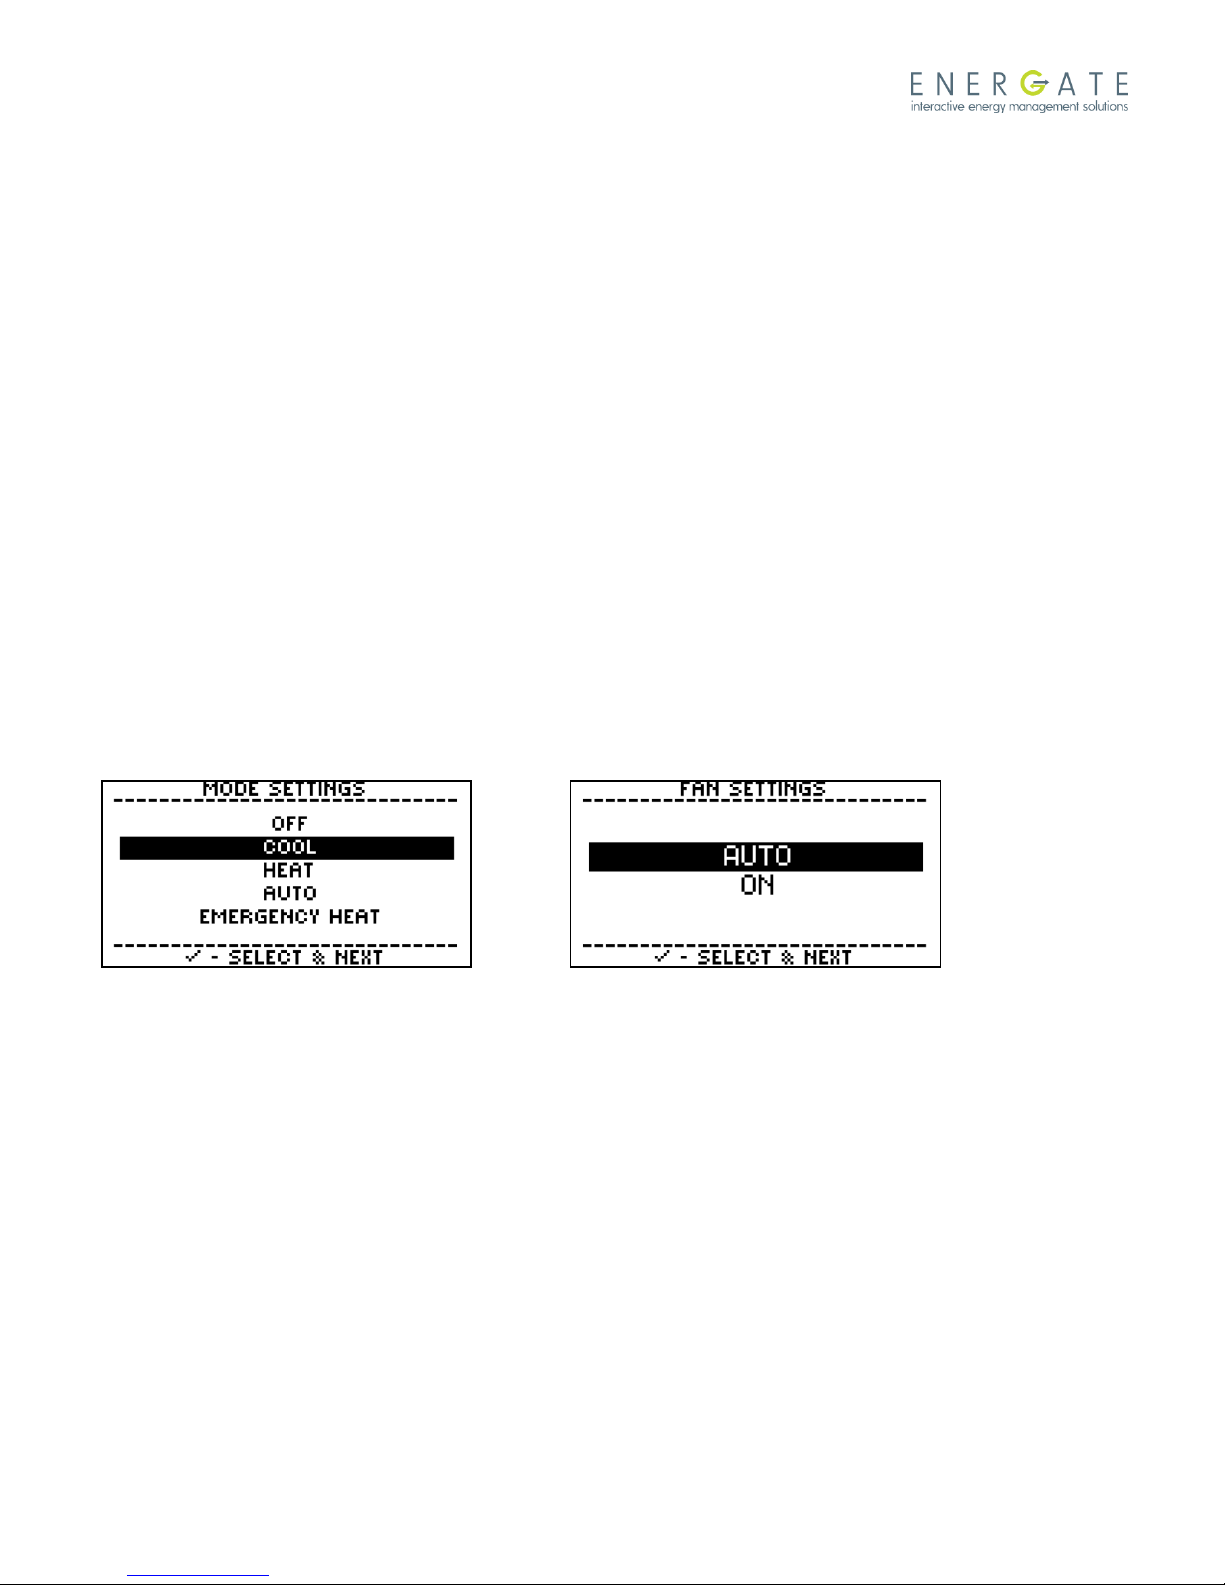
1.1.6 Changing the Thermostat Operating and Fan Modes
From the Thermostat home screen:
1. Press the Menu/Select button to wake up the thermostat, and press it again to display the main menu.
2. Press the Menu/Select button to select Mode & Fan Settings.
3. Use the Up or Down buttons to select the thermostat mode, and then press the Menu/Select button.
4. Use the Up or Down buttons to select Yes and then press the Menu/Select button to save the changes.
Note: Refer to the thermostat user manual for complete operating instructions.
THIS DOCUMENT CONTAINS CONFIDENTIAL INFORMATION PROPRIETARY TO ENERGATE INC. NO PART OF ITS CONTENTS MAY BE DISCLOSED OR CONVEYED TO,
USED BY, OR COPIED TO A THIRD PARTY WITHOUT PRIOR WRITTEN CONSENT BY ENERGATE INC. PRINTED COPIES WILL BE CONSIDERED UNCONTROLLED.
AW000873-G 12
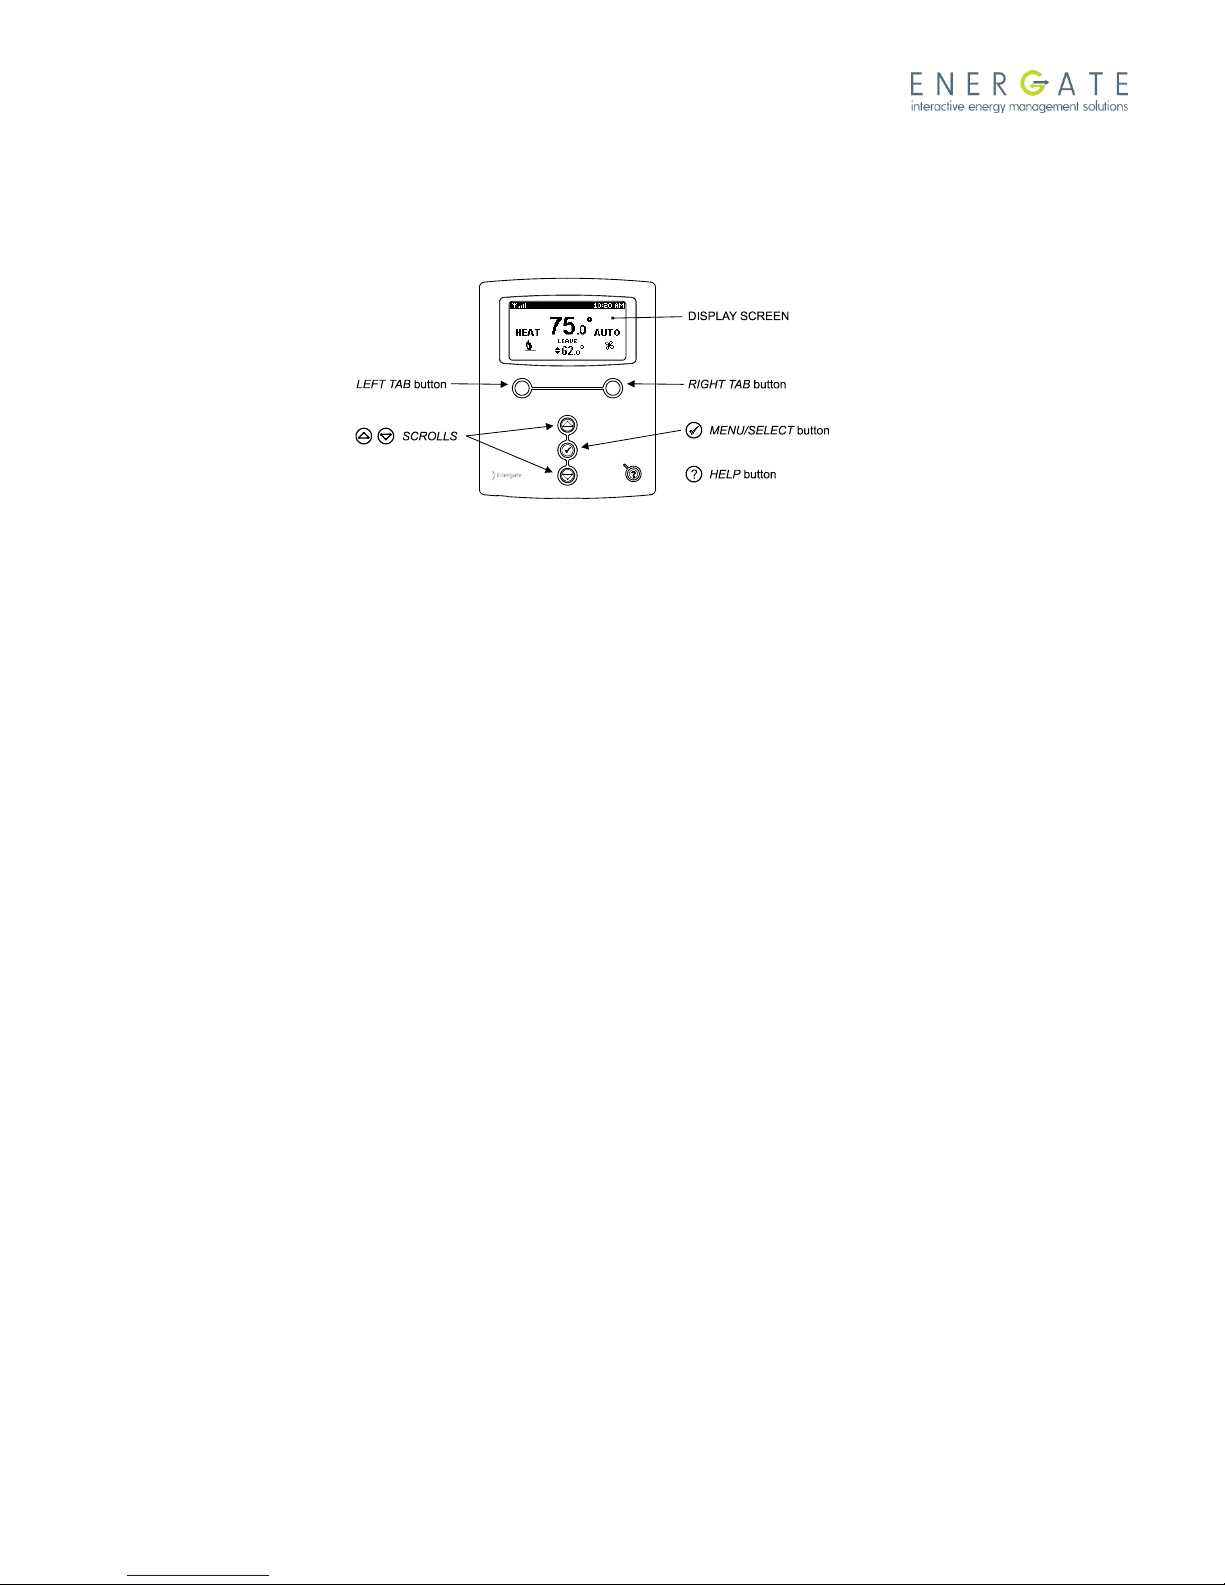
1.2 Operating the Z100 Pioneer Thermostat
1.2.1 Navigating the Controls
The function of the LEFT and RIGHT TAB buttons appears on the bottom of the display screen.
Use the SCROLL (▲▼) buttons to adjust the temperature, move through the menus options, and change highlighted
values. Press the MENU / SELECT (√) button to access the menu, and to select or accept highlighted menu items.

THIS DOCUMENT CONTAINS CONFIDENTIAL INFORMATION PROPRIETARY TO ENERGATE INC. NO PART OF ITS CONTENTS MAY BE DISCLOSED OR CONVEYED TO,
USED BY, OR COPIED TO A THIRD PARTY WITHOUT PRIOR WRITTEN CONSENT BY ENERGATE INC. PRINTED COPIES WILL BE CONSIDERED UNCONTROLLED.
AW000873-G 13
1.2.2 Home Screen
The Home screen displays current temperature and operation data. When the Home screen is in Sleep mode, the
backlight is dimmed (actual brightness level is user-adjustable). Please note that icons such as heat or fan are animated
when the equipment is running.
Note: A SETPOINT (e.g. LEAVE) is identified by a name and specifies both heating and cooling target temperatures. See
the Temperature Settings section for additional information.
When you press any of the buttons, the Home screen becomes active, the backlight brightens, and the MODE and FAN
tabs are shown.
Press the LEFT TAB button to change the thermostat mode (COOL/HEAT/AUTO/EMERG/OFF). The available options for
the thermostat mode depend on the type of heating or cooling equipment at your home. Press the RIGHT TAB button
to change the fan mode (ON/AUTO).
Press the SCROLL (▲▼) buttons to adjust the SETPOINT temperatures higher (warmer) or lower (cooler). To accept the
changes, press the LEFT TAB, which displays ACCEPT, or do nothing. They are automatically accepted when the screen
goes to the Sleep mode (that is, the backlight dims).

THIS DOCUMENT CONTAINS CONFIDENTIAL INFORMATION PROPRIETARY TO ENERGATE INC. NO PART OF ITS CONTENTS MAY BE DISCLOSED OR CONVEYED TO,
USED BY, OR COPIED TO A THIRD PARTY WITHOUT PRIOR WRITTEN CONSENT BY ENERGATE INC. PRINTED COPIES WILL BE CONSIDERED UNCONTROLLED.
AW000873-G 14
To display the menu items, press the MENU / SELECT (√) button once when the screen is active, or twice when it is in
the Sleep mode.
Note: Refer to the thermostat user manual for complete operating instructions.

THIS DOCUMENT CONTAINS CONFIDENTIAL INFORMATION PROPRIETARY TO ENERGATE INC. NO PART OF ITS CONTENTS MAY BE DISCLOSED OR CONVEYED TO,
USED BY, OR COPIED TO A THIRD PARTY WITHOUT PRIOR WRITTEN CONSENT BY ENERGATE INC. PRINTED COPIES WILL BE CONSIDERED UNCONTROLLED.
AW000873-G 15
2 General Installation Procedures
1. Before installing the new thermostat or replacing an existing one, it is very important to test all heating and
cooling stages to verify that the existing HVAC equipment is working correctly.
2. In general, the thermostat installation or replacement should not be attempted if the HVAC equipment does
not appear to be working correctly, as this can lead to future misunderstandings with the home owner.
3. If this is a replacement installation, record the schedule and equipment settings for the existing thermostat.
Label all the wires, and identify the terminals that they are connected to on the old thermostat, in case it needs
to be re-installed.
4. If there is no existing thermostat, mount the thermostat and related equipment. See 3 New Installation.
5. For replacement installations, disconnect power from the HVAC equipment and remove the old thermostat.
6. Install the Energate thermostat as described in 7 Standard Configurations.
If the thermostat backplate does not cover the hole in the wall, see 9.1 Wall Plate.
7. If there is no common (ground) wire, see 8.1 No Common Wire at Thermostat.
8. After you install the Energate thermostat, reconnect power and use the Installer Setup or Setup menu to
configure the thermostat for the type of equipment that it is connected to. See 6 Configuring the Thermostat
Settings.
9. Verify that all the heating and cooling stages are working correctly. See 10 Testing the System.
10. If the thermostat uses an outdoor sensor, air filter sensor, or heat pump fault sensor, see 9 Options and
Accessories.
11. If the HVAC equipment has two transformers, see 8.2 Dual Transformer .
12. To connect the HVAC equipment to a zone control system, see 8.3 Zone Control Systems.
13. Provision the thermostat to allow it to communicate with the ZigBee gateway or the optional Meter Data
Collector or pager module. See 11 Provisioning the Thermostat and Optional Equipment.
14. Show the homeowner how to use their new thermostat as described in 1.1 Operating the Foundation
Thermostat. In particular make sure they know how to:
a. Change the mode between Heat, Cool, Auto and Off.
b. Set a temporary hold, which they can also use to override an energy or price conservation event.

THIS DOCUMENT CONTAINS CONFIDENTIAL INFORMATION PROPRIETARY TO ENERGATE INC. NO PART OF ITS CONTENTS MAY BE DISCLOSED OR CONVEYED TO,
USED BY, OR COPIED TO A THIRD PARTY WITHOUT PRIOR WRITTEN CONSENT BY ENERGATE INC. PRINTED COPIES WILL BE CONSIDERED UNCONTROLLED.
AW000873-G 16
c. Modify their conservation settings if the electricity provider is sending price information.
d. Modify their schedule time and temperature settings.
For answers to some common user questions, see 14.2 User Questions.
15. Explain how the electricity provider’s demand response program works to the homeowner.
16. Provide the homeowner with the thermostat user guide and electric utility documentation.
THIS DOCUMENT CONTAINS CONFIDENTIAL INFORMATION PROPRIETARY TO ENERGATE INC. NO PART OF ITS CONTENTS MAY BE DISCLOSED OR CONVEYED TO,
USED BY, OR COPIED TO A THIRD PARTY WITHOUT PRIOR WRITTEN CONSENT BY ENERGATE INC. PRINTED COPIES WILL BE CONSIDERED UNCONTROLLED.
AW000873-G 17
3 New Installation
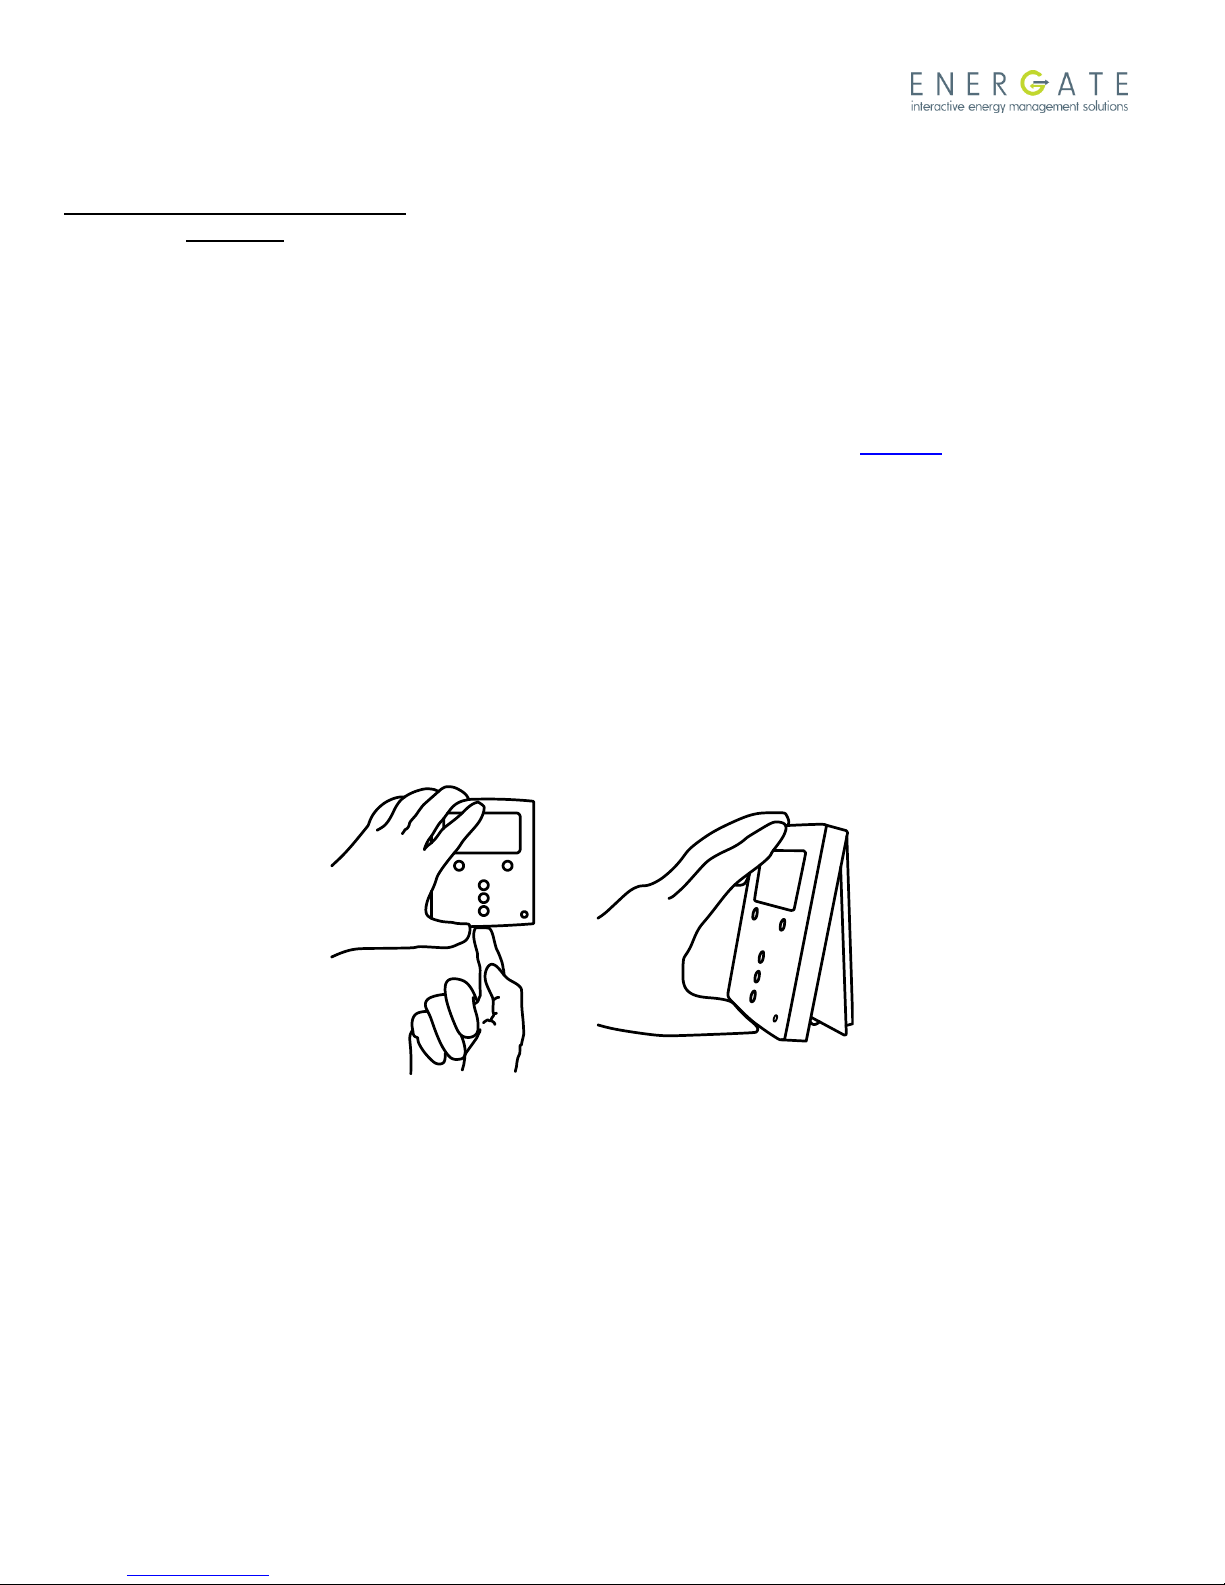
3.1 Removing battery tab on installation
Remove back-plate from thermostat housing.
Grab battery-tab and pull away from the battery.
Do not touch ESD sensitive components unless
properly grounded
(Pioneer thermostat is shown)
3.2 Mounting the Thermostat
Install the thermostat at 5 feet (1.5m) above the floor in an area with good air circulation and an average temperature.
Avoid locations with drafts, dead spots behind doors, hot or cold air ducts, sunlight or radiant heat from appliances,
concealed pipes or chimneys, and unconditioned areas. For example, don’t install the thermostat on an outside wall.
The two wallplate anchors should be spaced 3.5 inches (90 mm) apart in a vertical direction. Pull wires through the
backplate and connect them to the appropriate terminals as described in Error! Reference source not found. Error!
Reference source not found..
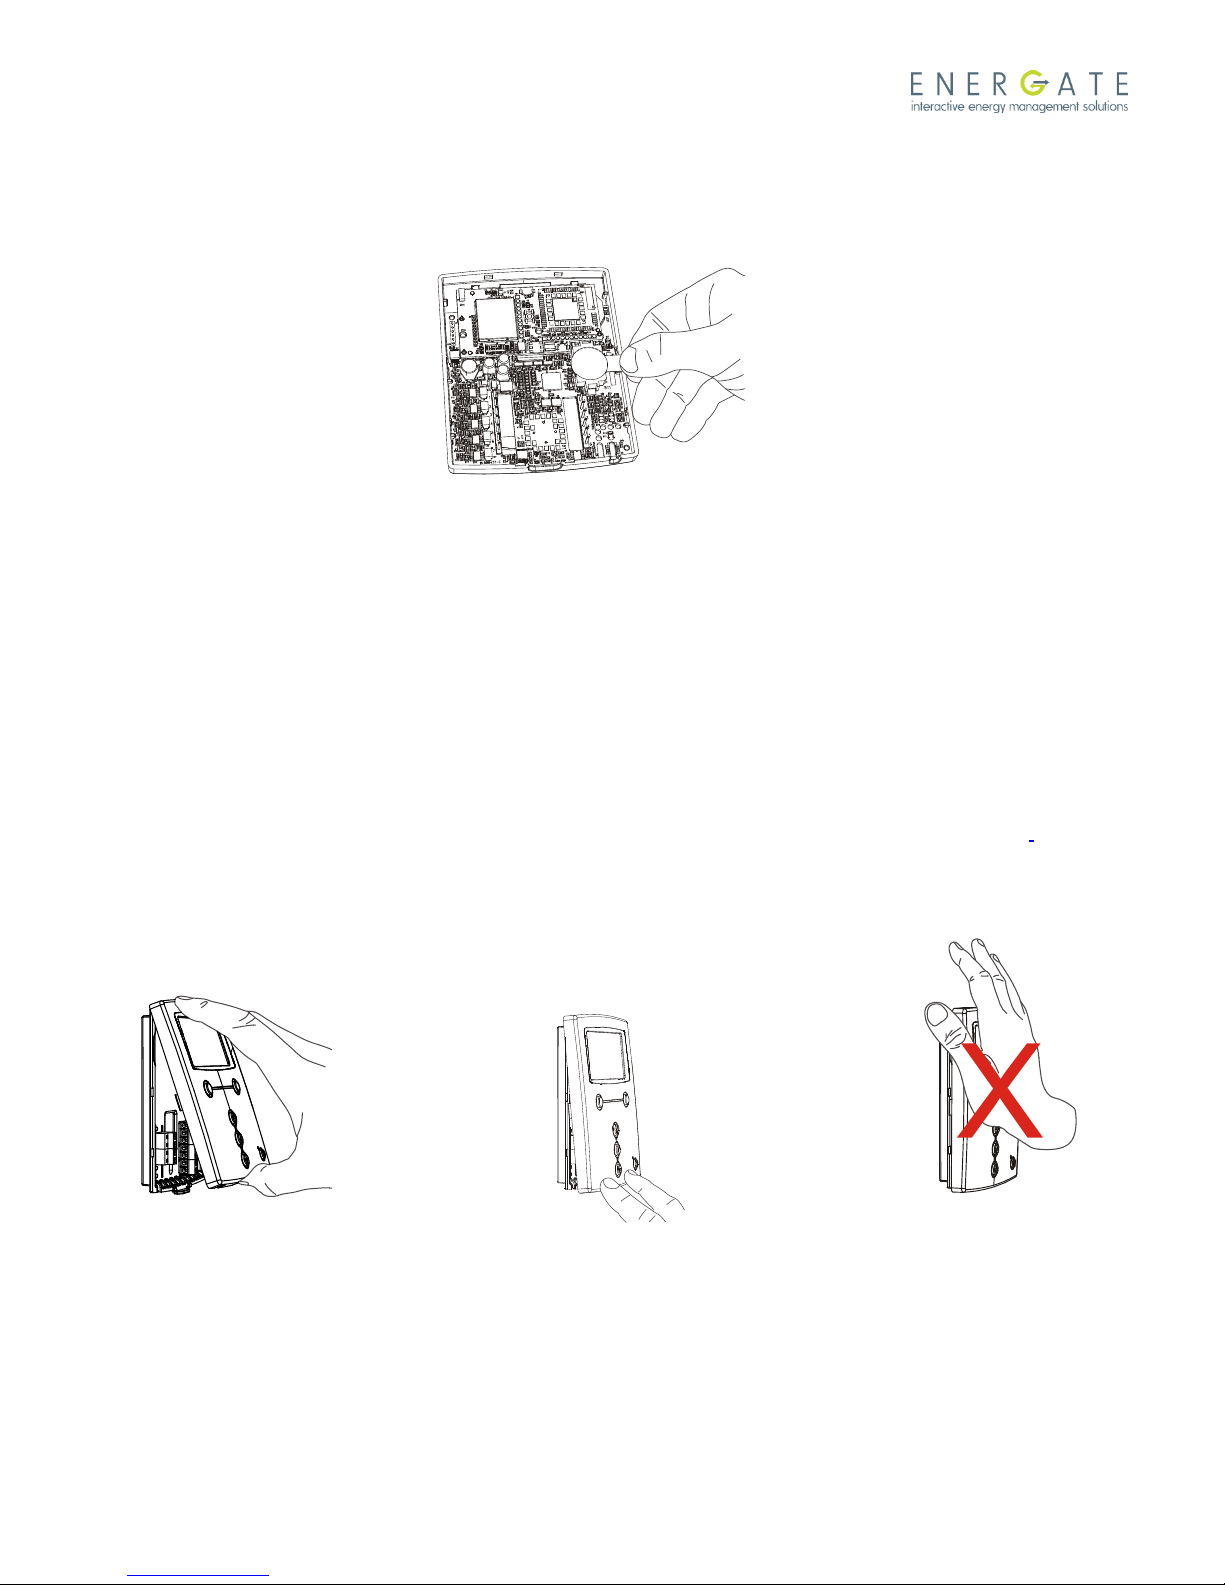
3.2.1 Pioneer thermostat installation
THIS DOCUMENT CONTAINS CONFIDENTIAL INFORMATION PROPRIETARY TO ENERGATE INC. NO PART OF ITS CONTENTS MAY BE DISCLOSED OR CONVEYED TO,
USED BY, OR COPIED TO A THIRD PARTY WITHOUT PRIOR WRITTEN CONSENT BY ENERGATE INC. PRINTED COPIES WILL BE CONSIDERED UNCONTROLLED.
AW000873-G 18
Place thermostat housing as shown
above.
It is very important to engage the top
hinge first.
Press down at the bottom of the
thermostat housing
until the housing snaps into position.
CAUTION:
Do not press on the front housing as
shown above.
This may cause the LCD to crack and/or
break!
3.3 Mounting the Outdoor Temperature Sensor
Mount the outdoor sensor in a shaded location, out of direct sunlight. The thermostat will automatically detect the
outdoor sensor and display its readings. For Foundation thermostats, the outdoor sensor should be connected to
terminals 10 and 11, see the diagram of Foundation backplate in Section 4. For Pioneer thermostats, the outdoor
sensor should be connected to terminals 3 and 4, see the diagram of Pioneer backplate in Section 5.
3.4 Cleaning the Thermostat
The thermostat can be cleaned with a soft cloth that is lightly dampened with isopropyl alcohol (IPA).
Warning: Excessive IPA or use of other solvents may damage the thermostat’s LCD display.
3.5 Removing Pioneer Z100 Thermostat Front Housing from Backplate
To remove the thermostat front housing from the backplate, press the plastic tab located at the bottom of the
thermostat. Pull the bottom of the front housing forward and remove.
Warning: To avoid damaging the thermostat, do not use metallic tools to remove the Pioneer Z100 thermostat battery
or backplate.

THIS DOCUMENT CONTAINS CONFIDENTIAL INFORMATION PROPRIETARY TO ENERGATE INC. NO PART OF ITS CONTENTS MAY BE DISCLOSED OR CONVEYED TO,
USED BY, OR COPIED TO A THIRD PARTY WITHOUT PRIOR WRITTEN CONSENT BY ENERGATE INC. PRINTED COPIES WILL BE CONSIDERED UNCONTROLLED.
AW000873-G 19
3.6 Placing the Foundation Thermostat on the Mounting Bracket
Push the bottom end of Foundation onto the mounting bracket until it snaps snugly into place before pushing
the top end on.
3.7 Removing the Foundation Thermostat from the Mounting Bracket
1. Use a large flathead screwdriver or large coin to lift up the snap-fit tab located on top of the mounting
bracket. Note: if the screwdriver is too small, the tab and/or thermostat housing can be damaged.
2. Lift the tab until Foundation is free to pull out.
3. Pull the top end of Foundation away from the mounting bracket until it is free of the snap-fit tab. Then lift
Foundation free of the mounting bracket.
Note: Be careful not to unplug any wiring that is still connected on the back.
THIS DOCUMENT CONTAINS CONFIDENTIAL INFORMATION PROPRIETARY TO ENERGATE INC. NO PART OF ITS CONTENTS MAY BE DISCLOSED OR CONVEYED TO,
USED BY, OR COPIED TO A THIRD PARTY WITHOUT PRIOR WRITTEN CONSENT BY ENERGATE INC. PRINTED COPIES WILL BE CONSIDERED UNCONTROLLED.
AW000873-G 20
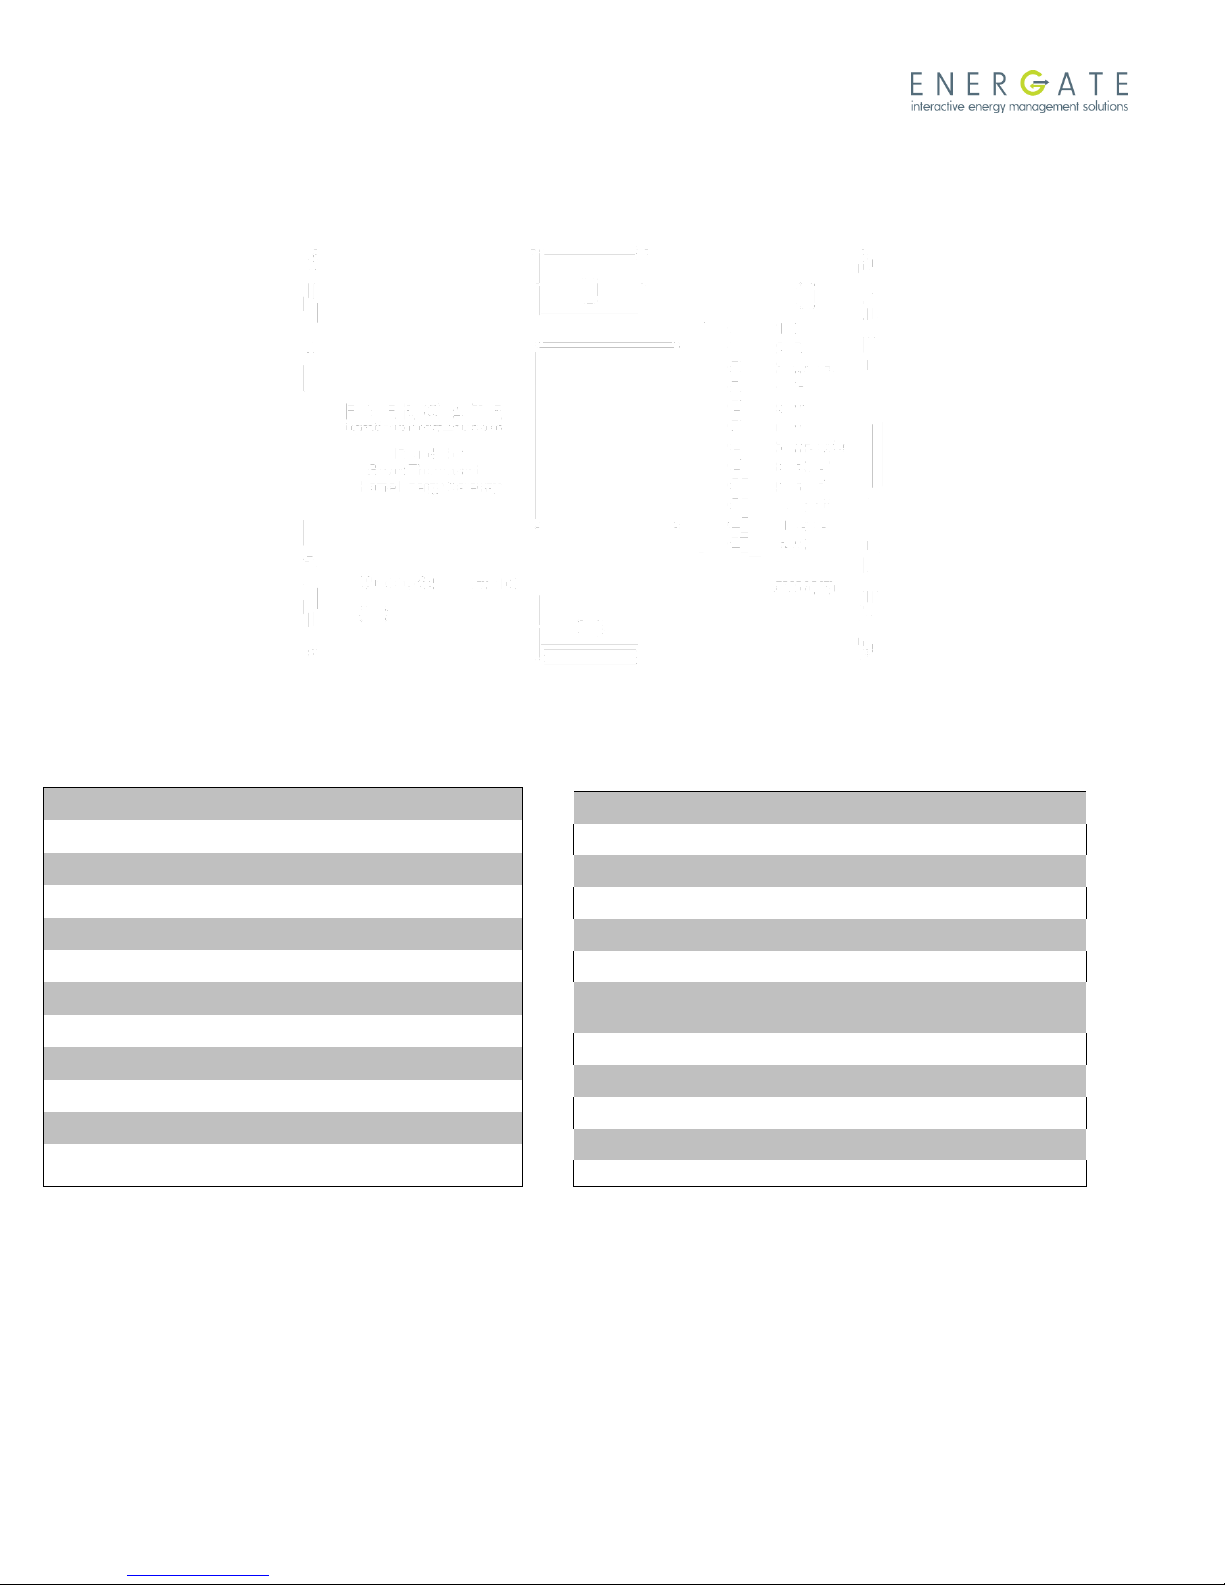
4 Foundation Thermostat Wiring
The following diagram shows the backplate of the Foundation thermostat.
4.1 Conventional System 4.2 Heat Pump
Common(GND)
C
1
Power (24VAC)
R
2
1st Stage Heat
W1
3
Fan
G
4
1st Stage Cool
Y1
5
2nd Stage Cool
Y2
6
2nd Stage Heat
W2
7
8
Filter
FILTER
9
Outdoor Sensor Signal
RS SIG
10
Outdoor Sensor Return
RS RET
11
Antenna
ANT
12
Common(GND)
C
1
Power (24VAC)
R
2
Emergency Heat
E
3
Fan
G
4
1st Stage Heat Pump
Y1
5
2nd Stage Heat Pump
Y2
6
Reversing/Changeover
Valve
O/B
7
Heat Pump Fault
FAULT
8
Air Filter
FILTER
9
Outdoor Sensor Signal
RS SIG
10
Outdoor Sensor Return
RS RET
11
Antenna
ANT
12
This manual suits for next models
1
Table of contents
Other Energate Thermostat manuals

Energate
Energate Z100 P2 Specification sheet

Energate
Energate Pioneer Z100 Smart Thermostat Specification sheet

Energate
Energate Pioneer Z100 Smart Thermostat Specification sheet

Energate
Energate Foundation RM41F User manual

Energate
Energate Pioneer Z100 Smart Thermostat Specification sheet

Energate
Energate Foundation User manual

Energate
Energate Foundation User manual

Energate
Energate AW000873 User manual

Energate
Energate FZ100 User manual

Energate
Energate Pioneer Z100 Smart Thermostat Specification sheet


