Energetic CT 610 ERGOMETER User manual
CT 610 ERGOMETER
GB
D
CZ
SK
HU

2
Table of contents - Inhaltsverzeichnis - Obsah - Obsah - Tájékoztató
English
P
3
Deutsch
P
16
Česky
P
29
Slovensky
P
42
Magyar
P
55
© The owner’s manual is only for the customer reference. ENERGETICS can not guarantee for
mistakes occurring due to translation or change in technical specification of the product.
©Die Gebrauchsanweisung dient nur zur Referenz für den Kunden. ENERGETICS übernimmt keine
Haftung für Fehler die durch Übersetzung oder technische Änderungen des Produkts entstehen.
©Návod k pouţití je pouze doporučení pro zákazníky. ENERGETICS nepřebírá ţádné ručení za
chyby zpŧsobené překladem či změnami v technické specfikaci výrobku.
© Tento návod je určený len pre potrebu zákazníkov. ENERGETICS nezodpovedá za chyby, ktoré sa
môţu vyskytnúť kvôli chybnému prekladu alebo zmenám v technickej špecifikácii produktu.
© A használati útmutató kizárólag felhasználói referenciaként szolgál. az ENERGETICS nem vállal
felelősséget a fordítási hibákból vagy a termék műszaki módosításaiból eredő hibákért.
© Copyright by ENERGETICS

3
Dear Customer,
Congratulations on your purchase of an ENERGETICS home exerciser. This product has
been designed and manufactured to meet the needs and requirements of in-home use.
Please carefully read the instructions prior to assembly and first use. Be sure to keep the
instructions for reference and/ or maintenance. If you have any further questions, please
contact us. We wish you lots of success and fun while training,
Your Team
Warranty
ENERGETICS offers high quality home exercisers that have been tested and certified
according to European Norm EN 957.
ENERGETICS warrants to the original purchaser 3 years against possible defects in material
and workmanship. Excluded are damages caused by misuse and wearing parts. All
electronic parts are warranted for a period of 1 year. The warranty period starts at the date
the product was purchased (retain your sales receipt).
Safety instruction
Consult your physician before starting with any exercise programme to receive advice
on the optimal training.
Warning: incorrect/ excessive training can cause health injuries. Stop using the home
exerciser when feeling uncomfortable.
Ensure that training only starts after correct assembly, adjustment and inspection of
the home exerciser.
Always start with a warm-up session.
Only use original ENERGETICS parts as delivered (see checklist).
Follow the steps of the assembly instruction carefully.
Only use suitable tools for assembly and ask for assistance if necessary.
Place the home exerciser on an even, non-slippery surface.
Use the height adjustment caps on the rear tube to ensure a stable position of the
home exerciser.
Make sure the front wheels are placed in the correct position: see assembly
instruction.
For all adjustable parts be aware of the maximum position to which they can be
adjusted.
Tighten all adjustable parts to prevent sudden movement while training.
This product is designed for adults. Please ensure that children only use it under the
supervision of an adult.
Ensure that those present are aware of possible hazards, e.g. movable parts during
training.
The resistance level can be adjusted to your personal preference.
Do not use the home exerciser without shoes or loose shoes.
Ensure that sufficient space is available to use the home exerciser.
Be aware of non-fixed or moving parts whilst mounting or dismounting the home
exerciser.
The resistance can be changed by computer
This product is made for home use only and tested up to a maximum body weight of
120 kilograms
Keep special attention to the minimum insertion depth of the seat post.
GB

4
Handling
A. After assembly, the rear stabilizer can be adjusted to accommodate slightly uneven
ground. Turn the adjustment knobs on the ends of the rear foot caps to level the rear
stabilizer to the floor.
B. The transportation wheels on the front foot caps allow for easy manoeuvring. Simply
pull back on the handlebars until the wheels touch the floor. Then roll the unit to a
desired location.
C. The handle bar can be adjusted to personal preference. Loosen the handle bar fixing
tube. Rotate the handle bar to the desired position and retighten the fixing tube.
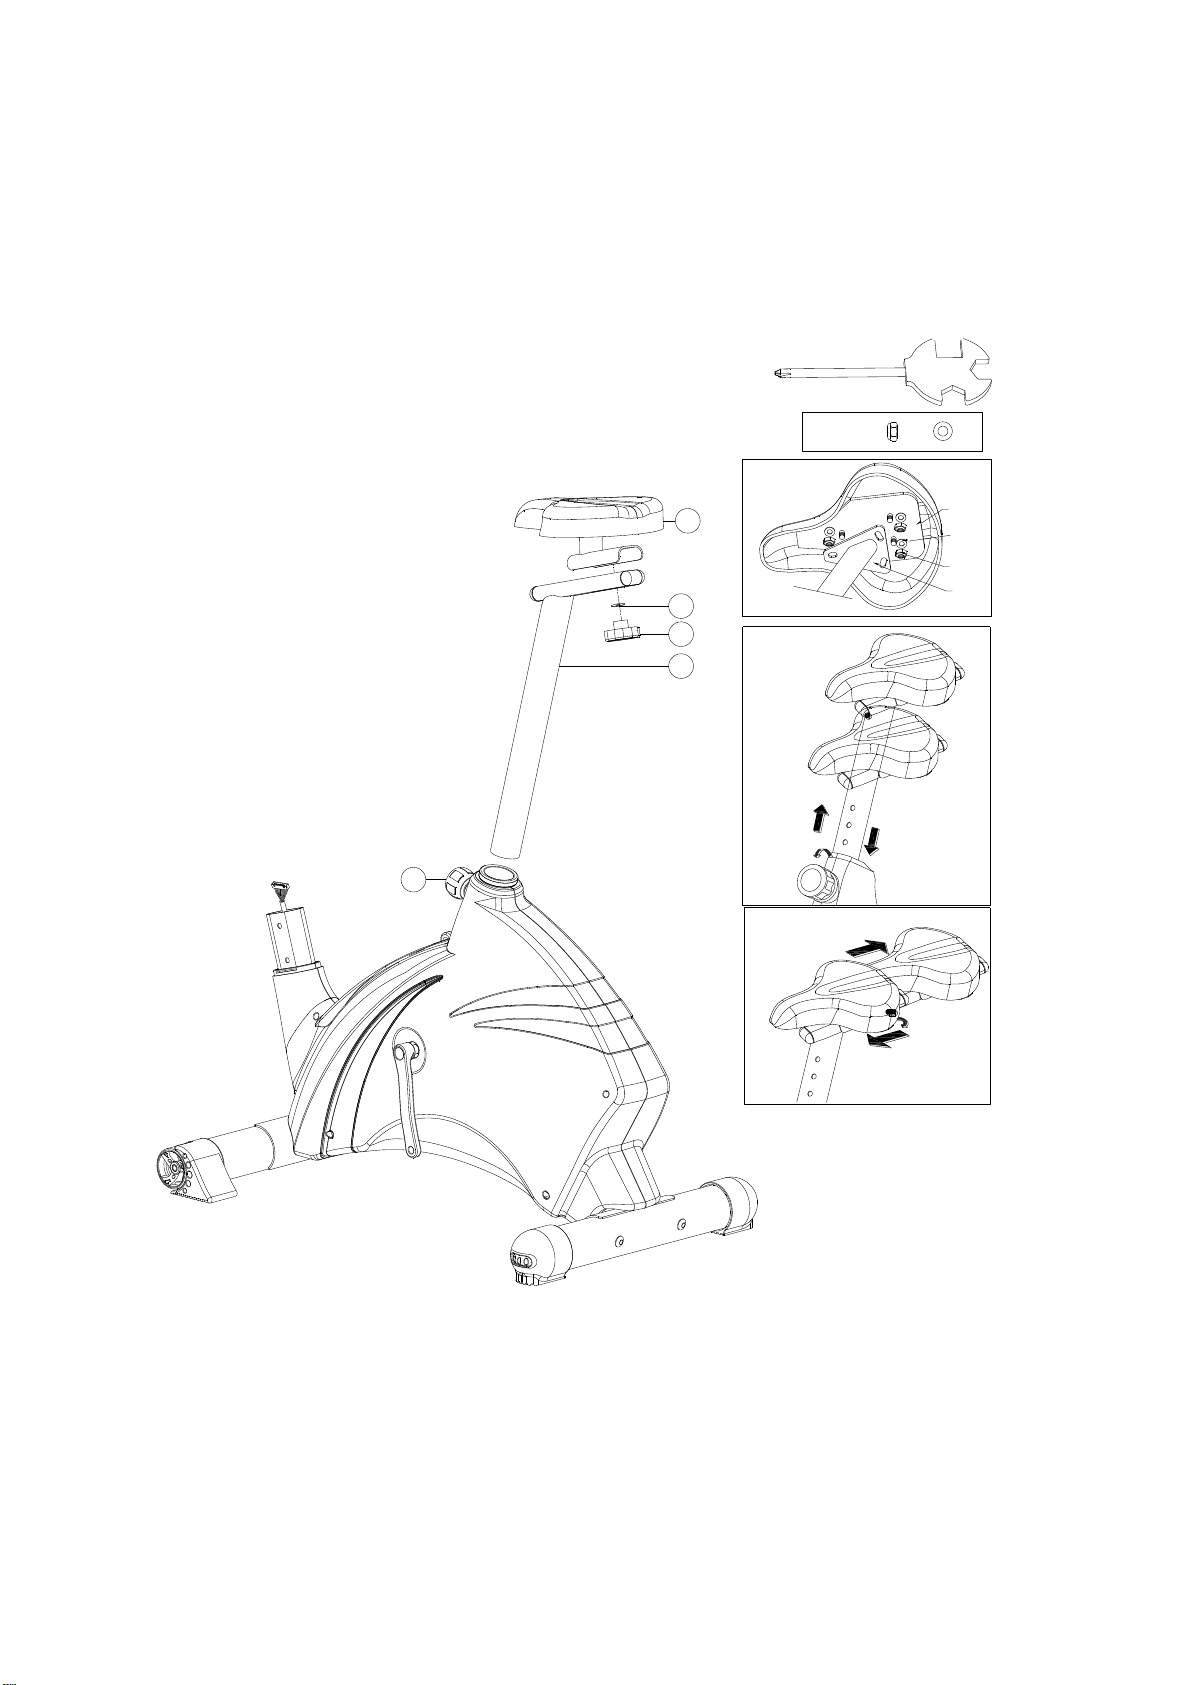
D. The height of the seat post can be adjusted by first loosening the height adjustment
knob, moving the seat post to the desired height then tightening the height
adjustment knob.
Care and Maintenance
-The home exerciser should not be used or stored in a moist area because of possible
corrosion.
-Check at least every 4 weeks that all connecting elements are tightly fitted and in
good condition.
-In case of repair please ask your dealer for advice.
-Replace defective components immediately and/or keep the equipment out of use
until repair.
-Only use original spare parts for repair.
-Use a damp cloth to clean the Home Exerciser and avoid the use of aggressive
detergents when cleaning the bike.
-After exercising, immediately wipe of the sweat; perspiration can ruin the appearance
and proper function of the Home Exerciser.

5
Checklist
1
X1
X1
X1
X1
X1
X1
29
2
4
38
M8*1.25*95L D22*D8.5*1.5T D15.4*D8.2*2T
M8*1.25*15L
7X413 x10 51 X4
20 X6
X1
X1
28
X1
42
X1
45
43
X1
37
44 X1
X1
15
X1
36
X1
9
X1
46L&R
X1
11
D16*D8.5*1.2T
12 X4
X1
10
14
ST4*15L X4
X2
69
41L&R
X1
M8*1.25*15L X4
6
6
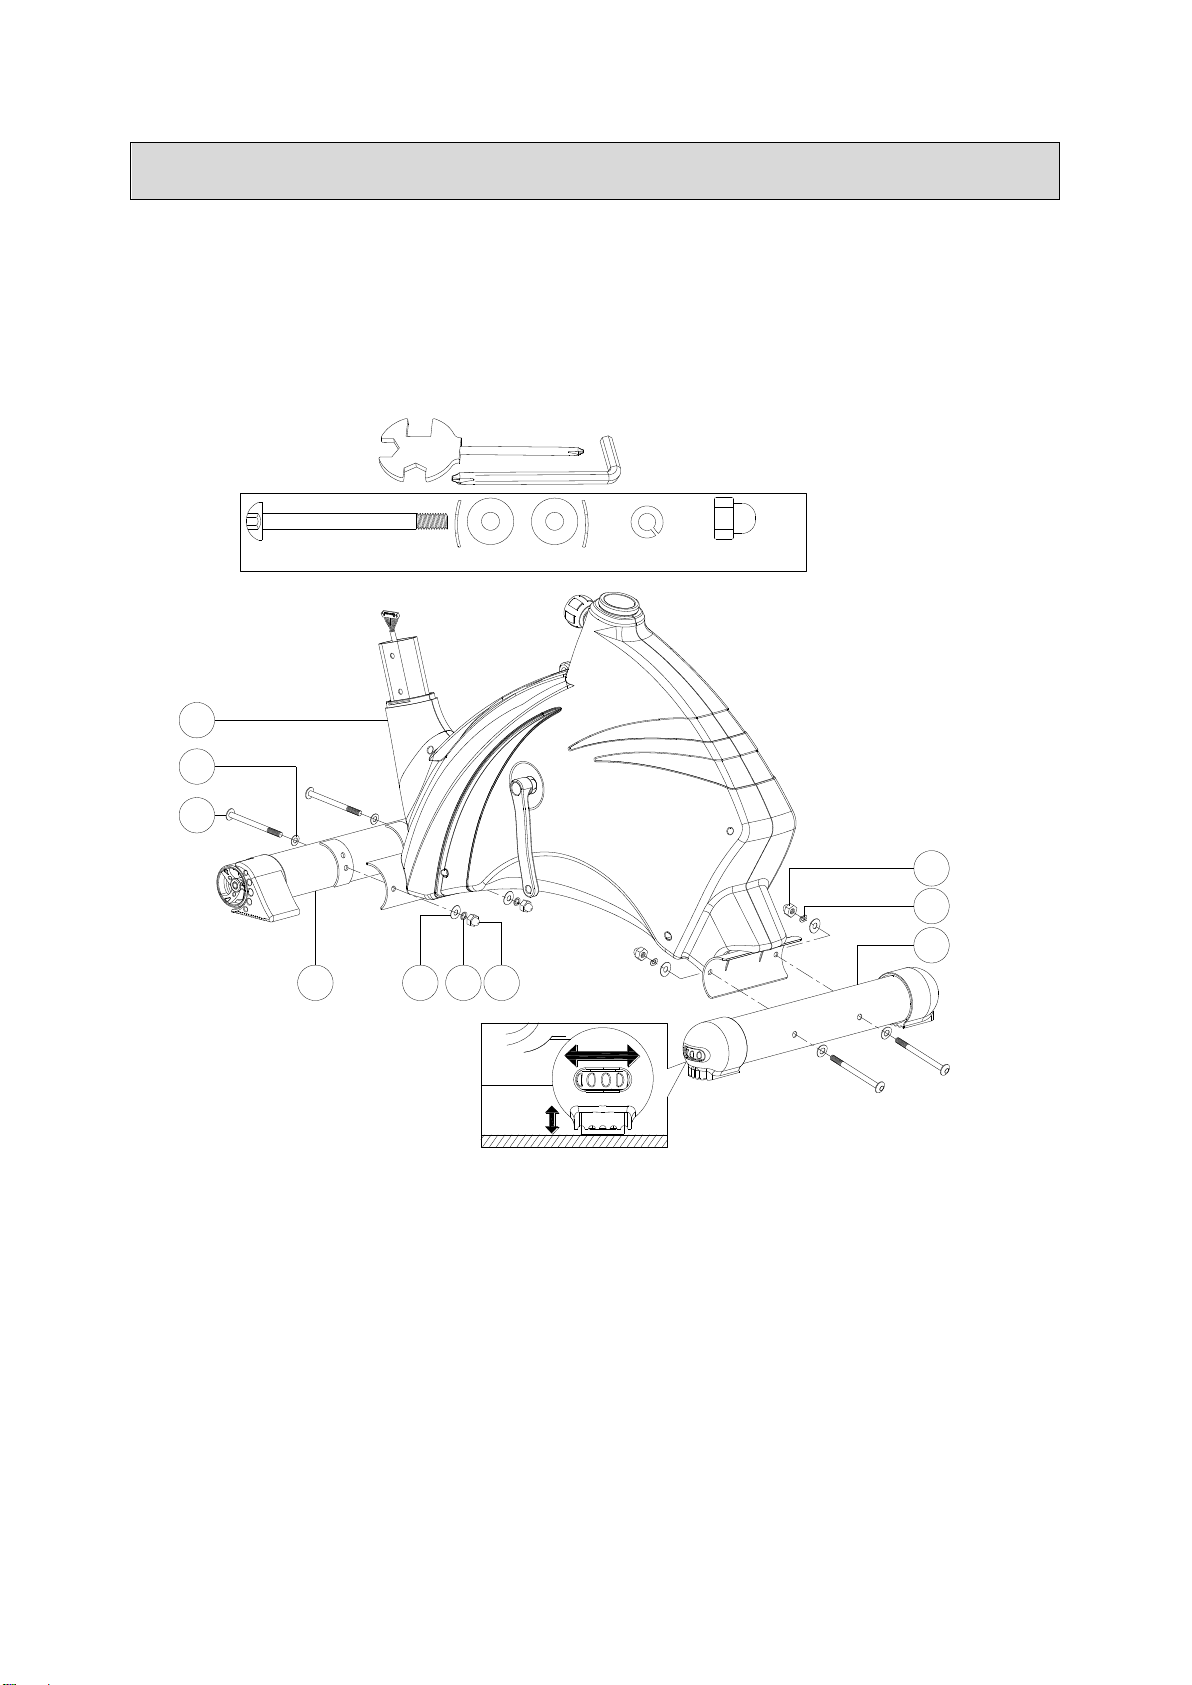
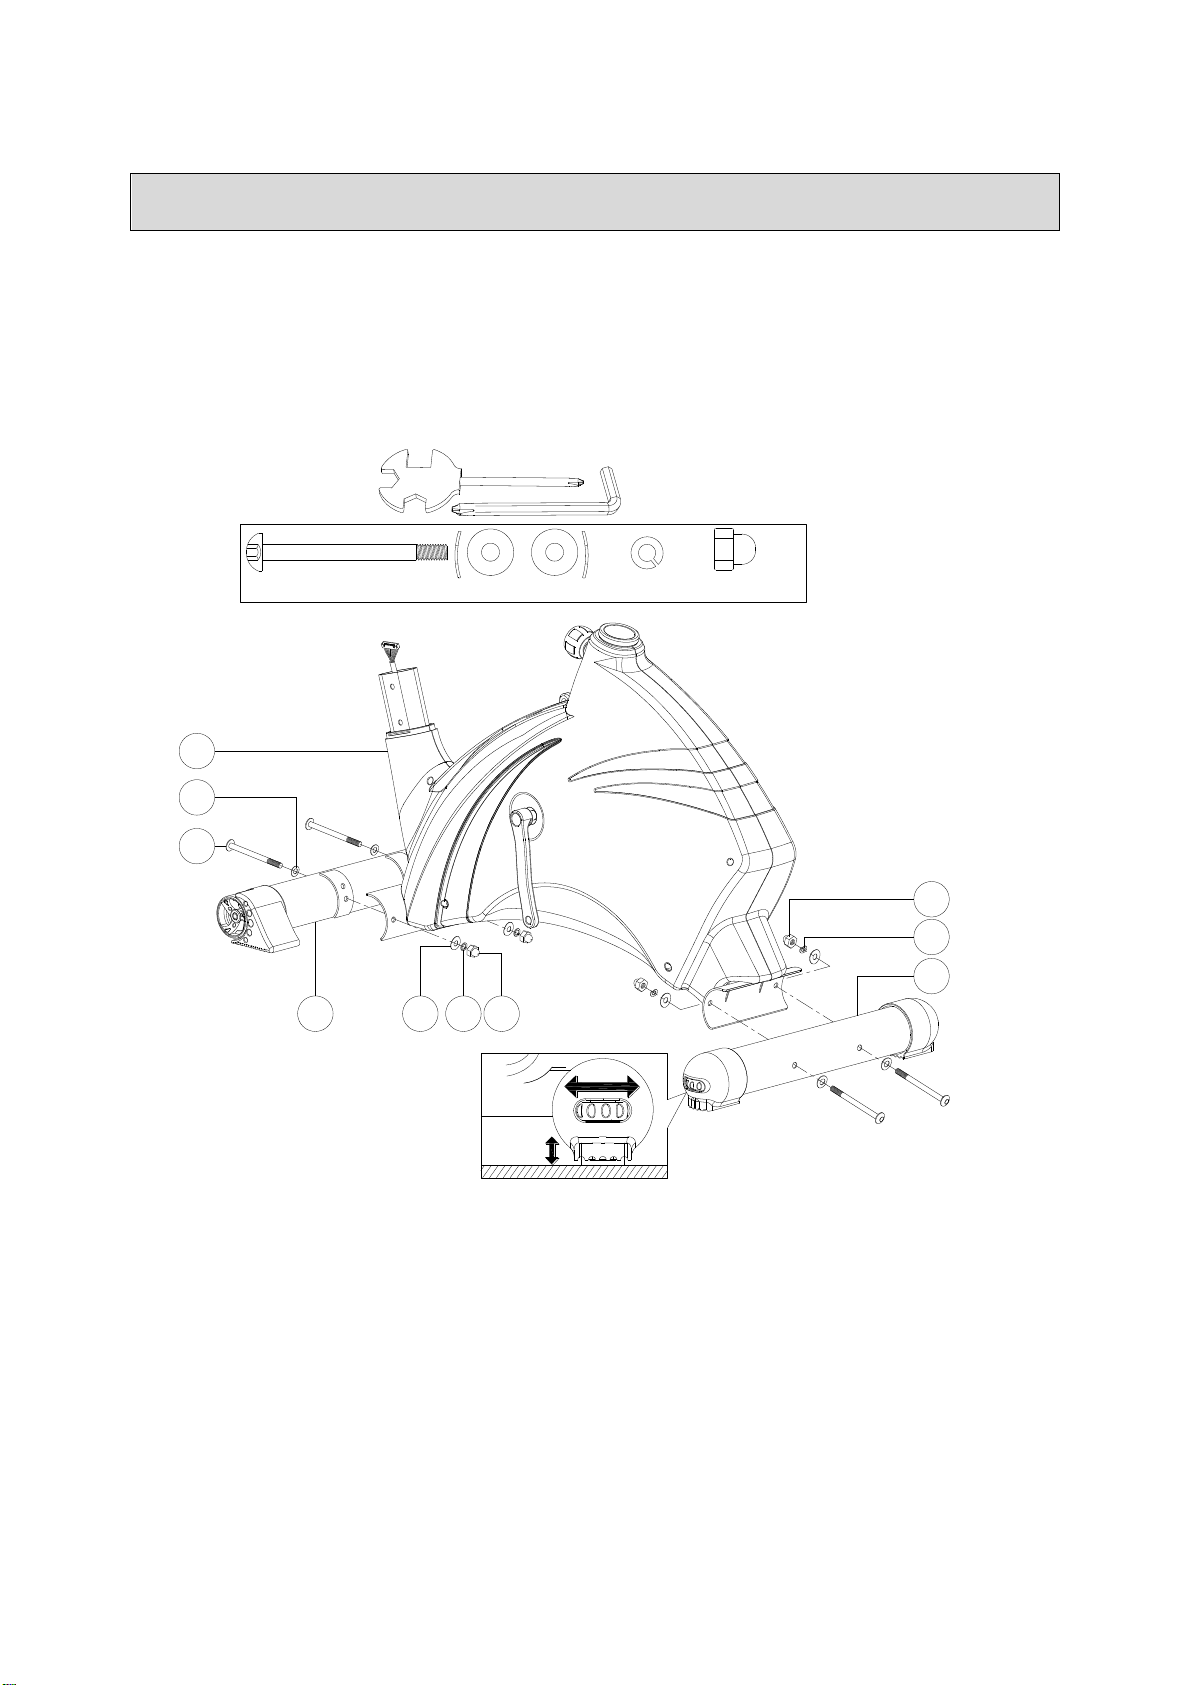
Assembly instruction
2
6
51
13
7
451
1
Step-1
6
13
A(x4)
M8*15L
D15.4
D22
M8*95L D22

7
31
10
17
18
9
DOWN
FRONTWARD
BACKWARD
c
UP
10
74
75
11
b
B(x3)
a
Step-2

8
20
12
13
28
29
(b)
(a)
28
65
40
M8*15L D22
(C)
M8*15L D16
(x2)
(x4)
Step-3

9
UP
DOWN
38
36
42
45
44
43
37
59
15
(x4)
M5*10L
Step-4
40
30

10
41L
14
69
14
41R
46L
46R
35L
Step-5
69
14

11
Computer manual
Function
SCAN
Alternates between WATTS/CALORIES and RPM/SPEED. 6 seconds
per display.
RPM
0~15~999
SPEED
0.0~99.9 km/h
TIME
0:00~99:59
The TM totals the riding time from the last RESET operation.
DISTANCE
0.00~99.99 km
CALORIES
0~999
WATT
0~999
PULSE
30~240
HEART SYMBOL
ON/OFF flashes
MANUAL
1~16 level
PROGRAM
P1~P12
USER
U1~U4
H.R.C
55%、75%、90%、IND (TARGET)
USER DATA
U0 ~U4 (U1 ~ U4 memorized user data)

12
FUNCTION DESCRIPTION
MANUAL
Set the resistance level using the dot matrix display then (if required) set
exercise parameters TIME/DISTANCE / CALORIES / PULSE then press
ST/STOP to START manual program.
PROGRAM
12 automatic adjusting programs with control exercise (P1~P12),
Resistance level can be adjusted during the program.
WATTS
Default WATTS value is 100. User can adjust WATTS value using the UP /
DOWN knob. The entered WATTS will be maintained automatically
regardless of speed.
USER
Create your own Program profile through U1~U4 by setting the resistance
level for each individual segment. Then the Program will be automatically
saved for future use. U0 ENTER can be set the same as U1~U4 but this
Program cannot be saved.
H.R.C
HEART RATE CONTROL- Select your own target Heart Rate of choose
one of the preset programs 55%, 75%,or 90%. Please enter your age into
the User Data to ensure that your target heart rate is set correctly. The
PULSE display will flash when you have reached your target heart rate
according to the Program you have chosen.
i. 55% -- DIET PROGRAM
ii. 75% -- HEALTH PROGRAM
iii. 90% -- SPORTS PROGRAM
iv. TARGET—USER SET TARGET HEART RATE
RECOVERY
When you have finished your workout, press RECOVERY. For RECOVERY
to function correctly, it needs your Heart Rate input. TIME will count - from 1
minute and then your fitness level from F1 to F6 will be displayed.
NOTE: during RECOVERY, no other displays will operate
USER DATA
U0~U4 are user’s Personal Programs (refer Personal). Users should enter
their gender, age, height and weight. Only data for U1 to U4 will be saved.
U0 is for casual users.

13
OPERATION
1.After power-on U1 by default but you can select any User ENTER by turning the
UP/DOWN knob the press the ENTER key for confirmation. Thereafter, sex, age,
height, weight and other personal information can changed top right display. please
press ENTER key for confirmation again.
2.Function Control display will flash indicating you can select the Programs P1-P12 by
turning UP/DOWN knob and then press ENTER key for confirmation. Any of the
default values can be changed by pushing the ENTER key until the desired display is
flashing. Press the ENTER key again for confirmation.
3.When the Program and other protocols are entered press START/STOP key and
begin your workout.
KEY FUNCTIONS
ENTER KEY
Function select and confirmation key. PUSH
UP/DOWN KNOB
Increase and decrease or select option. ROTATE
RESET KEY
Reset all displays to default values.
ST/STOP KEY
Start/stop key
RECOVERY KEY
Fitness test by measuring your recovery rate.
TIPS
Option: Plug in AC Adaptor (6 VOLT, 1A).
Keep moisture away from computer

14
Exploded drawing

15
Partlist
No.
Description
Qty
No.
Description
Qty
1
Main frame
1
39
Flat washer D22*D10*2T
2
2
Rear stabilizer
1
40
Upper computer cable
1
3
Adjustable foot cap
2
41L
Left computer bracket
1
4
Front stabilizer
1
41R
Right computer bracket
1
5L
Left moveable foot cap
1
42
Cover for handlebar
1
5R
Right moveable foot cap
1
43
Flat washer D16*D8.5*1.2T
1
6
Domed nut
44
Spring washer D15.4*D8.2*2T
1
7
Allen bolt M8*1.25*95L
4
45
Bushing
1
8
Oval cap 25*50*28L
2
46L/46R
Pedal set
1
9
Seat post
1
47
C ring S-16 (1T)
1
10
Seat
1
48
Nylon nut M6*1.0*6T
4
11
Seat adjustable tube
1
49
Allen bolt M6*1.0*15L
4
12
Flat washer D16*D8.5*1.2T
4
50
Plastic washer D50*D10*1.0T
2
13
Curved washer D22*D8.5*1.5T
10
51
Spring washer D15.4*D8.2*2T
4
14
Cross screw M5*0.8*12L
2
52
Crank axle
1
15
Adaptor
1
53
Buffer
4
16
Foam 575L
2
54
Sensor cable
1
17
Flat washer D25*D8.5*2T
1
55
Bearing #99502
2
18
Knob
1
56
Anti-loosen nut
2
19
Half ball cap
2
57
Metal flat washer
1
20
Allen bolt M8*1.25*15L
6
58
Fixing plate for idle wheel
1
21
Belt
1
59
Cross screw M5*10L
4
22
Waved washer
D21*D16.2*0.3T
2
60
Flat washer D50*D10*2.0T
1
23
Flat washer D24*D16*1.5T
1
61
Idle wheel
1
24
Round magnet
1
62
Cross screw ST4.2*1.4*15L
2
25
Left chain cover
1
63
Spacer
1
26
Right chain cover
1
64
Magnetic system
1
27
Belt wheel
1
65
Motor
1
28
Upper protective cover
1
66
Electric cable
1
29
Handlebar post
1
67
Nylon nut M6*1.0*6T
4
30
Handle pulse
2
68
Spring
1
Handle pulse cable
2
69
Cross screw ST4*1.41*15L
4
31
Ball knob
1
70
Inner tube
1
32
Nylon nut M10*1.5*10T
1
71
Tension cable
1
33
Bolt cover
2
72
Buffer
4
34
Allen bolt M8*1.25*25
2
73
Cross bolt M5*0.8*10L
1
35L
Left crank
1
74
Flat washer
3
35R
Right crank
1
75
Nylon nut
3
36
Handlebar
1
37
T knob
1
38
Computer UM6609L2-7
1

16
Sehr geehrte Kundin, sehr geehrter Kunde,
wir gratulieren Ihnen zum Kauf eines ENERGETICS Heimtrainers. Dieses Produkt ist für den
Heimbereich konzipiert um den Wünschen und Anforderungen dieses Bedarfs gerecht zu
werden. Bitte lesen Sie vor dem Aufbau und dem ersten Gebrauch zunächst sorgfältig diese
Anleitung. Bitte bewahren Sie die Anleitung als Referenz und für den richtigen Umgang mit
Ihrem Fitness-Gerät auf. Bei weiteren Fragen dazu stehen wir Ihnen selbstverständlich gerne
zur Verfügung. Wir wünschen Ihnen viel Spaß und Erfolg bei Ihrem Training.
Ihr - Team
Garantie
ENERGETICS Qualitätsprodukte werden konstruiert und getestet um für ein engagiertes
Fitness-Training eingesetzt zu werden. Dieses Gerät entspricht der europäischen Norm EN
957.
ENERGETICS gewährt auf Material- und Verarbeitungsfehler eine Garantie von 3 Jahren.
Von der Garantie ausgeschlossen sind sowohl Schäden, die durch unsachgemäße
Anwendung des Produktes entstehen als auch auf Verschleißteile. Auf elektronische
Komponenten wird eine Garantie von 1 Jahr offeriert. Die Garantiezeit beginnt mit dem
Verkaufsdatum (bitte Kaufbeleg sorgfältig aufbewahren).
Sicherheitshinweise
Bei gesundheitlichen Einschränkungen oder für individuelle und persönliche
Trainingsparameter konsultieren Sie bitte zunächst Ihren Arzt. Er kann Ihnen sagen,
welche Art des Trainings und welche Belastung für Sie geeignet sind.
Achtung: Falsches oder exzessives Training kann Ihre Gesundheit gefährden.
Beginnen Sie erst mit dem Training, nachdem Sie sichergestellt haben, dass der
Heimtrainer korrekt aufgebaut und eingestellt ist.
Starten Sie immer mit einer Aufwärm-Phase.
Verwenden Sie nur die der Lieferung beigelegten ENERGETICS Originalteile (siehe
Check-Liste).
Gehen Sie beim Aufbau des Geräts exakt nach der Montageanweisung vor.
Verwenden Sie nur geeignetes Werkzeug für die Montage und lassen Sie sich ggf. von
einer zweiten Person helfen
Stellen Sie das Gerät auf einem ebenen, rutschfesten Untergrund auf.
Verwenden Sie die Höhen-Einstellkappen an der hinteren Querstütze, um eine sichere
Position des Heimtrainers zu gewährleisten.
Stellen Sie sicher, dass die vorderen Transportrollen in der richtigen Position angebracht
sind (siehe Aufbauanleitung).
Stellen Sie bei allen verstellbaren Teilen sicher, dass die Maximalpositionen, in die sie
verstellt werden können, richtig eingestellt sind.
Schrauben Sie vor dem Training alle verstellbaren Teile fest, um eine Lockerung
während des Trainings zu vermeiden.
Das Gerät ist für das Training erwachsener Personen konzipiert. Stellen Sie sicher, dass
eine Nutzung des Geräts von Kindern nur unter Aufsicht von Erwachsenen erfolgt.
Weisen Sie anwesende Personen auf Gefährdung, z.B. durch bewegliche Teile, hin.
Der Widerstand kann auf Ihre persönlichen Bedürfnisse eingestellt werden.
Verwenden Sie den Heimtrainer nicht ohne Schuhe oder mit losem Schuhwerk.
Stellen Sie sicher, dass ausreichend Platz vorhanden ist, um den Heimtrainer zu
benutzen.
Beachten Sie die nicht fixierten oder beweglichen Teile während der
Montage/Demontage des Heimtrainers.
D

17
Der Widerstand kann durch den Computer verändert werden.
Dieses Gerät ist ausschließlich für den Heimanwendungsbereich konzipiert und
einem maximalen Körpergewicht von 120 Kilogramm getestet.
Achten Sie besonders auf die niedrigste Einstellhöhe der Sattelstütze
Handhabung
A. Nach dem Aufbau kann die hintere Querstütze verstellt werden, um kleinere
Unebenheiten auf dem Boden auszugleichen. Drehen Sie dazu am Verstellrad am
Rand der Höhenausgleichskappen, bis die Unebenheit ausgeglichen ist.
B. Die Transportrollen der vorderen Querstütze erlauben ein leichtes Verschieben.
Stellen Sie sich vor den Heimtrainer und drücken Sie auf den Lenker, bis die Rollen
den Boden berühren. Dann rollen Sie den Heimtrainer an die gewünschte Stelle.
C. Der Lenker kann auf die persönlichen Bedürfnisse wie folgt eingestellt werden: Lösen
Sie die Lenkerfixierung. Drehen Sie den Lenker in die gewünschte Position und
fixieren ihn wieder.
D. Die Höhe der Sattelstütze kann auf folgende Art verstellt werden: Lösen Sie den
Knopf zur Sitzhöhenverstellung, dann bringen Sie die Sattelstütze in die gewünschte
Position und anschließend fixieren Sie diese Position mit dem Verstellknopf.
Sorgfalt und Wartung
-Um die Gefahr von Korrosionsschäden zu vermeiden, verwenden oder lagern Sie
dieses Heim-Fitness-Gerät nicht in feuchten Räumen.
-Überprüfen Sie spätestens alle 4 Wochen, dass alle Verbindungen fest angezogen
und in einem guten Zustand sind.
-Im Falle einer Reparatur kontaktieren Sie bitte Ihren Händler.
-Ersetzen Sie beschädigte Teile sofort und/oder verwenden Sie diese nicht bis sie
repariert sind.
-Bitte verwenden Sie für Reparaturen nur original Ersatzteile
-Wischen Sie unmittelbar nach dem Training den Schweiß ab. Schweiß kann zu
Schäden führen und die Funktion des Heim-Fitness-Gerätes beeinträchtigen.

18
Checklist
1
X1
X1
X1
X1
X1
X1
29
2
4
38
M8*1.25*95L D22*D8.5*1.5T D15.4*D8.2*2T
M8*1.25*15L
7X413 x10 51 X4
20 X6
X1
X1
28
X1
42
X1
45
43
X1
37
44 X1
X1
15
X1
36
X1
9
X1
46L&R
X1
11
D16*D8.5*1.2T
12 X4
X1
10
14
ST4*15L X4
X2
69
41L&R
X1
M8*1.25*15L X4
6
19
Aufbauanleitung
2
6
51
13
7
451
1
Step-1
6
13
A(x4)
M8*15L
D15.4
D22
M8*95L D22
20
31
10
17
18
9
DOWN
FRONTWARD
BACKWARD
c
UP
10
74
75
11
b
B(x3)
a
Step-2
Table of contents


