ENERpower TSDZ2 User manual
ENERdan GmbH | Max-Planck-Straße 7, D-12489 Berlin, Germany | www.enerpower.de
Tel: +49 (0) 30 5770 344 35 | Fax: +49 (0) 30 5770 344 39 | [email protected]
1
TSDZ2 Central Motor Drive System
Installation Manual

ENERdan GmbH | Max-Planck-Straße 7, D-12489 Berlin, Germany | www.enerpower.de
Tel: +49 (0) 30 5770 344 35 | Fax: +49 (0) 30 5770 344 39 | [email protected]
2
Table of Contents
1. General Information ....................................................................................................................... 3
2. Motor System Higlights .................................................................................................................. 3
3. Technical Details ............................................................................................................................. 3
Motor .............................................................................................................................................. 3
Display ............................................................................................................................................ 3
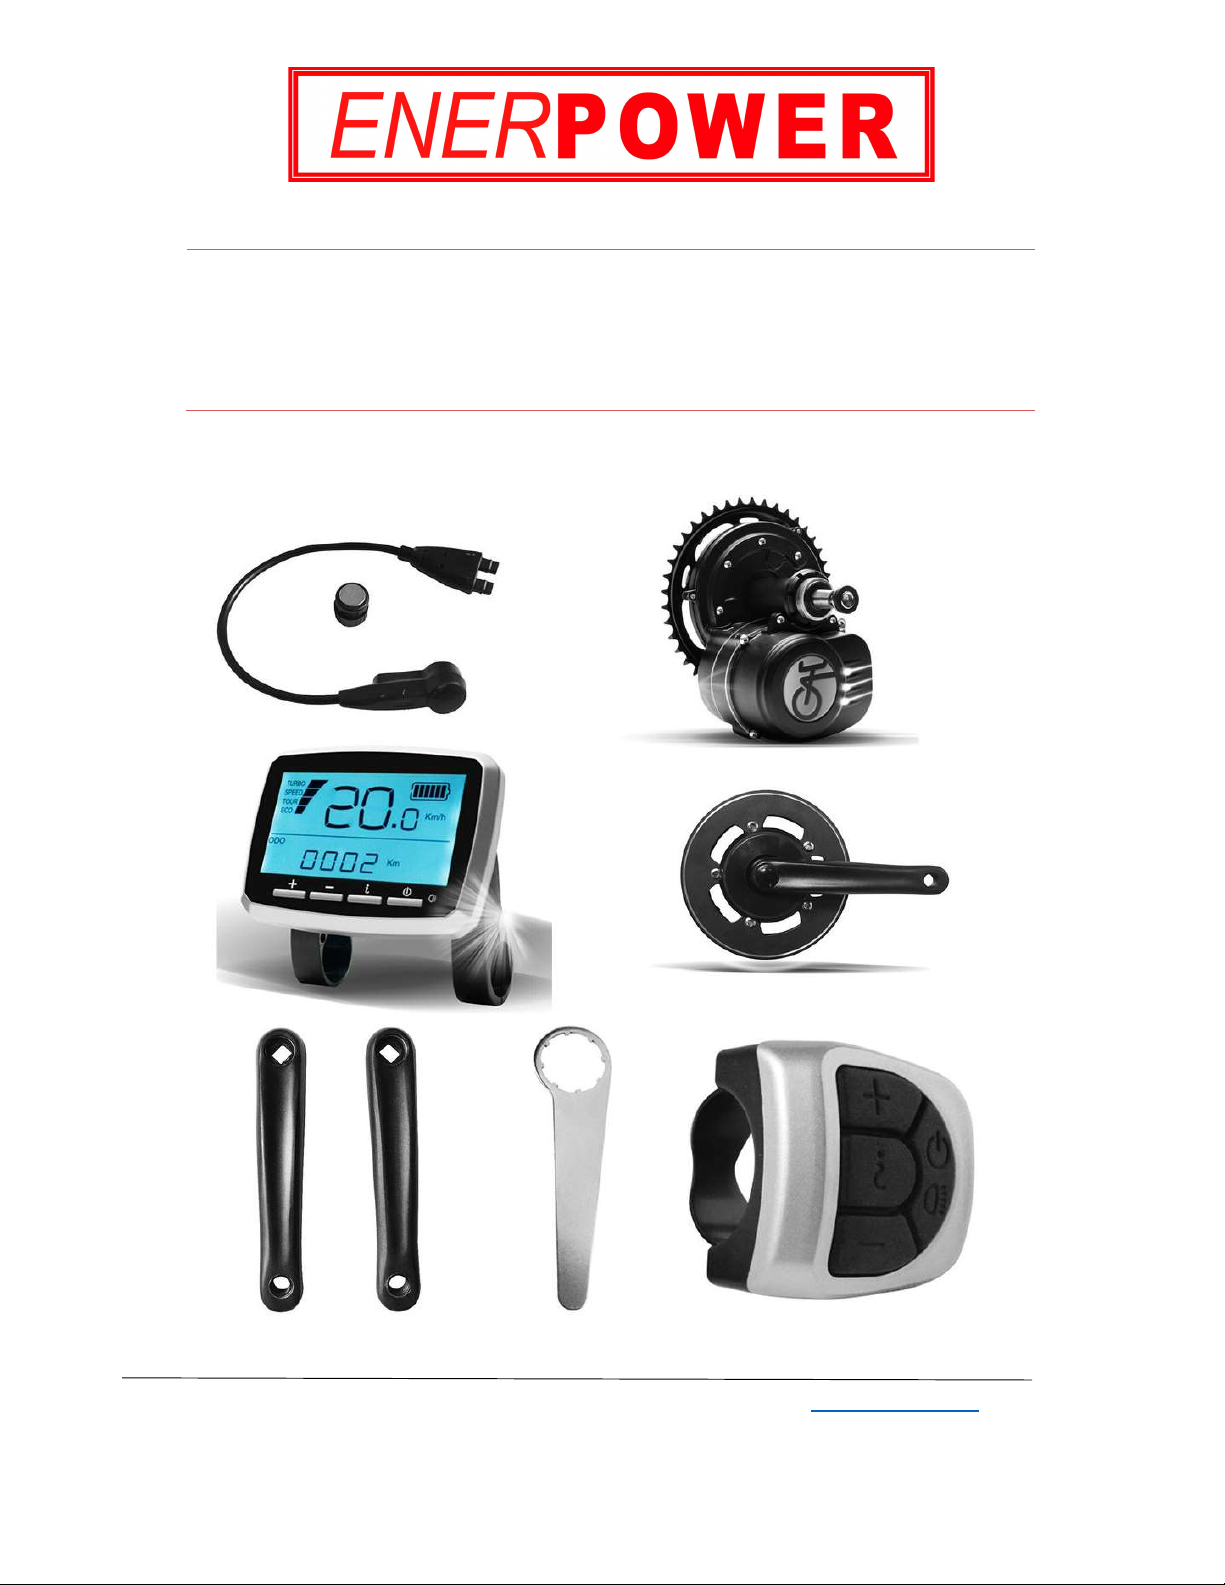
4. Parts List ......................................................................................................................................... 4
5. Motor Installation .......................................................................................................................... 5
Step 1: Placing the motor ............................................................................................................... 5
Step 2: Installing the securing plate .............................................................................................. 5
Step 3: Screwing the M33.5 nut onto the BB axle ........................................................................ 6
Step 4: Fixing the main body of the motor .................................................................................... 6
Step 5: Tightening the bolt ............................................................................................................. 7
Step 6: Installing the arm-cranks ................................................................................................... 7
6. Display Installation ......................................................................................................................... 8
Step 1: Installing the VLCD5 display .............................................................................................. 8
Step 2: Installing the left hand remote control buttons ............................................................... 8
7. Detective Sensor Installation ......................................................................................................... 9
8. System Connection ......................................................................................................................... 9
Step 1: Connecting the display and operation button .................................................................. 9
Step 2: Inserting the brake-levers plugs ...................................................................................... 10
Step 3: Connecting the main motor and the display................................................................... 10
Step 4: Connecting the main motor and the detective sensor ................................................... 11
Step 5: Connecting the motor and the battery ........................................................................... 11
9. System Connection ....................................................................................................................... 12
10. Motor Dimensions (in mm) ........................................................................................................ 13
EC Declaration of Conformity .......................................................................................................... 14
Identification of products / product types .................................................................................. 14
This product complies with the following EC directives ............................................................. 14
Applicable standards .................................................................................................................... 14
Responsibility ............................................................................................................................... 14

ENERdan GmbH | Max-Planck-Straße 7, D-12489 Berlin, Germany | www.enerpower.de
Tel: +49 (0) 30 5770 344 35 | Fax: +49 (0) 30 5770 344 39 | [email protected]
3
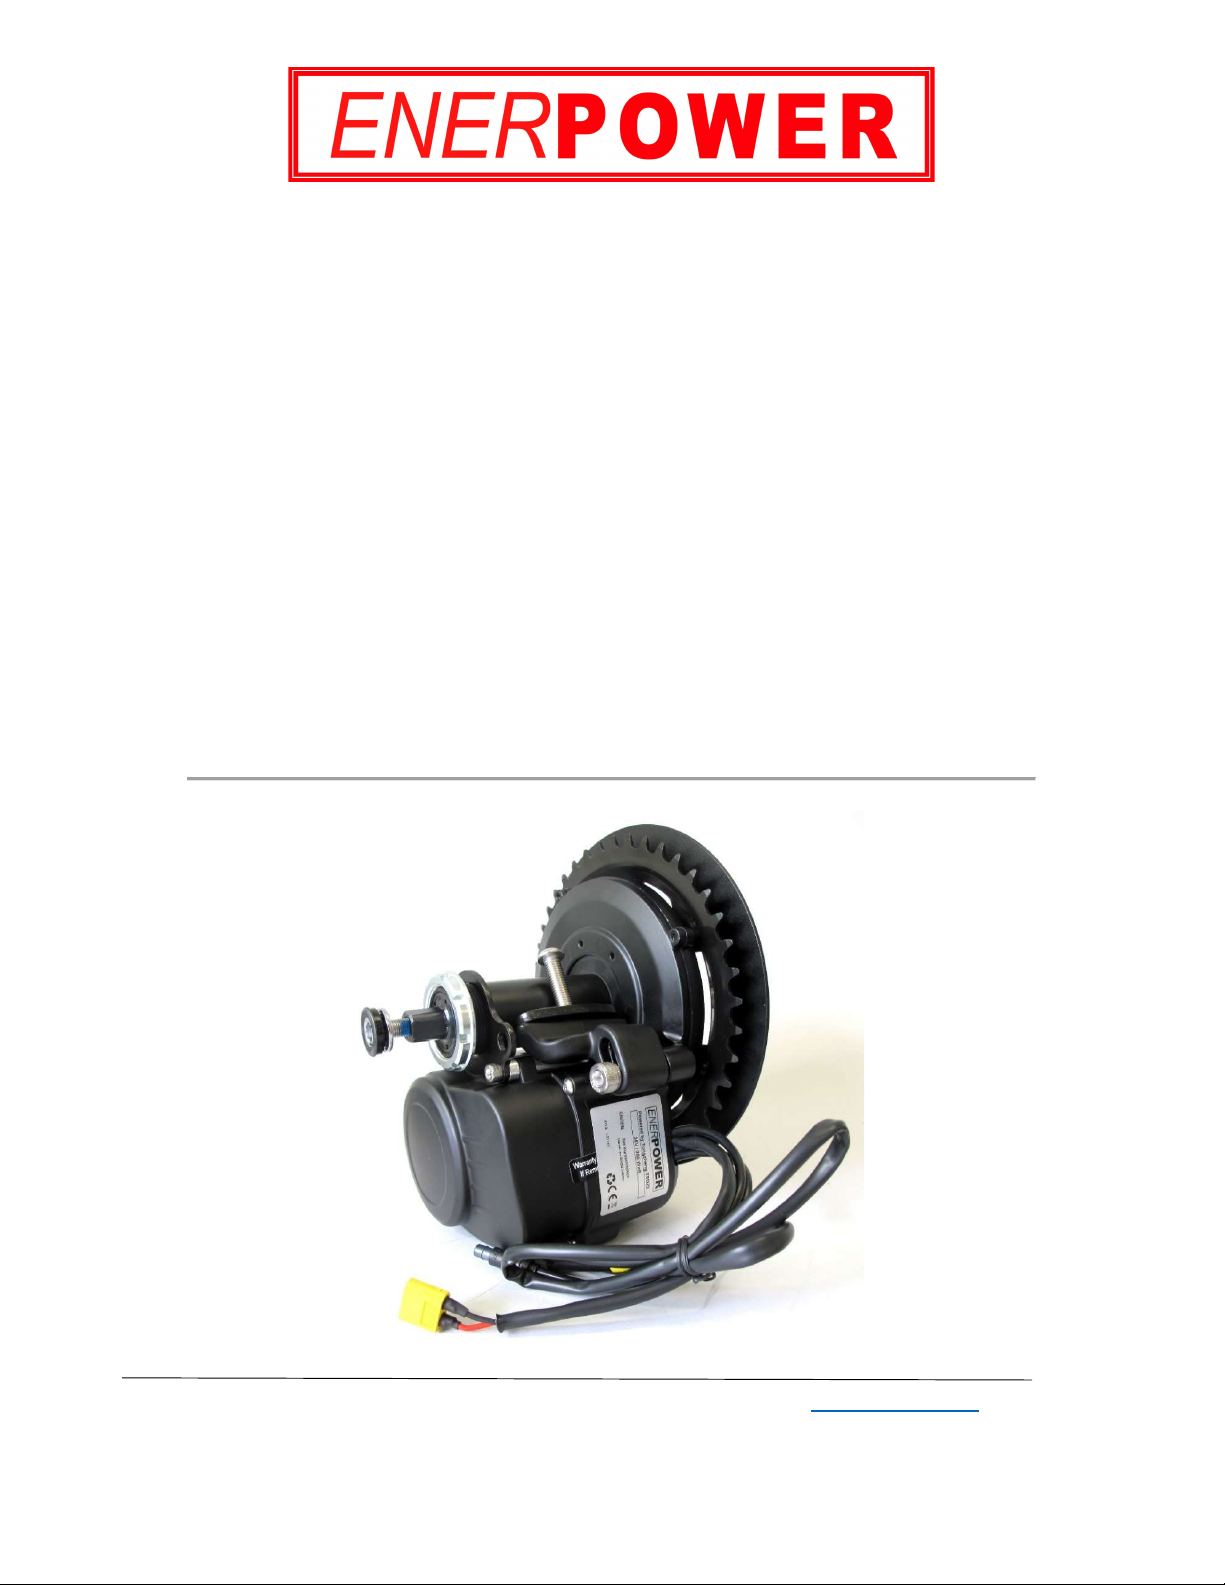
1. General Information
This manual elaborates the installation process of a TSDZ2 central motor drive system from
Tongsheng, imported and distributed by ENERdan GmbH under the brand ENERpower. This
manual will guide you step by step throughout the installation process.
Before starting, please make sure you have all the supplied parts (see list in paragraph 4 of
this document).
2. Motor System Higlights
Easy to install, suitable for most regular bikes
Maximum torque of about 80N.m, strong climbing ability
Internal control axial torque sensor actual double-sided torque
Compact, fine design, Lightweight (about 3.3 kg)
Comfortable ride, high efficiency, low battery consumption and longer battery life
Safe, reliable and excellent performance PCT/CN2014/091373
3. Technical Details
Motor
Manufacturer: Tongsheng (China)
Model: TSDZ2
Motor type: mid-motor
Wheel diameter: 16' - 28'
Energy: 250W - 350W
Voltage: 36V / 48V
Torque: 50N.m - 80N.m
Level of support: 36% ~ 300%
Maximal speed: 25Km/h
Weight: 3.3 Kg.
Display
Type: VLCD5
Bus communication: U-ART or CAN
Time display: single-way / total
Distance display: single-way / total
Power assist: adjustable, 5 levels
Background light: 3 levels brightness
Fault diagnosis function: intelligently identifies and shows the problem
Measuring units: selectable, metric / anglo-american
ENERdan GmbH | Max-Planck-Straße 7, D-12489 Berlin, Germany | www.enerpower.de
Tel: +49 (0) 30 5770 344 35 | Fax: +49 (0) 30 5770 344 39 | [email protected]
4
4. Parts List
1. Center motor (1)
2. VLCD5 display (1)
3. VLCD5 display bracket (φ 32) (1)
4. Left hand operator (1)
5. Brake-lever (1) (optional)
6. Detective sensor (1)
7. Securing plate (1)
8. M33.5mm bolt (1)
9. Hanging plate (1)
10. Securing block (1)
11. M8 X 45 roundhead bolt (1)
12. M5X 16 Hexagon socket head bolt (2)
13. Φ 5X5 Aluminum washer (2)
14. Wrench (1)
15. 170MM crank-arm (1) (1 set)
16. 1 VLCD display manual (Chinese & English) (1)
17. TSDZ2 center motor install manual (1)

ENERdan GmbH | Max-Planck-Straße 7, D-12489 Berlin, Germany | www.enerpower.de
Tel: +49 (0) 30 5770 344 35 | Fax: +49 (0) 30 5770 344 39 | [email protected]
5
5. Motor Installation
Step 1: Placing the motor
The bushing of the motor is pushed into the bicycle five-way pipe in the direction of the arrow, and
the length of the five-way pipe of 68mm, the exposed length of the middle bushing is 11mm, as
shown in image 1.
Image 1
Step 2: Installing the securing plate
1. Place the securing plate on the middle shaft five-way.
2. Place two aluminum washers between the securing plate and the center motor.
3. Tighten the securing plate and the motor with two M5×16 screws.
Image 2
ENERdan GmbH | Max-Planck-Straße 7, D-12489 Berlin, Germany | www.enerpower.de
Tel: +49 (0) 30 5770 344 35 | Fax: +49 (0) 30 5770 344 39 | [email protected]
6
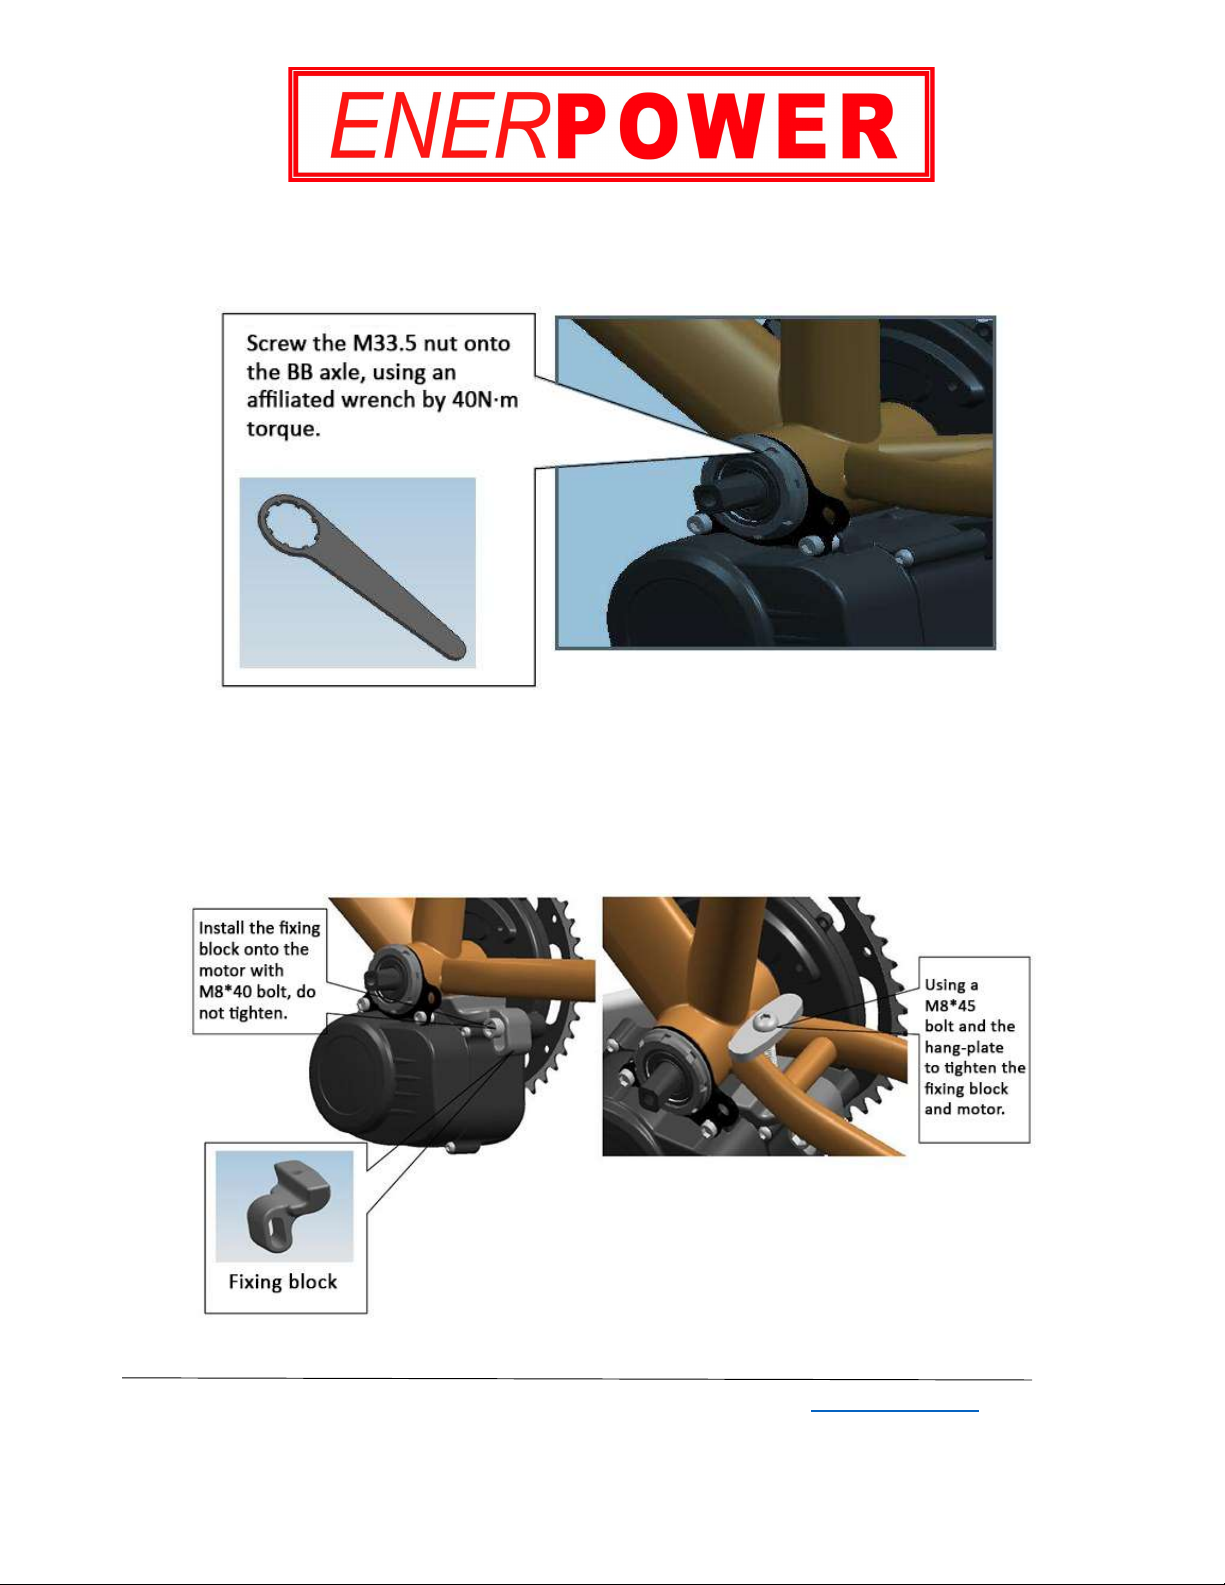
Step 3: Screwing the M33.5 nut onto the BB axle
Screw the M33.5 nut onto the BB axle, using an affiliated wrench by 40N·m torque. Please refer to
Image 3.
Image 3
Step 4: Fixing the main body of the motor
Fix the main body of the Motor onto bike-Frame. Please refer to Image 4.
1. Install the fixing block onto the motor with M8*40 bolt, do not tighten.
2. Using a M8 * 45 bolt and the hang-plate to tighten the fixing block and motor.
Image 4

ENERdan GmbH | Max-Planck-Straße 7, D-12489 Berlin, Germany | www.enerpower.de
Tel: +49 (0) 30 5770 344 35 | Fax: +49 (0) 30 5770 344 39 | [email protected]
7
Step 5: Tightening the bolt
Tighten the bolt with 40N.m torque force. Please refer to Image 5.
Image 5
Step 6: Installing the arm-cranks
Using M8×14 bolts to install the arm-cranks. The locking torque is 40N.m.
Image 6
ENERdan GmbH | Max-Planck-Straße 7, D-12489 Berlin, Germany | www.enerpower.de
Tel: +49 (0) 30 5770 344 35 | Fax: +49 (0) 30 5770 344 39 | [email protected]
8
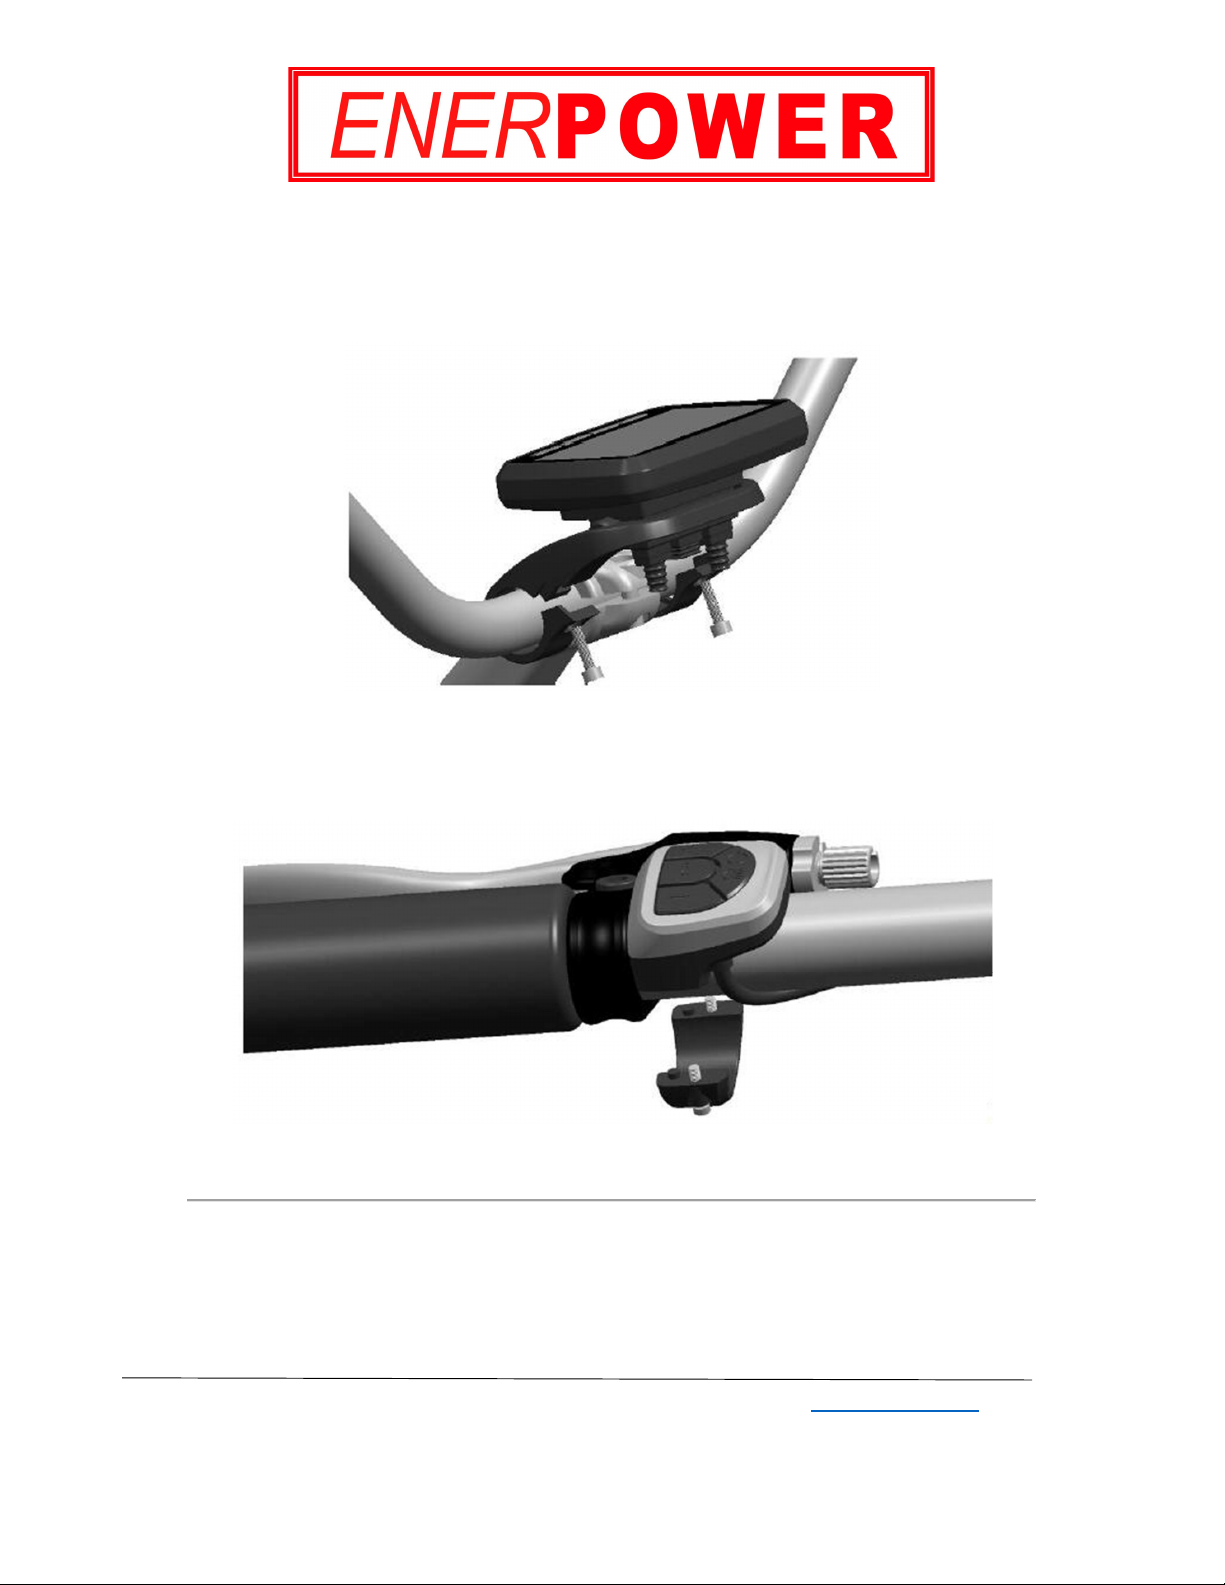
6. Display Installation
Step 1: Installing the VLCD5 display
Install the LCD display onto the handlebar using 2pcs of M4×14 bolts and 2pcs of M4 nuts.
The bracket isφ 32 with adjust rings for different handlebar sizes. Please refer to Image 7.
Image 7
Step 2: Installing the left hand remote control buttons
Install the left hand remote control buttons.Please refer to Image 8.
Image 8

ENERdan GmbH | Max-Planck-Straße 7, D-12489 Berlin, Germany | www.enerpower.de
Tel: +49 (0) 30 5770 344 35 | Fax: +49 (0) 30 5770 344 39 | [email protected]
9
7. Detective Sensor Installation
1. Install the detective sensor onto the bike rear fork with two ribbons as shown below.
Image 9
2. Install the magnet steal onto the rear fork, facing the detective sensor.
3. Adjust the distance between sensor and magnet steel
4. The distance between the sensor and the magnet steel should be below 5mm. Tighten the
M4 bolt.
8. System Connection
Step 1: Connecting the display and operation button
Connect the display and operation button. Please refer to Image 10.
Image 10

ENERdan GmbH | Max-Planck-Straße 7, D-12489 Berlin, Germany | www.enerpower.de
Tel: +49 (0) 30 5770 344 35 | Fax: +49 (0) 30 5770 344 39 | [email protected]
10
Step 2: Inserting the brake-levers plugs
Insert the brake-levers plugs into the display. Please refer to Image 11.
Note that the brake-levers are optional.
Image 11
Step 3: Connecting the main motor and the display
Please refer to Image 12.
Image 12

ENERdan GmbH | Max-Planck-Straße 7, D-12489 Berlin, Germany | www.enerpower.de
Tel: +49 (0) 30 5770 344 35 | Fax: +49 (0) 30 5770 344 39 | [email protected]
11
Step 4: Connecting the main motor and the detective sensor
Please refer to Image 13.
Image 13
Step 5: Connecting the motor and the battery
Please refer to Image 14.
Image 14
Connect the motor to the
battery using the XT-60
connector.

ENERdan GmbH | Max-Planck-Straße 7, D-12489 Berlin, Germany | www.enerpower.de
Tel: +49 (0) 30 5770 344 35 | Fax: +49 (0) 30 5770 344 39 | [email protected]
12
9. System Connection
ENERdan GmbH | Max-Planck-Straße 7, D-12489 Berlin, Germany | www.enerpower.de
Tel: +49 (0) 30 5770 344 35 | Fax: +49 (0) 30 5770 344 39 | [email protected]
13
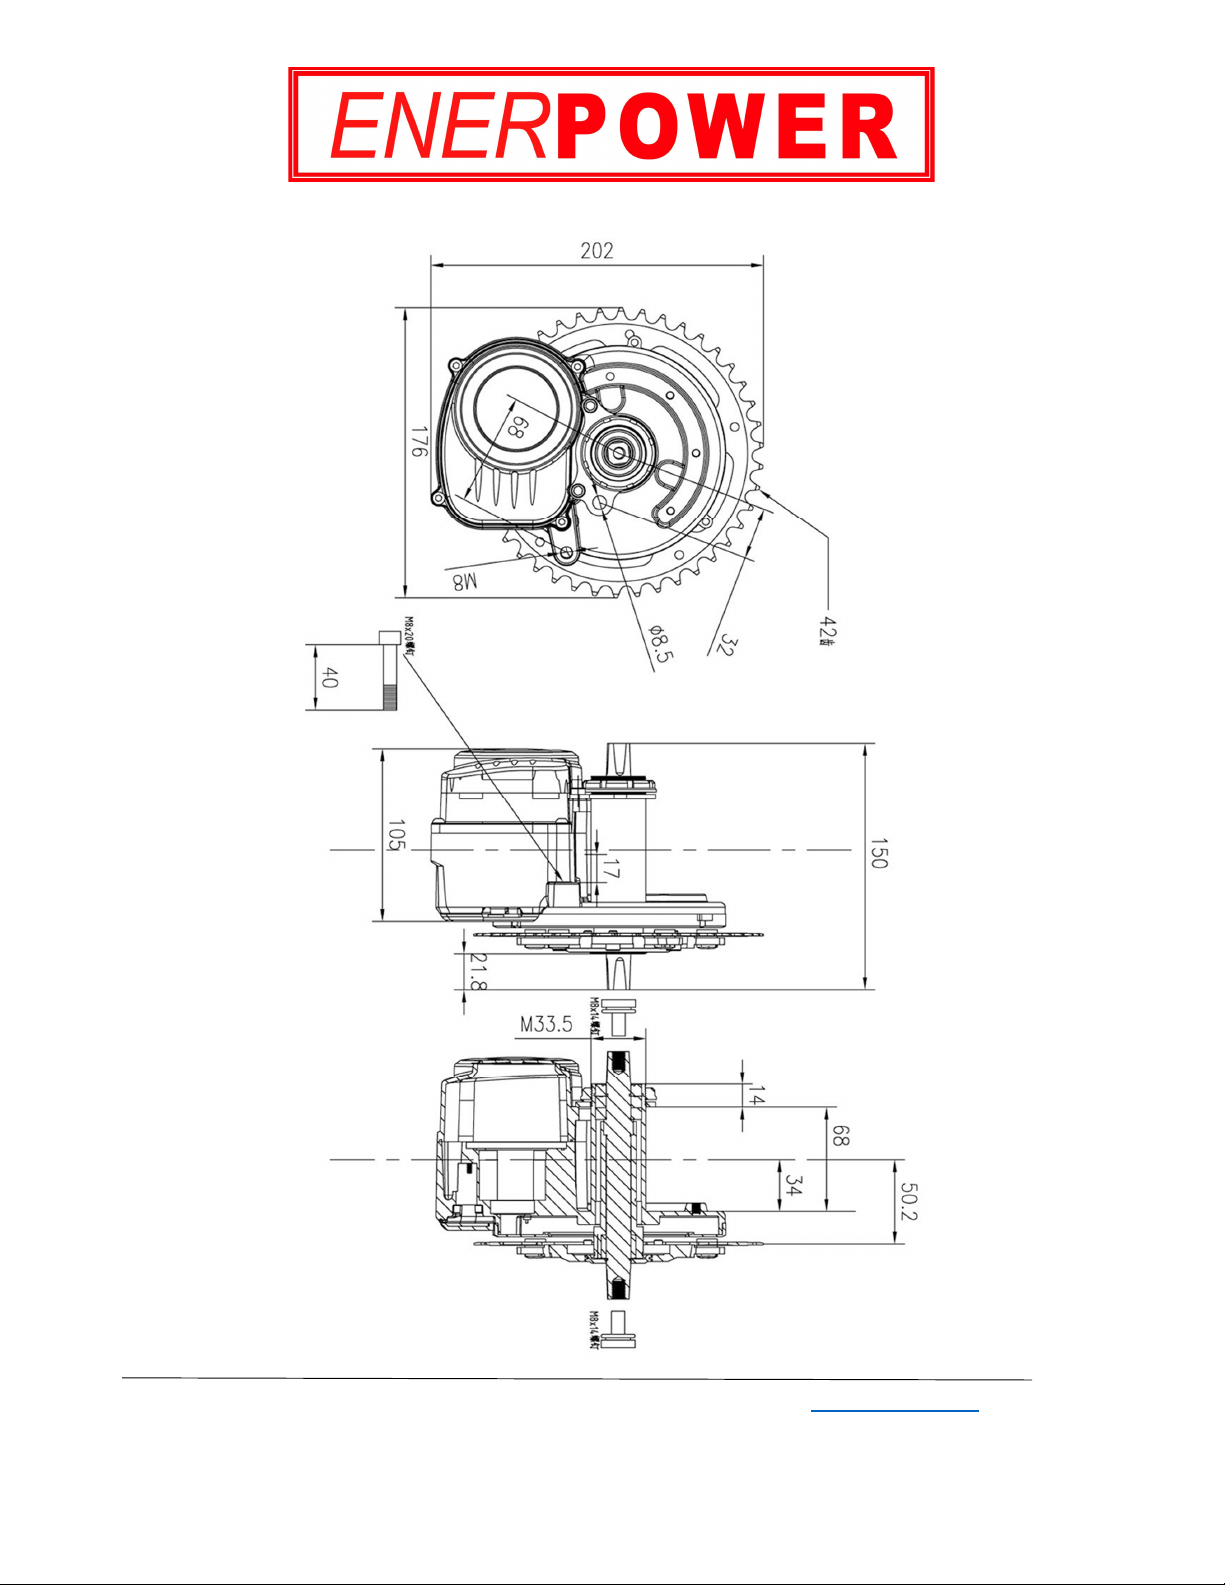
10. Motor Dimensions (in mm)

ENERdan GmbH | Max-Planck-Straße 7, D-12489 Berlin, Germany | www.enerpower.de
Tel: +49 (0) 30 5770 344 35 | Fax: +49 (0) 30 5770 344 39 | [email protected]
14
EC Declaration of Conformity
We hereby declare that the product described in its basic design and construction and in the form as
delivered the ENERdan GmbH are marketed complies with the essential health and safety
requirements of the EC directives.
Identification of products / product types
Article 899500001 Tongsheng TSDZ2 36V 250 Watt Mid-Drive Engine + Battery + Charger
Article 899500011 Tongsheng TSDZ2 48V 250 Watt Mid-Drive Engine + Battery + Charger
This product complies with the following EC directives
2006/66 / EC BATTERY DIRECTIVE
2001/95 / EC DIRECTIVE FOR GENERAL PRODUCT SAFETY
2004/108 / EC DIRECTIVE FOR ELECTROMAGNETIC COMPATIBILITY
Applicable standards
DIN EN 61960: 2004: cells and batteries containing alkaline or other non-acid electrolytes -
Secondary lithium cells and batteries for portable devices (IEC 61960: 2003)
DIN EN 62133: 2003: cells and batteries containing alkaline or other non-acid electrolytes -
Safety requirements for portable sealed secondary cells and batteries made from them for
use in portable devices
DIN EN 15194: 2009 / A1: 2011: Bicycles - Electrically powered bicycles - EPAC Bicycles
Responsibility
ENERdan GmbH
Max-Planck-Str. 7
D-12489 Berlin
www.enerdan.de
Managing Director: Assi Rutzki
+49 (0) 30-5770 344 35
04.07.2019
Table of contents
Other ENERpower Bicycle Accessories manuals


