manuals.online logo
Brands
  1. Home
  2. •
  3. Brands
  4. •
  5. Saris
  6. •
  7. Bicycle Accessories
  8. •
  9. Saris 801 User manual

Saris 801 User manual

Rear Leg Arm
Bumper
Leg
Figure 3a Figure 3b Figure 3c
Model #801
OWNER'S MANUAL
S-hook Strap
Arms with Stabilizers
and Hold-downs
Bumper Legs: Rest on Bumper
Lower Hook
Side Hook
Strap
Rear
Leg
Hold-downs
CAUTION Bones is a bumper-supported bike rack.
Be sure to check Saris Fit Guide before
installing rack on vehicle.
NOTE: Before installing carrier, clean all
surfaces of vehicle which may come in contact
withthecarrieroritsstraps.Makesurefootpads
arefreeofanydebristhatcouldscratchvehicle’s
finish.
Figure 2
• To adjust rear legs, loosen knobs, remove from end of cylinder and
reposition (A).
• To adjust arms, loosen knobs, slide to center of aluminum cylinder and
rotate (B).NOTE: It is not necessary to move bumper legs, as the
bones rack is pre-assembled to fit a majority of vehicles and bicycles.
However,itofferstheflexibilityofawiderarmorbasespreadifnecessary.
To do so, remove rear legs, bumper legs, and arms and reposition
symmetricallyasdesired.Forquestions,seealocalSarisdealerorcall
1-800-783-7257(C).
ADJUST CARRIER TO VEHICLE:
1
As shown in figure 3c, it is important that the tip of the arms (3rd position)
are at the highest point , as shown in Figure 3c.
•Following the illustration that most resembles the rear of your
vehicle, adjust arm and rear leg to position carrier.
•Retighten knobs. Do not overtighten knobs.
NOTE: To keep legs/feet firmly against glass of square back vehicles, lean carrier
slightly farther away from vehicle.
REAR
LEG
REAR
LEG ARMS
(A)
(A) (B)
(C) (C)
BUMPERLEGS
•Attach S-hook straps to top hinge line of vehicle as shown in
Fig's. 4a &5. Always place strap between car surface and
hook. NEVER bring strap over the top of hook (Fig. 4b).
S-hook special application:
If top hinge line has a rubber seal or indicated in fit guide, use
large bend in S-hook. To do so: remove strap from buckle, thread
end of strap into either slot in the hook and pull through (Fig. 4c).
Rethread strap as shown in Fig. 4d.
NOTE: S-hookattachmentmustbetoasupportedhingeline
- NEVER hook to glass, unsupported plastic, or roof rack.
•Attach lower hook straps to bottom edge of trunk at position
C2; and side hook straps to the side at position C1 or above
bendin trunkat positionC3(Fig. 5). NOTE:Forsquareback
vehiclessuch asmini-vans,makesurethe sidestrapsare in-
line with aluminum cylinder.
ATTACH STRAPS:
Figure 5
LOWER
STRAP
HOOK
SIDE STRAP HOOK
2
Figure 4a
Figure 4b
Figure 4d
Figure 4c
Figure 6
Lower strap hook special application:
ONLY IF SPECIFIED IN CURRENT FIT CHART
Some vehicles require placing the lower strap hook
completely inside the trunk. To do so, loosen lower
strap, place hook inside trunk, close trunk, pull strap
until hook braces against trunk wall, and tighten as
usual (Fig. 6).
•Tighten all straps evenly, removing any slack. When
straps are taut, shake carrier to check for any
movement. Retighten if necessary.
123
Locking Knobs
R
R
5253 Verona Road
Madison, WI 53711
1-800-783-7257
www.sarisproducts.com
Made in U.S.A.
10690 Rev. G 02/01 U.S. Patent
#5,495,970
3
LOAD AND SECURE BIKES:
•Check clearance. It is the responsibility of the user to ensure the necessary
clearance (dependent on vehicle, load, driving territory, etc.) is given from load
toground. Generally,12-15”isadequate (Fig. 10). Ifnecessary,rotate armsup
until at least 12-15” of clearance is achieved.
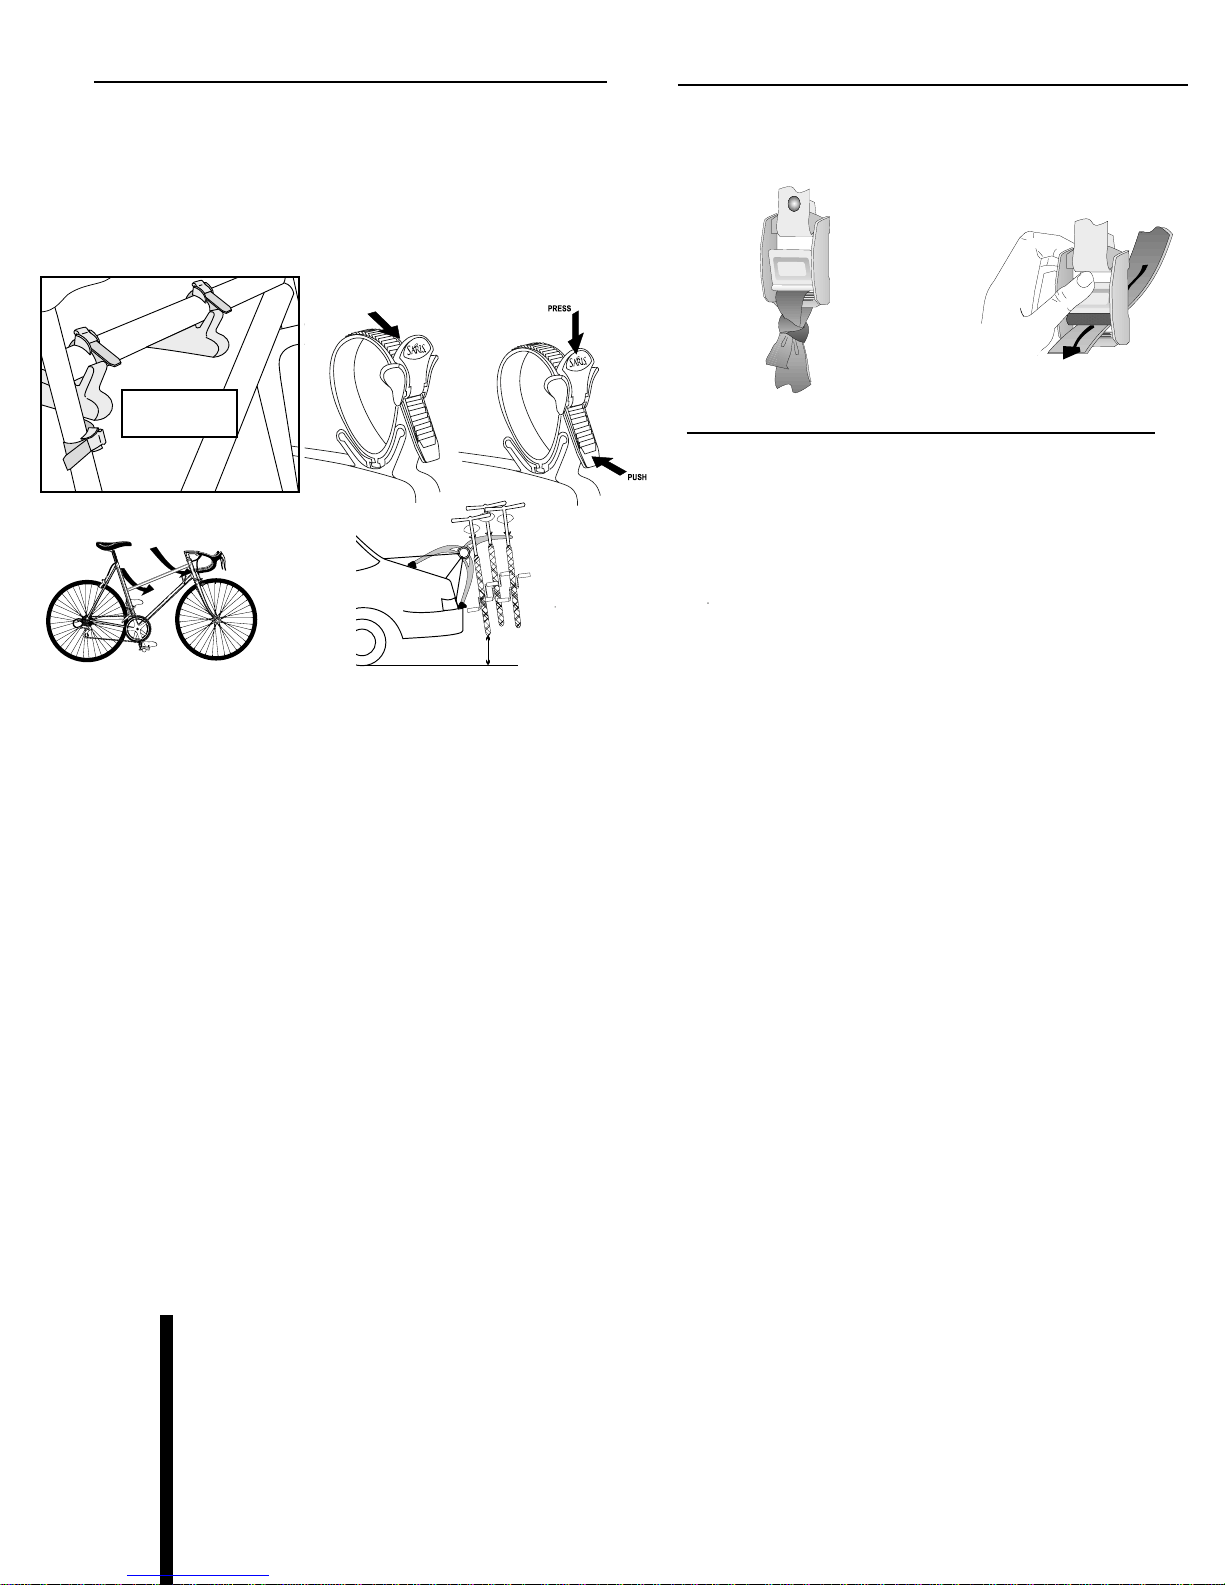
•Placebikesoncarrierarmsinbikesupports,alternatingdirectionofhandlebars.
Pull hold-down strap snug against bike tube. Rest seat tube against stabilizer
and pull strap around tube as shown in Fig. 7.
• If pedal touches vehicle, rotate arms up.
• To release hold-down straps, follow Fig. 8.
• Women’s frames can be mounted as shown in Fig. 9.
Figure 8
Figure 7a
CAUTION:
Pulling up on hold-down
strap could cause failure
Figure 7
Figure 9 Figure 10
CAUTIONS:
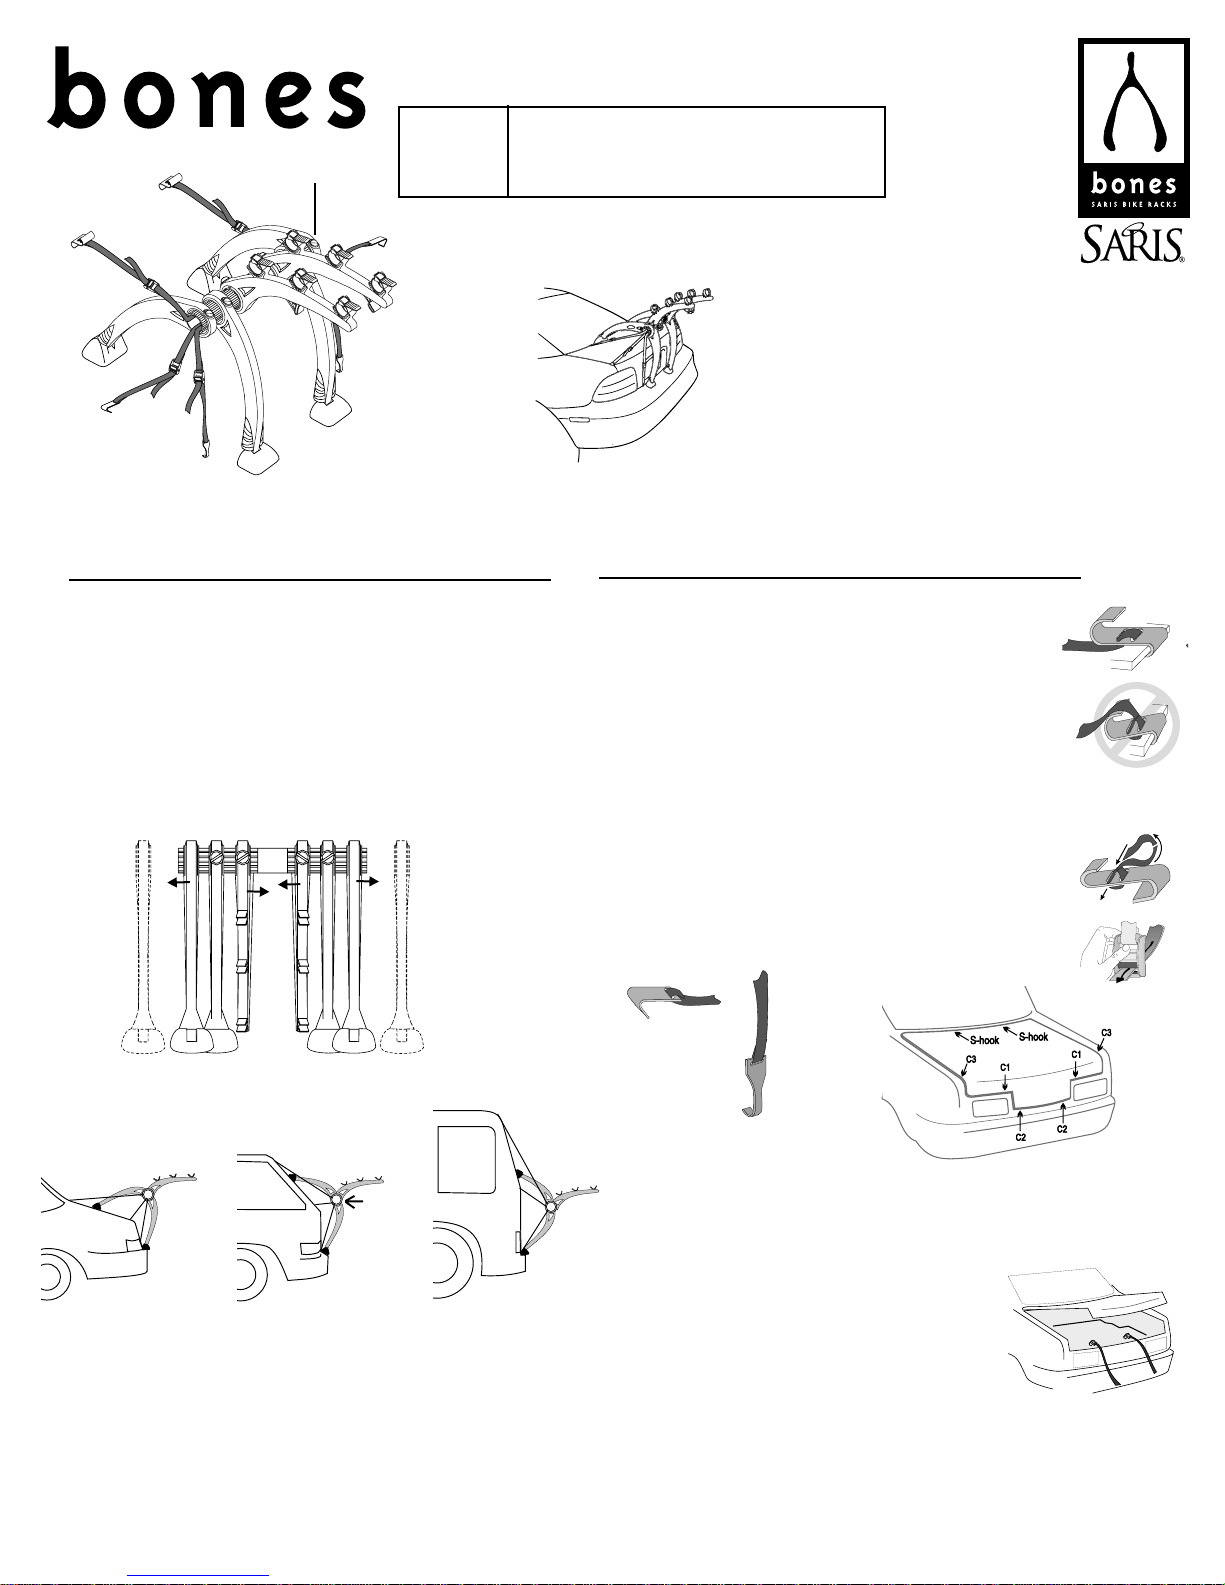
1) All requirements for compatability/fit as stated in the current Saris vehicle/carrier compatability guide must be followed. (Available at any Saris dealer). If your
vehicle is not listed or you have any questions, please call our customer service at 800-783-7257.
2) Bones is a bumper-supported bike rack. Bumper legs must rest on bumper.
3) Bones is not intended for use with tandem or recumbent bicycles.
4) Read and follow instructions carefully. Save owner’s manual for future reference or parts information.
5) Replace any mounting strap at the first sign of wear. Replacement parts are available through your local Saris dealer or call 1-800-783-7257.
6) S-hook straps must be parallel with the rear leg to prevent shifting.
7) Make sure bike tires are not directly behind exhaust pipe.
8) Never place more than three bicycles (maximum weight 105 lbs) on carrier. Secure properly and adjust for even load distribution.
9) Do not mount to any type of trailer.
10) No part of carrier, including straps, should ever come in contact with spoiler.
11) Do not open rear deck (trunk) with carrier installed.
12) This carrier is not recommended for off-road use or for use at speed exceeding 65 mph.
13) Remove carrier from vehicle when not in use.
14) When cleaning rack, use only water soluble cleaners.
15) Rear window wipers may not be usable while carrier is attached to vehicle.
16) It’s the end users responsibility to ensure that use of this product meets all local and state laws.
17) To prevent potential damage, secure the front tires of bicycles (part number 3033 recommended).
WARRANTY:
We warrant this product to the first consumer to be free from defect in material and workmanship for the lifetime of the product. Any product or part thereof found to be defective will be replaced
without charge provided that: (1) the product was not misused; (2) no alterations or modifications were made; (3) its failure resulted from a defect in material or workmanship and not from normal
wear expected in the use of the product; (4) the product or part is delivered, freight prepaid, to Graber Products. Manufacturers only obligation shall be to replace such products or parts proved to
be defective. Please contact Graber at the number below prior to return to obtain a return authorization number.
WARNING AND DISCLAIMER:
This carrier has been designed to carry bicycles on specific vehicles. Before installation, user must read and follow current Vehicle/ Carrier Compatibility Guide (available through Saris dealer)
recommendationsand enclosedinstructions. Fit recommendationsare basedon vehicle'sstandard features;optional features may affectthefitrecommendations. User mustattach carriercorrectly
to the vehicle, check its attachment before each use, and inspect carrier parts for wear. Carrier's attachment to the vehicle is critical and beyond the control of the manufacturer. Manufacturer and
seller expressly disclaim any and all liability for personal injury, property damage or loss, whether direct, indirect, or incidental, resulting from the incorrect attachment, improper use, inadequate
maintenance, or neglect of this carrier.
12-15”
4
FINAL ADJUSTMENT
•Retightenmountingstrapswithbicyclesoncarrier,thentieoff(Fig11).
•In unique cases, the stabilizer strap will not be long enough to secure
theseattube.Ifthisoccurs,pleasecallSarisat1-800-783-7257foran
additional stabilizer strap #12398.
Figure 11 Figure 12
5
CHECK STRAPS &STABILITY
While in use, recheck your installation
•Duringfirstuse check after 30 minutes or 30 miles.
•Thereafter, check every 200 miles.
•Check more frequently on bumpy roads.
•If bicycles shift or move, check IMMEDIATELY.
Be sure all straps are taut and knotted firmly against buckles.
Tie off all straps.
Rethreading Straps

This manual suits for next models

1

Other Saris Bicycle Accessories manuals

Saris Cycle-On Pro User manual

Saris

Saris Cycle-On Pro User manual

Saris 4640 User manual

Saris

Saris 4640 User manual

Saris Bones EX User manual

Saris

Saris Bones EX User manual

Saris Bones EX 803 User manual

Saris

Saris Bones EX 803 User manual

Saris 4412F User manual

Saris

Saris 4412F User manual

Saris 4430 User manual

Saris

Saris 4430 User manual

Saris 911 User manual

Saris

Saris 911 User manual

Saris 882 User manual

Saris

Saris 882 User manual

Saris ELECTRIC BIKE PUMP Manual

Saris

Saris ELECTRIC BIKE PUMP Manual

Popular Bicycle Accessories manuals by other brands

Pioneer SGX-CA500 user guide

Pioneer

Pioneer SGX-CA500 user guide

MINOURA BikePit-4 instruction manual

MINOURA

MINOURA BikePit-4 instruction manual

Topeak RideCase user guide

Topeak

Topeak RideCase user guide

QERIDOO TrailerQuick owner's manual

QERIDOO

QERIDOO TrailerQuick owner's manual

DT SWISS F 535 ONE Technical manual

DT SWISS

DT SWISS F 535 ONE Technical manual

DING FL1 user manual

DING

DING FL1 user manual

SQlab 312 R Carbon instruction manual

SQlab

SQlab 312 R Carbon instruction manual

Shimano MTB SHADOW RD Series Dealer's manual

Shimano

Shimano MTB SHADOW RD Series Dealer's manual

minnid e.carry operating instructions

minnid

minnid e.carry operating instructions

tubus DUO Instructions for use

tubus

tubus DUO Instructions for use

Topeak DUOBAND user guide

Topeak

Topeak DUOBAND user guide

Formula MOD operating manual

Formula

Formula MOD operating manual

CICLOSPORT Ciclomaster CM 8.3A operating manual

CICLOSPORT

CICLOSPORT Ciclomaster CM 8.3A operating manual

KMART 43181964 Assembly instructions

KMART

KMART 43181964 Assembly instructions

ZEHUS human+ quick start guide

ZEHUS

ZEHUS human+ quick start guide

Darimo IX2 Stem instruction manual

Darimo

Darimo IX2 Stem instruction manual

Key-Disp KD26E user manual

Key-Disp

Key-Disp KD26E user manual

CAMPAGNOLO Record 10S manual

CAMPAGNOLO

CAMPAGNOLO Record 10S manual

manuals.online logo
manuals.online logoBrands
  • About & Mission
  • Contact us
  • Privacy Policy
  • Terms and Conditions

Copyright 2025 Manuals.Online. All Rights Reserved.