manuals.online logo
Brands
  1. Home
  2. •
  3. Brands
  4. •
  5. ENFORCER
  6. •
  7. Door Opening System
  8. •
  9. ENFORCER SD-962AR-36G User manual

ENFORCER SD-962AR-36G User manual

Other ENFORCER Door Opening System manuals

ENFORCER SM-4201-LQ User manual

ENFORCER

ENFORCER SM-4201-LQ User manual

ENFORCER Enforcer Access SD-962AR-36A User manual

ENFORCER

ENFORCER Enforcer Access SD-962AR-36A User manual

ENFORCER Enforcer E-942FC-600SQ User manual

ENFORCER

ENFORCER Enforcer E-942FC-600SQ User manual

ENFORCER Enforcer E-942FC-1K3SQ User manual

ENFORCER

ENFORCER Enforcer E-942FC-1K3SQ User manual

ENFORCER SD-961A-36GQ User manual

ENFORCER

ENFORCER SD-961A-36GQ User manual

ENFORCER SM-226LQ User manual

ENFORCER

ENFORCER SM-226LQ User manual

ENFORCER SM-4302-LQ/W User manual

ENFORCER

ENFORCER SM-4302-LQ/W User manual

ENFORCER SECO-LARM SD-961A-36SLQ User manual

ENFORCER

ENFORCER SECO-LARM SD-961A-36SLQ User manual

ENFORCER SD-991A-E1Q User manual

ENFORCER

ENFORCER SD-991A-E1Q User manual

Popular Door Opening System manuals by other brands

Mobeye Call-Key MCK100 installation manual

Mobeye

Mobeye Call-Key MCK100 installation manual

SALICE Lapis Assembly instructions

SALICE

SALICE Lapis Assembly instructions

Cal-Royal N-F77CVR Installation instruction

Cal-Royal

Cal-Royal N-F77CVR Installation instruction

Scrigno OPEN1000 Assembly manual

Scrigno

Scrigno OPEN1000 Assembly manual

BFT WIND RMB 130B 200 installation manual

BFT

BFT WIND RMB 130B 200 installation manual

Alecto ADI-250 user manual

Alecto

Alecto ADI-250 user manual

Besam Swingmaster MP Installation, adjustment and maintenance instructions

Besam

Besam Swingmaster MP Installation, adjustment and maintenance instructions

Assa Abloy SARGENT 1431 Series instructions

Assa Abloy

Assa Abloy SARGENT 1431 Series instructions

GAL MOVFR Quick setup

GAL

GAL MOVFR Quick setup

Häfele Finetta T 70 VF manual

Häfele

Häfele Finetta T 70 VF manual

AGS D-PL Instructions for fitting, operating and maintenance

AGS

AGS D-PL Instructions for fitting, operating and maintenance

Stanley MA900ñ Installation and owner's manual

Stanley

Stanley MA900ñ Installation and owner's manual

WITTUR Hydra Plus UD300 Instruction handbook

WITTUR

WITTUR Hydra Plus UD300 Instruction handbook

Alutech TR-3019-230E-ICU Assembly and operation manual

Alutech

Alutech TR-3019-230E-ICU Assembly and operation manual

Pamex KT-INP35 Installation instruction

Pamex

Pamex KT-INP35 Installation instruction

MPC ATD ACTUATOR 50 ATD-313186 Operating and OPERATING AND INSTALLATION Manual

MPC

MPC ATD ACTUATOR 50 ATD-313186 Operating and OPERATING AND INSTALLATION Manual

Chamberlain T user guide

Chamberlain

Chamberlain T user guide

Dorma MUTO COMFORT M DORMOTION 50 Mounting instruction

Dorma

Dorma MUTO COMFORT M DORMOTION 50 Mounting instruction

manuals.online logo
manuals.online logoBrands
  • About & Mission
  • Contact us
  • Privacy Policy
  • Terms and Conditions

Copyright 2025 Manuals.Online. All Rights Reserved.

SD-962AR-36G
Grade 1 Rim-Type Exit Device
Manual
Heavy-duty ANSI Grade 1 steel
construction
Allows exit from inside while locked from
outside
Reversible non-handed design
For metal or wood doors up to
13/4" (44mm) thick
Separate deadlocking latch prevents the
use of credit cards or similar means to open
the latch bolt
Fits doors from 33" to 48" (84~122 cm) wide
Hex-type 1/4-turn dogging lock allows the exit
device to be unlocked for extended period of
time
Includes all needed hardware for typical
installation
Works with standard external door handle/lock
devices (not included)
ENFORCER Grade 1 Rim-Type Exit Device
2SECO-LARM U.S.A., Inc.
Introduction:
The ENFORCER SD-962AR-36G Rim-Type Exit Device, when mounted on the inside of a door to
block entry to a protected premises, securely locks the door from outside access while allowing
users inside the protected premises to exit.
The stainless steel enclosure protects the exit device from abuse, yet easily unlocks the door from
the inside by users who require exit. It can be connected to an entry-type lever trim or to any
physical locking device on the outside of the door in order to allow entry to authorized personnel.
Dimensions:
Specifications:
Construction
ANSI Grade 1 steel
For doors
13/4" (44mm) thick, wood or metal
Hand
Non-handed
Latch bolt
Stainless steel, 3/4" (19mm) throw
Dead latch
Stainless steel 5/8" (16mm) throw
Strike
For 5/8" (16mm) stop
Spring
Stainless steel
Chassis
Plated steel
Cover
Plated zinc cast
Rail assembly
Aluminum
End cap
Plated zinc cast
Dogging
Hex-type dogging standard
Dimensions
33"x8"x23/16" (838x203x56 mm)
Weight
9-lb 12-oz (4.4kg)
Parts List:
Screws Included:
1x Grade 1 Rim-Type Exit Device
1x Manual
1x Mounting template
1x Strike
1x Hex key
1x End cap
1x End cap bracket
Mounting hardware (see below)
Mounting chassis to door:
4x 1/4"x3/4" machine screws
4x 1/4"x3/4" wood screws
4x sex bolts
Connecting end cap to end cap bracket:
2x M4x6mm machine screws
Mounting end cap bracket to door:
2x 1/4"x3/4" machine screws
2x 1/4"x3/4" wood screws
Mounting strike to door:
2x 1/4"x3/4" machine screws
2x 1/4"x3/4" wood screws
1x #12x3/4" machine screw
8"
(203mm)
213/16" (71mm)
23/16"
(56mm)
23/8"
(61mm)
33" (838mm)
21/4"
(57mm)
ENFORCER Grade 1 Rim-Type Exit Device
SECO-LARM U.S.A., Inc. 3
Overview:
Sample Applications:
Double Door with Mullion
Single Door
Double Door
without Mullion
Chassis cover
Chassis
Mechanism housing
Push bar
Dogging device –
use hex key to lock in
the open position so
the door can be
opened from outside
the protected
premises
End cap
Strike
End cap bracket
Mounting:
Strike
Door
Exit device
Trim
27/16"
(62mm)
Door
Exit device
Trim
Trim
Door
Exit device
27/16"
(62mm)
Trim
Trim
Door
Door
Exit device
Exit device
215/16"
(75mm)
Double-door strike (not included)
Door
Draw line here
40"
(102cm)
ENFORCER Grade 1 Rim-Type Exit Device
4SECO-LARM U.S.A., Inc.
Final Installation:
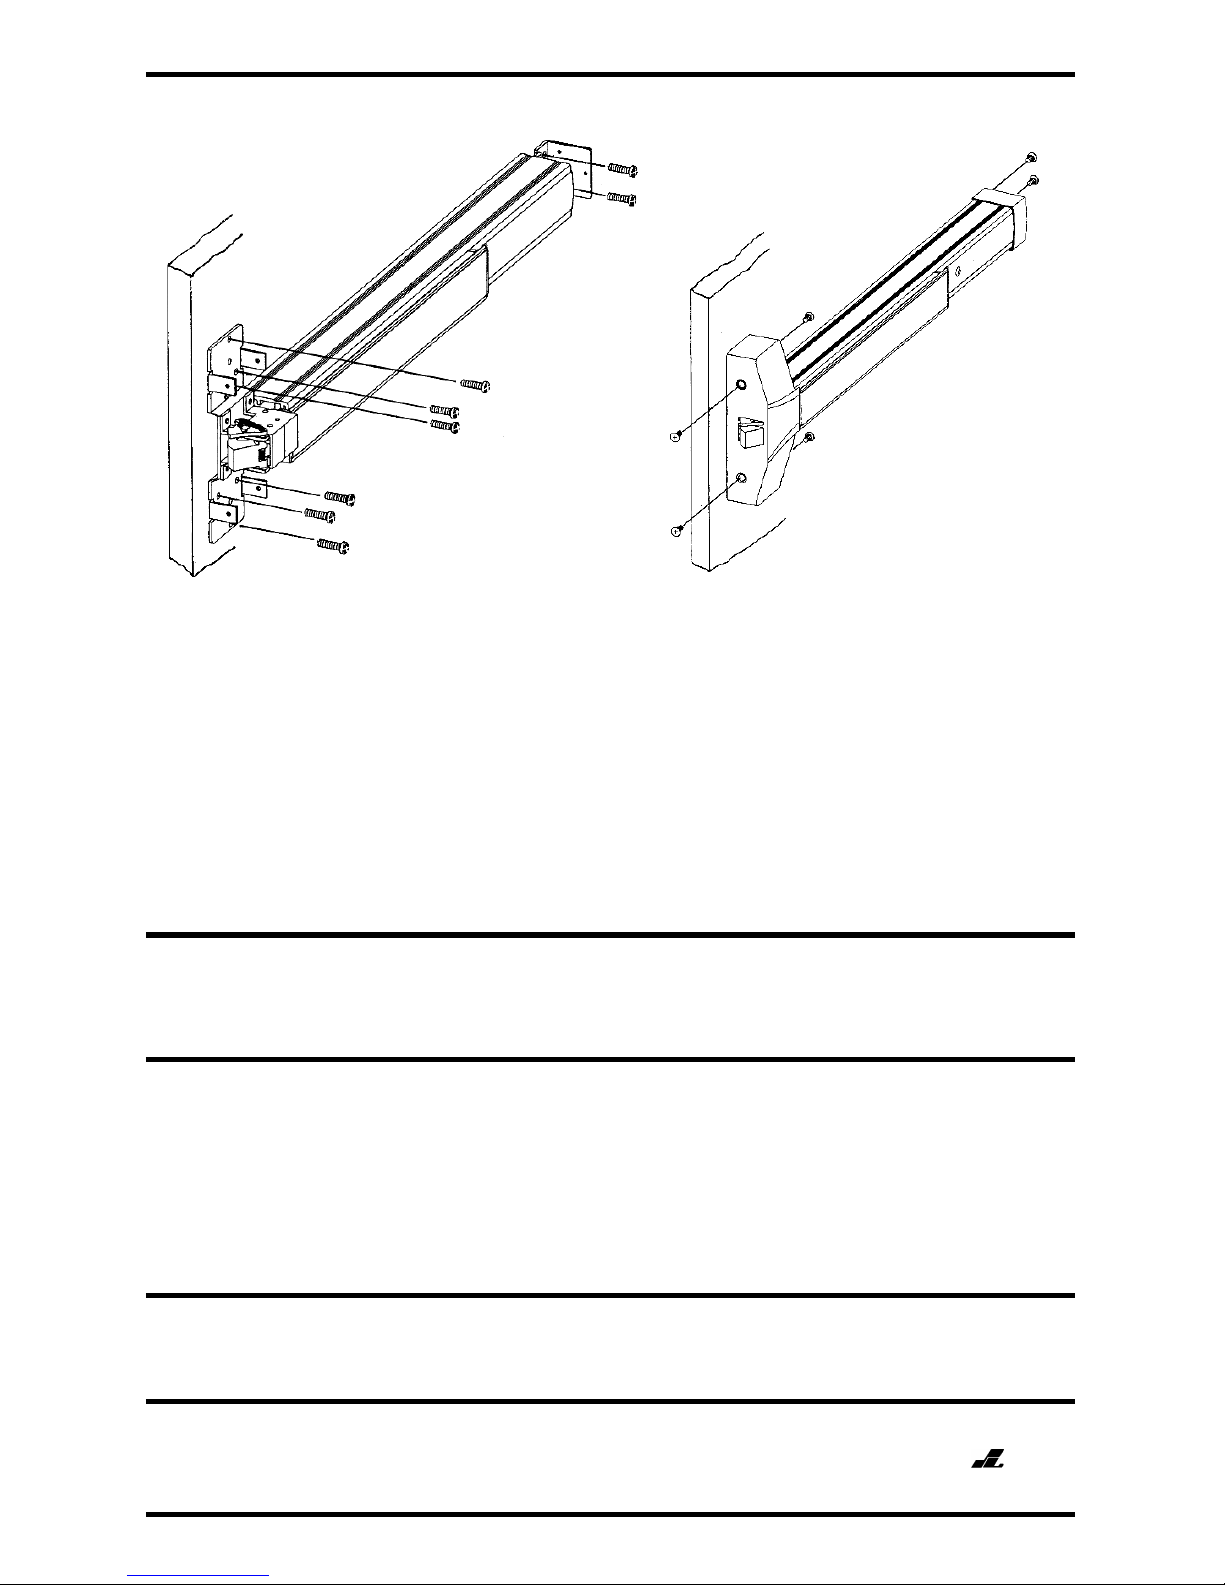
1. Mark the vertical center line of the exit bar by drawing a line across the door at 40” above the
floor. See “Mounting” on page 3.
2. Fold the included template, and align the center lines on the template with the center line drawn
on the door. Then mark the position of the mounting holes for the latch assembly.
See “Mounting” on page 3.
3. Move the template against the door stop and then mark the mounting holes for the strike.
4. Drill the holes as marked on the door and the mullion. See “Mounting” on page 3.
NOTE: Diagram shows 6 screws for mounting the chassis. Product only includes 4 screws. For best results, use 6 screws.
NOTICE: The SECO-LARM policy is one of continual development and improvement. For that reason, SECO-LARM
reserves the right to change specifications without notice. SECO-LARM is also not responsible for misprints. All trademarks
are the property of SECO-LARM U.S.A., Inc. or their respective owners. Copyright © 2018 SECO-LARM U.S.A., Inc. All
rights reserved.
LIMITED WARRANTY: This SECO-LARM product is warranted against defects in material and workmanship while
used in normal service for one (1) year from the date of sale to the original customer. SECO-LARM’s obligation is limited to
the repair or replacement of any defective part if the unit is returned, transportation prepaid, to SECO-LARM. This Warranty
is void if damage is caused by or attributed to acts of God, physical or electrical misuse or abuse, neglect, repair or
alteration, improper or abnormal usage, or faulty installation, or if for any other reason SECO-LARM determines that such
equipment is not operating properly as a result of causes other than defects in material and workmanship. The sole
obligation of SECO-LARM and the purchaser’s exclusive remedy, shall be limited to the replacement or repair only, at
SECO-LARM’s option. In no event shall SECO-LARM be liable for any special, collateral, incidental, or consequential
personal or property damage of any kind to the purchaser or anyone else.
SECO-LARM®U.S.A., Inc.
16842 Millikan Avenue, Irvine, CA 92606
Website: www.seco-larm.com
PITSW6
Phone: (949) 261-2999 | (800) 662-0800
Email: sales@seco-larm.com
MI_SD-962AR-36G_180403.docx
WARNING: Incorrect mounting that leads to exposure or moisture inside the enclosure could damage the device and will
void the warranty.
WARNING: Un montage incorrect qui conduit à une exposition à la pluie ou à l’humidité a l’intérieur de l’enceinte pourrait
endommager l’appareil et annuler la garantie.